1
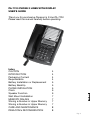
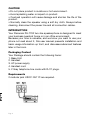
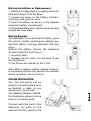
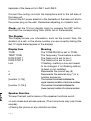
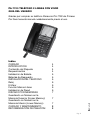
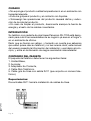
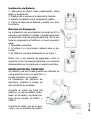
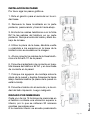
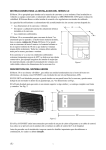
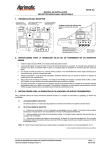
Pg. 1
PA-7700 PHONE 2 LINES WITH DISPLAY
USER’S GUIDE
Thank you for purchasing Panacom’s 2-line PA-7700.
Please read the manual carefully before operating.
Index
CAUTION
INTRODUCTION
Packaging Content
Requirements
Battery Installation or Replacement
Battery BackUp
PHONE INSTALATION
Clock
Speaker Function
Wall Mount Installation
MEMORY DIALING
Storing a Number in Upper Memory
Storing a Number in Upper Memory
CARE AND MAINTENANCE
PANACOM’s RECOMENDATION
4
4
4
4
5
5
5
6
6
7
7
7
7
8
8
Pg. 3
CAUTION
• Do not place product in moisture or hot environment.
• Avoid splashing water or impact on product.
• Overload operation will cause damage and shorten the life of the
product.
• Normally clean the speaker using a soft dry cloth. Always before
cleaning, disconnect the power line and all connection cables.
INTRODUCTION
Your Panacom PA-7700 two-line speakerphone is designed to meet
your business needs at home or in an office environment.
Because your time is valuable, and we know you want to use your
phone not read about it, this user manual presents installation and
basic usage information up front, and discusses advanced features
later in the book.
Packaging Content
Your Package should contain the following items:
1. Base Unit
2. Handset
3. AC power supply
4. Handset cord
5. 2 Gray telephone line cords with RJ11 plugs.
Requirements
2 modular jack USOC: RJ11C are required.
Pg. 4
Battery Installation or Replacement.
1. Remove the base plate by pressing down the
tabs and lifting it from the base.
2. Loosen the screw on the battery compartment door and open the door.
3. Insert the battery as shown in the diagram
inside the battery compartment.
4. Close the battery door, tighten the screw and
replace the base plate.
Battery BackUp
The installation of an optional 9V battery gives
the phone normal performance despite any
electrical failure or energy shutdown that may
occur.
Without the battery backup the telephone
wouldn’t allow the functions of:
1. incoming calls.
2. Speaker will not work, you will have to use
the handphone.
3. The Phone will operate on the 1-line.
Note: With or without battery backup, whenever a power shutdown may happen the numbers
stored in memory will not be lost.
PHONE INSTALATION
Your Two line phone can be
placed on a level surface such
as tabletop or desk, or you
can mount it on the wall.
The desktop/tabletop installation illustration shows 2 phone
lines on 2 modular jacks.
Connect each line cord to the
telephone line jacks on the
wall and the RJ11 jacks on the
Pg. 5
backside of the base unit in LINE 1 and LINE 2.
Connect the curling cord into the handphone and to the left side of
the base unit.
Connect the AC power adaptor in the backside of the base unit and to
the power plug on the wall. Remember adjusting on it plastic lock.
Clock:, set the 12-hour display clock by pressing the SET button,
and then the corresponding time. (0455, as on the example)
The Display:
The Display shows you information, such as the current time, the
duration of a call, or the phone number you are currently dialing (the
last 12 digits dialed appear in the display)
Display Item TONE
TEMP TONE
DATA PORT 1
DATA PORT 2
Low
n
A
[number (1-16)]
[number (1-16L)]
Meaning
The TONE/PULSE is set to TONE.
The Temporary Tone feature is active
The Data port is set to line 1
The Data port is set to line 2
If flashing –battery is low and needs to be changed, if not flashing battery is dead or not installed.
Represents the pound key (#)
Represents the asterisk key (*) in a number sequence.
The number in brackets indicates the upper memory location of a phone number.
The number in brackets indicates the lower memory location of a phone number.
Speaker Function
To keep the best performance of the speaker functions avoid:
• Loud noises and echoes spaces. (The microphone may play those
sounds).
• Placing the phone on any vibration surface.
Pg. 6
Wall Mount Installation
Please follow the next steps.
1. Rotate the handset hook one-half turn.
2. Remove the base plate from the back by
pressing down on the snap tabs located at
the top, and then lifting it off.
3. Plug the telephone line cords into the
phone jacks on the back of the unit; wrap
the extra line cord around the cord wrap on
the bottom of the base; and then thread the
other cords through the bottom of the base.
4. Plug the power supply adapter into the
9V AC jack on the back of the unit, and then
thread it through the bottom of the base.
5. Reverse the direction of the base plate and
replace it by putting the tabs into the slots on
the unit first, and then snapping the bottom
tabs into place.
6. Connect the telephone line cords to the
modular jacks on the wall.
7. Slip the mounting holes over the wall plate
posts and slide the unit down firmly into
place (wall plate not included).
8. Connect the AC power supply adapter to
an AC outlet.
9. Plug the handset cord into the handset and
into the unit, and then hang up the handset.
MEMORY DIALING
Each one of the 16 memory buttons on the
phone contains an upper and lower memory
location. This mean the phone maximum
memory storage is 32 phone numbers. The
lower memory is accessed by pressing the
Lower button on the Memory Directory
You can store numbers with the phone offPg. 7
hook or on-hook, note that if no keys are pressed for 15 seconds,
the memory feature automatically turns off.
Be careful when you store numbers with the phone off-hook, because if you don’t follow the correct procedures, you might actually
call someone instead of storing their number in memory.
Storing a Number in Upper Memory
You can storage 16 numbers in upper memory by following these steps:
1. Press STORE/IN (indicator lights turns on)
2. Dial the number to be stored
3. Press STORE/IN again (indicator lights turns on)
4. Press a Memory Location to store the number.
5. Record whose phone number it is on the memory directory (located under the plastic cover on the front of the unit)
Tip: if you make a mistake while entering a number into memory, wait
15 seconds for the feature to turn off, or press STORE/IN twice.
Storing a Number in Upper Memory
You can storage 16 numbers in upper memory by following these steps:
6. Press STORE/IN (indicator lights turns on)
7. Dial the number to be stored
8. Press STORE/IN again (indicator lights turns on)
9. Press Lower key followed by a Memory Location to store the number.
10. Record whose phone number it is on the memory directory (located under the plastic cover on the front of the unit)
Tip: if you make a mistake while entering a number into memory , wait
15 seconds for the feature to turn off, or press STORE/IN twice.
CARE AND MAINTENANCE
To keep Your Panacom PA-7700 two-line speakerphone working and
looking good, follow these few simple guidelines:
• Avoid putting telephone near heating appliances and devices that
generate electrical noise. (i.e., motors, fluorescent lamps.)
• Telephone should not be exposed to direct sunlight or moisture.
• Avoid dropping the handset and other rough treatment to the phone.
Pg. 8
• Clean telephone with a soft cloth. (Remember to first unplug the
phone from the wall outlet.)
• Never use a strong cleaning agent or abrasive powder, as this can
damage the finish.
• Retain the original packaging for future use.
PANACOM’s RECOMENDATION
At Panacom we strive to get you new technologies that are simple
and friendly. Accordingly to that, we always try to give you exactly
what you are looking for. This is why we have compiled a list of emergency numbers to be ready from the first moment.
Here they are:
In Argentina:
• Any type of emergency: 911
• Medical emergency: 107
• National Firemen Corps: 100
• Police: 101
In Chile:
• Any type of emergency: 911
• Medical emergency: 131
• National Firemen Corps: 132
• Police: 133
In United States of America:
• Any type of emergency: 911
In Uruguay:
• Any type of emergency: 911
• Medical emergency: 105
• Police: 109
• National Firemen Corps: 104
If you would like to comment about these lists and suggest new ones,
you are invited to contribute in our website: http://www.panacom.com
Pg. 9
Pg. 10
PA-7700 TELÉFONO 2 LINEAS CON VISOR
GUIA DEL USUARIO
Gracias por comprar su teléfono Panacom PA-7700 de 2 líneas.
Por favor lea este manual cuidadosamente previo al uso.
Indice
CUIDADO
INTRODUCCIÓN
Contenido del Paquete
Requerimientos
Instalación de Batería
Baterías de Resguardo
INSTALACIÓN DEL TELÉFONO
Reloj
El Visor
Función Manos Libres
Instalación de Pared
DISCADO POR MEMORIAS
Guardando un Número en la
Memoria Superior (Upper Memory)
Guardando un Número en la
Memoria Inferior (Lower Memory)
CUIDADO Y MANTENIMIENTO
RECOMENDACIÓN DE PANACOM
4
4
4
4
5
5
5
6
6
6
6
7
7
7
8
8
Pg. 11
CUIDADO
• No exponga el producto a altas temperaturas ni en un ambiente con
humedad elevada.
• Evite los golpes al producto y el contacto con líquidos.
• Sobreexigir las operaciones del producto causará daños y reducción de la vida del producto.
• En caso de limpiar el producto, desconecte siempre la fuente de
energía y el resto de los cables conectados.
INTRODUCCIÓN
Su teléfono con parlante de dos líneas Panacom PA-7700 está designado para cubrir las necesidades de su negocio ya sea en el hogar o
en un ambiente de oficina.
Dado que su tiempo es valioso, y teniendo en cuenta que sabemos
que usted quiere usar su teléfono y no leer acerca de él, este manual
del usuario presenta la información de instalación y uso básico al principio, y entra en la discusión de rasgos avanzados más adelante.
Contenido del Paquete
El paquete del teléfono debe tener los siguientes items:
1. Unidad Base,
2. Auricular,
3. Adaptador de Corriente,
4. Cable Rulo Telefónico,
5. Cable gris de línea con salida RJ11 (que soporta un número telefónico).
Requerimientos:
Dos entradas RJ11 hacia la instalación de cables de línea.
Pg. 12
Instalación de Batería
1. Remueva la placa base presionando hacia
abajo y levantando
2. Destornille y remueva la tapa de la batería.
3. Inserte la batería como muestra el gráfico.
4. Cierre la tapa de la batería y ajuste con destornillador.
Baterías de Resguardo
La instalación de una batería opcional de 9V le
permite a su teléfono trabajar normalmente ante
un eventual corte de energía eléctrica. Sin la batería de resguardo el teléfono no será operativo
para:
1. llamadas entrantes.
2. El altavoz no funcionará, deberá usar el auricular
3. El teléfono operará solamente en la línea 1.
Nota: con o sin batería de resguardo, ante un
eventual corte de energía eléctrica, los números
almacenados en la memoria no serán perdidos.
Instalación del Teléfono
Su teléfono de dos líneas puede ser utilizado en
una superficie como un escritorio o
puede montarlo en la pared.
La instalación del teléfono de
escritorio muestra 2 líneas en
dos módulos de entrada.
Conecte el cable de línea del
teléfono en las entradas modulares en la pared y la parte posterior de la unidad, en LINE 1 y
LINE 2.
Conecte el cable rulo en el auricular y en la entrada del teléfoPg. 13
no, en la parte izquierda de la unidad.
Conecte el adaptador de corriente en la parte posterior de la unidad y
el otro extremo en la salida de corriente de la pared. Recuerde ajustarlo en su traba correspondiente.
Reloj, Configure el reloj de 12 horas (Formato AM/PM) presionando
el boton SET y luego la hora correspondiente. (0455, en el ejemplo
mostrado)
El Visor,
El visor le muestra información como es la hora actual, duración de
una llamada, el número telefónico que esta actualmente discando
(aparecen los últimos 12 dígitos discados en el display)
Item TONE
TEMP TONE
DATA PORT 1
DATA PORT 2
Low
n
A [number (1-16)] [number (1-16L)]
Significado
El TONO/PULSO esta configurado en TONO.
La característica de Tono Temporal esta activa
La Data port está en la línea 1
La Data port está en la línea 2
Si destella es batería baja y necesita ser cambia
da, si no lo hace es batería muerta o no instalada
Representa la tecla #.
Representa la tecla asterisco (*) en una secuen
cia de números.
El número en corchetes indica ser un número de memoria superior
El número en corchetes seguido de L indica ser un número de memoria inferior.
Función Manos Libres
Para el mejor desempeño de este altavoz evite lo siguiente:
• Áreas con ruido de fondo. (el micrófono quizás levante estos sonidos).
• Colocar en superficies afectadas por la vibración.
• Áreas que puedan incluir un eco importante.
Pg. 14
Instalación de Pared
Por favor siga los pasos gráficos.
1. Rote el gancho para el auricular en la unidad base.
2. Remueva la base localizada en la parte
posterior, presionando y tirando hacia abajo.
3. Enchufe los cables telefónicos con la ficha
RJ11a las salidas del teléfono en su parte
posterior. Recoja el extra del cable y átelo debajo de la base.
4. Utilice la placa de la base, dándola vuelta
y uniéndola a los espacios en la base de la
unidad como se muestra en la imagen.
5. Ahora conecte los cables de la línea telefónica a la ficha RJ11 de la pared.
6. Conecte el adaptador de corriente en la salida trasera del teléfono 9V AC y en la entrada
de corriente en la pared.
7. Coloque los agujeros de montaje sobre la
placa de la pared y deslice firmemente hacia
abajo hasta encastrar (la placa de la pared no
está incluida).
8. Conecte el cable rulo al auricular y a la unidad del lado izquierdo. Luego cuélguelo.
Discado por Memorias
Cada uno de los 16 botones de memorias en
el teléfono contiene una ubicación superior e
inferior, por lo que se obtienen 32 números
posibles para almacenar.
A la memoria inferior se accede presionando
Pg. 15
el botón LOWER que se encuentra en el directorio de memorias.
Guardando un Número en la Memoria Superior (Upper Memory)
Puede almacenar hasta 16 números en la memoria superior siguiendo
estos pasos:
1. Presionar STORE/IN (titila esta luz)
2. Discando el número a ser almacenado
3. Presionar STORE/IN de nuevo (titila esta luz)
4. Presionar el botón de la ubicación de la memoria para guardar el
número.
5. Registre el número de quien está en el directorio de memorias (localizado debajo de la cubierta plástica en el frente de la unidad).
Consejo: Si comete un error cuando ingresa un número en la memoria, espere 15 segundos para cancelar la función, o presione STORE/
IN dos veces.
Guardando un Número en la Memoria Inferior (Lower Memory)
Puede almacenar hasta 16 números en la memoria superior siguiendo
estos pasos:
6. Presionar STORE/IN (titila esta luz)
7. Discando el número a ser almacenado
8. Presionar STORE/IN de nuevo (titila esta luz)
9. Presionar LOWER seguido de el botón de la ubicación de la memoria para guardar el número.
10. Registre el número de quien está en el directorio de memorias
(localizado debajo de la cubierta plástica en el frente de la unidad).
CUIDADO Y MANTENIMIENTO
Para mantener su teléfono Panacom en buen estado de funcionamiento y con una buena apariencia, observe las pautas simples siguientes:
• Evite colocar el teléfono cerca de aparatos calentadores y dispositivos que generan ruido eléctrico (es decir, motores, lámparas fluorescentes, etc.)
• No exponga el teléfono a la luz solar directa ni a la humedad.
• Evite dejar caer el auricular y evite cualquier otro tratamiento brusco
del teléfono.
• Limpie el teléfono con un paño suave. (Recuerde desconectar priPg. 16
mero el teléfono del contacto de pared.)
• Nunca utilice un agente limpiador fuerte ni polvo abrasivo, ya que
puede dañar el acabado.
• Conserve los materiales originales de empaque para utilizarlos en
el futuro.
RECOMENDACIÓN DE PANACOM
En Panacom nos esforzamos para ofrecerte nuevas tecnologías manteniendo la simplicidad del producto agregando valor a tu compra. De
acuerdo con esto, tratamos de darte exactamente lo que cada uno
busca. Es por eso que hemos compilado listado de números de emergencia para que puedas tenerlos a mano desde el primer momento.
En Argentina:
• Todo tipo de emergencias: 911
• Emergencias médicas: 107
• Bomberos: 100
• Policía: 101
En Chile:
• Todo tipo de emergencias: 911
• Ambulancia: 131
• Bomberos: 132
• Carabineros: 133
En Estados Unidos de América:
• Todo tipo de emergencias: 911
En Uruguay:
• Todo tipo de emergencias: 911
• Ambulancias: 105
• Bomberos: 104
• Policía: 109
Si quieres comentar acerca de estos listados y sugerir nuevos, estás
invitado a contribuir en nuestro sitio web: http://www.panacom.com .
Pg. 17
Pg. 18
INTERNATIONAL WARRANTY
Terms and Conditions
1. PANACOM warrants the operation of this product to be free
from any manufacturing and/or material defect for a period of 12
months from the date of purchase by the user.
2. This warranty is limited to the repair and/or replacement of this
product, according to our own criterion, free of charge within the
stipulated term and it does not extend to consequential or incidental damages to other products that may be used with this unit.
3. The warranty shall be voided in the following cases: a) repair or
attempt to repair by third parties not authorized by the company. b)
in case of performing any type of cut in connection cables, plugs,
connectors, or other adapters different from the original ones provided by the company.
4. To make this warranty effective, you shall contact the Authorized
Service Center of your country and they shall carry out the pertinent procedure; said information is available at www.panacom.
com. In order to start the necessary procedure to get said warranty, you shall hand in the Original Purchase Invoice where the
purchase date, dealer name and product identification shall be
stated clearly.
5. Transportation, freight, stay and/or insurance expenses, if any,
are not covered by this warranty.
Pg. 19
Authorized Service Centers:
Argentina
Elese Telefonía
Av. Santa Fé 2393 C1123AAF, C.A.B.A
Phone: (54 11) 45 82 66 38
Fax: (54 11) 45 82 76 96
E-mail: [email protected]
Chile
Importaciones y Exportaciones X-Tech Ltda.
San Alfonso 637, Santiago de Chile
Phone/Fax: (56 2) 689-1721
E -mail: [email protected]
Uruguay
Comunica S.R.L.
Constituyente 1873 C.P. 11.200 - Montevideo
Phone: (598 2) 403 5480
E-mail: [email protected]
USA
Amaury International Corp
7286-90 NW 70th Street - Miami, FL 33166
Phone: 1(305) 887-7100
Fax: 1 (305) 887-9177
E -mail: [email protected]
Pg. 20
GARANTIA INTERNACIONAL
Términos y Condiciones
1. PANACOM garantiza el funcionamiento de este producto ante cualquier defecto de fabricación y/o vicio de material por el término de 12
meses contado a partir de la fecha de compra por parte del usuario.
2. Esta garantía se limita a la reparación y/o reemplazo de este producto, a nuestro criterio, sin cargo alguno dentro del plazo de vigencia y no se extiende a daños concecuentes o incidentales hacia
otros productos que fueran utilizados con esta unidad.
3. La garantía queda anulada ante: a) reparación o intento de reparación por terceros no autorizados por la compañía. b) en el caso de
realizar cualquier tipo de corte de los cables de conexión, fichas, conectores, u otros adaptadores distintos de los originales de fábrica.
4. Para hacer valer esta garantía se deberá remitir al centro de servicios autorizado de su país quienes gestionarán la misma, dicha
información se encuentra www.panacom.com. Para gestionar dicha
garantía deberá presentar la Factura Original de compra en la cual
deberá constar claramente la fecha de compra, nombre del comercio e indentificación del producto.
5. No quedan cubiertos por esta garantía gastos de traslado, flete,
estadía, y/o seguro si los hubiera.
Pg. 21
Centro de Servicios Autorizado:
Argentina
Elese Telefonía
Av. Santa Fé 2393 C1123AAF, C.A.B.A Phone:
(54 11) 45 82 66 38
Fax: (54 11) 45 82 76 96
E-mail: [email protected]
Chile
Importaciones y Exportaciones X-Tech Ltda.
San Alfonso 637, Santiago de Chile
Phone/Fax: (56 2) 689-1721
E -mail: [email protected]
Uruguay
Comunica S.R.L.
Constituyente 1873 C.P. 11.200 - Montevideo
Phone: (598 2) 403 5480
E-mail: [email protected]
USA
Amaury International Corp
7286-90 NW 70th Street - Miami, FL 33166
Phone: 1(305) 887-7100
Fax: 1 (305) 887-9177
E -mail: [email protected]
Pg. 22
Pg. 24