1
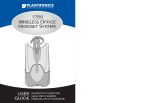
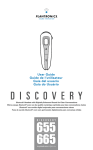
VOYAGER™ 510S
BLUETOOTH
HEADSET SYSTEM
®
Plantronics Inc
345 Encinal Street
Santa Cruz, CA 95060 USA
Tel: (800) 544-4660
www.plantronics.com
Quickstart Guide
Guía de inicio rápido
Guide rapide de mise
en route
Manual do Utilizador
©2005 Plantronics, Inc. All rights reserved. Plantronics, the logo design, Plantronics and the logo design combined, IntelliStand, and Voyager
are trademarks or registered trademarks of Plantronics, Inc. The Bluetooth name and the Bluetooth trademarks are owned by Bluetooth SIG, Inc.,
and are used by Plantronics, Inc. under license. Patents U.S. 5,210,791; 6,735,453; Patents Pending. Printed in USA 69299-02 (3.05)
2
INFORMATION
US This Quickstart Guide provides
instructions on the installation and
usage of your Voyager™ 510S
Bluetooth® Headset System. Warranty
and Service Information is also
included. Please refer to the Voyager
510 Bluetooth Headset user guide for
instructions on the use of the headset.
For safety and regulatory information,
please refer to the separate “Important
Safety and Operational Information”
booklet. Detailed technical information
and a copy of the Declaration of
Conformity can be found at www.
plantronics.com/documentation.
ES En la presente Guía de inicio rápido
se proporcionan instrucciones acerca
de la instalación y utilización del
sistema de auriculares inalámbricos
Voyager™ 510S Bluetooth®. También
se proporciona información sobre
aspectos relativos a la garantía y
mantenimiento. Consulte la Guía del
usuario del auricular Voyager 510
Bluetooth para obtener instrucciones
sobre cómo utilizar el auricular. Para
obtener información sobre seguridad y
cumplimiento de normativas, consulte
el folleto “Información importante
sobre seguridad y funcionamiento”,
que se suministra por separado.
Puede consultar información técnica
detallada, así como la Declaración
de conformidad, en www.plantronics.
com/documentation.
FR Ce Guide de mise en route rapide
comprend les instructions d’installation
et d’utilisation de votre système de
micro-casque sans fil Voyager™
510S Bluetooth®. Les informations
de garantie et de service sont
également incluses. Pour connaître
les instructions d’utilisation du microcasque, reportez-vous au guide de
l’utilisateur du micro-casque Voyager
510 Bluetooth. Pour connaître les
informations en matière de sécurité et
de réglementation, reportez-vous au
livret individuel « Important Safety and
Operational Information » (Informations
importantes en matière de sécurité et
de fonctionnement). Des informations
techniques détaillées et un exemplaire
de la déclaration de conformité sont
disponibles sur le site Web www.
plantronics.com/documentation.
PT Este Guia de Iniciação Rápida
disponibiliza instruções sobre
a instalação e a utilização do
Sistema de Auricular Sem Fios
Bluetooth® Voyager™ 510S. Estão
também incluídas informações
relativas à Garantia e à Assistência.
Consulte o manual do utilizador
do Auricular Bluetooth Voyager
510 para obter instruções sobre a
utilização do auricular. Para obter
informações relativas à segurança
e às regulamentações, consulte o
folheto “Importantes Informações
de Segurança e Funcionamento”,
em separado. Informações técnicas
detalhadas e uma cópia da
Declaração de Conformidade podem
ser encontradas em www.plantronics.
com/documentation.
GETTING STARTED
US This quickstart guide explains how to
install and use the Voyager™ 510S
Bluetooth® Headset System with your
corded telephone.
However, the Voyager 510 Headset
supplied as part of the Voyager 510S
System can also be used with most
Bluetooth enabled mobile handsets.
Please refer to the ‘Voyager 510
Bluetooth Headset Quickstart Guide’
for details on how to install and use
the Voyager 510 Bluetooth headset
with your mobile telephone.
ES En la presente Guía de inicio rápido
se explica cómo instalar y utilizar
el sistema de auriculares inalámbricos
Voyager™ 510S Bluetooth® con un
teléfono con cables.
Sin embargo, el auricular Voyager
510 suministrado como parte del
sistema Voyager 510S puede también
utilizarse con la mayoría de los
teléfonos móviles compatibles con la
tecnología Bluetooth.
Consulte la Guía de inicio rápido
del auricular para teléfonos móviles
Voyager 510 Bluetooth para obtener
información sobre cómo instalar y
utilizar el auricular Voyager 510
Bluetooth con un teléfono móvil.
3
FR Ce guide de mise en route rapide
décrit l’installation et l’utilisation
du système de micro-casque sans
fil Voyager™ 510S Bluetooth® avec
votre téléphone à fil.
Cependant, le micro-casque 510
compris dans le système Voyager
510S peut également être utilisé avec
la plupart des téléphones mobiles
compatibles Bluetooth.
Pour plus de détails sur l’installation
et l’utilisation du micro-casque Voyager
510 Bluetooth avec votre téléphone
mobile, reportez-vous au « Voyager
510 Headset with Bluetooth Quickstart
Guide » (Guide de mise en route
rapide du micro-casque mobile
Voyager 510 avec Bluetooth).
PT Este guia de iniciação rápida explica
como instalar e utilizar o Sistema
de Auricular Sem Fios Bluetooth®
Voyager™ 510S com o seu telefone
com fios.
Contudo, o Auricular Voyager 510
fornecido como parte integrante
do Sistema Voyager 510S também
pode ser utilizado com a maioria dos
telemóveis Bluetooth.
Consulte o ‘Guia de Iniciação Rápida
do Auricular Móvel com Bluetooth
Voyager 510’ para obter detalhes
sobre a instalação e utilização do
auricular Voyager 510 com o seu
telemóvel.
4
CONNECTING YOUR VOYAGER™ 510S BASE
OPTION – HANDSET LIFTER
CHARGING YOUR HEADSET
US The Status Indicator will be illuminated
red while charging and change to blue
when the headset is fully charged.
The headset must be charged for a
minimum of 20 minutes prior to use – 3
hours to fully charge.
ES El indicador de estado rojo se
iluminará mientras se esté realizando
la carga y cambiará a azul cuando
el auricular esté completamente
cargado. El auricular debe cargarse
durante al menos veinte minutos antes
de su utilización y durante tres horas si
se desea realizar la carga completa.
5
FR L’Indicateur d’état est rouge lors du
chargement et devient bleu une fois le
micro-casque complètement chargé. Le
micro-casque doit être chargé pendant
une durée minimale de vingt minutes
avant utilisation. Il faut compter trois
heures pour un chargement complet.
PT O indicador de Estado acende a
vermelho durante o carregamento e
passa para azul quando o auricular
estiver completamente carregado.
O auricular tem de ser carregado
durante, pelo menos, 20 minutos antes
de ser utilizado – 3 horas até à
carga completa.
6
POSITIONING
US Positioning: Recommended separation
distance. Important: Incorrect
positioning can cause problems with
noise and interference.
ES Colocación: Distancia de separación
recomendada. Importante: Una
colocación incorrecta puede causar
problemas de ruido o interferencias.
FR Positionnement: Distance de séparation
recommandée. Important: Un
positionnement incorrect peut être à
l’origine de problèmes d’interférence
et de bruits parasites.
PT Posicionamento: distância de
separação recomendada.
Importante: o posicionamento
incorrecto poderá causar ruído e
interferências indesejáveis.
POWERING THE HEADSET ON AND OFF
US To turn the headset on, press in and
hold the Power/Mute Button for 3
seconds until the Status Indicator
flashes blue. To turn off, press and
hold the button again for 3 seconds
until the Status Indicator flashes red.
ES Para encender el auricular, pulse
y mantenga pulsado el botón de
encendido/mute durante tres segundos
hasta que el indicador de estado
azul parpadee. Para apagarlo, pulse
y mantenga pulsado el mismo botón
durante otros tres segundos hasta que
el indicador de estado rojo parpadee.
7
FR Pour allumer votre micro-casque,
maintenez enfoncé le bouton Marche/
Secret pendant trois secondes, jusqu’à
ce que l’indicateur d’état devienne
bleu et clignote. Pour éteindre votre
micro-casque, maintenez enfoncé le
même bouton pendant trois secondes,
jusqu’à ce que l’indicateur devienne
rouge et clignote.
PT Para ligar o auricular, prima
e mantenha premido o Botão
Ligar/Desligar/Sem som durante 3
segundos até que o indicador de
Estado fique intermitente e azul. Para
desactivar, prima e mantenha premido
o botão novamente durante 3
segundos até o indicador de Estado
ficar intermitente e vermelho.
8
PLACING A CALL
PLACING A CALL
A
B
US Placing a call on your corded
telephone: Lift the handset and then
press either the Call Control button on
the headset (A) or base unit (B). When
you hear the dial tone, dial as normal.
If you do not obtain a dial tone, check
that the Configuration Dial is set correctly
as described on page 11.
Important: If your corded telephone has
a receive volume control, ensure it is set
no higher than mid-range. Too high a
setting could cause audio problems.
Placing a call on your mobile handset:
Dial using your telephone keypad or
voice-dialling (if supported by your
telephone).
Important: You will first need to pair the
headset to your mobile handset. Refer
to the Bluetooth® pairing instructions in
the Voyager™ 510 Bluetooth Headset
Quickstart Guide.
ES Realización de una llamada con el
teléfono con cables:
Levante el microteléfono y pulse el
botón de control de llamada del
auricular (A) o de la unidad base (B).
Cuando oiga el tono de llamada,
marque como lo haría normalmente.
Si no obtiene un tono de llamada,
compruebe que el regulador de
configuración está establecido
correctamente como se describe en la
página 11.
Importante: Si el teléfono con
cables permite ajustar el volumen
de recepción, asegúrese de que el
ajuste se haya establecido en un
nivel inferior al volumen medio. Si el
volumen es demasiado alto, pueden
producirse problemas auditivos.
Realización de una llamada con el
teléfono móvil:
Utilice el teclado numérico o la función
de marcación por reconocimiento de
voz (si es compatible con el teléfono).
Importante: Primero necesitará
emparejar el auricular con el teléfono
móvil. Consulte las instrucciones de
emparejamiento de Bluetooth® de la
Guía de inicio rápido del auricular
para teléfonos móviles Voyager™ 510
con Bluetooth.
9
FR Passage d’un appel sur votre
téléphone à fil:
Décrochez le combiné et appuyez
sur le bouton de contrôle d’appel du
micro-casque (A) ou de la base (B).
Lorsque vous entendez la tonalité,
composez le numéro de téléphone
souhaité. Si vous n’obtenez aucune
tonalité, assurez-vous que le cadran de
configuration est correctement défini,
comme décrit page 11.
Important: si votre téléphone est
équipé d’un réglage de volume en
réception, assurez-vous qu’il n’excède
pas le milieu de la plage. Un réglage
trop élevé risque de provoquer des
problèmes sonores.
PT Fazer uma chamada pelo telefone
com fios:
Erga o auscultador e depois prima
o botão de Controlo de chamadas
do auricular (A) ou da unidade de
base (B). Quando ouvir o sinal de
marcação, marque normalmente. Se
não obtiver um sinal de marcação,
verifique se o Botão de configuração
está bem definido, tal como é descrito
na página 11.
Importante: se o telefone com fios
possuir um controlo de volume de
audição, certifique-se de que não
está acima da posição intermédia.
Uma definição demasiado alta pode
provocar problemas sonoros.
Passage d’un appel sur votre
téléphone mobile:
Composez le numéro à l’aide du clavier
de votre téléphone ou de la fonction de
numérotation vocale (si elle est prise en
charge par votre téléphone).
Important: vous devrez dans un premier
temps coupler votre micro-casque à
votre téléphone mobile. Reportez-vous
aux instructions de couplage Bluetooth®
fournies dans le Guide de mise en
route rapide du micro-casque mobile
Voyager™ 510 Bluetooth.
Fazer uma chamada pelo telemóvel:
Marque utilizando o teclado do
telefone ou a marcação por voz (se
suportado pelo seu telefone).
Importante: primeiro, precisa de
emparelhar o auricular com o
telemóvel. Consulte as instruções
de emparelhamento Bluetooth® do
Auricular para Telemóvel Voyager™
510 com o Guia de Iniciação Rápida.
10
ANSWERING A CALL
COMPATIBILITY WITH YOUR TELEPHONE
11
A
B
US If either the mobile handset or corded
telephone are ringing, then press the
Call Control button on either the headset
(A) or base (B) to answer the call.
ES Si se recibe una llamada en el teléfono
móvil o en el teléfono con cables, pulse
el botón de control de llamada del
auricular (A) o de la unidad base (B)
para responder a la llamada.
FR Si le téléphone mobile ou le
téléphone à fil sonne, appuyez sur
le bouton de contrôle d’appel du
micro-casque (A) ou de la base (B)
pour répondre à cet appel.
PT Se um telemóvel ou telefone com fios
estiver a tocar, prima o botão de
Controlo de chamadas no auricular
(A) ou na base (B) para atender a
chamada.
US It is very important that the Configuration
Dial is positioned correctly. Audio
problems may be experienced if this
is incorrectly set. If you cannot hear a
dial tone through your headset, turn
the configuration dial until you obtain
it. Then dial a co-worker and whilst
speaking, turn the configuration dial
through the 4 positions. Select the
position that provides the best sound
quality for both you and your coworker. During this call you should also
adjust the Listen and Speak Volume
as described next. Once set, the
configuration dial will not require any
further adjustment.
ES Es muy importante que el disco de
configuración esté en la posición
correcta. Si no es así, pueden
experimentarse problemas de audio.
Si no puede oír el tono de marcado a
través del auricular, desplace el disco
de configuración hasta que lo perciba.
Llame a un compañero y gire el disco
de configuración a través de las cuatro
posiciones mientras habla con él.
Seleccione la posición que le ofrezca
la mejor calidad de sonido a usted
y a su interlocutor. Durante la misma
llamada, ajuste el volumen de escucha
y de voz y el tono de escucha, tal
como se describe a continuación. Una
vez que lo haya hecho no necesitará
ajustar mas el disco de configuración.
FR ll est très important que la molette
de configuration soit correctement
positionnée. Un réglage incorrect
pourrait être à l’origine de problèmes
sonores. Si vous n’entendez pas de
tonalité dans l’oreillette, tournez la
molette de configuration jusqu’à ce que
vous l’obteniez. Appelez ensuite un
collègue et tout en parlant, positionnez le
bouton de configuration sur chacune des
4 positions. Sélectionnez celle qui vous
offre la meilleure qualité de son, à vous
et à votre collègue. Durant cet appel,
vous devez également régler le volume
d’écoute et de transmission, et la tonalité
d’écoute, comme décrit ci-après. Une
fois réglée, la molette de configuration
ne nécessitera plus aucun ajustement.
PT É muito importante que o botão de
Configuração esteja correctamente
posicionado. Poderão ocorrer problemas
de áudio se não estiver correctamente
definido. Se não conseguir ouvir
um sinal de marcação através do
auscultador, vá rodando o botão de
configuração até o obter. Em seguida,
marque o número de um colega de
trabalho e, enquanto conversam, rode
o botão de configuração através das
4 posições. Seleccione a posição que
fornecer a melhor qualidade de som
para si e para o seu colega. Durante
a chamada, deverá ajustar igualmente
o Volume de Audição e Conversação,
bem como o Tom de Audição, tal
como está descrito a seguir. Uma vez
definido, o botão de configuração não
necessitará de mais nenhum ajuste.
12
LISTEN VOLUME
A
US A: Adjust the Listen Volume (how others
sound to you) to a comfortable level.
B: If you cannot find a comfortable
Listen level, try different settings on the
Listen Volume Slide Switch (1-4) as
shown until a satisfactory sound level
is experienced.
Note: This setting only adjusts the
headset listen level on calls placed
using the corded telephone and
cannot adjust the headset Listen
Volume when used with a mobile
handset.
Important: Too high a Listen Volume
can cause audio problems. Please
refer to the Troubleshooting section
of the Voyager™ 510S User Guide
which is located at www.plantronics.
com/documentation.
B
ES A: Ajuste el volumen de escucha
(sonido con el que escucha al
interlocutor) a un nivel que le resulte
cómodo.
B: Si no puede encontrar un nivel
de escucha cómodo, intente realizar
diferentes ajustes con el interruptor
deslizante de recepción (1-4), como
se muestra, hasta que consiga un nivel
de sonido satisfactorio.
Nota: Este método sólo sirve para
ajustar el nivel de escucha del
auricular en llamadas realizadas con
un teléfono con cables; no sirve para
ajustar el volumen de escucha si se
utiliza un teléfono móvil.
Importante: Un volumen de escucha
demasiado alto puede causar
problemas de audio. Para obtener
más información, consulte la sección
de resolución de problemas de la
Guía del usuario del Voyager™ 510S
que se encuentra en www.plantronics.
com/documentation.
LISTEN VOLUME
FR A: Réglez le volume d’écoute (la
manière dont vous entendez vos
interlocuteurs) sur un niveau sonore
agréable.
B: Si vous ne trouvez pas de niveau
d’écoute agréable, essayez les
différents réglages de l’interrupteur
coulissant pour la réception (1-4)
comme indiqué pour arriver à un
niveau sonore satisfaisant.
Remarque: cet interrupteur permet
uniquement de régler le niveau
d’écoute des appels sur le téléphone
fixe et non le volume d’écoute
du micro-casque couplé avec un
téléphone mobile.
Important: un volume d’écoute trop
élevé peut provoquer des problèmes
sonores. Reportez-vous à la section
Résolutions des problèmes du
Guide de l’utilisateur du Voyager™
510S disponible à l’adresse www.
plantronics.com/ documentation pour
plus d’informations.
13
PT A: Ajuste o Volume de audição (o
volume a que ouve os outros) para um
nível confortável.
B: Se não conseguir encontrar
um nível de audição confortável,
experimente diferentes definições com
o Interruptor deslizante de audição
(1-4), tal como é indicado, até atingir
um nível sonoro satisfatório.
Nota: esta definição apenas ajusta
o nível de audição do auricular nas
chamadas feitas utilizando o telefone
com fios e não pode ajustar o Volume
de audição do auricular quando
utilizado com um telemóvel.
Importante: um volume de audição
demasiado alto poderá causar
problemas de áudio. Consulte a
secção de resolução de problemas do
Manual do Utilizador do Voyager™
510S, localizado em www.
plantronics.com/documentation.
14
SPEAK VOLUME
A
US A: Adjust the Speak Volume (how
you sound to others) until the level is
comfortable for your co-worker.
B: If you cannot find a comfortable
Speak level, try different settings on
the Speak Volume Slide Switch (A-D)
as shown until a satisfactory sound
level is experienced.
Note: This setting only adjusts the
headset speak level on calls placed
using the corded telephone and
cannot adjust the headset Speak
Volume when used with a mobile
handset.
Important: Too high a Speak Volume
can cause audio quality problems.
Please refer to the Troubleshooting
section of the Voyager™ 510S User
Guide which is located at www.
plantronics.com/documentation.
B
ES A: Ajuste el volumen de escucha
(sonido con el que le escucha el
interlocutor) a un nivel que resulte
cómodo a su compañero de trabajo.
B: Si no puede encontrar un nivel de
conversación cómodo, intente realizar
diferentes ajustes con el interruptor
deslizante de transmisión (A-D), como
se muestra, hasta que consiga un nivel
de sonido satisfactorio.
Nota: Este método sólo sirve para
ajustar el nivel de conversación del
auricular en llamadas realizadas con
un teléfono con cables; no sirve para
ajustar el volumen de conversación si
se utiliza un teléfono móvil.
Importante: Un volumen de voz
demasiado alto puede causar
problemas de la calidad del sonido.
Para obtener más información,
consulte la sección de resolución de
problemas en la Guía del usuario del
Voyager™ 510S que se encuentra en
www.plantronics.com/documentation.
SPEAK VOLUME
FR A: Réglez le volume de l’émission
(votre voix entendue par vos
interlocuteurs) jusqu’à un niveau
acceptable pour votre collègue.
B: Si vous ne trouvez pas un niveau
d’émission agréable, essayez les
différents réglages de l’interrupteur
coulissant pour l’émission (A-D) comme
indiqué pour arriver à un niveau
sonore satisfaisant.
Remarque: cet interrupteur permet
uniquement de régler le niveau
d’émission des appels sur le téléphone
à fil et non le volume d’émission
du micro-casque couplé avec un
téléphone mobile.
Important: un volume de transmission
trop élevé peut provoquer des
problèmes de qualité sonore.
Reportez-vous à la section Résolutions
des problèmes du Guide de
l’utilisateur du Voyager™ 510S
disponible à l’adresse www.
plantronics.com/documentation pour
plus d’informations.
15
PT A: Ajuste o Volume da voz (o volume
a que os outros o ouvem) até que
o nível seja confortável para o seu
colega.
B: Se não conseguir encontrar um
nível de voz confortável, experimente
diferentes definições com o Interruptor
deslizante da voz (A-D), tal como é
indicado, até atingir um nível sonoro
satisfatório.
Nota: esta definição apenas ajusta
o nível de voz do auricular nas
chamadas feitas utilizando o telefone
com fios e não pode ajustar o Volume
de voz do auricular quando utilizado
com um telemóvel.
Importante: um volume de
conversação demasiado alto poderá
causar problemas na qualidade
do som. Consulte a secção de
resolução de problemas do Manual
do Utilizador do Voyager™ 510S,
localizado em www.plantronics.com/
documentation.
16
MUTE BUTTON
US To mute a call, short press (<1.0 sec)
the Power/Mute Button once (tone
goes up). To take the call off mute,
short press (<1.0 sec) the button again
(tone goes down).
ES Para activar la función de mute
durante una llamada, pulse el botón
de encendido/mute brevemente (es
decir, durante menos de un segundo).
Para desactivar la función de mute
de una llamada, vuelva a pulsar el
mismo botón también durante menos
de un segundo.
FR Pour activer la fonction secret,
appuyez une fois (<1.0 s) sur le
bouton Secret/Marche. Pour
désactiver le mode secret, appuyez
à nouveau une fois (<1.0 s) sur le
même bouton.
PT Para cortar o som a uma chamada,
prima rapidamente (< 1.0 seg.) o
botão Ligar/Desligar/Sem som uma
vez.Para devolver o som à chamada,
prima rapidamente (< 1.0 seg.) o
botão outra vez.
INTELLISTAND™ ENABLE/DISABLE
US When the Voyager™ 510S Bluetooth®
Headset System is used in conjunction
with a Plantronics Handset Lifter, you can
enable the IntelliStand™ feature.
The IntelliStand senses when the
headset has been removed or replaced
in the Voyager 510S Base unit,
automatically activating the lifter to
answer or end a call.
The IntelliStand feature is disabled when
the switch is in position I (as shown) or
enabled when the switch is in position II.
ES Si utiliza el sistema de auriculares
inalámbricos Voyager™ 510S Bluetooth®
con el dispositivo para descolgar el
teléfono de Plantronics, puede activar la
función IntelliStand™.
La función IntelliStand detecta si se ha
quitado el auricular o si se ha vuelto
a colocar en la unidad base Voyager
510S y activa automáticamente el
dispositivo para descolgar el teléfono
para responder a una llamada o
ponerle fin.
La función está desactivada si el
interruptor se encuentra en la posición
I (como se muestra) y activada si el
interruptor se encuentra en la posición II.
17
FR Lorsque le système de micro-casque
sans fil Voyager™ 510S Bluetooth®
est utilisé parallèlement à un levier
de décrochéde combiné Plantronics,
vous pouvez activer la fonctionnalité
IntelliStand™.
IntelliStand permet de reconnaître la
présence ou non du micro-casque
sur la base Voyager 510S, puis active
automatiquement le levier pour
répondre ou mettre fin à un appel.
La fonctionnalité IntelliStand est
désactivée lorsque le bouton de sonnerie
est sur la position I (comme illustré) et
activée lorsque le bouton est sur la
position II.
PT Quando o Sistema de Auriculares
Sem Fios Bluetooth Voyager 510S é
utilizado em conjunto com um Suporte
de atendimento do microauscultador
Plantronics, pode activar a função
IntelliStand™.
O IntelliStand sente quando o auricular
é removido ou reposto na Unidade
de base do Voyager 510S, activando
automaticamente o suporte de
atendimento para atender ou terminar
uma chamada.
A função IntelliStand está desactivada
quando o interruptor está na posição
I (tal como é indicado) ou activada
quando o interruptor está na posição II.
18
REGULATORY NOTICE
EXPOSURE TO RADIO
FREQUENCY RADIATION
The radiated output power of this internal wireless
radio is far below the FCC radio frequency
exposure limits. Nevertheless, the wireless radio
shall be used as described in the manual.
The internal wireless radio operates within
guidelines found in radio frequency safety
standards and recommendations, which reflect
the consensus of the scientific community.
Plantronics therefore believes the internal
wireless radio is safe for use by consumers.
The level of energy emitted is far less than the
electromagnetic energy emitted by wireless
devices such as mobile phones. However, the
use of wireless radios may be restricted in some
situations or environments, such as aboard
airplanes. If you are unsure of restrictions, you are
encouraged to ask for authorization before turning
on the wireless radio.
NOTE: Modifications not expressly approved by
Plantronics, Inc. could void the user’s authority to
operate the equipment.
FCC REGISTRATION INFORMATION
This device complies with Part 15 of the FCC
Rules. Operation is subject to the following two
conditions:
1. This device may not cause harmful interference;
and
2. This device must accept any interference
received, including interference that may cause
undesired operation.
This equipment has been tested and found to
comply with the limits for a Class B digital device,
pursuant to Part 15 of the FCC Rules. These limits
are designed to provide reasonable protection
against harmful interference in a residential
installation. This equipment generates, uses and can
radiate radio frequency energy and, if not installed
and used in accordance with the instructions, may
cause harmful interference to radio communications.
However, there is no guarantee that interference
will not occur in a particular installation.
If this equipment does cause harmful interference
to radio or television reception, which can be
determined by turning the equipment off and on, the
user is encouraged to try to correct the interference
by one or more of the following measures:
• Reorient or relocate the receiving antenna.
• Increase the separation between the equipment
and receiver.
• Connect the equipment into an outlet on a
circuit different from that to which the receiver
is connected.
INDUSTRY CANADA NOTICE
AVIS INDUSTRIE CANADA
Radio Equipment
The term “IC:” before the radio certification number
only signifies that Industry Canada technical
specifications were met.
Operation is subject to the following two conditions:
(1) this device may not cause interference, and (2)
this device must accept any interference, including
interference that may cause undesired operation of
the device. “Privacy of communications may not be
ensured when using this telephone.”
This product meets the applicable Industry Canada
technical specifications of the RSS210.
Équipement radio
Le terme « IC/CI » avant le numéro d’homologation
radio signifie seulement que les spécifications
techniques Industrie Canada ont été respectées.
Le fonctionnement de l’équipement est soumis
aux deux conditions suivantes: (1) le dispositif ne
doit créer aucune interférence nuisible, et (2) le
dispositif doit accepter toute interférence reçue, y
compris celles pouvant causer le fonctionnement
indésirable du dispositif. « La confidentialité des
communications n’est pas assurée lors de l’usage
du téléphone. »
Ce produit répond aux spécifications techniques
du ministère de l’Industrie du Canada en vigueur
pour le RSS210.
ONLINE PRODUCT REGISTRATION
19
US REGISTER YOUR PRODUCT ONLINE. FR ENREGISTREZ VOTRE PRODUIT
EN LIGNE.
This is not a condition of your warranty,
Ces informations faciliteront l’assistance
but will assist us in providing the best
technique et les services que nous
possible service and technical support
vous proposons : il ne s’agit pas d’une
for your product. Visit www.plantronics.
condition dont dépend votre garantie.
com/productregistration.
Consultez le site www.plantronics.
ES REGISTRE EL PRODUCTO EN LÍNEA.
com/productregistration.
No se trata de una condición de
PT REGISTE O SEU PRODUTO ON-LINE.
validez de la garantía, pero nos será
Não é uma condição da garantia,
útil a la hora de ofrecerle la mejor
mas irá ajudar-nos a fornecer a melhor
asistencia técnica y de mantenimiento
assistência e suporte técnico possíveis
para el producto. Visite www.
para o seu produto. Visite www.
plantronics.com/productregistration.
plantronics.com/productregistration.