1
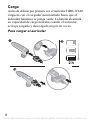
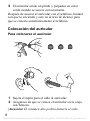
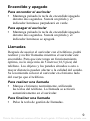
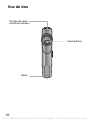
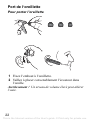
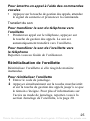
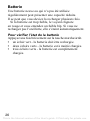
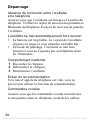
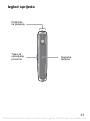
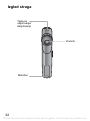
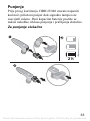
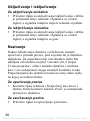
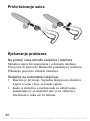
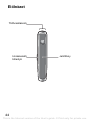
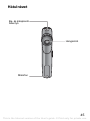
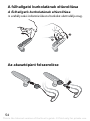
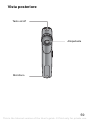
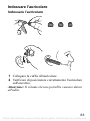
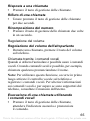
Bluetooth™ Headset
HBH-IV840
This is the Internet version of the User's guide. © Print only for private use.
Contents
Español ............................................................. 2
Français .......................................................... 15
Hrvatski ........................................................... 29
Magyar ............................................................ 42
Italiano ............................................................ 56
Declaration of conformity ............................. 70
FCC statement ................................................ 71
1
This is the Internet version of the User's guide. © Print only for private use.
Español
Carga ............................................................ 6
Asociación del auricular ............................. 7
Encendido y apagado ................................. 9
Llamadas ...................................................... 9
Reinicio del auricular .................................11
Solución de problemas ............................. 13
Sony Ericsson HBH-IV840
Esta guía del usuario ha sido publicada por Sony Ericsson Mobile
Communications AB o su empresa asociada, sin que se proporcione
ningún tipo de garantía. Sony Ericsson Mobile Communications AB
o su empresa asociada pueden realizar, en cualquier momento y
sin previo aviso, las mejoras y los cambios necesarios en esta guía
del usuario a causa de errores tipográficos, falta de precisión en la
información actual o mejoras de los programas y los equipos. No
obstante, estos cambios se incorporarán en las nuevas ediciones
de la guía. Todos los derechos reservados.
©Sony Ericsson Mobile Communications AB, 2007
Número de publicación: 1002-2628.1
Algunas redes no admiten todos los servicios incluidos en la presente
guía del usuario. Esto también se aplica al número de emergencia
internacional GSM 112. Si no está seguro de si puede utilizar un
servicio determinado, póngase en contacto con su operador de red
o proveedor de servicios. La marca y los logotipos Bluetooth™ son
propiedad de Bluetooth SIG, Inc. y cualquier uso de dichas marcas
por parte de Sony Ericsson se realiza bajo licencia.
Este producto no contiene ni plomo ni
halógenos.
2
This is the Internet version of the User's guide. © Print only for private use.
Introducción
El auricular Bluetooth™ HBH-IV840 puede conectarse
a cualquier dispositivo que disponga de tecnología
inalámbrica Bluetooth y que admita perfiles de manos
libres o de auricular. Esta guía del usuario se centra en
la utilización del dispositivo con un teléfono móvil de
Sony Ericsson.
3
This is the Internet version of the User's guide. © Print only for private use.
Vista anterior
Conector
de carga
Tecla de
gestión de
llamadas
4
Indicador
luminoso
This is the Internet version of the User's guide. © Print only for private use.
Vista posterior
Tecla de
encendido/apagado
Altavoz
Micrófono
5
This is the Internet version of the User's guide. © Print only for private use.
Carga
Antes de utilizar por primera vez el auricular HBH-IV840,
cárguelo con el cargador suministrado hasta que el
indicador luminoso se ponga verde. La batería alcanzará
su capacidad de carga máxima cuando el auricular
se haya cargado y descargado un par de veces.
Para cargar el auricular
2h
6
This is the Internet version of the User's guide. © Print only for private use.
Asociación del auricular
Para poder utilizar el auricular Bluetooth con
el teléfono, debe asociarlos con éste. Siga las
instrucciones de la Guía del usuario sobre cómo activar
Bluetooth en el teléfono.
Para teléfonos que no admitan la asociación automática,
consulte en la correspondiente guía de usuario cómo
asociarlos a un dispositivo Bluetooth. Si fuera
necesario, el código de acceso del auricular es el 0000
Nota: El auricular se apaga si se tarda en asociarlo
con un teléfono más de diez minutos.
Para asociar el auricular con el teléfono
1 Active Bluetooth en el teléfono.
2 Active la visibilidad Bluetooth en el teléfono.
Esto hará que otros dispositivos Bluetooth puedan
ver su teléfono.
3 Coloque el teléfono a 20 cm (8 pulgadas) del
auricular.
4 Asegúrese de que el auricular está apagado.
Mantenga pulsada la tecla de encendido durante
cinco segundos. Asegúrese de que el indicador
luminoso parpadea en rojo o verde.
5 Si su teléfono admite asociación automática,
pulse Sí cuando en el teléfono aparezca la pregunta
¿Añadir dispositivo? para finalizar con el
procedimiento. En caso contrario, consulte
la Guía de usuario.
7
This is the Internet version of the User's guide. © Print only for private use.
6 El auricular emite un pitido y parpadea en color
verde cuando se asocia correctamente.
Después de asociar el auricular con el teléfono, bastará
con que lo encienda y esté en el área de alcance para
que se conecte automáticamente al teléfono.
Colocación del auricular
Para colocarse el auricular
1 Sujete el tapón para el oído al auricular.
2 Asegúrese de que se coloca el auricular en la oreja
con firmeza.
¡Atención! El volumen alto podría dañarle el oído.
8
This is the Internet version of the User's guide. © Print only for private use.
Encendido y apagado
Para encender el auricular
• Mantenga pulsada la tecla de encendido/apagado
durante dos segundos. Sonará un pitido y el
indicador luminoso parpadeará en verde.
Para apagar el auricular
• Mantenga pulsada la tecla de encendido/apagado
durante dos segundos. Sonará un pitido y el
indicador luminoso se apagará.
Llamadas
Después de asociar el auricular con el teléfono, podrá
realizar y recibir llamadas mientras el auricular esté
encendido. Para que éste tenga un funcionamiento
óptimo, no lo aleje más de 5 metros (16,5 pies) del
teléfono. Los objetos y las paredes situados a esta o
mayor distancia pueden afectar a la calidad del sonido.
Se recomienda colocar el auricular en el mismo lado
del cuerpo que el teléfono.
Para realizar una llamada
• Marque el número normalmente, utilizando
las teclas del teléfono. La llamada se activará
automáticamente en el auricular.
Para finalizar una llamada
• Pulse la tecla de gestión de llamadas.
9
This is the Internet version of the User's guide. © Print only for private use.
Para responder a una llamada
• Pulse la tecla de gestión de llamadas.
Para rechazar una llamada
• Mantenga pulsada la tecla de gestión de llamadas
durante dos segundos.
Para rellamar
• Pulse dos veces la tecla de gestión de llamadas
durante un segundo.
Ajuste del volumen
Para ajustar el volumen del altavoz
• Durante una llamada, pulse la tecla de volumen
del teléfono.
Llamadas mediante comandos de voz
Los comandos de voz resultan útiles cuando se utiliza
un auricular. Puede crearlos, por ejemplo, para llamar
a alguien con sólo decir su nombre.
Nota: Para poder utilizar esta función, primero tiene
que activar el control de voz del teléfono y grabar los
comandos de voz. Si desea obtener más información
sobre los comandos de voz, y si el teléfono lo admite,
consulte la Guía del usuario del teléfono.
Para realizar llamadas mediante comandos
de voz
• Pulse la tecla de gestión de llamadas, espere a que
suene el tono de llamado y diga el comando.
10
This is the Internet version of the User's guide. © Print only for private use.
Transferencia de sonido
Para transferir el sonido del teléfono
al auricular
• Mientras habla por el teléfono, pulse la tecla
de gestión de llamadas. El sonido se transfiere
al auricular.
Para transferir el sonido del auricular
al teléfono
Consulte la Guía del usuario del teléfono.
Reinicio del auricular
Si el auricular funciona de forma anómala, reinícielo.
Para reiniciar el auricular
1 Seleccione el modo asociación.
2 Pulse simultáneamente la tecla de encendido y la de
gestión de llamadas hasta que el indicador luminoso
se apague. Para obtener información sobre el modo
asociación, consulte Asociación del auricular en la
página 7.
Batería
Una batería que no se ha utilizado con frecuencia o
una batería nueva pueden tener reducida la capacidad.
Es posible que deba recargarla varias veces.
Cuando la batería esté muy baja, el indicador
luminoso parpadea en rojo y se oye un leve pitido.
Si no carga el auricular, se apagará automáticamente.
11
This is the Internet version of the User's guide. © Print only for private use.
Para comprobar el estado de la batería
Pulse brevemente la tecla de encendido.
• un parpadeo verde: es necesario cargar la batería.
• dos parpadeos verdes: la batería está medio cargada.
• tres parpadeos verdes: la batería está totalmente
cargada.
Retirada de la tapa
Para retirar la tapa
Debajo de la tapa figura la información normativa.
12
This is the Internet version of the User's guide. © Print only for private use.
Colocación del cordón
Solución de problemas
El auricular y el teléfono no conectan
Asegúrese de que el manos libres esté cargado y dentro
del alcance del teléfono. Compruebe o vuelva a
configurar los ajustes de Bluetooth en el teléfono.
Intente emparejar de nuevo el auricular.
El auricular se apaga solo
• La batería está descargada. El indicador luminoso
del auricular parpadea en rojo y se oye un ligero
pitido.
• Cuando el auricular se encuentra en modo
asociación, se apaga automáticamente si no se
asocia con ningún teléfono al cabo de 10 minutos.
13
This is the Internet version of the User's guide. © Print only for private use.
Comportamiento imprevisto
1 Conecte el cargador.
2 Desconecte el cargador.
3 Reinicie el auricular.
La rellamada no funciona
Esta función no se puede utilizar si la lista de llamadas
está vacía.
Comandos de voz
Compruebe que los comandos de voz estén activados
y que se hayan grabado en el teléfono antes de
empezar a utilizarlos.
14
This is the Internet version of the User's guide. © Print only for private use.
Français
Chargement................................................ 19
Jumelage de l’oreillette............................. 20
Mise sous/hors tension de l’oreillette ..... 23
Appel........................................................... 23
Réinitialisation de l’oreillette.................... 25
Dépannage ................................................. 28
Sony Ericsson HBH-IV840
Ce Guide de l’utilisateur est publié par Sony Ericsson Mobile
Communications AB ou sa filiale, sans aucune garantie.
Sony Ericsson Mobile Communications AB ou sa filiale peuvent
procéder en tout temps et sans préavis à toute amélioration et à
toute modification à la suite d’une erreur typographique, d’une erreur
dans l’information présentée ou de toute amélioration apportée aux
programmes et/ou au matériel. De telles modifications seront toutefois
intégrées aux nouvelles éditions de ce Guide de l’utilisateur. Tous
droits réservés.
©Sony Ericsson Mobile Communications AB, 2007
Numéro de publication : 1002-2628.1
Certains services présentés dans ce Guide de l’utilisateur ne sont
pas pris en charge par tous les réseaux. Cela s’applique aussi au
numéro d’urgence international 112 pour GSM. Contactez votre
opérateur réseau ou votre fournisseur de services si vous n’êtes
pas certain de la disponibilité d’un service donné. La marque et les
logos Bluetooth sont la propriété de Bluetooth SIG, Inc. et sont
utilisés sous licence par Sony Ericsson.
Ce produit est exempt de plomb et d’halogène.
15
This is the Internet version of the User's guide. © Print only for private use.
Introduction
L’oreillette Bluetooth™ HBH-IV840 peut être reliée
à tout appareil doté de la technologie sans fil Bluetooth
prenant en charge le profil Kit mains libres ou Casque.
Ce Guide de l’utilisateur s’attache plus particulièrement
à une utilisation avec un téléphone mobile Sony Ericsson.
16
This is the Internet version of the User's guide. © Print only for private use.
Vue de face
Connecteur
de chargement
Touche de
gestion des
appels
Voyant
17
This is the Internet version of the User's guide. © Print only for private use.
Vue de dos
Touche de mise
sous/hors tension
Haut-parleur
Micro
18
This is the Internet version of the User's guide. © Print only for private use.
Chargement
Avant d’utiliser la HBH-IV840 pour la première fois,
chargez-la à l’aide du chargeur fourni, jusqu’à ce que le
voyant vire au vert. La batterie atteint sa pleine capacité
une fois que l’oreillette a été chargée et déchargée à
quelques reprises.
Pour charger l’oreillette
2h
19
This is the Internet version of the User's guide. © Print only for private use.
Jumelage de l’oreillette
Avant de pouvoir utiliser votre oreillette Bluetooth avec
votre téléphone, vous devez la jumeler à celui-ci. Cette
opération ne doit être exécutée qu’une seule fois. Pour
activer la fonction Bluetooth sur votre téléphone, suivez
les instructions de son Guide de l’utilisateur.
Si votre téléphone ne prend pas en charge le jumelage
automatique, reportez-vous à son Guide de l’utilisateur
pour savoir comment le jumeler avec un périphérique
Bluetooth. Pour mémoire, le code d’accès de l’oreillette
est 0000.
Remarque : L’oreillette s’éteint si vous ne la jumelez
pas avec le téléphone dans les 10 minutes.
Pour jumeler l’oreillette avec le téléphone
1 Activez Bluetooth sur le téléphone.
2 Activez la visibilité Bluetooth sur le téléphone.
Le téléphone est alors visible par les autres appareils
Bluetooth.
3 Placez le téléphone à moins de 20 cm (8 pouces)
de l’oreillette.
4 Assurez-vous que l’oreillette est hors tension.
Maintenez la touche marche/arrêt enfoncée pendant
cinq secondes. Assurez-vous que le témoin clignote
en rouge ou en vert.
20
This is the Internet version of the User's guide. © Print only for private use.
5 Si le téléphone prend en charge le jumelage
automatique, appuyez sur Oui lorsque le message
Ajouter un périphérique? apparaît sur le téléphone
et terminez la procédure. Sinon, reportez-vous au
Guide de l’utilisateur.
6 L’oreillette émet des bips et clignote en vert
lorsqu’elle a été correctement jumelée.
Une fois que vous avez ajouté l’oreillette au téléphone,
elle s’y connecte automatiquement dès sa mise sous
tension pour autant qu’elle soit à sa portée.
21
This is the Internet version of the User's guide. © Print only for private use.
Port de l’oreillette
Pour porter l’oreillette
1 Fixez l’embout à l’oreillette.
2 Veillez à placer convenablement l’écouteur dans
l’oreille.
Avertissement ! Un niveau de volume élevé peut altérer
l’ouïe.
22
This is the Internet version of the User's guide. © Print only for private use.
Mise sous/hors tension de l’oreillette
Pour mettre l’oreillette sous tension
• Appuyez sur la touche marche/arrêt et maintenez-la
enfoncée pendant deux secondes. Un bip retentit et
le témoin clignote en vert.
Pour mettre l’oreillette hors tension
• Appuyez sur la touche marche/arrêt et maintenez-la
enfoncée pendant deux secondes. Un bip retentit et
le témoin s’éteint.
Appel
Quand vous avez jumelé l’oreillette avec le téléphone,
vous pouvez émettre et recevoir des appels aussi
longtemps qu’elle reste sous tension. Pour des
performances optimales, l’oreillette doit se trouver
à moins de 5 mètres (16,5 pieds) du téléphone. Une
distance supérieure ou la présence de murs ou d’objets
solides peuvent affecter le son. Nous vous conseillons
de porter l’oreillette du même côté du corps que le
téléphone.
Pour émettre un appel
• Utilisez les touches du téléphone et composez le
numéro comme vous le feriez normalement avec
votre téléphone. L’appel est automatiquement activé
dans l’oreillette.
Pour mettre fin à un appel
• Appuyez sur la touche de gestion des appels.
23
This is the Internet version of the User's guide. © Print only for private use.
Pour répondre à un appel
• Appuyez sur la touche de gestion des appels.
Pour rejeter un appel
• Appuyez sur la touche de gestion des appels et
maintenez-la enfoncée pendant deux secondes.
Pour recomposer un numéro
• Appuyez deux fois sur la touche de gestion des
appels dans un délai d’une seconde.
Réglage du volume
Pour régler le volume du haut-parleur
• Pendant un appel, appuyez sur la touche du volume
du téléphone.
Appel à l’aide des commandes vocales
Les commandes vocales peuvent être utiles lorsque
vous employez l’oreillette. En créant des commandes
vocales, vous pouvez notamment appeler un
correspondant en prononçant son nom.
Remarque : Pour utiliser cette fonction, vous devez
d’abord activer le contrôle vocal sur votre téléphone
et enregistrer des commandes vocales. Pour plus
d'informations sur les commandes vocales et sur leur
prise en charge par votre téléphone, reportez-vous à son
Guide de l’utilisateur.
24
This is the Internet version of the User's guide. © Print only for private use.
Pour émettre un appel à l’aide des commandes
vocales
• Appuyez sur la touche de gestion des appels, attendez
le signal de sonnerie et prononcez la commande.
Transfert du son
Pour transférer le son du téléphone vers
l’oreillette
• Pendant un appel sur le téléphone, appuyez sur
la touche de gestion des appels. Le son est
automatiquement transféré vers l’oreillette.
Pour transférer le son de l’oreillette vers
le téléphone
Reportez-vous au Guide de l’utilisateur.
Réinitialisation de l’oreillette
Réinitialisez l’oreillette si elle réagit de manière
inattendue.
Pour réinitialiser l’oreillette
1 Entrez le code de jumelage.
2 Appuyez simultanément sur la touche marche/arrêt
et sur la touche de gestion des appels jusqu’à ce que
le témoin s’éteigne. Pour plus d’informations sur
l’accès au mode de jumelage, reportez-vous à la
section Jumelage de l’oreillette, à la page 20.
25
This is the Internet version of the User's guide. © Print only for private use.
Batterie
Une batterie neuve ou qui n’a pas été utilisée
régulièrement peut présenter une capacité réduite.
Il se peut que vous deviez la recharger plusieurs fois.
Si la batterie est trop faible, le voyant clignote
en rouge et vous entendez un faible bip. Si vous ne
rechargez pas l’oreillette, elle s’éteint automatiquement.
Pour vérifier l’état de la batterie
Appuyez une fois brièvement sur la touche marche/arrêt.
• un éclair vert - la batterie doit être rechargée.
• deux éclairs verts - la batterie est à moitié chargée.
• trois éclairs verts - la batterie est complètement
chargée.
26
This is the Internet version of the User's guide. © Print only for private use.
Retrait du couvercle
Pour retirer le couvercle
Les informations réglementaires figurent sous
le couvercle.
Fixation de la sangle
27
This is the Internet version of the User's guide. © Print only for private use.
Dépannage
Absence de connexion entre l’oreillette
et le téléphone
Assurez-vous que l’oreillette est chargée et à portée du
téléphone. Vérifiez ou réglez de nouveau les paramètres
Bluetooth du téléphone. Essayez de nouveau de jumeler
l’oreillette.
L’oreillette se met automatiquement hors tension
• La batterie est trop faible. Le voyant de l’oreillette
clignote en rouge et vous entendez un faible bip.
• En mode de jumelage, l’oreillette se met hors
tension si vous ne l’ajoutez pas au téléphone dans
les 10 minutes.
Comportement inattendu
1 Raccordez le chargeur.
2 Débranchez le chargeur.
3 Réinitialisez l’oreillette.
Echec de la renumérotation
Si la liste d’appels du téléphone est vide, vous ne
pouvez pas utiliser la fonction de renumérotation.
Commandes vocales
Assurez-vous que les commandes vocales sont activées
et enregistrées dans le téléphone avant de les utiliser.
28
This is the Internet version of the User's guide. © Print only for private use.
Hrvatski
Punjenje...................................................... 33
Združivanje slušalice ................................ 34
Uključivanje i isključivanje ....................... 36
Nazivanje .................................................... 36
Reset slušalice........................................... 38
Rješavanje problema................................. 40
Sony Ericsson HBH-IV840
Izdavač ovog priručnika je Sony Ericsson Mobile Communications
AB ili njegovo pridruženo društvo, bez ikakvih jamstava. Sony Ericsson
Mobile Communications AB ili njegovo pridruženo društvo u bilo
koje vrijeme i bez najave može izvršiti preinake i poboljšanja ovog
priručnika zbog ispravljanja tipografskih pogrešaka, netočnih
tekućih informacija, ili poboljšanja programa i/ili opreme. Međutim,
takve izmjene će biti uključene u nova izdanja ovog priručnika.
Sva prava pridržana.
©Sony Ericsson Mobile Communications AB, 2007
Broj publikacije: 1002-2628.1
Neke mreže ne podržavaju sve usluge opisane u ovom priručniku.
To se također odnosi na GSM Međunarodni broj hitnih službi 112.
Obratite se svojem mrežnom operatoru ili davatelju usluga ako
ste u nedoumici u pogledu dostupnosti pojedine usluge. Riječ
Bluetooth i odgovarajući logotipovi vlasništvo su tvrtke Bluetooth
SIG, Inc., a Sony Ericsson ih koristi u skladu s licencijom.
Ovaj proizvod ne sadržava olovo niti halogen.
29
This is the Internet version of the User's guide. © Print only for private use.
Uvod
Bluetooth™ slušalica HBH-IV840 može se povezati
s drugim Bluetooth uređajima koji podržavaju handsfree
ili headset profil. Ovaj priručnik usredotočen je na
korištenje sa Sony Ericsson mobilnim telefonima.
30
This is the Internet version of the User's guide. © Print only for private use.
Izgled sprijeda
Priključak
za punjenje
Tipka za
upravljanje
pozivima
Signalna
lampica
31
This is the Internet version of the User's guide. © Print only for private use.
Izgled straga
Tipka za
uključivanje/
isključivanje
Zvučnik
Mikrofon
32
This is the Internet version of the User's guide. © Print only for private use.
Punjenje
Prije prvog korištenja, HBH-IV840 morate napuniti
koristeći priloženi punjač dok signalna lampica ne
zasvijetli zeleno. Puni kapacitet baterije postiže se
nakon nekoliko ciklusa punjenja i pražnjenja slušalice.
Za punjenje slušalice
2h
33
This is the Internet version of the User's guide. © Print only for private use.
Združivanje slušalice
Da biste mogli koristiti Bluetooth slušalicu sa svojim
telefonom, morate je najprije jednom združiti s
telefonom. Slijedite upute iz priručnika telefona
za uključivanje Bluetooth komunikacije na telefonu.
Ako imate telefon koji ne podržava automatsko
združivanje, u priručniku telefona pronađite upute
za združivanje Bluetooth uređaja. U slučaju da vam
zatreba, pristupni kôd za slušalicu je 0000.
Napomena: Slušalica se isključuje nakon 10 minuta
ako je ne združite s telefonom.
Za združivanje slušalice s telefonom
1 Uključite funkciju Bluetooth na telefonu.
2 Uključite Bluetooth vidljivost na telefonu. Time
ćete učiniti telefon vidljivim za druge Bluetooth
uređaje.
3 Postavite telefon na udaljenosti do 20 cm (8 inča)
od slušalice.
4 Slušalica mora biti isključena. Pritisnite tipku za
uključivanje/isključivanje i držite je pritisnutu pet
sekundi. Slignalna lampica mora treperiti crveno
ili zeleno.
5 Ako vaš telefon podržava automatsko združivanje,
za dovršetak postupka pritisnite Da kada se na
telefonu pojavi pitanje Dodati uređaj?. Ako to nije
slučaj, pogledajte priručnik telefona.
34
This is the Internet version of the User's guide. © Print only for private use.
6 Slušalica se oglašava tonskim signalom i treperi
zelenim svjetlom nakon uspješnog povezivanja.
Nakon dodavanja slušalice telefonu, slušalica će se
automatski povezati s telefonom čim je uključite,
pod uvjetom da je u dometu telefona.
Stavljanje slušalice
Za stavljanje slušalice
1 Stavite ušni nastavak na slušalicu.
2 Slušalicu treba čvrsto namjestiti u uho.
Pozor! Prevelika glasnoća može dovesti do oštećenja
sluha.
35
This is the Internet version of the User's guide. © Print only for private use.
Uključivanje i isključivanje
Za uključivanje slušalice
• Pritisnite tipku za uključivanje/isključivanje i držite
je pritisnutu dvije sekunde. Oglašava se zvučni
signal, a signalna lampica treperi zelenim svjetlom.
Za isključivanje slušalice
• Pritisnite tipku za uključivanje/isključivanje i držite
je pritisnutu dvije sekunde. Oglašava se zvučni
signal, a signalna lampica se gasi.
Nazivanje
Nakon združivanja slušalice s telefonom, možete
upućivati i primati pozive, pod uvjetom da je slušalica
uključena. Za najučinkovitiji rad slušalica treba biti
udaljena od telefona najviše 5 metara (16,5 stopa).
Čvrste prepreke i zidovi između slušalice i telefona,
kao i veće udaljenosti mogu smanjiti kvalitetu zvuka.
Preporučujemo da slušalicu nosite na istoj strani tijela
na kojoj se nalazi telefon.
Za upućivanje poziva
• Koristite tipke telefona i birajte broj kao što to i
obično činite koristeći telefon. Poziv se automatski
prenosi na slušalicu.
Za završavanje poziva
• Pritisnite tipku za upravljanje pozivima.
36
This is the Internet version of the User's guide. © Print only for private use.
Za odgovaranje na poziv
• Pritisnite tipku za upravljanje pozivima.
Za odbijanje poziva
• Pritisnite tipku za upravljanje pozivima i držite
je pritisnutu dvije sekunde.
Za ponovno biranje broja
• Pritisnite tipku za upravljanje pozivima dvaput
u roku od jedne sekunde.
Podešavanje glasnoće
Za podešavanje glasnoće zvučnika
• Tijekom poziva pritisnite tipku glasnoće na telefonu.
Nazivanje korištenjem glasovnih naredbi
Tijekom korištenja slušalice možete koristiti glasovne
naredbe. Možete npr. izraditi glasovnu naredbu pomoću
koje upućujete poziv izgovaranjem imena osobe koju
želite nazvati.
Napomena: Da biste mogli koristiti tu funkciju, prvo
morate uključiti upravljanje glasom u telefonu i snimiti
glasovne naredbe. Za više informacija o glasovnim
naredbama i o tome podržava li ih vaš telefon,
pogledajte priručnik telefona.
Za upućivanje poziva koristeći se glasovnim
naredbama
• Pritisnite tipku za upravljanje pozivima, pričekajte
signal i izgovorite naredbu.
37
This is the Internet version of the User's guide. © Print only for private use.
Prijenos zvuka
Za prijenos zvuka s telefona na slušalicu
• Tijekom telefonskog razgovora pritisnite tipku za
upravljanje pozivima. Zvuk se prenosi na slušalicu.
Za prijenos zvuka sa slušalice na telefon
Pogledajte priručnik telefona.
Reset slušalice
Ako slušalica ne radi kako valja, resetirajte je.
Za reset slušalice
1 Pokrenite način rada za združivanje.
2 Istovremeno pritisnite tipku za uključivanje/
isključivanje i tipku za upravljanje pozivima dok
se signalna lampica ne ugasi. Za informacije o tome
kako pokrenuti način rada za združivanje pogledajte
Združivanje slušalice na str. 34.
Baterija
Nova baterija ili baterija koja se rijetko koristi može
imati smanjeni kapacitet. Možda ćete je morati napuniti
nekoliko puta.
Kada je baterija pri kraju, signalna lampica treperi
crveno i čuje se niski ton. Ako slušalicu ne stavite na
punjenje, sama će se isključiti.
38
This is the Internet version of the User's guide. © Print only for private use.
Za provjeru stanja baterije
Kratko pritisnite tipku za uključivanje/isključivanje.
• jedan zeleni treptaj - bateriju treba napuniti.
• dva zelena treptaja - baterija je napola puna.
• tri zelena treptaja - baterija je posve puna.
Skidanje maske
Za skidanje maske
Regulativne informacije nalaze se ispod maske.
39
This is the Internet version of the User's guide. © Print only for private use.
Pričvršćivanje uzice
Rješavanje problema
Ne postoji veza između slušalice i telefona
Slušalica mora biti napunjena i u dometu telefona.
Provjerite ili ponovite Bluetooth podešenja u telefonu.
Pokušajte ponovno združiti slušalicu.
Slušalica se automatski isključuje
• Baterija je pri kraju. Signalna lampica na slušalici
trepće crveno i čuje se tonski signal.
• Kada je slušalica u načinu rada za združivanje,
automatski će se isključiti ako je ne združite s
telefonom u roku od 10 minuta.
40
This is the Internet version of the User's guide. © Print only for private use.
Neočekivano ponašanje
1 Priključite punjač.
2 Iskopčajte punjač.
3 Resetirajte slušalicu.
Ponovno biranje ne radi
Ako je popis poziva u telefonu prazan, funkcija
ponovnog biranja nije dostupna.
Glasovne naredbe
Da biste ih mogli koristiti, glasovne naredbe moraju
biti uključene i snimljene u telefonu.
41
This is the Internet version of the User's guide. © Print only for private use.
Magyar
Töltés .......................................................... 46
A fülhallgató párosítása............................ 47
A fülhallgató be- és kikapcsolása ............ 50
Hívás ........................................................... 50
A fülhallgató alaphelyzetbe állítása ......... 52
Hibaelhárítás .............................................. 55
Sony Ericsson HBH-IV840
Ezt a Használati útmutatót a Sony Ericsson Mobile
Communications AB, illetve egy társ- vagy leányvállalata adta ki
bármiféle jótállás vállalása nélkül. A tipográfiai hibák, az aktuális
információ pontatlansága, illetve a programok és/vagy a készülékek
fejlesztése miatti javításokat és módosításokat a Sony Ericsson
Mobile Communications AB, illetve megfelelő társ- vagy leányvállalata
bármikor, előzetes figyelmeztetés nélkül végrehajthatja. Ezek a
módosítások a jelen Használati útmutató későbbi kiadásaiba
kerülnek be. Minden jog fenntartva.
©Sony Ericsson Mobile Communications AB, 2007
Kiadványszám: 1002-2628.1
A Használati útmutatóban ismertetett szolgáltatások nem
mindegyikét támogatja minden hálózat. Ez vonatkozik a nemzetközi
GSM segélyhívószámra (112) is. Forduljon a hálózat üzemeltetőjéhez
vagy a szolgáltatóhoz, ha nem biztos abban, hogy használhat-e
egy adott szolgáltatást. A Bluetooth szó és emblémák a Bluetooth
SIG, Inc. tulajdonát képezik, és ezeket a jelöléseket a Sony Ericsson
minden esetben licenc alapján használja.
Ez a termék sem ólmot, sem
halogénvegyületeket nem tartalmaz.
42
This is the Internet version of the User's guide. © Print only for private use.
Bevezetés
A HBH-IV840 Bluetooth™ fülhallgató bármely,
Bluetooth vezeték nélküli technológiával felszerelt
eszközhöz csatlakoztatható, amely támogatja a
kihangosító vagy a fülhallgató profilt. Ez a Használati
útmutató egy Sony Ericsson mobiltelefonnal való
használatát mutatja be.
43
This is the Internet version of the User's guide. © Print only for private use.
Elölnézet
Töltőcsatlakozó
Híváskezelő
billentyű
44
Jelzőfény
This is the Internet version of the User's guide. © Print only for private use.
Hátulnézet
Be- és kikapcsoló
billentyű
Hangszóró
Mikrofon
45
This is the Internet version of the User's guide. © Print only for private use.
Töltés
A HBH-IV840 fülhallgató első használata előtt töltse
az eszköz akkumulátorát a vele együtt kapott töltővel
egészen addig, amíg a jelzőfény zöld fénnyel nem
világít. A fülhallgató akkumulátora csak az első néhány
feltöltés és kisütés után éri el teljes kapacitását.
A fülhallgató akkumulátorának feltöltése
2ó
46
This is the Internet version of the User's guide. © Print only for private use.
A fülhallgató párosítása
A Bluetooth fülhallgatót csak azt követően használhatja
a telefonnal, hogy egyszer már sikeresen párosította
azzal. Kövesse a telefon használati útmutatójában
olvasható, a Bluetooth funkció bekapcsolására
vonatkozó utasításokat.
Ha a telefon nem támogatja az automatikus párosítást,
lapozza fel a telefon Használati útmutatójának a
Bluetooth eszközök párosítását ismertető részét.
A fülhallgató jelszava 0000.
Megjegyzés: A fülhallgató kikapcsol, ha 10 percen
belül nem párosítja azt a telefonnal.
A fülhallgató párosítása a telefonnal
1. Kapcsolja be a Bluetooth funkciót a telefonon.
2. Engedélyezze a telefon Bluetooth láthatóságát.
Ezáltal a telefon láthatóvá válik más Bluetooth
eszközök számára.
3. Helyezze a fülhallgatót és a telefont egymástól
20 cm-es (8 hüvelyk) távolságon belülre.
4. Győződjön meg arról, hogy a fülhallgató ki legyen
kapcsolva. Nyomja meg és tartsa 5 másodpercig
lenyomva a fülhallgató be- és kikapcsoló billentyűjét.
Ellenőrizze, hogy piros vagy zöld fénnyel villog-e
a jelzőfény.
47
This is the Internet version of the User's guide. © Print only for private use.
5. Ha a telefon támogatja az automatikus párosítást,
akkor a művelet befejezéséhez válassza az Igen
lehetőséget, amikor a telefonon megjelenik a
Párosítja az eszközt? kérdés. Ha a telefon nem
támogatja az automatikus párosítást, lapozza fel
a telefon Használati útmutatóját.
6. A sikeres párosítást a fülhallgató sípoló hanggal
és villogó zöld fénnyel nyugtázza.
Miután felvette a fülhallgatót a telefon listájára,
a fülhallgató automatikusan csatlakozik a telefonhoz,
amint a hatókörön belül bekapcsolja azt.
48
This is the Internet version of the User's guide. © Print only for private use.
A fülhallgató felhelyezése
A fülhallgató felhelyezése
1. Csatlakoztassa a füldugót a fülhallgatóhoz.
2. A füldugónak szorosan kell illeszkednie a fülébe.
Vigyázat! A nagy hangerő károsíthatja a hallását.
49
This is the Internet version of the User's guide. © Print only for private use.
A fülhallgató be- és kikapcsolása
A fülhallgató bekapcsolása
• Nyomja meg és tartsa 2 másodpercig lenyomva
a fülhallgató be- és kikapcsoló billentyűjét.
A fülhallgató sípoló hanggal és villogó zöld fénnyel
jelez.
A fülhallgató kikapcsolása
• Nyomja meg és tartsa 2 másodpercig lenyomva a
fülhallgató be- és kikapcsoló billentyűjét. A
fülhallgató sípoló hanggal jelez, a jelzőfény pedig
kialszik.
Hívás
A fülhallgató és a telefon sikeres párosítását követően
hívásokat kezdeményezhet és fogadhat a fülhallgató
bekapcsolt állapota mellett. A legjobb teljesítmény
érdekében a fülhallgató és a telefon között legfeljebb
5 méter (16,5 láb) távolság legyen. A tömör tárgyak,
a falak, illetve a nagyobb távolság kedvezőtlenül
befolyásolják a hangátvitelt. Javasoljuk, hogy a
fülhallgatót testének ugyanazon az oldalán hordja,
mint amelyik oldalon a telefont tartja.
Hívás kezdeményezése
• A telefon billentyűinek segítségével tárcsázza a
számot a szokásos módon. A hívás automatikusan
továbbítódik a fülhallgatóra.
50
This is the Internet version of the User's guide. © Print only for private use.
Hívás befejezése
• Nyomja meg a fülhallgató híváskezelő billentyűjét.
Hívás fogadása
• Nyomja meg a fülhallgató híváskezelő billentyűjét.
Hívás visszautasítása
• Nyomja meg és tartsa 2 másodpercig lenyomva
a fülhallgató híváskezelő billentyűjét.
Telefonszám újratárcsázása
• Nyomja meg a fülhallgató híváskezelő billentyűjét
kétszer egymás után röviden, egy másodpercen belül.
A hangerő beállítása
A hangszóró hangerejének beállítása
• Hívás közben nyomja meg a telefon hangerőszabályozó billentyűjét.
Hívás kezdeményezése hangparancsok
használatával
A fülhallgató használata során hasznosak lehetnek a
hangparancsok. Hangparancsok rögzítésével felhívhat
például valakit a nevének kimondásával.
Megjegyzés: Ennek a lehetőségnek a használatához
előbb be kell kapcsolnia a telefon hangvezérelt
üzemmódját, és hangparancsokat kell rögzítenie.
A hangparancsokkal kapcsolatos további tudnivalókat
és a telefon által támogatott kapcsolódó szolgáltatásokat
a telefon Használati útmutatójában tekintheti át.
51
This is the Internet version of the User's guide. © Print only for private use.
Hívás kezdeményezése hangparancsokkal
• Nyomja meg a fülhallgató híváskezelő billentyűjét,
várja meg a hangjelzést, majd mondja ki a
hangparancsot.
Hang átadása
Hang átadása a telefonról a fülhallgatóra
• A telefonon folyamatban levő hívás közben nyomja
meg a fülhallgató híváskezelő billentyűjét. A hang
átadódik a fülhallgatóra.
Hang átadása a fülhallgatóról a telefonra
A részletes tudnivalók a telefon Használati
útmutatójában találhatók meg.
A fülhallgató alaphelyzetbe állítása
Ha szokatlan működést tapasztal, állítsa alaphelyzetbe
a fülhallgatót.
A fülhallgató alaphelyzetbe állítása
1. Váltson át a fülhallgató párosítási módjába.
2. Egyidejűleg nyomja meg és tartsa lenyomva a
fülhallgató be- és kikapcsoló billentyűjét, valamint
híváskezelő billentyűjét, amíg az eszköz jelzőfénye
ki nem alszik. A párosítási módra való átváltás
lépéseit lásd: A fülhallgató párosítása (47. oldal).
52
This is the Internet version of the User's guide. © Print only for private use.
Akkumulátor
A ritkán használt, a régóta nem használt és az
új akkumulátorok kapacitása a megszokottnál
alacsonyabb lehet. Előfordulhat, hogy az ilyen
akkumulátorokat többször fel kell tölteni.
Amikor az akkumulátor lemerülőben van, a fülhallgató
jelzőfénye pirosan villog és mély tónusú hangjelzés
hallható. Ha nem kezdi el tölteni a fülhallgató
akkumulátorát, a fülhallgató automatikusan kikapcsol
az akkumulátor lemerülésekor.
Az akkumulátor állapotának ellenőrzése
Nyomja meg egyszer röviden a fülhallgató be- és
kikapcsoló billentyűjét, és értelmezze a jelzőfényt
az alábbiak szerint:
• Egy zöld villogás – az akkumulátor töltése
szükséges.
• Két zöld villogás – az akkumulátor félig fel van
töltve.
• Három zöld villogás – az akkumulátor teljesen fel
van töltve.
53
This is the Internet version of the User's guide. © Print only for private use.
A fülhallgató burkolatának eltávolítása
A fülhallgató burkolatának eltávolítása
A szabályozási információkat a burkolat alatt találja meg.
Az akasztópánt felszerelése
54
This is the Internet version of the User's guide. © Print only for private use.
Hibaelhárítás
Nincs kapcsolat a fülhallgató és a telefon között
Győződjön meg arról, hogy a fülhallgató fel van töltve,
és hogy a telefon hatótávolságán belül van. Ellenőrizze
vagy adja meg újból a telefon Bluetooth beállításait.
Próbálja újból párosítani a fülhallgatót.
A fülhallgató automatikusan kikapcsol
• Az akkumulátor töltöttsége túl alacsony. A fülhallgató
jelzőfénye pirosan villog, és mély tónusú hangjelzés
hallható.
• Párosítási módban a fülhallgató automatikusan
kikapcsol, ha 10 percen belül nem veszi fel a telefon
eszközlistájára.
Szokatlan működés
1. Csatlakoztassa a töltőt.
2. Válassza le a csatlakoztatott töltőt.
3. Állítsa alaphelyzetbe a fülhallgatót.
Nem működik az újrahívás
Ha üres a telefon híváslistája, akkor az újrahívás nem
használható.
Hangparancsok
A hangparancsok használata előtt ellenőrizze, hogy
azok engedélyezve és rögzítve vannak-e a telefonban.
55
This is the Internet version of the User's guide. © Print only for private use.
Italiano
In carica ...................................................... 60
Pairing dell'auricolare ............................... 61
Accensione e spegnimento ...................... 64
Chiamate .................................................... 64
Ripristino dell'auricolare........................... 66
Risoluzione dei problemi .......................... 69
Sony Ericsson HBH-IV840
Questo manuale dell'utente è pubblicato da Sony Ericsson Mobile
Communications AB o dalle relative affiliate, senza alcuna precisa
garanzia. Sony Ericsson Mobile Communications AB si riserva il
diritto di apportare in qualsiasi momento e senza notifica eventuali
modifiche e miglioramenti a questo manuale dovuti a errori tipografici,
imprecisioni, aggiornamento delle informazioni oppure ad
aggiornamenti di programmi e/o dei dispositivi. Tali modifiche
saranno incorporate nelle edizioni successive del presente
manuale. Tutti i diritti riservati.
©Sony Ericsson Mobile Communications AB, 2007
Numero di pubblicazione: 1002-2628.1
Alcuni dei servizi descritti nel presente manuale non sono supportati
da tutte le reti. Lo stesso vale anche per il numero di emergenza
internazionale 112 GSM. Per informazioni relative alla disponibilità
di un determinato servizio, contattare il gestore di rete o il provider
di servizi. Il marchio e i logo Bluetooth sono proprietà di Bluetooth
SIG, Inc. e qualsiasi uso da parte di Sony Ericsson è concesso in
licenza.
Questo prodotto è privo di piombo e alogeni.
56
This is the Internet version of the User's guide. © Print only for private use.
Introduzione
Grazie alla tecnologia wireless Bluetooth, l'auricolare
Bluetooth™ HBH-IV840 può essere collegato a
qualsiasi dispositivo che supporta i profili viva voce
o auricolare. Questo manuale dell'utente illustra
l'utilizzo con un telefono cellulare Sony Ericsson.
57
This is the Internet version of the User's guide. © Print only for private use.
Vista frontale
Connettore
per ricarica
Tasto di gestione
delle chiamate
58
Indicatore
luminoso
This is the Internet version of the User's guide. © Print only for private use.
Vista posteriore
Tasto on/off
Altoparlante
Microfono
59
This is the Internet version of the User's guide. © Print only for private use.
In carica
Prima di utilizzare il dispositivo HBH-IV840 per la prima
volta, caricarlo utilizzando il caricatore in dotazione
fino a quando l'indicatore luminoso diventa verde. La
piena durata della batteria viene raggiunta dopo che
l'auricolare è stato caricato e scaricato un paio di volte.
Caricamento dell'auricolare
2h
60
This is the Internet version of the User's guide. © Print only for private use.
Pairing dell'auricolare
Per poter essere utilizzato la prima volta, l'auricolare
Bluetooth deve essere associato (pairing) al telefono.
Seguire le istruzioni riportate nel manuale dell'utente
del telefono per l'attivazione della funzionalità Bluetooth.
Per i telefoni che non supportano il pairing automatico,
consultare il manuale dell'utente del telefono per la
procedura di pairing di un dispositivo Bluetooth. Se
necessario, il codice di accesso dell'auricolare è 0000.
Nota: L'auricolare si spegne se non viene associato
al telefono entro 10 minuti.
Pairing dell'auricolare al telefono
1 Attivare la funzionalità Bluetooth sul telefono.
2 Attivare la visibilità Bluetooth sul telefono.
In questo modo il telefono sarà visibile agli altri
dispositivi Bluetooth.
3 Collocare il telefono entro 20 cm (8 pollici)
dall'auricolare.
4 Verificare che l'auricolare sia spento. Tenere premuto
il tasto di accensione per cinque secondi. Verificare
che l'indicatore luminoso lampeggi verde o rosso.
61
This is the Internet version of the User's guide. © Print only for private use.
5 Se il telefono supporta il pairing automatico, premere
Sì alla richiesta di aggiunta del dispositivo
visualizzata sul telefono per completare la procedura.
In caso contrario, consultare il manuale dell'utente
del telefono.
6 L'indicatore luminoso verde dell'auricolare
lampeggia e al completamento della procedura
di pairing viene emesso un segnale acustico.
Quando si aggiunge l'auricolare al telefono, l'auricolare
riconosce automaticamente il telefono al momento
dell'accensione se si trova entro il raggio di copertura.
62
This is the Internet version of the User's guide. © Print only for private use.
Indossare l'auricolare
Indossare l'auricolare
1 Collegare la cuffia all'auricolare.
2 Verificare di posizionare correttamente l'auricolare
sull'orecchio.
Attenzione: Il volume elevato potrebbe causare danni
all'udito.
63
This is the Internet version of the User's guide. © Print only for private use.
Accensione e spegnimento
Accensione dell'auricolare
• Tenere premuto il tasto on/off per due secondi.
Viene emesso un segnale acustico e l'indicatore
luminoso lampeggia verde.
Spegnimento dell'auricolare
• Tenere premuto il tasto on/off per due secondi.
Viene emesso un segnale acustico e l'indicatore
luminoso si spegne.
Chiamate
Dopo aver eseguito il pairing dell'auricolare con
il telefono, è possibile effettuare e ricevere chiamate
purché l'auricolare sia acceso. Per ottenere prestazioni
ottimali, l'auricolare deve trovarsi entro 5 metri
(16,5 piedi) dal telefono. La presenza di pareti e oggetti
solidi interposti o una distanza eccessiva possono
influire sulla qualità dell'audio. Si raccomanda di
indossare l'auricolare sullo stesso lato del telefono.
Esecuzione di una chiamata
• Utilizzare i tasti del telefono e comporre il numero
come si farebbe normalmente con il telefono.
La chiamata viene automaticamente attivata
nell'auricolare.
Fine di una chiamata
• Premere il tasto di gestione delle chiamate.
64
This is the Internet version of the User's guide. © Print only for private use.
Risposta a una chiamata
• Premere il tasto di gestione delle chiamate.
Rifiuto di una chiamata
• Tenere premuto il tasto di gestione delle chiamate
per due secondi.
Ricomposizione del numero
• Premere il tasto di gestione delle chiamate due volte
in un secondo.
Regolazione del volume
Regolazione del volume dell'altoparlante
• Durante una chiamata, premere il tasto del volume
sul telefono.
Chiamata tramite i comandi vocali
Quando si utilizza l'auricolare è possibile usare i comandi
vocali. Creando comandi vocali è possibile, per esempio,
chiamare qualcuno pronunciandone il nome.
Nota: Per utilizzare questa funzione, occorre in primo
luogo attivare il controllo vocale sul telefono e
registrare i comandi vocali. Per ulteriori informazioni
sui comandi vocali e per sapere se sono supportati dal
telefono, consultare il manuale dell'utente.
Esecuzione di una chiamata utilizzando
i comandi vocali
• Premere il tasto di gestione delle chiamate,
attendere l'indicatore suoneria e pronunciare
il comando.
65
This is the Internet version of the User's guide. © Print only for private use.
Trasferimento dell'audio
Trasferimento dell'audio dal telefono
all'auricolare
• Durante una chiamata sul telefono, premere il tasto
di gestione delle chiamate. L'audio viene trasferito
all'auricolare.
Trasferimento dell'audio dall'auricolare
al telefono
Vedere il manuale dell'utente.
Ripristino dell'auricolare
Se l'auricolare si comporta in modo imprevisto, occorre
ripristinarlo.
Reimpostazione dell'auricolare
1 Accedere alla modalità di pairing.
2 Premere simultaneamente il tasto di accensione
e il tasto di gestione delle chiamate fino allo
spegnimento dell'indicatore luminoso. Per
informazioni su come accedere alla modalità di
pairing, vedere Pairing dell'auricolare a pagina 61.
66
This is the Internet version of the User's guide. © Print only for private use.
Batteria
La durata della batteria potrebbe risultare ridotta nel
caso in cui non sia stata utilizzata di frequente oppure
in caso di primo utilizzo. Potrebbe essere necessario
effettuare ricariche ripetute.
Quando la batteria è troppo scarica, l'indicatore
luminoso lampeggia rosso e viene emesso un segnale
acustico basso. Se l'auricolare non viene ricaricato,
si spegne automaticamente.
Verifica dello stato della batteria
Premere una volta brevemente il tasto di accensione:
• una luce verde – la batteria deve essere caricata
• due luci verdi – la batteria è carica a metà
• tre luci verdi – la batteria è completamente carica
67
This is the Internet version of the User's guide. © Print only for private use.
Rimozione della cover
Rimozione della cover
Le informazioni regolamentari sono disponibili sotto
la cover.
Inserimento del laccetto
68
This is the Internet version of the User's guide. © Print only for private use.
Risoluzione dei problemi
Nessuna connessione tra l'auricolare e il telefono
Verificare che l'auricolare sia carico e si trovi entro
il raggio di copertura del telefono. Controllare o
selezionare nuovamente le impostazioni del telefono.
Provare a eseguire di nuovo il pairing dell'auricolare.
L'auricolare si spegne automaticamente
• Il livello di carica della batteria è insufficiente.
L'indicatore luminoso sull'auricolare lampeggia
rosso e viene emesso un segnale acustico basso.
• Quando l'auricolare è in modalità di pairing,
se non viene associato al telefono entro 10 minuti,
si spegne automaticamente.
Funzionamento errato
1 Collegare il caricatore.
2 Scollegare il caricatore.
3 Reimpostare l'auricolare.
La ricomposizione non funziona
Se la lista delle chiamate nel telefono è vuota, non sarà
possibile utilizzare la funzione di ricomposizione.
Comandi vocali
Verificare che i comandi vocali siano abilitati e
registrati nel telefono prima di iniziare a utilizzarli.
69
This is the Internet version of the User's guide. © Print only for private use.
Declaration of conformity
We, Sony Ericsson Mobile Communications AB of
Nya Vattentornet
SE-221 88 Lund, Sweden
declare under our sole responsibility that our product
Sony Ericsson type DDA-0002014
and in combination with our accessories, to which this
declaration relates is in conformity with the appropriate
standards EN 300 328:V1.7.1, EN 60950-1:2006,
EN 301 489-7:V1.3.1 and EN 301 489-17:V1.2.1,
following the provisions of Radio Equipment and
Telecommunication Equipment directive 99/5/EC.
Lund, August 2007
Jacob Sten, Head of Product Business Unit Accessories
Cumplimos con los requisitos de la directiva R&TTE (99/5/EC).
Ce produit est conforme à la directive R&TTE (99/5/CE).
Mi ispunjavamo zahtjeve R&TTE Direktive (99/5/EC).
Teljesítjük az R&TTE irányelv (99/5/EC) követelményeit.
Il prodotto soddisfa i requisiti della Direttiva R&TTE (99/5/CE).
70
This is the Internet version of the User's guide. © Print only for private use.
FCC statement
This device complies with part 15 of the
FCC rules. Operation is subject to the
following two conditions: (1) This device may not
cause harmful interference, and (2) This device must
accept any interference received, including interference
that may cause undesired operation.
71
This is the Internet version of the User's guide. © Print only for private use.