1
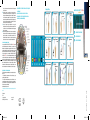
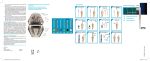
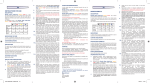
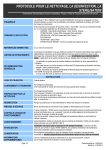
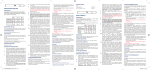
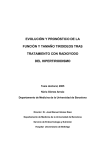
GB
INSTRUCTIONS FOR USE
DESCRIPTION
MACRO-LOCK POST™ ILLUSION™ X-RO® is a serrated taper
post , length 17,5 mm.
MACRO-LOCK POST™ ILLUSION™ X-RO® is a light yellow
translucent fiber post with a colored resin matrix which becomes
translucent in the mouth. The post color will re-appear on command under cold air, water spray if re-treatment is required.
The radiopacity level of the MACRO-LOCK ILLUSION™ X-RO® is
340 % Al equ. (ISO 4049)
●1
●2
●3
●4
●5
●6
Ø apical tip
0.80
0.80
1.00
1.00
1,30
1,30
Ø Post head
1.35
1.47
1.67
1.83
2,05
2,20
INDICATIONS FOR USE
In case of insufficient residual tooth structure (<4mm), the post is
needed to support and secure the coronal restoration.
CONTRAINDICATIONS
Insufficient residual dentin: at least 1.5 mm of tooth structure
around the preparation (ferrule effect) is requiredø.
PRECAUTIONS
The post must be cleaned with alcohol before insertion in the
canal. Avoid touching the posts with your fingers after cleaning.
Shortening the post should be done outside of the mouth.
The use of rubber dam is recommended. However, sometimes
the rubber dam may prevent the temperature elevation required
for the color disappearance until the dam is removed. The crown
must cover the preparation for at least 1.5 mm of healthy dentin
in order to get the ferrule effect.
ADVERSE REACTIONS
None known to date.
STEP-BY-STEP INSTRUCTIONS
1.  Root canal preparation.
2.  Select the correct MACRO-LOCK POST™ ILLUSION™
X-RO®. Determine the post size according to the anatomical
situation of the tooth using the radiograph and the calibrating paper.
3.  Determine the length of the coronal build-up, which will
account for 1/3 of the final post length. Remove the root filling with the starter Drill (rotation speed 1000-2000 rpm) as
deep as necessary for the post to be inserted to 2/3 of the
not4590 std.indd 1
root length. At least 4 mm of root canal filling should remain
in the apical region. In case of curved canal, this calculated
length is not suitable.
4.  Shape the canal with the Finishing Drill corresponding to the
selected MACRO-LOCK POST™ ILLUSION™ X-RO® size, in
increasing size sequence (rotation speed 1000-2000 rpm).
5.  Try in the post, to check that the post is properly seated in the
canal Shorten the post to its final length with a diamond disc
outside of the mouth. Never use a crimping instrument,
such as wire cutters, as the pressure can destroy the
structure of the post.
SAFETY AND LIABILITY
RTD declines any liability or compensation for possible damage
due to:
- Use of instruments which do not belong to the system and
which may impair the function.
- Failure to observe the Instructions For Use The user is responsible for testing the material for its suitability and use for any purpose not explicitly stated in the instructions for use.
For Dental use only.
* Refer to the manufacturer ’s instructions for use.
6.  Clean post with alcohol.
7.  Apply etchant in the post space and to the exposed dentin
for 15 seconds*. Rinse for 10 seconds. Remove the excess
water with paper points but leave surface moist. Do not put
the etchant in contact with the gingiva.
8.  Apply 2 coats* of the primer with a thin brush (e.g. Composibrush RTD) in the post space. Remove excess using paper
points and gently air dry all surfaces. Enamel and dentin
surfaces should have a uniform, glossy appearance. If not,
repeat application. Light-cure the primer* inside the post
space for 10 to 20 seconds.
9.  Apply a single coat of primer to the post. Gently air dry 5 seconds and light-cure the post for 10 to 20 seconds (if needed)
outside the mouth*.
10.  Mix the cement* and apply it in post space and to the post
using a Lentulo spiral or a syringe tip. Seat the post immediately. Remove excess with appropriate instruments. If dual
cure cement, light-cure for 40 to 60 seconds, applying gentle
pressure with the tip of the curing light probe.
11.  Apply 2 coats of bonding agent* to the exposed post,
cement and coronal areas. Remove excess and air-dry with
jet of air. Light-cure for 20 seconds (if needed).
12.  Directly model the build-up using a composite core build-up
material*. R.T.D. recommends that the coronal end of the post
be covered by core composite. In cases where a prosthetic
crown is not indicated, a minimum of 1 mm of composite
restorative should cover the post.
OTHER RECOMMENDATIONS
MACRO-LOCK POST™ ILLUSION™ X-RO® can be disinfected
with medical alcohol.
They can neither be sterilised nor disinfected in thermo disinfector. The use of autoclave is not recommended.
Do not store in direct sun light or artificial light
MACRO-LOCK POST™ ILLUSION™ X-RO® Starter and Finishing Drills: the drills are supplied non-sterile. Disinfect and sterilize drills before each use.
Disinfect drills with disinfecting or cleaning agents adapted for
rotary instruments and follow the manufacturer’s instructions for
use.
Do not disinfect drills in thermo disinfector.
Control drills visually before each use: change drills when they
are damaged, corroded or dull.
Use a new drill after 12 - 15 use.
FR
MODE D’EMPLOI
DESCRIPTION
MACRO-LOCK™ ILLUSION™ X-RO® en fibres de quartz est
un tenon coloré dans la masse. Il devient jaune translucide en
bouche. Sous simple spray d’eau froide le tenon redeviendra
coloré en cas de besoin de visualisation.
Son niveau de radio-opacité est de 340 % Al equ. (ISO 4049)
●1
●2
●3
●4
●5
●6
Ø pointe
0.80
0.80
1.00
1.00
1,30
1,30
Ø tête
1.35
1.47
1.67
1.83
2,05
2,20
INDICATIONS
Le tenon sert de support à la restauration coronaire en cas de
substance dentaire résiduelle inférieure à 4 mm.
CONTRE-INDICATIONS
Parois dentinaires inférieures à 1,5mm au niveau coronaire.
PRECAUTIONS D’EMPLOI
Le tenon doit être nettoyé à l’alcool avant toute insertion dans la
bouche du patient.
Ne pas toucher le tenon avec vos mains.
Le tenon doit être coupé à l’extérieur de la bouche du patient.
L’usage de la digue est recommandé.
Cependant, il arrive parfois que la digue empêche l’ élévation de
température du tenon et que la couleur du tenon reste jusqu’ au
retrait de la digue.
Le recouvrement prothétique doit être d’au moins 1.5 mm
de structure dentaire saine pour obtenir l’effet de sertissage désiré (Ferrule effect).
EFFETS SECONDAIRES
Aucun effet secondaire connu à ce jour.
PREPARATION PAS-A-PAS
1. Préparation canalaire.
2. Choisir le MACRO-LOCK™ ILLUSION™ X-RO® adapté à
l’anatomie du canal d’après analyse radiographique et film
calibreur.
3. Déterminer la longueur du tenon : la longueur du tenon dans
le canal doit être le double de celle du tenon au niveau de
la restauration. Retirer l’obturation radiculaire avec le foret
Préformage, (1000-2000 t.min-1). Il doit rester un minimum
de 4mm d’obturation jusqu’à l’apex. Dans le cas de canaux
très courbés, il n’est pas toujours possible d’atteindre cette
longueur.
4. Préparer le canal radiculaire adapté au tenon choisi avec le
foret finition correspondant, (1000-2000 t.min-1).
5. Vérifier que le tenon est bien ajusté au canal ainsi préparé.
Raccourcir le tenon à la longueur adéquate avec un disque
diamanté. Ne pas utiliser de pinces, car la pression exercée
risque de détruire la structure du tenon.
6. Nettoyer le tenon à l’alcool.
7. Mordancer le canal et la partie coronaire pendant 15 secondes*. Rincer le canal pendant 10 secondes et le sécher
légèrement avec des pointes de papier. Les parois canalaires
doivent rester humides. Eviter tout contact avec la gencive.
8. Appliquer 2 couches d’adhésif sur la préparation à l’aide de
l’applicateur de type Composibrush RTD. Retirer l’excès de
produit avec des pointes de papier. Sécher légèrement avec
un jet d’air. La surface canalaire doit avoir un aspect lisse
et brillant. Si tel n’est pas le cas, renouveler l’application.
Photopolymériser l’adhésif* dans le canal pendant 10 à 20
secondes.
9. Appliquer une seule couche d’adhésif* sur le tenon. Sécher 5
secondes avec un jet d’air. Photopolymériser pendant 10 à 20
secondes (extra oral) si nécessaire.
10. Mélanger le ciment* et l’appliquer dans le canal et sur le
tenon avec un bourre pâte ou une seringue. Insérer immédiatement le tenon et enlever les excès de ciment avec un
instrument adapté. Dans le cas d’un ciment dual, photopolymériser pendant 40-60 secondes, en exerçant une pression
modérée sur le tenon avec le bout de la lampe appuyée à
l’extrémité du tenon.
11. Appliquer 2 couches d’adhésif* préparé sur le tenon, le ciment et la dentine exposés. Enlever les excès d’adhésif avec
un jet d’air. Photopolymériser si nécessaire.
12. Reconstituer le moignon avec un matériau composite.
RTD, recommande que la partie coronaire du tenon soit
recouverte par le composite .
Au cas où l’emploi d’une couronne ne soit pas nécessaire,
un minimum de 1 mm de composite doit recouvrir le tenon.
AUTRES RECOMMANDATIONS
Les tenons ne peuvent être ni stérilisés, ni purifiés au désinfecteur thermique. L’utilisation de l’autoclave n’est pas recommandée.
Conserver les tenons à l’abri de la lumiére.
Forets Universal Drill et Finishing Drill: les instruments sont
livrés non stériles. Stériliser avant utilisation. Désinfecter les
instruments avec des solutions* de rinçage adaptées aux instru-
ments rotatifs. Les forêts ne peuvent être ni stérilisés, ni purifiés
au désinfecteur thermique. Vérifier les instruments avant chaque
utilisation. Changer les instruments quand c’est nécessaire.
Un kit de réaccés canalaire est disponible en cas de besoin,
contacter votre distributeur.
Changer de foret aprés 12 à 15 utilisations.
SECURITE ET RESPONSABILITE
RTD décline toute responsabilité pour des dommages causés
par :
- l’utilisation d’instruments étrangers au système
- le non respect des instructions d’utilisations spécifiées dans
cette notice
Il revient à l’utilisateur de s’assurer que les produits sont bien
appropriés à l’utilisation prévue.
Destiné à l’usage dentaire uniquement.
* Se reporter aux instructions du fabricant
CUIDADOS
El poste debe ser limpiado con alcohol, antes de insertarlo en
el conducto.
Una vez limpiado, evitar tocar los postes con los dedos.
El poste debe ser cortado fuera de la boca del paciente.
Se recomienda el uso del dique de goma: sin embargo, a veces
el dique de goma puede impedir que se eleve la temperatura
(condición requerida para que desaparezca el color), en tanto
éste no sea retirado.
La corona protésica debe cubrir la preparación asentándose cuando menos en 1,5 mm de estructura dentaria sana, para obtener el efecto abrazadera o zuncho.
EFECTOS SECUNDARIOS
Ninguno conocido a la fecha.
PREPARACIÓN PASO A PASO
1. Preparación del conducto radicular.
2. Elegir el poste MACRO-LOCK POST™ ILLUSION X-RO®
ES
MODO DE EMPLEO
DESCRIPCIÓN
MACRO-LOCK™ ILLUSION™ X-RO® es un poste de 17,5mm de
longitud, tiene forma de cono trunco y presenta indentaciones
en su superficie.
MACRO-LOCK™ ILLUSION™ X-RO® es un poste de fibra de
cuarzo amarillo claro traslúcido, dotado de una matriz de resin
a de color que se torna translúcida al ser colocado el poste en
la boca. El color del poste reaparecerá cuando se requiera, al
aplicársele aire o spray frío; por ejemplo, si fuese necesario realizar el retratamiento del conducto.
El nivel de radiopacidad del poste MACRO-LOCK™ ILLUSION™
X-RO® es de 340% Al equ. (ISO 4049)
●1
●2
●3
●4
●5
●6
Ø extremo
apical
0.80
0.80
1.00
1.00
1,30
1,30
Ø cabeza
del poste
1.35
1.47
1.67
1.83
2,05
2,20
INDICACIONES PARA SU USO
Si la estructura dental remanente fuese insuficiente (< 4 mm), se
hace necesario recurrir al poste a efecto de proveerle soporte y
retención a la restauración coronaria.
CONTRAINDICACIONES
Dentina remanente insuficiente: se requiere no menos de 1.5
mm de estructura coronaria circundante a la preparación (efecto
zuncho o abrazadera).
apropiado, cerciorándose que la dimensión del mismo
guarde concordancia con la anatomía del diente, utilizando
para ello la radiografía y el papel calibrador.
3. Determinar la longitud de la reconstrucción coronaria,
la misma que debe ser equivalente a 1/3 de la longitud
final del poste. Eliminar el material de obturación del conducto radicular, con ayuda de la fresa o trépano universal (a una velocidad de rotación de 1000-2000 rpm), hasta
alcanzar una longitud necesaria para que el poste ocupe
los 2/3 de la longitud radicular, condición que no siempre es factible conseguir en los conductos muy curvos.
Finalmente debe quedar un mínimo de 4 mm de obturación
en la región apical. 4. Preparar el conducto radicular con la fresa o trépano de acabado MACRO-LOCK POST™ ILLUSION X-RO® correpondiente al tamaño del poste seleccionado, siguiendo una
secuencia creciente (1000 - 2000 rpm).
5. Insertar el poste en el conducto radicular para constatar que
quede apropiadamente asentado. Con un disco de diamante,
fuera de la boca, cortar el poste a la longitud deseada. Bajo
ninguna circunstancia utilizar pinzas, pues la presión excesiva que ellas ejercen puede destruir la estructura del poste. 6. Limpiar el poste con alcohol.
7. Aplicar el agente acondicionador en el conducto y la dentina coronaria durante 15 segundos*. Lavar el conducto durante 10 segundos y luego eliminar el exceso de
agua con puntas de papel, pero dejando húmeda la superficie. Evitar todo contacto del acondicionador con la encía.
8. Con la ayuda de un pincel delgado (v. gr. Composibrush RTD), aplicar 2 capas* del primer en las paredes del
conducto. Retirar el exceso del producto utilizando puntas
de papel y secar ligeramente con aire todas las superficies. Las superficies de esmalte y dentina deben mostrar una
apariencia brillante uniforme; de lo contrario, volver a efectuar la aplicación. Fotopolimerizar el primer* dentro del conducto durante 10 a 20 segundos.
9. Aplicar una sola capa de primer en la superficie del poste. Secar suavemente con aire durante 5 segun-
09/10/09 10:36
dos y -si fuese necesario- fotopolimerizar 10 a 20 segundos
fuera de la boca.
10. Mezclar el cemento* y aplicarlo en las paredes del con-
ducto utilizando un lentulo o la punta de una jeringa. Insertar el poste inmediatamente y eliminar el exceso de cemento
con un instrumento apropiado. En el caso de un cemento de
curado dual, fotopolimerizar durante 40 a 60 segundos, ejerciendo una presión moderada sobre la punta del poste con
el extremo de la varilla conductora de luz.
11. Aplicar 2 capas de agente adhesivo* en las superficies del poste, del cemento y de las áreas coronarias. Eliminar el exceso con aire. Fotopolimerizar durante 20 segundos
(si fuese necesario).
12. Reconstruir directamente el muñón con un composite específico* para ello. RTD recomienda que el extremo coronal del
poste sea cubierto por el composite para muñones. Si no
estuviese indicada el uso de una corona protésica, el poste
debe ser cubierto con un composite para restauraciones.
• SUGGESTED POST SIZE FOR EACH TOOTH (GUIDELINES ONLY)
• SUGGESTION POUR LE CHOIX DU TENON
• TAMAÑO DEL POSTE SUGERIDO PARA CADA
DIENTE (SOLO LINEAMIENTOS)
Step by Step
MACRO-LOCK POST™ X-RO®
ILLUSION™
Tr a n s l u c e n t q u a r t z f i b e r
GB
INSTRUCTION FOR USE
FR
MODE D’EMPLOI
ES
MODO DE EMPLEO
SEGURIDAD Y REPONSABILIDAD
RTD declina toda responsabilidad por los eventuales daños causados por: - La utilización de instrumentos extraños al sistema, ya que
podrían perjudicar la función.
- El no observar las indicaciones para el uso. El usuario es responsable de asegurarse de que los productos son apropiados y
que se utilicen en función a los propósitos especificados en las
instrucciones para su utilización.
Destinados solo al uso dental.
* Para su uso, remitirse a las instrucciones provistas por el fabricante
Fabricante :
RTD
3 rue Louis Neel
38120 St Egrève Francia
www.rtd.fr
[email protected]
|
0459
-2009-
not4590 std.indd 2
NOT4590UE Ver.: 09/09 -2009-
OTRAS RECOMENDACIONES
Los postes MACRO-LOCK POST™ ILLUSION X-RO®pueden
ser desinfectados con alcohol medicinal , no pueden ser esterilizados ni desinfectados en dispositivos térmicos. No se recomienda la utilización de autoclave. Evítese almacenar los postes
exponiéndolos directamente a la luz solar o a una luz artificial.
Las fresas universal y de acabado MACRO-LOCK POST™
ILLUSION X-RO®, no son suministradas esterilizadas; por ello,
antes de utilizarlas deben ser desinfectadas con agentes limpiadores o desinfectantes apropiados para instrumentos rotatorios. Las fresas NO PUEDEN ser esterilizadas ni desinfectadas mediante dispositivos o sistemas térmicos. Verificar
visualmente los instrumentos antes de cada utilización: cambiarlos cuando se muestren deteriorados, corroídos u opacos.
09/10/09 10:36