1
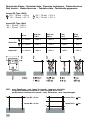
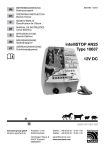
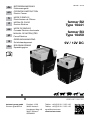
de
BETRIEBSANWEISUNG
Elektrozaungerät
en
OPERATING INSTRUCTION
Electric Fencer
fr
MODE D‘EMPLOI
Électrificateur de Clôture
it
MODALITA D‘USO
Recinto Elettrico
es
MODE DE EMPLEO
Cercado Electrico Accionado
pt
MANUAL DE INSTRUÇÕES
Cerca Eléctrica
nl
GEBRUIKSAANWIJZING
Schrikdraadapparaat
da
BRUGSANVISNING
Spændingsgiver
85773P - 01/10
farmer B2
Type 10441
farmer B3
Type 10450
9V / 12V DC
LEBEN MIT DEM TIER
horizont group gmbh
Division agrartechnik
Postfach 13 29
34483 Korbach
Telefon: +49 (0) 56 31 / 5 65-1 00
Telefax: +49 (0) 56 31 / 5 65-1 20
Homberger Weg 4-6
34497 Korbach
GERMANY
[email protected]
www.horizont.com
Fig. 1
Fig. 4a
Fig. 2
01a
Fig. 3a
02a
07
Ersatzteile / Spare parts / Pièces détachées / Pezzi di ricambio
Peças de reposção / Piezas de repuesto / Reservedele / Reserve onderdelen
01b
08
02b
03
09
04
05
10
06
Fig. 4b
14
15
16
2
Fig. 3b
13
11
12
Pos.
farmer B2 Type 10441
farmer B3 Type 10450
01a
88167
-
01b
94265
-
02a
-
88167
02b
-
88168
03
90918
90964
04
60076C
60076C
05
96598
96598
06
81051
81051
07
91956
91956
08
94833-94905
94833-94923
09
90443 (2x)
90443 (2x)
10
81045 (2x)
81045 (2x)
11
91960
91960
12
91921-98308
91921-98306
13
80979
80979
14
80054
80054
15
83449
83449
16
90676
90676
3
Betriebsanweisung für Elektrozaungeräte
"farmer B2" (baugleich mit "farmer B") und "farmer B3" (baugleich mit "horigard B")
de
in Verbindung mit den Errichtungs- und Sicherheitshinweisen für Elektrozaungeräte SECURA ANIMAL
oder SECURA SECURITY (www.horizont.com)
Aufstellung und Anschluss: Gemäß Fig.1 + 4b die beiden Teile des Erd- und Standpfahles mit dem
Erdkabel verbinden. Den Erdpfahl bis zum Anschlag in eine möglichst feuchte Stelle beim Zaun in den
Boden einschlagen. Gerät aufsetzen und an Erd- und Zaunkabel anschließen. Zaunkabel in den Zaun
hängen.
Erdung: Eine gute Erdung ist äußerst wichtig für den einwandfreien Betrieb und die optimale Leistung
des Gerätes (siehe z.B. Fig.2), daher unbedingt SECURA beachten.
Inbetriebnahme und Kontrolle: Schalter 1 - 0 drücken, nach einigen Sekunden hört man ein gleichmäßiges Ticken. Die Kontrollampe leuchtet im Rhythmus der Impulse auf.
Mode d‘emploi de l‘électrificateur
"farmer B2" (identique à "farmer B") et "farmer B3" (identique à "horigard B")
en relation avec les conseils de sécurité SECURA ANIMAL ou SECURA SECURITY (www.horizont.com)
Montage et raccordement: Assembler les deux parties du piquet de terre et de support au câble de
terre selon fig.1 + 4b. Enfoncer le piquet de terre dans le sol dans un endroit aussi humide que possible,
près de la clôture. Mettre l‘appareil en place et le raccorder au câble de terre et au câble de clôture.
Prise de terre: Une bonne prise de terre est particulièrement importante pour le fonctionnement parfait et la performance optimale de l‘appareil (fig.2). Il est donc nécessaire de se reporter aux données
SECURA .
Mise en service et contrôle: Presser l‘interrupteur 1-0. Après quelques secondes on entend un léger
tic-tac régulier. La lampe témoin s‘allume au rythme des impulsions.
"farmer B3":
Réglage de puissance: L‘interrupteur marqué avec les deux flèches vous permet
"farmer B3":
Mit Schalterbetätigung (dünner oder dicker Blitz) die Leistugsstufe wählen:
Stufe ( II )
= „verstärkt“ für das Einhüten und schwierige Tiere,
sowie für eine Zaunlänge über 3km
Stufe ( I )
= „normal“ für Zäune unter 3km und problemlose Tiere
(Kühe, Tiere mit kurzem Fell)
Batteriewechsel: Gerätegriff gemäß Fig. 3a entriegeln und abziehen. Geräteoberteil abnehmen. Batterieanschlüsse abnehmen. Neue Batterie einsetzen und Anschlüsse (rot an +) aufstecken. Oberteil
aufsetzen, Griff auf die Schwalbenschwanzführung aufschieben, bis die unteren Haken einrasten.
Vorschriften: Das Gerät entspricht den Sicherheitsvorschriften für Elektrozaungeräte.
Service Batteriegerät: Steckbare Module ermöglichen einen raschen, problemlosen Austausch bei
Ihrem Fachhändller, siehe Fig.4a/4b und die zugehörige Auflistung der Art.-Nr.. Die Abdeckplatte im
Oberteil des Gerätes wird zu diesem Zweck gemäß Fig. 3b angehoben.
Technische Änderungen vorbehalten !
en
Operating instruction for electric fence controller
"farmer B2" (identical in construction to "farmer B") and "farmer B3" (identical in construction to
"horigard B") - in connection with SECURA ANIMAL or SECURA SECURITY safety hints (www.horizont.com)
Installation and connection:
Connect the 2 parts of the earth and support rod with the ground cable. acc. to the figures (fig.1 + 4b).
Drive the ground rod to its stop into a rather moisty place close to the fence. Place the controller on
the support and connect the earth and fence cable to the marked terminals. Attach the fence cable to
the fence.
Operation and control: Press button 1-0, after few seconds a slight tick-tac can be heard. The fence
controllamp flashes with the pulses.
"farmer B3":
The controller has two output levels, to be adjusted with the press button switch, marked with
a thick and a thin arrow:
- thick arrow ( II ) for cattle training, stubborn animals and long fences
- thin arrow
( I ) for normal fencing conditions with short fences
Change of the battery: Depress the retention catches of the handle and slide it off (fig.3a). Separate
the upper controller unit from the battery housing. Change the battery and connect the battery red lead
to the + positive terminal on the underside of the controller unit and the black lead to the - negative
terminal. Refit the unit to the battery housing and slide the handle into position ensuring the retention
catches are engaged.
Earthing: An effective earthing is a precondition for a well operating fence installation, in order to
achieve this follow secura.
Requirements: The controller is designed to conforme to the corresponding standard.
Service: Plug in moduls can be replaced easily by your dealer, where in the event of failure the fault
is likely to be on the printed board.
Technical changes reserved !
4
fr
- une puissance
II (flèche gros) pour le dressage ou les animaux difficiles à garder
- une puissance I (flèche maigre) dans tous les autres cas. Elle fait durer la pile plus longtemps.
Changement de pile: Débloquer la poignée de l‘appareil selon la fig. 3a et l‘enlever. Retirer la partie supérieure de l‘appareil. Retirer les raccords de pile. Placer la nouvelle pile et enficher les raccords (rouge sur +). Remettre lapartie supérieure, placer la poignée sur la glissiére en forme de queue
d‘hirondelle, jusqu‘à l‘encliquetage du crochet inférieur.
Prescriptions: L‘appareil correspond aux normes de sécurité pour les électrificateurs de clôtures.
Service, appareils à pile: Modules enfichables peuvent être échangés rapidement et sans problème
chez votre revendeur. Pour celà, on soulèvera le couvercle dans la partie supérieure de l‘appareil (fig.3b).
Sous réserve de changements techniques !
Instruzioni per l‘uso della centralina per il recinto elettrico
"farmer B2" (identico a "farmer B") e "farmer B3" (identico a "horigard B")
it
Rispondente alle norme costruttive e di sicurezza per gli apparecchi elettrificatori di recinzioni SECURA ANIMAL o SECURA SECURITY (www.horizont.com)
Montaggio e allacciamento: collegare le due parti del picchetto di terra e di supporto al cavetto di
terra come da fig. 1-4. Piantare il picchetto di terra nel suolo in un posto il più umido possibile vicino
alla recinzione. Posare l‘apparecchio sul supporto e raccordarlo al cavetto di terra e al cavetto di elettrificazione della recinzione.
Presa di terra: una buona presa di terra è particolarmente importante per un perfetto funzionamento e
la prestazione ottimale dell‘apparecchio (fig.2). E‘dunque necessario riportarsi ai dati SECURA.
Messa in servizio e controllo: premere l‘interruttoro I O. Dopo qualche secondo si udirà un leggero
tic-tac regolare. La lampada spia della recinzione si accende al ritmo degli impulsi.
"farmer B3": Con il tasto
Livello ( II ):
( NORMALE / FORTE ) è possibile selezionare un livello di potenza.
per la protezione e per animali difficili
Livello ( I ): per i recinti inferiori a 3 km ed animali poco impegnativi
(mucche, animali con pelo corto)
Cambio della pila: sbloccare l‘impugnatura dell‘apparecchio secondo la fig.3 a toglierla. Togliere la
parte superiore dell‘apparecchio. Sfilare i raccordi della pila, mettere a posto la pila nuova e infilare i
raccordi (il rosso sul più). Rimettere a posto la parte superiore, mettere l‘impugnatura sullo scivolo a
forma di coda di rondine, fino al bloccaggio del gancio inferiore.
Norme: l‘elettrificatore è costruito secondo le norme di sicurezza.
Scatole per la corrente di servizio: i moduli schedabili possono essere cambiati rapidamente e senza
problemi presso il vostro rivenditore. Vedere fig.1 e la lista dei pezzi di ricambio corrispondenti con il
no. degli articoli.
Con riserva di eventuali modifiche !
5
Manual de instruções da cerca eléctrica
"farmer B2" (idêntica à "farmer B") e "farmer B3" (idêntica à "horigard B")
pt
em ligação com os conselhos de segurança SECURA ANIMAL ou SECURA SECURITY (www.horizont.com)
Instalação e ligação: Ligue as duas partes da estaca de terra ao cabo de ligação de acordo com as
figuras (fig. 1 + 4a). Coloque a estaca de terra num local húmido e junto ao cercado. Coloque o aparelho no suporte da estaca de terra e ligue o cabo de ligação à terra e o cabo de ligação ao cercado
nos respectivos terminais. Ligue o cabo de ligação ao cercado no fio, fita ou corda que compõem o
seu cercado.
Gebruiksaanwijzing voor het schrikdraadapparaat
"farmer B2" (identiek aan "farmer B") en "farmer B3" (identiek aan "horigard B")
nl
in samenhang met de veiligheidsinstructies voor elektrische afrasteringen SECURA ANIMAL of
SECURA SECURITY (www.horizont.com)
Het installeren en aansluiten: Volgens figuur 1 + 4b de aardpaal monteren en aansluiten op de
aardkabel. De aardpaal totaan de ronding liefs op een vochtige plaats in de grond drukken. Hierna
het apparaat erop zetlen met het steunpunt onder de batterijbak en de AARDE- en STROOMkabel
aansluiten
Operação e controlo: Pressione o botão 1-0 e após alguns ligeiros segundos poderá ouvir um tic-tac.
A luz de controlo do cercado começa a piscar de acordo com os impulsos.
Aarding: Een goede aarde is uiterst belangrijk voor het goed funktioneren von het apparaat. Hoe beter
de aarde hoe sterker de stroom.
"farmer B3":
O controlador tem dois níveis de saída de energia, ajustáveis através do interruptor e marca dos com uma seta grossa ou fina.
Het Ingebruikstellen en kontrole: Schalkelaar 1-0 indrukken en na enkele sekonden hoort U een
gelijkmatig tikken. Het kontrolelampje licht in het ritme van de tik op.
A seta grossa (II) para educação de bovinos, animais teimosos e cercados longos
"farmer B3":
Met de schakelaar het dunne of dikke bliksemteken kiezen.
A seta fina (I): para cercados normais e curtos
Stand dik
Mudança da pilha: Solte a molas de retenção da asa e retire esta (fig. 3a). Separe o topo do compartimento da pilha. Desligue os cabos, retire a pilha e coloque outra, fazendo as respectivas ligações
– vermelho ao terminal positivo (+) e preto ao terminal negativo (-). Coloque a pilha no compartimento
da bateria e coloque o topo sobre este. Coloque a asa assegurando-se de que as molas de retenção
ficam devidamente fixadas.
Terra: Uma terra efectiva é uma pré-condição para a instalação de um bom cercado eléctrico. De
modo a obter os melhores resultados possíveis consulte as nossas indicações sobre o sistema de terra
no nosso catálogo ou aceda a SECURA (www.horizont.com).
Requisitos: Esta unidade foi concebida em conformidade com os standards respectivos.
Serviço: Os módulos de ligação podem ser substituídos facilmente pelo seu fornecedor. Veja no início
deste manual a lista de peças e acessórios.
Reservamo-nos o direito de fazer alterações técnicas!
Stand dun
Modo de empleo del cercado
Brugsanvisning for spædingsgiver
"farmer B2" (identisk med "farmer B") og "farmer B3" (identisk med "horigard B")
"farmer B2" (idéntica con "farmer B") y "farmer B3" idéntica con "horigard B")
es
- Voor afrasteren tot 5 km en dieren met dikke vacht.
- Voor afrasteren tot 3 km voor gemakkelijke dieren.
Het verwisselen van de batterij: Handgreep volgens figuur 3a indrukken en lostrekken. Bovendeel
apparaat afnemen en de batterijaansluitingen losmaken. Nieuwe batterij plaatsen en de batterij op de
+(rood) en de -(zwart) aansluiten. Bovendeel weer aanbrengen en met de greep vastklikken.
Voorschrift: Het apparaat voldoet aan alle veiligheidsvoorschriften voor schrikdraden.
Service: Door de printen is het zeer eenvoudig voor Uw vakhandelaar om een defekte print te vervangen (zie figuur 4a en figuur 4b). Alle onderdelen worden op figuur 4b met bestelnummer aangegeven
en volgens figuur 3a en figuur 3b kan men het aparaat openen.
Technische veranderingen voorbehouden !
da
De acuerdo con las normas para el montaje y seguridad de los cercados SECURA ANIMAL o
SECURA SECURITY (www.horizont.com)
I relation til sikkerhedsanvisninger for spændingsgivere SECURA ANIMAL eller SECURA SECURITY
(www.horizont.dk) - (www.horizont.com)
Montaje y unión: Juntar las dos partes del piquete de tierra y del soporte al cable de tierra según la
fig.1 + 4b. Hundir el piquete de tierra en el suelo en un lugar lo más húmedo posible, cerca del cercado.
Poner el aparato en su sitio y unirlo al cable de tierra y al cable del cercado.
Montering og tilslutning: Forbind begge dele fra jord-og standpælene med jordledningen i henhold
til fig. 1 og 4b. Slå jordpælen i jorden til stoppekanten på et mest muligt fugtigt sted ved hegnet. Sæt
spædingsgiveren på og tilslut jord-og hegnledningerne. Sæt hegnledningen på hegnet.
Toma de tierra: Una buena toma de tierra es particularmente importante para el buen funcionamiento
y el cuidado óptimo del aparato (fig.2). Por lo tanto es necesario de hacerlo según las normas SECURA.
Jordforbindelse: En god jordforbindelse er yderst vigtig for en perfekt drift og spændingsgiverens
optimale ydelse- derfor er det vigtigt at SECURA.
Puesta en marcha y control: Pulsar el interruptor 1-0. Después de algunos segundos se oirá un tictac regular. La luz piloto del cercado se enciende al ritmo de los impulsos.
Ibrugtagning og kontrol: Tryk på 1-0 knappen, efter nogle sekunder høres en ensartet tikken.
Hegnskontrollampen blinker med de elektriske impulser.
"farmer B3":
Arreglo de potencia: El interruptor marcado con dos flechas le permite:
Una potencia II
( flecha gorda ) para el adiestramiento o animales dificiles de guardar.
Una potencia I
( flecha delgada ) para todos los otros casos. Hace durar la pila más tiempo.
Cambio de pilas: Desbloquear el asa del aparato según la fig. 3 y quitarla. Retirar la parte superior
del aparato. Retirar los enlaces de la pila. Poner una nueva y poner los enlaces (rojos en +) Poner parte
superior, poner el asa en la corredera, hasta el click del corchete interior.
Descripción: El aparato corresponde a las normas de seguridad para los cercados.
Servicio, aparatos a pilas: Módulos sueltos pueden cambiarse rápidamente y sin problemas en su
distribuidor (ver. 4a/4b y la lista de recambios con sus correspondientes referencias). Para esto habrá
que levantar la tapa de la parte superior del aparato (fig.3b).
Nos reservamos el derecho de las modificaciones técnicas !
6
"farmer B3":
Med ydelsesomskifteren kan man vælge følgende:
Trin II =
Fuld effekt til indhegning af store dyr med en hegnslængde på over 3 km.
Trin I =
Reduceret effekt til indhegning under 3 km og problemløse dyr.
Batteriskift: Løsn spændingsgiverens håndtag og træk af. Tag spændingsgiverens overdel af tag batteritilslutningen af. Sæt et nyt batteri i og tilslut det (røt til +). Sæt overdelen på batterikassen og før
håndtaget frem indtil de nederste kroge går i hak.
Regler: Spændingsgiveren imødekommer sikkerhexreglerne.
Lysnetapparat service: 2-stiks modul muliggør en hurtig, problemfri udskiftning hos Deres leverandør.
Se fig 4a/4b og den tilhørende liste med varenr.
Der tages forbehold mod tekniske aendringer !
7
Technische Daten - Technical data - Données techniques - Dados técnicos
Dati tecnici - Dados técnicos - Tekniske data - Technische gegevens :
farmer B3, Type 10450
12V / 36 mA / 0,25 J
9V / 28 mA / 0,17 J
12V / 28 mA / 0,14 J
9V / 24 mA / 0,11 J
farmer B2, Type 10441
12V / 32 mA / 0,20 J
9V / 25 mA / 0,17 J
0 km
0,25 km
1MΩ
0,25 km
500 Ω
5 km
5kΩ
5 km
500 Ω
max.
9500 V
~ 9000 V
~ 2000 V
~ 2000 V
~ 1300 V
max.
8000 V
~ 8000 V
~ 1500 V
~ 1300 V
~ 800 V
max.
9200 V
~ 9000 V
~ 2000 V
~ 1600 V
~ 1300 V
farmer B3
farmer B2
CEE: max. Zaunlänge - max. fence line length - longueur électrifée
lunghezza massima recinzione - max. longitud de la cerca
comprimento máximo do cercado - max. afrasteren - max. hegnslængde
farmer B3 = 8 km
farmer B2 = 5 km
8
farmer B2 = 8 km
3
farmer B3 = 5 km
3