1
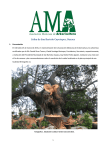
READ AND SAVE THESE INSTRUCTIONS
Use and Care Guide
TOWER HUMIDIFIER
6 Gallon Output with
Digital Readout
Model 758.17006
•
•
•
•
•
•
CAUTION: Before using this
product, read this manual and
follow all its Safety Rules and
Operating Instructions.
Part No. 1B71756
N.º de repuesto 1B71756
Printed in China
Impreso en China
32
Safety
Assembly
Operation
Maintenance
Parts
Español, pg.17
Sears, Roebuck and Co., Hoffman Estates, IL U.S.A.
ww.sears.com
Part No. 1B71756
Printed in China
1
GENERAL SAFETY INSTRUCTIONS
Safety Signal Words
DANGER: Means if the safety
information is not followed someone
will be seriously injured or killed.
WARNING: Means if the safety
information is not followed someone
could be seriously injured or killed.
CAUTION: Means if the safety
information is not followed someone
may be injured.
1. To reduce the risk of fire or
shock hazard, plug humidifier
directly into a 120 V, A.C.
electrical outlet. Do not use
extension cords.
2. Keep the electric cord out of
traffic areas. To reduce the
risk of fire hazard, never put
the electric cord under rugs,
near heat registers, radiators,
stoves or heaters.
3. Always unplug the humidifier
before moving it, before
cleaning, or whenever the
humidifier is not in service.
WARNING: To reduce risk of
fire, electric shock, or injury
always unplug before servicing
or cleaning.
4.
5.
6.
7.
8.
9.
10.
11.
12.
Keep the humidifier clean
Do not put foreign objects
inside the humidifier.
Do not allow to be used as a
toy. Close attention is
necessary when used by or
near children.
Never use your humidifier
while any part is missing or
damaged in any manner.
To reduce the risk of electrical
hazard or damage to
humidifier, do not tilt, jolt or tip
humidifier while unit is
running.
To reduce the risk of damage
to humidifier, unplug when not
in use.
To reduce the risk of
accidental electrical shock, do
not touch the cord or controls
with wet hands.
To reduce the risk of fire, do
not use next to an open
flame source, such as a
candle or other flame source.
Note the warning label
shown adjacent.
Garantía limitada por un año
Cuando se instala, opera y mantiene de acuerdo con las instrucciones proporcionadas con el
producto, si el aparato falla debido a un defecto de los materiales y de la mano de obra dentro del
lapso de un año desde la fecha de compra, devuélvalo a cualquier tienda Sears, Repuestos Sears y
Centro de Servicios de Reparación u otra tienda de Kenmore para que lo reparen gratuitamente.
Si se utiliza alguna vez este aparato con fines que no sean familiares, esta garantía tendrá validez
sólo por 90 días desde la fecha de compra.
Esta garantía cubre solamente defectos de los materiales y mano de obra. Sears NO se hará
responsable de pagar:
1. Los artículos fungibles que puedan desgastarse por el uso normal, incluidos,
entre otros, filtros, correas, lámparas y bolsas.
2. Un técnico de servicios que le enseñe al usuario la correcta instalación,
funcionamiento o mantenimiento.
3. Un técnico de servicios contratado para limpiar o brindar mantenimiento a este
producto.
4. Daños o fallas que se produjeran en el producto si no se lo instaló, operó o
mantuvo de acuerdo con las instrucciones proporcionadas con el producto.
5. Daños o fallas en este producto resultado de accidentes, abusos, usos
incorrectos o usos con fines distintos de los previstos.
6. Daños o fallas en este producto causados por el uso de detergentes,
limpiadores, sustancias químicas o utensilios que no eran los recomendados en
las instrucciones proporcionadas con el producto.
7. Daños o fallas en las partes o en el sistema resultado de modificaciones no
autorizadas realizadas a este producto.
Exención de responsabilidad de garantías implícitas; límite de la garantía
El derecho de garantía único y exclusivo del cliente de acuerdo con la presente garantía
limitada será la reparación el producto según aquí se estipula. Las garantías implícitas,
incluidas las garantías de comerciabilidad o aptitud para este fin en particular, están limitadas
a un año o al periodo más corto permitido por ley. Sears no será responsable de daños
incidentales o consecuentes. Algunos estados y provincias no permiten la exclusión o
limitación de los daños incidentales o consecuentes, ni la limitación en la duración de las
garantías implícitas de comerciabilidad o aptitud, por lo tanto, estas exclusiones o
limitaciones pueden no aplicarse a su caso.
Esta garantía tiene vigencia solamente cuando este aparato se utiliza en los Estados
Unidos o en Canadá.
Table of Contents
General Safety Information............2
Know Your Humidifier ....................3
How Your Humidifier Works...........4
Getting you Humidifier Up
and Running ...............................4
Location ......................................4
Electrical Hook-up.......................5
Water Fill ....................................6
Setting the Controls ....................7
Operating the Controls .................. 7
Using Your Humidifier ................... 8
Filter Replacement and Care ...... 10
Cleaning and Maintenance.......... 11
Troubleshooting .......................... 13
Parts List for Kenmore
P/N 758.17006 ............................ 14
Warranty Information................... 15
2
Esta garantía le otorga derechos legales específicos y usted también puede tener otros derechos
que varíen de un estado a otro.
Sears, Roebuck and Co., Hoffman Estates, IL 60179
31
Lista de repuestos para el Humidificador Kenmore Modelo
N.º 758.17006
KNOW YOUR HUMIDIFIER
Description
Siempre encomiende según el número de repuesto, no por el número de clave
N.º de
clave
N.º de
repuesto
1
758.17006
2
3
4
5
6
7
8
15508
831188-1
833189
1B71761
831199
1B71763
1B71756
Descripción
* Alojamiento, conjunto superior
(incluye todos los repuestos del 1 al 8)
± Filtro
Soporte, flotador
Flotador, depósito
Base
Pie, goma
Conjunto de la botella
Manual del operador (no se ilustra)
± Artículo de mercadería – puede conseguirse en el Departamento de artículos de
ferretería en la mayoría de las tiendas minoristas.
* Cualquier intento de reparar el ensamblaje del control o el motor puede provocar
un peligro a menos que la reparación sea realizada por un técnico de servicios
calificado. El servicio de reparaciones está disponible en la tienda Sears más
cercana u otra tienda de Kenmore para que lo reparen gratuitamente.
30
*Gallon Output 24/hrs
Capacity of Bottle
Capacity of Base
*Sq. Ft. Coverage
Fan Speeds
Auto Fan Speed
Replacement Filter
Auto Humidistat
Auto Shut Off
Controls
Rubber foot
UL Listed
Volts
Hertz
Amps (High Speed)
Watts (High Speed)
758.17006
6 gal.
1.25 gal.
1.25 gal.
1300
3
Yes
15508
Yes
Yes
Electronic (Push Button)
Yes
Yes
120 A.C.
60
1.2
81
*Based on an area with average insulation and an 8 foot ceiling
height.
3
Solución de problemas
How Your Humidifier Works
Problema
Your new humidifier is designed to satisfy home humidity requirements through
the principle of evaporation of water in the air.
Once the filter becomes saturated, air is drawn in, passes through the filter and
moisture is absorbed into the air. All evaporation occurs in the humidifier so any
residue remains in the filter. This natural process of evaporation virtually
eliminates white dust.
CAUTION: To reduce the risk
of injury, fire or damage to
humidifier, use only cleaners
specifically recommended for
humidifiers. Never use
flammable, combustible or
poisonous materials to clean
your humidifier. To reduce the
risk of scalds and damage to
humidifier, never put hot water
in humidifier.
No se ilumina el visor
digital.
No funciona el ventilador
(el visor digital está
iluminado).
El ventilador funciona
continuamente.
Escasa evaporación de
agua.
La botella se vacía por
completo.
La botella se sigue
vaciando después de
llenarla por completo.
Getting Your
Humidifier Up
and Running
No se vacía la botella.
Once removed from its carton,
remove all packing materials.
Verify the filter is properly installed
(See page 10).
Step 1. Location
WARNING: For your own safety, do not use humidifier if any parts are
damaged or missing.
Selecting a Location
Place humidifier on a flat level surface;
take extra care in leveling when placing
the unit on carpet. Position the humidifier
where the most humidity is needed or
where the most air will be circulated
throughout the house such as near a cold
air return.
4
Moist air (humidity) produced will
disperse into the whole house, but
the area closest to the unit will
have the highest humidity. If the
unit is positioned close to a
window, condensation may form
on the window pane. If this occurs
the unit should be repositioned in
another location.
El visor brilla
intermitentemente o el
ventilador se mueve
levemente cuando el
humidificador está
enchufado.
El ventilador funciona
más lento que la
velocidad registrada en
el visor digital.
Posible causa
• No hay energía
• No se presionó el botón de
encendido.
• El nivel de humedad del
AMBIENTE no supera el 3%
por debajo del nivel de
humedad de AJUSTE.
• El depósito está vacío.
• El nivel de humedad de
AJUSTE es del 65%.
• El nivel de humedad del
AMBIENTE no alcanzó el 1% o
más por encima del nivel de
humedad de AJUSTE.
• Se enciende de manera
intermitente el mensaje REVISE
EL FILTRO.
• Se acumularon minerales en el
filtro.
• Esto es normal en el llenado
inicial.
Solución
• Revise la fuente de energía de 120 voltios.
• Presione el botón de encendido una vez
para encenderlo.
• Aumente el nivel de humedad de AJUSTE
si lo desea.
• Aumente la velocidad del ventilador.
• Llene el humidificador con agua.
• Un porcentaje de humedad de ajuste del
65% hace que el ventilador funcione
continuamente. Regule el nivel de AJUSTE
entre el 25% y el 60%.
• Déjelo funcionar hasta que se alcance el
nivel de humedad deseado. Esto puede
tardar hasta 48 horas inicialmente.
• Coloque un filtro nuevo limpio.
• OBSERVACIÓN: La pureza del agua de la
zona varía de un área a otra.
• Rellene la botella para el tiempo máximo
de funcionamiento.
• Entra aire a la botella de agua.
• Revise si hay pérdidas en la botella
de agua.
• El conjunto de la válvula con
resorte está dañado o falta el
poste en la parte inferior de la
base.
• La base está llena de agua.
• Revise la orientación de la botella.
Reposiciónela para que la válvula de
llenado en la parte inferior de la botella
quede presionada por el poste en la parte
inferior de la base.
La base tendrá la capacidad para los
contenidos de la botella de agua (1.25
galones). Deje funcionar el humidificador
para vaciar el agua de la base.
• Es normal
• No se requiere ninguna acción.
• El humidificador está en “DRY
OUT MODE” (MODO DE
SECADO)
• El humidificador coloca automáticamente al
ventilador en F1 (BAJO) cuando se
muestran la “F” y la humedad del ambiente
cambiante.
• Durante “DRY OUT MODE” (MODO DE
SECADO), el humidificador continuará
funcionando a velocidad BAJA según se
requiera hasta 2 horas o hasta que el filtro
esté totalmente seco.
El humidificador no se
apaga durante “DRY
OUT MODE”
(MODO DE SECADO).
• El filtro no está seco.
Se muestra la “F” y la
humedad del ambiente
de modo alternativo.
• El depósito está vacío.
• Llene el humidificador con agua.
• El filtro puede estar sucio.
• Reemplace el filtro.
• Desenchufe la unidad durante
30 segundos y vuelva a enchufarla
para iniciar.
Se muestra la “CP” y la
humedad del ambiente
de modo alternativo.
29
Paso 3
Mantenimiento quincenal
Remoción de sarro
1. Llene la base del humidificador con agua y agregue una taza (8
onzas) de vinagre blanco sin diluir. Deje reposar la solución durante
20 minutos.
2. Limpie todas las superficies interiores con un cepillo blando.
Humedezca un paño suave con vinagre blanco sin diluir y frote la base
para retirar el sarro.
3. Enjuague cuidadosamente con agua tibia y limpia para retirar el sarro
y la solución de limpieza.
Desinfección de la base
1. Vierta medio galón de agua y media cucharadita de blanqueador
clorado en la base. Deje reposar la solución durante 20 minutos,
revolviendo cuidadosamente en intervalos de algunos minutos.
Humedezca todas las superficies que normalmente están expuestas al
agua.
2. Vacíe la base después de 20 minutos. Enjuague con agua hasta que
desaparezca el olor al blanqueador. Permita que la unidad se seque
por completo.
OBSERVACIÓN: la botella de agua se debe limpiar de la misma manera
que la base. Enjuague con cuidado con agua limpia después de completar
todos los pasos.
Mantenimiento de fin de temporada
1. Siga las instrucciones de “Mantenimiento
quincenal” al final de la temporada de
humidificación.
2. Retire el filtro.
3. Deje que el humidificador se seque
por completo antes de guardarlo.
4. Guárdelo en un lugar fresco y seco.
5. Instale un filtro nuevo en el humidificador
limpio antes de que comience la próxima
temporada.
OBSERVACIÓN: también se recomienda el
procedimiento de "Mantenimiento quincenal”
si no va a utilizar el humidificador durante una
semana o más.
28
Positioning the Unit
The humidifier should be positioned with
the back (cord exit side) and sides, at
least 2 inches away from the wall. Air
needs to enter through all of the louvers
in the housing assembly in order for the
humidifier to operate at peak efficiency.
NOTE: Be sure humidistat (located
approximately 4 inches outside humidifier
body on power cord) is free from
obstruction and away from any hot air
register.
NOTE: Due to release of cool, moist air from humidifier, it is best to direct air
away from thermostat and hot air registers and to position humidifiers next to an
inside wall. Unit should not be placed where cold air from outside walls or warm
air from a hot air register blows directly on it.
Step 2. Electrical Hook-Up
Locate nearest 120V A.C. wall socket in the location desired, preferably on
inside wall. With the humidifier in the desired location, route the electrical cord
safely so no one will trip or upset the humidifier.
Plug in the electrical cord.
WARNING: To reduce the risk of fire or shock hazard, only plug humidifier
into a 120V A.C. outlet. Do not use extension cords.
To reduce the risk of electrical shock, this
humidifier has a polarized plug (one blade
is wider than the other). This plug will fit in
a polarized outlet only one way.
If the plug does not fit fully in the outlet,
reverse plug. If it still does not fit, contact
a qualified electrician to install the proper
outlet. Do not change the plug in any way.
5
Limpieza y mantenimiento
Step 3. Water Fill
Paso 1
ADVERTENCIA: para reducir el
riesgo de lesiones, incendios o
daños al humidificador, utilice
solamente limpiadores
recomendados específicamente
para humidificadores. Nunca utilice
materiales inflamables,
combustibles ni venenosos para
limpiar su humidificador. Para
reducir el riesgo de quemaduras y
daños al humidificador, nunca
coloque agua caliente en el
humidificador.
WARNING: To reduce the risk of fire
or shock hazard, do not pour or spill
water into control or motor area. If
controls get wet, let them dry
completely and have unit checked
by qualified service personnel before
plugging in.
After the humidifier is positioned
where it will be operating, you are
ready to fill the humidifier. The bottle
tilts out and away from the base.
Take care not to bump or damage fill
valve assembly on the bottom of the
bottle.
Para facilitar la limpieza, la base del
humidificador debe estar vacía y
completamente seca. Para lograr esto,
use el siguiente método:
a. Deje que el humidificador
funcione hasta que el
mensaje de LLENADO “F”
se ilumine y el apagado
automático detenga el
ventilador del humidificador.
b Desenchufe el humidificador
Paso 2
ADVERTENCIA: para reducir el
riesgo de descarga, siempre
desenchufe el humidificador
antes de limpiarlo o de efectuar
reparaciones. Si el humidificador
no está desenchufado, el
ventilador puede arrancar
después de que se retire el
alojamiento.
Invert the bottle. Press the valve
stem button into the bottle and turn
clockwise to lock in open position.
Place bottle under the faucet. Fill the
bottle, being careful not to allow any
debris to get in the valve seating.
Once the bottle is full, press the
valve stem button and turn counter
clockwise to release and close.
Remoción de partes
Consulte “Reemplazo y cuidado del
filtro” en la página 10.
OBSERVACIÓN: puede haber todavía
un poco de agua en la base. Con
cuidado elimine el agua o retírela con
una esponja.
PRECAUCIÓN: La pureza del
agua local varía según el área y,
en ciertas condiciones, las
impurezas del agua y las bacterias
en el aire pueden promover el
crecimiento de microorganismos
en el depósito del humidificador.
Para retardar el crecimiento de
bacterias que puedan causar
olores y ser perjudiciales para su
salud, utilice solamente los filtros
de reemplazo recomendados.
También recomendamos usar el
bactericida aprobado EPA 3214900 de Sears y el limpiador de
humidificadores, disponibles en su
tienda local minorista.
CAUTION: Use only 32-14900 EPA
Registered Bacteriostat from Sears.
Under no circumstances should you
use water treatment products designed
for Rotobelt or Ultrasonic humidifiers.
Place the water bottle back into the
humidifier base. When positioned
properly, the plunger will open and
the water will flow into the base. The
base will hold the entire contents of
the water bottle. Once the bottle is
empty, remove it and repeat the
filling process. The humidifier is now
filled to capacity. For less frequent
filling let the humidifier exhaust both
the water from the bottle and the
base before filling.
6
27
Reemplazo y cuidado del filtro
PRECAUCIÓN: para ayudar a
retrasar el crecimiento de bacterias
y mantener el rendimiento máximo,
se debe reemplazar el filtro al
menos una vez por temporada, o
más a menudo en condiciones de
agua dura. Utilice el filtro de
reemplazo recomendado 15508.
ADVERTENCIA: para reducir el
riesgo de descarga o de daño en las
partes movibles, siempre
desenchufe el humidificador antes
de retirar o reemplazar las partes.
Reemplace el filtro con mecha
evaporadora al menos una vez por
temporada de humidificación, o más
seguido, dependiendo de las
condiciones del agua en su área.
Reemplazo del filtro
1. Desenchufe el humidificador. Antes
de retirar el filtro, lleve el humidificador
a un área que no sea susceptible a
sufrir daños por el agua. (Es decir, a la
cocina o al baño).
2. Saque la botella de agua y déjela a
un lado. Asegúrese de no golpear ni
dañar la válvula de llenado.
3. El alojamiento superior y la base
están sujetos juntos con dos ganchos
en la parte frontal del alojamiento y
una traba flexible en la parte trasera.
Para retirar el alojamiento, presione la
traba con forma triangular en la parte
posterior del humidificador, debajo de
la salida del cable, mientras levanta,
inclinando el alojamiento superior
hacia adelante para liberar los
ganchos en la parte frontal de la base.
4. Deje el alojamiento superior a un
lado. Ahora se puede acceder al filtro.
26
5. Recuerde la posición del filtro.
Retire el filtro. En este punto, es
posible que desee limpiar la base.
Consulte la sección “Limpieza y
mantenimiento” de este manual.
6. Instale un nuevo filtro (15508)
en la base. Coloque el filtro entre
las piezas verticales en la parte
inferior de la base. El filtro debe
descansar sobre el piso de la
base.
7. Vuelva a colocar el alojamiento
superior en la base, primero
colocando los ganchos ubicados
cerca de la parte frontal de la base
en los orificios de contacto en el
alojamiento superior y luego
inclinando el alojamiento superior
hacia la base hasta que la traba
de la parte trasera se conecte al
alojamiento principal.
8. Vuelva a colocar el
humidificador en su posición de
funcionamiento.
9. El humidificador está ahora listo
para ser llenado para su
funcionamiento.
Step 4. Setting the Controls
Where you set your
desired humidity levels
depends on your personal
comfort level, outside
temperature and inside
temperature. A starting
Set point of 30%-40%
ROOM humidity is
recommended but there
may be conditions that
require a different setting.
When Outdoor
Temperature is:
-10˚F -24˚C
2˚F -18˚C
10˚F -12˚C
> 20˚F -6˚C
Recommended
Indoor Relative
Humidity is:
20%
25%
30%
35%
The chart provided offers general guidelines for selecting indoor humidity.
IMPORTANT: Water damage may result if condensation starts to form
on windows or walls. Humidity SET point should be lowered until
condensation no longer forms. We recommend room humidity levels
do not exceed 50%.
Operating the Controls
Digital Display
Press the power button once to turn
the unit on* . Initially there is a slight
delay while the electronics calibrate.
Two bars (--) appear during this time.
Function
Buttons
Function
Buttons
Once calibration is complete a ROOM
humidity reading between 20% – 95%
will be displayed. A flashing 20 display
indicates that the room humidity is less
than 20%.
Digital Display
NOTE: The default settings at initial
startup are (LOW) F1 fan speed and
65% SET humidity. After desired settings
are selected by the user, they remain as
long as the unit remains plugged in and
there is no power interruption. If the unit
is unplugged the original default settings
are employed.
7
*Humidifier fan should operate at
initial startup. If it does not, refer
to “Fan not operating (digital
display is illuminated)” in the
“Troubleshooting” section on
page 13 of this manual.
Operating the Controls - continued
Speed Button
This humidifier is equipped with a
3-speed fan control. Initially depressing
the speed button will display the current
speed setting. Each push of the speed
button advances the mode through the
settings of (HIGH) F3, (MEDIUM) F2,
(LOW) F1 and (AUTO) A.
The selected setting is displayed on the
digital readout. The higher the setting,
the faster water is evaporated and
released into the air. F1 (LOW) is the
quietest setting and is provided for
conditions that do not require a rapid
evaporation rate. When (AUTO) A is
selected the humidifier will determine the
required fan speed needed to bring the
actual room humidity up to the set
humidity.
Speed
Button Humidity
Button
Humidity Control
This button allows you to adjust
the humidity to suit your needs.
This humidifier will automatically
cycle on and off as required to
maintain the selected setting. The
readout displays both actual
(ROOM) and desired (SET)
humidity percentage (%) settings
when humidity control button is
pressed. The ROOM readout has
a range of 20% to 95%. If the
room humidity level is equal to or
less than 20% the display will
show a flashing 20.
The SET readout has a range of
25% to 65% and is adjusted in
increments of 5%. Initially
depressing the humidity button will
display the current humidity
setting. Each additional press of
the button increases the setting by
5%. A SET point of 65% operates
the humidifier continuously
regardless of the ROOM reading.
The humidistat that senses the
readings is located on the power
cord. Insure that it is free from
obstructions.
Using Your Humidifier
Refill Display
For maximum run time both the bottle
and the base should be filled. When
both the bottle and the base are empty
the display alternates the room
humidity reading and “F” (FILL),
indicating that additional water is
required. Also at this time the unit will
automatically switch into DRY OUT
MODE and continue to run on the
lowest speed until the filter is dry.
Refill Display
8
OBSERVACIÓN: durante este periodo, se continuará controlando el nivel de
humedad del ambiente y el humidificador encenderá y apagará el ventilador
hasta que el filtro esté totalmente seco. El ventilador se apagará y le
proporcionará un humidificador seco menos propenso al crecimiento de moho.
Si no se desea el MODO DE SECADO, llene el humidificador con agua y el
ventilador volverá a la velocidad determinada.
OBSERVACIÓN: el ventilador cambiará automáticamente a la velocidad más
baja durante el MODO DE SECADO.
Revise el indicador del filtro
La capacidad de cualquier humidificador
para proporcionar de manera eficiente
el rendimiento de humedad depende en
gran parte del estado del filtro. A
medida que el filtro se carga con
impurezas, gradualmente pierde su
capacidad de filtrar. Cuando esto
sucede, el rendimiento de humedad se
reduce y el humidificador tiene que
trabajar más tiempo para satisfacer el
valor determinado. Este humidificador
tiene un aviso de control de filtro
programado para aparecer después de
720 horas de funcionamiento. Cuando
el visor alterna entre "CF" y "Room
humidity" (humedad del ambiente) en
intervalos de 5 segundos, es un aviso
para que se controle el estado del filtro.
Humidistato
El humidistato ubicado en el cable
detecta el porcentaje de humedad en
el aire. Hace que el humidificador se
encienda y se apague para mantener
el punto de AJUSTE de humedad
seleccionado. El ventilador se
encenderá si la lectura de “ROOM”
(AMBIENTE) cae un 3% por debajo
del punto de AJUSTE y continuará
haciendo funcionar al humidificador
hasta que se alcance una lectura del
1% por encima del punto de AJUSTE.
El ventilador se apagará hasta que la
lectura del AMBIENTE caiga un 3%
por debajo del punto de AJUSTE
nuevamente.
OBSERVACIÓN: asegúrese de que
el humidistato, ubicado en el cable, no
tenga obstrucciones y esté lejos de
fuentes de aire caliente.
25
Bloqueo de los controles
Para evitar que se modifiquen por
error los valores del humidificador,
se pueden bloquear los controles.
Procedimiento de activación
Después de que se configuren las
funciones del humidificador,
mantenga presionado el botón de
encendido durante 5 segundos. El
visor mostrará “CL” durante 2
segundos. Suelte el botón de
encendido y el control reanudará el
visor de la humedad del ambiente. El
humidificador de ambiente continuará
funcionando con los valores
bloqueados. Si se presionan los
botones mientras "CL" está activado,
aparecerá "CL" en el visor y los
valores no se verán afectados.
Procedimiento de
desactivación
Para desactivar la función “CL”,
simplemente presione y mantenga
presionado el botón de encendido
durante 5 segundos. “CL”
parpadeará encendiéndose por un
segundo y apagándose por un
segundo durante 2 segundos y luego
se reanudará el visor de humedad del
ambiente.
Funcionamiento de los controles- continuación
Botón de velocidades
Este humidificador está equipado con un
control de ventilador de tres velocidades.
En un principio, al presionar el botón de
velocidades se mostrarán los valores de
la velocidad actual. Cada vez que se
presiona el botón de velocidades, el
modo avanza por los valores de F3
(ALTA), F2 (MEDIA), F1 (BAJA) y A
(AUTOMÁTICO).
El valor seleccionado se muestra en el
lector digital. Mientras más alto sea el
valor, más rápido se evaporará el agua y
se liberará en el aire. F1 (BAJA) es el
valor más bajo y se utiliza en condiciones
donde no se requiere un índice de
evaporación alto. Cuando se selecciona
A (AUTOMÁTICO), el humidificador
determinará la velocidad del ventilador
necesaria para aumentar la humedad del
ambiente real a la humedad
seleccionada.
Botón de
humedad
Botón de
velocidades
Control de humedad
Este botón le permite ajustar la
humedad según sus necesidades.
Este humidificador arrancará o
finalizará su ciclo automáticamente
según se requiera para mantener el
valor seleccionado. El lector
muestra el porcentaje (%) de
humedad real (AMBIENTE) y de la
deseada (AJUSTE) cuando se
presiona el botón de control de
humedad. El lector de AMBIENTE
tiene un rango de 20% a 95%. Si el
nivel de humedad del ambiente es
igual o inferior al 20%, el visor
mostrará un 20 parpadeando.
El lector de AJUSTE tiene un rango
de 25% a 65% y se ajusta en
aumentos del 5%. En un principio,
al presionar el botón de humedad
se mostrará la humedad actual.
Cada vez que se presione el botón,
el valor aumentará un 5%. Un
punto de AJUSTE del 65% hará
funcionar el humidificador de
manera continua sin importar la
lectura de AMBIENTE. El
humidistato que detecta las lecturas
está ubicado en el cable.
Asegúrese de que no esté
obstruido.
Uso de su humidificador
Visor de llenado
Para lograr un tiempo de
funcionamiento máximo, se deben llenar
tanto la botella como la base. Cuando
la botella y la base están vacías, el visor
muestra alternando la lectura de
humedad del ambiente y “F” (LLENAR)
para informar que se requiere más
agua. También en este momento, la
unidad cambiará automáticamente al
MODO DE SECADO y continuará
funcionando a la velocidad más baja
hasta que el filtro se seque.
24
NOTE: During this time the room humidity level will continue to be monitored and
the humidifier will cycle the fan on and off until the filter is completely dry. The fan
will shut off leaving you with a dry humidifier that is less prone to mold and mildew
growth. If DRY OUT MODE is not desired, refill the humidifier with water and the
fan will return to the set speed.
NOTE: Fan automatically switches to lowest speed during DRY OUT MODE.
Check Filter Indicator
The ability of any humidifier to efficiently supply
humidity output relies heavily on the condition
of the filter. As the filter loads with impurities it
gradually loses its wicking capability. When this
happens, moisture output is reduced and the
humidifier has to work longer to satisfy the
selected setting. This humidifier has a check
filter reminder timed to appear after 720 hours
of operation. When display shows an
alternating “CF” and “room humidity” setting at
5 second intervals it is a reminder to check the
filter condition.
Humidistat
Control Lock Out
The humidistat located on the power
cord senses the percentage of
humidity in the air. It causes the
humidifier to cycle on and off to
maintain the selected humidity SET
point. The fan will turn on if the
“ROOM” reading falls 3% below the
SET point and will continue to run the
humidifier until a reading of 1% above
the SET point is achieved. The fan
will turn off until the ROOM reading
falls 3% below the SET point again.
To avoid unwanted tampering with the
humidifier settings the controls can be
locked.
Activation Procedure
After the humidifier functions have been
set up, hold the power button down for
5 seconds. The display will show “CL”
for 2 seconds; release the power button
and the control will resume the display
of the room humidity. The room
humidifier will continue to function with
the locked in settings. If buttons are
operated while “CL” is active, the “CL”
is displayed and settings are
unaffected.
NOTE: Be sure that the humidistat,
which is located on the power cord, is
free from obstruction and away from
any hot air source.
Deactivation Procedure
To deactivate the “CL” function simply
press and hold the power button for 5
seconds. “CL” will flash at the rate of 1
second on and 1 second off for a period
of 2 seconds and then resume the
display of room humidity.
Visor de llenado
9
Paso 4. Configuración de los controles
Filter Replacement and Care
CAUTION: To help retard bacteria
growth and keep maximum
efficiency, the filter should be
replaced at least once per season,
or more often under hard water
conditions. Use Kenmore 15508
replacement filter.
WARNING: To reduce the risk of
shock or injury from moving parts,
always unplug humidifier before
removing or replacing any parts.
Replace the evaporative wicking filter
at least once per humidification season
or more depending on water conditions
in your area.
Filter Replacement
1. Unplug humidifier. Before removing
the filter, move the humidifier to an
area not susceptible to water damage.
(i.e. kitchen or bath areas).
2. Remove the water bottle and set
aside. Be sure not to bump or damage
the fill valve.
3. The upper housing and the base are
held together by two hooks at the front
of the housing and a flexible snap in
the rear. To remove the housing, press
in on the triangular shaped snap at the
rear of the humidifier, below the cord
exit, while lifting upward, tilting the
upper housing forward to clear the
hooks at the front of the base.
4. Set the upper housing aside.
The filter is now accessible.
10
5. Take note of the filter position.
Remove the filter. You may want
to clean the base at this time. See
the “Cleaning and Maintenance”
section of this manual.
6. Install a new filter (15508) into
the base. Position the filter
between the uprights in the bottom
of the base. The filter should be
resting on the floor of the base.
7. Return the upper housing to the
base by first placing the hooks
located near the front of the base
into the mating holes in the upper
housing. Then tilt the upper
housing down towards the base
until the rear snap engages the
main housing.
8. Reposition the humidifier to its
operating position.
9. The humidifier is now ready to
be filled for operation.
Los niveles de humedad
Cuando la
deseados que establezca
temperatura
dependerán de su nivel de
exterior es de:
comodidad personal,
temperatura exterior y
-10˚F -24˚C
temperatura interior. Se
2˚F -18˚C
recomienda un punto de
10˚F
-12˚C
ajuste inicial del 30%- 40%
>20˚F
-6˚C
de humedad del
AMBIENTE, pero pueden
existir condiciones que
requieran un valor diferente.
IMPORTANTE: El agua puede
producir daños si se comienza a
formar condensación en las
ventanas o paredes. Se debe
disminuir el punto de AJUSTE de
humedad hasta que no se forme
más condensación. Recomendamos
que los niveles de humedad del
ambiente no excedan el 50%.
La humedad relativa
interior recomendada
es del:
20%
25%
30%
35%
Botones
de funciones
Funcionamiento de los
controles
Visor digital
Presione el botón de encendido una vez para
encender la unidad* . Al principio hay una
leve demora mientras se calibran los
dispositivos electrónicos. Aparecen dos
barras (--) durante este periodo.
Una vez que se complete la calibración, se
mostrará una lectura de humedad del
AMBIENTE de entre 20% - 95%. El visor
mostrará un 20 parpadeando que indica que
la humedad del ambiente es inferior al 20%.
OBSERVACIÓN: los valores
predeterminados en el arranque inicial son F1
(BAJO) para la velocidad del ventilador y
65% de la humedad de AJUSTE. Después
de que el usuario elija los valores deseados,
permanecerán mientras la unidad siga
enchufada y no haya ninguna interrupción de
la energía. Si se desenchufa la unidad, se
utilizan los valores predeterminados
originales.
23
Visor digital
*El ventilador del
humidificador debe
funcionar en el arranque
inicial. Si no lo hace,
consulte “No funciona el
ventilador (el visor digital
está iluminado)” en la
sección de “Solución de
problemas” en la página 13
de este manual.
Paso 3. Llenado con agua
ADVERTENCIA: para reducir el riesgo de
incendio o el peligro de una descarga
eléctrica, no deje caer agua dentro del
área de los controles o del motor. Si los
controles se humedecen, deje que se
sequen por completo y haga que el
personal de servicio autorizado revise la
unidad antes de enchufarla.
Después de ubicar el humidificador en el
lugar donde funcionará, usted está listo
para llenarlo. La botella se inclina y se
saca de la base. Tenga cuidado de no
golpear ni dañar el conjunto de válvula
de llenado en la parte inferior de la
botella.
Invierta la botella. Presione el botón del
eje de la válvula en la botella y gírelo en
sentido de las agujas del reloj para
bloquearlo en la posición abierta.
Coloque la botella debajo del grifo. Llene
la botella, con cuidado para evitar que
cualquier residuo ingrese en el asiento
de la válvula. Una vez que la botella esté
llena, presione el botón del eje de la
válvula y gire en sentido contrario a las
agujas del reloj para soltar y cerrar.
PRECAUCIÓN: Utilice solamente el
bactericida registrado 32-14900 EPA
de Sears. Bajo ninguna
circunstancia, utilice productos de
tratamiento de agua diseñados para
humidificadores Rotobelt o Ultrasonic.
Coloque de nuevo la botella de agua en
la base del humidificador. Cuando se lo
coloca apropiadamente, el émbolo se
abrirá y el agua fluirá en la base. La base
tendrá la capacidad para el contenido
completo de la botella de agua. Una vez
que la botella se vacíe, retírela y repita el
proceso de llenado. El humidificador está
lleno hasta su capacidad máxima. Para
llenarlo con menos frecuencia, deje que
el humidificador termine el agua de la
botella y de la base antes de llenarlo.
22
Cleaning and Maintenance
Step 1
WARNING: To reduce the risk
of shock, always unplug
humidifier before cleaning or
servicing. If humidifier is not
unplugged, fan could start after
housing is removed.
To make cleaning easier, the
humidifier base should be empty and
completely dried out. To accomplish
this, use the following method:
a. Allow the humidifier to run
until the REFILL message
“F” illuminates and the
automatic shutoff has
stopped the humidifier fan.
b. Unplug humidifier.
WARNING: To reduce the risk
of injury, fire or damage to
humidifier, use only cleaners
specifically recommended for
humidifiers. Never use
flammable, combustible or
poisonous materials to clean
your humidifier. To reduce the
risk of scalds and damage to
humidifier, never put hot water
in humidifier.
Step 2
Remove humidifier parts.
See “Replacement and Care of
Filter” page 10.
NOTE: There may be a little water
still in the base. Carefully dump the
water out or remove with a sponge.
CAUTION: Local water purity
varies from area to area and
under certain conditions water
impurities and airborne bacteria
may promote the growth of
microorganisms in the reservoir
of the humidifier. To retard
bacteria growth that may cause
odors and be harmful to your
health, use only recommended
replacement filters. Also use
EPA registered Bacteriostat 3214900 from Sears.
11
Ubicación de la unidad
Step 3
Bi-Weekly Maintenance
Removing Scale
1. Fill the humidifier base with water and add one 8-ounce cup of
undiluted white vinegar. Let solution stay 20 minutes.
2. Clean all interior surfaces with a soft brush. Dampen a soft cloth with
undiluted white vinegar and wipe out the base to remove scale.
3. Rinse thoroughly with clean warm water to remove scale and cleaning
solution.
Disinfecting Base
1. Pour 1/2 gallon of water and 1/2 teaspoon chlorine bleach into the
base. Let solution stay for 20 minutes, carefully swishing every few
minutes. Wet all surfaces normally exposed to water.
2. Empty base after 20 minutes. Rinse with water until bleach smell is
gone. Allow unit to dry out completely.
NOTE: The water bottle should be cleaned in the same manner as the
base. Rinse thoroughly with clean water after all steps are complete.
End of Season Maintenance
1. Follow “Bi-Weekly Maintenance” instructions at end of humidification
season.
2. Remove filter.
3. Let humidifier dry completely
before storing.
4. Store in cool, dry location.
5. Install a new filter in clean
humidifier before next season begins.
NOTE: “Bi-Weekly Maintenance” procedure
is also recommended if you do not plan to
run the humidifier for one week or more.
Se debe colocar el humidificador con la
parte trasera (lado de salida del cable) y
los lados al menos a 2 pulgadas de la
pared. El aire tiene que ingresar por
todos los respiraderos en el conjunto del
alojamiento para que el humidificador
funcione con la mayor eficacia.
OBSERVACIÓN: Asegúrese de que el
humidistato (ubicado aproximadamente a
4 pulgadas fuera del cuerpo del
humidificador en el cable de energía) no
tenga obstrucciones y esté lejos de
cualquier fuente de aire caliente.
OBSERVACIÓN: debido a que el humidificador libera aire húmedo frío, es mejor
dirigir el flujo de aire lejos del termostato y de las fuentes de calor, y colocar los
humidificadores junto a una pared interior. La unidad no se debe colocar donde
el aire frío proveniente de paredes externas o el aire tibio proveniente de una
fuente de aire caliente la alcancen directamente.
Paso 2. Conexión eléctrica
Ubíquelo lo más cerca posible de un tomacorriente de pared de 120 V de CA en
el lugar deseado, preferentemente en una pared interna. Con el humidificador en
la ubicación deseada, coloque el cable de manera segura para que nadie tropiece
ni moleste el funcionamiento del humidificador. Enchufe el cable.
ADVERTENCIA: Para reducir el riesgo de incendio o peligro de descarga
eléctrica, el humidificador debe estar enchufado a un tomacorriente de 120
V de CA No utilice extensiones
Para reducir el riesgo de descarga
eléctrica, este humidificador posee un
enchufe polarizado (una espiga es
más ancha que la otra). Este enchufe
encajará en un tomacorriente
polarizado de una sola forma.
Si el enchufe no encaja
completamente en el tomacorriente,
inviértalo. Si aún así no encaja,
contacte a un electricista calificado
para que instale el tomacorriente
adecuado. No cambie el enchufe de
ninguna manera.
12
21
Funcionamiento de su humidificador
Su nuevo humidificador está diseñado para satisfacer los requisitos de humedad
del hogar por medio del principio de evaporación de agua en el aire.
Troubleshooting
Trouble
Una vez que el filtro se satura, el aire ingresa, pasa a través del filtro y la
humedad es absorbida y liberada en el aire. Toda la evaporación se produce en
el humidificador para que cualquier residuo permanezca en el filtro. Este proceso
natural de evaporación elimina prácticamente todo el polvo blanco.
PRECAUCIÓN: Para reducir el riesgo
de lesiones, incendios o daños al
humidificador, utilice solamente
limpiadores recomendados
específicamente para humidificadores.
Nunca utilice materiales inflamables,
combustibles ni venenosos para
limpiar su humidificador. Para reducir
el riesgo de quemaduras y daños al
humidificador, nunca coloque agua
caliente en el humidificador.
Encendido de su
humidificador
Una vez que lo saque de la caja, retire
todos los materiales de embalaje.
Verifique que el filtro esté instalado
adecuadamente (Consulte la página10).
Probable Cause
Digital display not
illuminated.
• Check 120 volt power source.
• Press power button once to turn
on.
Fan not operating (digital
display is illuminated).
• ROOM humidity level is not 3%
more below SET humidity level.
• Reservoir is empty.
• Raise SET humidity level if
desired.
• Increase fan speed.
• Fill humidifier with water.
Fan running
continuously.
• SET humidity level is 65%.
• ROOM humidity level has not
reached 1% or more above SET
humidity level.
• A Set humidity percentage of 65%
operates fan continuously. Adjust
SET level between 25%-60%.
• Continue to run until desired
humidity level is achieved. This
may take up to 48 hours initially.
Poor evaporation of
water.
• CHECK FILTER message
flashing.
• Mineral buildup on filter.
• Change to a fresh new filter.
• NOTE: Local water purity varies
from area to area.
Bottle empties
completely.
• This is normal for
initial filling.
• Refill bottle for maximum run time.
Bottle continues to empty
after complete filling.
• Air is entering water bottle.
• Check for leak in water bottle.
Bottle not emptying.
• Spring Valve Assembly damaged
or missing post in bottom of base.
• Base full of water.
Paso 1. Ubicación
ADVERTENCIA: Por su propia seguridad, no utilice el humidificador si
están dañadas o faltan algunas de las partes.
Selección de una ubicación
Coloque el humidificador sobre una
superficie plana, preste especial
cuidado de que quede nivelado
cuando se coloca la unidad sobre una
alfombra. Ubique el humidificador
donde se requiera la mayor cantidad
humedad o donde circulará la mayor
parte de aire en la casa, como cerca
de un conducto de aire frío.
20
El aire húmedo (humedad)
producido se dispersará por toda la
casa, pero el área más cercana a la
unidad tendrá la humedad más alta.
Si se coloca la unidad cerca de una
ventana, se puede formar
condensación en el vidrio de la
ventana. Si esto ocurre, se debe
colocar la unidad en otro lugar.
Remedy
• No Power
Power button has not been
depressed.
• Check orientation of bottle.
Reposition so that fill valve on
bottom of bottle is depressed by
post in bottom of base.
The base will hold the contents of
water bottle (1.25 gallons).
Continue to run humidifier to
deplete water from base.
Display blinks or fan
moves slightly when
humidifier is plugged in.
• Normal
• No action required.
Fan operating slower
than speed registered on
digital display
• Humidifier in “DRY OUT MODE”.
• Humidifier automatically switches
fan to (LOW) F1 when “F” and
alternating room humidity is
displayed.
Humidifier not shutting off
during “DRY OUT MODE”
• Filter not dry.
• During “DRY OUT MODE” the
humidifier will continue to run on
“LOW” speed as required for up to
2 hours or until the filter is
completely dry.
Alternating “F” and room
humidity displayed.
• Reservoir is empty.
• Fill humidifier with water.
Alternating “CF” and
room humidity displayed.
• Filter may be dirty.
• Replace filter.
• Unplug unit for 30 seconds and
replug in to clear.
13
Parts List for Kenmore Humidifier Model No. 758.17006
SOBRE SU HUMIDIFICADOR
758.17006
Descripción
Always order by part number - Not by key number
Key No.
Part No.
Description
1
758.17006
* Housing, Upper Assembly (includes all parts 1-8)
2
15508
± Filter
3
831188-1
Support, Float
4
833189
Float, Reservoir
5
1B71761
Base
6
831199
Foot, Rubber
7
1B71763
Bottle Assembly
8
1B71756
Operator’s Manual (not shown)
± Stock item - May be secured through the Hardware Department of most retail
stores.
* Any attempt to repair the control assembly or motor may create a hazard unless
repair is done by a qualified service technician. Repair service is available at your
nearest Sears store or Sears Parts & Repair Service Center.
14
* Rendimiento de galones
durante 24 horas
Capacidad de la botella
Capacidad de la base
*Cobertura en pies cuadrados
Velocidades del ventilador
Velocidad del ventilador
automático
Filtro de reemplazo
Humidistato automático
Apagado automático
Controles
Pie de goma
Registrado por UL
Voltios
Hertz
Amperes (velocidad máxima)
Vatios (velocidad máxima)
6 galones
1.25 galones
1.25 galones
1300
3
Sí
15508
Sí
Sí
Electrónico (botón pulsador)
Sí
Sí
120 CA
60
1.2
81
*Basado en una superficie con aislamiento promedio y una altura
de cielorraso de 8 pies.
19
INSTRUCCIONES GENERALES DE
SEGURIDAD
4.
Palabras indicadoras de seguridad
PELIGRO: significa que si no se respeta la
información de seguridad, alguien puede
resultar seriamente herido o muerto.
ADVERTENCIA: significa que si no se
respeta la información de seguridad,
alguien podría resultar seriamente herido o
muerto.
PRECAUCIÓN: significa que si no se
respeta la información de seguridad,
alguien puede resultar herido.
1. Para reducir el riesgo de incendio o el
peligro de descarga eléctrica, enchufe
el humidificador directamente a un
tomacorriente eléctrico de 120 V de
CA. No utilice extensiones.
2. Mantenga el cable fuera de las áreas
de tránsito. Para reducir el riesgo de
peligro de incendio, nunca coloque el
cable debajo de alfombras, cerca de
fuentes de calor, radiadores, cocinas o
calentadores.
3. Siempre desenchufe el humidificador
antes de moverlo, antes de limpiarlo o
cada vez que el humidificador no esté
funcionando.
ADVERTENCIA: para reducir el
riesgo de incendio, descargas
eléctricas o lesiones siempre
desenchúfelo antes de efectuar
reparaciones o de limpiarlo.
5.
6.
7.
8.
9.
10.
11.
12.
Mantenga el humidificador
limpio
No coloque objetos extraños
dentro del humidificador.
No permita que lo utilicen como
un juguete. Se debe prestar
atención cuando lo utilizan niños
o cuando se lo utiliza cerca de
niños.
Nunca utilice su humidificador
cuando le falte una parte o una
parte esté dañada en alguna
forma.
Para reducir el riesgo de peligro
eléctrico o daño al
humidificador, no lo mueva,
sacuda ni incline mientras la
unidad esté en funcionamiento.
Para reducir el riesgo de daños
en el humidificador,
desenchúfelo cuando no lo esté
utilizando.
Para reducir el riesgo de
descargas eléctricas
accidentales, no toque el cable
ni los controles con las manos
húmedas.
Para reducir el riesgo de
incendio, no lo utilice cerca de
una fuente de fuego abierta,
como una vela u otra fuente.
Preste atención a la etiqueta de
advertencia que aparece
adjunta.
One Year Limited Warranty
When installed, operated and maintained according to all instructions supplied with the product, if
this appliance fails due to a defect in material and workmanship within one year from the date of
purchase, return it to any Sears store, Sears Parts & Repair Service Center, or other Kenmore
outlet for free repair.
If this appliance is ever used for other than private family purposes, this warranty applies for only
90 days from the date of purchase.
This warranty covers only defects in material and workmanship. Sears will NOT pay for:
1. Expendable items that can wear out from normal use, including but not limited
to filters, belts, light bulbs, and bags.
2. A service technician to instruct the user in correct product installation,
operation or maintenance.
3. A service technician to clean or maintain this product.
4. Damage to or failure of this product if it is not installed, operated or maintained
according to the all instructions supplied with the product.
5. Damage to or failure of this product resulting from accident, abuse, misuse or
use for other than its intended purpose.
6. Damage to or failure of this product caused by the use of detergents, cleaners,
chemicals or utensils other than those recommended in all instructions
supplied with the product.
7. Damage to or failure of parts or systems resulting from unauthorized
modifications made to this product.
Disclaimer of implied warranties; limitation of remedies
Customer’s sole and exclusive remedy under this limited warranty shall be product repair
as provided herein. Implied warranties, including warranties of merchantability or fitness for
a particular purpose, are limited to one year or the shortest period allowed by law. Sears
shall not be liable for incidental or consequential damages. Some states and provinces do
not allow the exclusion or limitation of incidental or consequential damages, or limitation on
the duration of implied warranties of merchantability or fitness, so these exclusions or
limitations may not apply to you.
This warranty applies only while this appliance is used in the United States or
Canada.
Tabla de contenidos
This warranty gives you specific legal rights, and you may also have other rights which vary
from state to state.
Información general de
seguridad .................................... 18
Sobre su humidificador................ 19
Funcionamiento de su
humidificador ............................... 20
Encendido de su humidificador. 20
Ubicación ................................. 20
Conexión eléctrica .................... 21
Llenado con agua ..................... 22
Configuración de los controles . 23
Funcionamiento de los controles. 23
Uso de su humidificador.............. 24
Reemplazo y cuidado del filtro .... 26
Limpieza y mantenimiento .......... 27
Solución de problemas................ 29
Lista de repuestos para Kenmore
N/P 758.17006 ............................ 30
Información sobre la garantía ..... 31
18
Sears, Roebuck and Co., Hoffman Estates, IL
15
NOTES
LEA Y GUARDE ESTAS INSTRUCCIONES
Guía de uso y cuidado
_________________________________________
_________________________________________
_________________________________________
_________________________________________
_________________________________________
HUMIDIFICADOR TIPO TORRE
Rendimiento de 6 galones con
lector digital
Modelo 758.17006
_________________________________________
_________________________________________
_________________________________________
_________________________________________
_________________________________________
_________________________________________
_________________________________________
_________________________________________
_________________________________________
_________________________________________
_________________________________________
16
•
•
•
•
•
PRECAUCIÓN: antes de usar
este producto, lea este manual
y siga todas las Reglas de
seguridad y las Instrucciones de
funcionamiento.
Seguridad
Ensamblaje
Funcionamiento
Mantenimiento
Partes
Sears, Roebuck and Co., Hoffman Estates, IL 60179 U.S.A.
www.sears.com
N.º de repuesto 1B71756
Impreso en China
17