1
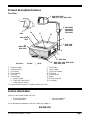
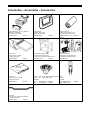
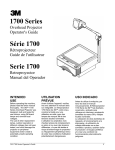
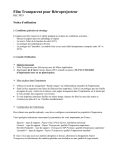
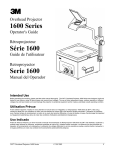
9000 Series
Overhead Projector
Operator’s Guide
Série 9000
Rétroprojecteur
Manuel d’utilisation
Serie 9000
Retroproyector
Manual del Operador
IMPORTANT
SAFEGUARDS
When using your photographic equipment,
basic safety precautions should always be
followed, including the following:
1. Read and understand all instructions
before using. Pay particular attention to
areas where this symbol ! is shown.
2. Close supervision is necessary when
any appliance is used by or near
children. Do not leave appliance
unattended while in use.
! 3. Care must be taken as burns can occur
from touching hot parts.
4. Do not operate appliance with a
damaged cord or if the appliance has
been dropped or damaged — until it
has been examined by a qualified
serviceman.
! 5. Position the cord so that it will not be
tripped over, pulled or contact hot
surfaces.
6. If an extension cord is necessary, a
cord with a current rating at least equal
to that of the appliance should be used.
Cords rated for less amperage than the
appliance may overheat.
7. Always unplug appliance from
electrical outlet before cleaning and
servicing and when not in use. Never
yank cord to pull plug from outlet.
Grasp plug and pull to disconnect.
! 8. Let appliance cool completely before
putting away or when replacing lamp.
Loop cord loosely around appliance
when storing.
9. To reduce the risk of electric shock, do
not immerse this appliance in water or
other liquids.
10. To reduce the risk of electric shock, do
not disassemble this appliance, but
take it to a qualified technician when
service or repair work is required.
Incorrect reassembly can cause
electric shock when the appliance is
used subsequently.
11. The use of an accessory attachment
not recommended by the manufacturer
may cause a risk of fire, electric shock,
or injury to persons.
12. Connect this appliance to a grounded
outlet.
13. Disconnect this unit from its source of
supply before replacing the projection
lamp.
! 14.This unit is equipped with optical
lenses and should not be exposed to
direct sunlight.
15. Keep ventilation openings free of any
obstructions.
16. This unit is assembled with a special
power cable that, if damaged, must be
replaced by the same type of cable.
This power cable can be ordered from
your local 3M Visual Systems Division
Dealer and must be installed by a
serviceman.
SAVE THESE
INSTRUCTIONS
The information contained in this manual
will help you operate and maintain your
overhead projector.
PRÉCAUTIONS
Observer les précautions suivantes
lorsqu’on utilise ce rétroprojecteur :
1. Lire attentivement les directives avant
d’utiliser l’appareil. Porter une
attention particulière aux passages où
apparaît le symbole ! .
2. Faire preuve d’une grande vigilance
lorsque l’appareil est utilisé par des
enfants ou en présence d’enfants. Ne
pas laisser sans surveillance un
appareil en utilisation.
! 3. Veiller à ne pas se brûler en touchant
les parties chaudes de l’appareil.
4. Ne pas se servir du rétroprojecteur si le
cordon d’alimentation est endommagé
ou si l’appareil est tombé ou est
endommagé. Le faire inspecter par un
technicien compétent.
! 5. Placer le cordon d’alimentation de
manière qu’on ne trébuche pas, qu’on
ne le tire pas par inadvertance et qu’il
ne touche pas les parties chaudes de
l’appareil.
6. Si on utilise une rallonge, choisir un
cordon prévu pour une intensité au
moins égale à celle de l’appareil. Les
cordons prévus pour une intensité
moindre risquent de surchauffer.
7. Débrancher l’appareil lorsqu’on ne
l’utilise pas ou lorsqu’on doit le
nettoyer. Ne pas tirer sur le cordon
pour le débrancher, mais sur la fiche.
! 8. Laisser l’appareil refroidir
complètement avant de le ranger ou de
remplacer la lampe. Enrouler le cordon
sans le serrer autour de l’appareil
avant de le ranger.
9. Afin d’éviter les chocs électriques, ne
pas plonger l’appareil dans l’eau ou
tout autre liquide.
10. Afin d’éviter les chocs électriques, ne
pas démonter l’appareil. En confier
l’entretien ou les réparations à un
technicien compétent. Incorrectement
remonté, le rétroprojecteur peut
produire des décharges électriques au
moment de sa réutilisation.
11. L’utilisation d’accessoires non
recommandés par le fabricant présente
des risques d’incendie, de choc
électrique ou de blessures.
12. Brancher l’appareil à une fiche reliée à
une prise à la terre.
13. Débrancher l’appareil avant de
remplacer la lampe de projection.
! 14.Comme il est doté de lentilles optiques,
cet appareil ne doit pas être exposé
directement au soleil.
15. Ne pas obstruer les orifices de
ventilation.
16. Cet appareil est muni d’un câble
électrique spécial. Tout câble
endommagé doit être remplacé par le
même type de câble. Le commander
auprès de son distributeur de la
division des systèmes visuels de 3M et
le faire installer par un technicien.
CONSERVER CE
MANUEL
Ce manuel contient des renseignements
utiles pour utiliser et entretenir votre
rétroprojecteur.
PRECAUCIONES
IMPORTANTES
Al utilizar el retroproyector, han de
seguirse siempre las siguientes
instrucciones básicas:
1. Lea y entienda todas las instrucciones
antes de usar. Preste especial atención
a las áreas donde se encuentra el
simbolo ! .
2. Vigile de cerca si el retroproyector es
usado por niños o cerca de ellos.
! 3. Hay que tener cuidado cuando se
encuentre abierta la puerta de accesso
a la lámpara, ya que si se toca en una
zona calienta, se pueden producir
quemaduras.
4. No hacer funcionar el retroproyector si
tiene el cable defectuoso o si el
retroproyector se ha caido o dañado.
Es necesario que antes lo examine un
técnico de 3M.
! 5. No dejar que cuelgue el cable sobre el
borde de la mesa, ya que se podria
dañar. No tocar las superficies
calientes.
6. Si es necesario un cable más largo,
puede utilizarse un alargador. Si se
utilizan cables con menos amperios
que el proyector, éste puede
calentarse en exceso. Hay que tener
cuidado de que el cable no se deforme
ni se tire de él.
7. Desenchufar el retroproyector cuando
no se use. No tire del cable para
desenchufarlo de la pared.
Desconéctelo tirando del enchufe.
! 8. Deje que la máquina se enfrie
completamente antes de guardarse o
de re-emplazar la lámpara.
9. Para evitar sacudidas eléctricas, no
instale el retroproyector en zonas
mojadas.
10. Para evitar el riesgo de sacudidas
eléctricas, no desmonte el
retroproyector. Llame a un técnico de
3M siempre que sea necesaria
cualquier reparación, ya que el
montaje incorrecto puede originar
sacudidas eléctricas al utilizar la
máquina.
11. No toque ni cubra la rejilla de
ventilación cuando se esté usando el
retroproyector.
12. El uso de cualquier accesorio no
recomendado por el fabricante puede
originar cortacircuitos y provocar
incendios o heridas a personas.
13. Conecte el retroproyector a un enchufe
que disponga de toma de tierra.
! 14.Desenchúfelo antes de cambiar una
lámpara.
15. Evitar que se obstruyan las aberturas
de ventilación.
16. Esta unidad está conectada mediante
un cable especial que, si se daña,
tiene que ser reemplazado con el
mismo tipo de cable. Este cable puede
ser ordenado (pedido) a su
representante de venta local de 3M, y
tiene que ser instalado por un técnico
profesional.
SIGA ESTAS
INSTRUCCIONES
La información que aparece en este
manual le ayudará a manejar y mantener
el retroproyector de transparencias en
perfecto estado.
Product Description/Features
Front View
1 9060, 9070, 9075
9080 (U.S. only), 9085, 9110
2
3
9550
10
3 9050,
9070,
9080,
9100,
11
9060,
9075,
9085,
9200
12
6
9100, 9200,
9550
4
5 9080, 9100,
9200, 9550
13
9080, 9085,
9100, 9200
9
7
8 9200, 9550
Electrical:
1.
2.
3.
4.
5.
6.
120 VAC
Projection Head
Projection Mirror
Focus Knob
Post Assembly
Post Lock
Control Panel
a. Lamp Changer
b. High/Low Lamp Switch*
c. Lamp Interlock Switch
14
60 Hz
7.
8.
9.
10.
11.
12.
13.
14.
9060, 9070, 9075, 9080, 9085,
9100, 9200, 9550
Post Cradle
Carry Handle
Top Cover Release
Top Cover
On/Off Switch
Stage
Color Tuning Dial
Cord Wrap
* On some models the switch is located inside the top cover.
Service Information
In the U.S. and Canada, please call us for
---
Product information
Product assistance
---
Technical assistance
Service locations
If you need product assistance or service, contact your dealer or:
800-328-1371
3M 9000 Series Operator’s Guide
Page 1
Set Up
B
A
(9550)
2. Plug in power cord and turn on. Adjust image to
screen elevation (A).
3. Focus the projected image (B).
1. Raise the post until it locks into place.
Fold Down
A
B
3. Fold down the post. Secure the post in post
cradle.
4. Rotate focus knob to minimum (except 9550).
1. Raise projection head (A) up to the maximum
(except 9550).
2. Release the post lock (B).
5. Hold to lift projector.
Page 2
3M 9000 Series Operator’s Guide
Lamp Replacement
!
Lamp and adjacent metal parts are hot. Allow lamp
to cool before replacing.
ENX -- 82V, 360W
9050, 9060, 9070,
9080, 9100
FXL -- 82V, 410W
9075, 9085, 9200
or
FNT -- 24V, 275W
EVD -- 36V, 400W
9550 only
1. Turn projector off and unplug the power cord.
2. Lift up top cover.
3. Remove and discard the old lamp. See
Illustration (A).
4. Install new lamp.
5. Push fully and squarely into socket. See
Illustration (B).
A
ENX
FXL
B
ENX
FXL
6. Close the top cover.
Lamp Changer/Indicator
High/Low Lamp Switch -- 9070,
9075, 9085, 9100, 9200, 9550
Note
Two lamps are provided with the 9200 and
9550.
1. The 9080, 9085, 9100, 9200 and 9550 have a
lamp changer feature.
Note
9080/9085 only: To access the Lamp
Changer Control, raise the Top Cover.
2. To activate the second lamp, rotate the lamp
changer knob (1).
3. The 9550 has an indicator that lights up red (2).
This visual reminder alerts the operator that one
or both of the lamps are burned out or missing.
3M 9000 Series Operator’s Guide
1. The High-Low lamp switch (3) * is located on
the top front control panel.
2. High is recommended for LCD projection panels.
Low is recommended for normal use.
Note
Operating the OHP in the Low lamp setting
will extend lamp life.
Note
Opening the lamp changer will deactivate the
lamp (Lamp Interlock Switch (4)).
* On some models the switch is located inside the
top cover.
Page 3
Cleaning
Color Tuning
1. The mirror in the open projection head is a
front-surface mirror and must not be wiped clean.
2. Remove any surface dirt with a soft brush to
avoid scratching the mirror.
1. To eliminate red or blue corners on the screen,
rotate the Color Tuning Dial.
a. Blue corners -- Rotate the dial to the left.
b. Red corners -- Rotate the dial to the right.
3. Clean the outside surfaces of the projection
lenses and the stage with 3MtOverhead Cleaner
676 (70-0705-6877-2).
Note
Cleaning the underside of the stage glass or
fresnel lens is not recommended. Improper
cleaning or disassembly may damage the
fresnel lens. If cleaning is required, contact
your local 3M Visual Systems dealer for
assistance.
Troubleshooting
Problem
Lamp does not come on -- fan runs
New lamp lasts for more than one
minute but less than 2--5 hours
New lamp burns out immediately
after turning on
Fan doesn’t run, but lamp is on
Neither lamp nor fan comes on
S
S
S
S
S
S
S
S
S
S
Projected image is wider at the top S
or on one side of the screen
Corners of projected image appear S
red or blue or the bottom or sides of
projected image are not in focus
S
Page 4
Probable Causes
Lamp is burned out
Lamp is not seated in the socket
Lamp changer door is open
Defective lamp
Defective lamp
Electrical problem
Fan or motor is obstructed
Not plugged into power source
No power at the wall outlet
Top cover not down all the way
Screen is not perpendicular to
the projected image
Misaligned optical components
Lamp not of the proper type
S
S
S
S
Solution
Replace or change lamp
Seat lamp all the way in socket
Close door
Replace lamp
S Try one more lamp. If 2nd lamp
blows, have machine checked
S Have machine serviced
S Plug into power source
S Check power supply
S Close top cover all the way
S Reposition the screen surface to
be 90_ to the projected image
S Have optical components
adjusted by qualified technician
S Replace with proper type lamp
3M 9000 Series Operator’s Guide
Accessories -- Accessoires -- Accessorios
Roller Attachment -- 10 1/4² (260 mm)
Attachment à roulettes
Accessorio para el rodillo
Carry Handle
Poignée pour porter
Manija de transporte
78-6969-7214-6
78-6969-7968-7
HA5760
Travel Cover
Couvercle pour voyager
Cubierta para Viajes
78-6969-7969-5
HA5785
HA5792
Cord Wrap
Crochets pour cordon d’alimentation
Envoltura del Cordón
78-6969-7993-5
HA5781
78-9020-1282-8 -- 10 1/4 ² (260mm)
AF4310
Overhead Presenter ’s Cart
Chariot pour rétroprojecteur
Carro para Presentación del Proyector
Overhead Cleaner
Nettoyant pour rétroprojecteur
Limpiador de retroproyectores
78-6969-7217-9
70-0705-6877-2
HA5651
Lamp ENX -- 9050, 9060, 9070, 9080, 9100 Lamp
Lampe
Lampe FXL -- 9075, 9085, 9200
Bombilla
Bombilla
Dust Cover
Couvercle anti-poussières
Cubierta para Polvo
78-6969-7216-1
Write-on Film Roll
Rouleau de pellicule à écrire
Rollo de Pelicula para Escribir
HA5786
ENX -- 78-6969-8027--1 HA6000
FXL -- 78-6969-7947-1 HA6005
EVD 78-6969-7970-3
FNT 78-8054-1175-4
HA6009