1
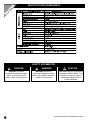
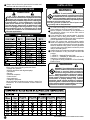
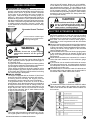
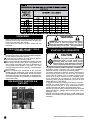
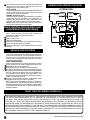
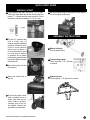
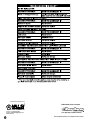
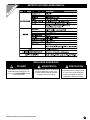
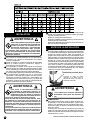
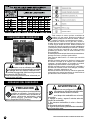
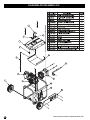
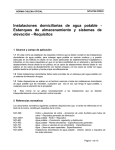
SPECIFICATIONS G50MG0950KV
SAFETY INFORMATION
DANGER
DANGER indicates a
potentially hazardous situation
which, if not avoided, WILL
result in death or serious injury.
2
CAUTION
WARNING
WARNING indicates a
potentially hazardous situation
which if not avoided could result
in death or serious injury.
CAUTION indicates a potentially
hazardous situation which, if not
avoided, may result in minor or
moderate personal injury, or
property damage.
SPECIFICATIONS SUBJECT TO CHANGE WITHOUT NOTICE
SAFETY AND OPERATION RULES
1 Read carefully and understand operator manual before
operate this product. Read and understand engine
manual prior to operation. Follow all warnings and
instructions.
2 Know your equipment. Consider the applications,
limitations and the potential hazards specific to your
unit.
3 Equipment must be placed on a firm, supporting
surface.
4 Load must be kept within rating stated on generator
nameplate. Overloading will damage the unit or shorten
its life.
5 Engine not to be run at excessive speeds. To operate
an engine at excessive speeds increases the hazard
of personal injury. Do not tamper with parts which may
increase or decrease the governed speed.
6 To prevent accidental starting, always remove the spark
plug or cable from the spark plug before maintaining the
generator or engine.
7 Units with broken or missing parts, or without protective
housing or covers, should never be operated. Contact
your service center for replacement parts.
8
Units should be not operated or stored in wet or damp
conditions or highly conductive locations such as
metal decking and steel work.
Keep
the generator clean and free of oil and other foreign
9
matter.
10 Extension cords, power cords, and all electrical equipment
must be in good conditions. Never operate electrical
equipment with damaged or defective cords.
Store the generator in a well ventilated area with
11
the fuel tank empty. Fuel shall not be stored near
the generator.
12 Your generator should never be operated under these
conditions:
• Uncontrolled change in engine speed.
• Electrical output loss.
• Overheating in connected equipment.
• Sparking
• Damaged receptacles
• Engine starting failure
• Excessive vibration
• Flame or smoke.
• Enclosed compartment.
• Rain or inclement weather. Do not let the unit get wet
when operating.
13 Check the fuel system periodically for leaks or signs of
deteriorations, such as chafed or spongy hose, loose
or missing clamps, or damaged tank or cap. All defects
should be corrected before operation.
14 The generator should be operated serviced, and refueled
under the follow Conditions:
a. Start and run the generator outdoors. Do not
run the generator in an enclosed area, even if
doors or windows are open; avoid areas where
vapors may be trapped, such as pits, garages,
cellars, excavations, etc.
DANGER-CARBON MONOXIDE HAZARD; the
engine exhaust contains carbon monoxide,a
poisonous odorless, invisible gas which, if
breathed, may cause death or serious personal
injury. If you start to feel sick, dizzy or weak while using
the generator, shut it off and get to fresh air right away;
you may have carbon monoxide poisoning.
b. Good ventilation for cooling. Air flow and temperatures
are important for air cooled units. Temperatures should
not exceed 104ºF ambient (40ºC).
SPECIFICATIONS SUBJECT TO CHANGE WITHOUT NOTICE
c. Refuel the generator in a well lighted area. Avoid fuel
spills and never refuel while the generator is running.
Allow engine to cool for two minute prior to refueling.
d. Do not refuel near open flames, pilot lights, or sparking
electrical equipment such a power tools, welders and
grinders.
e. The muffler and cleaner must be installed and kept
in good condition at all times as they function as flame
arrest if backfiring occurs.
f. Do not smoke near the generator.
15 Ensure that generator is properly grounded (see
Grounding the Generator section in this manual).
16
Do not wear loose clothing jewelry, or anything
that maybe caught in the alternator. Or other
rotating parts.
17 Unit must reach operating speed before electrical loads
18
19
20
21
22
are connected. Disconnect loads before turning off
engine.
To prevent surging that may possibly damage equipment
do not allow engine to run out of fuel when electrical
loads are applied.
When powering solid state equipment, a Power Line
conditioner should be used to prevent possible damage
to the equipment.
Do not stick anything through ventilating slots, even
when the generator is not operating. This can damage
the generator or cause personal injury.
Before transporting the generator in a vehicle, drain all
fuel to prevent leakage that may occur.
Use proper lifting techniques when transporting the
generator from site to site. Improper lifting techniques
may result in personal injury.
23 To avoid burns, do not touch engine muffler or other
engine or generator surfaces which became hot during
operation.
24 Do not alter or modify the heat shield.
Noise cautions
The generator can produce high noise levels. Prolonged
exposure to noise levels above 85 dBA is a hazard to
hearing. Always wear ear protection when operating or
working around the generator when it is running.
DEFINING TOTAL WATTAGE
1 In order to prevent overloading and possible damage to
2
3
4
5
6
your generator it is necessary to know total wattage
of the connected load. To determine which load and or
appliances your generator will run follow these steps.
Check wattage requirements by referring to the loads
nameplate or by calculating it (multiply amps x volts = watts).
You can get help for calculation using the Table 1
Total the watts for each item. If the nameplate only give
volts and amps, multiply volts x amps = watts. 1 kW =
1,000 watts.
Motorized appliances or tools require more than their
rated wattage for start up.
NOTE: Allow 2 ½ to 4 times the listed wattage for starting
equipment powered by electric motors.
The generator’s rated watts should match or exceed
the total number of watts required for the equipment
you want to run.
The altitude and temperature can modify the generator’s
ratings. Use the Table 2 to calculate the generator’s
rating, multiply the factor x rated output in the generator’s
specs when the condition is not at 21ºC at the sea
level.
3
7 Always connect first to the generator the heaviest load,
installation
operation voltage
WARNING
and then add other items one at a time.
CAUTION
C A U T I O N : Operating voltage and frequency
requirements of all electronic equipment should be
checked prior plugging them into this generator.
Damage may result if the equipment is not designed
to operate within +/- 10% of voltage and +/- 3 Hz of the
rated values marked in the generator´s nameplate.
To avoid damage, always have an additional no solid
state load plugged into the generator if only solid
state equipment (such as a television set) is used.
A power line conditioner is recommended for some
solid state applications.
WARNING : To avoid possible personal injury
or equipment damage, a register electrician or
an authorized service representative should
perform installation and all service. Under no
circumstances should an unqualified person
attempt to wire into utility circuit.
Give the generator at least two feet of space from
any nearby wall to dissipate heat.
1 To avoid back feeding into utility systems, isolation
of the residence electrical system is required.
2 Before temporary connection of the generator to
3
4
5
A power line conditioner should be used when running
one or more of the following solid state items:
• Garage door openers.
• Kitchen appliances with digital displays.
• Televisions.
• Stereos.
• Personal computers.
• Quartz clocks.
• Copy machines
• Telephone equipment
Other solid state equipment may require a power line
conditioner, for more information contact customer
service.
4
the residence system, turn off the main service
disconnecting device.
If your generator is to be used as a stand – by power
source in case of utility power failure, it should be
installed by a registered electrician and in compliance
with all applicable local electrical codes.
Proper use requires that a double throw transfer
switch be installed by licensed qualified electrician
so that the building’s electrical circuits may be safely
switched between utility power and the generator
output; thereby preventing back feed into the power
utility’s electrical system.
Always follow local codes and regulations that apply
to the installation of any item that concerns this
product.
1. NFPA 70 – National Electrical Code.
2. NFPA 37 – Standard for Installation and Use of
Stationary Combustible Engines.
3. Agricultural Wiring handbook of Farm Standby
Electric Power.
WARNING
WARNING : To avoid back feeding into utility
system, isolation of the residence electrical
system is required. Before temporary
connection of a generator to the residence
electrical system turn off the main switch.
Before making permanent connections a double
throw transfer switch must be installed. To avoid
electrocution or property damage, only a trained
electrician should connect generator to residence
electrical system. California law requires isolation
of the residence electrical system before connecting
generator to residence electrical system.
SPECIFICATIONS SUBJECT TO CHANGE WITHOUT NOTICE
value (at least 85 octane). Always use a fuel additive.
A fuel additive will minimize the development of fuel
gum deposits during storage. The fuel additive can be
added to the fuel int the gas tank or put toguether to the
fuel in a storage container. The fuel and engine smoke
are flammable and potentially explosive. Use a suitable
procedure to store and handle fuel. Always have ABC
fire extinguisher nearby.
BEFORE OPERATION
1 GROUNDING THE GENERATOR
The National Electric Code requires that this product be
properly connected to appropriate earth ground to help
prevent electric shock. A ground terminal connected
to the frame of the generator has been provided for
this purpose. Connect a length of a heavy gauge (12
AWG min.) bare cooper cable between the ground lug
attached to the generator´s frame (identified with a label
with the ground symbol- see figure below) and a cooper
rod drawn 1 meter into the ground which should provide
a suitable ground connection. However, consult with
a local electrician to insure that local codes are being
adhered to.
Generator Ground Terminal
CAUTION
Do not overfill the tank. Keep maximum fuel
level to ¼ inch below the top of the tank.
This will allow for expansion during warm
weather, and so, avoiding spillage.
ELECTRIC EXTENSIONS OR CORDS
1 All generator loads will be connected from the control
Connect a bare # 12 AWG copper
cable from the ground terminal to
an earth grounding point
2
3
WARNING
WARNING: do not use a pipe carrying
combustible material as the ground
source.
2 LUBRICATION
3
DO NOT attempt to start the engine without filling the
engine crankcase with the proper amount and type of
oil. Use SAE 30 oil.
Your generator has been shipped from the factory without
oil in the engine crankcase. Operating the unit without oil
can damage the engine and lose the warranty.
Fill the engine according to the engine manual. In this
engine the plastic plug of the engine crankcase is the oil
fill and check plug.Fill with oil and check the level using
the marks settings in the dipstick.
LOW OIL SENSOR
The engine is equipped with an oil sensor. If the oil level
becomes lower than required, the sensor will activate
a warning device and stop the engine (see the
accompanying engine manual for more information).
If the generator turns off and the oil level is within
specifications, check that the generator is not placed at
an angle that forces the oil level to change. Place the
generator in an even area to correct this problem. If the
engine doesn’t start, the oil level could not be enough
to shut off the automatic “low oil” swith. Make sure the
oil cap is in the correct level.
4
5
6
7
panel with extensions or cords with 3-prong grounded
plug for connection to120 volts outlet and 4-prong
grounded plug for connection to 120/240 volts outlets.
See Table 3 for select the minimum cable gauge of
extensions or cords in agreement with the necessities
of the loads.
When the load increases must be used a cable extension
of greater size. Using extensions of inadequate size it is
in where can result in serious problems with the voltage,
reducing the electric energy applied to the tools and
causing damage on them.
As far as smaller is the number of the wire gauge greater
is the conduction capacity, an example is that A wire
gauge 14 for example can lead a current higher than a
wire gauge16.
When several extensions are connected it is a must to
review that each extension is of the minimum gauge
required.
If you need to use an extension with outlets to connect
more than one electric tool, sum the amperes marked in
the nameplates of each tool to determine the minimum
cord gauge you need to use.
The extensions for 120 volts are made of 3 cables where
the green cable is the grounding one, the white cable is
the neutral and the black cable is the hot wire.
5-20P
L14-30P
8 The extensions for exits of 120/240 are made of 4 cables
where the green cable is the grounding one, the white
cable is the neutral and the black and red cables are
the hot wires.
4 FUEL
Fill the tank with unleaded fuel, clean and new. You can
use regular-grade fuel as long as it has a high octane
SPECIFICATIONS SUBJECT TO CHANGE WITHOUT NOTICE
5
unpacking
When unpacking check to make sure that all parts are
included. Refer to the General Assembly Drawing and
Parts List at the end of this manual.
If any parts are missing or broken, please call our
distributor.
generator set up and cable
connections
1 Place the generator outdoors where it will be used. This
2
3
4
must be a flat surface. and far from flamables materials.
Do not allow the generator gets wet.
Fill the tank fuel (outdoors) up to 6.0 gallon of gasoline,
do not fill the tank up to the top of tank.
After removing the plug with dipstick located in one side
of the engine, fill with 1.2 liter of oil. Fill with SAE 30 oil.
Use a funnel to avoid the spill of the oil. Review the oil
level by means of the dipstick, it must mark “Full”. Place
the plug with plastic dipstick, carefully, to avoid damage
of the threads.
Before connecting the equipment to the generator
review that the equipment is Off. Read the section
DETERMINING TOTAL WATAGGE . Do not overload the
generator. Calculate the total power of the equipment.
The maximum power of the generator is indicated in the
specification sheet.
g55 electric controls &
outlets
6
WARNING
WARNING: If the Generator will be used to replace
facility power in times of outages, the facility
power input must be isolated. Refer to the Electric
Generator Safety Precautions. These connections
must only be made by a licensed electrician.
STARTING THE GENERATOR
CAUTION
CAUTION: This product contains, or produces
chemistries when it is used, known by the
Californian state that cause cancer, severe
defects of birth or other damages. (Californian
Code of Health and Security 25249,5 et seq.).
All engines exhaust carbon monoxide, a deadly gas.
Breathing carbon monoxide can cause headaches,
dizziness, nausea, confusion and eventually death.
The carbon monoxide is colorless, odorless, tasteless gas
which may be present even if you do not see or smell any
engine exhaust. Deadly levels of carbon monoxide can
lay for hours or day in inclosed or poorly ventilated areas.
If you experience any symptoms of carbon monoxide
poisoning, leave the area immediately, get fresh air and
SEEK MEDICAL TREATMENT.
To prevent serious injury or death from carbon monoxide:
NEVER run engine indoors. Even if you try to ventilate
engine exhaust with fans or open windows and doors,
carbon monoxide can rapidly reach dangerous levels.
NEVER run engine in poorly-ventilated or partially enclosed
areas such as barns, garages, basements,carports, under
dwellings or pits.
NEVER run engines outdoors where engine exhaust can
be dawn into a building through openings such as windows
and doors
SPECIFICATIONS SUBJECT TO CHANGE WITHOUT NOTICE
STARTING THE UNIT
APPLYING LOAD
This unit has been pretested and adjusted to handle its
full capacity. When starting the generator, disconnect
all loads. Apply load only after the generator is running.
Voltage is regulated via the engine speed adjusted
al the factory for correct output. Readjusting will void
warranty.
WARNING
WARNING: Gasoline is very dangerous.
Serious injury or death may result from fire
caused by gasoline contacting hot surfaces.
1. Do not fill the fuel tank with the engine
running.
2. Turn off the engine and wait 2 minutes before
filling the tank.
3. Do not spill fuel while refilling tank.
4. Do not mix oil with gasoline.
5. Follow all the instructions and warnings in the
engine manual.
PRE-START PREPARATION
Before starting the generator, check for loose or missing
parts and for any damage which may have occurred
during shipment.
WARNING
WARNING: This generator must not be
operated without heat shield installed in
factory. Failure to comply may cause the
fuel tank to overheat an result in personal
injury from fire.
1
2
3
4
5
6
Check the oil level and fuel.
Disconnect all electrical loads from the unit.
Open fuel shut off valve.
Adjust choke as necessary.
Set the engine switch to the “ON” position.
Pull on the starter rope with fast steady pull. As the
engine warms up, readjust the choke. On electrical start
models, turn the key switch to “START”. Release key
switch after the engine start.
CAUTION
When applying a load, do not exceed the
maximum wattage rating of the generator
when using one or more receptacles.
Also, do not exceed the amperage rating of any
receptacle.
SHUTTING THE GENERATOR OFF
1 Remove entire electrical load.
2 Let the engine run for a few minutes with no load.
3 Move the engine switch to the “OFF” position.(turn the
key switch to “OFF” on the electrical start models).
4 Do not leave the generator until it has been completely
stopped.
5 Close the fuel shut off valve if the engine is to be put in
storage or transported.
6 If cover is used, do not install it untill the generator is
cool.
INITIAL START PROCEDURE
Controlled initial start helps insurance of proper engine
and generator operation. Follow engine start procedure
outlined in engine manual.
CAUTION
Do not apply a heavy electrical load during
start period (the first two to three hours of
operation).
DANGER
• Provide adequate ventilation for toxic exhaust
gases and cooling air flow.
• Do not start or run the generator in an enclosed
area, even if doors or windows are open.
• Engines operation produces carbon monoxide, an
odorless, colorless, poison gas.
• Breathing carbon monoxide can cause nausea, fainting
or death.
CAUTION
Allow generator to run at no load for five
minutes after each initial start-up to permit
engine and generator to stabilize.
SPECIFICATIONS SUBJECT TO CHANGE WITHOUT NOTICE
MAINTENANCE
1
2
3
4
5
ATTENTION: Disconnect all plugs from the panel, and
the cable of the spark plug if the motor is of electrical
starting, before any inspection for maintenance.
Before each use, review the general conditions for the
generator, review that all the pieces are complete, review
if there are damaged cables or some other condition that
can affect that the generator operates on safe way. If a
strange noise is listened to or some abnormal vibration,
turn off the generator immediately. Be sure to fix the
problem before giving the generator more use. Do not
use the equipment damaged.
Periodically inspect all the screws and bolts to check
they are in place and tight.
Keep this equipment in a clean and dry place.
For the best maintenance of the engine and any other
problem, read the engine owner’s manual.
After the engine has become cool, remove the excessive
gasoline and store it in a container, safe and approved
for that purpose.
7
6 After the first 20 hours of use of the generator drain and
replace the oil of the engine, after that the oil must be
changed every 100 working hours
HEAT SHIELD:
Inspect to ensure that all heat shields and heat deflectors
are intact and in place. Removing of these parts could
cause serious damage to the unit.
ENGINE: Carburetor Icing
During the winter months, rare atmospheric conditions
could cause an icing condition in the carburetor. If it
happens, the engine may run rough, loose power, and
may stall. Call Product Service for more information.
NOTE: Refer to the engine manufacturer’s manual for
service and maintenance of the engine.
G50MG0950KV wiring diagram
ALTERNATOR
quick starting tips for units that
have been sitting for a while
1
2
3
4
5
6
If your unit has not been used for a long period of time
and it is hard to start it, try to do some of these easy
steps before calling the customers hotline.
Check the oil level.
Replace the old fuel.
Change the spark plug.
Check the fuel lines. Make sure the fuel valve is open.
Check all generator parts for integrity
Clean the carburetor. (See engine manual for service
centers)
service and storage
INFREQUENT SERVICE
If the unit is used infrequently, difficult starting may result,
to eliminate hard starting, run the generator at least 30
minutes every 15 days. Also, if the unit will not be used
for some time, it is a good idea to drain the fuel from the
carburetor and gas tank.
LONG TERM STORAGE
When the generator set is not being operated or is being
more than one month, follow these instructions:
1 stored
Replenish engine oil to upper level.
2 Drain gasoline from fuel tank line and carburetor.
3 Pour about one teaspoon of engine oil through the spark
plug hole, pull the recoil starter several times and replace
the plug. Then pull the starter until you feel piston is on
its compression stroke and leave it in that position. This
closes both the intake and exhaust valves to prevent the
inside of cylinder from rusting.
4 Cover the unit and store in a clean, dry place that is well
ventilated away from open flame or sparks.
NOTE: We recommend always using a fuel stabilizer.
A fuel stabilizer will minimize the formation of fuel gum
deposits during storage. The fuel stabilizer can be added
to the gasoline in the fuel tank, or into the gasoline in a
storage container.
READ THE FOLLOWING CAREFULLY
THE MANUFACTURER HAS PROVIDED IN THIS MANUAL THE PRODUCT EXPLODED DRAWING INCLUDING
THE LIST OF MAIN COMPONENTS OF THE PRODUCT AS A REFERENCE TO THE END USER ONLY. IT DOES
NOT IMPLY THAT BUYER AND/OR END USER IS AUTHORIZED TO USE THIS INFORMATION AS A BASIS TO
PERFORM BY ITSELF ANY PARTS REPLACEMENT OR REPAIRS TO THE PRODUCT. ON PRINCIPLE, BUYER
AND/OR END USER IS CONSIDERED BY THE MANUFACTURER UNQUALIFIED TO PERFORM BY ITSELF ANY
REPAIRS OR PARTS REPLACEMENT TO THE PRODUCT. ALL REPAIRS AND PARTS REPLACEMENTS SHOULD
BE UNDERTAKEN BY AN AUTHORIZED SERVICE CENTER OR A PROPERLY QUALIFIED TECHNICIAN. BUYER
AND/OR END USER ASSUMES ALL RISK AND LIABILITY ARISING OUT OF HIS OR HER REPAIRS OR PARTS
REPLACEMENT MADE BY ITSELF TO THE ORIGINAL PRODUCT.
8
SPECIFICATIONS SUBJECT TO CHANGE WITHOUT NOTICE
G50 GENERAL DRAWING ASSEMBLY
SPECIFICATIONS SUBJECT TO CHANGE WITHOUT NOTICE
9
ALTERNATOR SPARE PARTS
NOTE: Some parts are shown for illustration
purposes only and are not available individually as
replacement parts.
NOTE: only a licensed electrician should perform electrical repairs on this generator.
10
SPECIFICATIONS SUBJECT TO CHANGE WITHOUT NOTICE
QUICK START GUIDE
MANUAL START
1 Fill the engine with SAE 10W-30 oil 1.7 L of SAE10W-30 oil, then check the oil level until it marks just
below “F”. A funnel must be used to do this. Do not
exceed the maximum capacity of 1.9L (2.0 qts.).
2 Fill the 6.6 gasoline tank
with a clean, new 85
octanes or higher unleaded
gasoline. A funnel must be
used to avoid gasoline
spills near hot areas. It
is recommended to pour
no more than 6 gallons
of gasoline due to gases
produced by gasoline when
exposed to higher ambient
temperatures.
3 Move the switch onto the
6 Move the choke lever to the right to let the engine
run at full speed (3600 rpm)
assembly instructions
1 Wheels and axle
Tools required: None
2 Transporting handle
Tools required: 7/16” Spanner
or wrench
ON position.
4 Move the choke lever to
the left
3 Stationary foot
Tools required: 1/2” Spanner or wrench
5 Pull one time with a slow
and controlled move to
make sure there are no
knots. Make a quicker,
stronger pull to turn on
the engine. Repeat this
procedure as necessary.
SPECIFICATIONS SUBJECT TO CHANGE WITHOUT NOTICE
11
Imported and Distributed by:
Nationwide Service Centers
Contact us 1•866•260•4843
e-mail: [email protected]
www.valsi.net
12
Call: 888-ready-19 (888-73239-19)
SPECIFICATIONS SUBJECT TO CHANGE WITHOUT NOTICE
ESPECIFICACIONES G50MG0900THV
REGLAS DE SEGURIDAD
PELIGRO
PELIGRO indica una situación
potencialmente peligrosa que, si
no se evita, PROVOCARÁ muerte
o una lesión seria.
ADVERTENCIA
ADVERTENCIA indica una situación
de peligro potencial, la cual, si no
se evita, podría ocasionar lesiones
severas e incluso la muerte.
ESPECIFICACIONES SUJETAS A CAMBIO SIN PREVIO AVISO
PRECAUCION
PRECAUCION indica una situación
potencialmente de riesgo, la cual,
si no se evita, puede ocasionar
heridas personales menores o
moderadas o daños materiales.
13
REGLAS DE SEGURIDAD Y
FUNCIONAMIENTO
ADVERTENCIA. El no seguir estas instrucciones
y advertencias puede ocasionar muerte, heridas
personales o daños materiales.
1 Lea cuidadosamente y entienda el manual del operador
antes de utilizar este producto. Lea y entienda el manual
de motor antes de su funcionamiento. Siga todas las
advertencias e instrucciones.
2 Conozca su equipo. Considere las aplicaciones,
limitaciones y los riesgos potenciales específicos de
su unidad.
3 El equipo deberá colocarse sobre una base de
sustentación firme.
4 La carga debe de mantenerse dentro de los valores
nominales que aparecen en la placa de identificación
del generador. Una sobrecarga dañará la unidad o
acortara su vida útil.
5 No se debe de hacer funcionar el motor a velocidades
demasiado altas. Si se opera el motor a excesiva
velocidad aumenta el riesgo de lesiones físicas. No
toque a cambie piezas que puedan aumentar o disminuir
a velocidad regulada.
6 Para evitar un arranque inesperado, siempre retire
el cable de la bujía antes de dar mantenimiento al
generador o al motor.
debe operarse una unidad con piezas
7 Nunca
quebradas o faltantes, o sin el revestimiento o cubiertas
protectoras.
8 Comuníquese con su centro de servicio para solicitar
los repuestos.
Las unidades no deben operarse ni almacenarse
9
en lugares húmedos o mojados ni altamente
conductores tales como plataformas metálicas o
estructuras de acero
Mantenga
el generador limpio y libre de aceite, barro o
10
cualquier otro material extraño.
Los cordones de extensión, los cordones eléctricos y
todos los equipos eléctricos deben estar en buenas
condiciones. Nunca opere un equipo eléctrico con
cordones dañados o defectuosos.
Guarde el generador en un lugar con buena
11
ventilación, con el tanque de combustible vacío.
No se debe de almacenar combustible cerca
del generador.
Su
generador
no deberá operase jamás si ocurre lo
12
siguiente:
• Velocidad del motor fuera de control.
• Pérdida de carga eléctrica.
• Sobrecalentamiento de el equipo conectado.
• Formación de chispas.
• Receptáculos dañados.
• Fallo de encendido.
• Vibración excesiva.
• Llamas o humo.
• Compartimiento cerrado.
• Lluvia o inclemencia del tiempo. No permita que la
unidad se moje cuando está funcionado.
13 Verifique periódicamente que no haya fugas o señales
de deterioro en el sistema de combustible, como
mangueras demasiado gastadas o blandas, abrazaderas
flojas o faltantes, o tanque o tapón dañados. Todos estos
defectos deberán corregirse antes de la operación.
14 El generador debe operarse, recibir servicio y rellenarse de
combustible solamente en las siguientes condiciones:
• Encienda y ponga a funcionar el generador al aire libre.
No ponga a funcionar el generador en un área cerrada,
aun cuando las puertas o ventanas se encuentren
abiertas; evite áreas donde los gases de escape
puedan encerrarse, tales como pozos, garajes, sótanos,
excavaciones y galerías.
14
PELIGRO-RIESGO DE MONOXIDO DE CARBONO:
Los gases del escape del motor contienen
monóxido de carbono, un gas letal, inodoro,
invisible que, si se inhala, puede provocar la
muerte o una lesión personal seria. Si comienza
a sentirse indispuesto, mareado o débil mientras utiliza
el generador, apáguelo e inmediatamente vaya a un
lugar fresco; podría padecer de envenenamiento por
monóxido de carbono.
• Buena ventilación para el enfriamiento. La circulación
de aire y las temperaturas son importantes para las
unidades enfriadas por aire. Las temperaturas no deberán
exceder 40°C (104° F) de temperatura ambiente.
• Rellene de combustible al generador en un área bien
iluminada. Evite el derrame de combustible y nunca
rellene con combustible mientras el generador está
funcionando. Antes de rellenar combustible, espere que
el motor se enfríe durante 2 minutos.
• No eche combustible cerca de llamas, luces piloto
o equipos eléctricos con chispas como herramientas
mecánicas, soldadoras y rectificadoras.
• El motor deberá tener instalado siempre el silenciador y
el filtro de aire, los cuales deberán de estar en buenas
condiciones en todo momento ya que detienen el fuego
en caso de una ignición incompleta en el motor.
• No fume cerca del generador.
15 Cerciórese que el generador esté conectado a tierra
correctamente (consulte la sección Puesta a Tierra del
Generador).
No use ropa demasiado holgada, alhajas o
16
cualquier otra cosa que se pueda atrapar en el
alternador u otras partes movibles.
17 La unidad debe de alcanzar la velocidad de operación
antes de conectarse las cargas eléctricas. Desconecte
as cargas antes de apagar el motor.
18 Para evitar sobrecargas que podrían dañar el equipo,
no permita que el motor se quede sin combustible al
aplicarse las cargas eléctricas.
19 Al dar carga a un equipo de estado sólido, debe utilizarse
un protector de sobrecarga para evitar posibles daños
al equipo.
20 No coloque nada a través de las ranuras de ventilación,
aun cuando el generador no esté en operación.
Esto puede dañar al generador o causar lesiones
personales.
21 Antes de transportar el generador en vehículo, extraiga
todo el combustible para evitar la posibilidad de fugas
o derrames.
22 Use técnicas correctas para alzar el generador de un
lugar a otro. De lo contrario, podrían producirse lesiones
personales.
23 Para evitar quemaduras, no toque el silenciador del
motor u otras superficies del generador que se hayan
calentado durante la operación.
24 No modifique el deflector de calor.
PRECAUCIONES DE RUIDO
El generador puede producir elevados niveles de sonido,
un nivel de sonido prolongado arriba de 85 dB es dañino
para el oído. Utilice protección para los oídos cuando
esté operando alrededor del generador mientras está
encendido.
ESPECIFICACIONES SUJETAS A CAMBIO SIN PREVIO AVISO
COMO DETERMINAR LA POTENCIA
1
2
3
A fin de evitar la sobrecarga y los posibles daños a su
generador, resulta necesario conocer la potencia total de
la carga conectada. Para determinar a qué herramientas
y/o equipos electrodomésticos su generador hará
funcionar, siga los pasos a continuación:
Determine si desea hacer funcionar un aparato o varios
aparatos simultáneamente.
Verifique los requerimientos de potencia de arranque
y de funcionamiento de los aparatos fijándose en la
carga especificada en la etiqueta o ayúdese utilizando
los valores de la Tabla 1 o calculándola (multiplique
volts x amperes).
Sume la potencia necesaria de arranque y de
funcionamiento de cada aparato. Si la etiqueta solo le
da el voltaje y el amperaje, entonces multiplique volts
x ampes = watts. 1kW = 1,000 watts.
4 Los electrodomésticos o las herramientas impulsadas
5
6
7
por motores requieren más potencia que lo especificado
en su placa de datos para arrancar.
NOTA: Considere 2 ½ - 4 veces la potencia marcada
para arrancar al equipo.
Los watts unitarios del generador deberían coincidir o
superar el número de watts que requiere el equipo que
usted desea arrancar.
La potencia continua del generador disminuye de
acuerdo a la temperatura y la altitud del lugar donde se
está usando, utilice la tabla de corrección de potencia
y multiplique el factor de corrección por la potencia
nominal indicada en la hoja de especificaciones.
Siempre conecte la carga más grande primero, y luego
agregue los demás equipos uno por uno.
PRECAUCION
REQUERIMIENTO DE VOLTAJE
Se deberá de utilizar un acondicionador (regulador) de línea
cuando se operen uno o más de los siguientes equipos de
estado sólido:
• Control para abrir la cochera o garaje.
• Equipos de cocina con visualización digital.
• Televisores.
• Estéreos.
• Computadoras personales.
• Relojes de cuarzo.
• Máquinas fotocopiadoras.
• Equipo telefónico.
ESPECIFICACIONES SUJETAS A CAMBIO SIN PREVIO AVISO
Los requerimientos de voltaje y frecuencia
operativa de todos los equipos electrónicos
deben comprobarse antes de enchufarlos
a este generador. Pueden ocurrir daños
si el equipo no está diseñado para operar
dentro de una variación de voltaje de +/- 10%
y una variación de frecuencia de +/- 3 Hz de
los valores nominales que aparecen en la
placa de datos de el generador. A fin de evitar
daños, siempre tenga una carga adicional no
de estado sólido enchufada al generador en
caso de usarse solamente equipo de estado
sólido (tales como un aparato de televisión).
También podría resultar necesario un regulador
de línea eléctrica para algunas aplicaciones de
equipo de estado sólido.
15
instalacion
ADVERTENCIA
Para evitar posibles lesiones físicas o daños
materiales, es necesario que la instalación
y todo el servicio sea realizado por un
electricista profesional o representante
de servicio autorizado. Bajo ninguna
circunstancia debe permitirse que una persona
que no está capacitada trate de manipular cables
dentro del circuito de la compañía suministradora
del servicio eléctrico.
1 Para evitar la retroalimentación a los sistemas de
2
3
4
suministro, se requiere el aislamiento del sistema
eléctrico residencial.
Antes de realizar la conexión temporal del generador
hacia el sistema eléctrico residencial, apague o
desconecte el servicio principal.
Si el generador va usarse como fuente de energía de
reserva en caso de un fallo del suministro eléctrico, debe
de ser instalado por un electricista calificado de acuerdo
con todos los códigos eléctricos locales aplicables.
El uso apropiado requiere la instalación de un interruptor
de transferencia de doble tiro por un electricista
capacitado y calificado para asegurar que los circuitos
eléctricos del edificio puedan ser conmutados con
seguridad entre el suministro eléctrico y la salida del
generador, evitando de este modo la retroalimentación
hacia el sistema de suministro eléctrico.
ADVERTENCIA
Para evitar la retroalimentación hacia
los sistemas de suministro eléctrico, se
requiere el aislamiento del sistema eléctrico
residencial. Antes de realizar la conexión
temporal del generador al sistema eléctrico
residencial, apague el interruptor principal.
Antes de hacer las conexiones permanentes, debe
de instalarse un interruptor de transferencia de
doble tiro. Para evitar la electrocución o daños a la
propiedad, solo debe de ser un electricista calificado
el que conecte el generador al sistema eléctrico
residencial.
Las leyes de California requieren el aislamiento del
sistema eléctrico residencial antes de conectar un
generador a los sistemas eléctricos residenciales.
16
5 Siempre siga los códigos y regulaciones locales que se
aplican a la instalación de cualquier equipo que tenga
relación con este producto.
NFPA 70- Código Nacional Eléctrico.
NFPA 30- Estándar para la instalación y uso de motores
estacionarios de combustible.
Manual de cableado agrícola de la energía eléctrica en
posición auxiliar para granjas.
ANTES DE LA INSTALACION
2 PUESTA A TIERRA DEL GENERADOR
EL Código Nacional Eléctrico requiere que este producto
se conecte adecuadamente a una puesta de tierra para
prevenir un choque eléctrico. Para este propósito, se
proporciona una terminal de tierra conectada al marco
del generador. Conecte una punta de un cable de cobre
desnudo (calibre 12 AWG mínimo) a la terminal de tierra
situada en el marco del equipo (se identifica por una
calcomanía con el símbolo de tierra física ver figura abajo)
y la otra punta del cable a una varilla de cobre enterrada
en el suelo (1metro) la cual deberá proporcionar una
conexión a tierra adecuada. Sin embargo, consulte con
un electricista local para asegurarse que los códigos
locales se cumplen adecuadamente.
Terminal de puesta a tierra
Conectar un cable de cobre
desnudo # 12 AWG entre la
terminal de tierra y un punto de
aterrizado adecuado
ADVERTENCIA
No use tubería que conduzca materiales
combustibles como punto de conexión a
tierra.
2 LUBRICACION
NO intente arrancar este motor sin llenar el carter con
la cantidad y el tipo de aceite adecuado. (Utilice aceite
SAE 30). Su generador ha sido enviado de fábrica sin
aceite en el carter. El operar la unidad sin aceite puede
arruinar el motor.
Llene el motor con aceite de acuerdo con el manual del
motor. En este motor el tapón de plástico del carter por
donde se le llena de aceite contiene la bayoneta con las
marcas de lleno y vacío.
ESPECIFICACIONES SUJETAS A CAMBIO SIN PREVIO AVISO
2 Refiérase a la tabla para los calibres mínimos de
3
4
3 EL SENSOR DE BAJO NIVEL DE ACEITE
4
Esta unidad esta equipada con un sensor de nivel bajo
de aceite. Inicialmente, si el nivel de aceite es menor
que el requerido, el sensor activará un artefacto y parará
el motor. (Consulte el manual adjunto del motor para
más información)
Si se apaga el generador y el nivel de aceite se
encuentra dentro de las especificaciones, verifique
que el generador no esté colocado a un ángulo que
obligue a que el aceite varíe su nivel. Colóquelo sobre
una superficie pareja para corregir este problema. Si
el motor no arranca, el nivel de aceite podría no ser el
suficiente como para desactivar el interruptor de bajo
nivel de aceite. Asegúrese de que el tapón de aceite
marque que está en nivel correcto.
COMBUSTIBLE
Llene el tanque con gasolina sin plomo para automóviles,
limpia y nueva. Puede usarse gasolina de grado regular
siempre y cuando se obtenga un valor alto de octanaje
(por lo menos 85 octanos). Recomendamos que
siempre utilice un aditivo de gasolina. Un aditivo de
gasolina minimizará la formación de depósitos de goma
de gasolina durante el almacenamiento. El aditivo de
gasolina puede agregarse a la gasolina en el tanque de
combustible o junto con la gasolina en un contenedor
de almacenamiento.
El combustible y el humo del motor son flamables, y
potencialmente explosivos. Utilice un procedimiento
adecuado para almacenar y manejar combustible.
Siempre tenga extinguidores ABC a la mano.
PRECAUCION
No llene demasiado el tanque. Mantenga
un nivel máximo de combustible a ¼ de
pulgada por debajo de la parte superior
del tanque de combustible. Esto permitirá
la expansión durante el clima cálido, evitando así
el derrame.
Extensiones electricas
1
Todas las cargas del generador serán conectadas al
panel mediante extensiones o cables y deberán ser
hechas con clavijas o enchufes aterrizados de 3 espigas
para los receptáculos de 120 volts y con clavijas o
enchufes de 4 espigas para los receptáculos de 120/240
volts.
5-20P
5
6
7
8
extensión eléctrica de acuerdo con las necesidades de
las cargas.
Cuando la carga aumenta debe de utilizarse una
extensión de cable de calibre mayor. Utilizar extensiones
de calibre inadecuado puede causar serios problemas
con el voltaje, dando como resultado una pérdida de
energía y el daño de las herramientas.
Cuanto más pequeño es el número del calibre del cable
mayor es la capacidad de conducción. Un cable calibre
14, por ejemplo, puede conducir una corriente más alta
que un calibre 16.
Cuando hay varias extensiones conectadas debe de
revisarse que cada extensión sea del calibre mínimo
de cable requerido.
Si se utiliza una extensión con salidas para más de una
herramienta sume los amperes de placa de datos de
cada una de las herramientas para determinar el tamaño
minimo del calibre del cable de la extensión.
Las extensiones para salidas a 120 volts son de 3
conductores, donde el conductor verde es el cable de
tierra, el conductor blanco es la conexión al neutro del
generador, y el conductor negro es el cable vivo.
Las extensiones para salidas de 120/240 son de 4
conductores, donde el conductor verde es el cable
de tierra, el conductor blanco es la conexión al neutro
del generador, y los conductores negro y rojo son los
vivos.
desempaque
Cuando desempaque el generador, asegúrese de que
todas las piezas esten completas, vea la sección de
Explosivo de Partes y Listado de Partes que están al
final de este manual.
Si alguna de las piezas no está o se encuentra en mal
estado, por favor diríjase a nuestro distribuidor lo más
pronto posible.
preparacion e instalacion del
generador
1 Coloque el generador al aire libre en donde será
2
3
4
utilizado. Esto debe de ser en una superficie plana,
y lejos de materiales flamables. No permita que el
generador se moje.
Llene el depósito de combustible (al aire libre) hasta 21
litros de gasolina, no llene el tanque hasta el tope.
Agregue 1.2 litros de aceite al motor quitando la
bayoneta que se localiza a un lado del motor. Utilice
aceite SAE 30. Utilice un embudo para evitar el derrame
de aceite.
Revisar el nivel de aceite con una bayoneta; esta debe
marcar “lleno”. Coloque cuidadosamente el tapón de
aceite, para evitar que los hilos de la rosca se dañen.
Antes de conectar los equipos al generador, revise
que se encuentren en posición de apagado. Vaya a
la sección COMO DETERMINAR LA POTENCIA. No
sobrecargue el generador. Calcule la potencia total de
los equipos. La potencia máxima del generador está
indicada en la hoja de especificaciones
L14-30P
ESPECIFICACIONES SUJETAS A CAMBIO SIN PREVIO AVISO
17
conexiones del generador
ADVERTENCIA
Si el generador va a ser utilizado para sustituir
energía en épocas de interrupciones, la entrada
de energía debe ser aislada. Refiérase a las
medidas de seguridad eléctricas del generador
en la sección INSTALACION.
Estas conexiones se deben hacer solamente por
un electricista calificado.
Todo escape de motor contiene monóxido de
carbono, un gas mortal. Respirar monóxido de
carbono puede provocar dolor de cabeza, mareos,
nauseas, confusión y eventualmente la muerte.
El monóxido de carbono es un gas letal, inodoro e
invisible. Que se puede presentar aunque usted no vea
o huela ningún escape de motor. Niveles mortales de
monóxido de carbono se pueden acumular rápidamente
y usted puede perder habilidad para salvarse. También,
niveles mortales del monóxido de carbono pueden
guardarse por horas o días, en áreas cerradas o con
poca ventilación.
Si usted experimenta cualquier sintoma de envenenamiento,
obtenga aire fresco y busque ayuda médica.
Para prevenir daños serios o la muerte por monóxido
de carbono:
NUNCA encienda motores en interiores. Aunque trate
de ventilar el escape de la máquina con ventiladores,
ventanas o puertas abiertas, el monóxido de carbono
rápidamente puede alcanzar niveles peligrosos.
NUNCA encienda motores en áreas poco ventiladas o
parcialmente cerradas. Areas como bodegas, cocheras,
sótanos, viviendas, habitaciones, etc.
NUNCA encienda motores afuera, cuando los gases del
escape del motor puedan introducirse en construcciones
por aberturas como ventanas o puertas.
ARRANQUE del generador
PRECAUCION
Este producto contiene o produce quimicos,
cuando es utilizado, conocidos por el
estado de California como causantes de
cáncer, defectos de nacimiento y otros
daños severos. (California Código de
Salud y Seguridad 25249.5 et seq.)
18
ADVERTENCIA
La gasolina es muy peligrosa. Si la gasolina
hace contacto con superficies calientes puede
ocasionar lesiones serias o la muerte.
1. No llene el tanque de combustible con el motor
en marcha.
2. Apague su motor y espere 2 minutos antes de
llenarlo de combustible
3. No derrame combustible al volver a llenar el
tanque.
4. No mezcle aceite con gasolina.
5. Siga las instrucciones y advertencias contenidas
en el manual de motor.
ESPECIFICACIONES SUJETAS A CAMBIO SIN PREVIO AVISO
COMO APLICAR UNA CARGA
preCAUCIONES ANTES DE
ARRANCAR
Esta unidad ha sido previamente verificada y ajustada
para manejar su capacidad máxima. Al arrancar el
generador, desconecte todas las cargas. Aplique la
carga solamente después de que el generador esté
funcionando. El voltaje se regula por medio de la
velocidad del motor ajustada en fábrica para la salida
correcta. Mover la velocidad del motor le hará perder
la garantía.
Antes de arrancar el generador, verifique si hay piezas
sueltas o faltantes y si hay cualquier tipo de daño que
pudiera haber ocurrido durante el envió.
ADVERTENCIA
Este generador no debe operase sin tener
colocado el deflector contra el calor instalado de
fábrica. Si no se hace ésto, podría recalentarse
el tanque de combustible, pudiendo ocurrir un
incendio que cause lesiones personales.un
electricista calificado.
ARRANQUE del MOTOR
1
2
3
4
5
6
Revise el nivel de aceite.
Desconecte todas las cargas eléctricas de la unidad.
Abra la válvula de cierre de combustible.
Si el motor esta frío mueva la palanca del ahogador
hacia la derecha.
Mueva el interruptor de apagado-encendido a la posición
“ON”.
Jale la cuerda del retráctil del motor, si es de arranque
manual (de un tiron rápido y parejo), o gire la llave de
switch de encendido, si es de arranque eléctrico (lleve la
llave a la posición de “START”, y posteriormente suelte
la llave después que arranque el motor).
Después del arranque regrese la palanca del ahogador
a su posición original (hacia la izquierda)
PRECAUCION
Al aplicar una carga, no exceda la potencia
nominal máxima del generador al usar uno
o más receptáculos. Además, no exceda el
amperaje nominal de ningún receptáculo
individual.
APAGADO DEL GENERADOR
1
2
3
4
5
6
ARRANQUE INICIAL
PRECAUCION
PRECAUCION
Permita que el generador funcione sin carga
durante cinco minutos después de cada
arranque inicial para permitir que se estabilicen
el motor y el generador
No aplique una carga eléctrica fuerte
durante el periodo inicial de funcionamiento
(las primeras 2 ó 3 horas de operación).
Un procedimiento de arranque inicial controlado ayuda
a asegurar una operación correcta del motor y del
generador. Siga el procedimiento para el motor descrito
en el manual de motor.
PELIGRO
• Debe suministrar una ventilación adecuada
para los gases tóxicos de escape y el flujo de
aire que enfria al motor ( el motor es enfriado
por aire que es inyectado por su propio
ventilador)
• No encienda o arranque el generador en un área
cerrada, incluso si las puertas o ventanas están
abiertas.
• El motor despide monóxido de carbono, un gas
venenoso, inodoro e invisible.
• Aspirar monóxido de carbono puede ocasionar nausea,
desfallecimiento o la muerte.
ESPECIFICACIONES SUJETAS A CAMBIO SIN PREVIO AVISO
Retire toda la carga eléctrica.
Deje que el motor funcione por unos minutos sin
carga.
Mueva la llave del motor a la posición “OFF”. (Haga
girar la llave a “OFF” en los modelos de encendido
eléctrico)
No abandone el generador hasta que ya haya sido
detenido por completo.
Cierre la válvula de paso del combustible si el motor
debe colocarse en depósito o en transporte.
Si le va a colocar una cubierta, espere hasta que la
unidad se haya enfriado.
MANTENIMIENTO
1
ATENCION: Desconecte todos los enchufes o clavijas
del panel y el cable de la bujia si el motor es de
arranque electrico antes de cualquier inspección de
mantenimiento.
Antes de cada uso, revise las condiciones generales del
generador, revise que todas las piezas estén alineadas
completas, revise si hay cables dañados o alguna otra
condición que pueda afectar que el generador opere
de manera segura. Si se escucha un ruido extraño
o alguna vibracion anormal, apague el generador
imediatamente.
Asegúrese de arreglar ese problema antes de darle más
uso. No utilice el equipo dañado.
Inspeccione periódicamente todas las tuercas y tonillos
(que se encuentren en su lugar y apretados)
19
2 Guarde su equipo en un lugar limpio y seco.
3
4
5
6
Para el mejor mantenimiento del motor y cualquier otro
problema, acuda al manual de propietario del motor.
Después de que el motor se haya enfriado, remueva
la gasolina excedente y almacénela en un recipiente
seguro y aprobado para tal fin.
A las primeras 20 horas de uso del generador drene y
reemplace el aceite del motor, después de eso el aceite
debe de ser cambiado cada 100 horas de trabajo.
DEFLECTOR DE CALOR:
Inspecciónelo para asegurarse de que el deflector de
calor esté intacto y en su lugar. No retire ni modifique
ninguna pieza. Retirar o modificar estas piezas puede
causar daños serios a la unidad.
MOTOR: Congelamiento del carburador
Durante los meses de invierno, podrían desarrollarse
condiciones atmosféricas poco usuales que causen una
condición de congelamiento en el carburador. Si esto
ocurre, el motor podría funcionar mal, perder potencia
y detenerse. Para obtener mas información llame al
Centro de Servicio.
NOTA: Consulte el manual de fabricante del motor para
su servicio y mantenimiento.
CONSEJOS PARA UN ENCENDIDO
RAPIDO EN UNIDADES QUE HAN ESTADO
INHABILITADAS DURANTE UN TIEMPO
1
2
3
4
5
6
20
Si su unidad ha estado fuera de servicio durante un
periodo de tiempo extenso y es difícil que encienda,
intente realizar algunos de estos fáciles pasos antes
de llamar a la línea directa de información de servicio
al cliente.
Verifique el nivel de aceite.
Reemplace el combustible viejo.
Cambie la bujía de encendido.
Verifique los ductos de combustible. Asegúrese que la
válvula de combustible esté abierta.
Verifique la integridad de todas las piezas del
generador.
Limpie el carburador. (consulte el manual de motor para
obtener información sobre los centros de servicio)
servicio y almacenamiento
1
2
3
4
SERVICIO POCO FRECUENTE
Si la unidad no se utiliza frecuentemente, podrían
surgir dificultades para arrancar. Para eliminar estos
problemas, haga funcionar el generador por lo menos
30 minutos cada 15 días. Además, si la unidad no se va
a utilizar durante algún tiempo, es conveniente extraer el
combustible del carburador y del tanque de gasolina.
ALMACENAMIENTO A LARGO PLAZO
Cuando el equipo generador no se está operando o
está almacenado durante más de un mes, siga las
instrucciones siguientes:
Vuelva a llenar de aceite el motor hasta su nivel
superior.
Saque la gasolina del tanque de combustible, la línea
de combustible y del carburador.
Vierta hasta una cucharadita de aceite para motores a
través del orificio de la bujía, tire del retráctil varias veces
y coloque la bujía. Luego tire del arrancador hasta que
sienta que el pistón está en su carrera de compresión
y déjelo en esta posición. Esto cierra las válvulas de
entrada y escape para evitar que el interior del cilindro
se oxide.
Cubra la unidad y almacénela en un lugar limpio y seco
con buena ventilación y lejos de chispas o llamas.
NOTA: Recomendamos que siempre utilice un
estabilizador para combustible. Un estabilizador de
combustible minimizará la formación de depósitos de
goma de combustible durante el almacenamiento. El
estabilizador de combustible puede agregarse a la
gasolina en el tanque de combustible o junto con la
gasolina en un contenedor de almacenamiento.
ESPECIFICACIONES SUJETAS A CAMBIO SIN PREVIO AVISO
LEA CUIDADOSAMENTE
EL FABRICANTE HA PROVISTO EN ESTE MANUAL
E L D I B U J O E X P L O S I V O D E L P R O D U C TO ,
INCLUYENDO EL LISTADO DE LOS PRINCIPALES
COMPONENTES DEL MISMO, ÚNICAMENTE COMO
REFERENCIA PARA EL USUARIO FINAL. ELLO
NO IMPLICA QUE EL COMPRADOR Y/O USUARIO
FINAL ESTÁ AUTORIZADO PARA USAR ESTA
INFORMACIÓN COMO BASE PARA EFECTUAR POR
SÍ MISMO CUALQUIER REEMPLAZO DE PARTES
O REPARACIÓN AL PRODUCTO. EN PRINCIPIO,
EL FABRICANTE CONSIDERA AL COMPRADOR
Y/O USUARIO FINAL COMO NO CALIFICADO PARA
LLEVAR A CABO POR SÍ SOLO REEMPLAZO DE
PARTES Y REPARACIONES AL PRODUCTO. TODAS
LAS REPARACIONES Y REEMPLAZO DE PARTES
DEBEN SER LLEVADAS A CABO POR UN CENTRO
DE SERVICIO AUTORIZADO O POR PERSONAL
TÉCNICO PROBADAMENTE CALIFICADO. EL
COMPRADOR Y/O USUARIO FINAL ASUME TODO
RIESGO Y RESPONSABILIDAD LEGAL QUE SE
DERIVE DE REPARACIONES O REEMPLAZO DE
PARTES QUE EL O ELLA HAGAN POR SU CUENTA
SOBRE EL PRODUCTO ORIGINAL.
ESPECIFICACIONES SUJETAS A CAMBIO SIN PREVIO AVISO
21
DIAGRAMA DE ENSAMBLE G50
22
ESPECIFICACIONES SUJETAS A CAMBIO SIN PREVIO AVISO
GUIA DE INICIO RAPIDO
ARRANQUE MANUAL
1 Llene el motor con aceite SAE 10W-30 oil hasta 1.7
L y cheque que el nivel este justamente debajo de
“F”. Continuar hasta llegar antes de este nivel sin
exceder su capacidad máxima de 1.9L (2.0 qts.).
2 Llene el tanque de 25
litros con gasolina sin
plomo limpia y nueva de
85 octanos o superior.
Use un embudo para este
proceso. Se recomienda
no exceder la cantidad de
23 L, para dejar espacio
para los gases producidos
por la gasolina.
6 Mueva la palanca de “Choke” (Ahogador) hacia
la derecha
INSTRUCCIONES DE ENSAMBLE
1 Llantas y eje
Herramienta requerida: Ninguna
2 Manija de transporte
Mueva el switch a la
3 posición “ON”
4 Mueva la palanca de
Choke (ahogador) hacia
la izquierda.
5 Jale el retráctil en
u n movimiento lento
y controladopara
asegurarse de que no haya
nudos. Jale el retráctil
rapida y fuertemente.
Herramienta requerida: Llave
de 7/16”
3 Pata estacionaria
Herramienta requerida: Llave de 1/2”
Imported and Distributed by:
Nationwide Service Centers
Contact us 1•866•260•4843
e-mail: [email protected]
www.valsi.net
Call: 888-ready-19 (888-73239-19)