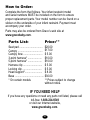
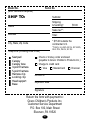
1
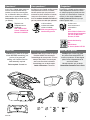
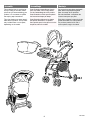
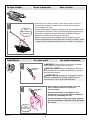
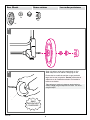
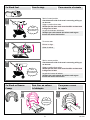
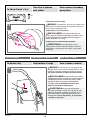
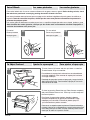
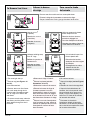
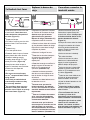
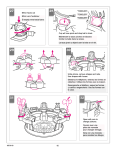
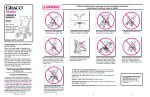
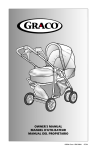
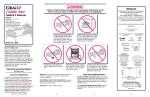
Stroller Owner’s Manual Please save for future use. Poussette Manuel d’utilisateur Veuiller garder pour usage ultérieur. Coche Manual del propietario Por favor, conservélo para utilizarlo en el futuro. 7586 & 7588 Model • Modèle • Modelo:_______________ Serial No. • No. de Série • N° de Serie:_______________ Dear Customer, Cher Client, Estimado cliente, Please fill in the model and serial numbers above from the label on the rear leg of your new stroller. Veuillez inscrire ci-haut les numéros de modèle et de série que vous trouverez sur l’étiquette située sur la jambe arrière de votre poussette. Complete los números de modelo y de serie arriba indicados, de la etiqueta en la parte trasera del coche. Merci de votre achat d’une poussette Graco®! ¡Gracias por comprar del coche Graco®! Graco est le chef de file dans la conception et la fabrication de produits de qualité pour bébé. Nous croyons que la poussette Graco® est un choix judicieux, garantissant plusieurs heures de plaisir pour votre bébé. Graco es el líder reconocido en el diseño y fabricación de productos infantiles de calidad. Creemos que su coche Graco® es una compra acertada y ofrecerá a su bebé muchas horas de placer. Thank you for purchasing this Graco® stroller! Graco is the recognized leader in the design and manufacture of quality baby products. We believe your new Graco® stroller is a wise choice, promising many hours of enjoyment for your baby. Before using your stroller, please take a few minutes to read this Owner’s Manual. The short time you spend reading these instructions will help you use your stroller properly. Avant d’utiliser la poussette, prenez quelques minutes pour lire le manuel d'utilisateur. Ce court instant que vous prendrez à lire les instructions vous aidera à utiliser correctement la poussette. Antes de usar su coche, dedique unos minutos a leer este manual del propietario. El poco tiempo que emplee en leer estas instrucciones le ayudará a utilizar su coche de manera correcta. © 2000 Graco 836-8-00 WARNING Failure to follow these warnings and the assembly instructions could result in serious injury or death. MISE EN GARDE Manquer de suivre ces avertissements et les instructions d'assemblage peut entraîner de sérieuses blessures ou un décès. ADVERTENCIA Si no se obedecan estas advertencias y se siguen las instrucciones de montaje, el resultado podrian ser lesiones graves o la muerte. NEVER LEAVE CHILD UNATTENDED. Always keep child in view while in stroller. NE LAISSEZ JAMAIS VOTRE ENFANT SANS SURVEILLANCE. Ayez toujours l’enfant en vue. NUNCA DEJE A SU NIÑO DESATENDIDO. Siempre tenga su niño a la vista. DO NOT LIFT THE STROLLER by the child’s tray. NE PAS SOULEVER LA POUSSETTE par le plateau pour enfant. NO LEVANTE EL COCHE agarrándolo de la bandeja del niño. NEVER USE STROLLER ON STAIRS OR ESCALATORS. You may suddenly lose control of the stroller or your child may fall out. Also, use extra care when going up or down a step or curb. SOYEZ CONSCIENT(E) DES DANGERS À UTILISER LA POUSSETTE DANS LES ESCALIERS OU LES ESCALIERS ROULANTS. L’enfant pourrait tomber ou vous pourriez perdre le contrôle de la poussette. Aussi, soyez très prudent lorsque que vous montez et descendez une marche ou le bord du trottoir. NUNCA USE EL COCHE EN LAS ESCALINATAS O LAS ESCALERAS MECÁNICAS. Usted puede perder súbitamente el control del coche, o su niño podrá caerse. Asimismo, tenga cuidado especial cuando suba o baje un escalón o la calzada. BE CERTAIN THE STROLLER IS FULLY ERECTED AND LATCHED before allowing your child near the stroller. DO NOT PLACE PURSES, SHOPPING BAGS, PARCELS AND ACCESSORY ITEMS ON HANDLE OR CANOPY. They may fall on the child or change the balance of the stroller and make it unstable. AVOID STRANGULATION. DO NOT place items with a string around your child’s neck, suspend strings from this product, or attach strings to toys. USE OF THE STROLLER WITH A CHILD weighing more than 40 lbs (18.1 kg) will cause excessive wear and stress on the stroller. Use the stroller with only one child at a time. SOYEZ ASSURÉ(E) QUE LA POUSSETTE EST BIEN DROITE ET QUE LES LOQUETS SONT BIEN ENCLENCHÉS avant de laisser votre enfant près de la poussette. NE PAS PLACER LES SACS À MAINS, LES SACS DE MAGASINAGE, ACCESSOIRES ET COLIS SUR LE GUIDON OU LE BALDAQUIN. Ils risquent de tomber sur l’enfant ou de rendre la poussette instable. ÉVITEZ D’ÉTRANGLEMENT. NE JAMAIS accrocher des objects avec ficelles autour du cou de votre enfant, suspendre des ficelles au-dessus de ce produit, ou attacher des jouets à des ficelles. L’USAGE DE LA POUSSETTE AVEC UN ENFANT pesant plus de 40 lb (18,1 kg) occasionnera une usure et une tension excessive à la poussette. Utilisez la poussette avec seulement un enfant à la fois. 836-8-00 2 ASEGÚRESE DE QUE EL COCHE ESTÉ TOTALMENTE erguido y trabado antes de que el niño esté cerca del coche. NO PONGA CARTERAS, BOLSAS, PAQUETES O ACCESORIOS EN LA MANIJA O LA CAPOTA. Pueden caerle encima al niño, o desequilibrar el coche y hacerlo inestable. ¡EVITE LA ESTRANGULACIÓN! No coloque artículos con cuerdas alrededor del cuello del niño, o suspenda cuerdas del coche, o coloque cordones en los juguetes. SI USA EL COCHE PARA UN NIÑO que pese más de 40 libras (18,1 kg.) causará desgaste y tensión excesiva en el coche. Empléelo solamente con un niño a la vez. WARNING TO PREVENT A HAZARDOUS CONDITION, do not place more than 10 lbs (4.5 kg) in the storage basket. DO NOT use storage basket as a child carrier. DO NOT ALLOW YOUR CHILD to stand on the basket. It may collapse and cause injury. NEVER ALLOW YOUR STROLLER to be used as a toy. STROLLER TO BE USED only at walking speed. Product not intended for use while jogging, skating, etc. DISCONTINUE USING YOUR STROLLER should it become damaged or broken. DO NOT USE SEAT in an automobile. DO NOT USE AS A CAR BED. DO NOT lift, REVERSE OR CARRY THE SEAT while child is in the seat. MISE EN GARDE ADVERTENCIA POUR ÉVITER DES CONDITIONS HASARDEUSES, ne placez jamais plus de 10 lb (4,5 kg) dans le panier ou plus de 3 lb (1,4 kg) dans le plateau pour adulte. NE PAS utiliser le panier comme porte-bébé. PARA PREVENIR UNA SITUACIÓN PELIGROSA, no coloque más de 10 libras (4,5 kg) en la cesta o no coloque más de 3 libras (1,4 kg.) en la bandeja para padres. No use dicha canasta como portadora de niño. NE LAISSEZ PAS VOTRE ENFANT debout sur le panier. Il pourrait s’écrouler et causer des blessures. NO DEJE QUE SU NIÑO se pare en la canasta. Puede desmoronarse y causar daño. NE JAMAIS UTILISER LA POUSSETTE comme un jouet. NUNCA DEJE QUE EL COCHE sea usado como juguete. LA POUSSETTE DOIT ÊTRE UTILISÉE pour la marche seulement. Ce produit n’est pas conçu pour usage pendant la course à pied, pour patiner, etc. EL COCHE DEBE SER USADO solamente a velocidad de caminar. El producto no está destinado para usarlo mientras está corriendo, patinando, etc. CESSEZ L’USAGE DE VOTRE POUSSETTE si elle devient endommagée ou brisée. PARE DE USAR EL COCHE si éste se daña o se quiebra. NE PAS UTILISER LE SIÈGE dans une automobile. NE PAS UTILISER COMME LIT D'AUTOMOBILE. NE PAS SOULEVER, INVERSER OU TRANSPORTER lorsque l'enfant east dans le siège. 3 NO USE EL ASIENTO en un automóvil. NO LO USE COMO UNA CAMA EN EL AUTOMÓVIL. NO LEVANTE, INVIERTA NI TRANSPORTE EL ASIENTO mientras el niño esté sentado. 836-8-00 Questions? Des questions? ¿Preguntas? In the U.S.A. or Canada, please contact our Customer Service Department with any questions you may have concerning parts, use, or maintenance. When you contact us, please have your product’s model and serial numbers ready so that we may help you efficiently. Aux Etats-Unis ou au Canada, veuillez contacter notre département du service à la clientèle avec des questions que vous pourriez avoir concernant les pièces, l'utilisation ou l'entretien. Lorsque vous nous contactez, soyez prêt à fournir les numéros de modèle et de série afin que nous puissions vous aider plus rapidement. En los EE.UU. y Canadá, por favor contacte a nuestro Departamento de Servicio al Cliente con cualquier pregunta que pueda tener sobre las piezas, uso o mantenimiento. Cuando nos contacte, por favor tenga el número del modelo y número de serie listos para que podamos ayudarlo mejor. Telephone us at: Téléphonez-nous au: Llámenos al: USA: 1-800-345-4109 Canada: 1-800-667-8184 Montreal: 514-344-3533 or visit our website, ou visitez notre website, o visitar a el website, or write to us at: sinon, écrivez-nous à: o nos escribir a: USA: www.gracobaby.com Canada: www.graco.net USA: Graco Children’s Products Inc. Customer Service Department P.O. Box 100, Main Street Elverson, PA 19520 Canada: distributed by Elfe 4580 Hickmore St. Laurent, Quebec H4T 1K2 Parts list Liste des pièces Lista de las piezas Adult assembly required. Assurez-vous d'avoir toutes les pièces illustrées AVANT de commencer l'assemblage de votre produit. S'il vous manque des pièces, communiquez avec notre service à la clientèle. Verifique que cuenta con todas las piezas mostradas ANTES de montar su producto. Si falta alguna pieza, llame al departamento de servicio al cliente. Tools required: Screwdriver Assemblage par un adulte requis. Montaje requiere por un adulto. Outils nécessaires: Tournevis Herramienta necesaria: Destornillador Check that you have all the parts shown BEFORE assembling your product. If any parts are missing, call Customer Service. 2X 3X 836-8-00 3X 4 2X 2X 2X Assembly Assemblage Montaje This exploded view is provided as a way to help you see the overall picture as you are assembling your product. It is not meant to replace the step-by-step instructions. Cette illustration agrandie est fournie pour vous aider à voir l'image totale lors de l’assemblage de votre produit. Cette illustration ne doit pas remplacer les instructions étape par étape. Se proporciona este plano explotado para darle una perspectiva global para el montaje de su producto. No está destinado a remplazar las instrucciones paso por paso. This view shows most parts associated with this product. Your product may include fewer or more parts, depending on the model. Cette illustration démontre la plupart des pièces associées à ce produit. Votre produit peut inclure plus ou moins de pièces, selon le modèle. Este plano muestra la mayoría de las piezas asociadas con este producto. Su producto puede incluir más o menos piezas, según el modelo. 5 836-8-00 Ouvrir la poussette To Open Stroller Abrir el coche Slide seat out from frame; set aside. Open stroller frame on carton by lifting handle until latches on both sides are locked. Remove parent’s tray if snapped onto frame. 1 SNAP! ENCLENCHEZ! ¡CHASQUEO! Glissez le siège hors de l'armature; mettre de côté. Ouvrez l'armature de la poussette sur la boîte en carton en soulevant le guidon jusqu'à ce que les loquets de sûreté sur les deux côtés soient verrouillés. Enlevez le plateau pour adulte s'il est enclenché sur l'armature. Deslice el asiento del armazón; apártelo. Abra el armazón del coche sobre la caja levantando la manija hasta que se traben las trabas a ambos costados. Saque la bandeja para padres si se ha trabado en el armazón. Les roues avant Front Wheels 2 Las ruedas delanteras WARNING Choking Hazard: remove and immediately discard plastic end caps on the front leg pins. MISE EN GARDE Danger d'étranglement: Enlevez et jetez immédiatement les embouts de plastique sur les tiges des pieds de base avant. 2X ADVERTENCIA de peligro de estrangulación: Saque y deseche inmediatamente las tapas de plástico de los extremos de las clavijas de las patas delanteras. After snapping on wheel assembly, check that wheel is securely attached by pulling on wheel assembly. 3 Après avoir enclenché l'assemblage de roue, assurez-vous que la roue est attachée solidement en tirant sur l'assemblage de roue. Después de trabar el equipo de la rueda, verifique que esté seguramente conectado tirando del equipo de la rueda. SNAP! ENCLENCHEZ! ¡CHASQUEO! 836-8-00 6 Rear Axle L’essieu arrière El eje trasero 4 Brake levers point toward you. Leviers des freins vers vous. Las palancas del freno deben apuntar hacia usted. SNAP! ENCLENCHEZ! ¡CHASQUEO! WARNING Choking Hazard: remove and immediately discard plastic end caps on the axle pins. After snapping on rear axle, check that rear axle is securely attached by pulling on brake assembly. MISE EN GARDE Danger d'étranglement: Enlevez et jetez immédiatement les embouts de plastique sur les tiges des pieds de base avant. Après avoir enclenché l'essieu arrière, assurez-vous que l'essieu arrière est attaché solidement en tirant sur l'assemblage du frein. ADVERTENCIA de peligro de estrangulación: Saque y deseche inmediatamente las tapas de plástico de los extremos de las clavijas de las patas delanteras. Después de trabar el eje trasero, verifique que el eje trasero esté seguramente conectado tirando del equipo de frenos. 7 836-8-00 Roues arrières Rear Wheels 2X Las ruedas posteriores 2X 2X 2X 5 Snap red retainer (wide end toward wheel) on first. Then snap cover over retainer. Snap plug on last. 6 Enclenchez la rondelle de maintien rouge (extrémité large vers la roue) en premier. Ensuite, enclenchez le capuchon sur la rondelle de maintien. Enclenchez le bouchon en dernier. Trabe primero el retén rojo (extremo ancho hacia la rueda). Luego ponga la tapa sobre el retén. Por último ponga el tapón. SNAP! ENCLENCHEZ! ¡CHASQUEO! 836-8-00 8 Fixer le siège To Attach Seat Para conectar el asiento Seat in forward position. Check that each side of the seat is secure by pulling up on the seat. 7 SNAP! ENCLENCHEZ! ¡CHASQUEO! Siège en position face avant. Vérifiez que les deux cotés sont vérouillés en tirant sure le siège vers le haut. La posicion delantera del asiento. Verifique que cada costado del asiento esté seguro tirando del asiento hacia arriba. To remove seat. 8 Enlever le siège. Quitar el asiento. Seat in reverse position. Check that each side of the seat is secure by pulling up on the seat. 9 SNAP! ENCLENCHEZ! ¡CHASQUEO! To Attach or Remove Canopy Siège en position face arrière. Vérifiez que les deux cotés sont vérouillés en tirant sure le siège vers le haut. La posicion inverso del asiento. Verifique que cada costado del asiento esté seguro tirando del asiento hacia arriba. Pour fixer ou enlever le baldaquin 10 Para poner o sacar la capota 11 SNAP! ENCLENCHEZ! ¡CHASQUEO! 9 836-8-00 Pour fixer le plateau pour adulte To Attach Parent’s Tray Para conectar la bandeja para padres 2X Check that screws are tight. 12 WARNING To avoid burns, never put hot liquids in the parent’s tray. To prevent tipping, do not place more than 3 lbs (1.4 kg) on the parent’s tray. Vérifiez que les vis sont serrées. MISE EN GARDE Pour éviter les brûlures, ne jamais mettre de liquides brûlants dans ce plateau. Pour ne pas déséquilibrer la poussette, NE PAS charger le plateau à plus de 3 lb (1,4 kg). Verifique que los tornillos estén ajustados. ADVERTENCIA Evite quemaduras, nunca ponga liquidos calientes sobre la bandeja. Para evitar volcamientos, no ponga mas de 3 libras (1,4 kg) sobre la bandeja. To Use Stroller To Recline Seat Pour utiliser la poussette Pour incliner le siège Para usar el coche Para reclinar el asiento WARNING Child may slip into leg openings and strangle. Never use in reclined carriage position unless footrest is completely raised and locked into position. See figures 20 and 21 to adjust and lock footrest. 13 MISE EN GARDE ne jamais utiliser en position complètement inclinée à moins que le repose-pied soit complètement élevé et verrouillé en place. L'enfant peut glisser dans les ouvertures des jambes et s'étrangler. Voir les illustrations 20 et 21 pour ajuster et verrouiller le repose-pied. ADVERTENCIA No use nunca la posición totalmente reclinada a menos que el apoya pie esté totalmente levantado y trabado en posición. El niño podría caerse por las aberturas para las piernas y estrangularse. Vea las figuras 20 y 21 para ajustar y trabajar el apoya pie. 836-8-00 10 Replacement Parts (USA) Piezas de repuesto (EE.UU) Complete the form below. Your stroller model number MUST be included on the form to ensure proper replacement parts. Your model number can be found on the rear leg of the stroller. Payment must accompany your order. Complete el formulario a continuación. El número de modelo de su coche DEBE incluirse en este formulario para asegurarse de que recibirá las piezas de repuesto apropiadas. El número de modelo puede encontrarse en la pata trasera del coche. El pago en dólares estadounidenses debe incluirse con el pedido. Return the form with payment to: GRACO Children’s Products Inc. Customer Service Department P.O. BOX 100, Main Street Elverson, PA 19520 Devuélvase con pago a: GRACO Children’s Products Inc. Customer Service Department P.O. BOX 100, Main Street Elverson, PA 19520 Replacement Parts (Canada) To purchase parts in Canada, contact Elfe at 1-800-667-8184 (Montreal: 514-344-3533 Fax: 514-344-9296). Des pièces de remplacement (au Canada) Pour commander les pièces au Canada, communiquez avec Elfe au 1-800-667-8184 (Montréal: 514-344-3533 Fax: 514-344-9296). Questions? Telephone us at: • ¿Preguntas? Llámenos al: 1-800-345-4109 • Circle the part you need. • Marque con un círculo el repuesto que necesita. 1 2 Must be filled in: Debe completarse: Total • Total: Model No. N° de modelo Sales tax**: Impuestos**: Shipping & handling*: Gastos de envío*: $5.00 Total due: Total a pagar: *$15.00 outside the continental U.S. *US$ 15,00 para fuera del continente de EE.UU **CA 6%, IL 6.25%, IN 5%, NY 8.25%, OH 5.75%, PA 6%, SC 5% Serial No. N° de serie $25.00 $18.00 3 Ship to • Enviar a: 5 4 Name • Nombre Address • Dirección City, State, Zip • Ciudad, Estado, Código postal $15.00 $16.00 ( ) Telephone • Telefóno $16.00 7 1X 8 Check or money order enclosed (payable to Graco Children’s Products Inc.) Cheque o giro adjunto (a nombre de Graco Children's Products Inc.) 6 2X $11.00 Charge to credit card • Cargar a la tarjeta de crédito Account #: • Cuenta N°: $8.00 Visa Mastercard Discover $16.00 9 3X 3X 2X no charge Exp. date • Fecha de vencimiento: Signature • Firma: sin costo 10 11 2X $12.00 $15.00 11 836-8-00 836-8-00 12 Ê IMPORTANT! ! 1. Mr. 2. Mrs. Product Registration Card 3. Ms. IMPORTANT! 4. Miss First Name: 238 A Initial: Last Name: Address: (Number and Street) Thank you for your purchase of a Graco product. Your input regarding this product is very important to us. 3 RECEIVE FUTURE INFORMATION By returning this card, you will help us to notify you of any issues concerning this product. HELP US DEVELOP NEW PRODUCTS We value your input. Your responses will help us develop new products specifically designed to meet your needs. @ Phone #: $ Store Name: ^ DETACH HERE BEFORE MAILING 2 REGISTER YOUR PRODUCT We will keep the model number, serial number, and date of purchase of your Graco product on file. State: City: Return this card today to: 1 Apt. #: # % Record Model Number and Serial Number: (These can be found on the white label on the product) Model Number & * ( BL BM BN BO BP Serial Number Was this purchase a: 1. Gift? 2. Self purchase? Is this your first child? 1. Yes 2. No In what trimester was your purchasing decision made? 1. 1st 2. 2nd 3. 3rd This child is: 1. Male 2. Female How did you first hear about this Graco product? 5. Store Flyer 1. Word of Mouth 2. Salesperson 6. Catalog 3. In-Store Display 7. Other 4. Magazine Ad Check the three (3) most important reasons why you purchased this Graco product: 1. Received as a Gift 2. Fabric Design / Appearance 3. Frame Design / Style 4. Graco Reputation 5. Recommendation of Salesperson 6. Recommendation of Friend / Family 7. Value for Price 8. Magazine Advertisement 9. Ease of Operation 10. Light Weight 11. Product Features 12. Sale / Promotion 13. Prior Experience with Graco What other brands did you consider? 1. Graco was the only brand considered 2. Century 6. Fisher Price 3. Combi 7. Gerry 4. Cosco 8. Other ______________________________________________________ 5. Evenflo Have you purchased Graco products before? 2. No 1. Yes BQ BR BS BT BU CL CM CN I am a: 1. Parent Zip Code: 2. Grandparent Date of Purchase: Month Day Year Where do you and your family do most of your shopping? 1. Shopping Mall 2. Discount Store 3. Specialty Store Baby’s date of birth: (or due date) Month Day Year Month Day Year Date of Your birth: For your primary residence, do you: 2. Rent? 1. Own? Your marital status: 1. Married 2. Single Education (Please check which category applies): 1. High School 3. Completed College 2. Some College 4. Graduate School Including yourself, what is the total number of people living in your household? (Examples: 01, 02, 03, 04...) NOT including yourself, what are the AGES of the other people living in your household? Age (in years) Male: Female: CO CP Which best describes your family income? 1. Under $15,000 5. $50,000-$74,999 2. $15,000-$24,999 6. $75,000-$100,000 3. $25,000-$34,999 7. $100,000-$149,999 4. $35,000-$49,999 8. Over $150,000 In the last 6 months have you or your spouse: 1. Purchased clothes through the mail? 2. Purchased gifts through the mail? 3. Worked in your garden? 4. Traveled on vacation? 5. Purchased through television shopping? 6. Purchased two or more books? 7. Purchased cassettes or CDs? 8. Donated to wildlife / environmental causes? 9. Donated to charities? Thanks for taking time to fill out this questionnaire. Please check here [ ] if you do not wish to learn more about Graco or obtain information on new ideas from other exciting companies. 13 836-8-00 THANK YOU FOR CHOOSING Please send other correspondence to: PRODUCT REGISTRATION CARD Graco Children’s Products Inc. Main Street P.O. Box 100 Elverson, PA 19520-0100 238 A HELP US DEVELOP NEW PRODUCTS Post Office will not deliver without proper postage Place First-Class Stamp Here ± ± ± REGISTER YOUR PRODUCT RECEIVE FUTURE INFORMATION ± ± ± ± ± ± PRODUCT REGISTRATION DEPARTMENT PO BOX 40 DENVER CO 80201-0040 Please take a moment to complete this card today to: !802010040401! 14 836-8-00 IMPORTANT! To Adjust Child’s Tray 14 Pour ajuster le plateau pour enfant Para ajustar la bandeja del niño To release: squeeze latches under the tray. Pour dégager: pressez les loquets de sûreté sous le plateau. Para liberarla: apriete las trabas debajo de la bandeja. Pull tray out until it snaps into extended position. 15 SNAP! ENCLENCHEZ! ¡CHASQUEO! Brakes Retirez le plateau jusqu'à ce qu'il s'enclenche en position étendue. Tire la bandeja hacia fuera hasta que se trabe en la posición extendida. Les freins Los frenos To apply brake To release brake Pour utiliser le frein Pour dégager le frein Para aplicar el freno Para liberar el freno 16 17 WARNING Always apply brakes when parking stroller. Check that brakes are on by pushing stroller forward. MISE EN GARDE Toujours utiliser les deux freins pour stationner la poussette. Assurez-vous que les freins fonctionnent en poussant la poussette. ADVERTENCIA Aplique siempre los frenos cuando estaciona el coche. Inspeccione los frenos tratando de empujar el coche. 15 836-8-00 Les roues pivotantes Swivel Wheels Las ruedas giratorias Front swivel wheels lock for use on uneven surfaces such as grass, stones or gravel. Before locking swivels, check that wheels are positioned correctly by pushing the stroller forward a few feet. Les roues pivotantes avant se barrent pour un usage sur les surfaces irrégulières tel que le gazon, les cailloux ou le gravier. Avant de verrouiller les pivots, vérifiez que les roues sont placées correctement en poussant la poussette de quelques pieds. Las ruedas giratorias delanteras se traban para el uso en superficies desparejas tales como césped, piedras o grava. Antes de trabar las ruedas giratorias, verifique que las ruedas estén correctamente colocadas empujando el cochecito hacia delante unos pocos pies. For swivel Roues pivotantes For non-swivel 18 Roues non-pivotantes Para que no giren Para que giren To Adjust Footrest 20 19 Ajuster le repose-pied Para ajustar el apoya pie To lower footrest: lift footrest and then pull down on metal bar. To raise footrest: lift up on metal bar. Pour abaisser le repose-pied: soulevez-le et ensuite abaissez sur la tige métallique. Pour remonter le repose-pied: soulevez sur la tige métallique. Para bajar el apoya pie: levante el apoya pie y luego tire hacia abajo la barra de metal. Para levantar el apoya pie: tire hacia arriba la barra de metal. 21 To close leg opening: Extend the tray. Raise footrest completely and push metal bar down to lock. Push tray in until it snaps into the normal position. Pour fermer l'ouverture des jambes: étendez le plateau. Soulevez complètement le repose-pied et abaisser la tige métallique pour verrouiller. Enfoncez le plateau jusqu'à c qu'il s'enclenche en position normale. Para cerrar los espacios para las piernas: Extienda la bandeja. Levante el apoya pie completamente y empuje la barra de metal hacia abajo para que se trabe. Empuje la bandeja hacia dentro hasta que se trabe en la posición normal. 836-8-00 16 Attacher l'enfant To Secure Child 22 Para asegurar al niño WARNING Avoid serious injury from falling or sliding out. Always use seat belt. After fastening buckles, adjust belts to get a snug fit around your child. 23 MISE EN GARDE Évitez de sérieuses blessures. Utilisez toujours la ceinture de sécurité. Après avoir attaché les boucles, ajustez les ceintures pour obtenir un ajustement confortable autour de votre enfant. To secure To release Pour attacher Pour dégager Para asegurarlo Para liberarlo To Use Boot ADVERTENCIA Evite una lesión seria debido a una calda o resbalamiento del asiento. Use siempre el cinturón de seguridad. Luego de ajustar las hebillas, ajuste las correas para que queden ajustadas alrededor de su niño. Utiliser la chancelière Para usar la bota Adjust footrest to seat height (see figures 20 and 21) and tray to extended position (see figures 14 and 15). Check that footrest is secure by pressing down on it. Réglez le repose-pied à la hauteur du siège (voir les illustrations 20 et 21) et du plateau en position étendue (voir les illustrations 14 et 15). Assurez-vous que le repose-pied est solide en appuyant dessus. Ajuste el apoya pie según la altura del asiento ( vea las figuras 20 y 21) y la bandeja en la posición extendida (vea las figuras 14 y 15). Verifique que el apoya pie esté asegurado haciendo fuerza hacia abajo sobre él. 24 Slide boot over footrest and tray. Placez la chancelière sous le repose-pied. Glissez-la sur le repose-pied et le plateau. Coloque la bota debajo del apoya pie. Deslícela sobre el apoya pie y la bandeja. 25 Snap in three places. Attachez avec les boutons-pression à trois endroits. Se traba en tres lugares. 17 836-8-00 To Remove Seat Cover Enlever la housse du siège Para sacar la funda del asiento Remove seat from stroller and turn seat upside down. 26 Enlevez le siège de la poussette et retournez le siège. Saque el asiento del coche y ponga el asiento hacia arriba. 27 Unsnap VELCRO® (6 places). 28 Détachez le VELCRO® (6 endroits). Destrabe el (6 lugares). 29 Détachez les deux boutonspression et dégager les courroies élastiques de la barre. VELCRO® Unfasten webbing strap from “D” rings. Undo two snaps and release elastic straps from bar. Destrabe dos trabas y libere las cintas elásticas de la barra. 30 Défaites la courroie de l'anneau en D. Unhook elastic loops from the two plastic tabs. Décrochez les boucles elastiques des deux onglets de plastique. Destrabe las cintas tejidas de los anillos en "D". Desenganche los nudos elásticos de las dos lengüetas de plástico. Turn seat right side up. Rétournez le siège à l'endroit. Dé vuelta el asiento. Remove tray (see Figures 14 and 15). Enlevez le plateau (voir les Illustrations 14 et 15). Saque la bandeja (vea las Figuras 14 y 15). Unbuckle seat belt. Débouclez la ceinture de retenue. Destrabe el cinturón de seguridad. Remove seat cover from frame: pull crotch strap through slot in covering and pull webbing straps and “D” rings out of slots in the seat frame. Enlevez la housse du siège de l'armature: passez la courroie d'entrejambes à travers l'ouverture dans la housse et tirez les sangles et les anneaux en forme de "D" hors des fentes dans l'armature du siège. Saque la funda del asiento del armazón; tire la cinta para la entrepierna a través de la ranura en la funda y tire las cintas tejidas y los anillos en "D" fuera de las ranuras del armazón del asiento. Enlever la courroie d'entrejambes: sous l'armature du siège, passez le maintien en plastique de la courroie d’entrejambes à travers la fente dans l'armature. Para sacar la cinta de la entrepierna: debajo del armazón del asiento, tire el retén de plástico de la cinta de la entrepierna a través de la ranura del armazón. To remove crotch strap: under the seat frame, push the plastic crotch strap retainer through the slot in the frame. 836-8-00 18 To Reattach Seat Cover Replacer la housse du siège Para volver a conectar la funda del asiento 31 32 33 Slide back part of cover over rear of seat frame. Check that cover slides behind the side panels of the seat. (Figure 31) Replacez une partie de la housse sur l'arrière de l'armature du siège. Assurez-vous que la housse glisse derrière les panneaux latéraux du siège. (Illustration 31) Deslice hacia atrás parte de la funda sobre la parte trasera del armazón del asiento. Verifique que la funda se desliza detrás de los paneles laterales del asiento. (Figura 31) Replace all straps. Fit sides of covering over the side panels of seat. Push cover down into seat. Reattach tray. Turn seat upside down. Reattach elastic loops on footrest pad to plastic tabs under footrest. Reattach webbing strap by threading strap through “D” rings exactly as shown. (Figure 32) Snap the two elastic straps at bottom of seat back around the bar. Fasten the side flaps with VELCRO® tabs. Be sure to secure all snaps, VELCRO®, straps and fabric before using stroller. Pull firmly on waist belt and crotch strap to make sure they are correctly attached. Be sure fabric does not cover notches in seat sides. Notches must be clear of fabric to securely latch onto frame. (Figure 33) Replacez toutes les courroies. Placez les deux côtés de la housse sur les panneaux latéraux du siège. Enfoncez la housse dans le siège. Replacer le plateau. Retourner le siège à l'envers. Rattachez les boucles élastiques du coussin du repose-pied aux onglets de plastique sous le repose-pied. Rattachez la sangle en enfilant la sangle à travers les anneaux en forme de "D" exactement tel qu'illustré. (Illustration 32) Attachez les boutons-pression des deux courroies élastiques au bas du dossier du siège et autour de la barre. Attachez les rabats latéraux avec les attaches VELCRO®. Assurez-vous que tous les boutons-pression, les attaches VELCRO®, les courroies et le tissu sont bien attachés avant d'utiliser la poussette. Tirez sur la ceinture de retenue et les courroies d'entrejambes pour vous assurer qu'elles sont correctement attachées. Assurez-vous que le tissu ne recouvre pas les encoches sur les côtés du siège. Les encoches doivent être libérées de tout tissu pour qu'il s'enclenchent correctement à l'armature. (Illustation 33) 19 Coloque de nuevo todas las cintas. Ponga los costados de la funda sobre los paneles laterales del asiento. Empuje la funda hacia abajo en el asiento. Vuelva a conectar la bandeja. Dé vuelta el asiento. Vuelva a conectar los nudos elásticos en la almohadilla del apoya pie a las lengüetas de plástico debajo del apoya pie. Vuelva a conectar la cinta tejida pasando la cinta a través de los anillos en "D" exactamente como se indica. (Figura 32) Trabe las dos cintas elásticas en el fondo de la parte trasera del asiento alrededor de la barra. Ajuste las aletas laterales con las lengüetas VELCRO®. Inspeccione todas las trabas, cintas y telas antes de usar el coche. VELCRO®, Tire con firmeza del cinto de la cintura y la cinta de la entrepierna para asegurarse que estén conectadas correctamente. Asegúrese que la tela no cubre ranuras en los costados del asiento. Las ranuras no deben tener tela para poder trabarse con firmeza al armazón. (Figura 33) 836-8-00 Plier la poussette To Fold Stroller 34 Para plegar el cochecito Before folding stroller: fold canopy, fully recline seat and apply brakes. For more compact folding install seat in the forward position. Avant de replier la poussette : repliez le baldaquin, inclinez complètement le siège et appliquez les freins. Pour replier de façon plus compacte installez le siège en position avancée. Antes de plegar el coche: pliegue la capota, recline totalmente el asiento y aplique los frenos. Para lograr un plegado más compacto, instale el asiento en la posición delantera. 35 36 OR 37 2 OR 1 OU OU O O 3 Certain models: pull red latches up on handle to release. Fold handle down. Certain models: 1) slide red button to right; 2) twist grip forward until it stops; 3) push stroller handle down. Certain models: pull up locking latches at sides of stroller to release and fold handle down. Certains modèles: tirez les loquets de sûreté rouges vers le haut sur le guidon pour dégager. Repliez le guidon. Certains modèles: 1) glissez le bouton rouge vers la droite; 2) tournez la poignée vers l'avant jusqu'à ce qu'elle s'arrête; 3) abaissez le guidon de la poussette. Certains modèles: remontez les loquets de sûreté sur les côtés de la poussette afin de libérer le guidon, et repliez le guidon vers le bas. Ciertos modelos: 1) deslice el botón rojo hacia la derecha; 2) gire el puño hacia delante hasta que se pare; 3) empuje hacia abajo la manija del cochecito. Ciertos modelos: tire hacia arriba las trabas de seguridad en los costados del cochecito para liberar y plegar la manija hacia abajo. Ciertos modelos: tire las trabas rojas de la manija para liberarla. Pliegue la manija hacia abajo. 38 Close and lock storage latch. To stand folded stroller, lock the brakes. Plier complètement et enclencher le loquet de rangement. Pour mettre la poussette repliée debout, verrouillez les freins. Cierre y asegure la traba de almacenamiento. Para que se pare el coche plegado, trabe los frenos. 836-8-00 20 Des jouets Mix ‘N Move® (vendu séparément) Mix ‘N Move® Toys (sold separately) 39 Juguetes Mix ‘N Move® (vendidos por separado) 40 41 42 To remove plugs: WARNING: Remove child from swing before removing plugs. Throw the plugs away immediately; they are not reusable. Pour enlever les couvercles: MISE EN GARDE: Enlevez l'enfant de la balançoire avant d'enlever les couvercles. Jetez les couvercles immédiatement, ils ne sont pas réutilisables. Para sacar los tapones: ADVERTENCIA: Saque al niño del columpio antes de sacar los tapones. Tire los tapones a la basura inmediatamente; no pueden volver a usarse. (USA) (Canada) (EE.UU) To find out more about Graco’s Mix ’N Move toys, visit our website at www.gracobaby.com and go to the “Parts Ordering” section under “Services.” To find out more about Graco's Mix 'N Move toys, please call 1-800-667-8184 or 514-344-3533 in Montreal. Para obtener más información sobre los juguetes Mix 'N Move de Graco, visite nuestro sitio Web en www.gracobaby.com y pase a la sección "Pedido de piezas" bajo "Servicios". Mix ’N Move toys are available at major U.S. retailers. To find out where you can purchase them in your area, call 1-800-345-4109. Pour plus de renseignement au sujet des jouets Mix ‘N Move de Graco, communiquez avec le 1-800-667-8184 ou au 514-344-3533 à Montréal 21 Los juguetes Mix 'N Move están disponibles en los comercios más importantes de EE.UU., Para determinar dónde puede comprarlos en su área, llame al 1-800-345-4109. 836-8-00 Attacher le siège de retenue (vendu séparément) Instalación del asiento de seguridad (vendidos por separado) 43 44 45 WARNING Improper use of this stroller with a carrier may result in serious injury or death. Use a Graco® infant restraint only. Read the manual provided with your Graco® infant restraint before using it with your stroller. If you do not have the owner’s manual for the Graco® infant restraint, call Graco in USA at 1-888-224-6549 or in Canada at 1-800-667-8184. Make sure stroller is fully assembled according to the preceding instructions. MISE EN GARDE Un usage inadéquat de cette poussette avec le porte-bébé peut causer de sérieuses blessures ou la mort. Utilisez seulement un siège de retenue de Graco®. Lisez le manuel d'utilisateur fournit avec votre siège de retenue Graco® avant d'utiliser le siège de retenue avec votre poussette. Si vous n'avez pas le manuel d'utilisateur pour le siège de retenue Graco®, communiquer avec Graco® au 1-888-224-6549 aux EtatsUnis ou au 1-800-667-8184 au Canada. Assurez-vous que la poussette est complètement assemblée d'après les instructions précédentes. ADVERTENCIA El uso inadecuado de este cocheo con un transportador podría resultar en lesiones serias o la muerte. Use un sistema de seguridad para bebés Graco® solamente. Lea el manual provisto con su sistema de seguridad para bebés Graco® antes de usarlo con su coche. Si no tiene el manual del dueño del sistema de seguridad para bebés Graco®, llame a Graco en EE.UU. al 1-888-224-6549 o en el Canadá al 1-800-667-8184. Asegúrese que el coche esté totalmente armado según las instrucciones anteriores. MISE EN GARDE Toujours attaché votre enfant avec le harnais du siège de retenue quand vous utilisez le siège de retenue avec la poussette. Si votre enfant est déjà dans le siège de retenue, assurez-vous que l'enfant est attaché avec le harnais. Incliner le siège de la poussette en position la plus basse. ADVERTENCIA Asegure siempre a su bebé con el arnés del sistema de seguridad para bebés cuando usa el sistema de seguridad para bebés en el coche. Si su niño ya se encuentra en el asiento de seguridad, verifique que el niño esté asegurado con el arnés. Recline el asiento del coche hacia atrás hasta la posición más baja. Attaching Safety Seat (sold separately) WARNING Always secure your child with the infant restraint harness when using the infant restraint in the stroller. If your child is already in the infant restraint, check that the child is secured with the harness. Recline the stroller seat back to its lowest position. Slide child tray to rear position. Check that tray is securely attached by pushing down. 836-8-00 Glissez le plateau pour enfant vers l'arrière. Assurez-vous que le plateau est bien attaché en abaissant. 22 Deslice la bandeja del niño a la posición trasera. Verifique que la bandeja esté conectada con seguridad empujando hacia abajo. Move carrier handle to carrying position. Déplacez la poignée en position de transport. Mueva la manija del transportador a la posición para el transporte. Position mounting notches over tray. Push down on carrier until the attachment latch snaps into tray (Figure 43). Placez les encoches du montant sur le plateau. Abaissez le siège de retenue jusqu'à ce que le loquet de sûreté de l'attachement s'enclenche dans le plateau (Illustration 43). Coloque las ranuras de montaje sobre la bandeja. Empuje hacia abajo el transportador hasta que la traba de seguridad se trabe en la bandeja (Figura 43). Glissez la sangle de la ceinture de sécurité à travers les crochets pour la ceinture de sécurité du véhicule sur chaque côté du siège de retenue. Serrez es boucles de la ceinture de la poussette contre l'intérieur du siège de retenue (Illustration 44). Deslice la cinta tejida del cinturón de seguridad del coche a través de los ganchos del cinturón del vehículo a cada costado del asiento de seguridad. Ajuste las hebillas del cinturón del asiento del coche contra el interior del asiento de seguridad (Figura 44). Slide stroller seat belt webbing through vehicle belt hooks on each side of the infant restraint. Tighten stroller seat belt buckles against inside of infant restraint (Figure 44). Check that infant restraint is securely attached by pulling up. To remove infant restraint: remove stroller seat belts from vehicle belt hooks, squeeze release handle at back of infant restraint, and lift infant restraint out of the stroller (Figure 45). Assurez-vous que le siège de retenue est attaché solidement en tirant vers le haut. Pour enlever le siège de retenue, enlevez les ceintures de sécurité de la poussette des crochets pour la ceinture de sécurité du véhicule, pressez la poignée de declenchment à l'arrière du siège de retenue, et soulevez le siège de retenue hors de la poussette (Illustration 45). 23 Verifique que el asiento de seguridad esté conectado con firmeza tirando hacia arriba. Para sacar el asiento de seguridad: Saque los cinturones del asiento del coche de los ganchos del cinturón del vehículo, apriete la manija de liberación en la parte trasera del asiento de seguridad, y levante el asiento de seguridad del coche (Figura 45). 836-8-00 Care and Maintenance Soins et entretien Cuidado y mantenimiento TO WASH SEAT COVERING, remove seat from stroller and remove seat covering. Machine wash in lukewarm water on delicate cycle and drip-dry. NO BLEACH. POUR LAVER LA HOUSSE DU SIÈGE, enlevez le siège de la poussette et enlevez la housse. Lavez à la machine dans une eau tiède au cycle délicat et suspendre pour sécher. PAS D’EAU DE JAVEL PARA LAVAR LA FUNDA DEL ASIENTO: Saque el asiento del coche y saque la funda del asiento. Lavar a máquina en agua fria en el ciclo delicado y secar al aire. NO USAR BLANQUEADOR. LE DEUXIÈME COUSSIN DE SIÈGE AMOVIBLE est lavable à la machine à l’eau tiède et au cycle délicat. Étendre pour sécher. PAS D’EAU DE JAVEL. EL SEGUNDO ALMOHADÓN REMOVIBLE DEL ASIENTO (ciertos modelos) puede lavarse a máquina en agua tibia en el ciclo delicado y secarse al aire. NO USAR BLANQUEADOR. POUR LAVER LE BALDAQUIN: (1) Enlevez le baldaquin de la poussette. (2) Détachez les boutons-pression du baldaquin et enlevez des montants en plastique. (3) Dévissez la tringle de maintien métallique à une des extrémités tel qu’illustré. (4) Tirez sur l’extrémité de la tringle hors du montant en plastique. (5) Glissez le baldaquin sur le montant et les deux tringles pour l’enlever. Lavez à la machine en eau tiède au cycle délicat et suspendre pour sécher. PAS D’EAU DE JAVEL. PARA LAVAR LA CAPOTA: (1) Saque la capota del coche. (2) Destrabe la capota de sus montajes de plástico. (3) Desenrosque la varilla de metal de apoyo en un extremo como se indica. (4) Tire el extremo de la varilla fuera del montaje de plástico. (5) Deslice la capota sobre el montaje de plástico y ambas varillas para sacarlas. Lavar a máquina en agua fria en el ciclo delicado y secar al aire. NO USAR BLANQUEADOR. REMOVABLE SECOND SEAT PAD (certain models) may be machine washed in lukewarm water on delicate cycle and drip-dried. NO BLEACH. TO WASH CANOPY: (1) Remove canopy from stroller. (2) Unsnap canopy from plastic canopy mounts. (3) Unscrew metal support rod at one end as shown. (4) Pull end of rod out of plastic mount. (5) Slide canopy over plastic mount and both rods to remove. Machine wash in lukewarm water on delicate cycle and drip-dry. NO BLEACH. TO CLEAN STROLLER FRAME, use only household soap or detergent and warm water. NO BLEACH. FROM TIME TO TIME CHECK YOUR STROLLER for loose screws, worn parts, torn material or stitching. Replace or repair the parts as needed. Use only Graco® replacement parts. EXCESSIVE EXPOSURE TO SUN OR HEAT could cause fading or warping of parts. IF STROLLER BECOMES WET, open canopy and remove boot. Allow to dry thoroughly before storing. IF WHEEL SQUEAKS, use a light oil (e.g., WD-40, 3-in-1, or sewing machine oil). It is important to get the oil into the axle and wheel assembly as illustrated. WHEN USING YOUR STROLLER AT THE BEACH completely clean your stroller afterward to remove sand and salt from mechanisms and wheel assemblies. 836-8-00 POUR NETTOYER L’ARMATURE DE LA POUSSETTE, utilisez un détergent doux et de l’eau tiède. PAS D’EAU DE JAVEL. PARA LIMPIAR EL ARMAZÓN DEL COCHE: usar solamente jabón o detergente de uso doméstico y agua tibia. NO USAR BLANQUEADOR. DE TEMPS EN TEMPS, VÉRIFIEZ VOTRE POUSSETTE pour des vis desserrées, pièces usagées, tissu ou couture déchiré. Remplacez ou réparez ces pièces si nécessaire. Utilisez seulement les pièces de remplacement Graco®. DE VEZ EN CUANDO, INSPECCIONE EL COCHE para determinar si hay tornillos flojos, piezas gastadas, material o costuras rotas. Cambie o repare las piezas según sea necesario. Use solamente repuestos marca Graco®. UNE EXPOSITION PROLONGÉE AU SOLEIL peut provoquer une décoloration prématurée du tissu et du plastique. EL CONTACTO EXCESIVO CON EL SOL O EL CALOR podría causar que se destiña o se tuerzan algunas piezas. SI LA POUSSETTE EST MOUILLÉE, ouvrez le baldaquin et enlevez la chancelière. Laissez sécher complètement avant l’entreposage. SI EL COCHE SE MOJA, abra la capota y saque la bota. Déjelo secar completamente antes de guardarlo. SI LES ROUES GRINCENT, utilisez une huile légère (i.e. WD40, 3 dans 1, ou bien une huile pour machine à coudre). Il est important de déposer l’huile dans l’essieu de la roue. SI LAS RUEDAS HACEN RUIDO, use un aceite liviano (por ej., WD-40, 3-en-1, o aceite para máquinas de coser). Es importante hacer penetrar el aceite en el eje y equipo de la rueda como se ilustra. LORSQUE VOUS UTILISEZ VOTRE POUSSETTE À LA PLAGE, prenez soin de bien la nettoyer après l’usage afin d’enlever le sable et le sel du mécanisme et des roues. 24 CUANDO USA EL COCHE EN LA PLAYA, limpie el coche completamente después para sacar la arena y la sal de los mecanismos y equipos de las ruedas. Infant Restraint/Carrier Owner’s Manual READ THIS MANUAL KEEP INSTRUCTIONS FOR FUTURE USE. Do not install or use this infant restraint until you read and understand the instructions in this manual. FAILURE TO PROPERLY USE THIS INFANT RESTRAINT INCREASES THE RISK OF SERIOUS INJURY OR DEATH IN A SUDDEN STOP OR CRASH. © 2001 Graco 430-8-01 1 1.0 Registration Information . . . . . . . . . . . . . . . . . . . . . . . . . . .4-5 1.1 Register Your Infant Restraint . . . . . . . . . . . . . . . . . . . . . .4 1.2 Recall Information . . . . . . . . . . . . . . . . . . . . . . . . . . . . . . .4 1.3 If You Need Help . . . . . . . . . . . . . . . . . . . . . . . . . . . . . . . .5 2.0 Features and Components . . . . . . . . . . . . . . . . . . . . . . . .6-13 2.1 3-Point Harness Model . . . . . . . . . . . . . . . . . . . . . . . . . . .7 2.2 5-Point Harness Model . . . . . . . . . . . . . . . . . . . . . . . . . . .9 2.3 Removing and Attaching Base . . . . . . . . . . . . . . . . . . . . .11 2.4 Adjusting Handle . . . . . . . . . . . . . . . . . . . . . . . . . . . . . . .11 2.5 Attaching Canopy . . . . . . . . . . . . . . . . . . . . . . . . . . . . . .12 2.6 Head Support . . . . . . . . . . . . . . . . . . . . . . . . . . . . . . . . .13 2.7 Cold Weather Boot . . . . . . . . . . . . . . . . . . . . . . . . . . . . .13 3.0 Important Information . . . . . . . . . . . . . . . . . . . . . . . . . . .14-18 3.1 Warnings for Use as Infant Restraint . . . . . . . . . . . . . . . .14 3.2 Warning for Use With a Stroller . . . . . . . . . . . . . . . . . . . .16 3.3 Additional Warnings for Use as Carrier . . . . . . . . . . . . . .17 3.4 Height and Weight Limits . . . . . . . . . . . . . . . . . . . . . . . .18 4.0 Infant Restraint Location . . . . . . . . . . . . . . . . . . . . . . . .19-23 4.1 Vehicle Seat Requirements . . . . . . . . . . . . . . . . . . . . . . .19 4.2 Vehicle Seat Belt Requirements . . . . . . . . . . . . . . . . . . .20 4.2.1 UNSAFE Vehicle Belt Systems . . . . . . . . . . . . . . . .21 4.2.2 SAFE Vehicle Belt Systems . . . . . . . . . . . . . . . . . .22 2 5.0 Using Infant Restraint . . . . . . . . . . . . . . . . . . . . . . . . . . . . . . .24-36 5.1 Positioning Harness Straps . . . . . . . . . . . . . . . . . . . . . . .24 5.1.1 3-Point Harness . . . . . . . . . . . . . . . . . . . . . . . . . .25 5.1.2 5-Point Harness . . . . . . . . . . . . . . . . . . . . . . . . . .26 5.2 Securing Child in Infant Restraint . . . . . . . . . . . . . . . . . .28 5.2.1 3-Point Harness . . . . . . . . . . . . . . . . . . . . . . . . . .29 5.2.2 5-Point Harness . . . . . . . . . . . . . . . . . . . . . . . . . .30 5.3 Installing the Infant Restraint/Base . . . . . . . . . . . . . . . . .31 5.4 Reclining Infant Restraint/Base . . . . . . . . . . . . . . . . . . . .34 6.0 Additional Information . . . . . . . . . . . . . . . . . . . . . . . . . .37-38 6.1 Airplane Use . . . . . . . . . . . . . . . . . . . . . . . . . . . . . . . . . .37 6.2 Cleaning and Maintenance . . . . . . . . . . . . . . . . . . . . . . .37 Replacement Parts . . . . . . . . . . . . . . . . . . . . . . . . . . . . . . . . .40-41 3 1.0 Registration Information Model Number: Serial Number: Purchase Date: 1.1 Register Your Infant Restraint Please fill in the above information. The model and serial numbers can be found on a label underneath your infant restraint. Fill out the prepaid registration postcard attached to the seat cover and mail it today. Child restraints could be recalled for safety reasons. You must register this restraint to be reached in a recall. Send your name, address and model/serial numbers to: Graco Children’s Products Inc. P.O. Box 100 Elverson, PA, 19520-9974 or call 1-888-224-6549 1.2 Recall Information • Call the U.S. Government’s Auto Safety Hotline at 1-800-424-9393 (202-366-0123 in D.C. area) • www.nhtsa.dot.gov • Graco: 1-888-224-6549 or www.gracobaby.com 4 1.3 If You Need Help In the U.S.A. or Canada, please contact our Customer Service Department with any questions you may have concerning parts, use, or maintenance. When you contact us, please have your product’s model and serial numbers ready so that we may help you efficiently. These numbers can be found on a sticker on the underside of your infant restraint. USA: 1-888-224-6549 or www.gracobaby.com Canada: 1-800-667-8184 Montreal: 514-344-3533 5 2.0 Features and Components Each model of the infant restraint comes with different harness options. To adjust your infant restraint properly, it is very important to follow the instructions that are appropriate for the model you have purchased. OR 3-Point Harness 5-Point Harness Vehicle belt path Base Boot (on certain models) 6 2.1 3-Point Harness Model FRONT VIEW: 3-POINT HARNESS Harness slots Handle Handle adjustment button Harness clip Vehicle belt hook Harness straps Harness buckle 7 REAR VIEW: 3-POINT HARNESS Canopy Harness tightener Release handle Level indicator* Harness anchor buckle Harness slot Mounting notch Attachment latch Owner’s manual pocket Locking clip** *Level Indicator The level indicator is attached to the side of the infant restraint, and indicates whether or not the infant restraint is properly reclined. **Locking Clip The locking clip is stored on the bottom of the infant restraint. You will need to use it with certain types of vehicle seat belts. 8 2.2 5-Point Harness Model FRONT VIEW: 5-POINT HARNESS Handle Harness slots Harness clip Handle adjustment button Harness buckle Vehicle belt hook Harness adjustment button Harness buckle tongues Harness adjustment strap 9 REAR VIEW: 5-POINT HARNESS Canopy Release handle Mounting notch Level indicator* Harness slot Owner’s manual pocket Attachment latch Metal junction plate Waist strap anchor buckle Harness adjustment strap Locking clip** *Level Indicator The level indicator is attached to the side of the infant restraint, and indicates whether or not the infant restraint is properly reclined. **Locking Clip The locking clip is stored on the bottom of the infant restraint. You will need to use it with certain types of vehicle seat belts. 10 2.3 Removing and Attaching Base To remove infant restraint, squeeze handle at back of seat and lift infant restraint from base as shown . To put infant restraint in base, push infant restraint down until it clicks into base. Pull up on infant restraint to be sure it is latched firmly into base. 2.4 Adjusting Handle 1. Press handle adjustment buttons on both sides of handle . 2. Rotate handle until it clicks into any of three positions (for carrying, reclining, or sitting). BOTH handle adjustment buttons must pop out to lock handle in place . 3. Push and pull on the handle to be sure it is locked firmly in position. Carrying Reclining Sitting 11 2.5 Attaching Canopy 1. Infant restraint comes with four (two on certain models) identical canopy support parts. Thread one canopy support completely through one sewn tunnel . 2. Slide straight end of a second support into the straight end of the first support . 3. On models with four canopy supports, repeat steps one and two for the other canopy tunnel. The canopy should appear as shown . 4. Attach canopy in the areas between the infant restraint and the handle base . 12 2.6 Head Support (on certain models) Some infants may need extra support to keep their head and body in a comfortable position. Unsnap the sides and resnap them with the harness straps threaded through the slots in the cushion . If your model does not include a head support, you may want to use a rolled towel or a blanket for support . MAKE SURE THAT NOTHING INTERFERES WITH THE HARNESS. It must still be flat and snug against your child’s shoulders. 2.7 Cold Weather Boot (on certain models) Some models come with a cold weather boot. To use, wrap elastic around bottom of seat and place both elastic loops around vehicle belt hooks as shown . 13 3.0 Important Information 3.1 Warnings for Use as Infant Restraint • DO NOT INSTALL OR USE THIS INFANT RESTRAINT AND BASE UNTIL YOU READ AND UNDERSTAND THE INSTRUCTIONS IN THIS MANUAL AND IN YOUR VEHICLE OWNER’S MANUAL. DO NOT let others install or use the infant restraint unless they understand how to use it. • FAILURE TO PROPERLY USE THIS INFANT RESTRAINT AND BASE INCREASES THE RISK OF SERIOUS INJURY OR DEATH IN A SUDDEN STOP OR CRASH. Your child can be injured in a vehicle even if you are not in a crash. Sudden braking and sharp turns can injure your child if the infant restraint is not properly installed or if your child is not properly secured in the infant restraint. • PLACE THIS INFANT RESTRAINT IN A REAR-FACING POSITION when using it in the vehicle. • NEVER PLACE THIS INFANT RESTRAINT IN A VEHICLE SEATING LOCATION THAT HAS AN AIR BAG. If an air bag inflates, it can hit the infant restraint with great force and cause serious injury or death to your child. Refer to your vehicle owner’s manual for information about air bags and infant restraint installation. 14 • SOME SPECIAL NEEDS CHILDREN, such as pre-term babies or those who have tested positive for positional apnea, may be at increased risk of suffering breathing or other difficulties in an infant restraint. If your child has special needs, we recommend that you have your physician or hospital staff evaluate your child and recommend the proper infant restraint or car bed before using this product. • According to accident statistics, CHILDREN ARE SAFER WHEN PROPERLY RESTRAINED IN REAR VEHICLE SEATING POSITIONS, RATHER THAN FRONT SEATING POSITIONS. For a vehicle with a front passenger air bag, refer to your vehicle owner’s manual as well as these instructions for infant restraint installation. • NEVER LEAVE YOUR CHILD UNATTENDED. • NEVER LEAVE AN INFANT RESTRAINT AND BASE UNSECURED IN YOUR VEHICLE. An unsecured infant restraint can be thrown around and may injure occupants in a sharp turn, sudden stop or crash. Remove it or make sure that it is securely belted in the vehicle. • REPLACE THE INFANT RESTRAINT AND BASE AFTER AN ACCIDENT OF ANY KIND. An accident can cause damage to the infant restraint that you cannot see. • STOP USING INFANT RESTRAINT AND BASE AND THROW IT AWAY after the date molded into the underside of the infant restraint. • DO NOT MODIFY YOUR INFANT RESTRAINT AND BASE or use any accessories or parts supplied by other manufacturers. 15 • NEVER USE INFANT RESTRAINT AND BASE IF IT HAS DAMAGED OR MISSING PARTS. DO NOT use a cut, frayed or damaged infant restraint harness or vehicle seat belt. • THE INFANT RESTRAINT CAN BECOME VERY HOT IF LEFT IN THE SUN. Always touch the surface of any metal or plastic parts before putting your child in the infant restraint. • THIS CHILD RESTRAINT CONFORMS to all applicable Federal Motor Vehicle Safety Standards and is certified for use in motor vehicles and aircraft. • NEVER GIVE THIS INFANT RESTRAINT AND BASE to someone else without also giving them this manual. • NEVER USE A SECOND-HAND INFANT RESTRAINT AND BASE or an infant restraint whose history you do not know. 3.2 Warning for Use With a Stroller • USE ONLY WITH STROLLERS THAT ARE PART OF THE GRACO TRAVEL SYSTEM. Refer to stroller instruction sheet for details about how to attach the infant restraint to your stroller. If you do not have an instruction sheet, please call toll-free, 1-888-224-6549 to obtain one, or visit our website, www.gracobaby.com. 16 3.3 Additional Warnings for Use as Carrier • FALL HAZARD: Child’s movements can slide carrier. NEVER place carrier near edges of countertops, tables or other high surfaces. Always stay within arms reach whenever carrier is not on floor/ground. BE SURE handle locks into position before lifting carrier. NEVER place carrier in the top of a shopping cart. • SUFFOCATION HAZARD: Infant Carrier can roll over on soft surfaces and suffocate child. Never place carrier on beds, sofas or other soft surfaces. • STRANGULATION HAZARD: Child can strangle in loose restraint straps. Always use harness, never leave child in carrier when straps are loose or undone. KEEP STRINGS AND CORDS AWAY FROM CHILD. Strings and cords can cause strangulation. DO NOT place carrier near a window where cords from blinds or drapes can strangle a child. DO NOT hang strings on or over the carrier. DO NOT place items with a string around a child’s neck, such as hood strings, pacifier cords, etc. DO NOT attach strings to toys. 17 3.4 Height and Weight Limits FAILURE TO USE INFANT RESTRAINT IN A MANNER APPROPRIATE FOR YOUR CHILD’S SIZE MAY INCREASE THE RISK OF SERIOUS INJURY OR DEATH. Your child MUST meet all requirements: • WEIGHT: 20 lbs. (9 kg) or less • HEIGHT: 26 inches (66 cm) or less 18 4.0 Infant Restraint Location 4.1 Vehicle Seat Requirements IMPROPER PLACEMENT OF THE INFANT RESTRAINT INCREASES THE RISK OF SERIOUS INJURY OR DEATH. Some seating positions in your vehicle may not be safe for this infant restraint. Some vehicles do not have any seating positions that can be used safely with the infant restraint. If you are not sure where to place the infant restraint in your vehicle, consult your vehicle owner’s manual or Graco Children's Products Inc., 1-888-224-6549. • Whenever possible, secure the infant restraint in the center position of the seat directly behind the front seats . An adult should ride in the rear seat to watch the child. If the driver is the only adult present, a child may need to ride in the front seat. BUT ONLY if there is no passenger-side air bag and all of the other vehicle seat and seat belt requirements listed are met. • NEVER place this infant restraint in a vehicle seating location that has an air bag . See “3.1 Warnings for Use as Infant Restraint”, p.14. 19 • The VEHICLE seat must face forward. • DO NOT use infant restraint on vehicle seats with seat backs that will not lock in an upright position. DO NOT use seats that can fold down without having to release a lock or latch of some kind. These seats can fly forward and strike the child in a sudden stop or crash. 4.2 Vehicle Seat Belt Requirements MANY SEAT BELT SYSTEMS ARE NOT SAFE TO USE WITH THE INFANT RESTRAINT. THE VEHICLE SEAT BELT MUST BE DESIGNED TO HOLD THE INFANT RESTRAINT TIGHTLY AT ALL TIMES. Pay careful attention to these systems; some of the seat belts that are not safe to use look very much like seat belts that are safe to use. If you are unsure, consult your vehicle owner’s manual or Graco Children's Products Inc., 1-888-224-6549. 20 4.2.1 UNSAFE Vehicle Belt Systems DO NOT use any of the following systems to secure the infant restraint. • Lap Belts with Emergency Locking Retractor (ELR) This lap belt stays loose and can move until it locks in a crash or sudden stop. • Combination Lap/Shoulder Belt with Retractor Each strap has a retractor at one end and is attached to the latch plate at the other end. • Passive Restraint - Lap Belt with Motorized Shoulder Belt • Passive Restraint - Lap or Shoulder Belt Mounted on Door DO NOT use vehicle belts that are attached to the door in any way or that move along a track to automatically surround the passenger when the door is closed. • Lap Belts Forward of Seat Crease 21 4.2.2 SAFE Vehicle Belt Systems THE FOLLOWING BELT SYSTEMS CAN BE USED WITH YOUR INFANT RESTRAINT, IF the seat location meets all other requirements of these instructions and those in your vehicle owner's manual. • Lap Belts - Manually Adjusted When buckled, the belt is tightened manually by pulling on the excess belt while pushing down hard on the infant restraint. • Lap Belts with Automatic Locking Retractor (ALR) The automatic locking retractor will not permit the lap belt to lengthen once it is buckled. Tighten the belt by feeding the belt back into the retractor while pushing down hard on the infant restraint. • Combination Lap/Shoulder Belt with Locking Latch Plate Once it is buckled, this type of belt has a latchplate that will not allow the lap portion of the belt to loosen. Belt is tightened by pulling hard on the shoulder portion of the vehicle belt while pushing down hard on the infant restraint. 22 • Combination Lap/Shoulder Belt with Sliding Latch Plate This belt has a latchplate that slides freely along the belt. This belt MUST be converted to prevent movement of the lap portion of the belt. You must use the locking clip provided with the infant restraint, unless your vehicle's seat belt Locking clip can be converted in another way as described in your vehicle owner's manual. To Install Locking Clip: 1. Tighten the buckled belt by pushing ½ down hard on the infant restraint and inch pulling hard on the shoulder belt. 2. While pushing down on infant restraint, pinch the two straps together behind the buckle tongue. Unbuckle the belt without allowing it to slip. 3. Connect lap and shoulder belts with locking clip as shown and . 4. Rebuckle belt. Check that lap belt does not move by pulling and pushing hard on infant restraint. If belt loosens or lengthens, Locking clip goes here, 1 repeat procedure. /2 inch from the buckle 23 5.0 Using Infant Restraint 5.1 Positioning Harness Straps FAILURE TO PROPERLY ADJUST THE HARNESS STRAPS FOR YOUR CHILD INCREASES THE RISK OF SERIOUS INJURY OR DEATH IN THE EVENT OF A SHARP TURN, SUDDEN STOP OR CRASH. The harness straps must be properly adjusted to fit your child according to the following instructions. 1. Remove infant restraint from base and rotate handle down to sitting position. See “2.3 Removing and Attaching Base” and “2.4 Adjusting Handle”, p. 11. 2. Place child in infant restraint as shown . 3. Determine which pair of harness slots are even with or just below your child’s shoulders . DO NOT use upper harness slots if they are above your child’s shoulders. They will not hold a small child securely in a sudden stop or crash. 4. If the harness straps must be adjusted: remove child from infant restraint and follow directions for your type of harness system: Use harness slots 5.1.1 3-Point Harness - p. 25 even with or just below 5.1.2 5-Point Harness - p. 26 child’s shoulders 24 5.1.1 3-Point Harness 1. From back, push harness anchor buckle back through harness slot. If necessary, from front, use harness strap to pull buckle from slot . Harness tightener 2. Reinsert harness anchor buckle in the appropriate slot . Harness anchor buckle 3. From back, remove harness strap from harness tightener. If necessary, from front, use harness strap to pull strap from slot. 4. Reinsert strap in the appropriate slot. Thread strap through tightener exactly as shown . 5. SAFETY CHECK: a) CHECK that straps are not twisted; b) CHECK that straps are secure: pull on harness straps from front. c) CHECK that harness anchor buckle is snapped flat against back as shown . 25 5.1.2 5-Point Harness 1. Depress the harness adjustment button under the seat flap . Pull the shoulder straps out to loosen the harness . 2. Behind seat, remove the ends of the two shoulder straps from the metal junction plate . 3. From front, pull straps through the harness slots and then reinsert them Harness adjustment button through the appropriate slots. 4. Behind seat, push both shoulder straps UNDER owner’s manual pocket and out the bottom. 5. Reassemble the strap ends onto the metal junction plate . Follow the appropriate instructions for a smaller or larger baby on the following page. 6. SAFETY CHECK: After the harness has been completely reinstalled, a) CHECK that harness straps are not twisted in front or back. b) CHECK that straps are secure by pulling on them. 26 FOR SMALLER BABY: Use the lower harness slots (if they are even with or just below your child’s shoulders) and the upper strap loops . The ends of the straps must hang in front of the metal plate as shown in , not as shown in . CHECK that the loops are completely within junction plate slots . CHECK that straps are secure by pulling on them. FOR LARGER BABY: Use upper harness slots and the end strap loops . CHECK that the loops are completely within junction plate slots . CHECK that straps are secure by pulling on them. 27 5.2 Securing Child in Infant Restraint Failure to properly secure your child in the infant restraint/carrier increases the risk of serious injury or death from suffocation or falls, or in the event of a sudden stop or crash. Even when used only as a carrier, make sure the harness straps are properly secured. 1. Move infant restraint handle to sitting position (see page 11). 2. Open harness clip by squeezing both sides and unbuckle as shown . OR 3. Place your child in the infant restraint as shown in , not . Pull the harness straps down over your child. 4. Follow directions for your harness: 5.2.1 3-Point Harness: p. 29 5.2.2 5-Point Harness: p. 30 28 5.2.1 3-Point Harness 5. Buckle harness to the latch between child’s legs. Make sure that you hear a “click.” DO NOT use the infant restraint if the harness does not latch in place. Call Graco at 1-888-224-6549. 6. From the back, pull strap through harness tightener to tighten the straps as shown . CHECK that both straps are flat and tight on child’s shoulders. 7. Snap harness clip pieces together . Position harness clip in middle of chest, level with armpits and away from the neck . 8. SAFETY CHECK: a) CHECK that harness straps are not twisted. b) CHECK that the harness is snug. You should not be able to insert more than one finger between the harness and your child’s shoulder . 29 5.2.2 5-Point Harness 5. Insert the two buckle tongues into the harness buckle on the crotch strap. Make sure that you hear each tongue click into the buckle. DO NOT use the infant restraint if the harness does not latch in place. Call Graco at 1-888-224-6549. 6. Snap harness clip pieces together . 7. Pull on harness adjustment strap to tighten straps as shown . CHECK that both straps are flat and tight on shoulders. 8. Position harness clip in middle of chest, level with armpits and away from the neck . 9. SAFETY CHECK: a) CHECK that harness straps are not twisted. b) CHECK that the harness is snug. You should not be able to insert more than one finger between the harness and your child’s shoulder . 30 5.3 Installing the Infant Restraint/Base You must carefully follow the instructions provided by your vehicle manufacturer, in addition to the information in this manual. Be sure you have read and understood section 4, “Infant Restraint Location” on p.19-23. Make sure vehicle is on level ground so that the level indicator, which is attached to the infant restraint, can be used to properly recline the infant restraint . If a front passenger seat is used, slide the vehicle seat rearward as far as possible from the dashboard. If a rear seat is used, make sure the seat in front of it is moved forward enough and is upright enough to allow room for the infant restraint. 1. Remove infant restraint from base, regardless of whether or not you plan on using the base. 2. Place the base or infant restraint in a rear-facing position in a forward-facing vehicle seat. 31 3. Thread the seat belt: Base and infant restraint Infant restraint only Belt MUST go under tongue 4. Buckle the seat belt. Make sure the buckle tongue goes into the correct buckle . The seat belt should not be twisted or turned. 5. Tighten the vehicle seat belt. Refer to your vehicle owners manuel and the instructions in “4.2.2 SAFE Vehicle Belt Systems”, p. 22-23, on tightening your vehicle belt. To create a very tight installation, push down hard with your knee or free hand in the middle of the infant restraint or base and pull and tighten the vehicle belt. 32 6. Push the infant restraint down into the base and make sure that you hear a “click” . Pull up on the infant restraint to be sure it is latched securely into the base. If the infant restraint does not securely latch into the base, the infant restraint provides NO protection for your child. DO NOT use the infant restraint/base if the infant restraint does not securely latch into the base. 33 5.4 Reclining Infant Restraint/Base For your child’s safety, it is important that your infant restraint/base be properly reclined. Attached to the side of your infant restraint is a level indicator to help properly recline the infant restraint/base on the vehicle seat. Failure to properly recline the infant restraint on the vehicle seat increases the risk of serious injury or death. If the infant restraint is too upright, a child’s head may drop forward and cause breathing problems. If the infant restraint is too reclined, a crash could put too much force on a child’s neck and shoulders. The infant restraint must be properly reclined according to the following instructions. Check the level indicator. You must look straight on at the indicator. —If the indicator shows ONLY blue, the infant restraint is properly leveled. —If any orange is showing in the level indicator adjust the recline. 34 When using the base: To lower the foot; pull down on the bottom of the foot to the desired setting to adjust the recline . To raise the foot; set the base on a flat surface, push in on the fingers on the base and push down on the base to adjust the recline . If there is still orange in the level indicator when the foot is completely extended then place a rolled towel under the foot until ONLY blue shows . When using only the infant restraint, if there is still orange in the level indicator when the infant restraint is resting on the vehicle seat then place a rolled towel under the infant restraint until ONLY blue shows . Readjust the vehicle seat belt as necessary to secure the infant restraint firmly in the vehicle seat. 35 Final Safety Check: Every time you drive with your child, PUSH DOWN on the top of the infant restraint slowly but firmly to make sure the vehicle belt does not lengthen at all and that the vehicle belt is fastened very tightly around the infant restraint/base . Holding the infant restraint near the vehicle belt path, TWIST AND PULL the seat forward and to both sides to make sure the vehicle belt does not lengthen or loosen and the infant restraint does not easily move . 36 6.0 Additional Information 6.1 Airplane Use Install in an airplane the same way as in an automobile. Notify the airline ahead of time that you intend to bring the seat on board. Use only in forward-facing aircraft seat. Follow the flight attendant’s instructions about infant restraint placement. Do not use this infant restraint if the airplane seat belt does not hold the infant restraint tightly. 6.2 Cleaning and Maintenance TO REMOVE AND WASH INFANT RESTRAINT PAD, follow instructions in “5.1 Positioning Harness Straps”, p. 24-26. On 5-point harness models, push aside the small tab that holds the anchor buckles in place and pull the anchor buckles out of their indentations. Push a corner of each anchor buckle back into its slot . Carefully remove the seat pad. Machine wash on delicate cycle and drip-dry. DO NOT USE BLEACH. 37 Reverse steps to reinstall seat pad. Check that harness system is not twisted, and pull on harness system to be sure harness is securely reinstalled. INFANT RESTRAINT METAL AND PLASTIC PARTS may be cleaned by wiping with a mild soap and water solution. DO NOT USE BLEACH. Use of bleach may weaken plastic parts. HARNESS STRAPS may be spot cleaned or replaced. DO NOT IMMERSE THE HARNESS STRAPS IN WATER. Doing so may weaken the harness straps. BUCKLE may be cleaned with a damp cloth. DO NOT LUBRICATE the buckle. DO NOT USE INFANT RESTRAINT without seat pad. 38 Notes: 39 How to Order: Complete the form that follows. Your infant restraint model and serial numbers MUST be included on the form to ensure proper replacement parts. Your model number can be found on a sticker on the underside of your infant restraint. Payment must accompany your order. Parts may also be ordered from Graco’s web site at www.gracobaby.com. Parts List: Price:** Seat pad ................................. $20.00 Canopy ................................... $17.00 Canopy bow ........................... $ 5.00 3-point harness* .................... $10.00 5-point harness* .................... $10.00 Harness clip ........................... $ 5.00 Locking clip ........................... $ 5.00 Head support*......................... $ 8.00 Base ......................................... $30.00 ** Prices subject to change * On certain models without notice. IF YOU NEED HELP If you have any questions or need any parts not listed, please call toll-free: 1-888-224-6549 or visit our Internet website, www.gracobaby.com. 40 Model No. (Both Numbers Required) Serial No. SHIP TO: Subtotal: Name Shipping & handling*: $5.00 Sales tax**: Address Total: City, State, Zip Code * $15.00 outside the continental U.S. **CA 6%, IL 6.25%, IN 5%, NY 8.25%, OH 5.75%, PA 6%, SC 5% Telephone (including Area Code) Seat pad Canopy Canopy bow 3-point harness 5-point harness Harness clip Locking clip Head support Base Check or money order enclosed (payable to Graco Children’s Products Inc.) Charge to credit card Visa MasterCard Discover Account # Expiration date Signature Return the form with payment to: Graco Children’s Products Inc. Customer Service Department P.O. Box 100, Main Street Elverson, PA 19520 41