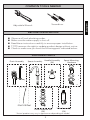
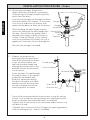
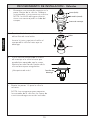
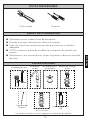
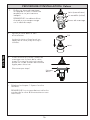
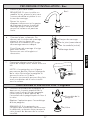
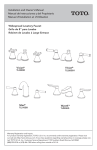
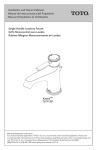
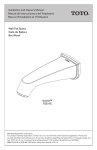
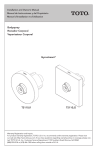
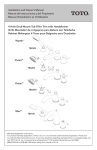
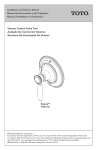
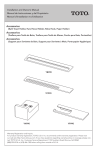
1
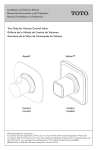
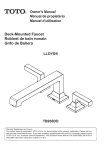
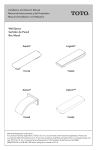
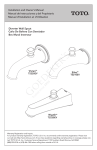
Installation and Owner’s Manual Manual de Instrucciones y del Propietario Manuel d’Installation et d’Utilisation Widespread Lavatory Faucet Grifo Mezclador Ensamble 8” para Lavabo Robinet Mélangeur de Lavabo Vivian™ TL220DDH Vivian™ TL220DD1H Warranty Registration and Inquiry For product warranty registration, TOTO U.S.A. Inc. recommends online warranty registration. Please visit our web site http://www.totousa.com. If you have questions regarding warranty policy or coverage, please contact TOTO U.S.A. Inc., Customer Service Department, 1155 Southern Road, Morrow, GA 30260 (888) 295-8134 or (678) 466-1300 when calling from outside of U.S.A. TABLE OF CONTENTS ENGLISH Thank You for Choosing TOTO! ������������������������������������������������������������������������ 2 Care And Cleaning���������������������������������������������������������������������������������������������� 2 Warnings��������������������������������������������������������������������������������������������������������������� 2 Common Tools Needed�������������������������������������������������������������������������������������� 3 Before Installation������������������������������������������������������������������������������������������������ 3 Included Parts������������������������������������������������������������������������������������������������������ 3 Installation Procedure��������������������������������������������������������������������������������������� 4-6 Warranty��������������������������������������������������������������������������������������������������������������� 7 Rough-In Dimensions ���������������������������������������������������������������������������������� 20-21 THANK YOU FOR CHOOSING TOTO! The mission of TOTO is to provide the world with healthy, hygienic and more comfortable lifestyles. We design every product with the balance of form and function as a guiding principle. Congratulations on your choice. CARE & CLEANING Your new faucet is designed for years of trouble-free performance. Keep it looking new by cleaning it periodically with mild soap, rinsing thoroughly with warm water and drying with a clean, soft cloth. Do not use abrasive cleaners, steel wool or harsh chemicals, as these will dull the finish. Failure to follow these instructions may void your warranty. WARNINGS For safe operation of the faucet, please observe the following: Operating Pressure: Minimum Pressure ……………..20 psi (0.14 MPa), dynamic Maximum Pressure …………….80 psi (0.55 MPa), static Do not use the product at an ambient temperature below 32 ºF (0 ºC). 2 COMMON TOOLS NEEDED ENGLISH Screwdriver Adjustable Wrench BEFORE INSTALLATION Observe all local plumbing codes. Make sure the water supply is shut off. Read these instructions carefully to ensure proper installation. TOTO reserves the right to update product design without notice. Check to make sure you have the following parts indicated below: INCLUDED PARTS Drain Assembly Spout Assembly Handle Assembly (2X) Spout Mounting Hardware Drain Lift Rod* Valve Assembly Valve Hardware Set (2X) (2X) * Actual product may vary in appearance depending on model. 3 INSTALLATION PROCEDURE - Valves 1. Thread a mounting nut to the bottom of the valve. Place a washer and gasket as shown. Gasket Gasket (Rubber) (Rubber) Washer Washer (Metal) (Metal) NOTE: the hot water valve has a red marking on side of body. ENGLISH Mounting Mounting Nut Nut 2. Pass the valve up through the installation hole. Gasket Collar Collar Washer Insert the gasket and fasten the collar to the valve body until it Mounting stops. Nut Gasket Gasket 3.Fasten the valve by threading the mounting nut up the valve until hand Gasket Collar tight. Tighten the retaining screws equally to secure. Washer Do not overtighten! Mounting Nut Gasket Mounting Mounting Screws Screws 4. Repeat steps 1-3 for remaining valve. NOTE: Hoses to connect valve inlets to water supply lines not included. INSTALLATION PROCEDURE - Spout 5. Place O-ring under spout. Spout Pass the supply hoses and mounting stud through the mounting hole until the spout comes to rest. O-ring 4 M INSTALLATION PROCEDURE - Spout 6. Orient the spout as needed. From below the mounting surface, place the gasket and washer over the mounting tube as shown. Fasten by threading the mounting nut up the tube until hand tight. Tighten the retaining screws equally to secure. Do not overtighten! Gasket (rubber) Washer (metal) Mounting Nut ENGLISH Mounting Tube 7.Connect each hose to the side port of each valve. Tighten with wrench. NOTE: If wrapping the hose(s) in a loop is needed, be careful not to crimp the hose at any point as this could restrict the water flow. INSTALLATION PROCEDURE - Handles 8.Orient handle assembly and lower onto the exposed portion of valve until engaged. Rotate the base (dome) of the handle assembly to fasten it to the valve. Handle Assembly* Repeat for other handle assembly. NOTE: If handles do not line up exactly as desired, remove handle from valve and reinstall one (1) notch over (on valve). Fine adjustment may be done by slightly rotating valve from underneath installed surface. Valve 9. Insert the drain lift rod through the opening in the spout. Drain Lift Rod 5 INSTALLATION PROCEDURE - Drain ENGLISH 10.Remove the plunger, flange and gasket (flat) from the drain assembly by unfastening the flange and pulling these parts from the drain. Insert the drain body up through the drain hole from below the lavatory. If necessary, turn the nut and push the washer and gasket (thick) down to allow for clearance. Plunger Plunger Flange Flange Gasket(flat) (flat) Gasket While holding the drain body in place, (thick) (thick) fasten the flange to the drain body from GasketGasket Washer Washer the top. Ensure that the gasket (flat) is Nut Nut between the flange and the lavatory as Tailpiece Tailpiece shown. Once the flange is fully seated, turn the nut below the lavatory up until a good seal if formed. Do not overtighten! Body Body Reinsert the plunger if needed. 11. Prepare the pivot arm by placing one bushing on each side of the pivot ball as shown. Insert the short end of the rod into the drain body and through the eyelet hole in the plunger. Fasten the pivot ball nut to secure. Insert the drain lift rod through the two (2) holes in the square end of the connector rod. Slide the connector rod up the drain lift rod to a suitable location so that the pivot arm can pass through one of the mounting holes as shown. Thumb Screw Drain Lift Rod Connector Rod Pivot Arm Pivot Ball Nut Bushings Secure the connector rod to the pivot arm using the spring clamp. One end of the spring clamp will need to be on the pivot arm before the connector rod is assembled. Tighten the thumb screw in the connector rod to secure it to the drain lift rod. Conduct tests to ensure all the linkages are working properly and no leaking occurs. Adjust if needed. 6 WARRANTY 2. TOTO’s obligations under this warranty are limited to repair, replacement or other appropriate adjustment, at TOTO’s option, of the Product or parts found to be defective in normal use, provided that such Product was properly installed, used and serviced in accordance with instructions. TOTO reserves the right to make such inspections as may be necessary in order to determine the cause of the defect. TOTO will not charge for labor or parts in connection with warranty repairs or replacements. TOTO is not responsible for the cost of removal, return and/or reinstallation of the Product. 3. This warranty does not apply to the following items: a.Damage or loss sustained in a natural calamity such as fire, earthquake, flood, thunder, electrical storm, etc. b.Damage or loss resulting from any accident, unreasonable use, misuse, abuse, negligence, or improper care, cleaning, or maintenance of the Product. c.Damage or loss resulting from sediments or foreign matter contained in a water system. d.Damage or loss resulting from improper installation or from installation of the Product in a harsh and/or hazardous environment, or improper removal, repair or modification of the Product. e.Damage or loss resulting from electrical surges or lightning strikes or other acts which are not the fault of TOTO or which the Product is not specified to tolerate. f.Damage or loss resulting from normal and customary wear and tear, such as gloss reduction, scratching or fading over time due to use, cleaning practices or water or atmospheric conditions, including but not limited to, the use of bleach, alkali, acid cleaners, dry (powder) cleaners or any other abrasive cleaners or the use of metal or nylon scrubbers. 4. In order for this limited warranty to be valid, proof of purchase is required. TOTO encourages warranty registration upon purchase to create a record of Product ownership at http://www.totousa.com. Product registration is completely voluntary and failure to register will not diminish your limited warranty rights. 5. If the Product is used commercially or is installed outside of North, Central or South America, TOTO warrants the Product to be free from defects in materials and workmanship during normal use for one (1) year from the date of installation of the Product, and all other terms of this warranty shall be applicable except the duration of the warranty. 6. THIS WARRANTY GIVES YOU SPECIFIC LEGAL RIGHTS. YOU MAY HAVE OTHER RIGHTS WHICH VARY FROM STATE TO STATE, PROVINCE TO PROVINCE OR COUNTRY TO COUNTRY. 7. To obtain warranty repair service under this warranty, you must take the Product or deliver it prepaid to a TOTO service facility together with proof of purchase (original sales receipt) and a letter stating the problem, or contact a TOTO distributor or products service contractor, or write directly to TOTO U.S.A., INC., 1155 Southern Road, Morrow, GA 30260 (888) 295 8134 or (678) 466-1300, if outside the U.S.A. If, because of the size of the Product or nature of the defect, the Product cannot be returned to TOTO, receipt by TOTO of written notice of the defect together with proof of purchase (original sales receipt) shall constitute delivery. In such case, TOTO may choose to repair the Product at the purchaser’s location or pay to transport the Product to a service facility. THIS WRITTEN WARRANTY IS THE ONLY WARRANTY MADE BY TOTO. REPAIR, REPLACEMENT OR OTHER APPROPRIATE ADJUSTMENT AS PROVIDED UNDER THIS WARRANTY SHALL BE THE EXCLUSIVE REMEDY AVAILABLE TO THE ORIGINAL PURCHASER. TOTO SHALL NOT BE RESPONSIBLE FOR LOSS OF THE PRODUCT OR FOR OTHER INCIDENTAL, SPECIAL OR CONSEQUENTIAL DAMAGES OR EXPENSES INCURRED BY THE ORIGINAL PURCHASER, OR FOR LABOR OR OTHER COSTS DUE TO INSTALLATION OR REMOVAL, OR COSTS OF REPAIRS BY OTHERS, OR FOR ANY OTHER EXPENSE NOT SPECIFICALLY STATED ABOVE. IN NO EVENT WILL TOTO’S RESPONSIBILITY EXCEED THE PURCHASE PRICE OF THE PRODUCT. EXCEPT TO THE EXTENT PROHIBITED BY APPLICABLE LAW, ANY IMPLIED WARRANTIES, INCLUDING THAT OF MERCHANTABILITY OR FITNESS FOR USE OR FOR A PARTICULAR PURPOSE, ARE EXPRESSLY DISCLAIMED. SOME STATES DO NOT ALLOW LIMITATIONS ON HOW LONG AN IMPLIED WARRANTY LASTS, OR THE EXCLUSION OR LIMITATION OF INCIDENTAL OR CONSEQUENTIAL DAMAGES, SO THE ABOVE LIMITATION AND EXCLU- 7 ENGLISH 1. TOTO® warrants its residential faucets and bathroom accessories (“Product") to be free from defects in materials and workmanship during normal use when properly installed and serviced, for the lifetime of the Product from date of purchase. This limited warranty is extended only to the ORIGINAL PURCHASER of the Product and is not transferable to any third party, including but not limited to any subsequent purchaser or owner of the Product. This warranty applies only to TOTO Product purchased and installed in North, Central and South America. ÍNDICE ¡Gracias Por Elegir TOTO!���������������������������������������������������������������������������������� 8 Cuidado y Limpieza��������������������������������������������������������������������������������������������� 8 Advertencias��������������������������������������������������������������������������������������������������������� 8 Herramientas Necesarias������������������������������������������������������������������������������������ 9 Antes de la Instalación���������������������������������������������������������������������������������������� 9 Partes Incluidas���������������������������������������������������������������������������������������������������� 9 Procedimiento de Instalación���������������������������������������������������������������������� 10-12 Garantía�������������������������������������������������������������������������������������������������������������� 13 Dimensiones Preliminares ��������������������������������������������������������������������������� 20-21 ESPAÑOL ¡GRACIAS POR ELEGIR TOTO! La misión de TOTO es dar al mundo estilos de vida más saludables, higiénicos y cómodos. Diseñamos cada producto guiándonos por el principio del equilibrio entre forma y función. Felicitaciones por su elección. CUIDADO Y LIMPIEZA Su nuevo grifo está diseñado para años de funcionamiento sin problemas. Manténgalo luciendo como nuevo mediante una limpieza periódica con jabón suave, enjuague minuciosamente con agua tibia y séquelo con un paño limpio y suave. No use limpiadores abrasivos, lana de acero ni productos químicos fuertes ya que éstos opacarán el acabado. El no cumplir con estas instrucciones podría anular su garantía. ADVERTENCIAS Para un funcionamiento seguro, tenga en cuenta lo siguiente: Presión de funcionamiento: Presión mínima……..20 psi (0.14 MPa), dinámico Presión máxima…….80 psi (0.55 MPa), estática No use el producto a una temperatura ambiente inferior a 32°F (0°C). 8 HERRAMIENTAS NECESARIAS Llave Ajustable Destornillador Cumpla con todos los códigos locales de plomería. Asegúrese de que el suministro de agua esté cerrado. Lea estas instrucciones con atención para asegurar una instalación correcta. TOTO se reserva el derecho de actualizar el diseño del producto sin previo aviso. Verifique para asegurarse de tener las piezas que se indican a continuación: PARTES INCLUIDAS Montaje del drenaje Montaje del surtidor Montaje de la manija(2X) Barra de elevación del drenaje* Set de herramientas para la válvula (2X) Herramientas para el montaje del surtidor Montaje de la válvula (2X) * El producto real puede variar en apariencia dependiendo del modelo. 9 ESPAÑOL ANTES DE LA INSTALACIÓN PROCEDIMIENTO DE INSTALACIÓN - Válvulas 1. Enrosque una tuerca de montaje en la parte inferior de la válvula. Coloque una arandela y junta como se muestra. NOTA: la válvula del agua caliente tiene una marca roja de un lado del cuerpo. 2. Pase la válvula hacia arriba a través Junta (hule) del orificio de instalación. Junta (hule) Arandela (metal) Tuerca de montaje Collar Arandela (metal) ESPAÑOL Inserte la junta y apriete el collar al cuerpo de la válvula hasta que se Tuerca de montaje detenga. 3. Fije la válvula enroscando la tuerca de montaje a la válvula hasta que unta (hule) quede bien apretada con la mano. Collar randela (metal) Apriete los tornillos de fijación de la misma forma para asegurarlos. erca de montaje ¡No apriete de más! Junta Tornillos de Montage 4. Repita los pasos 1-3 para la válvula restante. NOTA: Las mangueras para conectar las entradas de la válvula a las líneas de suministro de agua no están incluidas. 10 Junta Tornillos de Montage PROCEDIMIENTO DE INSTALACIÓN - Grifo 5.Coloque la junta debajo del surtidor. NOTA: Si está instalando un modelo Vivian, coloque la junta debajo del anillo de decoración y colóquelos sobre el orificio de montaje. Pase las mangueas de suministro y la tachuela de montaje hasta que el surtidor quede apoyado. Anillo en O 6. Oriente el surtidor según se necesite. Desde la parte inferior de la superficie de montaje, coloque la junta en forma de media luna y la arandela sobre la tachuela de montaje, tal como se muestra. Tachuela de montaje Junta (hule) Arandela (metal) Tuerca de montaje Apriete la tuerca de montaje a la tachuela para asegurar el surtidor. Apriete con la llave inglesa según sea necesario. 7. Conecte cada manguera al puerto lateral de cada válvula. Apriete con la llave inglesa. NOTA: si las manijas no alinean como deseado, remueva la manija de la válvula. Reinstale la manija girando la válvula un (1) diente. Ajustes pequeños pueden hacerse con un poco de rotación de la válvula instalada debajo de la superfície . PROCEDIMIENTO DE INSTALACIÓN - Manijas 8. Oriente el montaje de la manija y bájelo hacia la parte expuesta de la válvula hasta que quede en su lugar. Rote la base (domo) del montaje de la manija para sujetarlo a la válvula. Repita para el montaje de la otra válvula. NOTA: Si las manijas no se alinean exactamente como se desea, rote la válvula desde la superficie instalada abajo según sea necesario. Montaje de la manija* Valvula 11 ESPAÑOL Surtidor* PROCEDIMIENTO DE INSTALACIÓN - Desagüe 9. Inserte la barra de elevación del drenaje a través de la abertura en el surtidor. Barra de elevación del drenaje * ESPAÑOL 10. Retire el pistón, reborde y junta (plana) del montaje del drenaje aflojando el reborde y jalando estas partes del drenaje. Inserte el cuerpo del drenaje hacia arriba a través del orificio del drenaje desde la parte inferior del lavamanos. Si es necesario, gire la tuerca y empuje la arandela y la junta (gruesa) hacia abajo para dejar un espacio. Plunger Pistón Flange Reborde Gasket (flat) Junta Mientras sostiene el cuerpo del drenaje en su lugar, sujete el reborde al cuerpo del Gasket (thick) Arandela Washer drenaje desde la parte superior. Asegúrese Tuerca Nut que la junta (plana) esté entre el reborde y Tailpiece el lavamanos tal y como se muestra. Una vez Pieza de que el reborde esté perfectamente asentado, cola gire la tuerca debajo del lavamanos hacia arriba hasta que se forme un buen sello. Reinserte el pistón si es necesario. ¡No apriete de más! Body Cuerpo 11. Prepare el brazo de pivote colocando un buje de cada lado del balón de pivote tal y como se muestra. Inserte el extremo corto Tornillo de mariposa de la barra dentro del cuerpo del drenaje y a través del orificio Barra de del ojete en el pistón. Sujete la elevación del tuerca del balón de pivote para drenaje Barra del asegurarlo. conector Inserte la barra de elevación del drenaje a través de los dos (2) orificios en el extremo cuadrado de la barra del conector. Deslice la barra del conector hacia arriba de la barra de elevación Brazo de del drenaje hasta una ubicación pivote adecuada de tal forma que el Bujes Tuerca del balón brazo de pivote pueda pasar a de pivote través de uno de los oficios de montaje tal y como se muestra. Asegure la barra del conector al brazo de pivote utilizando la abrazadera de resorte. Un extremo de la abrazadera de resorte deberá estar en el brazo de pivote antes de montar la barra del conector. Apriete el tornillo de mariposa en la barra del conector para asegurarla a la barra de elevación del drenaje. Realice pruebas para asegurar que todas las uniones estén funcionando adecuadamente y que no ocurran fugas. Ajuste si es necesario. 12 GARANTÍA 1. TOTO® garantiza que sus grifos residenciales y accesorios de baño (“Producto”) no presentan defectos en sus materiales ni de fabricación durante su uso normal cuando son instalados y mantenidos adecuadamente, de por vida para el Producto a partir de la fecha de compra. Esta garantía limitada es válida solamente para el COMPRADOR ORIGINAL del Producto y no es transferible a una tercera persona, incluyendo, pero sin limitarse a, cualquier comprador o propietario subsecuente del Producto. Esta garantía aplica solamente al Producto TOTO comprado e instalado en América del Norte, Central, y del Sur. 3. Esta garantía no aplica en los siguientes casos: a.Daño o pérdida ocurrida en un desastre natural, tal como: incendio, sismo, inundación, relámpago, tormenta eléctrica, etc. b.Daño o pérdida resultado de cualquier accidente, uso no razonable, mal uso, abuso, negligencia o cuidado, limpieza o mantenimiento inadecuado del Producto, incluyendo el uso de un agente limpiador abrasivo o el uso de cualquier otro producto de limpieza de manera inconsistente con las instrucciones del Producto. c. Daño o pérdida causada por los sedimentos o material extraña contenida en un sistema de agua. d.Daño o pérdida causada por una mala instalación o por la instalación del Producto en un ambiente duro y/o peligroso, o una remoción, reparación o modificación inadecuada del Producto. e.Daño o pérdida causada por sobrecargas eléctricas o rayos u otros actos que no sean responsabilidad de TOTO o que el Producto no esté especificado para tolerar. f.Daño o pérdida causada por el uso normal y personalizado, tal como reducción del brillo, rayado o pérdida de color en el tiempo debido al uso, prácticas de limpieza o condiciones del agua o atmosféricas. 4. Para que esta garantía limitada sea válida, prueba de compra es necesaria. TOTO anima el registro de la garantía sobre compra para cree un archivo de la propiedad del producto en http://www.totousa.com. El registro del producto es totalmente voluntario y la falta a registrar no disminuirá sus derechas de garantía limitada. 5. Si el Si el producto es utilizado comercialmente o es instalado fuera de América del Norte, Central o del Sur, TOTO garantiza que el producto no presenta defectos en sus materiales ni de fabricación durante su uso normal por un periodo de un (1) año a partir de la fecha de instalación del Producto, y todos los otros términos de esta garantía deberán aplicar excepto la duración de la garantía. 6. ESTA GARANTÍA LE DA DERECHOS LEGALES ESPECÍFICOS. USTED PODRÍA TENER OTROS DERECHOS QUE PUEDEN VARIAR DEPENDIENDO DEL ESTADO O PROVINCIA EN EL QUE SE ENCUENTRE. 7. Para obtener el servicio de reparación de esta garantía, debe llevar el Producto o enviarlo prepagado a un modulo de servicios TOTO junto con la prueba de compra (recibo de compra original) y una carta en la que plantee el problema, o póngase en contacto con un distribuidor TOTO o el contratista de servicio de los productos, o escriba directamente a TOTO U.S.A., INC., 1155 Southern Road, Morrow, GA 30260 (888) 295 8134 o (678) 466-1300, si fuera de los E.E.U.U. Si, debido al tamaño del producto o naturaleza del defecto, el Producto no puede ser devuelto a TOTO, la recepción en TOTO del aviso escrito del defecto junto con la prueba de compra (recibo de compra original) constituirá el envío. En tal caso, TOTO podrá escoger entre reparar el Producto en el domicilio del comprador o pagar el transporte del Producto a un módulo de servicio. ESTA GARANTÍA ESCRITA ES LA ÚNICA GARANTÍA HECHA POR TOTO. LA REPARACIÓN, CAMBIO U OTRO AJUSTE ADECUADO, TAL COMO APARECE EN ESTA GARANTÍA, SERÁ EL ÚNICO REMEDIO DISPONIBLE PARA EL COMPRADOR ORIGINAL. TOTO NO SERÁ RESPONSABLE POR LA PÉRDIDA DEL PRODUCTO O POR CUALQUIER OTRO DAÑO ACCIDENTAL, ESPECIAL O CONSECUENTE O POR DAÑOS INCURRIDOS POR EL COMPRADOR ORIGINAL, O POR LA MANO DE OBRA U OTROS COSTOS RELACIONADOS CON LA INSTALACIÓN O REMOCIÓN, O COSTOS DE REPARACIONES HECHAS POR OTROS, O POR CUALQUIER OTRO GASTO NO INDICADO DE MANERA ESPECÍFICA EN LOS PÁRRAFOS ANTERIORES. EN NINGÚN CASO LA RESPONSABILIDAD DE TOTO EXCEDERÁ EL PRECIO DE COMPRA DEL PRODUCTO. EXCEPTO EN LA MEDIDA EN QUE QUEDE PROHIBIDO POR LA LEY APLICABLE, TODA GARANTÍA IMPLÍCITA, INCLUYENDO AQUELLAS DE COMERCIABILIDAD O IDONEIDAD DE USO PARA EL USO O PARA UN PROPÓSITO PARTICULAR, ESTÁ EXPRESAMENTE PROHIBIDA. ALGUNOS ESTADOS NO PERMITEN LAS LIMITACIONES ACERCA DE LA DURACIÓN DE UNA GARANTÍA TÁCITA, O LA EXCLUSIÓN O LIMITACIÓN DE DAÑOS INCIDENTALES O CONSECUENTES, POR LO QUE LA LIMITACIÓN E INCLUSIÓN ANTERIORES PUEDEN NO APLICAR A USTED. 13 ESPAÑOL 2. Las obligaciones de TOTO bajo esta garantía se limitan a la reparación, cambio o cualquier otro ajuste, a petición de TOTO, del Producto o partes que resulten defectuosas en su uso normal, siempre que dicho Producto haya sido instalado, utilizado y mantenido de acuerdo con las instrucciones. TOTO se reserve el derecho de hacer tantas inspecciones como sean necesarias para determinar la causa del defecto. TOTO no cobrará por la mano de obra o partes relacionadas con las reparaciones o cambios garantizados. TOTO no es responsable por el costo de la remoción, devolución y/o reinstalación del Producto. TABLE DES MATIÈRES Merci d’Avoir Choisi TOTO!����������������������������������������������������������������������������� 14 Entretien et Nettoyage������������������������������������������������������������������������������������� 14 Avertissements�������������������������������������������������������������������������������������������������� 14 Outils Nécessaires��������������������������������������������������������������������������������������������� 15 Avant de Commencer��������������������������������������������������������������������������������������� 15 Pièces incluses��������������������������������������������������������������������������������������������������� 15 Procédure d’Installation�������������������������������������������������������������������������������16-18 Garantie ������������������������������������������������������������������������������������������������������������ 19 Dimensions Brutes���������������������������������������������������������������������������������������20-21 MERCI D’AVOIR CHOISI TOTO! La mission de TOTO est d’offrir au monde entier un style de vie sain, hygiénique et plus confortable. Comme principe de base, nous concevons chaque produit avec un équilibre entre la forme et la fonction. Félicitations pour votre choix. FRANÇAIS ENTRETIEN ET NETTOYAGE Votre nouveau robinet mélangeur est conçu pour un rendement sans problèmes et ce, pour de nombreuses années. Maintenez son aspect de neuf en le nettoyant régulièrement avec un savon doux, rincez-le à fond avec de l’eau chaude et essuyez-le avec un chiffon doux et propre. N’utilisez pas de nettoyants abrasifs, laine d’acier ou produits chimiques corrosifs car ils terniront la finition. Le non-respect de ces directives peut annuler votre garantie. AVERTISSEMENTS Pour un fonctionnement sécuritaire, veuillez observer les indications suivantes: Pression de fonctionnement : Pression minimum …….. 20 psi (0.14 MPa), dynamique Pression maximum ……. 80 psi (0.55 MPa), statique N’utilisez pas le produit à une température ambiante sous 32°F (0°C). 14 OUTILS NÉCESSAIRES Tournevis Clé à molette AVANT DE COMMENCER Observez tous les codes locaux de plomberie. Assurez-vous que l’alimentation d’eau est coupée. L isez ces instructions attentivement afin d’assurer une installation adéquate. V érifiez pour vous assurer d’avoir toutes les pièces ci-dessous à portée de main: PIÈCES INCLUSES Assemblage du drain Tige de levage du drain* Assemblage du Bec Assemblage de la poignée(2X) Ensemble du matériel de la valve (2X) Matériel de montage du bec Ensemble de la valve (2X) * Le produit réel peut varier en apparence en fonction du modèle. 15 FRANÇAIS T OTO se réserve le droit de modifier la conception du produit sans préavis. PROCÉDURE D’INSTALLATION- Valves 1. Enfilez un écrou de montage au fond de la valve. Placez une rondelle et un joint comme indiqué. Joint (caoutchouc) Joint (caoutchouc) REMARQUE: Le robinet d’eau chaude a une marque rouge sur le côté du corps. Ecrous montage Ecrous de de montage La rondelle (métal) La rondelle (métal) 2. Passez la valve dans le trou Joint (caoutchouc) d’installation. Col Col La rondelle (métal) Insérez le joint et fixez le col au corps de la valve jusqu’à ce qu’il s’arrête. Ecrous de montage Joint Joint FRANÇAIS 3.Fixez la valve en vissant l’écrou de montage vers le haut de la valve oint (caoutchouc) jusqu’à ce que la main soit serrée. Serrer les vis de fixationCol de manière La rondelle (métal) égale pour sécuriser. Ne serrez pas trop! L’ecrous L’ecrous devis de vis rous de montage Joint 4. Répétez les étapes 1-3 pour la valve restante. REMARQUE: Les tuyaux doivent relier les entrées de la valve d’alimentation en eau non inclus. 16 L’ecrous de vis PROCÉDURE D’INSTALLATION - Bec 5. Placez le joint sous le bec. REMARQUE: Si vous installez un modèle Vivian, placez le joint sous l’anneau de décor et placez le sur le trou de montage. Passez les tuyaux d’approvisionnement et le goujon de montage à travers le trou de montage jusqu’à ce que le bec verseur se retrouve en position finale. Bec* Joint 6. Orientez le bec, au besoin. Du dessous de la surface de montage, placez le joint en forme de croissant et la rondelle sur la tige de montage comme indiqué. Goujon de montage Le joint (caoutchouc) La rondelle (métal) Fixez l’écrou de montage à la tige pour fixer le bec. Serrez avec une clé anglaise si nécessaire. Montage écrou FRANÇAIS 7.Connectez chaque tuyau à l’orifice latéral de chaque valve. Serrez avec une clé. NOTE: si les poignées ne s’alignent pas comme desirée. Retirez la poignée de la valve. Reinstallez la poignée et tournez la valve un (1) dent. De petits ajustements peuvent être faits avec une rotation de la valve installé sous la surface. PROCÉDURE D’INSTALLATION - Poignées 8.Orientez l’ensemble de la poignée et abaissez sur la partie exposée de la valve jusqu’à ce qu’elle soit engagée. Faites tourner la base (dôme) de l’ensemble de la poignée pour le fixer à la valve. Répétez l’opération pour l’assemblage d’autre poignée. REMARQUE: Si les poignées ne s’alignent pas exactement comme vous le souhaitez, au besoin faites tourner la valve à partir du dessous de la surface installée. 17 Ensemble de la poignée Valve PROCÉDURE D’INSTALLATION - Vidage 9. Insérez la tige de levage du drain par l’ouverture du bec. Tige de levage du drain* 10.Retirez le piston, la bride et le joint (plat) de l’ensemble du drain en déserrant la bride et en tirant ces pièces du drain. Insérez le corps du drain à travers le trou du drain à partir du bas des toilettes. Si nécessaire, tournez l’écrou et poussez la rondelle et le joint (épais) vers le bas pour permettre le dégagement. FRANÇAIS Tout en tenant le corps du drain en place, fixez la bride sur le corps du drain à partir du haut. Assurez-vous que le joint (plat) est entre la bride et les toilettes comme indiqué. Une fois que la bride est bien en place, tournez l’écrou en dessous du lavabo jusqu’à ce qu’une bonne étanchéité soit formée. Réinsérez le piston si nécessaire. Plunger Piston Flange Bride Gasket (flat) Joint Gasket (thick) Joint Washer Rondelle Nut Écrou Tailpiece Cordier Body Corps Ne serrez pas trop! 11. Préparez le bras pivotant en plaçant un coussinet sur chaque côté de la rotule Vis de serrage comme indiqué. Insérez l’extrémité courte de la tige Tige de levage dans le corps du drain et à du drain travers le trou d’oeillet dans le piston. Vissez l’écrou à rotule Tige du pour le sécuriser. Connecteur Insert the drain lift rod through the two (2) holes in the square end of the connector rod. Insérez la tige de levage du drain à travers les deux (2) trous à l’ extrémité carrée de la Bras pivotant tige du connecteur. Coussinets écrou à rotule Fixez la tige du connecteur au bras pivotant en utilisant la pince à ressort. Une extrémité de la pince à ressort devra être sur le bras pivotant avant que la tige du connecteur ne soit assemblée. Serrez la vis de serrage à la tige dans le connecteur pour la fixer à la tige de levage du drain. Effectuez des tests pour vous assurer que tous les liens fonctionnent correctement et qu’aucune fuite ne se produit. Réglez si nécessaire 18 GARANTIE 1. TOTO® garantit ses robinets résidentiels et accessoires de bain (« Produit ») contre tout défaut de matériau et de fabrication pendant l’utilisation normale, lorsqu`ils sont correctement installés et maintenus pendant la durée de vie du produit à partir de la date d`achat du produit. La présente garantie limitée ne peut être prolongée que pour le seul ACHETEUR D`ORIGINE de l`appareil et n`est pas transférable à un tiers, y compris mais pas limité à tout acheteur ou propriétaire subséquent du produit. Cette garantie n’est applicable qu’aux produits achetés et installés en Amérique du Nord, Centrale, et du Sud. 3. La garantie ne s`applique pas dans les cas suivants: a. Dommage ou perte suite à une cause naturelle telle que incendie, tremblement de terre, inondation, tonnerre, orage etc. b. Dommage ou perte causé par tout accident, utilisation non adaptée, abus, négligence ou mauvais traitement, nettoyage ou entretien de l`appareil, y compris l`utilisation d`agent abrasif ou l`utilisation d`autres produits de nettoyage de façon incompatible aux instructions de l`appareil. c. Dommage ou perte causé par des sédiments ou tout autre corps étranger contenus dans un réseau d`alimentation en eau. d. Dommage ou perte suite à une mauvaise installation ou à l`installation de l`appareil dans un environnement rude et/ou dangereux ou une mauvaise désinstallation, réparation ou modification de l`appareil. e. Dommage ou perte suite à des surtensions, foudres ou tous autres actes qui ne sont pas la responsabilité de TOTO, ou actes stipulés non supportables par le produit. f. Dommage ou perte résultant d`une usure normale et habituelle, telle que la diminution du lustre, grattage ou décoloration avec le temps, habitude de nettoyage, l`eau, ou des conditions atmosphériques. 4. Pour que la garantie limitée soit valable, la preuve d’achat est exigée. TOTO vous encourage à enregistrer votre produit après l’achat pour créer un record du propriété, cela peut être fait au site http://www.totousa. com. L’enregistrement du produit est complètement volontaire et à défaut de l’enregistrement ne va pas limiter votre droit au garantie limitée. 5. Si le produit est utilisé dans un but commercial ou installé en dehors de L`Amérique du Nord, Centrale ou du Sud, TOTO garantit que le produit est exempt de tous défauts matériels et de fabrication pour une utilisation normale pendant une durée de an (1) à partir de la date d`installation du produit, en plus de respecter tous les autres termes sauf la durée de cette garantie. 6. CETTE GARANTIE DONNE DES DROITS SPÉCIFIQUES. IL EST POSSIBLE QUE L’ACHETEUR AIT D’AUTRES DROITS QUI VARIENT DUN ÉTAT A UN AUTRE OU D’UNE PROVINCE À L’AUTRE. 7. Pour obtenir une réparation selon les termes de cette garantie, l’acheteur doit livrer le produit dans un centre de réparation de TOTO port payé avec preuve d’achat (reçu de caisse original), et une lettre expliquant le problème, ou contacter un distributeur de TOTO ou un entrepreneur de réparation du produit ou écrire directement à TOTO U.S.A., INC., Southern Road, Morrow, Géorgie 30260, (888) 295-8134 ou appelé (678) 466-1300, si en dehors de L’Etat Unis. Si, à cause de la taille du produit ou de la nature du défaut, il n’est pas possible de renvoyer le produit à TOTO, la réception par TOTO d’un avis écrit du défaut avec preuve d’achat (reçu de caisse original) constitue livraison. Dans un tel cas, TOTO peut choisir de réparer le produit chez l’acheteur ou de payer le transport du produit à un centre de réparation. CETTE GARANTIE ÉCRITE EST LA SEULE GARANTIE FAITE PAR TOTO®. LA RÉPARATION, LE REMPLACEMENT OU TOUT AUTRE AJUSTEMENT APPROPRIÉ SELON LES TERMES DE CETTE GARANTIE EST LE SEUL RECOURS DE L’ACHETEUR INITIAL. TOTO N’EST PAS RESPONSABLE DE LA PERTE DU PRODUIT OU DE TOUT AUTRE DOMMAGE INDIRECT, SPÉCIAL OU SECONDAIRE OU DES DÉPENSES ENCOURUES PAR L’ACHETEUR INITIAL NI DE LA MAIN-D’OEUVRE OU AUTRES FRAIS ASSOCIÉS À L’INSTALLATION OU LA MANIPULATION, OU LES FRAIS DE RÉPARATION PAR DES TIERS, NI POUR TOUS AUTRES FRAIS PAS SPÉCIFIQUEMENT MENTIONNÉS. EN AUCUN CAS, LA RESPONSABILITÉ DE TOTO NE PEUT DÉPASSER LE PRIX D’ACHAT DU PRODUIT. SAUF QUAND INTERDITE PAR UNE LOI APPLICABLE, TOUTE GARANTIE SOUS-ENTENDUE, Y COMPRIS CELLE DE VENDABILITÉ OU D’APPLICATION POUR UN USAGE PARTICULIER, EST EXPRESSÉMENT REJETÉ. CERTAINES PAYS NE PERMETTENT PAS LA LIMITATION DE LA LONGUEUR D’UNE GARANTIE SOUS-ENTENDUE, OU L’EXCLUSION OU LA LIMITATION DES DOMMAGES INDIRECTS OU SECONDAIRES, IL EST DONC POSSIBLE QUE CETTE LIMITATION ET EXCLUSION NE S’APPLIQUE PAS À VOTRE CAS. 19 FRANÇAIS 2. Les obligations de TOTO selon les termes de cette garantie sont limitées à la réparation, remplacement ou autre ajustement en conséquent, au choix de TOTO, des produits ou des pièces défectueuses en service normal, pourvu qu’un tel produit ait été installé, utilisé et entretenu conformément aux instructions. TOTO se réserve le droit d`effectuer ce genre de vérifications en cas de nécessité afin de déterminer la cause du défaut. TOTO ne facturera pas les interventions ou les pièces relatives à la réparation et au remplacement sous garantie. TOTO n`est pas responsable du coût de désinstallation, de renvoi et/ou de réinstallation de l`appareil. ROUGH-IN DIMENSIONS / DIMENSIONES PRELIMINARES / DIMENSIONS BRUTES TL220DDH CLOSED HOT 1-1/4" - 1-3/8" [32-35mm] Hole 90˚ 1/2" NPSM OPEN 6-12" [152-305mm] 1-3/8" - 1-1/2" [35-39mm] Hole HOT COLD OPEN 90˚ CLOSED COLD 2-1/16" 52mm 2-7/8" 73mm 4-1/8" 106mm 1/2" NPSM 4-3/4" 121mm 2-1/8" 54mm 1-5/16" 34mm 1-1/4" 32mm 30˚ 7-1/2" 190mm 5-9/16" 141mm 7-3/4" 196mm 20 ROUGH-IN DIMENSIONS / DIMENSIONES PRELIMINARES / DIMENSIONS BRUTES TL220DD1H 90˚ CLOSED HOT OPEN 3-3/16" 81mm 1/2" NPSM 6-12" [152-305mm] 1-1/4" - 1-3/8" [32-35mm] Hole 1-3/8" - 1-1/2" [35-39mm] Hole HOT COLD OPEN CLOSED 90˚ COLD 4-1/8" 106mm 2-7/8" 73mm 2-1/16" 52mm 1/2" NPSM 4-3/4" 121mm 2-1/8" 54mm 1-5/16" 34mm 1-1/4" 32mm 30˚ 7-1/2" 190mm 5-9/16" 141mm 7-3/4" 196mm 21 TOTO U.S.A., Inc. 1155 Southern Road, Morrow, Georgia 30260 Tel: 888-295-8134 Fax: 800-699-4889 www.totousa.com 0GU4251 Rev A Warranty Registration and Inquiry For product warranty registration, TOTO U.S.A. Inc. recommends online warranty registration. Please visit our web site http://www.totousa.com. If you have questions regarding warranty policy or coverage, please contact TOTO U.S.A. Inc., Customer Service Department, 1155 Southern Road, Morrow, GA 30260 (888) 295-8134 or (678) 466-1300 when calling from outside of U.S.A.