1
Owner's Manual
Manual del Propietario
®
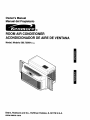
ROOM AIR CONDITIONER
ACONDICIONADOR DE AIRE DE VENTANA
Model, Modelo 580.73069_
Sears, Roebuck and Co., Hoffman Estates, IL 60179 U.S.A.
www.sears.com
TABLE
OF CONTENTS
Air Direction Adjustment......................... 11
..............................................
2
Remote Control ......................................
12
.....................................................
3
How to Insert Batteries into
remote control ........................................
12
WARRANTY
SAFETY
........................ 2
ImportantSafety Instructions...................... 3
MAINTENANCE
ELECTRICAL
REQUIREMENTS
.....................................
13
....... 4
Air Filter Cleaning ................................... 13
INSTALLATION
........................................
5
Air Conditioner Cleaning ........................ 13
Installation Requirements ......................... 5
How to Removethe FrontGdlle.................. 13
Installation ................................................
6
How to Replacethe FrontGrille.................. 13
How to Install............................................
6
TROUBLESHOOTING
......................... 14
Removalfrom Window................................. 8
Before Calling for Service ...................... 14
OPERATION
........................... ;................. 9
ESPAI_IOL
How and Why ...........................................
9
Normal Sounds ........................................
9
15
MASTER PROTECTION
AGREEMENTS ......................................
31
Capacity and Running Time ..................... 9
Features .................................................
................................................
10
SERVICE
NUMBERS
............BackCover
Using the Air Conditioner ....................... 10
Display ...................................................
FULL ONE YEAR WARRANTY
ROOM AIR CONDITIONER
11
WARRANTY SERVICE IS AVAILABLE BY
CONTACTING SEARS SERVICE AT
1-800-4-MY-HOME ®
ON
For one year from the date of purchase, when this
air conditioner is operated and maintained for
normal room cooling according to instructions in this
owner's manual, Sears will repair this air
conditioner, free of charge, if defective in material or
workmanship.
Warranty coverage applies only to air conditioners
used for non-commercial, private household
purposes.
This warranty applies only while this product is in
use in the United States.
FULL FIVE-YEAR WARRANTY ON
SEALED REFRIGERATION SYSTEM
This warranty gives you specific legal rights, and
you may also have other right which vary from state
to state.
For five years from the date of purchase, when this
air conditioner is operated and maintained for
normal room cooling according to instructions in this
owner's manual, Sears will repair the sealed
refrigeration system (consisting of refrigerant,
connecting tubing, and compressor), free of charge,
if defective in material or workmanship.
Sears, Roebuck and Co., D/817WA,
Hoffman Estates, IL 60179 U.S.A.
-2-
IMPORTANT
SAFETY INSTRUCTIONS
The safely instructions below will tell you how to use your room air conditioner to avoid harm to yourself or
damage to yourROOM AIR CONDITIONER.
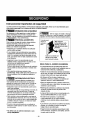
FOR YOUR SAFETY
Do not store or use gasoline or other flammable
vapors and liquids in the vicinity of this or any other
appliance. Read product labels for flammability and
other warnings.
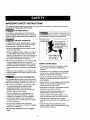
PREVENT
_
Avoid fire hazard or electric shock. Do
not use an extension cord or an adapter ptug.
Do not remove any prong from the power cord.
Grounding type
wall
ACCIDENTS
To reduce the risk of fire, electrical shock, or injury
to persons when using your air conditioner, follow
basic precautions, including the following:
• Be sure the electrical service is adequate for the
model you have chosen.
• If the air conditioner is to be installed i_na window,
you will probably want to clean both sides of the
glass first. If the window is a triple-track type with a
screen panel included, you may want to remove
the screen completely before installation.
L
Power supply cord
with 3-prong
_,_,
grounding plug
\,
• Be sure the air conditioner has been securely and
correctly installed according to the separate
installation instructions provided with this manual.
Save this manual and installation instructions for
possible future use in removing or reinstalling this
unit.
ENERGY SAVING IDEAS
• The capacity of the room air conditioner must fit
the room size for efficient and satisfactory
operation.
• Use gloves when handling the air conditioner. Be
careful to avoid cuts from sharp metal fins on front
and rear coils.
ELECTRICAL
/
Do not, under any
[
circumstances, cut,
remove, or bypass
the grounding prong
from this plug.
• Install the room air conditioner on the shady side
of your home. A window that faces nodh is best
because it is shaded most of the day.
• Do not block air flow inside with blinds, cudains, or
furniture, or outside with shrubs, enclosures, or
other buildings.
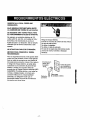
INFORMATION
The complete electrical rating of your new room air
conditioner is stated on the serial plate. Refer to the
rating when checking the electrical requirements.
• Close the floor and wall registers and the fireplace
damper so cool air does not escape up the
chimney and into the duct work.
• Be sure the air conditioner is properly grounded.
To minimize shock and fire hazards, proper
grounding is important. The power cord is
equipped with a three-prong grounding plug for
protection against shock hazards.
• Keep blinds and drapes in other windows closed
during the sunniest pad of the day.
• Clean the air filter as recommended in the
MAINTENANCE section of this manual.
• Your air conditioner must be plugged into in a
properly grounded wall receptacle. If the wall
receptacle you intend to use is not adequately
grounded or protected by a time delay fuse or
circuit breaker, have a qualified electrician install
the proper receptacle.
• Proper insulation and weather stripping in your
home will help keep warm air out and cool air in.
• External house shading with trees, plants or
awnings will help reduce the air conditioner's work
load.
• Do not run air conditioner with a protective
covering. This could result in mechanical damage
within the air conditioner.
• Operate heat producing appliances such as
ranges, washers, dryers, and dishwashers during
the coolest pad of the day.
• Do not use an extension cord or an adapter
plug.
-3-
OBSERVE ALL LOCAL CODES AND
ORDINANCES.
DO NOT, UNDER ANY CIRCUMSTANCES,
REMOVE THE POWER SUPPLY CORD
GROUND PRONG.
ELECTRICAL GROUND IS REQUIRED ON
THIS APPLIANCE.
A 115-volt 60 Hz, AC only, 15A fused and
properly grounded electrical supply is required.
A time delay fuse or time delay circuit breaker
is recommended. Use a dedicated circuit,
serving only this appliance.
Electrical Shock Hazard
Plug into a grounded 3 prong outlet.
Do not remove ground prong.
Do not use an adapter.
Do not use an extension cord.
DO NOT USE AN EXTENSION CORD.
RECOMMENDED
Failure to follow these instructions can result
in death, fire, or electrical shock.
GROUNDING METHOD
For your personal safety, this appliance must
be grounded. This appliance has a power
supply cord with a 3-prong grounding plug. To
minimize possible shock hazard, the cord must
be plugged into a mating grounding type wall
receptacle and grounded in accordance with
the National Electrical Code (ANSI/NFPA 70)
latest edition and all local codes and
ordinances. If a mating wall receptacle is not
available, it is the personal responsibility and
obligation of the customer to have a properly
grounded 3-prong wall receptacle installed by a
qualified electrician.
-4-
_3-prong
Jl_
gi!r°_l?n_p-g
"
Power _
supply
cord
_
_rtype_talclle
Ground
prong
grounding
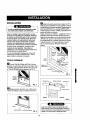
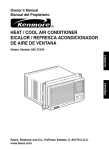
INSTALLATION REQUIREMENTS
ITEM
NAME OF PARTS
Q'TY
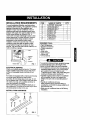
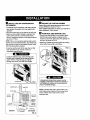
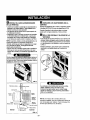
To avoid installation difficulties, read instructions
completely before starting. This publication contains
important information for the installation and
operation of your room air conditioner. Your air
conditioner will install into standard double hung
windows with actual clear opening widths of 26 to
39-3/8 inches (660mm to lOOOmm) (FIG. 1).
Lower sash must open sufficiently to allow a clear
vertical opening of 12 inches (305ram). However,
some window frame design variations require
modification to the window for safe, proper
installation. Side louvers and the roar of the air
conditioner must have clear air space to allow
enough airflow through the condenser for heat
removal. The rear of the unit must be outdoors, not
inside a building or garage.
A
B
C
D
E
SUPPORT, BRACKET
LEVELING BOLT
LEVELING BOLT
SCREW: 5/8"
SCREW: 5/8"
1
1
1
2
5
F
G
H
FOAM SEAL
FOAM STRIP
L BRACKET
1
1
1
REQUIRED TOOLS:
• Tight Fitting gloves
• Standard screwdriver
• Phillips screwdriver
• Pencil
• Sharp knife
• Tape measure
• Electric drill
• 1/4-inch drill bit
F-Sash
_I_26'(S60mm)
to_
393/8'(10(_(}mm)
12'(30_m}
m_r_.
Inner si!/ _
F
Window
_
Offset
._':'
o"'
Exterior
FIG. 1
To avoid riskof personal injury, property damage,
or product damage due to the weightof this
device and sharp edges that may be exposed:
• Air conditioners covered in this manual pose an
excessive weight hazard. Two or more people
are needed to move and install the unit.
To prevent injury or strain, use proper lifting and
carrying techniques when moving unit.
• Carefully inspect location where air conditioner
willbe installed.Be sure itwillsupportthe
weight of the unit over an extended period of
time.
• Handle air conditioner with care.
Wear protective gloves whenever lifting or
carrying the unit. AVOID the sharp metal fins of
front and rear coils.
ELECTRICAL
SERVICE
Check your available electrical service. The power
supply available must be the same as that shown
on the unit nameplate (found on left side of front
grille).
All models are equipped with a 3-prong service plug
to provide proper service and safe positive
grounding. Do not change plug in any way. Do not
use an adapter plug. If your present wall outlet does
not match your ptug, call a qualified electrician to
make the necessary corrections.
SAVE CARTON and this OWNER'S MANUAL for
future reference. The carton is the best way to store
unit during winter or when not in use.
INSTALLATION
• Make sure air conditioner does not fall during
installation.
HARDWARE
FIG. 2
-5-
INSTALLATION
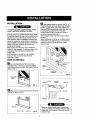
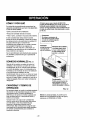
_1
Install support bracket on window. See FIG. 5.
Install leveling bolt up through bottom side of support
bracket. You can choose a short bolt(ITEM C) or a
long one (ITEM B) accordingto windowtype. Also, you
should select the positionof hole on bracket.
Positionbracket on sill 1 inch(25.4mm) to left of
center line of window (See FIG. 5).
Fasten bracket loosely to sill with screws (ITEM D)
provided.
Adjust leveling bolt so that the air conditionerwill be
installed with a very slight tilt (about 1/4") downward
toward the outside for proper drainage. Tighten
bracket screws.
To avoidthe possibiity of personalinjury,unplug
powerto unitbeforeinstallingor servicing.
Carefully remove air conditioner from carton, check
for possible shipping damage. Pick a location which
will allow you to blow the cold air into the area you
want. Windows used for installation must be strong
enough to support the weight of the air conditioner.
Good instanation with special attention to the proper
position of the unit will lessen the chance that
service will be needed.
When cooling more than one room, installation
location is very important. To cool your rooms, cold
air must be blown from the air conditioner in a
straight path.
If air conditioner is blocked by a storm window
frame, see Step 7 and 8 on Page 8 before
beginning to install.
SILL
HOW TO INSTALL
/
ADJUSTMENT SLOT
IIcut
the FOAM STRIP (ITEM G) to fit the
underside of the window sash. Open the window,
peel off the backing and attach the FOAM STRIP as
shown in FIG. 3.
'C)
WINDOW
SILL
1'(25 4rnn
"CENTER LINE
OF WINDOW
FIG. 5
(ITEM G)
SCREW
INNER SILL
SUPPORT
BRACKET
ABOUT 1/4"
FIG. 3
_'_ Mark center line with pencil on the center of the
inner sill, as shown in FIG. 4
INDOOR
1
INDO0 _1_1__
CENTER LINE
FIG. 6
INNER SILL
Failure to securely install support bracket may
/
result in unit falling from window if window sash is
raised after unit is installed. This could result in
personal injury.
/
FIG. 4
-6-
m
IKI INSTALL THE AIR CONDITIONER
THE WINDOW
[]
IN
SECURE THE CURTAIN FRAMES
Expand the curtain frames and secure them using 5
screws (ITEM E) as shown in FIG. 9.
When curtain frame opens or closes, you may feel a
slight resistance. This is normal.
• Carefully lift the air conditioner and slide it into the
open window. Be careful not to hurt waist in this
operation.
• Use the two hand grips on top sides of unitto lift unit.
• Make sure that support bracket is inserted in the
pocket under base fan, and that curtain frame
guide is stopped by stopper on the support bracket
as shown in FIG.8.
[]
FOAM SEAL AND WINDOW LOCK
• Cut the foam seal (ITEM F) to the window width.
Stuff the foam seal between the glass and the
window to prevent air and insects from getting into
the room, as shown in FIG.9.
NOTE: When unit is properly centered and pushed
outward to correct bracket location, you will feel unit
drop securely in place on the support bracket. Hold
unit firmly dunng this procedure.
• Install the L bracket to prevent window from being
raised which may result in unit falling.
FIG. 9
• Lower top window sash all the way down so that
sash sits firmly in top channel of unit and
expandable curtain frames.
f
During the following step, hold unitfirmlyuntil
window sash is lowered to top channel behind
curtain frames. Personal injury or property
damage may result if unit falls from window.
CENTER LINE
TOPC_!_WINDOW
SASH _
SECt,ON
' I
,'i ',
,NOOOB
ITEME
L-Bracketand curtainframescrewsmust be
installedas instructed to avoid the possibility of
unit falling from window and causing personal
injury or property damage.
FIG. 7
NOTE: If window sash has a metal surface, use
sheet metal screws instead of the provided wood
screws. Obtain sheet metal screws at local
hardware store.
HAND GRIP
*
_
SECT,ON
suR
oBx
GUTDOOH
BRACKET
PDOHET
-.LL :vi
CURTAIN
STOPPER
SUPPORT
LEVELING BOLT
OUTER SILL
INDO
DOOR
FIG. 8
-7-
D
IF AIR CONDITIONER IS BLOCKED BY
STORM WINDOW FRAME
(a) When window frame Is located on inner sill.
• If storm window presents interference, fasten a
2"(51mm) wide wood stripto the inner window sill
across the full width of the sill.The wood strip should
be thick enough to raise the height of the window sill
so that the unitcan be installedwithoutinterference
from the the storm windowframe. See FIG. 10.
Top of wood stdp shouldbe approximately
3/4"(19mm) higher than the stormwindow frame to
help condensation to drain properly to the outside.
• Installa woodstrip(windowwidth longand
windowframe heighthigh) onthe innersill.
SASHWINDOW--_
WINDOW FRAME
INNER
SILL
• Install a second wood stdp (approximately
6"(152mm) tong by 11/2"(38mm)wide and same
thickness as first strip) in the center of the outer sill
flush against the back of the inner sill. (FIG. 10)
WOOD STRIP_
WOODSTRIPMOUNTED
11/2"rain.
(38mm)
FRAME
);S]_RIP/
,o,
,_
OUTER
oSILL
o,ooo.
When storn_ window
frame is located on outer sill
I_
INSTALLATION
WINDOWS.
(b) Whenthe windowframe is higherthan
19/32"(15mm)
• Install a wood strip(about4"(102mm) long) on the
outdoor sill to raise support bracket.
;TRIP
19/32"
SILL
FIG. 10
FOR OTHER TYPE
OUTDOOR
SILL
• Dimensions and geometry of windows are different
according to manufacturers. Check your window
and refer to FIG.11 to install the support bracket
firmly.
REMOVAL
OUTDOOR
3/4"(19mm)
CLEARANCE
ONTOnOF,N ,LL W,NWW
STOnM
*
%
i
FIG. 11
FROM WINDOW
• Airconditioners coveredin this manualpose an
excessive weight hazard. Two or morepeople
are needed to move and install the unit.
To preventinjury or strain, use proper lifting and
carrying techniques when moving unit.
• When handling the air conditioner, be careful to
avoid cuts from sharp metal fins on front and
rear coils.
• Turn off and unplugthe air conditioner.
• Unscrew the side screwsthat you installed in Step 5. 6.
• Close the curtain frame and remove foam seal and L
bracket from the windows.
• Keep a firm grip on the air conditioner raise the sash.
• Lift the air conditioner from the window and remove the
foam strip from between the windows.
• Remove the support bracket from window frame.
• Make sure air conditioner does not fall during
removal.
NOTE: When cooling season is over, unit is removed
from window for cleaning and storage. There may still be
some condensation water in the basepan. Remove the
unit carefully to avoid water being spilled out on floor,
always store unit flat on its base. Do not stand on end. Be
sure to remove support bracket, L bracket, and foam seal
from window and save. Window will not close if support
bracket remains installed.
-8-
HOW AND WHY
Compressor
The modern high efficiency
compressor may have a high
pitched hum or pulsating
Your room air conditioner provides the following
functions to make hot weather living more
comfodable:
• Cools and circulates room air.
noise that cycles on andoff.
• Lowers humidity by removing excess moisture.
Fan
• Filters out summertime dust, dirt, and some
airborne impurities.
You may hear air
movement from
the fan.
The air conditioner performs these functions by
drawing room air through a filter which traps dust
and dirt particles. The air then passes over a
cooling coil which refrigerates the air and removes
excess moisture. The same air is then returned to
the room- cooler, drier, and cleaner. Moisture
removed from the room air is carried to the outside
and evaporated.
Unit Vibration -The unit may vibrate
and make noise
because of poor wall
or window construction.
Your air conditioner is designed to be easy to
operate and to provide plenty of cooling power.
NORMALSOUNDSRG.
12
Aside from the regular fan motor and compressor
sounds coming from your air conditioner, you will
once in a while hear a pinging sound. This is the
result of moisture being picked up from the air in the
room and thrown against the air conditioner's fan.
This is normal and should not be cause for concern.
Condenser-You may hear
droplets of water
hitting the condenser
causing a pinging or
clicking sound.
Also, do not be alarmed if you hear a slight hissing
or gurgling sound coming from your air conditioner
after it is off. These are normal coolant noises.
FIG. 12
CAPACITY AND RUNNING TIME
Proper unit size is important in deciding the desired
comfort for the area you want to cool. The proper
size is determined by the number of square feet in
the area to be cooled.
NOTE : In humid weather, excess water may cause
the BASE PAN to overflow and be splashed on the
louver.
Whenever the heat or humidity load is above normal
the air conditioner must run longer and more often to
keep the desired temperature you have selected.
Under heavy heat load conditions the air conditioner
may need to run constantly to keep the temperature
you want.
At times using the MED FAN setting to circulate the
room air may make it comfortable even though you
do not have the air conditioner set to cool the air.
This will decrease your cost of use.
-9-
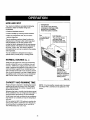
USING THE AIR CONDITIONER
FEATURES
To reduce the risk of fire, electric
shock, or injury to persons, read the important
SAFETY instructions section before operating this
appliance
To begin operating the air conditioner
installation, follow these steps:
after
t. Plug in the air coeditioner.(To prevent electrical
hazards, do not use an extension cord or an
adapter plug.)
2. Set the TEMP Control to the coolest setting.
3. Set the MODE control at the highest COOL level.
4. Adjust the louvers for comfortable air flow.
5. Once the room has cooled, adjust the TEMP and
Mode Control to the setting you find most
comfortable.
7
5
6
4
2
-3
1
NOTE : If the air conditioner is turned off, wait 3
minutes before restarting. This allows pressure
inside the compressor to equalize. Failure to wait 3
minutes before restarting may cause inefficient
operation.
If you move the TEMP Control to a warmer, then
immediately back to a cooler setting, the unit will
shut off. Wait 3 minutes before restarting.
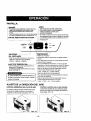
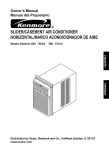
11 8
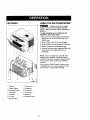
1. Cabinet
2. Vertical Louver
12
10
13
FIG.
13
8. Power Cord
3. Horizontal Louver
9. Evaporator
10. Condenser
4. Front Grille
11. Compressor
5. Inlet Grille
12. Base pan
13. Remote Control
6. Air Filter
7. Control Board
-10-
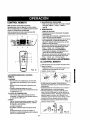
DISPLAY
MODE
r POWER
To turn the air conditionerON, pushthisbutton.To
turnthe air conditionerOFF, pushthe buttonagain.
• This buttontakespriorityover any other buttons.
• When youfirstturnit on, the unit isin cool mode,
Highfan speed,Temperaturesettingat 72°F.
- Every timeyou pushthisbutton,it willshiftamong
COOL, ENERGY SAVER and FAN.
- ENERGY SAVER
• The fan stopswhenthe compressorstopscooling.
Approximatelyevery 3 minutesthe fan will turnon and
the unitwill checkthe room air to determineif coolingis
needed.
REMOTE CONTROL SIGNAL
TIMER
FAN SPEED
• Everytimeyoupushthisbutton,itadvances
the
settingasfollows:{HIGH(F3)_- LOW(F1)-,
MED(F2)--,HIGH(F3)}
- SHUT-OFF TiME
• You will usually use shut-off time while you sleep.
• With unit running, use Timer to set number of hours until
shut-off.
• For your sleeping comfort, once Time is set, the
Temperature setting will raise 2°F after 30 min., and
2°F after another 30 min.
TEMPERATURE
SETTING
• Use thisbuttonto automatically controlthe
temperatureof the room. Thetemperaturecan be
set withina rangeof 60°F to 86°F by incrementsof
I°F.
• Every time you push Timer button, it advances the Timer
setting as follows: 1 Hour _ 2 Hours -* etc. --_12 Hours
maximum.
START TIME
a.or
an
, the unit will begin
to run at its last setting.
AIR DIRECTION
HORIZONTAL
1
• With unit not running, use Timer to set number of hours
before unit starts.
• Every time you push Timer button, it advances the Timer
setting as follows: 1 Hour -_ 2 Hours --, etc. --, 12 Hours
maximum.
ADJUSTMENT
AIR DIRECTION
VERTICAL
CONTROL
The horizontal air direction is adjusted by moving
the vertical louvers right and left with your
fingertips. (FIG. 14)
FIG.
AIR DIRECTION CONTROL
The vertical air direction is adjusted by moving the
horizontal louvers up and down with your fingertips.
(FIG. 15)
14
FIG.
-11 -
15
5. TIMER
- SHUT-OFF TIME
• You willusuallyuse shut-offtime while yousleep.
• With unitrunning,use Timer to set numberof hours
untilshut-off.
• For yoursleeping comfort,onceTime is set, the
Temperaturesettingwill raise2"F after30 min, and
2°F after another 30 min.
• Everytimeyou pushTimer button,it advancesthe
Timer settingas follows:1 Hour_ 2 Hours --,etc. -,
12 Hoursmaximum.
- START TIME
• With unitnot running, use timerto set number of
hoursbeforeunit starts.
• Everytime youpushTimer button,it advancesthe
Timer settingas follows: 1 Hour _ 2 Hours _ etc.
12 Hours maximum.
REMOTE CONTROL
Note: The Remote Control willnot operateproperly if
stronglightshineson the sensorwindowof the Air
Conditioneror if there are obstaclesbetweenthe Remote
Controland the AirConditioner.
Everytimeyou push button,youwill hear bsep sound
from the Air Conditioner.
1
4
6
3
2
5
HOW TO INSERT BATTERIES
INTO REMOTE CONTROL
5m
<_,_
1. Remove the coverfrom the back of the remote controller.
2. Insert two batteries.
• Be sure that the (+) and (-) directions are correct.
• Be sure that both batteries are new.
3. Re-attach the cover.
m3
m
FIG. 16
__IG.
REMOTE CONTROL OPERATIONS
17
1. POWER
• To turnthe air conditionerON, push this button.
To turnthe air conditionerOFF, pushthe button
again.
• This button takespriorityover any otherbutton.
• When youfirst turn it on, the unitis in coolmode, High
fan speed, Temperaturesettingat 72'F.
2. TEMPERATURE SETTING
• Use this buttonto automaticallycontrol the
temperatureofthe room.
The temperaturecan be set withina rangeof 60°F to
86°F by incrementsof I°F.
3. MODE
- Every time you push thisbutton, it willshift among
COOL, ENERGY SAVER and FAN.
• Do not use rechargeablebatteries. Such battehes
differ from standard dry cells in shape,dimensions, and
performance.
• Remove the batteries from the remote controller if the air
conditioner is not going to be used for an extended
length of time,
• In order to prevent discharge, remove the batteries from
the remote control if the air conditioner is not going to be
used for an extended period of time. Keep the remote
control away from extremely hot or humid places. To
maintain optimal operation of the remote control, the
remote sensor should not be exposed to direct sunlight.
• The remote control can be mounted on a wall using the
mountable holder.
- ENERGY SAVER
• The fan stops whenthe compressorstops cooling.
Approximately every 3 minutes the fan will turn on and
the unit will check the room air to determine if cooling
is needed.
4. FAN SPEED
• Every time you push thisbutton, it advances the setting
as follows: {High(F3) > Low(F1) _ Med(F2) _ High(F3)}
-12-
FIG. 18
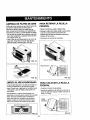
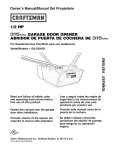
HOW TO REMOVE THE FRONT
GRILLE
AIR FILTER CLEANING
The Air Filter will become dirty as it removes dust
from the inside air. it should be washed at least
every 2 weeks. If the Air Filter remains full of dust,
the air flow will decrease and the cooling capacity
will be reduced, possibly damaging the unit.
• Remove the screw securing the Front Gdlle.
• Push the gdlle up from the bottom and pull the top
of the gdlle away from the cabinet to lift the top
tabs out of their slots.
• Pull the inlet grille forward, grasping both tabs,
then pull Outthe air filter. (FIG. 19)
• Wash the Air Filter under the faucet with warm
water. Be sure to shake off all the water before
replacing the filter. (FIG. 20)
Disconnect display connector.
Inlet Grilk
FIG.
_FIG.
AIR CONDITIONER
19
20 1
FIG. 22
HOW TO REPLACE THE
FRONT GRILLE
CLEANING
Clean the front grille and inlet grille by wiping with a
cloth dampened in a mild detergent solution.
The cabinet may be washed with mild soap or
detergent and lukewarm water, then polished with
liquid appliance wax.
To ensure continued peak efficiency, the condenser
coils (outdoor side of the unit) should be checked
periodically and cleaned if they become clogged
with soot or dirt from the atmosphere. Brush or
vacuum exterior coils to remove debris from fins.
• Connect display connector.
• Attach the front grille to the cabinet by inserting
the tabs on the grille into the tabs on the front of
the cabinet. Push the grille in until it snaps into
place.
FIG. 23
FIG. 21
-13-
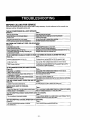
BEFORE CALLING FOR SERVICE
Check the following list to be sure a service call is really necessary. A quick reference to this manual may
help you avoid an unneeded service call.
THE AIR CONDITIONER
Check if...
WILL NOT OPERATE
Then...
WallPlugdisconnected.
Housefuseblownor circuit
breakertripped.
PowerisOFF.
Unitwasturnedoffandthenontooquick.
TEMPControls_ warmerthanroomtemperature.
Pushplugfirm;yintowallouttet.
Replacefuse withitmedelaytypeorresetcircuit
breaker.
Pushthe powerbutton.
Setunitoffandwait3 minutesbeforeresta_r_j.
SetTEMPControltoa lowertemperature.
AIR FROM UNIT DOES NOT FEEL COLD ENOUGH.
Check if...
Then...
FANSPEEDsetat LOW.
TEMPControlsettoowarm.
Roomtemperature
below70°F (21°C).
Temperaturesensir_ tubetouchingevaporatorcoil,
locatedbehindfront idlle.
PushFANSPEEDbuttonto set at HIGH.
SetTEMPControlto a lowertemperature.
Coolin
9 maynotoccuruntilrsomtemperature
risesabove70°F (21°C).
Sfraigntan
tubeawayfromevaperator
coil
THEAIRCONDITIONER
COOLING,
BUTROOMISTOOWARM- ICEFORMINGONCOOLINGCOILBEHINDFRONTGRILLE.
Check if...
Then...
Outdoortemperature
below70°F (21°C).
To defrostthecoil,settheMODEtoFAN,FanspeedtoHigh
Airfiltermay bedirty.
Cleanairfilter.Referto Maintenance
sectionofowne_'s
manual.
TEMPControlsettoo low.
Todefrostthecoil,setthe MODEtoCool,Fanspeedto high,andthe
Tempcontroltoa highertemperature.
THEAIRCONDmONER
COOUNG,BUTROOMISTOOWARM
Then...
Check if...
Cleanairfilter.RefertoMaintenance
sectionofowner'smanual.
Dirtyair filter- airrestricted.
TEMPControlsettoowarm.
SetTEMPControlto a lowertemperature.
Frontofunitis blockedby drapes,blinds,furniture,etc.
Clearblockageinfront ofunit.
Airdistributionis restricted.
Closedoors,windows,registers,etc.
Doors,windows,registers,etc.open.Coldairescapes.
Ailowadditional
timetoremove
storedheatfromwalls,ceiling,floor,andfurniture
Unitrena_yturnedon inhot room.
THE AIR CONDITIONER
Check if...
TURNS ON AND OFF RAPIDLY.
Then...
I Outsidetemperatura
isextremelyhoL
NOISE WHEN UNIT IS COOLING.
Check if...
I Set FANSPEEDco LOWto minimizethe ccolingload.
Then...
t Wiedowvibration-poorinstallaiton.
ScoedoffanhitlJng
water- fremthemoislursrernovalsystem/t This
isnormalwhen humidity
is high.Closedaors,windows,
andregisters.
Refertoinstall.alJoninstrucitonsorchankwithinsta
er.
WATER DRIPPING
Check if,,.
INSIDE ROOM WHEN UNIT IS COOLING.
Then...
Theair coeditioneris improperlyinstalled.
WATER DRIPPING
Check if...
OUTSIDE
instructions
or checkwithinstaller.
1 installation
lilt air cond_onerslighitytothe
outaldeto allowwaterdrainage.Referto
WHEN UNIT IS COOLING.
Then...
I Thisis normaldanngexcessively
humiddays
I fromhumid
Tbeunitisremoving
room.
largequantitiesofmoisture
I
II
-14-
CONTENIDO ...........................................
15
Ajuste de la direcci6n del aire ................ 24
GARANT[A
Control remoto .......................................
..............................................15
SEGURIDAD
Como colocar las baterfas dentro del
control remoto ........................................ 25
...........................................16
Instrucciones
25
importantes de seguridad ...16
REQUERIMIENTOS
INSTALAClON
MANTENIMIENTO
ELECTRICOS----17
................................ 26
Lirnpieza de filtro de aire ........................ 26
........................................18
Limpieza de aire acondicionado ............. 26
Requerirnientos
de instalaci6n ............... 18
Instalaci6n ..............................................
19
Cbmo instalado ......................................
19
Retiro de la ventana ..................................
21
Para retirarla rejillafrontal ......................... 26
Paracambiarla rejillafrontal ...................... 26
SOLUCI(_N
DE PROBLEMAS
.......... 27
Antes de Ilamar al Servicio ..................... 27
OPERAClON
C6mo
...........................-..............22
y por qu6 ......................................
22
Sonidos norrnales ..................................
22
Capacidad
ACUERDOS DE PROTECCION
ESPECIALIZADA
..................................31
TELEFONOS
y tiempo de operaci6n .......... 22
Caracter[sticas
.......................................
Utilizando del Aire Acondicionado
23
..............
Cubierta posterior
.......... 23
Pantalla. -................................................
UN ANO DE GARANT|A
EN DISPONIBLE AIRE
ACONDICIONADO
DE SERVIClO
.......................................
24
COMPLETA
sistema sellado de refrigeraci6n (que consta de
refrigerante, tuberfas de conexibn y compresor), sin
costo, si presenta defectos en el material o mano de
obra.
Por un afio a partir de la fecha de compra, cuando
el aire acondicionado sea operado para el
enfriamiento normal de habitaciones y se le de
mantenimiento de acuerdo alas instrucciones en
este manual del propietario. Sears reparar& el aire
acondicionado sin costo, si hay un defecto en el
material o mano de obra.
EL SERVICIO DE GARANT|A ESTA
CONTACTANDO AL SERVICIO DE SEARS
AL 1-800-4-MY-HOME ®
CINCO ANOS DE GARANT[A EN
SISTEMA DE REFRIGERACI(_N
SELLADO.
Esta garanfia aplica solamente cuando el producto
se utilice en los Estados Unidos.
La cobertura de la garantia se aplica solamente si el
aparato de aire acondicionado se utiliza con fines no
comerciales, en casas habitaci6n, para uso privado.
Esta garantia le otorga derechos legales especfficos, y
podria tener otros derechos que podrian variar entre
un estado y otro.
Por cinco ahos a partir de la fecha de compra,
cuando el aire acondicionado sea operado para el
enfriamiento normal de habitaciones y se le de
mantenimiento de acuerdo a las instrucciones en
este manual de1 propietario. Sears reparard el
Sears, Roebuck and Co., D/817WA,
Hoffman Estates, IL 60179 EE.UU
-15-
Instrucciones
importantes
de seguridad
Las instrucciones de seguridad a continuaci6n le indicardn como debe utilizar su aire acondicionado para
evitar dafios personales o a su sistema de AIRE ACONDICIONADO.
INFORMAClON PARA SU SEGURIDAD
No almacene ni utilice gasolina no otros liquidos o
gases inflamables cerca de este o cualquier otro
aparato. Lea las etiquetas en el producto respecto a
la inflamabilidad y otras advedencias.
PREVENGA ACClDENTES
Toma de pared
de tipo de
conexibn a
tierra
Para minimizarel riesgode incendio, cheque el6ctrico,
lesiones personales o dafios al usar su aire
acondicionado, siga las precauciones de seguridad
b&sicas,que incluyen las siguientes:
• Aseg_rese que el suministro el_ctdco sea adecuado
para el modelo que eligi6.
• Siva a instalar el aire acondicionado en una ventana,
probablemente desear_llimpiar antes ambos lados del
cristaL Si la ventana es del tipo de tres deles con una
rejilla, quiz_ desee retirar la rejilla completamente antes
de la instalacibn.
• AsegLirese de que el aire acondicionado ha side
insfalado correct_ y seguramente de acuerdo con las
instrucciones de instalaci6n por separado
proporcionadas con este manual.
Conserve este manual y las instrucciones de instalacibn
para su posible uso futuro para retirar o reinstalar esta
unidad.
• Utilice gaantes siempre que manipule el aire
acondicionado.Tenga cuidadopara evitar cortarse con
I&minas met_licas o con los serpentines delantero o
trasero.
INFORMACION
Evite los riesgosde incendioo descarga
electrica.No utiliceconun cablede extensi6no unaclavija
adaptadora.
Noelimineningunadelaspatasdelcabledecorriente.
Bajo ninguna
|
circunstancia, code,
elimine o desvie la
pata de tierra de este
enchufe.
Cable de corriente con
clavija de tres patas
para conexibn a tierra.
1
_1
\
IDEAS PARA EL AHORRO DE ENERG|A
• La capacidad del aire acondicionado debe ser
adecuada para el tamafio de la habitacibn para un
funcionamiento eficiente y satisfactorio.
• Instale el aire acondicionado del lado sombreado
de su casa. Es mejor una ventana que da al norte
porque recibe sombra la mayor parte del dfa.
ELECTRICA
La clasificaci6n y norrnas eldctdcas completas de su
nuevo aparato de aire acondicionado se encuentran
grabadas en la placa con el nLimeroserial. Consulte las
especificaciones el_ctricas de consumo y suministro.
• Aseg0rese de que el aire acondicionado cuente con la
tierra ffsica apropiada.
Para reducir el riesgo de choque el_ctrico e incendio, es
importante contar con una tierra fisica. El cable de
corriente estd equipado con una clavija de tres patas
para protecci6n en contra de descargasel_ctricas.
• Debe conectar su aire acondicionado en una toma de
pared debidamente aterrizada. Si la toma de pared que
pretende usar no cuenta con tierra o est', protegida pot
un fusible o disyuntor, haga qua un electricista instale
primero la conexion necesaria.
• No opere el aire acondicionado con una cubierta de
protecciSn. Puede ocasionar un dafio mecanico al aire
acondicionado.
• No bloquee el flujo de aire al interior con
persianas, cortinas o muebles, o al exterior con
arbustos, adomos u otras edificaciones.
• Cierre los registros de piso y pared y el tim de la
chimenea para que el aire fresco no escape por la
chimenea y por la tuberfa.
• Mantenga las persianas y codinas en las dem_.s
ventanas cerradas durante el perfodo rods
soleado del dia.
• Limpie el filtro de aire como se recomienda en la
seccibn MANTENIMIENTO en este manual.
• El aislamiento apropiado y la proteccibn
impermeabilizante en su hogar ayudard a
mantener el aire caliente afuera y el aire fresco
dentro.
• Las sombras que producen al exterior los arboles,
plantas, etc, ayudardn a reducir la carga de
trabajo del aire acondicionado.
• Haga funcionar los aparatos que producen calor
como lavadoras, secadoras, lavavajillas, durante
la parte m_s fria del dia.
• No utilice con un cable de extensi6n o una
clavija adaptadora.
-16-
OBSERVE ALL LOCAL CODES AND
ORDINANCES.
BAJO NINGUNA CIRCUNSTANCIA QUITE
LA CONEXI(_N DE TIERRA DE LA CLAVIJA.
SE REQUIERE UNA TIERRA FfSICA PARA
EL FUNCIONAMIENTO DE ESTE APARATO.
Se requiere un suministro electrico de 115
voltios a 60 Hz, solo CA, con fusible de 15A y
tierra ffsica. Se recomienda el uso de un
fusible de paso o un disyuntor. Use un circuito
dedicado que de servicio solamente a este
aparato.
Riesgo de chequeeldctrico.
Enchufe en una toma de corrientede tresorificios.
No retire la pata de tierra.
No utilice un adaptador.
No utilice un cable de extensi6n.
En case de no seguir estas instrucciones puede
provocar la muerte, incendios o descargas
el6ctricas.
NO UTILICE UN CABLE DE EXTENSI6N.
METODO PARA CONEXI(_N A IIERRA
RECOMENDADO
Para su seguridad personal, este aparato debe
contar con una conexi6n a tierra. Este aparato
tiene un cable de corriente con una clavija de
tres patas (para conexi6n a tierra). Para reducir
el riesgo de choque el6ctrico, el cable debe
conectarse a una conexi6n de pared de tipo
trifdsico y contar con una tierra ffsica de
acuerdo con el C6digo EI6ctrico Nacional (NEC
ANSI/NFPA 70) _ltima edici6n y con todas las
normas y cbdigos locales, si no tiene una
conexi6n trifdsica es su responsabilidad
personal y su obligaci6n hacer que un
electricista instale una toma de cordente de
tres puntos con tierra ffsica.
-17-
Enchufe de 3
patas para
conexi6n
terra
._,
_
II
_tierra
N
Cable de_
corriente
]IF--..._"I
III FI_ I _
,
,
%_j_/oma
oe pareo
IIF>_ I con conexion a
Patas para
la conexi6n a tierra
de 3 paras
REQUERIMIENTOSDE INSTALACION
_RTiCUL0 NOMBREDE LA PARTE
A
B
C
D
E
F
G
H
Para evitarproblemasconla instalaci6n,lea
completamantelas instruccionesantesde comenzar.
Esta publicaci6ncontieneinformaci6nimportantepara la
instalaci6ny operaci6nde su airs acondicionado.Su airs
acondicionadose instalarben unasventanasde doble
hoja normalesconaberturas de 66 cm a 1 metro(26 a 39
3/8 pulgada)(FIG. 1). Lahoja inferiorde la ventanadebe
abrirse Io suficientepara crear unaabertura verticalde
30.5 cm (12 pulgadas).No obstante,de acuerdoalas
variacionesen el disefiodel marcode la ventanase
requerir_modificar la ventanapara una instalaci6n
seguray apropiada.Las rejillasde ventilacibnlateraresy
trasera del aire acondicionadodebentenerespacio libre
suficientepara permitirel flujo de airea trav6sdel
condensadorpara sacar el calor.La pads posteriordebe
quedaral exterior,no dentrode un edificioo cochera.
I,._2€660mm)a --J
I 112'(_r_)
rain.
/I
:_-----_.
Pared internaj
+
II
I.l_Ventana
'
",
',,]
/::
1
1
1
2
5
1
1
1
• Guantes ajustados
• Destonillador est&ndar
• Destonillador phillips
• Ldpiz
• CuchiHo afilado
• Cinta de medir
• Taladro el6ctrico
• Punta para taladrc 1/4 pulgada
I
Alfe_zar
FIG. 1
_.o_.÷o
SERVIClO
ELECTRICO
Verifique su servicioelectdcodisponible. El suministm
elL=ctdcodebe ser igual al mostrado en la placa del
n6mem de serie (del lade izquierdoen la rejilla
delantera)
Todos los modelos est_,nequipados con una clavija de
tres paras para proporcionarunatierra adecuada.
No cambie la clavija ni la modifique. No utilice un
adaptador. Si su toma de corrienteactualmente no
cuenta con la conexi6n a tierra, Ilame a un electricista
para que haga las conexiones necesarias.
CONSERVE LA CAJA Y ESTE MANUAL DEL
PROPIETARIO PARA REFERENCIA FUTURA. La
caja es la mejor forma de guardar la unidaddurante el
inviemo o cuando no la est6 usando.
HERRAJE
CANT
HERRAMIENTA NECESARIA:
arc°
I
SOPORTE,MENSULA
PERNO NIVELADOR
PERNO NIVELADOR
TORNILLO: 5/8"
TORNILLO: 5/8"
SELLO DE ESPUMA
CINTA DE ESPUMA
MENSULA L
PARA INSTALACI(_N
FIG. 2
-18-
Para evitar el riesgo de lesiones personales,
dafio a la propiedad o daSo al producto debido al
peso de este dispositivo y a los bordes filosos
que puedan quedar al descubierto:
• Los aires acondicionados que se cubren en este
manual representan un riesgo por su peso
excesivo. Se requiere de dos o mas personas
para mover e instalarla unidad. Para prevenir
las lesiones, use tecnicas y aparatos apropiados
para levantar peso cuando mueva la unidad.
• Revise cuidadosamente la ubicacibn en donde
instalard el aire acondicionado. Aseg_rese que
soportara el peso de la unidad por mucho
tiempo.
Maneje la unidad de aire acondicionado con
sumo cuidado.
Use guantes de protecci6n siempre que levante
o transporte la unidad. Tenga cuidado para
evitar cortarse con laminas metalicas o con los
serpentines delantero o trasero.
• AsegOreseque el aire acondicionado no caiga
durante la instalacion.
INSTALACION
_1
Paraevitarunaposible
lesi6npemonal,
desconecte
launidad
de a corriente
antesde nstalada
o dademantenmento.
Saque concuidadoel aire acondicionadode su caja,
reviseque no tenga da5os por el embarque.Seleccione
la ubicaci6nque le permitirdsoplar el airsfrfo al interior
del drea que desea. Las ventanasque se utilicenpara
instalacibndeben ser Io suficientementefuertes para
soportarel peso del airs acondicionado.Una buena
instalacibnconespecialatencibn al posicionamiento
apropiadode la unidadreducirdlos serviciosnecesarios.
AI enfriar rodsde una habitaci6n,la ubicaci6nde la
instalaci6nes muy importante.Para enfriarsue
habitaciones,el airefrio debe ser soplado desde el aire
acondicionadoan un patentadirecto.
Instalela mensulade sopertesobrelaventana.Ver FIG.5.
Instals el pemo de nivelacionen la partesuperior a trav6s de
la parteinferior de la m(_nsulade soporte.Puedeescogerun
pemo corto (ARTiCULOC) o uno largo (ARTiCULOB) de
acuerdoal ripede laventana.Tambien, puedeseleccionarla
pesici6ndel orificio en la m_nsula.
Coloque lamensulaen el alfeizara t pulgada(25.4 mrn)a la
izquierdade la linea del controde la ventana(Vea FIG.5).
Sujete la m_nsulaal alfeizarcon lostomillos propercionados
(ARTiCULO D).Ajusteel tomillo niveladorde modo queel
aire acondicionadoque se instalara,quedecon una pequeSa
inclinaci6n(Acercade 1/4") hacia abajo hacia el exterior,
para un drenadoapropiado.Aprietelos tomillos de la
m(_nsula.
Si el airs acondicionadose bloqueapor uh marco de
ventanapara tormentas,consulteel Paso 7, 8 en la
pdgina8 antesde comenzarla instalaci6n.
Tomillo
(ART.D)
C6mo instalarlo
Abe_uradeaiu_te
_1
Corte la TIRA DE ESPUMA (ARTfCULOG) para
ajustarso a la parte inferior del marco de la ventana. Abra
la wentana, quite la protecoi6n posterior de la tira y una
la TIRA DE ESPUMA como ss muestra en la FIG. 3.
AIf_izarde la
vefltaflairltema
FIG. 5
TIRA DI
ESPUMA
(ART. G)
Alfeizar intemo
Tornillo
M6nsula de soporte
Acerca de 1/4"
_
FIG. 3
_'_ Marque la linea del centro con un I_.piz en el
interior del alf_,izar, como se muestra en la FIG. 4
Interi
r
FIG. 6
Lafallaenlainstalaci6n
segura
delamensula
desoporte
puederesultar
enlacaidadelaunidaddesdelaventana
siel
marcodelaventana
eslevantado
despu6s
dequela unidad
es
instalada.
Estopuederesultar
enlesiones
personales.
internal_P'_
LINEA CENTRAL
ALFEIZAR
INTERIOR
FIG. 4
-19-
[]
[]
INSTALE EL AIRE ACONDICIONADO
EN LA VENTANA
ASEGURE LOS BASTIDORES DE LA
CORTINA
• Levanteconcuidadola unidadde aireacondicionadoy
deslicelaen ta ventanaabierta.Tenga cuidadode no
lesionarla cinturaen esta operacibn.
• Use ganohosde dosrnanos sobre la partesuperiorde
la unidadpara levantada.
• AsegOresede que ia rn6nsela de soportesea insertada
en el bolsillodebajodel ventiladorbase, y que la guia
del bastidorde la cortinaest_ paradapor el obturador
en la m_nsulade soportecomoIo muestraen la FIG.8.
NOTA: Cuando la unidedse centra apropiadamentey se
ernpujahacia afuera a la ubicacibncorrectaen la
rn_nsela, sentirdquese traba conseguddaden su lugar
en la rn_nsuladel alfdizar.Sostengalafirmemento
cluranteeste procedirniento.
• Baje el marcode la ventana superiortodoIo posiblede
forma queel marco se sientafirrnnernenteen el canal
superiorde la unidady los bastidoresexpandiblesde la
cortina.
Expandalosbastidoresde la oortinay aseg_relosusando
4 tornillos(ARTiCULO E) oomoio muestraen la FIG 9.
Cuando el bastidordo la cortinase abre o se ciorra,
puede sentirun ligeraresistencia. Estoes normal.
[]
SELLO DE ESPUMA Y BLOQUE DE LA
VENTANA
• Corte el sello de espuma(ARTiCULO F) al ancho de la
ventana. Relleneel ospacio entre el viddoy la ventana
con la espumaselladorapara prevenirque losinsectos
y el aire penetrenen la habitaci6n,cornose rnuestra en
la FIG. 9.
• Instale la rn_nsula L para prevenir que la ventana sea
levantada Io coal puede resultar en la caida de la
unidad.
FIG. 9
Durante
elsiguiente
paso
scotenga
launidad
firmemente
hasta
queel
marco
delaventana
descienda
sobre
elcanal
superior
pordetr_s
de
10s
marcos
decorUna.
Puede
provcoar
lesiones
personales
odaSo
a la
Lprop
edad
s a undadsecaedelaventana.
ART. E
FIG. 7
Unea central
Marcode la ventana
La m_nsula y los tomillos del marco de cortina
deben instalarse como se indica en las
instrucciones para evitar que la unidad caiga
desde la ventana y cause lesiones personales o
daSo a la propiedad.
Asidero de mano
Canal superior _
intema
Secc_n
,
l
,
i
'1
_
_==_
!
_
_
•
Cortina
extema
Seccion
BOISilIOdel
_I__________1
°.
Soporte
NOTA: Si el marco de la ventana tiene una
superficie metalica, use los tornillos para Idmina en
vez de las pijas para madera. Puede conseguir los
tornillos para lamina en su ferreteda.
del soporte
Mensula
Pemo de nive_ac_n
Aff_izar exteme
Inter
erior
FIG. 8
- 20-
Irlsl
EL AIRE ACONDICIONADO ESTA
OBSTRUIDO POR UN MARCO DE VENTANA
PARA TORMENTA
• Si hay unmarco paratormentaque obstaculice,unauna
lira de maderade.2"(51mm)de espesoral alleizar interior
de la ventanaa todoIo anchodel alf_izar.Lalira de
maderadebe ser Io suficientemente
gruesaparaelevarla
alturadelalleizarde la ventanapara que la unidadse
instalesinque el marcopara tormentaIo obstaculico.Vea
la FIG. 10 La partesuperiorde latirade madera debeser
aproximadamente
3/4"(19mm)mas alia queel marcopara
torrnentaparaayudara drenarla condensaci6n
haciael
exterior.
almaconamientoPuedehabercondensaci6n
deaguaenla
base Retirela unidadcon cuidadoparaevitarselpicadurasen
supise,siempreguardela unidadbienasentadaen subase No
la recargueen loscostadosAseg_rese
de retirarlam_sula de
seporle,lam_nsulaL y elsellode espureade laventanay
gu_rdelosLa ventananocerraramientrasla reensulade
soporlecontinueinstalada
(a) Cuandoel marcode la ventanaestdubicadoen
el alf6izarintemo
• Instaleunatira de madera(anchoy largode la
ventanay el altode la alturadel marco de la ventan_
sobre el alf_izarinterne
• Instaleuna segundatira de madera (aproximadamentede
6"(152mm)de largo por 11/2"(38mm)de ancho y del mismo
grosorque la primera lira)en el centrodel rebordedel
alfeizarcontra la parteposterior del alfeizar interior
(FIG 10)
VENTANA
DEMARCO_'_
i
Marco de la ventana
[
Tira de madera
Tira de madera montada
I 1/2" rain
Espacio libre de
sobretaparlesuperior
138mm)
delalfeizarinterno _
3/4"(19rnm)
AIf_izarmtemo
tormenta
AIf_izar
intemo
__a
Alteizar
ra
i_nsu
(b) Cuando el bastidor de la ventana es mds alto
que 19/32"(15rnm)
• Instaleunatira de Madera (acercade 4"(102mm)
de largo)sobreel alfdizarextemo para aumentarI_
m_nsula del soporte
Alfeizar externo
Interior
V/f_,y////_//_/_
Exterior
Cuandoel
marcoparatormenta
est_
ubicado
enel alfeizarexterno
FIG. 10
Marco de ia ventana
Tira de madera
19/3C: _
I'_J| INSTALACION PARA VENTANAS DE
OTROS TIPOS
• Dimensiones y la geometr{a de la ventana son
diferentes de acuerdo a los fabricantes Revise su
ventana y refi_,rase a la FIG. 11 para instalar
firmemente la m_nsula del soporte
AIf6izar intern° _Zna
AIf_izar
r
FIG. 11
Retiro de la ventana
• Apaguey desconecteel aireacondicionado.
• Desatornillelostornilloslateralesque instal6en el Paso
5.6.
• Losairesacondicionaclos
quesecubrenen este
manualrepresentanunriesgoporsu pesoexcesivo.
Se requierede doso maspersonasparamovere
instalarla unidad.Paraprevenirlaslesiones,use
tecnicasy aparatosapropiadosparalevantarpeso
cuandomuevala unidad.
• Cuandomaniupleel aire acondicionado,
tengacuidado
paraevitarcortarse
conI_minasmet&licaso conlos
serpentinesdelanteroo trasero
• Asegeresequeel aireacondicionado
no caigadurante
la instalaci6n
• Cierre lacortinay retireel sellodel marcoy la mensula Lde
lasventanas.
• Mantengabien sujeto la unidedde el aim acondicionado
y
levanteel marcoe inclineconcuidadoel aire
acondicionade
hacia atr&s,drenandoel aguacondensada.
• Levanteel sireacondicionade
dela ventanaysaque la tira
de espumade entrelas ventanas.
• Retirela mensulade soporte del marcode la ventana
NOTA: Cuandose terminalatemporadade usodel enfriador,la
unidaddebequitarsede laventanapara su limpiezay
21 -
COMOYPOR
QUE
Su unidad de aire acondicionado proporciona las
siguientes caractedsticas que hardn mds placentera
su vida en climas c_lidos:
• Enfria y circula aire en la habitaci6n.
AI tiempo que se usa el ajuste de MED FAN
(VENTILACI6N MEDIA) para circular al aire de la
habitaci6n puede realizado mds conformable
aunque no tenga ajustado el aire acondicioeado en
el modo de enfriar el aire. Esto disminuird su costo
por el uso.
• Reduce la humedad retirando el exceso.
• Filtra el polvo, suciedad e impurezas del ambiente.
El aire acondicionado realiza estas funciones
paando el aire de la habitaci6n a traves de un friltro
que atrapa el polvo y las partfculas de suciedad. El
aire pasa entonces por un serpentin de
enffiamieeto que refrigera el aire y retira el exceso
de humedad. El mismo aire se regresa a la
habitacibn, m_s fdo, mds seco y mas limpio. La
humedad que se retira del aire de la habitaci6n se
Ileva al exterior y se evapora.
Compresor
El moderno compresor de
alta eficiencia puede producir
un ruido de zumbido agudo o
pulso que va y viene.
Ventilador
Vibraci6n de la unidadPuede escuchar el
movimiento del
La unidad podda vibrar
aire del ventilador. Y hacer ruidos debido a
la mala calidad de las
o ventanas.
Su aire acondicioeado estd disefiado para operarse
con facilidad y proporcionarle gran capacidad de
enfriamiento.
SONIDOS
NORMALES
FIG.12
Adem&s de los sonidos normales del motor del
ventilador y del compresor que salen de su aire
acondicionado, de vez en cuando podria escuchar
un sonido de golpeteo suave. Es producido por la
humedad que se recolecta del aire en la habitaci6n
y se arroja contra et ventilador del aire
acondicionado. Esto es normal y no debe ser eausa
de preocupaci6n. Igualmente no debe alarmarse si
escucha un lugero silbido o regorjeo que sale de su
unidad al apagarla. Estos son ruidos normales del
refrigerante.
Condensador
Podda escuchar goteo de
agua pegando contra el
condensador causando un
sonido de golpeteo o tintineo.
CAPACIDAD Y TIEMPO DE
OPERAClON
Es importante elegir un tamafio de unidad apropiado
de acuerdo con la comodidad deseada en el drea
que requiere enfriar. El tamafio apropiado se
determina por el n0mero de metros cuadrados del
_.rea que desea enfriar, la temperatura interior y
exterior y la humedad.
FIG. 12
NOTA: En climas h0medos, es posible que la
BANDEJA EVAPORADORA se Ilene de agua y
salpiqL_ese en PERSIANA LATERAL.
Aunque el calor o la carga de la humedad est,.
sobre Io normal el aire acondicionado debe operar
por mas tiempo y mds frecuentemente para
mantener la temperatura deseada que ha
seleccionado. Bajo condiciones de carga de calor
muy pesado el aire acondicionado puede necesitar
ser operado constantemente para mantener la
temperatura deseada.
- 22 -
CARACTERISTICAS
UTILIZANDO
DELAIREACONDICIONADO
_Para
minimizar el riesgo de inoendio,
choque el_ctrico, lesiones personales o da_os al
usar su aire acondicionado, lea la secci6n de
instrucciones de SEGURIDAD antes de hacer
funcionar este aparato,
Para comenzar el funcionamiento del aire
acondJcionado despu6s de su instalaci6n, siga
estos pasos:
1. Conecte el aire acondicionado. (Para prevenir
descargas no use extensiones ni adaptadores de
clavija)
2. Coloque el control de TEMP en el ajuste mds
frio.
3. Coloque el control de modo MODE en el nivel
m&s alto de enfdamiento COOL.
7
5
6
4
2 -3
1
4. Ajuste las rejillas para un flujo de aire apropiado.
5. Una vez que haya enfriado la habitacion, ajuste
los controles TEMP y MODE al nivel que sienta
mas confortable.
NOTA: Si apaga el aire acondicionado, espere 3
minutos antes de volver a encenderlo. Esto permite
que se equilibre la presi6n interna del compresor.
En caso de no esperar los 3 minutos podrfa
provocar fallas en el funcionamiento.
Si mueve el control TEMP amas c_lido, y luego
inmediatamente de regreso a Io mds fdo, la unidad
se apagar_. Espere 3 minutos antes de volver a
encederla.
11 8
12
10
13
FIG.
13
1. Gabinete
8. Cable de corriente
2. Rejilla vertical
9. Evaporador
3. Rejilla horizontal
10. Condensador
4. Rejilla delantera
5. Rejilla de entrada
11. Compresor
12. Base
6. Filtro de aire
13. Control remoto
7. Panel de control
- 23 -
PANTALLA.
MODO
ENERGiA
• Pare encenderel aireacondidonedo,opr_mael bot6n,Pare
- Cada vez queoprLmeeste both, c_mbiaraentre
• apagarelaireacondidonado vuelvaa oprimir el bot6n
Este bot6n tiene la prioridad sobre cualesquieraotros
botones
• CuandoIo enciendepor primeravez el aire acondicionadoes_
en el modode enfriamientom_s alto y la temperaturaen 72°F
COOL, ENERGYSAVER y FAN(ENFRIAMIENTO,
AHORRO DE ENERGIAy,VENTILADOR).
- AHORRO DE ENERGIA
Aproximadamenteeada 3 minutosel ventiladorse encendera
y se verificar_ la temperatura de la habitaei6npara ver si es
necesario enfriar.
CONTROLREMOTORECEPTOR
TEMPORIZADOR
VELOCIDAD
DEL VENTILADOR
TIEMPO
DE APAGADO
• Normalmente utilizara el temporizador de apagado mientras
duerme
• Cada vez que oprima este boton, se avanza en el
ajuste de un rango come sigue:{HIGH(F3) •
LOW(F1) , MED(F2), HIGH(F3)}
• Si su unidad esta funcionando
de horas antes de apagarse
el temporizador Iija el numero
• Para su comodidad mientras duerme una vez que se fija el
temporizador el ajuste de temperature se elevar_ 2°F despues
de 30 minutos y una vez mas despues de otros 30 minutos
• Cada vez que oprima el botSn del temporizador har_ que
AJUSTE DE TEMPERATURA
• Use este botSn
temperatura de
La temperatura
de 60°F a 86°F
• El ventiladorse detiene euandoel compresordeja de enfriar.
pare controlarautomaticamente la
la habitacion.
puede ajustarse dentro de un range
de I°F.
avarice el ajuste del temporizador como sigue:
1 Hora , 2 Horas_etc
,12 Horas maximo
TIEMPO DE INICIO DE FUNCIONAMIENTO
En caso de fallode la corrienteel&ctrica, la
unidad funcionar& como antes cuando
I
vuelve la corriente
horas antesde encenderse
• Cada vez queoprima el bot6n del temporizador hare que
• Si su unidad esta apagada, el temporizador fija el nt_mero de
avance el ajustedel temporizadorcomosigue:
1 Hora , 2 Horas • etc •12 Horasm_ximo
AJUSTE DE LA DIRECCIC)N DEL AIRE
CONTROL VERTICAL DEL FLUJO DE AIRE
La direccidn del flujo de aire vertical se ajusta
girando las rejillas horizonatales hacia arriba o
hacia abajo. (FIG. 15)
CONTROL HORIZONTAL DEL FLUJO DE AIRE
La direccibn del flujo de aire horizontal se ajusta
moviendo las rejillas verticales a la derecha o
izquierda con la punta de sus dedos (FIG 14)
FIG.
14
FIG.
- 24 -
15
CONTROL
REMOTO
Note:ElControlremotopodrfanofuncionar
apropiadamente
si hayunreflejodeluzsobreel sensor
delaireacondicionado
osi hayobstdculos
entreel control
remotoy la unidaddeaireacondicionado.
Cadavezqueoprimeunbot6n,escuchard
unaserial
ac_sticadesdeelaireacondicionado.
1
6
4
4. VELOCIDAD DEL VENTILADOR
•Cada vez queoptimaestebot6n,se avanzaenel ajuste
comosigue:{High(F3)-, Low(F1)-, Med(F2)=,
High(F3)}
5. TEMPORIZADOR
-TIEMPO DE APAGADO
• Normalmenteutilizardel temporizadorde apagado
mientrasduerme.
• Si su unidadestgfuneionando,el tempodzadorfija el
nOmerode horasantes de apagarse.
• Pare sucomodidadmientrasduerme, unavez que se
fija el temporizador,el ajuste detemperaturase
elevar_ 2°F despu_sde 30 minutosy unavez m_,s
despu_sde otros30 minutos.
Cada vez que oprimael bot6n deltemporizador,hard
que avance el ajustedel temporizadorcomosigue:
1 Hora _. 2 Horas_.etc.--,12 Horasm_imo.
- TEMPO DE INICIO DE FUNCIONAMIENTO
• Si su unidadestd apagada,el temporizadorfija el
nflmerode horasantes de encenderse.
Cada vez que optimael botbndeltempodzador,hara
que avance el ajustedel temporizadorcomosigue:
1 Hora -* 2 Horas -*etc._12 Horas m_imo.
3
2
5
--2
COMO COLOCAR LAS BATERiAS
AL CONTROL REMOTO
F_
4
3
5--
=
1. Retire la cubiertade la parle posterior del control remote.
2. Insertedos batefias.
FIG.
LAS OPERACIONES
REMOTO
• Aseguresede orientar correctamentelos polos (+) y (-).
• AsegQresequeambas baterias sonnuevas.
3. Vuelvaa colocar la cubierta.
16
DEL CONTROL
1. ENERG[A
•Para encenderel aireacondicionado,
optimael boton,
Paraapagarel aireacondicionado,
vuelvaa oprimirel
bot6n.
• Este bot6n tienela priofidadsobrecualesquieraotros
botones.
• CuandoIo endende por primera vez, el aire
acondicionadoesta en el modo de enfriamientomEisalto
y la temperaturaen 72°F.
2. AJUSTE DE TEMPERATURA
• Useeste boron para controlarautomaticamentela
temperatura.Latemperaturepuedeajustarsedentro de
un rangode 60°F a 86°F de I°F.
3. MODO
-Cada vez queopfimeeste bot6n,cambiar_,
entreCOOL,
ENERGYSAVERy FAN(ENFRIAMIENTO,AHORRO
DE ENERGIAy VENTILADOR).
- AHORRODE ENERG[A
• El ventiladorse detienecuandoel compresordejade
enfriar.
Aproximadamente
cada3 minutosel ventiladorse
encenderdy se verificar_,
la temperature
de la habitaci6n
paravet sies neeesarioenfriar.
_FIG.
17
• No utilice bateriasrecargables.Dichasbateriasson
diferentesde las bateriassecas en la forrna,dimensionesy
funcionamiento.
• Saque las batedasdel control remotosi no va a utilizarel
aire acondicionadopor un periodoprolongado.
• Pareevitar el descargue,remuevalas pilesdel control
remotosi el aireacondicionadono va a ser usadopor un
periodo extendidode tiempo. Mantengael controlremoto
alejado de lugaresde extramo caloro humedad.Para
mantenerla operaci6n5ptima del control remoto, elsensor
del rernotono debe set expuestoal rayo solardirecto.
• El control remote puedeser colocadosobre una pared
usandoel soportemonteble.
- 25 -
FIG.
18
PARA RETIRAR LA REJILLA
FRONTAL
LIMPIEZA DE FILTRO DE AIRE
El filtro de aire se ensucia ya qua retira el polvo del
aire interior. Debe lavarse al menos cada 2
semanas. Si el filtro de aire se queda neno de
polvo, el flujo de aim disminuye y la capacidad de
enfriamiento se reduce, y puede da_arse ta unidad.
• Jale la rejilla de entrada hacia adelante, sujetando
por ambas pestaSasm y luego jale el filtro de aire
para sacado. (FIG. 19)
• Lave el filtro de aire directamente en el chorro de
agua tibia, Aseg_rese de sacudir toda el agua
antes de volver a colocar el filtro. (FIG.20)
• Retire el tornillo que sujeta la rejilla frontal.
• Empuje la rejilla hacia arriba desde la parte inferior
y jale por la parte superior para sacarla deL
gabinete para levantar las pestafias superiores y
sacarlas de 1as ranuras
• Desconecte el conector de la pantalla.
Rej
FIG. 19
Rejilla
FIG. 22
FIG. 20
LIMPIEZADE AIRE ACONDICIONADO
Limpie la rejilla delantera y la rejilla de entrada con
un trapo humedeeido en uan solueibn de jabbn
suave. Puede lavar et gabinete con un jabbn suave
o detergente y agua templada, luego pulirlo con
cera liquida
Para garantizar un 5ptimo funcionamiento, los
serpentines de condensaciSn (exterior de la unidad)
deben revisarse peri6dicamente y limpiarlos si
estdn obstruidos con suciedad de la atmbsfera.
Cepille o aspire los serpentines exteriores para
retirar la acumulaci6n de residues de las aletas
PARA COLOCAR
FRONTAL
LA REJILLA
• Conecte el conector de la pantalla.
• Inserte las pestaSas de la rejilla en las ranuras al
frente del gabinete. Empuje la rejilla hasta que se
trabe en su lugar.
delantera
FIG.
FIG. 21
- 26 -
23
Antes de Ilamar al Servicio
Revise la siguiente lista para asegurarse de que realmente es necesario Ilamar al servicio.
rdpida a este manual podda ayudarle a evitar Ilamadas innecesarias
a servicio.
EL AIRE ACONDIClONADO
Revise si..
Una referencia
NO FUNClONA
Entonces...
La unidadesta desoonectadade la tomade cornenlede la pared.
Conesteapropiadamente
a la tomade cordente
El fusible esta quemado o el disyuntorest_ abierto.
El internJptor
est_ en modeAPAGADO.
Resmpieseel fusibleo restablezca
eltlu}odecorrienteenel dis,/untor.
Oprimael bot6nde encandido.
La unidad se apagb y volvi6 a encenderse rdpidamente.
El conbol TEMP est_ en una temperafurarr_s alia que la
temperaturaen la habitaci6n.
Apaguela unidady espare
almeess3 minutosantesde velvera encenderia,
C,_oqueelcont_ deTEMPan un aiusternasfrio.
EL AIRE DE LA UNIDAD NO EST/i, SUFICIENTEMENTE
Revise
si...
FR|O.
Entonces...
La velocidaddel ventiladoresta en LOW(baja).
El conkol TEMP estden un ajuste dernas_do caliente.
La temperafurade la habitaci,6'n
es menor a 70°F (21°C).
Eltubo sensor de temparafuratocaelserpetin evaporador,
ubicadodetrasde la rejUlafrontal.
OpdmaelbotOIdeajustede _
delveblilado_FANSPEEDpara
ajusta_ en HI(elta).
Col_ue elcontroldeTEMPen unajusterodsfdo.
Noseenfria_hastaqes latemper-=tura
delahdei_ sessupenora70OF
(21=C).
Endereceeltubo paraespararlodelsorpentinevaparador.
EL AIRE ACONDICIONADO ENFRIA, PERO LA HABITACI(_N EST.&.MUY CALIENTE, SE FORMA
HIELO EN EL SERPENTiN DE ENFRIAMIENTO DETR_,S DE LA REJILLA DE ENTRADA.
Revise
si...
Entonces,,,
La temperaturaexteriores menora 70°F (21°C).
! Paradescongelar
el esrpentin,coloqueelajustede modeMODEen FAN
! (ventilador).
bmpieelflhmdeaJre.
Consulte
lasecc_ndeMantenimiento
enelmanualdel
propietario.
El filtro de aire estd sock.
El control TEMP est_ muy bajo para el enfdemientonocfumo.
Paradescongelarel serpentin,coloqueel ajusteMODEen FANo an "High
Coot conel controldeTEMPen unajustemasalto.
EL AIRE ACONDICIONADO ENFRIA, PERO LA HABITACI(_N ESTA DEMASIADO CAMENTE
Revise si...
Entonces...
Elfiltrode airees_ sucio- e_struesi6n
deaim.
IJmpieel filtrode elre.Consuftela ses_n de Mantanimiantoen elmanual
delpropietario.
El control TEMP esta en un ajusta demasiado calienta.
Cbl<xlueel controlde TEMPenunajesle m_ frio.
Despejeelfrentede launidad.
Elfrestedela unidedestaobslmideconcdeJnas,
pam"-J.anas,
muebles,etc.
La distribuc_n de aJreest_ restringide.
Haypuertas, ventanas, registros,etc abiertos. El frio escapa.
Launidadseacaba de encenderdentrode una habitael6ncaliente.
CierrepJertas,ventanas,regis_ros
, etc.
Deuntiempoparaelimiesrelcelorresidualen paredes,techc_,pis(_ymuebles.
EL AIRE ACONDICIONADO SE ENCIENDE Y SE APAGA R.&.PIDAMENTE.
Revise
si...
Entonces...
I Latemperaturaexteriores extrernadamentecaliente.
I Cbloquelavekxltdaddelveblltador
en baja(FANSPPED-LOW)para
I acelerarel pasodelairepo_elsorpantin.
I
I
RUIDO CUANDO LA UNIDAD ESTA ENFRIANDO.
Revise
si,..
Entonces...
S_idedelven_dorquegelpea
agua-delahumeded
queserebra
delaml_nte.
Vibraci6n de laventana - mala instalaci6n.
HAY GOTEO
Revise
DE AGUA EN EL INTERIOR
si...
t El aire acondielonadoesta rnalinstalado.
Estoesnormel
cuandolahumeded
esalta,Cierre_Jerlas,
vantanas,
registrc_,
etc,
Consultelas instruesionesde insta_aci6n
o verifiqueson su instelader.
DE LA HABITACI(_N
CUANDO
LA UNIDAD
ESTA ENFRIANDO.
Entonces...
Incline
elaJre
ac0r_idmade
Ik;a-ar_tehapa
elexteri_pennltir
eld_er_ado
deagua I
dec_r,
dersad_.
Corsulte
lasi_i_o_es
de_tala,
ci_para
oveltl_que
o0n
s_insteladu.
HAY GOTEODEAGUA EN EL EXTERIORCUANDOLA UNIDADESTAENFRIANDO.
Revise
sL..
Entonces...
[Launidadestasacar,:tograndescanltdedesdehumedaddelahabitaden
I
I
Estoesnormaleslosdiasexcest.,amentehbmedes.
-27 -
- 29-
- 30-
Master Protection Agreements
Acuerdos de Protecci6n
Congratulations on making a smart purchase.
Your new Kenmore ®product is designed and
manufactured for years of dependable operation.
But like all products, it may require preventive
maintenance or repair from time to time.
That's when having a Master Protection Agreement
can save you money and aggravation.
iEnhorabuena! Ha realizado unacomprainteligente.
Su nuevoaparato Kenmore_ estd diseSadoy fabricado
para ofrecedeaSosde buen funcionamiento.
Sin embargo,al igualque todoslosproductos,puede
precisarun mantenimientopreventivoo inclusoalguna
reparacibnde vez en cuando.En esas ocasiones,un
Master ProtectionAgreementpuedeayudarlea ahorrar
dineroe inconvenientes.
Purchase a Maser Protection Agreement now and
protect yourseff from unexpected hassle and
expense.
Adquiera un Maser Protection Agreement ahora, y
prot_jase a s[ mismode molestiasy gastos inesperados.
The Master Protection Agreement also helps extend
the life of your new product. Here's what's included
in the Agreement:
[]
Expert service by our 12,000 professional
repair specialists
[]
Unlimited service and no charge for parts and
labor on all covered repairs
[]
"No-lemon" guarantee - replacement of your
covered product if four or more product failures
occur within twelve months
[] Product replacement ifyourcoveredproduct
can'tbe fixed
[]
Annual Preventive Maintenance Check at your
request - no extra charge
[]
Fast help by phone - phone support from a
Sears technician on products requiring in-home
repair, plus convenient repair scheduling
[]
Power surge protection against electrical
damage due to power fluctuations
[]
Rental reimbursement if repair of your covered
product takes longer than promised
Once you purchase the Agreement, a simple phone
call is all that it takes for you to schedule service.
You can call anytime day or night, or schedule a
service appointment online.
Sears has over 12,000 professional repair
specialists, who have access to over 4.5 million
quality parts and accessories. That's the kind of
professionalism you can count on to help prolong
the life of your new purchase for years to come.
Purchase your Master Protection Agreement today[
Some limitations and exclusions
apply.
For prices and additional
information
call
1-800-827-6655.
Sears
Installation
Service
For Sears professional installation of home
appliances, garage door openers, water
heaters, and other major home items, in the
U.S.A. call 1-8O0-4-MY-HOME ®
Especializada
El Master Protection Agreement le ayudara tambien a
prolongar la vida de su nuevo aparato. Los siguientes
se_,icios estdn incluidos:
[]
[]
[]
Servicio experto por parte de cualquiera de
nuestros 12.000 tL=cnicosprofesiona[es especialistas
de Sears.
Prestaci6n de servicios sin limitaciones y sin
cargarle las piezas o la mano de obraen todaslas
reparacionescubiertasporel aceerdo.
Garantia seria de sustitucl6n de las piezas del
producto cubiertoper el acuerdo,si cuatroo m_s
piezas se mostrasen defectuosas en un periodo de
doce meses.
[]
Sustituci6n del producto per otro nuevo, si el
defectuoso no pudiese repararae.
[] Control de mantenimiento anual preventivo,
siempreque I0 desee y sin gasto adicional alguno.
[] Asistencia telef(_nicainmediata de un tecnico
especialista en productosque ban de ser reparados a
domicilio, ademds de una programacionadecuadade
la reparacibn.
[] Protecci6n contra subidas de tensi6n que
provoquenda_os el6ctdcosdebidosalas
fluctuaciones en el suministro.
] Reintegro del alquiler si la repareciondel producto
Ileva rods tiempodel promtetido
Una vez que haya adquiridoel Agreement,no necesitara
m_s que unasimpleIlamsdapara solicitarel serviciode
suaparato. Ademas,podrdhecerloen cualquiermomento
del dia o de la noche, o solicitarunacita para prestaci6n
de serviciosonline.
Sears cuenta conm_s de 12.000 tecnicosprofesionales
especialistas en reparacioees, con acceso a mas de 4,5
millones de piezas de sustituci6n y accesorios de calidad.
Este ser_ el tipo de profesionalidad y servicio con el que
podr&contar para prorongar la vida de su nuevo producto
por muchos afios, iAdquiera hoy mismo su Master
Protection Agreement!
Se aplicardn algunas limitaciones y
restricciones.
Si desea hacer alguna consulta sobra los
precios u otra informaci6n adicional, le rogamos
Ilame al tel6fono 1-800-827-6655.
Servicios
de Instalaci6n
Sears
Para solicitar servicios de instalaci6n profesionales
de Sears de electrodomesticos, mandos de aperture
de puertas de garajes, calentadores de agua y otros
aparatos en los Estados Unidos, puede Ilamar a
1-800-4-MY-HOME
®
Your Home
For repair- in your home-of all major brand appliances,
lawn and garden equipment, or heating and cooling systems,
no matter who made it, no matter who sold it!
For the replacement parts, accessories and
owner's manuals that you need to do-it-yourself.
For Sears professional installation of home appliances
and items like garage door openers and water heaters.
1-800-4-MY-HOME ® (1-800-469-4663)
Call anytirhe,
day or night (U.S.A. and Canada)
www.sears.com
www.sears.ca
Our Home
For repair of carry-in items like vacuums, lawn equipment,
and electronics, call or go on-line for the location of your nearest
Sears Parts & Repair Center.
1-800-488-1222
Call anytime, day or night (U.S.A. only)
www.sears.com
To purchase a protection agreement(U.S.A.)
or maintenance agreement(Canada)
on a product serviced by Sears:
1-800-827-6655
Para pedir servicio
a domicilio,
(U.S.A.)
de reparaci6n
y para ordenar piezas:
1-888-SU-HOGAR
(1-888-784-6427)
s_
1-800-361-6665
Au Canada
(Canada)
pour service
en fran_ais:
1-800-LE-FOYER _
(1-800-533-6937)
www.sears.ca
® Registered Trademark / TM Trademark / _ Service Mark of Sears, Roebuck and Co.
® Marca Registrada / TM Marca de Fabrica / s_ Mama de Servicio de Sears, Roebuck and Co
MCMarque de commerce / MOMarque deposee de Sears, Roebuck and Co.
© Sears, Roebuck and Co.
Part NO.: 3828A20291E