1
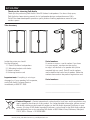
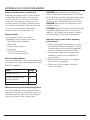
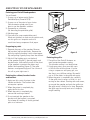
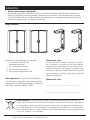
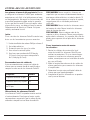
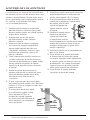
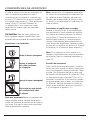
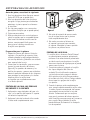
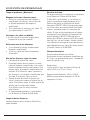
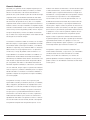
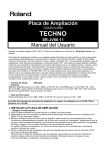
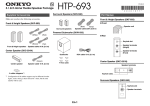
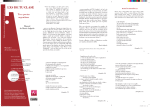
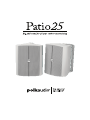
ENGLISH Thank you for choosing Polk Audio Thank you for purchasing Polk Audio’s Patio25 Outdoor Loudspeakers. For almost forty years, Polk Audio has been winning awards for its loudspeaker designs and performance. Polk’s Patio25 has been developed to provide a quality outdoor listening experience around all your outdoor spaces. Take Inventory Inside the carton you should find the following: 1. 2 Patio25 Outdoor Loudspeakers 2. 2 Mounting brackets with knobs 3. Owner’s manual 4. Online registration card Important note: If anything is missing or damaged, or if your speakers fail to operate, notify Polk Audio Customer Service immediately at 800-377-7655. Serial numbers It’s easier to access a serial number if you have it in your records, much easier than trying to copy it off the back of a speaker that you’ve mounted high on a wall. Patio25 serial numbers are located on the back of each speaker. Write the numbers here and on the product registration card. Serial numbers: __________________________________ __________________________________ Product Disposal—Certain international, national and/or local laws and/or regulations may apply regarding the disposal of this product. For further detailed information, please contact the retailer where you purchased this product or the Polk Audio Importer/Distributor in your country. A listing of Polk Audio Importer/Distributors can be found on the Polk Audio website www.polkaudio.com or by contacting Polk Audio at 5601 Metro Drive, Baltimore, Maryland 21215, USA—Phone: +1 410 358-3600. 2 Polk Audio Customer Service: 1-800-377-7655 (Outside US & Canada: 410-358-3600) Monday-Friday, 9:00 AM-5:30 PM EST, [email protected] INSTALLING YOUR SPEAKERS CAUTION: Never mount the loudspeakers on surfaces that are not sturdy enough, or that have electrical wire or plumbing concealed behind them. If you are unsure about installing the bracket, please contact a qualified professional installer. CAUTION: Never install the loudspeakers near any heat sources. CAUTION: Never hang anything from the brackets or speakers. Never place items on top of the speakers. The brackets are designed to support only the weight of the Patio25 Loudspeakers. Please read the owner’s manual first Mounting and setting up your Patio25 Outdoor Loudspeakers will be easier if you read the owner’s manual first. If you don’t follow the instructions in the owner’s manual, you can void the warranty. So please, read the manual. If you seem unsure about a step, don’t hesitate to call our Customer Service Department. They are there for you, they really are. Getting started: If you’re going to install your Patio25 Loudspeakers, here are tools you’ll need. 1. #2 Phillips-head screwdriver 2. Power drill 3. Eye and ear protection 4. Dust mask 5. 3/32" (2.5 mm) wood bit, or ¼" (6.0 mm) masonry bit Wire recommendations These recommendations are for the speaker wire you connect from your amplifier/receiver to each Patio25 loudspeaker: Runs Gauge Lengths up to 20' 18 Lengths greater than 20' but less than 50' 16 Lengths greater than 50' 14 Important steps to take before mounting your speakers 1. Check local building codes before you install your Patio25 Outdoor Loudspeakers. If you’re uncomfortable installing these loudspeakers, contact a qualified home audio installer. 2. Measure the length of each speaker wire needed to connect your loudspeakers to your amplifier. 3. Determine the best route for your speaker wire so that it is protected. 4. Make sure that the speakers cannot fall and cause injuries. Where to locate your Patio25 loudspeakers Patio25 Loudspeakers may be mounted either vertically or horizontally. For the best sound, we recommend spacing them at least 6 feet apart; always aim them into the listening area. For more information visit our website at www.polkaudio.com 3 MOUNTING YOUR SPEAKERS The Patio25’s bracket allows it to be mounted either horizontally or vertically and aimed to deliver the best possible sound in a variety of situations. Follow the steps below to safely secure the brackets and speakers. Installation of the Patio25 Loudspeakers requires basic skills in using tools such as a drill and screwdriver. If you are in doubt that you possess the necessary skills or tools, consult a professional installer. 1. Make sure the material on which you plan to mount the speakers (plaster, drywall, paneling, stone, etc.) can support the weight of the speakers. 2. Make sure the locations you select do not conceal electrical wiring or plumbing. 3. Prior to installation, hold the speaker in the chosen location to make sure it safely clears obstacles such as ceiling, adjacent walls, corners, beams, lighting fixtures and door/window frames. 4. Using the keyhole slots in the bracket as a template, mark the installation location of the two keyhole slots with a pencil. You can do this by removing the bracket knobs on the top and bottom of the speaker and removing the bracket, or by leaving the bracket connected to the speaker. Orient the bracket so that the small ends of the keyhole slots are facing “up” according to the direction of installation. If you have removed the bracket, reattach it by inserting it and then tightening the bracket knobs. 5. If you are certain that there is a stud behind the wall surface, drive #10 screws (not included) through the wall and into the stud. 6. If there is no stud behind the wall at the chosen location, install #10 wall anchors (not supplied) into the wall by following the wall anchor wall stud manufacturer’s instructions. Always use two wall anchors and two screws per speaker. 4 7. Drive screws into stud or wall anchors, leaving screw heads protruding 1/16” (1/6mm). 8. If speaker wire is being fed from a hole in the wall behind the bracket, pull this speaker wire through the hole in the bracket before mounting the bracket 9. Line up the bracket, attached to the speaker, so that the screw heads pass through the large center hole of the bracket’s keyhole slots. 10. Let the speaker and bracket slide straight down, allowing the screw head to slip into the smaller end of the keyhole slot. 11. Tug gently on the speaker to make certain that the screws and bracket are properly aligned and that the wall anchors are secure. 12. If the bracket is not held snug against the wall by the screw heads, remove the speaker from the wall, drive the screws in a little further and then remount the speaker. 13. Once the speaker is mounted, the bracket knobs can be loosened to “aim” the speaker, and then hand-tightened to keep the speaker angled correctly. no wall stud Polk Audio Customer Service: 1-800-377-7655 (Outside US & Canada: 410-358-3600) Monday-Friday, 9:00 AM-5:30 PM EST, [email protected] CONNECTING YOUR SPEAKERS Speaker wire consists of two insulated wires. The wire marked with a stripe or rib is used for the positive (+) red terminal connection. The plain wire is used for the negative (–) black terminal connection. Strip approximately 1/2" (1.3 cm) of insulation from the ends of both wires. Then, twist the ends of each wire so there are no loose strands. CAUTION: Before you make any connections, turn off your receiver/amplifier and unplug it from the AC power outlet. Making binding post connections Loosen hex nut Insert speaker wire through hole Tighten hex nut Note: Bare lengths of speaker wire can be affected by exposure to the outdoor elements. Protect the speaker wires by applying a thin coating of silicone caulking material to any bare sections of speaker wire. Make the connection to your amplifier or receiver Connect the speaker on the left side of the listening area to the left amplifier channel. Attach the marked wire to the positive (+) red terminal. Attach the plain wire to the negative (–) black terminal. Connect the speaker on the right side of the listening area to the right amplifier channel. Attach the marked wire to the positive (+) red terminal. Attach the plain wire to the negative (–) black terminal. Note: If your speakers are being connected to your receiver or amplifier as a secondary set of speakers, make the appropriate connections to the “B” channels. Check your connections Set the balance control on your receiver or amplifier to normal (centered), then play some music with deep bass passages. Now listen. Does the sound appear to come from a point between the two speakers? Does the bass sound full and natural? If yes, you’re done. If not, check your connections, because they could be reversed, which would cause your speakers to play out of phase. Check that all the speaker wires are connected positive to positive (+ to +), negative to negative (– to –). Do not insert insulated section of speaker wire Very important note: Check the speaker connections carefully. No loose strands of wire should touch across terminals. This will create a short circuit that can damage your amplifier or receiver. For more information visit our website at www.polkaudio.com 5 PAINTING YOUR SPEAKERS Painting your Patio25 Loudspeakers You will need: 1. A spray can of primer paint (Krylon Sandable Spray Primer #1318) 2. A spray can of the paint of your choice. Choose exterior grade paint if you plan to use the speakers outdoors. 3. A paperclip or corkscrew (for removing the paintable grille) 4. Masking tape 5. Paint mask (to cover unpaintable parts) Mask not included, to make an easy paint mask, use the grille as a template and cut a mask from heavy, nonporous Kraft paper. Preparing to paint: 1. Separate the parts of the speaker. Remove the brackets and bracket knobs. Remove the grille by carefully hooking it with a bent paper clip and pulling it gently away from the cabinet. 2. Mask off the binding posts on the back of the speaker [figure 1], the end panels and bracket knobs, and carefully mask off the front of the speakers to protect the drivers and baffles while painting [figure 2]. The grille features an engraved logo pod. You can mask this off or paint right over it. Painting the cabinet, bracket knobs and bracket: 1. Apply two thin coats of primer to the cabinet and knobs. The bracket does not require a primer. 2. When the primer is completely dry, apply the finish color. 3. When the paint is completely dry, remove the masking material. 4. Do not reattach the speaker to the bracket until the bracket is mounted. Try to keep all handling of freshly painted parts to a minimum. 6 figure 1 figure 2 Painting the grille: 1. The grille of the Patio25 features an even, protective powder coating. This powder coating is an ideal primer. 2. Using spray paint, spray two thin coats of finish color with no primer. If you’re using a compressor and spray gun, use the finest, most diffuse setting. Be careful not to fill the holes in the grille with paint. 3. When the paint is completely dry, carefully fit the grille into its recess so that it is just resting on the cabinet. Starting with one corner, go around the speaker and push the grille into the grille notch a little bit at a time. Be gentle; the grille may be easily bent out of shape by rough handling. Polk Audio Customer Service: 1-800-377-7655 (Outside US & Canada: 410-358-3600) Monday-Friday, 9:00 AM-5:30 PM EST, [email protected] TROUBLESHOOTING I have a problem, now what? Neither speaker plays • Check the settings on your receiver/amplifier. Refer to its owner’s guide for instructions. • If you’ve connected your speakers to the “B” output, have you selected the “B” output ? Bass or treble is weak • Is the tonal balance on your receiver or amplifier set correctly? Only one speaker plays • Is your receiver/amplifier balance control centered? • Are the speaker wires securely connected? One speaker still does not play • Disconnect the working speaker from the receiver or amplifier. • Switch the cord of the faulty speaker from its original receiver or amplifier connections to the other set of connections (the ones the working speaker is attached to). If the speaker now works, your receiver or amplifier has a problem. Reconnect the speakers to a working unit. If the speaker still does not work, then: • Remove the speaker wire from the working speaker and connect it to the faulty speaker. If the speaker works now, the original speaker wire is bad. If the speaker still doesn’t work, the speaker has a problem. • If trouble persists, contact Polk Audio Customer Service. Customer Service If you need help with your new product, please contact Polk Audio Customer Service. If anything is missing or damaged, or if your speaker fails to operate, notify Polk Audio Customer Support Services immediately at 800-377-7655. If, after following the hookup directions, you experience difficulty, please double-check all wire connections. Should you isolate the problem to the speaker, contact Polk Audio Customer Service 800-377-7655 (M-F, 9-5:30 EST, US &Canada only) or via email [email protected]. Outside the US & Canada, call 410-358-3600. Technical information Driver complement per speaker: 6 1/2" polymer composite cone with rubber surround, 1" silk dome tweeter Dimensions: 12" H x 9" D x 8½" W (30.5 cm x 22 cm x 23 cm) Frequency response: 40Hz -25kHz Maximum power handling: 150 Watts Impedance: 8 Ohms Cleaning your speakers Use a damp cloth to clean the outside of your Patio25 Loudspeakers. For more information visit our website at www.polkaudio.com 7 ESPAÑOL Gracias por escoger a Polk Audio Gracias por comprar los altavoces Patio25 para ambientes exteriores de Polk Audio. Durante casi 40 años, Polk Audio ha estado ganando galardones por los diseños y el rendimiento de sus altavoces. El Patio25 de Polk ha sido desarrollado para que produzca una experiencia de audición de alta calidad en cualquiera de sus espacios al aire libre. . inventario Haga Dentro de la caja debe haber lo siguiente: 1. Dos altavoces Patio25 para ambientes exteriores 2. Dos soportes de montaje 3. Un manual del propietario 4. Una tarjeta de registro en línea Nota importante: Si algo falta o está dañado, o si el altavoces no funciona, comuníquese inmediatamente con los Servicios de Apoyo al Cliente de Polk Audio llamando al 800-377-7655. Números de serie: Es más fácil ver los números de serie si los tiene en sus registros. Es mucho más fácil que intentar copiarlos de la parte de atrás de un altavoz montado en la parte alta de la pared. Los números de serie de los altavoces Patio25 están en la parte de atrás del altavoz. Escríbalos aquí y en la tarjeta de registro del producto. Números de serie: __________________________________ __________________________________ Product Disposal— Es posible que haya leyes y/o reglamentos internacionales, nacionales y/o locales sobre la eliminación de este producto. Para obtener información más detallada, comuníquese con el distribuidor a quien le compró este producto de Polk Audio o al importador o distribuidor en su país. Puede obtener una lista de importadores y distri-buidores de Polk Audio en el sitio Web de Polk Audio, www.polkaudio.com, o comuni-cándose con Polk Audio: 5601 Metro Drive, Baltimore, Maryland 21215, USA. Teléfono: +1 410 358-3600. 8 Polk Audio Customer Service: 1-800-377-7655 (Outside US & Canada: 410-358-3600) Monday-Friday, 9:00 AM-5:30 PM EST, [email protected] INSTALAR LOS ALTAVOCES Lea primero el manual del propietario Montar y configurar los altavoces Patio25 para ambientes exteriores es más fácil si ha leído primero el manual del propietario. No seguir las instrucciones del manual del propietario puede anular la garantía. Así es que lea el manual.Si no está seguro sobre alguno de los pasos, no dude en llamar a nuestro Departamento de Servicio al Cliente. Está para servirlo; realmente lo está. Inicio: Si va a instalar los altavoces Patio25 usted mismo, éstas son las herramientas que va a necesitar. 1. Un destornillador de cabeza Phillips número 2 2. Un taladro eléctrico 3. Protección para los ojos y los oídos 4. Una máscara contra el polvo 5. Una broca para madera de 3/32 de plg. (2.5 mm) o una broca para mampostería de 1/4 de plg. (6.0 mm) Recomendaciones de cableado Estas recomendaciones son para el cable de altavoz que se conecta desde el amplificador o receptor a cada uno de los altavoces Patio25: Trayectos Calibre Trayectos de hasta 20 pies 18 PRECAUCIÓN: Nunca monte los altavoces en superficies que no sean suficientemente fuertes o que tengan cables eléctricos o tuberías detrás. Si no se siente seguro respecto a instalar el soporte, comuníquese con un instalador profesional calificado. PRECAUCIÓN: Nunca instale los altavoces cerca de fuentes de calor. Nunca instale los altavoces cerca de fuentes de calor. PRECAUCIÓN: Nunca cuelgue nada de los soportes o de los altavoces. Nunca ponga objetos encima de los altavoces. Los soportes han sido diseñados para soportar sólo el peso de los altavoces Patio25. Pasos importantes antes de montar los altavoces 1.Revise los códigos de construcción local antes de instalar los altavoces Patio25 para ambientes exteriores. Si no se siente seguro respecto a instalar estos altavoces personal mente, comuníquese con un instalador de audio en casa calificado. 2.Mida la longitud de cada uno de los cables de altavoz necesarios para conectar los altavoces al amplificador. 3.Determine la mejor ruta posible del cable de altavoz para que quede protegido. 4.Asegúrese de que los altavoces no se puedan caer y causar lesiones. Trayectos entre 20 y 50 pies 16 Trayectos de más de 50 pies 14 Ubicación de los altavoces Patio25 Los altavoces Patio25 se pueden montar vertical u horizontalmente. Para lograr el mejor sonido, recomendamos espaciarlos por lo menos 6 pies; oriéntelos siempre hacia el área de audición. For more information visit our website at www.polkaudio.com 9 MONTAJE DE LOS ALTAVOCES La instalación de los altavoces de la Patio25 requiere destrezas básicas con herramientas tales como taladros y destornilladores. Si tiene dudas acerca de sus capacidades o de las herramientas necesarias, consulte a su distribuidor Polk Audio o a un instalador profesional. 1.Verifique que el material en el que tiene. pensado montar los altavoces (yeso, panel de yeso, paneles, piedra, etc.) puede soportar el peso de los altavoces: 2.Asegúrese de que las ubicaciones que seleccione no oculten cableado eléctrico o tuberías. 3.Antes de instalar el altavoz, sosténgalo en la ubicación escogida asegurándose de que quede separado del cielo raso y de paredes adyacentes, esquinas, vigas, accesorios de iluminación y marcos de puertas y ventanas. 4.Con el soporte como plantilla, marque con un lápiz la ubicación de las dos ranuras en forma de ojo de cerradura en la pared. Puede hacerlo quitando las perillas de soporte de arriba y de abajo del altavoz y quitando el soporte. 5.Oriente el soporte de manera que los extremos angostos de las ranuras en forma de ojo de cerradura queden hacia arriba, de acuerdo con la dirección de la instalación. 6.Si está seguro de que hay un paral detrás de la pared, atornille tornillos con cabeza troncocónica nº 10 (no se incluyen) a través de la pared en el paral. 7.Si no hay paral detrás de la pared en la ubicación escogida, instale anclas de pared nº10 (no se incluyen) en la pared siguiendo las instrucciones del fabricante de anclas de pared. Use siempre dos tiene anclas por altavoz. parales internos 10 8.Atornille los tornillos en el paral o en anclas de pared dejando que la cabeza de cada tornillo sobresalga de 1/8 a 1/4 de plg. 9. Si está haciendo pasar cable de altavoz a través de un agujero en la pared detrás del soporte, pase el cable a través del agujero del soporte antes de montar el soporte. 10. Atornille el soporte directamente en el paral que soporta peso detrás de la superficie de montaje. Encaje firmemente los tornillos en el extremo angosto de la ranura en forma de ojo de cerradura. No deje que la cabeza de los tornillos sobresalga. 11.Atornille las perillas en las protuberancias, pero no las apriete. 12.Fije el altavoz en el soporte deslizando el altavoz entre los brazos del soporte. Las rampas integradas abren ligeramente el soporte y guían los extremos hacia las protuberancias. Un sistema de trinquete sujeta el altavoz en posición y permite hacer ajustes menores de orientación. 13.Fije el altavoz al soporte apretando las perillas de ajuste del soporte. no tiene parales internos Polk Audio Customer Service: 1-800-377-7655 (Outside US & Canada: 410-358-3600) Monday-Friday, 9:00 AM-5:30 PM EST, [email protected] CONEXIÓN DE LOS ALTAVOCES El cable de altavoz consta de dos conductores aislados. El conductor que tiene una franja o un resalte es para la conexión a la terminal roja positiva (+). El conductor liso es para la conexión a la terminal negra negativa (-). Quite aproximadamente 1/2 plg. (1.3 cm) de aislamiento de los extremos de los dos conductores. Luego retuérzales los extremos para que no queden hebras sueltas. PRECAUCIÓN: Antes de hacer cualquier conexión, apague el receptor o amplificador y desenchúfelo del tomacorriente de corriente alterna. Conexiones a las terminales Afloje la tuerca hexagonal. Inserte el conductor del cable de altavoz en el agujero. Apriete la tuerca hexagonal. No inserte la parte aislada del conductor del cable de altavoz. Nota: La exposición a la intemperie puede dañar los tramos sin aislamiento de los conductores de los cables de altavoz. Protéjalos aplicando una delgada capa de enmasillado de silicona a todos los tramos sin aislamiento de los conductores de cable de altavoz. Conexiones al amplificador o receptor Conecte el altavoz ubicado al lado izquierdo del área de audición al canal izquierdo del amplificador. Conecte el conductor marcado a la terminal roja positiva (+). Conecte el conductor liso a la terminal negra negativa (-). Conecte el altavoz ubicado al lado derecho del área de audición al canal derecho del amplificador. Conecte el conductor marcado a la terminal roja positiva (+). Conecte el conductor liso a la terminal negra negativa (-). Nota: Si sus altavoces se van a conectar a un receptor o amplificador como conjunto secundario de altavoces, haga las conexiones apropiadas al canal “B”. Revisión de conexiones Fije el control de balance del receptor o amplificador en la posición normal (al centro) y luego toque música con fragmentos de bajos profundos. Luego escuche. ¿Da la impresión de que el sonido sale de un punto ubicado entre los dos altavoces? ¿Son los bajos pronunciados y naturales? Si es así, ha terminado la instalación. Si no, revise las conexiones porque pueden estar al revés, lo cual desfasa los altavoces. Verifique que todos los cables de altavoz estén conectados de positivo a positivo (+ a +) y de negativo a negativo (- a -). Nota muy importante Revise las conexiones del altavoz cuidadosamente. No debe haber hebras sueltas del conductor de una terminal en contacto con la otra. Esto crea un cortocircuito que puede dañar el amplificador o receptor. For more information visit our website at www.polkaudio.com 11 PINTURA DE LOS ALTAVOCES Antes de pintar, necesitará lo siguiente: 1.Una lata de pintura base (base en aerosol Krylon Nº 1318 que se puede lijar). 2.Una lata de pintura del color que haya escogido. Escoja pintura para ambientes exteriores si piensa poner los altavoces al aire libre. 3.Un clip para papeles o un sacacorchos (para quitar la rejilla que se puede pintar). 4.Cinta enmascaradora. 5.Máscara de pintura (no se incluye) para cubrir las partes que no se pueden pintar. Para hacer fácilmente una máscara de pintura, recorte papel Kraft grueso no poroso por el contorno trazado con la rejilla como plantilla. Preparación para la pintura 1.Separe las piezas del altavoz: Quite los soportes y las perillas de soporte. Quite cuidadosamente la rejilla enganchándola con un clip doblado y jalándola con cuidado para separarla de la caja. 2.Enmascare las terminales, que se encuen- tran en la parte de atrás del altavoz [figura 6], los paneles de extremo y las perillas de soporte, y enmascare cuidadosa- mente la parte de adelante de los altavoces para proteger los excitadores y los bafles mientras pinta. La rejilla tiene un logotipo que se puede enmascarar si no desea pintarlo. PINTURA DE LA CAJA, LAS PERILLAS DE SOPORTE Y EL SOPORTE 1.Aplique dos capas delgadas de base a la caja y a las perillas de soporte. El soporte no necesita capa de base. 2.Aplique el color del acabado sólo cuando la base esté completamente seca. 12 figura 1 figura 2 3.No quite el material de enmascarado (no se incluye) hasta que la pintura esté completamente seca. 4.No vuelva a montar el altavoz en el soporte hasta que haya montado el soporte. Manipule lo menos posible las piezas con pintura fresca. PINTURA DE LA REJILLA 1. La rejilla de los altavoces Patio25 tiene 1 un revestimiento protector pulverizado uniforme. Este revestimiento pulverizado es ideal como base de pintura. La rejilla tiene una cápsula de logotipo que se puede enmascarar o pintar. 2.Con pintura aerosol, póngale a la rejilla dos capas delgadas del color de acabado Si está utilizando compresor y pistola de rociado, ponga el selector de la pistola en la posición que produce el rociado más fino y difuso. Tenga cuidado de no tapar los agujeros de la rejilla con pintura. 3.Cuando la pintura esté completamente seca, ponga cuidadosamente la rejilla sobre la muesca que le corresponde, de manera que quede justo encima de la caja del altavoz. Comenzando por una esquina, vaya por el contorno del altavoz presion- ando la rejilla para que encaje en la muesca poco a poco.Tenga cuidado; la rejilla puede doblarse fácilmente si la manipula con brusquedad. Polk Audio Customer Service: 1-800-377-7655 (Outside US & Canada: 410-358-3600) Monday-Friday, 9:00 AM-5:30 PM EST, [email protected] SOLUCIÓN DE PROBLEMAS Tengo un problema. ¿Qué hago? Ninguno de los dos altavoces suena • Revise las configuraciones del receptor o amplificador. Consulte las instrucciones de la guía del propietario del receptor o amplificador. • Si ha conectado los altavoces a la salida “B”, ¿ha seleccionado la salida “B”? Los bajos o los altos son débiles • ¿Está el control de tono del amplificador o receptor en la posición correcta? Sólo suena uno de los altavoces • ¿Está centrado el control de balance del receptor o amplificador? • ¿Están los cables de altavoz firmemente conectados? Uno de los altavoces sigue sin sonar • Desconecte el altavoz que suena. • Conecte el altavoz que no suena a las terminales del receptor o amplificador a las cuales estaba conectado el altavoz que sonaba. Si el altavoz suena, el receptor o amplificador está fallando. Si el altavoz no suena, conecte los dos altavoces a un receptor o amplificador que funcione. Si el altavoz sigue sin sonar: • Quítele el cable de altavoz al altavoz que suena y úselo para conectar el altavoz que no suena. Si el altavoz suena, el cable original del altavoz que no sonaba está dañado. Si el altavoz sigue sin sonar, el altavoz está fallando. • Si sigue teniendo problemas, comuníquese con el Servicio al Cliente de Polk Audio. Servicio al cliente ISi necesita ayuda con su producto, comuníquese con el Servicio al Cliente de Polk Audio. Si algo falta o está dañado, o si el altavoz no suena, comuníquese inmediatamente con los Servicios de Apoyo al Cliente de Polk Audio llamando al 800-377-7655. Si después de seguir las instrucciones de conexión tiene dificultades, vuelva a comprobar todas las conexiones de cables. Si logra aislar el problema en el altavoz, comuníquese con el Servicio al Cliente de Polk Audio llamando al 800-377-7655 (de lunes a viernes, de 9:00 de la mañana a 5:30 de la tarde, hora del Este, sólo en Canadá y Estados Unidos) o escribiendo un mensaje de correo electrónico a [email protected]. Fuera de Estados Unidos y Canadá, llame al 410-358-3600. Información técnica Dotación de excitadores por altavoz: Un excitador de cono compuesto de polímero de 6 1/2 plg. con envolvente de goma, 1 tweeter de domo de seda de 1 plg. Dimensiones: 12 plg. de alto x 9 plg. de fondo x 8½ plg. de ancho (30.5 cm x 22 cm x 23 cm) Respuesta de frecuencias: 40 Hz a 25 kHz Máximo procesamiento de potencia: 150 W Impedancia: 8 Ohms. Limpieza de los altavoces Limpie el exterior de los altavoces Patio25 con upaño húmedo. For more information visit our website at www.polkaudio.com 13 Limited Warranty Polk Audio, Inc. warrants to the original purchaser only that of the use or inability to use the Product, even if Polk Audio, this Polk Audio Loudspeaker Product (the “Product”) will be free Inc. or a Polk Audio Authorized Dealer has been advised of from defects in materials and workmanship for a period of the possibility of such damages, or for any claim by any other one (1) year from the date of original retail purchase from a party. Some states do not allow the exclusion or limitation of Polk Audio Authorized Dealer. However, this Warranty will auto- consequential damages, so the above limitation and exclusion matically terminate prior to the expiration of the one (1) years may not apply to you. if the original retail purchaser sells or otherwise transfers the Product to any other party. The original retail purchaser shall All implied warranties on this Product are limited to the dura- hereinafter be referred to as “you.” To allow Polk Audio to offer tion of this expressed Warranty. Some states do not allow the best possible warranty service, please fill out the Product limitation on how long an implied Warranty lasts, so the above Registration Card(s) and send it to the Factory, at the address limitations may not apply to you. This Warranty gives you provided on the Product Cards(s) within ten (10) days of the specific legal rights, and you also may have other rights which date of purchase. Defective Products must be shipped, together vary from state to state.This Warranty applies only to Products with proof of purchase, prepaid insured to the Polk Audio purchased in the United States of America, its possessions, Authorized Dealer from whom you purchased the Product, or and U.S. and NATO armed forces exchanges and audio clubs. to the Factory at 1 Viper Way, Vista, California 92081. Products TheWarranty terms and conditions applicable to Products must be shipped in the original shipping container or its equiva- purchased in other countries are available from the Polk Audio lent; in any case the risk of loss or damage in transit is to be Authorized Distributors in such countries. borne by you. If upon examination at the Factory or Polk Audio Authorized Dealer it is determined that the unit was defective in materials or workmanship at any time during this Warranty period, Polk Audio or the Polk Audio Authorized Dealer will, at its option, repair or replace this Product at no additional charge, except as set forth below. All replaced parts and Products become the property of Polk Audio. Products replaced or repaired under this warranty will be returned to you, within a reasonable time, freight prepaid. This warranty does not include service or parts to repair damage caused by accident, disaster, misuse, abuse, negligence, inadequate packing or shipping procedures, commercial use, voltage inputs in excess of the rated maximum of the unit, cosmetic appearance of cabinetry not directly attributable to defect in materials or workmanship, or service, repair, or modification of the Product which has not been authorized or approved by Polk Audio. This warranty shall terminate if the Serial number on the Product has been removed, tampered with or defaced. This warranty is in lieu of all other expressed Warranties. If this Product is defective in materials or workmanship as warranted above, your sole remedy shall be repair or replacement as provided above. In no event will Polk Audio, Inc. be liable to you for any incidental or consequential damages arising out 14 Polk Audio Customer Service: 1-800-377-7655 (Outside US & Canada: 410-358-3600) Monday-Friday, 9:00 AM-5:30 PM EST, [email protected] Garantía Limitada Polk Audio, Inc. garantiza sólo al comprador original que este Producto tiene defectos de materiales o de mano de obra según producto de altavoz de Polk Audio (el “Producto”) no tendrá se indica anteriormente, su único remedio es la reparación o defectos ni de materiales ni de mano de obra durante un el cambio según se especifica anteriormente. En ningún caso período de uno (1) año contados a partir de la fecha de compra Polk Audio Inc. será responsable ante usted por daños fortuitos original al detalle a un distribuidor autorizado de Polk Audio. o consecuentes que surjan del uso o de la incapacidad de Sin embargo, esta garantía terminará automáticamente antes usar el Producto, aun en el caso de que Polk Audio, Inc. o el del vencimiento del período de uno (1) años si el comprador distribuidor autorizado de Polk Audio haya estado al tanto de original al detalle vende o transfiere de alguna otra manera el la posibilidad de tales daños, ni por ninguna reclamación de Producto a terceros. De aquí en adelante el comprador original terceras partes. Algunos estados no permiten la exclusión o la al detalle será denominado “usted”. Para que Polk Audio pueda limitación de los daños consecuentes, de modo que es posible ofrecer el mejor servicio de garantía posible, llene las tarjetas que la exclusión y la limitación especificadas anteriormente no de registro del producto y envíelas a la fábrica a la dirección se apliquen a su caso. Todas las garantías implícitas de este que se indica en las tarjetas del producto a más tardar diez (10) Producto se limitan a la duración de esta garantía expresa. días después de la fecha de compra. Algunos estados no permiten la limitación de la duración de la garantía implícita, de modo que es posible que la limitación Los Productos con defectos deben ser enviados, con el comprobante de compra y el seguro pagado, al distribuidor autorizado de Polk Audio donde usted compró el Producto, o a la fábrica, especificada anteriormente no se aplique a su caso. Esta garantía le otorga derechos legales específicos y es posible que usted tenga derechos que varían de un estado a otro. ubicada en 1 Viper Way, Vista, California 92081. Los Productos deben enviarse en la caja original de envío o su equivalente; Esta garantía se aplica sólo a Productos comprados en los en todo caso, el riesgo de pérdida o daño en tránsito es su Estados Unidos de América, sus posesiones y los intercambios responsabilidad. Si al examinar el Producto en la fábrica o el y clubes de audio de las Fuerzas Armadas de los Estados establecimiento del distribuidor autorizado de Polk Audio se Unidos y de la OTAN. Las condiciones y los términos de determina que la unidad ha tenido defectos de materiales o de garantía aplicables a Productos comprados en otros países se mano de obra en algún momento dentro del período cubierto pueden solicitar a los distribuidores autorizados de Polk Audio por esta garantía, Polk Audio o el distribuidor autorizado de en tales países. Polk Audio reparará o cambiará, a su discreción, este Producto sin costo adicional, excepto según se especifica más adelante. Todos los repuestos y Productos cambiados pasan a ser propiedad de Polk Audio. Le enviaremos los Productos cambiados o reparados al amparo de esta garantía en un plazo razonable y con el flete pagado. Esta garantía no incluye el servicio ni los repuestos para reparar daños causados por accidente, desastre, uso indebido, abuso, negligencia, procedimientos de empaquetado o envío inadecuados, uso comercial, entradas de voltaje que superan el máximo nominal de la unidad, ni el aspecto cosmético de las cajas que no se pueda atribuir directamente a defectos de materiales o de mano de obra, ni el servicio, reparación o modificación del Producto que no cuente con autorización o aprobación de Polk Audio. Esta garantía se anula si el número de serie del Producto ha sido retirado, alterado o desfigurado. Esta garantía reemplaza toda otra garantía expresa. Si este For more information visit our website at www.polkaudio.com 15 5601 Metro Drive Baltimore, Maryland 21215 800-377-7655 (US & Can, outside us 410-358-3600) www.polkaudio.com