1
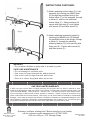
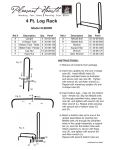
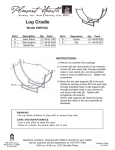
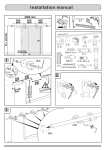
W a r m i n g Y o u r H o m ee..
W a r m i n g Y o u r H e a r tt..
8 Ft. Log Rack with Cover
Model #LS003RC
Ref.#
A
B
C
D
E
F
Fig. 2)
Description
Upright
U-Shape Tube
Bottom Tube
Cap Nut
Keps Nut
M6x35 Bolt
Qty. Part#
4 40-04-469
2 40-08-129
6 40-08-130
8 40-09-936
16 40-09-937
8 40-09-938
Ref.#
G
H
I
J
K
L
Description
M6x60 Bolt
Washer
Divider
Cover
Wrench
Allen Wrench
Qty. Part#
16 40-09-939
16 40-09-950
4 40-04-470
1 40-08-131
1 40-08-132
1 40-08-133
INSTRUCTIONS:
1) Remove all contents from package.
2) Insert two uprights (A) into one U-shape
tube (B). Insert M6x35 bolts (F)
through predrilled holes as illustrated
and secure with cap nuts (D). Tighten
with wrench (K) and Allen wrench (L).
Repeat with remaining uprights (A) and
U-shape tube (B).
Fig. 3)
Fig. 4)
3) Attach two bottom tubes (C) to assembled
upright by inserting four M6x60 bolts (G)
through the predrilled holes, through a
divider (I), attaching washers (H), and
securing with Keps nuts (E). Tighten
with wrench (K) and Allen wrench (L).
4) Attach two bottom tubes (C) to the
assembly by inserting four M6x60 bolts
(G) through the predrilled holes in
the bottom tubes (C) of the assembly,
through a divider (I), and into the
additional bottom tubes (C). Attach
washers (H), secure with Keps nuts (E),
and tighten with wrench (K) and Allen
wrench (L).
continued on back
INSTRUCTIONS CONTINUED:
Fig. 5)
5) Attach remaining bottom tubes (C) to the
assembly by inserting four M6x60 bolts
(G) through the predrilled holes in the
bottom tubes (C) of the assembly, through
a divider (I), and into the additional
bottom tubes (C). Attach washers (H),
secure with Keps nuts (E), and tighten
with wrench (K) and Allen wrench (L).
Fig. 6)
6) Attach remaining assembled upright by
inserting four M6x60 bolts (G) through
the predrilled holes in the upright, through
a divider (I), through the assembly,
attaching washers (H), and securing with
Keps nuts (E). Tighten with wrench (K)
and Allen wrench (L).
WARNING
• Do not allow children to play with or around log rack.
CARE AND MAINTENANCE
• Do not attempt to overload rack.
• Use cover to keep firewood dry and protected.
• Use a soft cloth to wipe the rack and cover.
• Store in a clean, dry place when not in use.
ONE YEAR LIMITED WARRANTY
If within one year from the date of original purchase, this item fails due to a defect in material or workmanship, we will replace or repair at our option, free of charge. To order parts or to obtain warranty service, call
1-877-447-4768, Monday - Friday, 8:30 a.m. - 4:30 p.m. CST. This warranty does not cover defects resulting from improper or abnormal use, misuse, accident, or alteration. Failure to follow all instructions in the
owner’s manual will also void this warranty. GHP Group, Inc. will not be liable for incidental or consequential
damages. Some states do not allow the exclusion or limitation of incidental or consequential damages, so the
above limitation or exclusion of incidental or consequential damages may not apply to you. This warranty gives
you specific legal rights and you may also have other rights which vary from state to state.
8280 Austin Avenue
Morton Grove, IL 60053
877-447-4768
Questions, problems, missing parts? Before returning to your retailer,
call our customer service department at 1-877-447-4768,
8:30 a.m.-4:30 p.m., CST, Monday-Friday.
Printed in China
40-10-076
W a r m i n g Y o u r H o m ee..
W a r m i n g Y o u r H e a r tt..
Rack de 8 Pies con Forro,
para Madera
Modelo N.°LS003RC
Pieza N.° Descripción
Cant. Ref. N.°
A
Tubo vertical
4 40-04-469
B
Tubo en U
2 40-08-129
C
Tubo Inferior
6 40-08-130
D
Tuerca Tapón
8 40-09-936
E Tuerca de Arandela 16 40-09-937
F
Perno M6x35
8 40-09-938
Fig. 2)
Pieza N.° Descripción
Cant. Ref. N.°
G
Perno M6x60
16 40-09-939
H
Arandela
16 40-09-950
I
Barra de Soporte
4 40-04-470
J
Forro
1 40-08-131
K
Llave Inglesa
1 40-08-132
L
Llave Allen
1 40-08-133
INSTRUCCIONES:
1) Retire todo el contenido del empaque.
2) Inserte dos tubos verticales (A) dentro de
un tubo en U (B). Inserte los pernos M6x35
(F) a través de los huecos pre-perforados
como se ilustra y asegúrelos con las tuercas
tapón (D). Apriételos con la llave inglesa (K) y
con la llave Allen (L). Repita el proceso con los
demás tubos verticales (A) y los tubos en U (B).
Fig. 3)
Fig. 4)
3) Acople dos tubos inferiores (C) al ensamble
vertical, insertando cuatro pernos M6x60 (G)
a través de los huecos pre-perforados y de
la barra de soporte (I), acoplando arandelas (H)
y asegurándolas con tuercas de arandela (E).
Apriételas con la llave inglesa (K) y con la llave
Allen (L).
4) Acople dos tubos inferiores (C) al ensamble,
insertando cuatro pernos M6x60 (G) a
través de los huecos pre-perforados en los
tubos inferiores (C) del ensamble, pasándolos
a través de una barra de soporte (I) y de los
tubos inferiores adicionales (C). Acople arande
las (H) asegurándolas con tuercas de arandela
(E) y apriételas con la llave inglesa (K) y con la
llave Allen (L).
Continúa por detrás
INSTRUCCIONES – CONTINUACIÓN:
Fig. 5)
Fig. 6)
5) Acople los tubos inferiores restantes (C)
al ensamble, insertando cuatro pernos
M6x60 (G) a través de los huecos preperforados en los tubos inferiores (C) del
ensamble, pasándolos a través de una
barra de soporte (I) y de los tubos inferiores
adicionales (C). Acople arandelas (H)
asegurándolas con tuercas de arandela (E)
y apriételas con la llave inglesa (K) y con
la llave Allen (L).
6) Acople los ensambles verticales restantes,
insertando cuatro pernos M6x60 (G) a
través de los huecos pre-perforados en los
ensambles verticales, pasándolos a través
de una barra de soporte (I) y del ensamble.
Acople arandelas (H) y asegúrelas con
tuercas de arandela (E). Apriételas con la
llave inglesa (K) y con la llave Allen (L).
ADVERTENCIA
• No permita que los niños jueguen con el rack de madera o alrededor de este.
CUIDADO Y MANTENIMIENTO
• No intente sobrecargar el rack.
• Utilice la cubierta para mantener la leña seca y la protegió.
• Utilice un paño suave para limpiar el rack.
• Consérvelo en un lugar limpio y seco cuando no esté en uso.
GARANTÍA LIMITADA DE UN AÑO
Si en el lapso de un año a partir de la fecha de compra original este artículo falla debido a un defecto
en el material o la mano de obra, lo reemplazaremos o repararemos sin cargos a nuestra discreción.
Para hacer un pedido de las piezas o para obtener el servicio de garantía, llame al 1-877-447-4768,
de lunes a viernes, de 9:00 a.m. a 4:30 p.m., hora central estándar. Esta garantía no cubre defectos
que sean producto de un uso incorrecto o anormal, uso indebido, accidente o alteración. No seguir
todas las instrucciones del manual del propietario también anulará esta garantía. El fabricante no será
responsable de daños accidentales o resultantes. Algunos estados no permiten la exclusión o limitación
de los daños accidentales o resultantes, de modo que las limitaciones anteriores pueden no aplicarse
en su caso. Esta garantía le otorga derechos legales específicos, pero podría tener también otros
derechos que varían según el estado.
8280 Austin Avenue
Morton Grove, IL 60053
877-447-4768
¿Preguntas, problemas, piezas faltantes? Antes de volver a la tienda,
llame a nuestro departamento de servicio al cliente al 1-877-447-4768,
de lunes a viernes de 8:30 a.m. a 4:30 p.m., hora central estándar.
Impreso en China
40-10-076