1
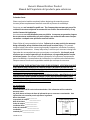
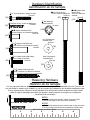
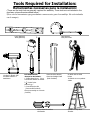
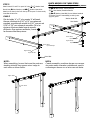
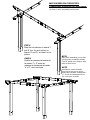
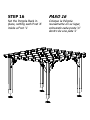
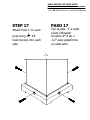
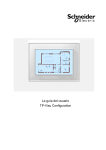
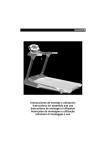
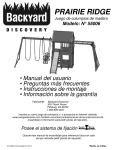
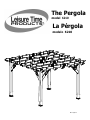
The Pergola
model 6210
La Pérgola
modelo 6210
Rev. 3/18/10
Owner’s Manual Outdoor Product
Manual del Propietario del producto para exteriores
Dear Customer:
Estimado cliente:
Please read entire booklet completely before beginning the assembly process.
Lea este folleto completamente antes de comenzar el proceso de ensamblaje.
Structures are not intended for public use. The Company does not warranty any of its
residential structures subjected to commercial use such as: Recreational Park, or any
similar Commercial Application.
Las estructuras no están diseñadas para uso público. La empresa no garantiza ninguna
de sus estructuras residenciales que estén sujetas a uso comercial tales como: Parques
recreativos o cualquier otra aplicación comercial similar.
Please follow all recommendations below. Failure to do so may result in the warranty
being void and/or safety violations that could result in serious injury. This manual
contains helpful information concerning Assembly Preparation, Installation Procedure,
and Required Maintenance. Always keep safety in mind as your structure is being built.
Siga todas las recomendaciones que se mencionan a continuación. No hacerlo puede
ocasionar que se anule la garantía y/o las violaciones a la seguridad podrían resultar
en lesiones graves. Este manual contiene información útil referente a la preparación
para el ensamblaje, el procedimiento de instalación y los requisitos de mantenimiento.
Siempre conserve en mente la seguridad a medida que construye la estructura.
PLEASE RETAIN THESE INSTRUCTIONS FOR FUTURE REFERENCE. KEEP THEM IN A SAFE
PLACE WHERE YOU CAN REFER TO THEM AS NEEDED. IN ORDER TO PROVIDE YOU
WITH THE MOST EFFICIENT SERVICE, IT IS REQUIRED THAT YOU PROVIDE US WITH THE
PART NUMBERS WHEN ORDERING PARTS.
CONSERVE ESTAS INSTRUCCIONES PARA REFERENCIA FUTURA. MANTÉNGALAS EN UN
LUGAR SEGURO DONDE PUEDA REFERIRSE A ELLAS SEGÚN SEA NECESARIO. PARA
PROPORCIONARLE UN SERVICIO MÁS EFICAZ, ES NECESARIO QUE SUMINISTRE EL(LOS)
NÚMERO(S) DE PIEZA(S) CUANDO PIDA REPUESTOS.
For Your Records:
Para sus archivos:
Please take time and fill out the information below. This information will be needed for
warranty issues.
Por favor tómese el tiempo de llenar la información que se encuentra a continuación. Esta
información será necesaria para lo referente a la garantía.
Where Purchased: ______________
Staple Receipt Here
Lugar donde lo compró: ______________
Engrape el recibo aquí
Date of Purchase: ________________
Fecha de compra: ______________
Installation Date: _______________
Fecha de instalación: ______________
Installed by: ______________________
Instalado por: ______________
OWNER OP-2010
Rev. 8/5/2009
Owner’s Manual Outdoor Product
Manual del Propietario del producto para exteriores
Maintenance Instructions:
Instrucciones de mantenimiento:
1. Check all nuts and bolts twice monthly during the usage season and tighten as required.
(But not so tight that you crack the wood) It is particularly important that this
procedure be followed at the beginning of each season.
Revise todas las tuercas y pernos dos veces al mes durante la estación de uso y apriete
según sea necesario. (Pero no apriete tanto que raje la madera). Es particularmente
importante que siga este procedimiento al comienzo de cada estación.
2. Oil all metallic moving parts monthly during the usage period.
Engrase todas las partes móviles metálicas mensualmente durante el período de uso.
3. Check all coverings for bolts and sharp edges twice monthly during usage season to be
certain they are in place. Replace when necessary. It is especially important to do this
at the beginning of each new season.
Revise todos los capuchones de pernos y bordes afilados dos veces al mes durante la
estación de uso para cerciorase de que estén en su lugar. Reemplace cuando sea
necesario. Es especialmente importante hacer esto al comienzo de cada nueva estación.
4. For rusted areas on metallic members such as hinges, brackets, etc. sand and repaint,
using a non lead-based paint meeting the requirements of Title 16 CRF Part 1303.
Para las áreas oxidadas en elementos metálicos como las bisagras, soportes etc., lije y
repinte utilizando una pintura que no tenga base de plomo y cumpla con los requisitos
del Título 16 CRF Parte 1303.
5. Inspect wood parts monthly. The grain of the wood sometimes will lift in the dry season
causing splinters to appear. Light sanding may be necessary to maintain a safe
environment. Treating your Product with protection (sealant) after sanding will help
prevent severe checking/splitting and other weather damage.
Inspeccione las piezas de madera mensualmente. Las fibras de la madera a veces se
levantan en la estación seca ocasionando que aparezcan astillas. Es posible que necesite
lijar ligeramente para mantener un ambiente de juego seguro. Tratar el producto con un
protector (sellador) después de lijar ayudará a evitar fisuras/astillas y otros daños
ocasionados por el clima.
6. We have applied a waterborne translucent stain to your unit. This is done for color only.
Once or twice a year, depending on your climate conditions, you must apply some type
of protection (sealant) to the wood of your unit. Prior to the application of sealant,
lightly sand any “rough” spots on your set. Please note this is a requirement of your
warranty.
Hemos aplicado un tinte translúcido a base de agua a su unidad. Esto se hace por el
color únicamente. Una o dos veces al año, dependiendo de las condiciones del clima,
deberá aplicar algún tipo de protección (sellador) a la madera de su unidad. Antes de la
aplicación del sellador, lije ligeramente cualquier punto “áspero” de la unidad. Tome
nota que este es un requisito de su garantía.
OWNER OP-2010
Rev. 8/5/2009
Outdoor Product Assembly Manual FAQs:
1. Is the wood treated with chemicals? Backyard Discovery uses 100% Chinese Cedar wood
which is naturally bug resistant, decay and rot resistant. To help ensure your families
safety, our wood is completely chemical free and we do not use pressure-treated wood.
The stain we use is a top coat using a water-based product that is for appearance only.
2. How often should the product be stained? Backyard Discovery recommends the product be
stained once each year. A water or oil based stain can be used at the customer’s discretion.
3. Why does it seem that my product is developing cracks? Wood is a natural material; no two
pieces are exactly alike. Each piece has its own characteristics and personality and reacts
differently to climate changes. When any wood product is exposed to the elements, it
develops “wood checks”. A check is the radial separation of the wood fibers running with
the grain of the wood. These are caused by the varying temperature and moisture
conditions. A check is not a crack – it does not affect the strength or durability of the wood
or structural integrity of the product.
4. Do Backyard Discovery products come with a warranty? Yes. All Backyard Discovery
products carry a 1-year replacement warranty on all parts for manufacturer’s defect. Our
wood carries a 5 year warranty on rot and decay as well. Please see warranty details for
more information.
5. What is the best way to get started assembling the product? Backyard Discovery
recommends taking all the parts out of the boxes and arranging them by part number
before you begin any assembly. This will not only allow faster assembly, but will also
identify any parts that may be missing or damaged so they can be replaced before
assembly. If parts are missing or need replacement, go to
www.swingsetsonline.com/support.aspx and follow the prompts to order them. Next, read
the assembly manual and get the tools ready for the job as recommended in the manual. If
the assembly manual is lost or misplaced a new one can be printed from Backyard
Discovery’s website: www.swingsetsonline.com .
6. The 2”x4” boards do not measure 2”x 4”. Why not? In the U.S. it’s common practice to
describe lumber dimensions using the rough cut sizes from the sawmill and not the finished
dimensions. Retailers, home stores, etc. all use this accepted practice for describing lumber
dimensions. However, Backyard Discovery products are designed and constructed using the
actual dimensions so everything fits properly and remains so during the life of the product.
For more information and frequently asked questions, please refer to our website at
www.swingsetsonline.com .
Preguntas más frecuentes del manual de ensamblaje del producto para exteriores:
1. ¿La madera tiene algún tratamiento químico? Backyard Discovery utiliza 100% de madera de cedro
chino, la cual es naturalmente resistente a insectos, a la descomposición y al deterioro. Para ayudar a
garantizar la seguridad de su familia, nuestra madera no contiene productos químicos y no utilizamos
madera tratada a presión. El tinte que se utiliza es una capa superior con un producto a base de agua,
que se aplica solo por cuestiones estéticas.
2. ¿Con qué frecuencia se le deberá aplicar tinte al producto? Backyard Discovery recomienda la
aplicación de tinte al producto una vez al año. Podrá utilizarse un tinte a base de agua o aceite, a
discreción del cliente.
3. ¿Por qué parece que se están desarrollando grietas en la unidad? La madera es un material natural; no
hay dos piezas exactamente iguales. Cada pieza tiene sus propias características y cualidades, y
reacciona de manera diferente a los cambios climáticos. Cuando algún producto de madera es
expuesto a los elementos, se desarrollarán “fisuras en la madera”. Una fisura es la separación radial de
las fibras de la madera que van con la veta. Son causadas por las variaciones en la temperatura y las
condiciones de humedad. Una fisura no es una grieta; no afectará la fortaleza o durabilidad de la
madera ni la integridad estructural del producto.
4. ¿Los productos Backyard Discovery tienen garantía? Sí. Todos los productos Backyard Discovery
cuentan con una garantía de reemplazo de un año sobre todas las piezas con defectos de fabricación.
Nuestra madera tiene, además, una garantía de cinco años sobre la descomposición y el deterioro.
Consulte los detalles sobre la garantía para obtener más información.
5. ¿Cuál es la mejor manera de comenzar a ensamblar el producto? Backyard Discovery recomienda
retirar todas las piezas de las cajas y ordenarlas según el número de pieza antes de comenzar cualquier
ensamblaje. Esto no solo permitirá un ensamblaje más rápido, sino que también permitirá identificar
las piezas que puedan faltar o estar dañadas, de modo que puedan ser reemplazadas antes del
ensamblaje. Si faltan piezas o necesita reemplazarlas, ingrese a
www.swingsetsonline.com/support.aspx y siga las instrucciones para efectuar el pedido. Luego, lea el
manual de ensamblaje y prepare las herramientas para la tarea, tal como se recomienda en el manual.
Si traspapeló o perdió el manual de ensamblaje, podrá imprimir uno nuevo desde el sitio en Internet
de Backyard Discovery: www.swingsetsonline.com.
6. Las tablas de 2” x 4” (5 cm x 10 cm) no miden eso. ¿Por qué? En los Estados Unidos es práctica común
describir las dimensiones de la madera conforme a los tamaños de corte aproximado en el aserradero,
en lugar de hacerlo según las dimensiones de acabado. Las tiendas minoristas, las tiendas de artículos
para el hogar, etc. utilizan esta práctica convencional para describir las dimensiones de la madera. Sin
embargo, los productos Backyard Discovery están diseñados y construidos según las dimensiones
reales, de manera que todo encaje correctamente y permanezca así durante toda la vida útil del
producto.
7. Para obtener más información y preguntas más frecuentes, consulte nuestro sitio en Internet
www.swingsetsonline.com.
Parts Identification
Identificación de las partes
ITEM 'A'
5 1/2"
ITEM 'B'
3'5"
TOP
4 - BRACE LONG - W100925
REFUERZO GRANDE
ITEM 'C'
3'
4 - BRACE SHORT - W100926
REFUERZO PEQUEÑO
ITEM 'D'
7'6"
5'6"
2 - BEAM EXTERIOR (SHORT) - W100927
NOTE: Holes near
end of board
VIGUETA EXTERIOR PEQUEÑO
ITEM 'E'
5'6"
2 - BEAM EXTERIOR (SHORT) - W100928
VIGUETA EXTERIOR PEQUEÑO
ITEM 'F'
5'6"
5 - BEAM INTERIOR (SHORT) - W100929
VIGUETA INTERIOR PEQUEÑO
5'6"
BOTTOM
4 - POST - W100924
POSTE
ITEM 'G'
5 - BEAM INTERIOR (SHORT) - W100930
VIGUETA INTERIOR PEQUEÑO
Parts Identification
Identificación de las partes
ITEM 'H'
7'4"
2 - BEAM EXTERIOR (LONG) - W100931
NOTE: Holes near
end of board
VIGUETA EXTERIOR GRANDE
ITEM 'I'
7'4"
2 - BEAM EXTERIOR (LONG) - W100932
VIGUETA EXTERIOR GRANDE
ITEM 'J'
7'4"
5 - BEAM INTERIOR (LONG) - W100933
VIGUETA INTERIOR GRANDE
ITEM 'K'
7'4"
5 - BEAM EXTERIOR (LONG) - W100934
VIGUETA INTERIOR GRANDE
ITEM 'L'
4 - FOOT - A100029
PATA
Hardware Identification
Identificación de los herrajes
3
16"x2"
5
16"x6"
Concrete Anchor/ Anclaje concreto
H100120
5
3
16"x54"
Hex Lag Screw/
Tornillo Tirafondo Hexagonal
H100119
(18)
Perno con cabeza de
arandela
H100032
(55)
5
16"
1
(18)
Washer Head
Machine Bolt/
12" #8 Deck Screw/ Tornillo de Plataforma
H100086
5
3
16"x4"
(18)
Star Washers/
Arandela Estrella
H100030
(106)
Washer Head Barrel Nut/
Tuerca Cilíndrica con Cabeza de Arandela
H100118
(62)
5x15 Flat Washers/
Arandela Plana
5
1
16"x12"
H100122
Washer Head Barrel Nut/
Tuerca Cilíndrica con Cabeza de Arandela
(18)
H100006
(18)
5
16"x1"
Washer Head Machine Bolt/
9x18 Flat Washers/
Perno Cabeza de Arandela
Arandela Plana
H100008
(62)
H100104
(55)
5
1
16"x22"
Washer Head Lag Screw/
Tornillo Tirafondo con Cabeza de Arandela
H100028
(26)
Measuring Hardware
Medición de los herrajes
It is very important that you get the right hardware in the correct place when assembling the unit. You can use
the ruler below to measure your hardware or you can compare the hardware to the hardware identification page.
Es muy importante que coloque el herraje adecuado en el sitio correcto cuando ensamble la unidad. Puede
utilizar la regla de más abajo para medir sus herrajes o puede comparar los herrajes con la página de
identificación de los herrajes.
NOTES:
1) Do not include bolt head when measuring length of bolt.
2) Include full length of deck screw when measuring.
NOTAS:
1) No incluya la cabeza del perno cuando mida el largo del mismo.
2) Incluya el largo total del tornillo de plataforma cuando mida.
NOT TO SCALE / No Están a Escala
1
2
3
4
5
6
Tools Required for Installation:
Herramientas necesarias para la instalación:
(These are the tools that are generally required for assembly. These tools are not included in the
purchase, unless otherwise stated below.)
(Estas son las herramientas que generalmente son necesarias para el ensamblaje. No están incluidas
con la compra).
Tape Measure
Level (Optional)
3.
Nivel (Opcional)
Cinta para medir
2.
1.
-Cordless or Electric Drill
Drill Attachments:
Un taladro eléctrico o
inalámbrico
1. Phillips Head Screw
Accesorios del taladro:
Drive
-6mm Hex Allen Wrench
-6mm Hex Straight Shaft
(Both Included)
Para tornillo cabeza de estrella
An Adult with an Adult
Helper
Un adulto con un ayudante
adulto
1
2. 2" Socket Driver
Dado de
5
16 ”
3. Concrete Anchor Bit
(Concrete Bit Included)
Broca para anclaje en concreto
(incluido)
Phillips Head Screwdriver
A Ladder or Step Stool
desarmador
Escalera
Important
Assembly Tips
Assembly Tip
● If during assembly of beams
the threads do not engage, install
the bolt without the star washer
to seat. Once seated loosen, add washer,
and re-tighten.
Assembly Tip
● To ease assembly and to reduce the chance
of splintering the beams, lightly sand the
leading edges of all notches using sandpaper.
● To reduce friction during
assembly apply barsoap to the surfaces
of the notches where shown.
Apply bar soap
to both sides.
Additional Assembly Tips
● If it is necessary to pound on the beams using a hammer or rubber mallet, be sure to place a piece of scrap
lumber between the hammer and the beams. This will help to ensure the beam is not damaged.
● Lag screws may be used to pull together upper
and lower beam assemblies.
NOTE: PROPER NOTCH ALIGNMENT
MUST BE MADE TO ENSURE NO
DAMAGE OCCURES TO BEAMS
For additional assembly quesitions or to order damaged or missing parts call: 1-800-765-4138
(2)
03/16/2010
PARTS NEEDED FOR THESE STEPS
STEP 1
Attach boards 'H' and 'D' Using
5
16"x1"
Washer Head Bolts,
5
16"
Componentes necesarios para estos pasos:
Star
5
3
16"x4"
5
16"x1"
Washer Head Bolt/ Perno Cabeza Arandela
-(16)
5
3
16"x4"
Washer Head Barrel Nut/ Tuerca cilíndrica
5
16"
-(16)
Star Washer/ Arandella Estrella
-(2) Item H
-(2) Item I
-(2) Item D
-(2) Item E
Washers, and
Washer Head
Barrel Nuts.
For best results, insert Barrel Nuts
first.
Note: Each set of boards
includes notches facing the
same direction (up or down),
a short (3 notch) board and
a long (4 notch) board.
PASO 1
Fije las tablas 'H' y 'D' utilizando los
pernos de 5/16"x1" con cabeza
de arandela, arandelas de estrella
de 5/16", y tuercas cilíndricas de
5/16"x ¾” con cabeza de arandela.
Para mejores resultados, inserte las
tuercas cilíndricas primero.
Nota:Cada juego de
tablas incluye muescas
orientadas en la misma
dirección (hacia arriba o
hacia abajo), una tabla
corta (3 muescas) y una
larga (4 muescas).
H
STEP 2
Attach boards 'I' and 'E' Using I
5
16"x1" Washer Head Bolts,
5
16" Star Washers, and
5 3
16"x4" Washer Head Barrel Nuts.
For best results,
insert Barrel Nuts first.
PASO 2
Fije las tablas 'I' y 'E' utilizando
pernos de 5/16"x1" con cabeza
de arandela, arandelas de
estrella de 5/16" y tuercas
cilíndricas de 5/16"x 3/4" con
cabeza de arandela. Para mejores
resultados, inserte primero las
tuercas cilíndricas.
-(16)
D
3
4"
Barrel Nut
Star Washer
1" Washer Head Bolt
E
Note:
Each board includes
2 holes near the end.
Nota:
Cada tabla incluye 2
hoyos hacia el final.
PARTS NEEDED FOR THESE STEPS
Componentes necesarios para estos pasos:
STEP 3
Attach boards 'G' and 'J' Using
5
5
16"x1" Washer Head Bolts, 16"
5 3
Star Washers, and 16"x4"
Washer Head Barrel Nuts.
For best results, insert Barrel
Nuts first.
-(40)
5
3
16"x4"
Barrel Nut/ Tuerca cilíndrica
-(40)
5
16"x1"
Washer Head Bolt/ Perno Cabeza Arandela
5
16"
-(40)
Star Washer/ Arandela Estrella
-(5) Item 'G"
-(5) Item 'J'
-(5) Item 'F'
-(5) Item 'K'
G
PASO 3
Fije las tablas 'G' y 'J'
utilizando pernos de 5/16"x1"
con cabeza de arandela,
arandelas de estrella de 5/16"
y tuercas cilíndricas de 5/16"x
3/4" con cabeza de arandela.
Para mejores resultados, inserte
primero las tuercas cilíndricas.
Note: Each set of boards includeS
notches facing the same direction
(up or down), a short (3 notch)
board and a long (4 notch) board.
Nota:Cada conjunto de
tablas incluye cortes frente a
la misma dirección
(arriba o hacia abajo), una
tabla corto (3 corte) y una
tabla largo (4 corte).
1" Washer Head Bolt
J
F
STEP 4
Attach boards 'F' and 'K' Using
5
5
16"x1" Washer Head Bolts, 16"
5 3
Star Washers, and 16"x4" Washer
Head Barrel Nuts.
For best results, insert Barrel Nuts
first.
PASO 4
Fije las tablas 'F' y 'K' utilizando
pernos de 5/16"x1" con cabeza
de arandela, arandelas de
estrella de 5/16" y tuercas
cilíndricas de 5/16"x 3/4" con
cabeza de arandela. Para mejores
resultados, inserte primero las
tuercas cilíndricas.
Star Washer
3
4"
K
Barrel Nut
PARTS NEEDED FOR THESE STEPS
STEP 5
Attach boards 'H' and 'D' to posts 'A' Using
5
16"
5
1
16"x12"
Componentes necesarios para estos pasos:
Washer Head
5
3
16"x54"
Barrel Nuts,
Star Washers, and
Washer Head bolts.
Attach to the lower holes from the top of the post. For best results,
insert Barrel Nuts first.
PASO 5
Fije las tablas 'H' y 'D' a los postes 'A' utilizando
tuercas cilíndricas de 5/16" x 3/4" con cabeza de
arandela, arandelas de estrella de 5/16" y pernos de
5/16"x 5 3/4" con cabeza de arandela. Fije a los
agujeros inferiores desde la parte superior
del poste. Para mejores resultados, inserte
las tuercas cilíndricas primero.
-(8)
5
1
16"x12"
-(8)
5
16"
Barrel Nut/ Tuerca cilíndrica
Star Washer/ Arandela Estrella
5
3
16"x54"
-(8)
Washer Head Bolt/ Perno Cabeza Arandela
-(2) Items 'H' and 'D' assembled/ ponidos juntos
-(4) post/ poste
Washer Head Bolt
Star Washer
D
A
H
Lower Holes/
hoyos más bajo
Higher Holes/
hoyos más alto
A
Lower Holes/
hoyos más bajo
Higher Holes/
hoyos más alto
Barrel Nut
NOTE:
When assembling, be sure that once the posts are
standing virtically they appear mirror image to
each other as shown below.
NOTA:
Cuando ensamble, cerciórese de que una vez que
los postes estén colocados verticalmente, sean la
contraimagen de uno con el otro como se ilustra.
D
Higher Holes
H
D
A
H
Lower Holes
A
A
A
PARTS NEEDED FOR THESE STEPS
Componentes necesarios para estos pasos:
H
-(2) Items 'I' and 'E' assembled/ ponidos juntos
I
A
E
H
STEP 6
Slide the end notches on boards 'I'
and 'E' over the end notches on
boards 'H' and 'D', as shown in the
picture.
A
NOTE:
Again, when assembling, be sure that
once the posts are standing virtically,
'I' and 'E' appear mirror image to each
other as shown below.
PASO 6
Deslice las muescas terminales de
las tablas 'I' y 'E' sobre las
muescas terminales de las tablas
'H' y 'D', como se ilustra.
NOTE:
Nuevamente, cuando ensamble,
cerciórese de que una vez que los
postes estén colocados verticalmente,
'I' y 'E' sean la contraimagen de uno
con el otro como se ilustra.
H
I
D
E
I
H
E
D
A
A
A
A
PARTS NEEDED FOR THESE STEPS
Componentes necesarios para estos pasos:
A
Star Washers
Washer Head Machine Bolts
-(8)
5
1
16"x12"
-(8)
5
16"
-(8)
5
3
16"x54"
Barrel Nut/ Tuerca cilíndrica
Star Washer/ Arandela Estrella
Washer Head Bolt/ Perno Cabeza Arandela
STEP 7
E
Attach boards 'I' and 'E' to posts 'A'
5 3
Using 16"x4" Washer Head Barrel
5
Nuts, 16" Star Washers, and
5
3
16"x54" Washer Head bolts. Attach
to the higher holes from the top of
the post. For best results, insert
Barrel Nuts first.
H
Barrel Nuts
A
Higher Holes
hoyos más alto
Lower Holes
hoyos más bajo
I
D
A
PASO 7
Utilizando tuercas cilíndricas
de 5/16" x 3/4" con cabeza
de arandela, arandelas de
estrella de 5/16" y pernos de
5/16"x 5 3/4" con cabeza de
arandela fije a los agujeros
superiores desde la parte
superior del poste. Para
mejores resultados, inserte
primero las tuercas
cilíndricas.
H
E
A
I
D
A
A
H
E
A
PARTS NEEDED FOR THESE STEPS
Componentes necesarios para estos pasos:
-(4) Item 'B'
-(4) Item 'C'
1
-(24) 22" Washer Head Lag Screw/ Tornillo Tirafondo
-(24)
5
16"
Star Washer/ Arandelas Estrella
I
D
A
B
C
STEP 8
STEP 9
Attach Brace 'C' to assembled
beams 'D' and 'H', and to post
'A' using
1
22"
Attach Brace 'B' to assembled beams 'I' and
1
'E', and to post 'A' using 22" Washer Head Lag
Washer Head Lag
5
Screws and 16" star washers. See picture for
details and dimmensions. Repeat this step at
each post.
5
16"
Screws and
star washers.
See picture details and
dimmensions.
Repeat this step at each post.
PASO 9
Fije el refuerzo 'B' a las vigas ensambladas 'I'
y 'E', y al poste 'A' utilizando tornillos
tirafondo de 2 1/2" con cabeza de arandela
y arandelas de estrella de 5/16". Vea los
detalles y dimensiones en la ilustración.
Repita este paso en cada poste.
PASO 8
Fije el refuerzo 'C' a las vigas
ensambladas 'D' y 'H', y al
poste 'A' utilizando tornillos
tirafondo de 2 1/2" con
cabeza de arandela y
arandelas de estrella de 5/16".
Vea los detalles y dimensiones
en la ilustración. Repita este
paso en cada poste.
I
D
C
H
A
E
A
C
B
B
B
D
I
H
E
C
A
B
C
A
PARTS NEEDED FOR THESE STEPS
Componentes necesarios para estos pasos:
-(5) Item 'F' and 'K' assembled/ ponidos juntos
5
-(10) 16"x6" Hex Lage Screw/ Tornillo Tirafondo
-(10) 8x19 Flat Washer/Arandela Plana
STEP 10
PASO 10
Slide the notches on boards 'F' and
'K' over the inner notches on 'I' and
'E', alternating 'F' and 'K' as shown
in the picture. As each board 'FK' is
pushed into the notches of boards
'IE', attach them from the top
Deslice las muescas de la tablas 'F' y 'K'
sobre las muescas internas de las tablas
'I' y 'E' alternado 'F' y 'K' como se
ilustra. A medida que cada tabla 'FK' se
empuja jacia las muescas de las tablas
'IE', fijelas desde la parte supeior a
traves de las bablas 'IE' utilizando
5
through boards 'IE' using 16"x6" Hex
Lag Screw and 8x19 Flat Washer.
5
tornillos tirafondo hexagonales de 16"x6"
y areandelas planas de 8x19
Lag Screw
Flat Washer
K
F
K
F
F
K
K
F
K
F
PARTS NEEDED FOR THESE STEPS
Componentes necesarios para estos pasos:
-(5) Item 'G' and 'J' assembled/ ponidos juntos
STEP 11
Slide the notches on boards 'G' and
'J' over the inner notches on
boards 'H' and 'D', and 'E' and 'I',
alternating 'G' and 'J' as shown in
the picture
PASO 11
Deslice las muescas terminales de
tablas 'G' y 'J' sobre las muescas
internas de las tablas 'H' y 'D', y 'E' y
'I', alternando 'G' y 'J' como ilustra.
G
J
G
J
G
J
I
G
J
G
J
E
H
D
PARTS NEEDED FOR THESE STEPS
Componentes necesarios para estos pasos:
5
-(39) 16"x6" Hex Lag Screw/ Tornillo Tirafondo
-(39) 8x19 Flat washer/ Arandela Plana
PASO 12
Fije las tablas 'IE', y 'GJ' a las
tablas 'FK' y 'DH' utilizando
tornillos tirafondo hexagonales
5/16"x6" y arandelas planas de
5/16” a través de los agujeros en
la parte superior de las tablas 'IE'
y 'GJ' que no se llenaron en el
paso 8.
STEP 12
Attach boards 'IE', and 'GJ' to
boards 'FK' and 'DH' using
5
16"x6"
5
Hex Lag Screws and 16" flat
washers throught the holes in the
tops of boards 'IE' and 'GJ' that
were not filled in step 8.
Lag Screw
Flat Washer
I
G
D
J
G
J
G
I H
F
K
F
K
E F
H
PARTS NEEDED FOR THESE STEPS
Componentes necesarios para estos pasos:
-(4) Item L
PASO 13
Coloque la Pérgola exactamente
donde irá fijada cuando la termine.
Luego deslice una pata 'L' debajo
de cada poste 'A'
STEP 13
Place the Pergola exactly where it
will be anchored when completed.
Then Slide a Foot 'L' under each
post 'A'
A
A
A
A
L
L
L
L
PARTS NEEDED FOR THESE STEPS
Componentes necesarios para estos pasos:
-(1) Non-Permanent Writing Utencile/ Utilice un utensilio
para escritura que no sea permanente
STEP 14
Use a non-permanent writing
utencile, such as chalk, to trace all
the way around the edges of each
foot 'L'.
PASO 14
Utilice un utensilio para escritura
que no sea permanente, tal como
tiza, para marcar alrededor de los
bordes de cada pata 'L'.
PARTS NEEDED FOR THESE STEPS
Componentes necesarios para estos pasos:
3
-(16) 16"x2" Concrete Anchor/ Anclaje Concreta
-(16) 5x15 Flat Washer/ Arandela Plana
STEP 15
Move the Pergola aside. Place each
Foot 'L' inside of the Lines drawn
around them in Step 11. Use the
Concrete Drill Bit to pre-drill holes
into the concrete. Then use the
3
16"x2"
Concrete Anchor, and 5x15
Flat Washer to attach each Foot to
the concrete surface.
PASO 15
Aparte la Pérgola a un lado.
Coloque cada pata 'L' dentro de las
líneas dibujadas alrededor de ellas
en el paso 11. Utilice la broca de
taladro, el anclaje para concreto
de 3/16"x2" y la arandela plana de
5x15 para fijar cada pata a la
superficie de concreto.
STEP 16
PASO 16
Set the Pergola Back in
place, setting each Post 'A'
inside a Foot 'L'
Coloque la Pérgola
nuevamente en su lugar,
colocando cada poste 'A'
dentro de una pata 'L'
PARTS NEEDED FOR THESE STEPS
Componentes necesarios para estos pasos:
1
-(16) 1 2" #8 Deck Screw/ Tornillo de Plataforma
STEP 17
PASO 17
Attach Feet 'L' to each
1
post using 12" #8
Deck Screws into each
side.
Fije la pata 'L' a cada
poste utilizando
tornillos Nº 8 de 1
1/2" para plataforma
en cada lado.
Limited Warranty
This Limited Warranty by Backyard Discovery applies to products manufactured under the Backyard Discovery
brand or its other brands including but not limited to Backyard Botanical, Adventure Playsets, and Leisure Time
Products.
Backyard Discovery warrants that this product is free from defect in materials and workmanship for a period of
one (1) year from the original date of purchase. This one (1) year warranty covers all parts including wood,
hardware, and accessories. All wood carries a five (5) year pro-rated warranty against rot and decay. Refer to
the schedule below for charges associated with replacement of parts under this Limited Warranty. In addition,
Backyard Discovery will replace any parts within the first 30 days from date of purchase found to be missing
from or damaged in the original packaging.
This warranty applies to the original owner and registrant and is non-transferable. Regular maintenance is
required to assure maximum life and performance of this product and failure by the owner to maintain the
product according to the maintenance requirements may void this warranty. Maintenance guidelines are
provided in the Owner’s Manual.
This Limited Warranty does not cover:
•
•
•
•
•
•
•
•
Labor for any inspection
Labor for replacement of any defective item(s)
Incidental or consequential damages
Cosmetic defects which do not affect performance or integrity of a part or the entire product
Vandalism, improper use, failure due to loading or use beyond the capacities stated in the applicable
Assembly Manual.
Acts of nature including but not limited to wind, storms, hail, floods, excessive water exposure
Improper installation including but not limited to installation on uneven, unlevel, or soft ground
Minor twisting, warping, checking, or any other natural occurring properties of wood that do not affect
performance or integrity
Backyard Discovery products have been designed for safety and quality. Any modifications made to the
original product could damage the structural integrity of the unit leading to failure and possible injury.
Modification voids any and all warranties and Backyard Discovery assumes no liability for any modified
products or consequences resulting from failure of a modified product.
This product is warranted for RESIDENTIAL USE ONLY. Under no circumstance should a Backyard Discovery
product be used in public settings. Such use may lead to product failure and potential injury. Any and all public
use will void this warranty. Backyard Discovery disclaims all other representations and warranties of any kind,
express or implied.
This Warranty gives you specific legal rights. You may have other rights as well which vary from state to state
or province to province. This warranty excludes all consequential damages, however, some states do not allow
the limitation or exclusion of consequential damages and therefore this limitation may not apply to you.
Pro Rated Part Replacement Schedule
Product Age
All Parts
0-30 days from date of purchase
31 days to 1 year
Customer Pays
$0 and free shipping
$0 + S&H
Wood Rot and Decay Only
1 year
2 years
3 years
4 years
5 years
Over 5 years
$0 and free shipping
20% + S&H
40% + S&H
60% + S&H
80% + S&H
100% + S&H
Garantía limitada
Esta garantía limitada de Backyard Discovery se aplica a productos fabricados bajo la marca Backyard Discovery o sus
otras marcas incluyendo a título informativo pero no limitativo Backyard Botanical, Adventure Playsets, y Leisure Time
Products.
Backyard Discovery garantiza que este producto no tiene defectos de material ni de mano de obra durante el período de
un (1) año a partir de la fecha original de compra. Esta garantía de un (1) año ampara todas las piezas incluyendo la
madera, los herrajes, y accesorios. La madera tiene una garantía prorrateada de cinco (5) años contra la descomposición
y el deterioro. Refiérase a la tabla que sigue para los cargos relacionados con el reemplazo de las piezas bajo esta
garantía limitada. Adicionalmente Backyard Discovery reemplazará cualesquiera piezas que faltaren en el empaque
original o estuviesen dañadas dentro de los primeros 30 días a partir de la fecha de compra.
Esta garantía se aplica al propietario original y al registrante y no es transferible. El mantenimiento regular es un
requisito para lograr el máximo de vida útil y rendimiento de este producto. Si el propietario no presta el mantenimiento
conforme a los requisitos puede anularse la garantía. Las pautas de mantenimiento se indican en el Manual del
Propietario.
Esta garantía limitada no ampara:
•
•
•
•
•
•
•
•
Mano de obra por cualquier inspección.
Mano de obra para el reemplazo de cualesquiera piezas defectuosas.
Daños accidentales o resultantes
Defectos de orden cosmético que no afecten el rendimiento o integridad de una pieza o del producto completo.
Vandalismo, uso inadecuado, fallas debido a la carga o el uso que excedan las capacidades establecidas en el
Manual de Ensamblaje correspondiente.
Actos de la naturaleza que incluyen, a título informativo más no limitativo, viento, tormentas, granizo,
inundaciones, excesiva exposición al agua.
Instalación inadecuada incluyendo a título informativo más no limitativo, la instalación en tierra dispareja,
desnivelada o poco compacta.
Torceduras menores, deformaciones, fisuras o cualquier otra característica natural de la madera que no afecte el
rendimiento o la integridad.
Los productos de Backyard discovery han sido diseñados para brindar seguridad y calidad. Cualquier modificación que
se haga al producto original podría dañar la integridad estructural de la unidad lo cual podría conducir a fallas y la
posibilidad de lesiones. La modificación anula cualquiera garantía en particular y todas las garantías en general y
Backyard Discovery no asume responsabilidad por cualquier producto modificado ni por las consecuencias que
resultaren de la falla de un producto modificado.
Este producto está garantizado para USO RESIDENCIAL ÚNICAMENTE. Bajo ninguna circunstancia debe utilizarse un
producto Backyard Discovery en lugares públicos tales. Tal uso podría ocasionar falla del producto y lesiones
potenciales. El uso público anulará esta garantía. Backyard Discovery desconoce toda otra representación o garantía de
cualquier índole, expresa o implícita.
Esta garantía le otorga derechos legales específicos. También podría gozar de otros derechos, los cuales varían de un
estado a otro o de una provincia a otra. Esta garantía excluye todos los daños resultantes. Sin embargo, algunos estados
no permiten la limitación o exclusión de los daños resultantes, por lo tanto es posible que esta limitación no aplique en su
caso.
Tabla prorrateada de reemplazo de piezas
Edad del producto
Todas las piezas
0-30 días a partir de la fecha de compra
31 días a 1 año
El cliente paga
$0 y envío gratis
$0 + envío y manejo
Descomposición y deterioro de la madera únicamente
1 año
$0 y envío gratis
2 años
20% + Envío y manejo
3 años
40% + Envío y manejo
4 años
60% + Envío y manejo
5 años
80% + Envío y manejo
Más de 5 años
100% + Envío y manejo