1
Owner's Manual
Manual Del Propietario
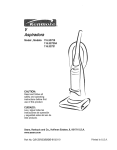
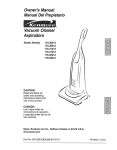
Vacuum Cleaner
Aspiradora
Model,
Modelo
116.36622
116.36623
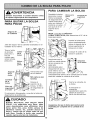
CAUTION:
Read and follow all
safety and operating
instructions before first
use of this product.
CUIDADO:
Lea y sigue todas las
instrucciones de operaci6n
y seguridad antes del uso de
este producto.
Sears, Roebuck and Co., Hoffman Estates, IL 60179 U.S.A.
www.sears.com
Part No. CO1ZCRD1OUO_-KCO1ZCRDZ_UO
Printed in Mexico
Impreso en Mexico
Before Using Your New
Vacuum Cleaner ....................
Vacuuming Tips ....................
Performance/Safety Features
2
Kenmore Vacuum Cleaner Warranty ... 2
Important Safety Instructions .........
3
Parts and Features ..................
4
Assembly Instructions .............
5-6
Operating Instructions
...............
Cord Release .......................
Cleaner
Care
...............
14
Vacuum Cleaner Storage .............
14
Cleaning Exterior and Attachments ......
14
Dust Bag Replacement ..............
15
Motor Safety Filter Cleaning ...........
16
Exhaust Filter Replacement ............
16
Belt Changing and Agitator Cleaning . .17-19
Light Bulb Replacement ..............
20
Clog Removal .....................
21
6
6
Releasing the Handle .................
Touch Control ......................
Pile Height Selection and Setting ........
Carpet/Bare Floor Selector .............
Attachments .....................
Attachment Use Table ...............
Vacuum
11
12-13
.......
7
7
8
8
9-10
11
Troubleshooting
....................
22
Requesting Assistance Or Service
Please read this guide. It will help you assemble
cleaner in the safest and most effective way.
and operate
your new Kenmore
back page
vacuum
For more information about vacuum cleaner care and operation, call your nearest Sears store.
You will need the complete model and serial numbers when requesting information. Your vacuum cleaner's model and serial numbers are located on the Model and Serial Number Plate.
Use the space below to record the model number
vacuum cleaner.
and serial
number of your new Kenmore
Model No.
Serial No.
Date of Purchase
Keep this book and your sales check (receipt)
ONE YEAR FULL WARRANTY
in a safe place for future
ON KENMORE
VACUUM
reference.
CLEANER
This warranty is for one year from the date of purchase, and includes only private household
vacuum cleaner use. During the warranty year, when this vacuum cleaner is operated and
maintained according to the owner's manual instructions,
Sears will repair any defects in
material or workmanship
free of charge.
This warranty excludes vacuum cleaner bags, belts, light bulbs, and filters, which are
expendable parts and become worn during normal use.
For warranty service,
the United States.
return this vacuum
cleaner
to the nearest
Sears Service
Center in
This warranty applies only while this product is in use in the United States. This warranty gives
you specific legal rights, and you may also have other rights which vary from state to state.
Sears, Roebuck
and Co., D/817 WA, Hoffman
Estates,
2
IL 60179
Your safety is important
to us. To reduce the risk
of fire, electrical
shock, injury to persons
or
damage when using your vacuum
cleaner, follow
basic safety precautions
including the following:
AWARNING:
Read all instructions in this manual before
assembling or using your vacuum cleaner.
Use
your
vacuum
cleaner
only
as
described
in this manual.
Use only with
Sears recommended
attachments.
Keep hair, loose clothing, fingers, and all
parts of body away from openings
and
moving parts.
Turn off all controls
before
unplugging.
Use extra care when cleaning
Disconnect
electrical supply before servicing or cleaning
out the brush area.
Failure to do so could result in the brush
unexpectedly
starting,
causing
personal
injury from moving parts.
Do not leave vacuum
cleaner
when
plugged in. Unplug from outlet when not in
use and before performing maintenance.
To reduce the risk of electrical shock - Do
not use outdoors or on wet surfaces.
Do not allow to be used as a toy. Close
attention
is necessary
when used by or
near children.
Do not use with a damaged cord or plug. If
vacuum cleaner is not working as it should,
has been dropped, damaged, left outdoors,
or dropped in water, return it to a Sears
Service Center.
Do not pull or carry by cord, use cord as a
handle, close a door on cord, or pull cord
around sharp edges or corners. Do not run
cleaner over cord.
Keep cord away from
heated surfaces.
Do not unplug
by pulling on cord.
unplug, grasp the plug, not the cord.
Do not handle plug or vacuum
wet hands.
Do not put any objects
cleaner
To
Do not use vacuum cleaner to pick up
flammable
or combustible
liquids (gasoline, cleaning fluid, perfumes, etc.), or use
in areas where they may be present. The
fumes from these substances can create a
fire hazard or explosion.
Do not pick up anything that is burning
smoking, such as cigarettes,
matches,
hot ashes.
Do not use vacuum cleaner
bag and/or filters in place.
into openings.
without
or
or
dust
Always replace the dust bag after vacuuming carpet cleaners or freshener, powders,
and fine dust. These products clog the filters, reduce airflow and can cause damage
to the vacuum cleaner. Failure to replace
the dust bag could cause permanent damage to the cleaner.
Do not use the vacuum cleaner to pick up
sharp hard objects, small toys, pins, paper
clips, etc. They may damage the cleaner or
dust bag.
Unplug before connecting
with
on stairs.
Do not put on chairs, tables, etc. Keep on
floor.
Handi-mate
Jr.®
You are responsible
for making sure that
your vacuum cleaner is not used by anyone
unable to operate it properly.
Do not use with any opening blocked; keep
free of dust, lint, hair, and anything that may
reduce air flow.
SAVE THESE INSTRUCTIONS
Proper assembly
cleaner
is intended
and safe use of your vacuum
for Household
use and safety information.
tion symbols.
cleaner
are your responsibilities.
use. Read this Owner's
This guide contains
Manual
safety statements
carefully
Your
for important
under warning
and cau-
itisimportant
toknow
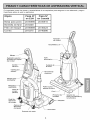
yourvacuum
cleaner's
partsandfeatures
toassure
itsproper
andsafe
use.Review
thesebefore
usingyourvacuum
cleaner.
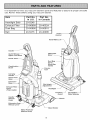
Item
Part No.
In U.S.
Part No.
In Canada
Headlight Bulb
Exhaust Filter
20-5248
20-86889
20-40324
Dust Bag
20-50690
20-50510
Belt
20-5275
20-40096
Touch
Control
Handi-Mate
Jr. ®_
Handle
Telescopic
Wand
Upper Cord Hook
Combination
Brush
Tool
Carrying
Handle
Upper
Hose
Extension
Hose
Cover
(Filter
Inside)
Furniture
Guard
Release
Pedal
Extension
Release
Lever
Wand
Motor Protector
(Behind Hose)
Holder
Carpet/Bare
Floor Selector
I
Please pay special
,_
attention
to these hazard alert boxes, and follow any instructions
given.
WARNING
you to such
hazards
fire, hazards
electric shock,
burns
and personal
injury.statements
CAUTION alert
statements
alert
you toassuch
as personal
injury and/or property damage.
WARNING
Electrical
Shock
Do not plug into
until the assembly
to do so could
shock
CAUTION
Hazard
Do not overtighten.
the electrical
supply
is complete.
Failure
result
in electrical
Overtightening
holes.
Do not operate
or injury.
without
could
strip the screw
the vacuum
the screw
cleaner
in place.
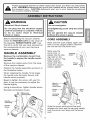
Before assembling
the vacuum cleaner,
check the PACKING LIST on the cover of
CORD ASSEMBLY
the separate
Make sure the quick release upper cord
hook is in the upright position. Remove
the wire tie from the power cord.
REPAIR
PARTS
LIST.
Use
this list to verify that you have received
the components
of your new Kenmore
vacuum cleaner.
all
Make sure the
HANDLE ASSEMBLY
Remove
the combination
the handle
ing hole.
brush
to expose the handle mount-
Remove the handle screw from
of the vacuum cleaner.
Position the handle assembly
the illustration
below.
When
installing the handle,
the handle
handle
power cord is
placed into the locking notch on the
body as shown. This
from
as shown
firmly
onto the body. Secure
screw
helps keep the
power cord from
under the vacuum
the body
in
cleaner
Notch
Power
agitator.
press
with
provided.
Begin to tighten the screw with your fingers. It may be necessary
to adjust the
handle
Using
slightly.
a screwdriver,
Reinstall
combination
tighten
brush.
handle
screw.
lug
Electrical
Connection
Assembly
Handle
Screw
Wrap the power cord around the quick
release cord hook and the carrying handle.
Lock the power cord plug onto the power
cord.
I
I
HANDI-MATE
For operation
of
JR.@
TELESCOPIC
PLACEMENT
/l_l_
Handi-MateJ_®
WAND
Place the telescopic
wand
holder. Place the crevice
the telescopic
wand.
Htond_Me
ate J'®
__
TO INSERT HANDI-MATE
in the wand
tool in the top of
_
JR _'
Place Handi-Mate Jr.
® intothe storage
compartment.
Rotate the Handi-Mate Jr.® back untilit
snaps intoplace.
TO REMOVE
lipi
HANDI-MATE
c
JR._
Rotate Handi-Mate Jr.
® out of the storage
compartment.
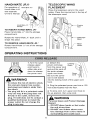
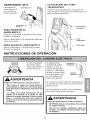
OPERATING INSTRUCTIONS
1. Turn the quick
release upper
cord hook to
2. Detach the
_ower cord plug
from the power cord
either
side and
and pull the cord off
down
to release
the quick release
upper cord hook.
the power
cord.
Lockinl
Notch
Power
Be sure the power
cord is still locked
kWARNING
To reduce
the risk of electric
this vacuum
cleaner
ized plug (one blade
into the locking
hook.
shock,
has a polaris wider than
notch
of the upper
cord
3. Plug the polarized
power cord into a 120
Volt outlet located near the floor.
the other).
The plug will fit in a polarized
outlet
only one way. If the plug does not
fit fully in the outlet,
plug. If it still does
qualified technician
proper
plug
outlet.
reverse
in any way.
the up position,
turn upper
then wrap
cord
hook to
cord.
the
not fit, contact
to install the
Do not change
4. To store cord,
the
a
IbWARNING
Personal
Hazard
Injury
and Product
• DO NOT place
hands
or feet
the unit at any time.
• DO NOT use outlets above
ters.
Damage
surrounding
from
Damage
under
coun-
cord to items
area could
occur.
in
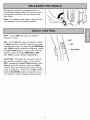
Release the handle by pressing down on
the handle release pedal with your foot and
pulling back and down on the handle with
your hand.
Note: The agitator
may rotate when the vac-
uum cleaner
is in the upright
OFF - Turns
OFF the vacuum
(suction)
cleaner
motor.
ON - Turns
to HIGH
carpets
position.
ON the vacuum
suction
and rugs.
cleaner
level for cleaning
In order
motor
of most
to get MEDIUM
and LOW suction levels for cleaning,
press
the SUCTION
button to cycle the vacuum
cleaner
motor
and HIGH
through
suction
MEDIUM,
levels
LOW,
respectively.
SUCTION
- Changes the suction level of
the vacuum cleaner motor. If the unit is
OFF, pressing the SUCTION
button turns
ON the vacuum cleaner motor to HIGH
suction
level for cleaning
of most carpets,
rugs, and fabrics.
If the unit is ON, press-
ing the SUCTION
um cleaner motor
button cycles the vacuthrough suction levels.
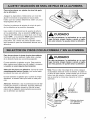
To select
a pile
Turn off vacuum
height
setting:
cleaner.
Select
a pile
height setting by tilting the cleaner back
until the front wheels are lifted slightly off
the floor.
Slide the adjustment
lever to the correct
setting.
There
are four (4) pile height
settings
on
the vacuum cleaner. Use the LOW setting
for most low-pile carpets and bare floor
cleaning.
Use the HIGH setting
pile carpets
like shag carpet,
etc. Use the other settings
carpet heights in between.
for high-
scatter
as needed
rugs,
for
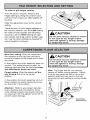
Bare floor setting: Slide the carpet/bare
floor selector all the way back and down
toward the bottom of the nozzle until it locks
into place.
in this position the brush assembly does not
revolve. This setting should be used for
cleaning hardwood and tile floors and when
any attachments
(tools) are used.
Carpet setting: Slide the selector all the
way forward and up to the carpet
position.
in this position the brush assembly will turn.
When carpets are being cleaned the selector should be in this position.
Attention:
Refer to your carpet manufacturers cleaning recommendations.
Some
more delicate carpets may require that they
be vacuumed with the agitator turned off, to
prevent carpet damage.
CAUTION
Do not allow
vacuum
cleaner
to remain
in one spot for any length of time
when the agitator
is turning.
Damage
to carpet may occur.
IbCAUTION
Do not allow vacuum
cleaner
to remain
in one spot for any length of time
when the agitator is turning, Damage
to carpet may occur.
Note: For longer belt life, turn vacuum
cleaner off before moving selector. Failure
to do so can cause the belt to rub on the
selector shaft and may result in the belt
becoming hot and creating a burning rubber
smell.
To Bare
Position
FlOor
I
Floor Selector
TELESCOPIC WAND WITH
SUCTION CONTROL SLIDE
1. Remove
the lower end of the extension
hose from the wand holder by grasping
the hose collar, twisting, and pulling
straight up.
2. Remove the telescopic wand from the
wand holder.
Combination
Brush
.....Crevice
Tool
3. Remove the crevice tool from its storage position in the wand. Turn the locking ring to the UNLOCK position.
Handle
Extension
Release
1. Crevice
Tool
Lever
TO USE ATTACHMENTS
2. Telescopic
Place the carpet/bare floor selector in the
bare floor setting by rotating the selector
back and down to the bare floor setting.
See CARPET/BARE
FLOOR SELECTOR
section.
Remove the lower end of the extension
hose from the wand holder by grasping the
hose collar, twisting, and pulling straight up.
Rotate the extension hose release lever
down if maximum reach is needed.
IbWARNING
Electrical
Hazard
Shock
And
Personal
Injury
Disconnect electrical supply before servicing or cleaning the unit. Failure to do
so could result in electrical shock or
personal injury from vacuum cleaner
suddenly starting,
3. Hose
Collar
Wand
Extend
the wand
TO OPERATE SUCTION
CONTROL SLIDE
to its full length. Turn the
locking ring to the LOCK position. Attach
the wand onto the open end of the hose.
Telescopic Wand
When
Lower_-_
Wand _'_r_
_
Suction
Control Slide
using
attachments
trol slide to the open
position.
located on the telescopic
the hose.
f
\
for cleaning
draperies,
small rugs with low pile and
other delicate items, twist the suction con-
_._<_
_Unlock
Locking Ring
_,_
I
close
to
Suction
Upper
Control This will reduce
suction for ease of
Wand
Align the tabs on the wand with the "J"
slots in the hose. Push the wand into the
hose and twist
This slide is
wand,
cleaning.
to the right to lock.
Note:
closed
Return
position
suction
control
for normal
slide to the
cleaning.
CAUTION
When using attachments,
be careful
not to overextend the stretch hose
when
reaching. Trying to reach beyond
the hose stretch capability could
the vacuum cleaner to tip over.
Suction
Raised
Tab
cause
TO STORE ATTACHMENTS
Remove the combination
appropriate
Telescopic
Wand
l
brush. Snap into
storage location.
Remove crevice tool from the wand by twisting. Lay aside.
Remove the telescopic
wand from the hose.
Tool
Twist the wand to the left and pull from the
hose end.
To achieve maximum
reach with the
attachments,
add the crevice tool to the
end of the wand
slightly.
by inserting
The combination
brush
Unlock the wand by turning
and twisting
mg ring to the UNLOCK
the wand lock-
position.
Slide the lower wand into the upper wand.
directly
can be attached
Turn the wand locking
3osition.
to the wand.
ring to the LOCK
Place the crevice tool down into the comb
Brush_
Combination
Brush
Use the brush
_
......
3ressed wand. Place the telescopic
the wand holder
_
BrushS
Holder
holder without
the brush
CAUTION
for
greater suction on furniture cushions or
stairs. Use brush holder with brush for
cleaning
loose
wand in
surfaces
DO NOT pull the vacuum cleaner around
the room by the hose. Property damage
or personal injury could result.
such as drapes.
10
CLEANING
ATTACHMENT
CREVICE
TOOL
COMBINATION
Handi-Mate
Between
Cushions*
Furniture*
_
** _
Jr.®
Floors
¢
¢
4
_
Stairs
Drapes*
¢
4
BRUSH
AREA
¢
¢
4
* Always clean attachments before usH_g on fabrics.
J = Applicable
**Use the brush holder without the brush for greater suction on furniture cushions or stairs. Use
brush holder with brush for cleaning loose surfaces such as drapes.
Carpet edges
Guide either side or the front of the nozzle
, WARNING
along a baseboard.
Personal
Stairs
Put handle
in full upright
the carpet/bare
floor
position.
selector
Place
erty damage
in the bare
floor position. Use the crevice
bination brush.
tool or com-
when
possible.
cleaner
when stretching
hose is needed
This helps
from
tipping
to keep
over
the hose. If additional
then unlock the release
lever and pull out additional
hose. Use
caution not to tip over vacuum cleaner.
Place the carpet/bare
floor
selector
bare floor position. Use the crevice
combination
brush.
result.
Unplug the vacuum cleaner from the outlet
before checking.
When using the attachments
keep the
extension
hose release lever in the locked
position
could
For best cleaning results, keep the airflow
passage clear.
Unit Tipping
the vacuum
Injury Hazard
Use care if vacuum cleaner is placed on
stairs. If it falls, personal injury or prop-
in the
tool or
11
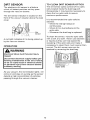
MOTOR PROTECTION
SYSTEM
Motor
Thermal
Protector
This vacuum cleaner
protector,
Protector
This vacuum
protect
cleaner
has a motor
by-pass valve which automatically
provide cooling air to the vacuum
motor when
a clog prevents
protector
opens to prevent
possible damage
You will notice
rushes
through
of sound
valve
prevent
cleaner.
as air
clogs,
any clogged
replace
restarting
when cleaning new
carpet due to
reduced airflow
Motor Protector
(Behind Hose)
or by
new carpet lint filling
the dust bag quickly.
Note:
Check
Do not block motor
for and remove
protector.
clogs,
replace
bag if necessary.
See page 19, CLOG
REMOVAL section.
Also check and
replace
any clogged
problem:
any clogged
approximately
protector may open
when using
attachments
or
themselves
damage
to the vacuum
Turn the vacuum
to reset.
replace
bag if necessary.
See page 19, CLOG
REMOVAL
section.
Also check and
filters.
The motor
caused by the
attachments
trips to
from
cool and the thermal protector
Check for and remove
clogs,
replace
NOTE:
cleaner
cleaner off and unplug the power cord from
the outlet to allow the vacuum cleaner to
bag if necessary.
See page 19, CLOG
REMOVAL section.
Also check and
replace
possible
To correct
the valve opening.
Check for and remove
the vacuum
protector turns the motor off automatically.
This allows the motor to cool in order to
the normal
motor overheating
and
to the vacuum cleaner.
a change
has a thermal
automatically
overheating,
if a clog prevents the normal
flow of air to the motor, the thermal
opens to
cleaner
flow of air to the motor. The by-pass
which
filters.
12
40-50
vacuum
filters.
minutes
cleaner.
Wait
before
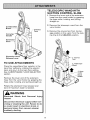
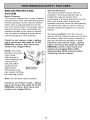
DIRT SENSOR
The electronic
TO CLEAN
dirt sensor
cells located
which will detect particles as they pass
through the vacuum cleaner.
The dirt sensor
indicator
front of the vacuum
is located
cleaner
DIRT
The dirt sensor
is a feature
Occasionally,
SENSOR
optics
consist
inside the dust bag port.
it may become
on the
• When
the optic cells be
the red light stays on
continuously.
• When dirt or dust adheres
optic
the dust bag is replaced.
To clean the sensor,
dirt is being picked
wipe the optic cells
with a soft, dry cloth. Never use cleaners
or liquids as they can help speed the
up
cleaner.
recoating
of the optic cells and make it
necessary
to clean them much sooner
normal. The dirt sensor area can be
OPERATION
reached
IbWARNING
Shock And Personal
the red indicator
lights
Optic Cells
will
come on and stay on as long as the sensor
detects a high concentration
passing through the vacuum
by removing
Injury
Disconnect electrical supply before performing maintenance to the unit. Failure
to do so could result in electrical shock
or personal injury from vacuum cleaner
suddenly starting.
As you vacuum,
to the
cells.
• Whenever
Electrical
Hazard
to
above the dust
It is recommended
cleaned:
by the vacuum
necessary
clean the two optic cells to assure
maximum
performance.
cover.
A red light indicates
OPTICS
of two optic
of particles
cleaner.
13
the dust bag.
than
VACUUM
CLEANER
CARE
Always follow all safety precautions when
performing maintenance
to the vacuum
cleaner.
I=WARNING
Electrical
Hazard
Shock
And
Personal
Injury
Disconnect electrical supply before ser.
vicing or cleaning the unit, Failure to dc
so could result in electrical shock or per.
sonal injury from cleaner suddenly starting,
Gather the cord and wrap it loosely around
the upper and lower cord hooks. Lock power
cord plug onto the power cord.
kWARNING
Electrical
Hazard
Store the vacuum
cleaner in a dry,
indoor area, on
the floor with the
handle locked in
Unplug cord from wall outlet. DO NOT drip
water on vacuum cleaner.
Do not
dry. Wipe
Wash
attachments
rinse and air dry.
washer.
use
attachments
they are washed.
marks.
and dust build-
up, wipe outer surface of vacuum
and attachments.
Injury
if they
are
wet. Attachments
used in dirty areas,
such as under a refrigerator,
should
not be used on other surfaces
until
dry after cleaning.
To reduce static electricity
Personal
CAUTION
Clean exterior using a clean, soft cloth that
has been dipped in a solution of mild liquid
and water, then wrung
And
Wrapping the cord too tightly puts stress
an the cord and can cause cord damage,
A damaged cord is an electrical shock
hazard and could cause personal injury
or damage,
the upright position.
detergent
Shock
cleaner
in warm soapy water,
Do not clean in dish-
14
They
could
leave
Note:
Always
check
motor
clogs. See MOTOR
CLEANING
SECTION
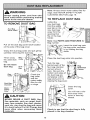
TO REPLACE
TO REMOVE
Unfold
DUST BAG
the
new dust bag.
Fold the safety
safety
SAFETY
page
filter for
FILTER
16.
DUST BAG
Dust
Bag
seal tab on the
new dust bag
away from the
opening that
fits on the bag
holder.
Dust Bag
Cover Latch
Note:
Safety
Seal Ta
See PARTS
AND
FEATURES
for
Bag number.
Pull on the dust bag cover latch
on the side
located
of the bag cover.
the bag collar completely by holding the bag
collar.
nsert the dust bag onto
Grasp the dust bag collar and pull gently,
carefully removing the dust bag.
_
Throw away
the used dust
Place
the dust bag collar
into position.
bag.
Tuck the bag
behind each of the
Do not reuse
dust
bag.
four bag retention
corners shown
here. Be sure the
bottom and sides of
Bag --_1_1__
Collar / _111_1_
I I-I
Check
the
the dust bag are
completely
within
bag cavity prior to
closing the bag cover.
bag collar
and the
motor safety
filter for dirt
Dus'Bag
Z l K or clogs.
Chamber I _
_,1_'{_ _J
safety
cover.
I _%-'_SJ/_
You will hear a distinct snap when
cover is securely
closed.
CAUTION
NEVER
REUSE
A DUST BAG. Very
fine materials,
such as carpet
freshener, face powder,
fine dust, plaster,
soot, etc. can clog the bag and cause
it to burst before it is full. Change bag
more
often
when
vacuuming
these
materials.
_
lose the bag
Check to see that the dust bag is fully
placed in the bag chamber.
15
Remove the dust bag as outlined in the
DUST BAG REPLACEMENT
section.
WARNING
Electrical
Shock Hazard
if the filter, located
Unplug power cord from electrical outlet. Do not operate the vacuum cleaner
without the motor safety filter. Be sure
the filter is dry and properly installed to
prevent motor failure and/or electrical
shock.
in the bottom
Wash the foam filter in warm soapy water,
rinse and dry thoroughly
by squeezing
ter in your hand and letting
MOTOR SAFETY FILTER
Check
motor
clean when
the fil-
it air dry.
DO NOT wash in the dishwasher,
DO NOT install damp.
safety
filter frequently
of the dust
cover cavity, is dirty, remove it by pulling forward out from under the ribs.
and
Replace
dirty.
the foam filter by sliding it back into
place under the ribs in the dust cover cavity.
Replace the dust bag as outlined in the
DUST BAG REPLACEMENT
section.
Filter Element
The HEPA exhaust
when
dirty.
depending
lose its dust
be washed
trapping
See PARTS
for the exhaust
Remove
be replaced
regularly
on use conditions.
The filter CANNOT
Note:
The foam seal of the filter should be
placed against the vacuum cleaner
body.
filter must be replaced
It should
exhaust
AND
as it will
Exhaust
Filter
ability.
Seal Against
Vacuum Cleaner
FEATURES
filter number.
filter cover
by pressing
the release tab on the cover and rotating
out from the vacuum cleaner.
\
Filter Cover
Release Tab
Remove
the filter
Filter
cartridge
from cover.
Replace the exhaust filter cover by placing
bottom tabs in slots and rotating in until
cover snaps
Place
new filter cartridge
into cover
making
sure that airflow arrow on side of cartridge
points into cover.
16
into place.
Push in on the locking tabs toward
center of the vacuum cleaner.
IbWARNING
Electrical Shock Or Personal Injury
Hazard
Rotate
the base plate away from the noz-
zle housing. The sides of the base plate
need to be pulled slightly outward to clear
the wheels.
Disconnect electrical supply before
servicing or cleaning the unit. Failure
to do so could result in electrical
shock or personal injury from vacuum
cleaner suddenly starting.
CLEANING
the
The agitator
and belt are now exposed.
Carefully remove any residue
exist in the belt area.
AGITATOR
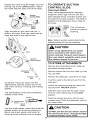
that may
Motor
Shaft
7_._
To clean agitator turn vacuum cleaner
over, cut off any carpet pile and lint
entangled around agitator with a pair of
scissors as shown.
If the belt is still attached
shaft, there
TO REMOVE
shaft
the agitator.
Carefully
and then
lift the one end of the agitator
lift the other end.
Personal Injury Hazard
Be careful when removing the agitator
as the belt tension is high. Failure to
do so could result in personal injury
from the agitator releasing quickly
and snapping away.
and
Latches--Locking
tabs
Lockin,
Tabs
the two latches
ing tabs which
lifting
it from
the motor
IbWARNING
posiiton.
Turn the unit over so the agitator
base plate are facing upward.
Locate
on the agitator.
remove
BELT
Disconnect
power cord from electrical
outlet, and place on paper to protect the
floor surface.
Place vacuum cleaner in
the full upright
before
Assembly
to the motor
will be tension
If the belt is not broken,
Frequently
check and remove hair, string
and lint build-up in the brush area. If
build-up becomes
excessive, follow the
steps below.
Agitator
secure
and the two lockthe base plate.
To remove the base plate, press
latches inward.
the two
17
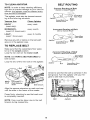
TO CLEAN
BELT ROUTING
AGITATOR
NOTE: In order to keep cleaning efficiency
high and to prevent damage to your vacuum
cleaner, the agitator must be cleaned every
time the belt is chanqed.
The agitator must also be cleaned
ing to the following schedule:
Vacuum
Use
Correct
Routing
(Selector
of Belt
in CarpetPosition)
accord-
Floor
Carpet/Bare
Floor
Selector
Shaft
Clean Agitator
HEAVY (used daily)
every week
MODERATE (used 2-3 times/week)
every month
LIGHT (used 1 time/week)
every 2 months
Incorrect
Pedal
Motor
Shaft
Routing
of Belt
(Belt on Selector
Shaft)
Carpet/Bare
Floor Pedal
Remove any dirt or debris in the belt path
Agitator
Motor
Carpet/Bare
Floor
Selector
Shaft
area or in the agitator area.
Shaft
TO REPLACE BELT
Make sure that the carpet/bare floor selector is in the carpet position.
Loop the new belt on the motor shaft.
NOTE: See PARTS AND FEATURES
belt number.
Incorrect
(Selector
Routing
in Bare
of Belt
Floor
Position)
/ _"
for
,
Loop the end of the new belt on the agitator.
Agitator
Belt
Carpet/Bare
Floor Pedal
Carpet/Bare
Floor
Selector
Shaft
Check to see that the belt is centered
in the
belt groove. Turn the agitator with your fingers to see that it turns freely.
Floor
Shaft
Selector
/_ _,-_/_'_,_1_/t_
\
Belt
Groove/
Align the square extension on each end cap
with the slots in the frame of the nozzle.
Press firmly, checking to see that each end
is completely
inserted.
Belt
NOTE: Care must be taken due to the belt
tension
during reassembly,
18
Agitator
Tore-attach
thebaseplate,
insert
thetabs
intotheslotsalong
thefrontedgeofthe
base.
Place
thevacuum
cleaner
infull
upright
position.
Lower
thebaseplatetoits
original
position.
Press the base plate down until the two locking tabs snap into place.
Latches_
_._._-
Locking
Slide the right latch to the right and the left
latch to the left to secure.
Tabs
As the base is lowered
position
outlet.
the inner areas will
brush against the dust compartment
A gentle pull outward
bly.
Return the vacuum
may assist
wheels.
in reassem-
19
cleaner
before plugging
to the upright
into the electrical
4. Remove the light bulb
by pulling straight out.
IbWARNING
Electrical
Hazard
Shock
Or Personal
Injury
Disconnect
electrical
supply before
performing
maintenance
to the unit.
Failure to do so could result in
5. To replace the light
bulb carefully insert
fully into slot.
electrical
shock or personal
injury
from the vacuum cleaner suddenly
starting.
TO REMOVE
1. Disconnect
outlet.
LIGHT BULB
power
cord from
electrical
2. Press
Flat
Note: See PARTS AND FEATURES for
bulb number.
handle
release pedal
and lay vacuum
cleaner back.
I&O.OT,O.
I
Do not plug in or turn on until the vacu- I
_eadfight
Lens
shown on both
sides. Rotate
3. Pry light lens
out
lens atupslots
and as
lift
off.
um cleaner
is completely
6. To replace light lens,
place tab at front of lens
into slot. Rotate lens
down and firmly
place.
CAUTION
Do not use a bulb rated over 9W (13V).
During extended use, heat from the
bulb could overheat surrounding plastic parts.
20
snap into
reassembled,
_-_lk',
_q,_://
I
Always follow all safety precautions when performing maintenance
to the vacuum cleaner.
Plug in the vacuum cleaner and turn it on.
Stretch the extension hose to maximum
length and then allow the hose to return to its
natural length.
WARNING
Electrical
Hazard
Hose
Storage
Position
Shock Or Personal Injury
Disconnect
electrical
supply before
performing
maintenance
to the unit.
Failure to do so could result in
electrical
shock
from the vacuum
starting.
or personal
injury
cleaner
suddenly
Hose
If the vacuum
cleaner
does not seem to have
adequate suction, first check if the dust bag
is full or if a filter is clogged. See DUST BAG
REPLACEMENT
sections.
Collar
If the dust bag and filter areas are free of
clogs, check the extension hose. Rotate the
extension hose release lever counterclockwise to release extension hose.
Re-insert the hose into the opening on the
body from which it was removed. Press firmly
to assure connection. Rotate hose release
lever clockwise
Extension
to the locked position.
If the dust bag, filter areas and the hose
areas are free of clogs, disconnect the nozzle hose from the wand holder and check the
nozzle for clogging.
Hose
Collar
d IbWARNING
Personal
Extension
Release
Injury
DO NOT place
neath the unit
Hose
Hazard
hands or feet
at any time.
under-
Lever
Clean the agitator according to the instructions in the AGITATOR CLEANING
section.
Hose
Remove the lower end of the extension
from the wand holder by grasping
collar, twisting, and pulling straight
Return the vacuum cleaner to the upright
position before plugging into an electrical
outlet.
hose
the hose
up.
21
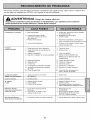
Review
thistabletofinddo-it-yourself
solutions
forminorperformance
problems.
Anyservice
needed,
other
thanmaintenance
described
inthisOwner's
Manual,
should
beperformed
bya
Sears
orother
qualified
service
agent.
WARNING
Disconnect electrical supply before performing maintenance to the unit. Failure to
do so could result in electrical shock or personal injury,
Vacuum cleaner
won't run.
1. Unplugged at wall outlet.
2. Tripped circuit breaker/blown fuse
at household service panel.
3. Thermal protector tripped.
4. Defective wall oufiet.
Poor job of dirt
pick-up.
Plug in firmly, select the desired setting on the touch control.
2. Reset circuit breaker or replace fuse.
1,
3. Allow vacuum
reset thermal
4. Check with a
have properly
cleaner to cool, then
protector.
good appliance/lamp,
serviced.
1. Full or clogged dust bag
1. Change bag.
2. Wrong pile height setting
2. Adjust setting.
3. Worn agitaton
3. Replace agitator
4. Check CLOG REMOVAL.
4. Clogged nozzle or bag holden
5. Clogged hose
6. Hole in hose.
7. Broken/misplaced
5. Check for clogs
6. Replace hose.
belt
7. Replace/fix
8. Hose not inserted fully
9. Motor protection system activated.
10. Dirty filters
belt.
8. Insert hose fully
9. Check for clogs.
10. Clean or change motor safety filter
and exhaust filter
Vacuum Cleaner picks up
moveable rugs or
pushes too hard.
1. Wrong pile height setting.
1. Adjust setting.
Light won't work.
1. Burned out light bulb.
1. Change light bulb.
Agitator
1. Broken belt
2. Carpet/Bare floor selector engaged
3. Thermal protector tripped.
1. Replace belt.
2. Disengage carpet/bare floor selector
3. Allow vacuum to cool 40 - 50 minutes
Airflow restricted
with attachment use.
Sound changes.
1. Attachment use restricts air flow.
1. Check ATTACHMENTS for fuzz, lint,
pet hair or other debris.
2. Check CLOG REMOVAL and clean
hose.
Difficulty adjusting pile
height setting
1. Vacuum cleaner not in proper upright
position,
does not turn.
2. New carpet fuzz clogged air path.
22
1. Place vacuum cleaner in the locked
upright position, tilt the vacuum back
slightly and adjust pile height.
Antes de usar su aspiradora nueva ..... 1
Garantia de la aspiradora de Kenmore ... 1
Instrucciones importantes de
seguridad ............................
2
Piezas y caracteristicas de aspiradora
vertical ...............................
3
Instrucciones de ensamble ...........
4-5
Instrucciones de operaci6n
............
Liberaci6n del cord6n el6ctrico ..........
5
5
Desprendimiento del mango ..............
Pulsador de control ....................
6
6
Ajuste y selecci6n de nivel de pelo de la
alfombra ............................
7
Carecteriisticas de
rendimiento/seguridad ...............
Cuidado de la aspiradora ..............
13
Almacenamiento de ta aspiradora ........
13
Limpieza det exterior y de tos accesorios ... 13
Cambio de la bolsa para polvo ...........
14
Filtro de protecci6n at motor .............
Filtro de escape ......................
Cambio de la correa y
limpieza del agitador ................
Cambio de la bombitla .................
C6mo eliminar los residuos de basura
en los conductos .....................
Selector de pisos con alfombra y sin alfombra .7
Accesorios .........................
8-9
Cuadro de uso de los accesorios .........
10
Reconocimiento de problemas .........
Informaci6n de assistancia
Sugerencias para aspirar ...............
o servicio
10
11-12
.................
15
15
16-18
19
20
21
pagina posterior
Por favor lea esta guia que le ayudara a assemblar y operar su aspiradora nueva de Kenmore en una manera
mas segura y efectiva.
Para mas informaci6n acerca del cuidado y operaci6n de esta aspirador, llame a su tienda Sears mas cercana.
Cuando pregunte por informaci6n usted necisitara el nt_merode serie compteto y modelo de la aspiradora que
estan en ia placa de los nQmerosde modelo y serie.
Use el espacio de abajo para registrar el nQmero de modelo y serie de su nueva aspiradora de Kenmore.
NQmerode Modelo
NOmerode Serie
Fecha de Compra
Matenga este libro y su recibo en un lugar seguro para referencias futuras.
GARANTiA DE UN A_IO DE LA ASPIRADORA KENMORE
Esta garantia es pot un a_o desde ta fecha de compra, e incluye solamente el uso de la aspiradora en
hogares privados. Durante el a_o de garantia, cuando ta aspiradora es operada y mantenida de acuerdo aI
manual de instrucciones del duefio, Sears reparar_ cualquier defecto en materiales o fabricaci6n tibre de cargo.
Esta garantia excluye tas bolsas de colecci6n, correas, lamparillas, y fiItros, las cuales son partes gastabies que
se deterioran con el uso normal.
Para el servicio de garantia, retorne esta aspiradora al Centro de Servicio Sears m_s cercano en los
Estados Unidos.
Esta garantia se aptica solamente mientras este producto esta en uso en los Estados Unidos. Esta garantia le
da a usted derechos legales especificos, y usted puede tenet tambien otros derechos los cuates varian de
estado a estado.
Sears, Roebuck and Co., D/817 WA, Hoffman Estates, IL 60179
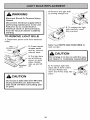
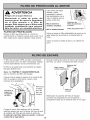
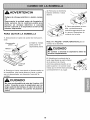
A DVE RT ENCIA so
reducirel
seguridades
riesgode
muyimportantepara
incendio,choque el_ctrico,Iesibn
nosotros. Para corporalo dai_osal utUizarsu aspiradora,actue de acuerdo
con precaucionesbasicasde seguridad,entre elias:
Lea todas tas instruccionesen este manual antes
de armar o usar su aspiradora.
Use su aspiradora solamente come se describe en
este manual. Use sotamente con los accesorios
Sears recomendados.
Desconecte la fuente de electricidad antes de
hacer el servicio o limpiar el area del cepillo. La
fatia de hacer esto puede resultar en cheque
electrico o en el sL_bitoarranque del cepillo.
Mantenga los cabeltos, ropas suettas, dedos, y
todas las partes del cuerpo lejos de aberturas y
partes movibtes.
Apague todos los controles antes de desenchufar.
Use cuidado extra cuando timpie escaleras. No la
ponga sobre silIas, mesas, etc. Mant0ngaia sobre
el piso.
No use la aspiradora para levantar liquidos
No deje ta aspiradora cuando esta enchufada.
Desenchufe del tomacorriente cuando no est9 en
inflamabtes o combustibles (gasolina, fluido de
uso y antes de hacer el servicio.
puedan estar presentes. Los vapores de estas
Para reducir el riesgo de choque elOctrico - No la
use afuera o sobre superficies mojadas.
limpiar, perfumes, etc.), o la use en &reas donde
substancias pueden crear un peIigro de incendio o
explosion.
No tevante nada que est0 ardiendo o echando
No permita que se la use come un juguete. Gran
atenciOn es necesaria cuando es usada por o
cerca de ni_os.
humo, tal como cigarriIios, fOsforos,o cenizas
calientes.
No la use con un cordon o ctavija dafiados. Si la
aspiradora no esta trabajando como debe, se la ha
dejado caer, da_ado, dejada afuera, o votteada en
el agua, retOrneIaa un Centro de Servicio Sears.
en su lugar.
No la tire o arrastre del cordon, use el cord6n como
una manija, cierre una puerta sobre el cord6n, o
tire del cordon alrededor de bordes afitados o
esquinas. No pase la aspiradora sobre el cordon.
Mantenga el cordon lejos de superficies calientes.
No use la aspiradora la bolsa de det polvo y/o filtros
Siempre cambie la botsa de polvo despuOs de
limpiar ta alfombra, limpiadores o refrescantes,
polvos, y potvo fine. Estos productos obstruyen los
flltros, reducen la circulaciOn del aire y pueden
causar dafio a ta aspiradora. La falla en cambiar ta
bolsa de polvo puede causar daSo permanente a
la aspiradora.
No desenchufe tirando del cordon. Para
desenchufar, tome la clavija, no et cordon.
No tome la clavija o la aspiradora con tas manos
mojadas.
No ponga ningL_nobjeto en las aberturas.
No la use con ninguna abertura bloqueada;
mantengala libre de polvo, hilachas, pelo, y
cuatquier cosa que pueda reducir la circulaciOn del
aire.
No use la aspiradora para levantar objetos duros
afilados, pequer_osjuguetes, atfileres,
sujetapapeles, etc. Ellos pueden da5ar la
aspiradora o ta bolsa de potvo.
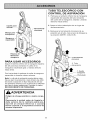
Desenchufe antes de conectar el Handi-mate Jr.@
Usted es responsabte de estar seguro de que su
aspiradora no es usada per alguien incapaz de
operarla correctamente.
GUARDE ESTAS INSTRUCCIONES
El armado y use seguro de su aspiradora son su responsabilidad. Esta aspiradora ha sido dise_ada
exctusivamente para uso domestico. La aspiradora debera almacenarse en un tugar seco yen el interior. Lea
este Manual del propietario detenidamente, pues contiene informaciOn importante sobre seguridad y use.
Esta guia contiene informaciOnsobre seguridad debajo de simbolos de advertiencia o cuidado.
Esimportante
concer
laspiezas
ycaracteristicas
desuaspiradora
para
asegurar
suuso
adecuado
yseguro.
Examinelas
antes
deusar
suaspiradora.
Objeto
Pieza N°
en EUA
Pieza N°
en Canada
Bolsa para polvo
20-50690
20-50510
Bombilla de farol
20-5248
Filtro de escape
20-86889
20-40324
Correa
20-5275
20-40096
Pulsador
de control
Handi-Mate
Jr.®_
Mango
Tubo
de liberaci6n
del cordon
rapida
electrico
Cepillo
sacudir
para
transportar
expansible
escape
(dentro)
Selector
muebles
fiberaci6n
uflla
del mango
liberacion
manguera
Por_.tubo
Protector
de motor
de
pisos
con alfombra
sin alfombra
y
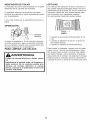
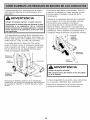
Por favor ponga atenci6n especial a estas instrucciones dadas. Advertencia: Este informaci6n le
alertara de peligro de fuego, choques electrico& quemadas y lesiones. Cuidado: Este
informaci6n te alertara de peligros como lesiones y dafios de propiedad.
ADVERTENCIA
CUIDADO
Peligro de leeibn personal y da_o al producto
No apriete demasiado
No conecte la aspiradora hasta que termine
de armada. De Io contrario podria causar un
choque el_ctrico o lesion corporal.
Si Io aprieta demasiado podria arruinar los
orificios para el tornillo.
Antes de armar la aspiradora, revise la LISTA
DE EMBALAJE en la cubierta separada de la
Lista de Partes para Reparaci6n. Use esta
tista para verificar que ha recibido todos los
componentes de su nueva aspiradora Kenmore.
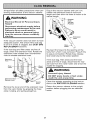
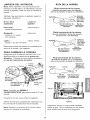
MONTAJE
DEL MANGO
Saque el cepillo combinacion de la manija
para exponer el agujero de montaje de la
manija.
Quite el tornitto del mango Iocatizado justo
debajo del borde superior de ta parte posterior
de ta aspiradora, ver ilustraci6n de abajo.
Cotoque et mango como se ve en et diagrama
de abajo.
I
No opere la aspiradora
el tornillo.
COLOCACION
CORDON
el tornillo.
sin tenet instalado
DEL
AsegGrese de que el sujetador superior det cord6n de liberaci6n rapida se encuentre en posici6n vertical. Quite el alambre con el que esta
atado el cord6n etectrico.
Asegure el cord6n
etectrico en la ranura
de ta base
presion_ndoto en el
gancho superior de
Iiberaci6n r_pida para
et cord6n electrico
Hendidura_"_\
'
de fijacion _\
Cordon
/_11
como se muestra.
Cuando instate la manija, apriete firmemente ta
manija sobre et cuerpo. Asegure con et tornillo
para ta manija provisto.
Empiece a apretar el tomiIIo con los dedos. Quiza
sea necesario ajustar un poco el mango.
Apriete el tomiiIo con un destornillador.
Reinstale el cepillo combinaci6n.
electrica
Conexion
_
Clavija
Enrolle el cord6n de poder alrededor del gancho
de liberaci6n rapida del cord6n y la manija para
transportar.
HANDI-MATE
COLOCACION
JR.®
Para operar el
Handi-Mate Jr.®
ver manual det
Handi-MateJ_®
due_e separade.
_.,_b._
Ht['_
F'_\_
/
,,_
/
DEL TUBO
TELESCOPICO
Ponga et tube tetesc6pico en el soporte det
tubo. Ponga la herramienta de hendiduras en el
Spice del tubo tetesc6pico.
lilt
PARA INSERTAR EL
HANDI-MATE ®
Ponga et Handi-Mate Jr.® adentro deI compartimiento de dep6sito.
Rote et Handi-Mate Jr. ® hacia atr_s hasta que
calce en su lugar.
PARA SACAR EL HANDI-MATE ®
Rote et Handi-Mate Jr. ® afuera del compartimiento de dep6sito.
INSTRUCCIONES
DE OPERACION
1. Gire el sujetador
del cord6n hacia
abajo para Iiberar el
cord6n electrico.
IADVERTENCIA
Peligro de lesibn personal y daho al producto
Para reducir el riesgo de choque electrico,
esta aspiradora cuenta con una clavija polarizada (uno de los contactos es m_s ancho que
el otto).
La clavija s61o puede introducirse de una
manera en el enchufe. Si la clavija no cabe
bien en el enchufe, inviertala. Si aun no cabe,
Ilame a un electricista para que instale un
enchufe correcto. No altere Ia clavija de ninguna manera.
2. Desprenda el
enchufe del corddn
electrico y quite et
cord6n del sujetador
superior. Este seguro
de queet cord6n etectrico se mantiern fijo
en la hendidura de
fijacion det gancho.
de fijacion
Cord6n
3. Conecte el cord6n etectrico polarizado en
un enchufe de 120 voltios que se encuentre
cerca del piso.
4. Para guardar et cord6n, gire el sujetador
det cord6n hacia arriva y enredelo.
kADVERTENCIA
Peligro de lesibn personal y da_o al producto
NO PONGA manos ni pies debajo de la unidad
en ningun momento.
NO use los enchufes Iocalizados sobre los
muebles. Los objetos cercanos podrian resultar da_ados.
Desprenda
etmango
pisando
etpedal
deliberaci6n
ytirando
delmango
hacia
abajo
conla
mano.
Nota:
Etagitador
puede
girarcuando
taaspiradora
est8enposici6n
vertical.
OFF - Apaga el motor de succi6n de la
aspiradora.
ON - Prende
(ON) el motor
ra al nivel de ALTA
succion
de la
para limpiar
la
mayoria de las alfombras. A fin de obtener
niveles de succion MEDIO y BAJO para
limpiar,
apriete
el boton
SUCCION
ciclar el motor de la aspiradora
los niveles de succion MEDIO,
ALTO
motor
- Cambia
el nivel de succi6n
de la aspiradora.
Si la unidad
del
esta
apagada (OFF), apretando
el boton
SUCCION
prende (ON) solamente
el
motor
de la aspiradora
a un nivel de
succion ALTO para limpiar la mayoria de
las alfombras,
tapetes y telas. Si la unidad
esta prendida
(ON), apretando
el boton
de SUCCION
cicla el motor de la
aspiradora
succi6n.
a traves
de los niveles
I
FON
para
a traves de
BAJO, y
respectivamente.
SUCClON
_-OFF
aspirado-
de
_
SUCTION
Para seleccionar
de la alfombra:
un ajuste de nivel de pelo
Apague la aspiradora. Seleccione un nivel de
ajuste inctinando la aspiradora hacia atr&s
hasta que las ruedas delanteras esten un poco
despegadas det piso.
Destice ta palanca de ajuste de nivet de peto
de la alfombra a ta posici6n deseada.
Hay cuatro (4) posiciones de ajuste de attura
en la aspiradora. Use ta posici6n LOW para la
mayoria de atfombras y pisos lisos (con et agitador OFF), y la posici6n HIGH para alfombras
de fibras largas o abundosas, tapetes
pequefios, etc. Utilice los otros ajustes como
sea necesario para tas diferentes alturas de la
alfombra.
Para de seccionar el ajuste de piso descubierto:
Optima el bot6n de selecci6n hasta atras y debajo
de la boquiila hasta que se sienta asegurado.
En esta posici6n et agitador no gira. Esta posici6n
debe usarse para timpiar piso de madera y mosaico
y cuando se usan algunas herramientas.
Seleccibn de pisos con alfombra: Optima el boton
completamenta hasta el frente y por arriba hasta
la posici6n de pisos con alfombra.
En esta posici6n el agitador gira. Cuando se limpia
alfombras, el selector tiene que estar en esta posici6n.
CUIDADO
No deje permanecer Ia aspiradora en un solo
lugar durante ningun tiempo cuando el agitador esta rotando. Se puede da_ar la alfombra.
CUIDADO
No deje permanecer Ia aspiradora en un solo
lugar durante ningun tiempo cuando el agitadot esta girando. Se puede dai_ar la alfombra.
Nota: Para la vida mas larga de ta correa, apague
la aspiradora antes de mover et selector. Si usted no
Io hace de esta manera, puede causar que la correa
frote el eje det selector y puede calentar y causar
que se queme la correa que causeria un oior a
quemado.
/
Atencibn: Refierase alas recomendaciones del fabricante para limpiar su alfombra. AIgunas alfombras
mas delicadas pueden requerir el uso de ta aspiradora con el agitador desconectado para prevenir
que la alfombra sea dafiada.
Posici6n
de pisos
sin alfombra
pisos con
affombra
pisos
con alfombra y
sin alfombra
TUBO TELESCOPICO
CON
CONTROL DE ASPIRAClON
1. Remueva et extremo inferior de la manguera
expansible del soporte det tubo tomando
del cuetto de ta manguera, rotando y tirando
derecho hacia arriba.
Cepillo
para
Herramienta
3. Remueva la herramienta
Mango
para
transportar
expansible
2. Saque el tubo tetesc6pico
almacenamiento.
de su lugar de
rinconera de su
posicidn en el tubo. Gire el aro de bIoqueo a
ta posici6n ABRIR (UNLOCK).
_/
rinconera
Palanca de
liberaci6n
manguera
3. Herramienta
rinconera
PARA USAR ACCESORIOS
Saque el extremo inferior de la manguera expansible del porta tubo tomando el cuello de la
manguera, haciendola girar, y tirando derecho
hacia arriba
2. Tubo
1. Cuello
Gire hacia abajo ia palanca de soltar la manguera
expansible si necesita maximo alcance.
Nota: La v_lvula de protecci6n puede abrirse mientras se usan los accesorios o para limpiar una atfombra nueva a causa de un flujo reducido de aire por
los accesorios mismos o pot la peIusa de la alfombra
que Ilene la botsa rapidamente. Consulte eI cuadro
RECONOCIMIENTO DE PROBLEMAS.
,ADVERTENCIA
Peligro de choque
ral
el_ctrico
o lesi6n
corpo-
Desconecte la unidad antes de limpiarla o
darle servicio. De Io contrario
podria producirse
un choque
electrico
o causar
lesibn corporal si la aspiradora arranca de
manera imprevista.
Despliegue el tube comptetamente. Gire el are de
btoqueo det tubo hasta la posici6n LOCK.
tnstaie el tubo de extensi6n en el extremo abierto de
la manguera.
Tubo
_'..._
_
_,_
Tubo telesc6pico
Cuando use accesorios para limpiar cortinas, tapetes
pequet_osde pelo corto y otros articuIos delicados,
gire el deslizador de control de aspiraci6n a la
_osici6nabierta. Esto reducir_ la potencia de
aspiraci6n para facilitar la limpieza.
Oeslizador
inferior------_
PARA OPERAR EL DESLIZADOR
DE CONTROL DE ASPIRACION
de control
Este selector se encuentra en el tube telesc6pico,
cerca de la manguera.
_Drlr
_'<_
Deslizador
Tube
superior
de contro!
Alinee las pestaSas del tube de extensi6n con las
ranuras en forma de "J" de ta manguera. Empuje et
tubo dentro de la manguera y gire hacia la derecha
para bloquearto.
Para obtener la maxima Iongitud con los accesorios,
instate ta herramienta para hendiduras en el extremo
del tubo. Para hacerlo, introdQzcaia en el tubo y gireIa
un poco.
Nota: Coloque el
deslizador de
control de
aspiraci6n a la
posici6n cerrada
para la limpieza
normal
IbCUIDADO
Cuando use los accesorios,
tenga cuidado
de no estirar
demasiado
la manguera
expansible
para tratar
de alcanzar
mas
lejos. Si trata de estirar la manguera m_e de
Io debido, podria causar que la aspiradora
se venga abajo.
ALMACENAJE DE LOS
ACCESORIOS
Retire el cepilto para sacudir o el cepiIIo para
combinaci6n. Cot6quelos firmemente en su lugar de
almacenamiento correspondiente.
expansible
Retire la herramienta para hendiduras del tubo
gir_ndola. P6ngaIa a un lade.
Deslizador
Retire et tubo de extensi6n de ta manguera. Gire el
tubo hacia la izquierda y tire del extremo de ta
manguera.
de aspiraci6n
levantada
Tube
Desbloquee el tube girando el are de bloqueo
hasta la posici6n UNLOCK.
'
Deslice el tube inferior dentro dei tube superior.
Gire el aro de bloqueo dei tubo a la posici6n
LOCK.
telesc6pico
Tool
Use et soporte
det cepitto
mayor succi6n
escaleras.
sobre
sin et cepitto
cubiertas
para
de maebles
Cepillo _
Introduzca la herramienta para hendiduras dentro
det tubo comprimido. Instale bien en su posicidn
de almacenamiento.
o
.......
_Cepillopara__
_
sacudir
Use et soporte
limpiar
nas.
superficies
IbCUIDADO
Cep illeu
L_J
para combinacion
det cepitto
suettas
con et cepillo
tales
como
AsegQrese de que ta unidad est6 apagada. Inserte
nuevamente la manguera completamente dentro de
la abertura ubicada en la parte inferior de ta
aspiradora, de donde la sac6 inicialmente.
para
corti-
NO tire de la aspiradora por la manguera en
la habitacion. Podrian ocurrir da_os a sus
)ertenencias,
AREA A LIMPIAR
ACCESORIO
Muebles*
Entre
cojines*
4
HERRAMIENTA
RINCONERA
_)
7
CEPILLO PARA
COMBINACION
d_
4
Handi-Mate
Jr,®
_
Cortinas*
Escalones
Paredes
7
4
4
4
4
* Siempre limpie los accesorios antes de usar sobre teias.
_/= Aplicable
Orillas de alfombras
Guie uno de los costados o la parte anterior de la
boquilla a Io largo del borde de la pared.
Escaleras
Ponga la manija en ta posici6n vertical compteta. Coloque el selector de pisos en pisos sin
alfombra (Bare Floor). Use la herramienta rinconera, cepillo combinaci6n o Handi-Mate Jr. ®
, !_
!!!!!d!!
Ed_r Cln_l a escalera
Para obtener los mejores resultados de limpieza, mantenga desbloqueados los conductos
de flujo de aire.
Volcando la Unidad
Cuando use los accesorios mantenga ta palanca de soltar ta manguera expansible en la
posici6n cerrada cuando sea posibte. Esto
ayuda a mantener ta aspiradora sin caerse
cuando se estira la manguera. Si se necesita
manguera adicional entonces abra ta palanca
de sottar y saque manguera adicional. Use
precauci6n para no vottear la aspiradora.
Cotoque et selector de pisos en pisos sin
alfombra (Bare Floor). Use la herramienta rinconera, cepillo combinaci6n o Handi-Mate Jr. ®
Desconecte
examinarla.
10
la aspiradora del enchufe antes de
SISTEMA
DE PROTECTION
Protector Termal
Esta aspiradora tiene un protector termal que se
ajusta automaticamente para proteger la
aspiradora de sobrecalentamiento. Si una
obstrucci6n impide et flujo normal de aire at
motor, et protector termal apaga et motor
automaticamente para permitir queet motor se
enfrie a fin de evitar posibles da_os a la
aspiradora.
DE MOTOR
Protector
de motor
Esta aspiradora tiene uea vatvuta de desviaci6n
que sirve como protector de motor y se abre
automaticamente para proveer un flujo de aire al
motor cuando un bIoqueo impida que circule el
aire at motor. Si se abre ta vatvuta para impedir
que se recatiente el motor y que se da_e a la
aspiradora, se notara un cambio de sonido
mientras el aire pasa por la abertura de la
v&lvula.
Para corregir el problema: Si esto ocurre,
apague la aspiradora y desenchufe el cord6n del
tomacorrieete para permitir que la aspiradora se
eefrie y que el protector termal se reajuste
Busque y saque las obstrucciones
o cambie
la bolsa de polvo, si es necesario. Examine
tambi_n y reemplace cualquier filtro
obstruido. Espere aproximadamente
40-50
minutos y enchufe la aspiradora y pr_ndala
para ver si el protector del motor se ha
reajustado.
Para corregir el problema: Coesutte et cuadro
RECONOCIMIENTODE PROBLEMAS.
Nota: La v_lvula de
desviaci6n puede estar
abierta mientras se usan
los accesorios o para
limpiar una alfombra
nueva a causa de un flujo
reducido de aire por los
accesorios mismos o por
la petusa de ta alfombra
que ttene la botsa
Protector
rapidamente. Consutte et
de motor
cuadro
RECONOCIMIENTO DE PROBLEMAS.
Nota: No obstruya el protector de motor.
11
INDICADOR DE POLVO
OPTICAS
El indicador de polvo est& Iocalizado en la parte
delantera de ta cubierta del indicador.
Los 6pticos det indicador de potvo consiste en
dos cetdas 6pticas tocalizadas dentro del compartimiento para la botsa. De vez en cuando es
necesario timpiar las dos celdas 6pticas para
que funcionen a su capacidad maxima.
Se recomienda timpiar las cetdas 6pticas:
El indicador etectrico de polvo es una caracteristica que detecta et potvo mientras que pasa
por ta aspiradora.
La tuz roja indica que la aspiradora succiona et
polvo.
OPERACION
6ptica
de polvo
• Cuando se enciende continuamente ta tuz
roja.
• Cuando se adhieren la tierra o et polvo en
tas cetdas 6pticas.
• Cuando se cambia la botsa para polvo.
AI pasar ta aspiradora, la tuz roja del indicador
de polvo enciende y sigue encendida mientras
que el indicador detecta una concentraci6n alta
de polvo pasando por la aspiradora.
Para timpiar et indicador, limpieto con un trapo
suave y seco. Nunca use detergentes o liquidos porque ettos pueden ensuciar m_s rapido
tas celdas 6pticas y sera necesario timpiarlas
m_s pronto de Io normaI. Se atcanza et compartimiento para et indicador de potvo abriendo ta
cubierta de potvo y quitando ta boIsa para polvo.
PARA LIMPIAR LAS CELDAS
ADVERTENCIA
Peligro de choque electrico o lesion corporal
Desconecte la unidad antes de limpiarla o
darle servicio. De Io contrario podria producirse un choque electrico
o causar
lesibn corporal si la aspiradora arranca de
manera imprevista,
12
CUIDADO
DE LA ASPIRADORA
Siga siempre todas las instrucciones de
seguridad antes de efectuar el mantenimiento
a su aspiradora.
ADVERTENCIA
Peligro de choque electrico o lesion corporal
Desconecte la unidad antes de efectuar el
mantenimiento a su aspiradora. De Io contrario podria producirse un choque el_ctrico o causar lesibn corporal si la aspiradora arranca de manera imprevista.
Recoja el cordon y enrrdlleto en los sajetadores superior e inferior, sin que quede muy apretado.
Asegure la clavija sobre el corddn de poder.
ADVERTENCIA
Peligro de choque electrico o lesion corporal
Guarde la aspiradora
bajo techo en un tugar seco, con et
mango en posicidn
vertical.
Si enrolla el cordon muy apretado puede
tensarlo mucho y causarle dafios. De daharse, el cordon podria causar descargas
electricas y lesiones o dafios personales.
Desconecte el cordon eIectrico de la clavija de la
pared. NO rocie agua sobre Ia aepiradora.
CUIDADO
Limpie el exterior con un trapo suave y limpio, que
ha side exprimido despu6s de remojar en una solucidn de agua y detergente liquido ligero. Seque el
exterior con un trapo seco despu6s de timpiar.
No use los accesorios si estan mojados. Los accesorios que se utilicen en
areas sucias, debajo del refrigerador,
no deben usarse en otras superficies
sin antes ser lavados. Podrian clejar
marcas.
Limpie la superficie exterior del receptaculo y de los
accesorios para reducir la electricidad estatica y la
acumulacidn de polvo.
Lave los accesorios en agua tibia jabonosa,
enjuague y deje secar al aire. No los lave en lavadora de platoe.
13
PARA CAMBIAR
I ADVERTENCIA
Desdobte la bolsa
para polvo nueva.
Doble la lengOeta
de seguridad de la
nueva bolsa para
polvo en direcci6n
contraria a ia abertura que va en el
soporte de la
bolsa.
Siempre desconecte el cord6n _lectrico antes
de reparar alguna parte de Ia aspiradora.
PARA QUITAR LA BOLSA
PARA POLVO
Seguro de
la cubierta
para
polvo
Leng_eta
de
seguridad
NOTA: Consulte las PII_ZAS Y
CARACTERiSTICAS
bolsa para polvo.
Coloque el collar de la
bolsa en posiciOn.
de la
bolsa
cuidado para
retirar la bolsa
para potvo.
Asegt_rese que la
boisa se queda detras
de las esquinas de
cada lado
para
polvo
Soporte _
de la
bolsa
Cavidao
de la
bolsa
para determinar el N°. de la
Inserte la bolsa para
polvo completamente
sobre el soporte de la
bolsa sujentando la
bolsa por el collar.
Jale det seguro de ta cubierta tocalizado en et
costado de la misma.
Tome el collar
de la bolsa
para potvo y
tire con
Bolsa
LA BOLSA
Esquinas
de la bolsa
demostradas aqui.
AsegL_resede que la
parte inferior de la
bolsa para polvo est6
completamente dentro de la cavidad para la bolsa
antes de instalar la cubierta de la bolsa.
Tire la botsa usada a la basura.
NO vuelva a usar
la bolsa.
Revise el
Filtro de
seguridad
al motor
ta botsa
soporte de la
botsa y et filtro
de seguridad al
motor.
Si estuvieran bIoqueados, consutte ta tabla de
diagn6stico de problemas.
_
At escuchar un
chasquido
caracteristico sera indicaci6n de que ta cubierta ha cerrado bien.
ierre ta cubierta de
CUIDADO
NUNCA REUTILICE UNA BOLSA PARA
POLVO. Los materiales
muy finos, tales
como desodorantes
para alfombras, talco
facial, polvo fino, yeso, hollin, pelusa de
alfombras nuevas, etc., pueden atascar la
bolsa y causar que se rompa antes de que
este Ilena. Cambie la bolsa mas seguido
cuando aspire este tipo de materiales.
AsegBrese de que la bolsa para polvo este
instalada por completo en la cavidad de la
bolsa.
14
Lave el fiItro con agua
caiiente y jab6n,
enjuaguelo y s6quelo
bien apretandolo con la
mano y dejando que se
seque al aire libre.
ADVERTENCIA
Peligro
de choque
Desenchufe
tomacorriente.
sin el filtro
el_ctrico
el
cable
de poder
del
No opere la limpiadora
primario
o el filtro de
Cubierta del
\
filtro de protecion
NO Io lave en la
escape. Est_ seguro que el filtros est_
instalado
propiamente
para prevenir
falla del motor y/o sacudida
el_ctrica.
\
lavadora de platos.
NO Io instale humedo.
al motor
Filtro de protreccion
FILTRO DE PROTECCION
Vueiva a cotocar el filtro deslizandolo de nuevo en su
Revise et filtro de protecci6n al motor frecuentemente y timpieto cuando este sucio. Si el
fittro esata sucio, saquel jalando hacia afuera.
lugar debajo de las estrias en la cavidad para la
bolsa.
Vuetva a coiocar la bolsa de polvo y la cubierta de
polvo.
El fittro det escape HEPA se debe reemplazar
caando este sucio. Se debe reemplazar regularmente dependiendo de las condiciones uso.
Empuje sotamente sobre el marco del cartucho
det fittro, no sobre el material del filtro mismo.
Cubierta
El fiItro no se puede tavar pues perderia su capacidad para atrapar polvo.
Sello contra
de/
filtro
Nota: Ver PARTES Y CARACTERiSTICAS
para et nQmero del filtro de escape.
Presione hacia abajo el seguro de la cubierta del
filtro de escape y tirela hacia afuera para
remover de la aspiradora.
cuerpoL
l_
Iaspirad°ra
1
Remaeva
Presione
el
seguro
la cubierto
de/filtro
el cartacho del
fittro
--Filtro
de
escape
de
escape.
Ponga et nuevo fittro adentro de ta cubierta
estando seguro de que la flecha de flujo de aire
al costado det fittro apunta hacia ta cabierta.
El sello gris del filtro debe ser puesto contra el
cuerpo de la aspiradora.
Reemptace ta cubierta del filtro de escape
poniendo las lengQetas en las hendiduras y
empujando hasta que la cubierta este en su lugar.
15
Ubique los dos pestittos y lengOetas de cierre
que aseguran ta base.
ADVERTENCIA
='eligro de choque el_ctrico o lesibn corporal
Para quitar ta base presione los pestillos hacia
et centro.
:)esconecte la unidad antes de limpiarla o darle
_ervicio. De Io contrario podria producirse un
:hoque el_ctrico o causar Iesibn corporal si la
_spiradora arranca de manera imprevista.
Presione tas lengOetas de ta base hacia et contro.
Gire la base fuera de ta boquitta La base tiene
que ser jatada ligeramente hacia fuera para
tibrar tas ruedas.
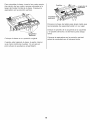
LIMPIEZA DEL AGITADOR
Eje de transmisi6n
del motor
_
/_
Agitador
Para timpiar et agitador voItee ta aspiradora.
Corte los hitos de atfombra y pelusas de
atfombra enredadas atrededor det agitado con
unas tijeras a traves de las aberturas provistas.
Revise frecuentementa y etimine cabettos, hilos
y petusas acumutadas en los cepillos. Si ta
acumutacidn es exseiva siga los pasos
siguientes.
PARA DESCONECTAR
CORREA
Ahora el agitador y ta correa est_n expuestos.
Cuidadosamente remueva cuaIquier residuo
que pueda existir en el _rea de la correa.
Si ta correa esta todavia agarrada at eje det
motor, habr_ tensi6n sobre et agitador. Si ta
correa no esta rota, remuevata del eje det
motor antes de tevantar et agitador.
LA
Desconecte el cord6n de poder det tomacorriente y coIoque papel para proteger ta superficie
del piso. Cotoque la aspiradora en ta posici6n
vertical.
Pestillos
ADVERTENCIA
Peligro de lesi6n personal
Tenga cuidado al quitar el cepillo cilindrico, Ia
tensi6n de Ia correa es grande. Si no tiene
_recaucibn podria sufrir una lesibn personal si
cepillo se libera rapidamente y sale disparado.
...............
-Leng#e_s
de
Cuidadosamente
levante un extremo det
agitador y entonces levante el otro extremo.
seguridad
Vottee ta aspiradora de manera que el agitador
y ta base miren hacia arriba.
16
LIMPIEZA DEL AGITADOR
RUTA DE LA CORREA
Nota: Para mantener una atta eficiencia de
limpieza y evitar da_o a ta aspiradora, hay que
limpiar et agitador cada vez que se cambia la
correa.
Ruta correcta de la correa
(Selector de pisos cony sin alfombra
este en la posici6n de pisos con alfombra)
Tambien hay que limpiar et agitador segQn et
siguiente calendario:
El uso de la
aspiradora
Limpie el
agitador
Frecuente
cada semana
-
Agitador
de pisos
con alfombray
sin
alfrombra
Eje del selector de
Eje de
pisos con y sin
transmisi6n
alfombra
de/motor
(usada dirariamente)
Ruta incorrecta
de la correa
(Correa aldrededor del eje del selector
de pisos con y sin alfombra)
Moderado (usada 2 o 3 veces
per semana)
cada mes
Ligero (usada 1 vez por semana)
cada 2 meses
de pisos
con alfombray
sin
alfombra
Retire todo indicio de basura o suciedad de la
zona de ta correa y det agitador.
Eje del selector
de pisos con y
sin alfombra
PARA CAMBIAR LA CORREA
Asegurase que el selector de pisos con y sin
alfombra este en ta posici6n de pisos con
alfombra,
Coloque ta nueva correa atrededor
det eje de transmision del motor.
Ruta
incorrecta
(El selector
de pisos
este en la posici6n
Eje de
transmisioo
delmotor
de la correa
con y sin affombra
de pisos
sin alfombra)
Selector de
_- Correa
pisos
Agitador
Correa
"_
con
affombra y
sin alfombra
/
Eje de
transmisi6n
del motor
d,/mot,r.
\.
Selector
con
. /,47"/_ 2_
de pisos
alfombra
sin alfombra
y
/_
'
Polea
/ _"_
_
Eje del selector
de pisos con
y sin alfombra
para
correa
I/
/
Nota: Consulte tas PIEZASY
CARACTERiSTICAS
correa.
para determinar el N°. de
Ensarte la correa nueva sobre el agitador.
Alinee ta extensi6n cuadrada de cada tapa con
las ranuras de la estructura de ta boquilla.
Agitador
AsegQrese de que ta correa este centrada
sobre ta guia. Gire el agitador con los dedos
para asegurarse de que gire libremente.
Nota: Debido a ta tensi6n de ta correa, debe
actuar con cuidado at instalarla.
17
Para reinstalar la base, inserte las cuatro pestafias dentro de tas cuatro ranuras ubicadas a Io
Pestillos
Leng#etas
de
largo det borde frontal de ta base. Coloque la
aspiradora en ta posici6n vertical.
seguridad
Precione ta base del plato para abajo hasta que
tas lengQetas de seguridad esten en su tugar.
Destize el pestitto de ta izquierda a la izquierda
y el pestitto derecho a la derecha para asegurartos.
LengEletas/
Ra_uras
Cotoque ta aspiradora en la posici6n verticat
antes de conectarta en el tomacorriente.
Cotoque ta base en su posici6n original.
Cuando este bajando la base, la parte interior
va a rozar contra tas ruedas. Si ud, jala un
poco afuera te ayudara a ensamblarlo.
18
4. Remueva la bombitta
tirando derecho hacia
afuera.
IbADVERTENCIA
Peligro de choque electrico o lesibn corporal
Desconecte la unidad antes de limpiarla o
darle servicio. De Io contrario podria producirse un choque el_ctrico
o causar
lesibn corporal si la aspiradora arranca de
rnanera imprevista.
5. Para reemplazar la bombilla cuidadosamente
ins6rtela seguramente en
la ranura. Reemplace la
cubierta de la lente.
PARA QUITAR LA BOMBILLA
1. Desconecte
ente.
et cable de poder det tomacorriNota: Mire PIEZAS Y CARACTERISTICAS para el
numero de la bombilla.
2. Baje la manija
para poner la
aspiradora plana.
Desarmador
conecte o encenda
INokCUIDADO
la aspiradora antes de
armada completamente.
6. Substituya la cubierta de la
lente insertando la parte inferior
de la lente en la ranura,
entonces aplique presi6n en la
parte superior. Un sonido "pop"
indica que la tente esta colocada
correctamente en su lugar.
la luz
3. Extraiga el tente insertando et desarmador en
la hendidura, jate hacia afuera et lente y girelo
con el desarmador en direcci6n fuera de ta
unidad.
19
I
Proceda siempre con precauciones de seguridad antes de efectuar et mantenimiento a su
aspiradora.
Enchufe la aspiradora y enciendata. Estire at
m&ximo la manguera y luego permita que se
encoja hasta su tamale normal de atmacenamiento.
ADVERTENCIA
Reinserte ta manguera adentro de la abertura
en el cuerpo de ta cuat fue sacada. Apriete
firmemente para asegurar la conexi6n.
Si Ia bolsa del polvo y areas det filtro estan
tibres de trabas, desconecte ta boquitta de ta
manguera del porta-tubo y revise ta boquitta per
obst_culos. Gire la palanca de liberaci6n de ta
manguera hacia la derecha a la posici6n cerrada.
Peligro de choque el_ctrico o lesibn corporal
Desconecte la unidad antes de efectuar el mantenimiento a su aspiradora. De Io contrario
podria producirse un choque el_ctrico o causar
lesibn corporal si Ia aspiradora arranca de manera imprevista.
Si ta aspiradora no parece tener suflciente succi6n, revise si la botsa det polvo est8 ttena o si
el filtro est_ tapado. Ver CAMBIO DE LA BOLSA
PARA POLVO y DEL FILTRO DE ESCAPE.
original
dep6sito
manguera
Si ta bolsa de polvo y areas det filtro estan
Iibres de trabas, revise ta manguera expansible.
Rote la patanca de soItar la manguera expansible en direccion de tas agujas del reloj para
sottar la manguera expansible.
expans_
expsansible
Cue//o
Cuello
manguera
manguera
,ADVERTENCIA
Peligro de lesibn personal
NO coloque nunca Ias manos ni los pies debajo de la unidad.
manguera
expansible
Limpie el agitador de acuerdo alas instruciones
en ta secci6n LIMPIEZA DEL AGITADOR.
Remueva el extreme inferior de ta manguera
expansible deI porta-tubo tomando del cuetlo de
Ia manguera, rotando, y tirando derecho hacia
arriba.
Retorne ta aspiradora a ta posici6n vertical
antes de enchufarla en un tomacoriente.
20
Revise este recuadro para encontrar soluciones a problemas que puede corregir usted mismo. Cuatquier otro
servicio debe ser realizado por SEARS u otro agente de servicio califlcado.
AalIADVERTENCIA
Pelig,o
dechoque electrico
Desconecte la aspiradora antes de efectuar el mantenimiento a su aspiridora. De Io contrario
podria producirse un choque el_ctrico o causar lesibn corporal.
La aspiradora no enciende
1. Esta desconectada
1. Conecte bien, seleccJone la funcJon deseada
en el control manual
2. Cortackcuitos botado o fusible
2. Restab]ezca el cortacircuitos o
cambJe e{ fusible.
quemado en el tablero de servicio
de ]a residencia.
3. Protector termal activado.
3. Desconecte la aspiradora y permita que se
4. Toma-corriente defeetuoso
4. Pruebelo con otto aparato / lampara, hagalo
enfri& el protector termico se activara pot si sol_
reparar apropiadamente
No aspira
satisfactoriamente,
1. Bolsa para polvo Hena o atascada.
1. Cambie ]a bolsa.
2. Ajuste incorrecto
la alfombra.
2. Ajuste
de nivel de pelo de
3. Agitador
desgastado
4. Boquil]a,
o sujetador
de la bolsa, atascada
el nive]
3.
Cambie el agitador
4.
Revise COMO
RESIDUOS
ELIMINAR
DE BASURA
LOS
EN LOS
CONDUCTOS.
5. Manguera
atascado
5.
Umpiar tubo para el mugre
6. Manguera
rota.
6.
Cambie la manguera.
7.
Cambie ]a correa
8.
Inserte bien la manguera.
9.
Determine
7. Correa rota.
8. La manguera
no est& bien insertada.
9. Activacion de1 sistema
del motor.
10,
de protecti6n
Filtros de seguddad.
10.
si exJsten bloqueos
Cambie el filtro de protecci6n
motor y el filtro del escape.
al
La aspiradora levanta
tapetes o es dificil empuiar.
1. Ajuste incorrecto de hive] de pelo
de ]a alfombra
1. Ajuste el nivef
La luz no funciona.
1. Bombilla fundida.
1. Cambiela bombiHa
El agitador
no gira
1. Selector de pisos activado
2, Correa daSada
3. Protector terma} activado.
1. Desactive el selector de pisos
2, Cambie la correa
3. Desconecte la aspkadora y perl_ta que se
enfrie, e] protector termico se activarapot s] sdo
Restriccion del flujo
con e] uso de los accesorios.
1. El uso de los accesofios limita el
flujo de aire.
2. La pe{usa de una alfombra nueva
1. Revise USO DE LOS
Cambio de sonido.
obstruye el paso de aire
Dificultad para ajustar ]a
aJtura de pelo de ]a alfombra.
ACCESORIOS
2. Revise COMO ELIMINAR LOS RESIDUOS DE BASURA EN LOS CQNDUCTOS y IJmpie la manguera
1. La aspiradora esta en la posici(_n vertical fija.
21
1. hcfinela ligeramente y ajuste la altura de pelo
Get it fixed, at your home or ours!
Your Home
For repair - in your home - of al major brand appliances•
lawn and garden equipment• or heating and cooling systems
no matter who made it, no matter who sold it!
For the replacement parts, accessories anc
owner's manuals that you need to do-it-yourself,
For Sears professionai installation of home appliances
and items like garage door openers and water heaters.
1-800-4-MY-HOM
E®
Anytime, day or night
•1-800-489-4863
U.S.A.and Canada
www.sears.com
www.sears.ca
Our Home
For repair of carry-in products like vacuums, awn equipment
and electronics, call or go on-line for the nearest
Sears Parts and Repair Center.
1-800-488-1222
Anytime, day or night (U.S.A. only)
www.sears.com
To purchase a protection agreement (U.S.A.)
or maintenance agreement ICanada) on a product serviced by Sears:
1-800-827-6655 (U.S.A.
1-800-361-6665 (Canada
Para cedir servicio de reDaraclon
Au Canada Dour service en fran£als:
1.800.LE.FOYER _ ;
a domicilio, y oara ordenar Dlezas:
1-888-SU-HOGAR ®
1-800-533-6937
www.sears.oa
"1-888-784-6427,
© Sears, Roebuck and Co
TM
SM
® Registered Trademark /
Trademark /
Service Mark of Bears Brand, LLC
® Marca Registrada / TM Marca de Fabrica / SM Marca de Servicio de Sears Bra Roebuck ands, LLC
#,1C
MD
Marque de commerce
/
Marque dcposee
de Sears Brands, LLC