1
SKIRT
NOSE
BREECH
Fig. 6
Fig. 5
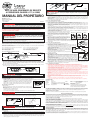
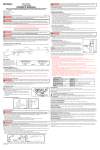
.177 CALIBER SPRING AIR PELLET RIFLE
OWNER’S MANUAL
Incluye instrucciones en español al reverso
Crosman Corporation
Rts. 5 & 20
East Bloomfield, NY 14443
www.crosman.com
1- 800-7-AIRGUN
B1K77-515
WARNING: Not a toy. This air gun is recommended for adult use only. Misuse or
careless use may result in serious injury or death. Dangerous within 600 yards (549 meters).
YOU AND OTHERS WITH YOU SHOULD ALWAYS WEAR SHOOTING GLASSES TO PROTECT YOUR EYES.
READ ALL INSTRUCTIONS BEFORE USING.
BUYER AND USER HAVE THE DUTY TO OBEY ALL LAWS ABOUT THE USE AND OWNERSHIP OF THIS AIRGUN.
THIS AIRGUN IS RECOMMENDED FOR USE BY ADULTS ONLY .
WARNING: Lead pellets. Do not inhale dust or put pellets in mouth. Wash hands after
handling. This product contains lead, a chemical known to the State of California to cause
cancer and birth defects (or other reproductive harm.)
This airgun has been classified as an adult gun, and is recommended for adult use only. Because it is considered to be a
special-purpose airgun, it is exempt from specific types of trigger pull, safety mechanism and drop tests.
Congratulations and thank you for purchasing the Benjamin Legacy 1000 Model B1K77 .177 caliber (4.5mm) pellet spring air rifle.
Please read this owner’s manual completely. Remember, this air rifle is not a toy. Treat it with the same respect you would a firearm.
Always carefully follow the safety instructions found in this owner’s manual and keep this manual in a safe place for future use.
If you have any questions regarding your new air rifle, please contact Crosman Corporation at 1-800-724-7486, 585-657-6161
or www.crosman.com.
STEPS FOR SAFE SHOOTING
Step 1. Learning the Parts of Your Rifle
Step 5. Aiming and Firing Safely
Step 2. Operating the Safety
Step 6. Removing a Jammed Pellet
Step 3. Trigger Adjustment
Step 7. Maintaining Your Rifle
Step 4. Cocking and Loading Your Rifle
Step 8. Reviewing Safety
Step 1. Learning the Parts of Your Rifle
STOCK
GRIP
REAR SIGHT
BARREL
FRONT SIGHT
MUZZLE
BUTT
FOREARM
TRIGGER
SAFETY
Fig. 1
Step 2. Operating the Safety
A. To put the rifle “ON SAFE” locate the safety in front of the trigger. Push the safety towards the trigger to put the safety on.
The safety is on, and the rifle is "ON SAFE" when the lever is in the rear position (near the trigger). (Fig. 2).
Even when the safety is on, you should continue to handle the rifle safely. Don’t point the gun at anything you don’t intend
to shoot.
B. To take the rifle “OFF SAFE,” push the safety to the forward position (away from the trigger). When the rifle is "OFF SAFE"
it is ready to be fired. (Fig. 2)
SAFETY
SAFETY
“OFF SAFE”
“ON SAFE”
Fig. 2
WARNING: Keep the rifle “ON SAFE” until you are actually ready to shoot, then push
it to “OFF SAFE.”
CAUTION: Do not fire your rifle without a pellet in the chamber (dry fire). This may permanently damage your rifle.
Step 3. Adjusting the trigger
This gun is supplied with a trigger with an adjusting screw for adjustment of the second stage length (Fig. 3)
NOTE: This feature is added for advanced shooters. Most shooters can use the settings provided during manufacturing
of the gun, and should not need to make any modifications.
• Be sure rifle is "ON SAFE", unloaded and not cocked.
• To reduce the second stage length, rotate the screw counterclockwise.
• To increase the second stage length, rotate the screw clockwise.
Step 4. Cocking and Loading Your Rifle
A. Cocking your rifle
Do not cock your rifle until you are ready to load and fire, since the only way to uncock
TRIGGER ADJUST SCREW
your rifle is to fire it. Firing your gun without a pellet in the chamber (dry firing) may
Fig. 3
cause damage to your rifle.
• Put the rifle “ON SAFE” (Step 2).
• Point the airgun in a safe direction.
• Grasp the rifle by the rifle grip with one hand and place your other hand around the barrel.
WARNING: Make sure you do not touch the trigger or push the safety to the “OFF SAFE”
position.
• Pull the barrel downward to the stop (Fig. 4A). Do not pull past this point and do not use excessive force or speed when
cocking your rifle.
• Some find it easier to cock the rifle when bracing the butt of the rifle against your leg (Fig. 4B).
Fig. 4A
Fig. 4B
WARNING: Make sure you do not pull trigger while cocking the rifle or with the barrel
in the down position. This may cause serious damage to the rifle.
• Be careful not to pinch your hand or fingers in the hinge area of the rifle.
B. Loading Your Rifle
CAUTION: Do not fire your rifle without a pellet in the chamber (dry fire). This may permanently damage your rifle.
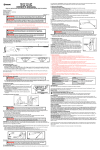
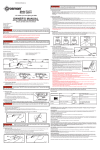
• With the barrel in the open position, after it has been cocked, place one .177 caliber pellet, nose forward, into the breech
(Fig. 5). Make sure that the skirt of the pellet is flush with face of breech.
• Move the barrel back to its original position by pushing the barrel up until it locks (Fig. 6). Once again, be careful not to
pinch your hands or fingers. Be sure the rifle is "ON SAFE" and pointed in a safe direction.
WARNING: Your rifle is now loaded and read to fire. Keep the rifle “on safe” until you
are ready to shoot. Do not point at anything you don’t intend to shoot.
C. Unloading Your Rifle
Do not cock and load your rifle until you are ready to shoot since the only way to decock your rifle is to fire it in a safe
direction. REMEMBER, choose your targets carefully and be sure that the area around the target is clear. THINK what you
will hit if you miss the target! Do not store you gun cocked or loaded.
CAUTION: Use .177 caliber pellets only. Never reuse ammunition. Use of any other ammunition can cause injury to you
or damage to the rifle.
Step 5. Aiming and Firing Safely
A. Aiming and Firing the Air Rifle
• You and others with you should always wear shooting glasses to protect your eyes.
• Always aim your air rifle in a SAFE DIRECTION. When you are sure of your target and backstop, and the area around the
target is clear, take the air rifle “OFF SAFE” (See Step 2B) and squeeze the trigger to fire.
• Do not shoot at hard surfaces or at the surface of water. The pellet may bounce off or ricochet and hit someone or
something you had not intended to hit.
• Always choose your target carefully. It is best to shoot at paper bull's-eye targets which are attached to a safe backstop
such as the Crosman 850 Target Trap. A heavy blanket should be hung behind the backstop to prevent ricochet should
you miss the backstop
• Your backstop should be checked for wear before and after each use. Replace your backstop if the surface is worn or
damaged or if a ricochet occurs.
• Your air rifle is designed for target shooting. Always remember to place your target carefully. THINK about what you will
hit if you miss the target.
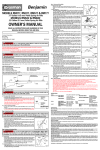
• The air rifle is correctly aimed when the front sight is positioned exactly in the notch of the rear sight. The top of the front
sight blade should be even with the top of the notch in the rear sight. The bull's-eye should appear to rest on the top of
the front sight (Fig. 7).
B Sight Adjustment
TOO LOW
TOO HIGH
RIGHT
• Elevation is set by means of the rear sight-elevating dial situated
on the rear sight base. Turn the dial counterclockwise to make the
pellet hit higher on the target and turn the dial clockwise to make
the pellet hit lower on the target. (Fig. 8)
• Windage is set by turning the windage dial located on the right
side of the sight. Turn the dial counterclockwise to make the pellet
hit to the left on the target and turn the dial clockwise to make the
pellet hit to the right on the target. (Fig. 8)
Fig. 7
Step 6. Removing a Jammed Pellet
ELEVATION DIAL
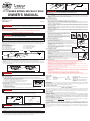
• Do not reload the rifle if a pellet is jammed.
• Put the air rifle "ON SAFE". (Step 2)
• Break the barrel open slightly (without pulling the barrel all the way down to the point
that it cocks the action) and look down the breech to see if the gun is jammed.
• If it is jammed, insert a cleaning rod into the breech and push the jammed pellet out of
the muzzle. Don’t try to reuse that pellet (Fig. 9)
WINDAGE DIAL
CAUTION: Do not cock the rifle during the removal of a jammed pellet unless you plan
on continuing to shoot.
Fig. 8
• Remember; do not fire your rifle without a pellet in the chamber (dry
fire). This may permanently damage your rifle.
BREECH
ROD
• Do not leave the rifle cocked. This will weaken the main spring and
cause damage to your airgun.
Step 7. Maintaining Your Rifle
MUZZLE
To ensure that your rifle maintains uniform power, it is important that
you apply a drop of Crosman RMCOIL every few hundred shots into the
PELLET
Fig. 9
compression chamber. (Fig.10). The external parts should be cleaned
with a cloth that has RMCOIL on it.
CAUTION: Do not attempt to disassemble your airgun. Take it to your nearest authorized
service station.
Tampering with the gun or attempts to change the gun in any way may make it unsafe to
use. Any change in performance, such as lowered trigger force or shortened trigger
travel, indicates possible wear or broken parts. Don’t use the rifle again until you’ve had
it checked by an Authorized Service Station. Check your rifle if it has been dropped to COMPRESSION
ensure that its function has not been affected.
CHAMBER
CAUTION: Use Crosman rmcoil only and do not over-oil. To do so can cause possible
damage to the gun and injury to the shooter and bystanders.
Fig. 10
Step 8. Reviewing Safety
• Do not ever point the air rifle at any person. Do not ever point the air rifle at anything you do not intend to shoot.
• Always treat the air rifle as though it is loaded and with the same respect, you would a firearm.
• Always aim in a SAFE DIRECTION. Always keep the muzzle of the air rifle pointed in a SAFE DIRECTION.
• Always keep the air rifle “ON SAFE” until you are ready to shoot in a SAFE DIRECTION.
• Always check to see if the air rifle is “ON SAFE” and unloaded when getting it from another person or from storage.
• Always keep your finger off the trigger and out of the trigger guard until ready to shoot.
• You and others with you should always wear shooting glasses to protect your eyes.
• If your reading or prescription glasses are not safety glasses, make sure you wear shooting glasses over your regular
glasses.
• Use .177 caliber (4.5 mm) pellets only. Never reuse pellets.
• Do not shoot at hard surfaces or at the surface of water. The pellet may bounce off or ricochet and hit someone or
something you had not intended to hit.
• Replace the backstop if it becomes worn. Place the backstop in a location that will be safe should the backstop fail. All
backstops are subject to wear and will eventually fail. Replace your backstop if the surface is worn or damaged or if a
ricochet occurs.
• Do not attempt to disassemble or tamper with your air rifle. Use an Authorized Service Station.
• Do not put the air rifle away loaded or cocked. Make sure pellet is unloaded from the air rifle. (See Step 4C)
• Do not shoot without a pellet in the chamber (dry fire). This may permanently damage your rifle.
• Do not leave the rifle cocked over an extended period of time. This will weaken the main spring and cause damage to your airgun.
SPECIFICATIONS
Mechanism/Action:
Caliber:
Ammunition:
Weight:
Overall Length:
Spring
.177 caliber
.177 cal. (4.5mm) Lead Airgun Pellet
6.5 lbs (2.95 kg)
43" (1.09 m)
Sights:
Barrel:
Velocity:
Performance:
Front: Fiber Optic ramp
Rear: Fully Adjustable for Windage and Elevation
Rifled Steel
Up to 1000 f.p.s.
Many factors affect velocity including brand of
projectile, oiling of gun, barrel condition and
temperature
REPAIR SERVICE
If your rifle needs repair, we recommend you take or send it to your nearest Crosman Authorized Service Station. DO NOT ATTEMPT
TO DISASSEMBLE IT! Your gun requires special tools and fixtures to repair it. If you take it apart, you probably will not be able to
reassemble it correctly. Crosman assumes no warranty responsibility in this case.
A SPECIAL CUSTOMER SERVICE
Crosman Authorized Service Stations will unjam your rifle at no cost during the warranty period.
LIMITED ONE YEAR WARRANTY
This product is warranted to the retail consumer for one year from date of retail purchase against defects in material and
workmanship and is transferable. To register the serial number of your gun, please return the Airgun registration form. The
warranty is not conditioned on the return of the card. You should retain the original sales receipt as record of date of purchase.
WHAT IS COVERED
Replacement parts and labor. Transportation charges to consumer for repaired product.
WHAT IS NOT COVERED
Transportation charges to Authorized Service Station for defective product. Damages caused by abuse or failure to perform normal
maintenance – see Owner’s Manual. Sales outside of the United States. Any other expense. CONSEQUENTIAL DAMAGES,
INCIDENTAL DAMAGES, OR INCIDENTAL EXPENSES INCLUDING DAMAGE TO PROPERTY. SOME STATES DO NOT ALLOW THE
EXCLUSION OR LIMITATION OF INCIDENTAL OR CONSEQUENTIAL DAMAGES SO THE ABOVE LIMITATION OR EXCLUSION MAY
NOT APPLY TO YOU.
HOW TO OBTAIN WARRANTY PERFORMANCE
Locate nearest service station (see www.Crosman.com or call Crosman customer service at 800-724-7486 for list of stations).
The service station will give you details of how to proceed with sending the item in for repair.
IMPLIED WARRANTIES
ANY IMPLIED WARRANTIES INCLUDING THE IMPLIED WARRANTIES OF MERCHANTABILITY AND FITNESS FOR A
PARTICULAR PURPOSE ARE LIMITED IN DURATION TO ONE YEAR FROM DATE OF RETAIL PURCHASE. SOME STATES DO
NOT ALLOW LIMITATIONS ON HOW LONG AN IMPLIED WARRANTY LASTS SO THE ABOVE LIMITATIONS MAY NOT APPLY
TO YOU.
To the extent any provision of this warranty is prohibited by federal, state or municipal law, which cannot be preempted, it
shall not be applicable. This warranty gives you specific legal rights and you may also have other rights, which vary, from
state to state.
BLINDAJE
PUNTA
CULATA
Fig. 6
Fig. 5
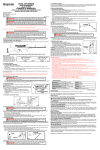
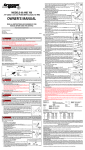
RIFLE DE AIRE COMPRIMIDO DE RESORTE
A PERDIGONES CALIBRE 0.177 (4.5 MM)
ADVERTENCIA: Ahora su rifle está cargado y listo para disparar. Mantenga el seguro
puesto (“on safe”) hasta que esté listo para disparar. No apunte el rifle a algo que no tenga la
intención de dispararle.
MANUAL DEL PROPIETARIO
Crosman Corporation
Rts. 5 & 20
East Bloomfield, NY 14443
www.crosman.com
1- 800-7-AIRGUN
B1K77-515
ADVERTENCIA: Éste no es un juguete. Esta arma de aire comprimido se recomienda
para ser utilizada por adultos únicamente. El uso incorrecto o inapropiado puede causar lesiones
graves o aún la muerte. Es peligrosa a una distancia de menos de 600 yardas (549 metros)
USTED Y LAS DEMÁS PERSONAS A SU ALREDEDOR SIEMPRE DEBEN USAR GAFAS DE TIRO PARA PROTEGER SUS OJOS.
LEA TODAS LAS INSTRUCCIONES ANTES DE USAR.
EL COMPRADOR Y EL USUARIO TIENEN EL DEBER DE OBEDECER TODAS LAS LEYES CON RESPECTO AL USO Y
POSESIÓN DE ESTA ARMA DE AIRE COMPRIMIDO.
ESTA ARMA DE AIRE COMPRIMIDO SE RECOMIENDA PARA SER UTILIZADA POR ADULTOS ÚNICAMENTE .
ADVERTENCIA: Perdigones de plomo. No respire el polvo ni se eche los perdigones a
la boca. Lávese las manos después de tomarlos. Este producto contiene plomo, un producto
químico identificado en el Estado de California como causante de cáncer y defectos de nacimiento
(u otros daños reproductivos).
Esta arma de aire comprimido se ha clasificado como arma para adultos y se recomienda para ser utilizada por adultos
únicamente. Debido a que se considera como arma de aire comprimido de uso especial, está exenta de tipos específicos de
apriete del gatillo, mecanismos de seguridad y pruebas contra las caídas.
Felicitaciones y gracias por haber comprado el rifle de aire comprimido de resorte a perdigones calibre 0.177 (4.5 mm) Benjamin
Legacy 1000 Modelo B1K77. Por favor lea todo este manual del propietario. Recuerde, este rifle de aire comprimido no es un juguete.
Trátelo con el mismo respeto que un arma de fuego. Siempre siga cuidadosamente las instrucciones de seguridad descritas en este
manual del propietario y guarde el manual en un lugar seguro para referencia futura.
Si tiene alguna pregunta acerca de su nuevo rifle de aire comprimido, comuníquese con Crosman Corporation al 1-800-724-7486,
585-657-6161 o en www.crosman.com.
Paso 1.
Paso 2.
Paso 3.
Paso 4.
Aprendizaje de los componentes de su nuevo rifle
Funcionamiento del seguro
Ajuste del gatillo
Montaje y carga de su rifle
Paso 5.
Paso 6.
Paso 7.
Paso 8.
Cómo apuntar y disparar sin peligro
Cómo retirar un perdigón atascado
Mantenimiento de su rifle
Consideraciones de seguridad
Paso 1. Aprendizaje de los componentes de su rifle
EMPUÑADURA
CAJA
ALZA
CAÑÓN
PUNTO DE
MIRA
BOCA
CULATA
ANTEBRAZO
GATILLO
SEGURO
Fig. 1
Paso 2. Funcionamiento del seguro
A. Encuentre el seguro directamente delante del gatillo para colocar el seguro (“ON SAFE") al rifle Empuje el seguro hacia el gatillo
para colocarlo. El seguro está puesto (”ON SAFE”) cuando la palanca está en la posición hacia atrás (cerca del gatillo). (Fig. 2).
Aún con el seguro puesto (“ON SAFE”), usted debe continuar manejando el rifle en forma segura. No apunte el arma a
algo que no tenga la intención de dispararle.
B. Para quitar el seguro (“OFF SAFE”) al rifle, empuje el seguro a la posición delantera (lejos del gatillo). Cuando el rifle no
tiene el seguro puesto ("OFF SAFE"), está listo para disparar. (Fig. 2)
SEGURO
SEGURO
SIN SEGURO (“OFF SAFE”)
SEGURO PUESTO (“ON SAFE”)
Fig. 2
ADVERTENCIA: Mantenga el seguro puesto (“ON SAFE”) hasta que esté listo para
disparar, luego quite el seguro (“OFF SAFE").
PRECAUCIÓN: No dispare el rifle sin un perdigón en la recámara (disparo en seco). Esto puede dañar permanentemente el rifle.
Paso 3. Ajuste del gatillo
El gatillo de esta arma incluye un tornillo para ajustar el largo de la segunda etapa (Fig. 3)
NOTA: Esta función se añade para personas con experiencia en disparar. La mayoría de la gente puede usar los ajustes
fijados durante la fabricación del arma y no necesitan hacer ninguna modificación.
• Verifique que su rifle tiene el seguro puesto (“ON SAFE”), está descargado y no está
montado.
• Gire el tornillo en sentido contrahorario para reducir el largo de la segunda etapa.
• Gire el tornillo en sentido horario para aumentar el largo de la segunda etapa.
Paso 4. Montaje y carga de su rifle
TORNILLO DE AJUSTE
A. Montaje del rifle
DEL GATILLO
Fig. 3
No monte su rifle hasta que esté listo para cargar y disparar, ya que la única forma de
desmontarlo es disparando. Se pueden ocasionar daños a su rifle si lo dispara sin que haya un perdigón en la recámara
(disparo en seco).
• Colóquele el seguro (“ON SAFE”) (Paso 2).
• Apunte el arma en una dirección segura.
• Tome el rifle por la empuñadura con una mano y coloque la otra mano alrededor del cañón.
ADVERTENCIA: Asegúrese de no tocar el gatillo ni le quite el seguro (“OFF SAFE”) al rifle.
• Hale el cañón hacia abajo hasta el tope (Fig. 4A). No hale más allá de este punto y no use fuerza o velocidad excesiva
cuando monte su rifle.
• Para algunas personas es más fácil montar el rifle apoyando la culata contra la pierna (Fig. 4B)
Fig. 4A
Fig. 4B
ADVERTENCIA: Asegúrese de no apretar el gatillo mientras monta el rifle o con el
cañón en posición hacia abajo. Esto podría ocasionar serios daños al rifle.
• Tenga cuidado de no apretarse las manos o dedos en el área de la articulación del rifle.
B. Carga del rifle
PRECAUCIÓN: No dispare el rifle sin un perdigón en la recámara (disparo en seco). Esto puede dañar permanentemente el rifle.
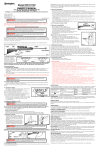
• Con el cañón en la posición abierta, después de haberlo montado, coloque un perdigón calibre 0.177, con la punta hacia
adelante, en la culata (Fig. 5). Asegure que el blindaje del perdigón esté a ras con la cara de la culata.
• Mueva el cañón de regreso a su posición original empujándolo hacia arriba hasta que se trabe en posición(Fig. 6).
Nuevamente, tenga cuidado de no apretarse las manos o los dedos. Verifique que el rifle tiene el seguro puesto “ON
SAFE” y que apunta en una dirección segura.
C. Descarga del rifle
No monte ni cargue el rifle hasta que esté listo para disparar, ya que la única manera de desmontar el rifle es disparando
en una dirección segura. RECUERDE de seleccionar sus blancos cuidadosamente y verifique que el área alrededor del
blanco esté despejada. PIENSE acerca del objeto que recibirá el disparo si no da en el blanco. No guarde su arma
montada o cargada.
PRECAUCIÓN: Sólo use perdigones calibre 0.177. Nunca use las municiones más de una vez. El uso de cualquier otro
tipo de munición puede causarle lesiones o dañar el rifle.
Paso 5. Cómo apuntar y disparar sin peligro
A. Cómo apuntar y disparar el rifle de aire comprimido
• Usted y las demás personas a su alrededor siempre deben usar gafas de tiro para proteger sus ojos.
• Siempre apunte su rifle de aire comprimido en una DIRECCIÓN SEGURA. Una vez que esté seguro de su blanco y de su
tope de retención, y después de asegurarse de que el área en torno al blanco esté despejada, quite el seguro (“OFF
SAFE”) al rifle (ver el Paso 2B) y apriete el gatillo para disparar.
• No dispare a superficies duras o a la superficie del agua. El perdigón podría rebotar y pegarle a alguien o a algo que no
era su intención.
• Siempre elija cuidadosamente su blanco. Es mejor disparar a blancos reglamentarios de papel instalados en un tope de
retención seguro como la Trampa de Blancos Crosman 850. Debe colgarse un cobertor pesado detrás del tope de
retención para evitar los rebotes en caso que no dé en el tope de retención.
• Revise el tope de retención antes y después de cada uso para asegurarse que no esté gastado. Reemplácelo si la
superficie está gastada o dañada o si se produce rebote.
• Su rifle está diseñado para disparar a blancos. Siempre coloque su blanco con cuidado. PIENSE acerca del objeto que
recibirá el disparo si no da en el blanco.
• El rifle está apuntado correctamente cuando el punto de mira está
posicionado exactamente en la ranura del alza. El extremo DEMASIADO ALTO DEMASIADO BAJO
CORRECTO
superior de la hoja del punto de mira debe estar nivelado con el
extremo superior de la ranura en el alza. El blanco debe parecer
apoyado sobre el extremo superior del punto de mira (Fig. 7).
B Ajuste de la mira
• La elevación se ajusta con el cuadrante de elevación situado en la
base del alza. Gire el cuadrante en sentido contrahorario para
hacer que el perdigón pegue más arriba en el blanco y gírelo en
Fig. 7
sentido horario para hacer que pegue más abajo. (Fig. 8)
CUADRANTE DE
• El efecto del viento se ajusta girando el cuadrante situado en el lado derecho de la
ELEVACIÓN
mira. Gire el cuadrante en sentido contrahorario para hacer que el perdigón pegue a
la izquierda en el blanco y gírelo en sentido horario para hacer que pegue a la
derecha. (Fig. 8)
Paso 6. Cómo retirar un perdigón atascado
CUADRANTE
• No cargue nuevamente el rifle si hay un perdigón atascado.
DE AJUSTE DE
LOS EFECTOS
• Ponga el seguro (“ON SAFE”) al rifle. (Paso 2)
DEL VIENTO
• Abra ligeramente el cañón (sin halarlo completamente hacia abajo al punto que
Fig. 8
monte el mecanismo) y mire hacia abajo por la culata para ver si el rifle está atascado.
• Si está atascado, introduzca una varilla de limpieza en la culata y
CULATA
VARILLA
empuje el perdigón atascado fuera de la boca. No trate de usar
nuevamente ese perdigón (Fig. 9)
PRECAUCIÓN: No monte el rifle mientras retira un perdigón atascado, a
menos que planee disparar.
BOCA
• Recuerde, no dispare el rifle sin un perdigón en la recámara (disparo en
PERDIGÓN
seco). Esto podría dañar permanentemente el rifle.
Fig. 9
• No deje el rifle montado. Esto debilitará el resorte principal y dañará el
rifle de aire comprimido.
Paso 7. Mantenimiento de su rifle
Para garantizar que su rifle mantenga una fuerza uniforme, es importante aplicar una
gota de RMCOIL Crosman a la recámara de compresión después de varios cientos de
disparos. (Fig.10). Los componentes externos se deben limpiar con un paño con RMCOIL.
PRECAUCIÓN:¡No trate de desarmar su arma de aire comprimido! Llévela a la estación de
RECÁMARA
servicio autorizada más cercana.
DE
La manipulación inapropiada del arma o los intentos de modificarla de cualquier manera COMPRESIÓN
hacen que sea poco seguro usarla. Cualquier cambio de rendimiento, como una
Fig. 10
disminución de la fuerza o un desplazamiento más corto del gatillo, indica la posibilidad
de componentes gastados o averiados. No use nuevamente el rifle hasta que haya sido revisado en una Estación de
servicio autorizada. Revise el rifle si lo dejó caer para verificar que su función no haya sido afectada.
PRECAUCIÓN: Utilice RMCOIL CROSMAN únicamente y no lo aplique en exceso. Demasiado aceite puede dañar el arma
y causar lesiones a la persona que dispara y a los transeúntes.
Paso 8. Consideraciones de seguridad
• Nunca apunte el rifle a una persona. Nunca apunte el rifle a algo que no tenga la intención de dispararle.
• Siempre trate el rifle como si estuviese cargado y con el mismo respecto que un arma de fuego.
• Siempre apunte en una DIRECCIÓN SEGURA. Siempre mantenga la boca del rifle apuntada en una DIRECCIÓN SEGURA.
• Siempre mantenga el seguro puesto (“ON SAFE”) en el rifle hasta que esté listo para disparar en una DIRECCIÓN SEGURA.
• Siempre verifique que el rifle tenga el seguro puesto (“ON SAFE”) y que esté descargado cuando lo reciba de otra persona
o lo saque del lugar donde lo estaba guardando.
• Siempre mantenga su dedo fuera del gatillo y fuera del guardamonte hasta que esté listo para disparar.
• Usted y las demás personas a su alrededor siempre deben usar gafas de tiro para proteger sus ojos.
• Si sus anteojos de lectura o correctivos no son de seguridad, asegúrese de usar gafas de tiro sobre sus anteojos regulares.
• Use perdigones de calibre 0.177 (4.5 mm) únicamente. Nunca use nuevamente los perdigones.
• No dispare a superficies duras o a la superficie del agua. El perdigón podría rebotar y pegarle a alguien o a algo que no era
su intención.
• Reemplace el tope de retención si está gastado. Coloque el tope de retención en un lugar que no implique peligro si el tope
falla. Todos los topes de retención están expuestos a desgaste y eventualmente fallarán. Reemplácelo si la superficie está
gastada o dañada o si se produce rebote.
• No intente desarmar o manipular indebidamente su rifle. Utilice una Estación de servicio autorizada.
• No guarde el rifle cargado o montado. Asegúrese de haber descargado el perdigón del rifle de aire comprimido. (Ver el
Paso 4C)
• No dispare sin un perdigón en la recámara (disparo en seco). Esto podría dañar permanentemente el rifle.
• No deje el rifle montado durante mucho tiempo. Esto debilitará el resorte principal y dañará el rifle de aire comprimido.
ESPECIFICACIONES
Mecanismo: Resorte
Calibre:
calibre 0.177
Munición:
Perdigón de plomo calibre 0.177 (4.5mm)
para arma de aire comprimido
Peso:
6.5 lbs (2.95 kg)
Largo total:
43 pulg. (1.09 m)
Miras:
Punto de mira: Rampa de fibra óptica
Alza:
Totalmente ajustable para los efectos del
viento y la elevación
Cañón:
Acero estriado
Velocidad:
Hasta 1000 pies por segundo
Rendimiento: Son muchos los factores que afectan la velocidad,
incluyendo la marca del proyectil, la lubricación del
arma, la condición del cañón y la temperatura.
SERVICIO DE REPARACIÓN
Si su rifle necesita reparación, recomendamos que lo lleve o lo envíe a la Estación de servicio autorizada de Crosman más cercana.
¡NO TRATE DE DESARMAR EL ARMA! Su arma requiere herramientas y accesorios especiales para repararla. Si la desarma,
probablemente no podrá rearmarla correctamente. Crosman no asume ninguna responsabilidad de garantía en este caso.
SERVICIO ESPECIAL A LOS CLIENTES
Las Estaciones de servicio autorizadas de Crosman quitarán la obstrucción de su rifle sin costo durante el período de garantía.
UN AÑO DE GARANTÍA LIMITADA
Para el consumidor minorista, este producto se garantiza por un año a partir de la fecha de compra minorista contra defectos
de materiales y mano de obra y dicha garantía es transferible. Para registrar el número de serie de su arma, envíe de regreso
el formulario de registro de arma de aire comprimido. La garantía no está condicionada a la devolución de dicho formulario.
Debe retener el recibo de venta original como registro de la fecha de compra.
QUÉ ESTÁ CUBIERTO POR LA GARANTÍA
Las piezas y la mano de obra de reemplazo. Los cargos de transporte del producto reparado al consumidor.
QUÉ NO ESTÁ CUBIERTO POR LA GARANTÍA
Los cargos de transporte del producto defectuoso a la Estación de servicio autorizada. Los daños causados por maltrato o falta de
mantenimiento normal – consulte el Manual del propietario. Ventas fuera de los Estados Unidos. Cualquier otro gasto. LOS DAÑOS
CONSECUENCIALES, DAÑOS INCIDENTALES O GASTOS INCIDENTALES, INCLUYENDO DAÑOS MATERIALES. ALGUNOS
ESTADOS NO PERMITEN EXCLUIR O LIMITAR LOS DAÑOS INCIDENTALES O CONSECUENCIALES, DE MODO QUE LA LIMITACIÓN
O EXCLUSIÓN ANTERIOR PODRÍA NO SER APLICABLE A USTED.
CÓMO OBTENER SERVICIO BAJO GARANTÍA
Encuentre la estación de servicio más cercana (consulte en www.Crosman.com o llame al servicio a los clientes de Crosman
al 800-724-7486 para obtener una lista de estaciones). La estación de servicio le dará los detalles sobre qué hacer para enviar
el artículo para reparación. Debe contactar a la estación antes de enviar su producto.
GARANTÍAS IMPLÍCITAS
CUALQUIER GARANTÍA IMPLÍCITA, INCLUSO LAS GARANTÍAS IMPLÍCITAS DE COMERCIALIZACIÓN Y ADECUACIÓN CON
UN FIN EN PARTICULAR, ESTÁ LIMITADA A UN AÑO A PARTIR DE LA FECHA DE COMPRA MINORISTA. ALGUNOS ESTADOS
NO PERMITEN LIMITACIONES EN LA DURACIÓN DE UNA GARANTÍA IMPLÍCITA, DE MODO QUE LAS LIMITACIONES
ANTERIORES PODRÍAN NO SER APLICABLES A USTED.
En la medida que cualquier disposición de esta garantía esté prohibida por las leyes federales, estatales o municipales que no
puedan prevenirse, dicha disposición no será aplicable. Esta garantía le da derechos legales específicos y también podría tener
otros derechos que varían de estado a estado y de país a país.