1
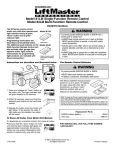
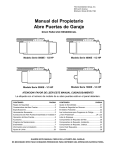
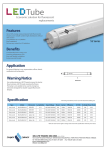
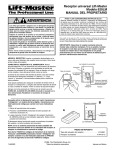
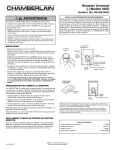
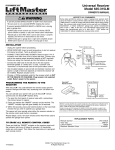
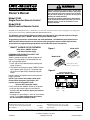
WARNING
©
Owner's Manual
Model 81LM
Single-Function Remote Control
Model 83LM
Multi-Function Remote Control
Children operating or playing with a garage door
opener can injure themselves or others. The garage
door could close and cause serious injury or death.
Do not allow children to operate the wall push
button(s) or remote control(s).
A moving garage door could injure or kill someone
under it. Activate the opener only when you can see
the door clearly, it is free of obstructions, and is
properly adjusted.
FCC/DOC rules prohibit adjustments to or modification of receiver and/or transmitter circuitry except for changing the code setting and/or
replacing the transmitter battery. THERE ARE NO USER SERVICEABLE PARTS.
The 80 Series remote control (with green battery test light) works only with door openers and light
controls having a green "SMART" button and a green indicator light.
Programming instructions are described and illustrated below. The additional push buttons on the
Multi-Function Remote Control can also activate other garage door openers and/or light controls.
(Instructions for programming light products are included with those accessories.)
"SMART" GARAGE DOOR OPENERS
(With Green "SMART" Button
and Green Indicator Light)
PROGRAM THE OPENER TO ACCEPT THE
REMOTE CONTROL CODE
Select a remote control push button to operate the
opener. The large button is recommended for use
with a garage door opener.
1. Press and hold the selected remote control push
button (Figure 1).
2. Then press and release the green "SMART" button
on the opener panel (Figure 2). The opener light
will flash once. Release the remote control push
button.
Now the opener will operate when the remote push
button is pressed.
NOTE: If you release the remote control push
button before the opener light flashes, the
receiver has not accepted the code.
To Erase All Transmitter Codes
• Press and hold the "SMART" button on the opener
panel until the indicator light turns off (about 6
seconds). ALL the codes the opener has learned
will be erased.
• To reprogram, repeat Steps 1 and 2 for each remote
control in use. Code programming instructions
are also located on the opener panel.
Figure 1
Model 81LM
Push
Button
Model 83LM
Select a remote control
push button to operate opener
Figure 2
Garage Door Opener
(With Green "SMART" Button)
1
2
3
9
1
7
Green
"Smart"
Button
3
9
1
7
3
5
5
KG
KG
Green
Indicator
Light
Replacement Parts
Single-Function remote case, cover, screw
(circuit board not included) Model 81LM . . . . . . . . . . . .41A3984-7
12 Volt battery . . . . . . . . . . . . . . . . . . . . . . . . . . . . . . . . . . . . . . . . . . . . . .10A14
Multi-Function remote case, cover, screw
(circuit board not included) Model 83LM . . . . . . . . . . . .41A3888-7
12 Volt battery . . . . . . . . . . . . . . . . . . . . . . . . . . . . . . . . . . . . . . . . . . . . . .10A14
FOR SERVICE DIAL OUR TOLL FREE NUMBER: 1-800-528-9131
114A2017
© 1996, Chamberlain Group Inc.
All Rights Reserved
Printed in Mexico
ADVERTENCIA
©
Los niños que operen o jueguen con un abrepuerta
de garaje pueden lesionarse ellos mismos o a los
demás. La puerta del garaje podría cerrarse y
causar lesiones graves o fatales. No dejar que los
niños operen los botones pulsadores de la pared ni
los transmisores.
Una puerta de garaje en movimiento podría lesionar
grave o fatalmente a alguien bajo la misma. Activar
el abrepuerta sólo cuando la puerta esté
debidamente ajustada, pueda verse claramente y no
hayan obstrucciones al recorrido de la puerta.
Manual del propietario
Modelo 81LM
Transmisor unifuncional
PRECAUCION
Modelo 83LM
Transmisor multifuncional
ADVERTENCIA
Las reglas de la FCC prohiben el ajuste o modificación de los circuitos del receptor y/o el transmisor, salvo para cambiar el ajuste del código
y reemplazar la batería del transmisor. NO HAY OTRAS PIEZAS QUE PUEDA REPARAR EL USUARIO.
El transmisor de la Serie 80 (con luz de prueba de batería verde) funciona sólo con los abre puertas y
controles de luz que tengan un botón Inteligente “SMART” verde y una luz indicadora verde.
Las instrucciones de programación se describen e ilustran más adelante. Los botones pulsadores
adicionales del transmisor multifuncional también pueden activar otros abre puertas de garaje y/o controles
de luces. (Se incluyen las instrucciones para programar productos de luces con dichos accesorios.)
ABRE PUERTAS DE GARAJE
INTELIGENTE "SMART"
Figura 1
(Con botón verde inteligente "SMART"
y luz indicadora verde)
PROGRAMAR EL ABRE PUERTA PARA ACEPTAR EL
CODIGO DEL TRANSMISOR
Seleccionar un botón pulsador de transmisor para operar el
abre puerta. El botón grande se recomienda para usarse
con un abre puerta de garaje.
1. Presionar y mantener presionado el botón pulsador del
transmisor seleccionado (Figura 1).
2. Luego presionar y soltar el botón inteligente “SMART” de
la tableta electrónica del abre puerta (Figura 2). La luz
del abre puerta destellará una vez. Soltar el botón
pulsador del transmisor.
Ahora el abre puerta funcionará cuando se presione el
botón pulsador del control remoto.
NOTA: Si se suelta el botón pulsador del transmisor
antes de que destelle la luz del abre puerta,
el receptor no ha aceptado el código.
Para borrar todos los códigos del transmisor
• Presionar y mantener presionado el botón inteligente
“SMART” de la tableta electrónica del abre puerta hasta
que la luz indicadora se apague (unos 6 segundos).
Se borrarán TODOS los códigos que haya
almacenado la tableta electrónica.
• Para reprogramar, repetir los pasos del 1 al 2 para cada
transmisor en uso. Las instrucciones de programación
de código también se hallan en el panel de la tableta
electrónica.
Modelo 81LM
WARNING
Botón pulsador
Modelo 83LM
Seleccionar un botón pulsador del
transmisor para operar el abre puerta
Figura 2
Abrepuerta de garaje
(con botón inteligente "SMART")
1
2
3
9
1
7
Botón
inteligente
"SMART"
3
9
1
7
3
5
5
KG
KG
Luz
indicadora
verde
Piezas de repuesto
Caja, tapa, tornillo de transmisor unifuncional
(no se incluye la placa de circuitos) Modelo 81LM . . . . . . .41A3984-7
Batería de 12 voltios . . . . . . . . . . . . . . . . . . . . . . . . . . . . . . . . . . . . . . . .10A14
Caja, tapa, tornillo de transmisor multifuncional
(no se incluye la placa de circuitos) Modelo 83LM . . . . . .41A3888-7
Batería de 12 voltios . . . . . . . . . . . . . . . . . . . . . . . . . . . . . . . . . . . . . . . .10A14
PARA SERVICIO LLAMAR A NUESTRO NUMERO GRATIS: 1-800-528-9131
114A2017
© 1996, Chamberlain Group Inc.
Todos los derechos reservados
Impreso en México