1
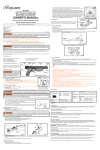
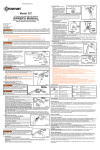
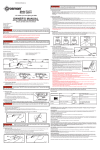
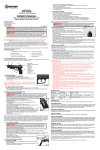
• Open the bolt by rotating the handle ¼ turn counterclockwise and pull back all the way until you hear two clicks and the bolt stays
rearward (Fig 3)
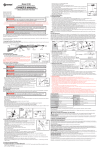
• With the bolt open, place one pellet, nose first, in to the loading port. (Fig 4)
• Lightly push the pellet in to the barrel by moving the bolt to the full forward position.
• Close and lock bolt by turning clockwise until firm resistance is felt.
• Be sure the bolt is closed and locked before firing.
E SERIES
4.2 Unloading/Firing the Pellets
• The most common way to unload the pellets, is to fire your airgun in a SAFE
DIRECTION after following Section 5 on aiming and firing safely.
• You can also follow the directions under section 6 on removing a jammed pellet.
EB17 .177 Caliber (4.5 mm) Pellet CO2 Airgun
EB20 .20Caliber (5.0 mm) Pellet CO2 Airgun
EB22 .22 Caliber (5.5 mm) Pellet CO2 Airgun
OWNER'S MANUAL
5. Aiming and Firing Safely
5.1 Aiming and Firing the Airgun
READ ALL INSTRUCTIONS AND WARNINGS IN THIS
MANUAL BEFORE USING THIS AIRGUN
Crosman Corporation
Routes 5 & 20,
POB 308
E. Bloomfield, NY 14443
www.crosman.com
1-800-7AIRGUN
EB17-515
! WARNING: Not a toy. Adult supervision required. Misuse or careless use may cause serious injury or
death. The Model EB17 may be dangerous up to 450 yards (411 meters). Model EB20 may be dangerous up to
550 yards (503 meters) Model EB22 may be dangerous up to 500 yards (457 meters).
• Always point your airgun in a SAFE DIRECTION.
• Follow the instructions for installing CO2 (Section 3.1) and loading pellets (Section
4.1)
• You and others with you should always wear shooting glasses to protect your eyes.
Fig. 4
• Do not shoot at hard surfaces or at the surface of water. The pellet may bounce off
or ricochet and hit someone or something you had not intended to hit.
• Always choose your target carefully. For example, you may wish to shoot at paper bulls-eye targets that are attached to a safe
backstop such as the Crosman 850 Target Trap. A heavy blanket should be hung behind the target trap to prevent ricochet should you
miss the backstop.
• Your airgun is designed for target shooting and is suited for both indoor and outdoor use.
Always remember to place your target carefully. THINK about what you will hit if you miss
the target.
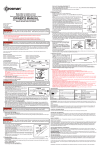
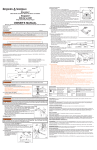
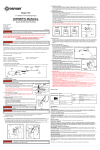
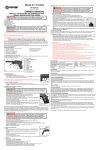
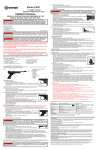
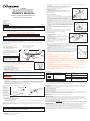
• The airgun is correctly aimed when the front sight blade is positioned exactly in the center
Front Sight
of the notch of the rear sight. The top of the front sight blade should be even with the top
of the notch in the rear sight. The bulls-eye should appear to rest on the top of the front
sight. (Fig. 5)
• When you are sure of your target and backstop, and the area around the target is clear,
take the airgun “Off Safe” (See Section 2.2) and pull the trigger to fire.
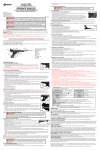
5.2 Sight Adjustment
Fig. 5
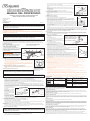
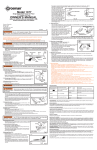
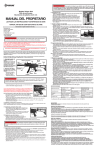
The rear sight may be adjusted to shoot higher or lower (elevation). Turn the rear sight
elevation screw clockwise to make the pellet hit higher on the target. Turn the screw
counterclockwise to make the pellet hit lower on the target (Fig 6).
YOU AND OTHERS WITH YOU SHOULD ALWAYS WEAR SHOOTING GLASSES TO PROTECT YOUR EYES.
READ ALL INSTRUCTIONS BEFORE USING.
BUYER AND USER HAVE THE DUTY TO OBEY ALL LAWS ABOUT THE USE AND OWNERSHIP OF THIS AIRGUN.
6. Removing a Jammed Pellet
THIS AIRGUN IS INTENDED FOR USE BY THOSE 16 YEARS OF AGE OR OLDER.
! WARNING:
Lead pellets. Do not inhale dust or put pellets in mouth. Wash hands after handling. This
product contains lead, a chemical known to the State of California to cause cancer and birth defects (or other
reproductive harm.)
Congratulations and thank you for purchasing the Benjamin E-Series CO2 airgun. Please read this owner's manual completely. And
remember, this airgun is not a toy. Treat it with the same respect you would a firearm. Always carefully follow the safety instructions found in
this owner's manual and keep this manual in a safe place for future use.
•
•
•
•
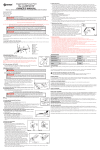
Put your airgun "ON SAFE"
Remove the filler cap (Section 3.2) to release the CO2 charge.
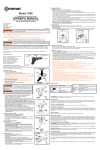
Recock the action.
With the bolt in the open position, insert a ramrod in to the muzzle end of
the barrel and gently push the jammed pellet in to the pellet loading port
(forward of the bolt). (Fig 7)
• Do not reuse the pellet again.
• If you are not able to unjam your airgun by following the unloading
procedure, take no further action. An Authorized Service Station will
unjam your airgun (no cost during the warranty period).
Fig. 6
7. Maintaining Your Airgun
If you have any questions regarding your new airgun, please contact Crosman at 1-800-7AIRGUN, 585-657-6161 or www.crosman.com.
Operating Procedures
Section
Section
Section
Section
Section
1.
2.
3.
4.
5.
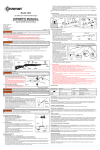
Learning the Parts of Your New Airgun
Operating the Safety
Installing and removing the CO2 Cartridge
Loading and Unloading Pellets
Aiming and Firing Safely
Section 6. Removing a Jammed Pellet
Section 7. Maintaining Your Airgun
Section 8. Reviewing Safety
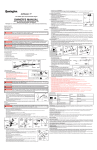
REAR
SIGHT
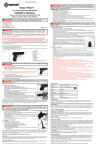
1. Learning the Parts of Your New Airgun.
Learning the names of the parts of your new airgun
will help you to understand your owner's manual.
Use this manual to increase your enjoyment of this
airgun.
LOADING
PORT
BREECH
BARREL
FRONT
SIGHT
MUZZLE
BOLT
8. Reviewing Safety
2. Operating the Safety
GRIP
! WARNING: Keep the airgun
in the "ON SAFE" position until you are
actually ready to shoot. Then push the
safety to the "OFF SAFE" position.
FILLER
CAP
TRIGGER
SAFETY
2.1 To Put the Airgun "ON SAFE":
SAFETY
• Locate the safety directly in back of the trigger.
• Push the safety from the left side all the way in (Fig. 1). The safety is not "On Safe" unless it is
pushed all the way in and the RED ring around the safety is NOT showing.
Like all mechanical devices, an airgun safety can fail. Even when the safety is "On Safe", you should
continue to handle the airgun safely. NEVER point the airgun at any person. NEVER point the air
gun at anything you do not intend to shoot.
2.2 To Take the Airgun "OFF SAFE":
• Push the safety from the right side all the way in. When you can see the RED ring around the
safety, the airgun is "Off Safe" and can be fired.
3. Installing and Removing the CO2 cartridge
3.1 Installing the CO2 Cartridge
• Make sure the airgun is "On Safe" (See Section 2.1).
• Insert the new CO2 cylinder into the gun with the small neck of the cylinder first. (Fig. 2)
!
Fig. 1
Push in from left for "On Safe".
Push in from right for "Off Safe".
WARNING:
CO2 Cartridges may explode at temperatures above 120°F (48.9°C). Do not mutilate or
incinerate them. Do not expose them to heat or store CO2 cartridges at temperatures above 120°F (48.9°C).
!
• Before you attempt to oil your airgun, make sure the gun is unloaded and the CO2 cylinder has been removed (see sections 3.2 and
4.2)
• Your airgun will maintain proper function longer if you oil it every 250 shots. Put 1 drop of Crosman
0241 Pellgunoil® on the threads of the filler cap.
• Putting a drop of Pellgunoil on the tip of every CO2 cylinder will also help to maintain your airgun. DO
NOT use petroleum distillate based oil or solvent and DO NOT over-oil as this can cause damage to
your airgun.
• A light coat of Pellgunoil on the barrel helps prevent rust.
• DO NOT MODIFY OR ALTER YOUR AIRGUN. Attempts to modify the airgun in any way inconsistent
with this manual may make your airgun unsafe to use, cause serious injury or death, and will void the
warranty.
• If you drop your airgun, check to see that it works properly before you use it again. If anything seems
changed, like a shorter or weaker trigger pull, this may mean worn out or broken parts. Call
Crosman customer service for assistance before using your airgun again.
• Never point the airgun at any person or at anything you do not intend to shoot.
• Always treat the airgun as though it is loaded and with the same respect you would a firearm.
• Always aim in a SAFE DIRECTION.
Fig. 7
• Always keep the muzzle of the airgun pointed in a SAFE DIRECTION.
• Always keep the airgun on safe until you are ready to shoot.
• Always check to see if the airgun is "On Safe" and unloaded when getting it from another person or from storage.
• Always keep your finger off the trigger and out of the trigger guard until ready to shoot.
• You and others with you should always wear shooting glasses to protect your eyes.
• If your reading or prescription glasses are not safety glasses, make sure you wear shooting glasses over your regular glasses.
• Use the proper size pellet for your airgun. .177 caliber (4.5 mm) pellet only for the EB17, .20 caliber (5.0 mm) pellet only for the EB20,
and .22 caliber (5.5 mm) pellet only for the EB22 .
• Never reuse ammunition.
• Do not shoot at hard surfaces or at the surface of water. The pellet may bounce off or ricochet and hit someone or something you had
not intended to hit.
• Place the backstop in a location that will be safe should the backstop fail.
• Your backstop should be checked for wear before and after each use. All backstops are subject to wear and will eventually fail.
Replace your backstop if the surface is worn or damaged or if a ricochet occurs.
• Do not attempt to disassemble or tamper with your airgun. Use an Authorized Service Station. Using unauthorized repair centers or
modifying the function of your airgun in any way may be unsafe and will void your warranty.
• Always keep your CrosBlock trigger block in place when storing this airgun. Store airgun in a secure location. (See CrosBlock
instructions packaged with this airgun for assistance)
• Before you store your airgun, make sure that it is unloaded, not charged, and that the airgun is "On Safe."
SPECIFICATIONS
Mechanism/Action
Single Shot Bolt-Action
Sights
Caliber/Ammunition
EB17
EB20
EB22
Front: Fixed
Rear: Adjustable for Windage and Elevation
Power Source:
12 gr. CO2 cartridge
Safety:
Cross bolt
Velocity:
EB17
EB20
EB22
WARNING:
Keep hands and face away from escaping CO2 gas. It can cause frostbite if allowed to
come in contact with skin.
• Replace the filler cap assembly in the action tube. Be sure to screw the filler cap completely into place.
• Point the airgun in a SAFE DIRECTION
• Cock the action by rotating the bolt handle ¼ turn counterclockwise and pull back all the way until you hear two clicks and the bolt stays
rearward. (Fig. 3)
• Take the airgun "Off Safe" (See Section 2.2) and pull the trigger. If the airgun does not make a popping noise after pulling the
trigger, the CO2 is not being discharged. In that event, you should put the gun on safe, tighten the filler cap assembly a little more,
and cock the gun following the steps above. Point the gun in a SAFE DIRECTION, take "Off Safe" and pull the trigger until there is a
popping noise, which will mean the airgun is releasing CO2 with each pull of the trigger.
• Return the safety to the "On Safe" position (See Section 2.1)
NOTE: We recommend the use of CROSMAN® POWERLET® CO2 cartridges.
They are made to fit
your airgun. Other
brands of CO2
cartridges may not fit
properly and if you
force them into place
it may result in injury
to you or damage to
your airgun. Never
try to force any CO2
cartridge into or out of
place. Do not store
Fig. 3
Fig. 2
your airgun with a
CO2 cartridge in it. (This is very important to remember, as it will prolong the longevity of your airgun seals.)
3.2 Removing the CO2 Cartridge
• Put the airgun "On Safe" (See Section 2.1).
• Make sure the airgun is unloaded (See Section 4.2).
• Point the airgun in a SAFE DIRECTION.
• With one hand, hold the airgun by the grip. With the other hand, slowly turn the filler cap counterclockwise completely allowing the
release of remaining CO2. (Fig. 2).
REMEMBER: Keep hands and face away from escaping CO2 gas. It can cause frostbite if allowed to come in contact with skin.
Pull the filler assembly from the action tube and remove the empty CO2 cylinder by pointing the muzzle of the airgun down. Avoid prolonged
contact with the CO2 cylinder if it is very cold.
!
WARNING:
Use .177 (4.5mm) caliber pellets only in your Model EB17. Use .20 (5 mm) caliber pellets
only in your Model EB20. Use .22 (5.5mm) caliber pellets only in your Model EB22. Use of any other ammunition
can cause injury to you or damage to the airgun. Never reuse pellets.
4. Loading and Unloading/Firing Pellets
4.1 Loading Pellets
• Make sure the airgun is "On Safe." (See Section 2.1)
• Point the airgun in a SAFE DIRECTION.
Weight
Length
.177 cal. (4.5 mm)
.20 cal. (5.0 mm)
.22 cal. (5.5 mm)
1 ¾ lbs (.8 kg)
9 inches (22.9cm)
up to 500 fps (154 m/s)
up to 425 fps (130 m/s)
up to 430 fps (131 m/s)
PERFORMANCE: Many factors can affect velocity, including brand of projectile, type of projectile and barrel condition. For optimum
performance we recommend the use of Copperhead® or Benjamin ® Legacy pellets with your airgun. We also recommend Copperhead or
Game Face ® CO2 cylinders. These products are designed specifically for use in your airgun.
REPAIR SERVICE
If your airgun needs repair, we recommend you take or send it to your nearest Crosman Authorized Service Station. DO NOT ATTEMPT TO
DISASSEMBLE IT! Your airgun requires special tools and fixtures to repair it. Any disassembly or modification not performed by an
Authorized Service Station will void the warranty.
A SPECIAL CUSTOMER SERVICE
Crosman Authorized Service Stations will unjam your airgun at no cost during the warranty period.
LIMITED ONE YEAR WARRANTY
This product is warranted to the retail consumer for one year from date of retail purchase against defects in material and workmanship and is
transferable. To register the serial number of your gun, please return the airgun registration form. The warranty is not conditioned on the
return of the card. You should retain the original sales receipt as record of date of purchase.
WHAT IS COVERED
Replacement parts and labor. Transportation charges to consumer for repaired product.
WHAT IS NOT COVERED
Transportation charges to Authorized Service Station for product. Damages caused by abuse, modification or failure to perform normal
maintenance - see Owner's Manual. Any other expense. CONSEQUENTIAL DAMAGES, INCIDENTAL DAMAGES, OR INCIDENTAL
EXPENSES INCLUDING DAMAGE TO PROPERTY. SOME STATES DO NOT ALLOW THE EXCLUSION OR LIMITATION OF INCIDENTAL
OR CONSEQUENTIAL DAMAGES SO THE ABOVE LIMITATION OR EXCLUSION MAY NOT APPLY TO YOU.
HOW TO OBTAIN WARRANTY PERFORMANCE
Locate nearest service station (see www.Crosman.com or call Crosman customer service at 800-724-7486 for list of stations). The service
station will give you details of how to proceed with sending the item in for repair. You must contact the station prior to shipping your product.
IMPLIED WARRANTIES
ANY IMPLIED WARRANTIES INCLUDING THE IMPLIED WARRANTIES OF MERCHANTABILITY AND FITNESS FOR A PARTICULAR
PURPOSE ARE LIMITED IN DURATION TO ONE YEAR FROM DATE OF RETAIL PURCHASE. SOME STATES DO NOT ALLOW
LIMITATIONS ON HOW LONG AN IMPLIED WARRANTY LASTS SO THE ABOVE LIMITATIONS MAY NOT APPLY TO YOU.
To the extent any provision of this warranty is prohibited by federal, state or municipal law, which cannot be preempted, it shall not be
applicable. This warranty gives you specific legal rights and you may also have other rights, which vary, from state to state.
BENJAMIN, CROSMAN, PELLGUNOIL and CROSBLOCK are registered trademarks of Crosman Corporation in the United States.
SERIE E
Pistola de aire de diábolos de CO2 EB17 Calibre .177 (4.5 mm)
Pistola de aire de diábolos de CO2 EB20 Calibre .20 (5.0 mm)
Pistola de aire de diábolos de CO2 Calibre EB22 .22 (5.5 mm)
MANUAL DEL PROPIETARIO
LEA TODAS LAS INSTRUCCIONES Y ADVERTENCIAS DE ESTE
MANUAL ANTES DE USAR LA PISTOLA DE AIRE
Crosman Corporation
Routes 5 & 20,
POB 308
E. Bloomfield, NY 14443
www.crosman.com
1-800-7AIRGUN
EB17-515
! ADVERTENCIA: No es un juguete. Es necesaria la supervisión de un adulto. El uso incorrecto o
descuidado puede causar graves lesiones o la muerte. El modelo EB17 puede ser peligroso hasta a 411 metros
(450 yardas). El modelo EB20 puede ser peligroso hasta a 503 metros (550 yardas). El modelo EB22 puede ser
peligroso hasta a 457 metros (500 yardas).
USTED Y LAS DEMÁS PERSONAS DEBEN USAR SIEMPRE LENTES DE TIRO PARA PROTEGER SUS OJOS.
LEA TODAS LAS INSTRUCCIONES ANTES DE USARLAS.
EL COMPRADOR Y EL USUARIO TIENEN EL DEBER DE OBEDECER TODAS LAS LEYES RELATIVAS AL USO Y
PROPIEDAD DE ESTA PISTOLA DE AIRE.
ESTA PISTOLA DE AIRE ESTÁ HECHA PARA SER USADA POR PERSONAS DE 16 AÑOS DE EDAD O MAYORES.
! ADVERTENCIA: Municiones de plomo. No inhale el polvo ni se ponga los diábolos en la boca. Lávese
las manos después de manipularlas. Este producto contiene plomo, que en el Estado de California se ha
determinado que causa cáncer y defectos congénitos (u otros daños a la reproducción)
Felicidades y gracias por comprar la Pistola de aire de CO2 Benjamin Serie E. Lea este manual del propietario en su totalidad. Y recuerde
que esta pistola de aire no es un juguete. Trátela con el mismo respeto que le tendría a un arma de fuego. Siempre siga cuidadosamente las
instrucciones de seguridad que se encuentran en este manual del propietario y consérvelo en lugar seguro para utilizarlo en el futuro.
Si tiene preguntas sobre su nueva pistola de aire, comuníquese a Crosman al 1-800-7AIRGUN, al 585-657-6161 o en www.crosman.com.
Procedimientos de operación:
Sección 1. Aprender las partes de su nueva pistola de aire
Sección 2. Operación del seguro
Sección 3. Instalación y extracción del cartucho de CO2
Sección 4. Carga y descarga de los diábolos
Sección 5. Apuntar y disparar con seguridad
1. Aprender las partes de su nueva pistola de aire
Aprenderse los nombres de las partes de su nueva pistola de
aire le ayudará a entender el manual del propietario. Use este
manual para aumentar su disfrute de esta pistola de aire.
2. Operación del seguro
! ADVERTENCIA: Mantenga la pistola
de aire en la posición "ON SAFE" (Seguro
activado) hasta que esté totalmente listo para
disparar. Entonces empuje el seguro a la
posición "OFF SAFE" (Seguro desactivado).
Sección 6. Extracción de un diábolo atorado
Sección 7. Mantenimiento de la pistola de aire
Sección 8. Revisión de seguridad
MIRA
TRASERA
PUERTO DE
RECÁMARA CAÑÓN
CARGA
MIRA
DELANTERA
BOCA
CERROJO
CACHA
TAPA DE
LLENADO
GATILLO
SEGURO
2.1 Para poner la pistola de aire "ON SAFE" (Seguro
activado):
• Encuentre el seguro que está directamente detrás del gatillo.
SEGURO
• Empuje el seguro del lado izquierdo introduciéndolo por completo (Fig. 1). El seguro no está "On
Safe" (activado) a menos que se haya presionado completamente hacia adentro y NO se vea el
anillo ROJO que está alrededor del seguro.
Como todos los dispositivos mecánicos, el seguro de las pistolas de aire puede fallar. Incluso con
el seguro en "On Safe" (activado), debe seguir manipulando con seguridad la pistola de aire.
NUNCA apunte la pistola de aire a una persona. NUNCA apunte con la pistola de aire a nada
que no tenga intención de dispararle.
2.2 Para dejar la pistola de aire "OFF SAFE" (con seguro desactivado):
Fig. 1
• Empuje el seguro desde la derecha totalmente hacia adentro. Cuando pueda ver el anillo ROJO
alrededor del seguro, la pistola de aire está "Off Safe" (con seguro desactivado) y puede
(Empuje hacia adentro desde la
dispararse.
izquierda para "On Safe" (seguro
3. Extracción e instalación del cartucho de CO2
activado), empuje hacia adentro
!
ADVERTENCIA:
Los cartuchos de CO2 pueden estallar a temperaturas
por encima de los 48.9 °C (120 °F). No los mutile ni incinere. No los exponga al calor
ni almacene los cartuchos de CO2 a temperaturas por encima de los 48.9°C (120°F).
desde la derecha para "Off Safe"
(seguro desactivado)
! ADVERTENCIA: Cuando escape gas de CO2 mantenga apartadas de la fuga la cara y las manos.
Puede causar congelación si se le permite que entre en contacto con la piel.
3.1 Instalación del cartucho de CO2
• Asegúrese de que el seguro de la pistola de aire esté activado ("On Safe") (consulte la Sección 2.1).
• Introduzca el nuevo cilindro de CO2 en la pistola empezando por el cuello estrecho del cilindro. (Fig. 2)
• Coloque de nuevo el conjunto de la tapa de llenado en el tubo accionador. Cuide de atornillar completemente la tapa de llenado.
• Apunte la pistola en una DIRECCIÓN SEGURA
• Amartille la acción girando el tirador del cerrojo ¼ de vuelta en sentido contrario al de las manecillas del reloj y extráigala por completo
hasta que escuche dos "clics" y el cerrojo quede retraído. (Fig. 3)
• Desactive el seguro de la pistola de aire ("Off Safe") (consulte la Sección 2.2) y tire del gatillo. Si la pistola de aire no hace un sonido
similar a un taponazo después de oprimir el gatillo, no se está descargando el CO2. En tal caso, debe activar el seguro de la pistola,
apretar un poco más el conjunto de la tapa de llenado y amartillar la pistola siguiendo los pasos que se indican arriba. Apunte la pistola
en una DIRECCIÓN SEGURA, desactive el seguro ("Off Safe") y tire del gatillo hasta que escuche un sonido similar a un taponazo, lo
que indicará que la pistola de aire
CONJUNTO DE LA TAPA DE
está liberando CO2 cada vez que
LLENADO
tira del gatillo.
• Devuelva el seguro a la posición
de activado ("On Safe") (consulte
la Sección 2.1)
NOTA: Recomendamos el uso de
cartuchos de CO2 CROSMAN®
CILINDRO DE CO2
POWERLET®.
EXTREMO ESTRECHO
Están construidos para ajustarse a
EXTREMO DE LA BOCA
Fig. 2
Fig. 3
su pistola de aire. Es posible que
otras marcas de cartuchos de CO2 no se ajusten correctamente, y forzarlos a entrar puede producirle lesiones o dañar la pistola de
aire. Nunca intente forzar un cartucho de CO2 para meterlo o sacarlo. No almacene la pistola de aire con un cartucho de CO2 en su
interior. (Es muy importante que recuerde esto, ya que aumentará la vida útil de los sellos de la pistola de aire.)
3.2 Extracción del cartucho de CO2
• Active el seguro de la pistola de aire ("On Safe") (consulte la Sección 2.1).
• Cerciórese de que la pistola de aire esté descargada (consulte la Sección 4.2).
• Apunte la pistola de aire en una DIRECCIÓN SEGURA.
• Sostenga la pistola de aire por las cachas con una mano. Con la otra, gire lentamente la tapa de llenado en sentido contrario al de las
manecillas del reloj, permitiendo que se libere por completo el CO2 restante. (Fig. 2).
RECUERDE: Mantenga las manos y la cara alejados del gas CO2 que escapa. Puede causar congelación si se le permite que entre en
contacto con la piel.
• Extraiga el conjunto de llenado del tubo accionador y extraiga el cilindro de CO2 vació apuntando hacia abajo la boca del cañón de la
pistola de aire. Evite el contacto prolongado con el cilindro de CO2 si está muy frío.
4. Carga y descarga o disparo de los diábolos
!
ADVERTENCIA: Use únicamente diábolos de calibre .177 (4.5 mm) en el modelo EB17. Use
únicamente diábolos de calibre .20 (5 mm) en el modelo EB20. Nunca utilice los diábolos dos veces. Use
únicamente diábolos de calibre .22 (5.5 mm) en el modelo EB22. El uso de cualquier otro tipo de diábolos puede
causarle lesiones o dañar la pistola de aire.
4.1 Carga de los diábolos
• Cuide que esté activado el seguro de la pistola de aire ("On Safe"). (consulte la Sección 2.1)
• Apunte la pistola de aire en una DIRECCIÓN SEGURA.
• Abra el cerrojo girando el tirador ¼ de vuelta en sentido contrario al de las manecillas del reloj y tire de él hacia atrás hasta que
escuche dos "clics" y el cerrojo quede atrás (Fig 3)
MUNICIÓN NARIZ
• Con el cerrojo abierto, coloque un diábolo, empezando por la nariz, en el puerto de carga.
(Fig 4)
• Empuje suavemente el diábolo al interior del cañón moviendo el cerrojo a la posición
FALDA
totalmente delantera.
• Cierre y asegure el cerrojo girándolo en sentido de las manecillas del reloj hasta que sienta
una resistencia firme.
• Cuide que el cerrojo esté cerrado y asegurado antes de disparar.
4.2 Descarga o disparo de los diábolos
• La forma más común de descargar los diábolos es disparar la pistola de aire en una
DIRECCIÓN SEGURA después de seguir la Sección 5 sobre cómo apuntar y disparar con
Fig. 4
seguridad.
• También puede seguir las direcciones de la sección 6 sobre cómo extraer un diábolo
atorado.
5. Apuntar y disparar con seguridad
BLANCO
5.1 Apuntar y disparar la pistola de aire
• Siempre apunte su pistola de aire en una DIRECCIÓN SEGURA.
MIRA
• Siga las instrucciones para instalar el CO2 (Sección 3.1) y cargar los diábolos (Sección 4.1)
DELANTERA
• Usted y las demás personas deben usar siempre lentes de tiro para protegerse los ojos.
• No dispare a superficies duras o a la superficie del agua. El diábolo puede rebotar y golpear a
alguien o algo que usted no tenía intención de tocar.
• Elija siempre su blanco con cuidado. Por ejemplo, es recomendable disparar contra dianas de papel
fijas en respaldos seguros para atrapar los diábolos como la trampa de dianas Crosman 850 Target
Trap. Debe colgarse una manta gruesa detrás de la trampa de dianas para evitar rebotes en caso de
que no atine al respaldo.
• Su pistola de aire está diseñada para tiro al blanco y es adecuada para usarla bajo techo o al aire
Fig. 5
MIRA TRASERA
libre. Recuerde siempre colocar su blanco con cuidado. PIENSE en lo que puede golpear si no atina
al blanco.
• La pistola de aire está apuntada correctamente cuando la hoja de la mira delantera está posicionada exactamente el centro de la
muesca de la mira trasera. La parte superior de la hoja de la mira frontal debe estar nivelada con la parte superior de la muesca de la
mira trasera. La diana debe verse como si descansara encina de la mira delantera. (Fig. 5)
• Cuando esté seguro de su blanco y respaldo, y no haya gente en el área alrededor del blanco, desactive el seguro de la pistola
de aire ("Off Safe") (consulte la sección 2.2) y tire del gatillo para disparar.
5.2 Ajuste de la mira
Se puede ajustar la mira trasera para tirar más alto o más bajo (elevación). Gire el tornillo de elevación de la mira trasera en sentido de
las manecillas del reloj para que el diábolo golpee más alto en el blanco. Gire el tornillo en sentido contrario al de las manecillas del
reloj para hacer que el diábolo pegue más bajo en el blanco (Fig 6.)
6. Extracción de un diábolo atorado
EN SENTIDO DE LAS MANECILLAS DEL
• Active el seguro de la pistola de aire ("ON SAFE")
RELOJ, MÁS ARRIBA
• Quite la tapa de llenado (Sección 3.1) para liberar la
DESTORNILLADOR
EN SENTIDO CONTRARIO AL DE LAS
carga de CO2 .
MANECILLAS
DEL
RELOJ,
MÁS
ABAJO
• Amartille de nuevo la acción.
• Con el cerrojo abierto, introduzca una varilla por la boca TORNILLO DE ELEVACIÓN TRASERO
del cañón y empuje suavemente el diábolo atorado
hacia el puerto de carga de diábolos (parte delantera del TORNILLO DE MONTAJE Y VIENTO
cerrojo). (Fig 7)
• No vuelva a utilizar el diábolo.
• Si no puede desatascar la pistola de aire con el
Fig. 6
procedimiento de descarga, no haga nada más, Una
Estación de servicio autorizada se encargará de desatascar su pistola de aire (sin costo durante el período de garantía).
7. Mantenimiento de su pistola de aire
• Antes de empezar a aceitar la pistola de aire, cerciórese de que la pistola esté descargada y de haber
extraído el cilindro de CO2 (consulte las secciones 3.2 y 4.2.)
• Su pistola de aire funcionará correctamente durante más tiempo si la aceita cada 250 tiros. Ponga 1
gota de aceite Crosman 0241 Pellgunoil® en la rosca de la tapa de llenado.
• Poner una gota de aceite Pellgunoil en la punta de cada cilindro de CO2 también ayudará a mantener
su pistola de aire. NO use aceites o solventes basados en destilados de petróleo y NO aceite
excesivamente, ya que esto puede dañar la pistola de aire.
VARILLA
• Una ligera capa de Pellgunoil en el cañón ayuda a evitar el óxido.
DE
• NO MODIFIQUE NI ALTERE LA PISTOLA DE AIRE. Los intentos de modificar la pistola de aire de
LIMPIEZA
cualquier forma que no esté indicada en este manual pueden hacer que la pistola de aire no sea
DIÁBOLO
segura para usarse, ocasionar graves lesiones o la muerte, y anular la garantía.
• Si su pistola de aire se cae, revise que funcione correctamente antes de volverla a usar. Si parece que
Fig. 7
cualquier cosa ha cambiado, como que el gatillo está más suave o más duro, puede ser indicación de
piezas desgastadas o rotas. Llame a servicio al cliente de Crosman para obtener ayuda antes de volver a usar su pistola de aire.
8. Revisión de seguridad
• Nunca apunte la pistola de aire a ninguna persona o a ninguna cosa a la que no tenga intención de dispararle.
• Siempre trate la pistola de aire como si estuviera cargada y con el mismo respeto que le tendría a un arma de fuego.
• Apunte siempre en DIRECCIÓN SEGURA. Mantenga siempre el cañón de la pistola de aire apuntado en DIRECCIÓN SEGURA.
• Mantenga siempre la pistola de aire con el seguro activado hasta que esté listo para disparar.
• Siempre compruebe que la pistola de aire tenga el seguro activado ("On Safe") y esté descargada al recibirla de otra persona o al
sacarla después de estar guardada.
• Mantenga siempre el dedo apartado del gatillo y fuera del guardamonte hasta que esté listo para disparar.
• Usted y las demás personas deben siempre usar anteojos de tiro para proteger sus ojos.
• Si sus lentes de lectura o para ver no son de seguridad, cuide de usar anteojos de tiro encima de sus lentes normales.
• Use el tamaño de diábolo adecuado para su pistola de aire. Diábolo de calibre .177 (4.5 mm) solamente para el EB17, diábolo de
calibre .20 (5.0 mm) solamente para el EB20 y diábolo de calibre .22 (5.5 mm) solamente para el EB22 .
• Nunca reutilice ningún diábolo.
• No dispare a superficies duras o a la superficie del agua. El diábolo puede rebotar y golpear a alguien o algo que usted no tenía
intención de tocar.
• Coloque el respaldo en un lugar que sea seguro en caso de que falle el respaldo.
• Debe revisarse el desgaste del respaldo antes y después de cada uso. Todos los respaldos se desgastan y eventualmente dejarán de
servir. Reemplace el respaldo si la superficie está desgastada o dañada, o si rebota la munición.
• No intente desarmar la pistola de aire ni la manipule indebidamente. Use una Estación de servicio autorizada. El uso de centros de
reparaciones no autorizados o la modificación de las funciones de la pistola de aire en cualquier forma puede ser inseguro y anulará la
garantía.
• Conserve siempre el bloqueo del gatillo CrosBlock en su sitio al guardar esta pistola de aire. Guarde la pistola de aire en un sitio
seguro. (Consulte las instrucciones del CrosBlock incluidas con esta pistola de aire para obtener ayuda.)
• Antes de guardar la pistola de aire, cerciórese de que no tenga munición, esté descargada y tenga activado el seguro ("On Safe").
ESPECIFICACIONES
Mecanismo:
Acción de cerrojo de un tiro
Calibre/Diábolos:
EB17
EB20
EB22
.177 cal. (4.5 mm)
.20 cal. (5.0 mm)
.22 cal. (5.5 mm)
Peso:
.8 kg (1 ¾ lbs))
Longitud:
22.9cm (9 pulgadas)
Miras:
Trasera: para viento y elevación
Delantera: Fija
Fuente de
energía::
Seguro:
Cartucho de CO2 de 12 gramos
Velocidad:
EB17 hasta 154 m/s (500 fps)
EB20 hasta 130 m/s (425 fps)
EB22 hasta 131 m/s (430 fps)
Perno cruzado
DESEMPEÑO
Hay muchos factores que afectan la velocidad, incluida la marca del proyectil, el tipo de proyectil, la cantidad de CO2 del cartucho, la
lubricación, las condiciones del cañón y la temperatura. Para un desempeño óptimo, recomendamos el uso de diábolos Copperhead® o
Benjamin ® Legacy con su pistola de aire. También recomendamos los cilindros de CO2 Copperhead o Game Face ®. Estos productos están
diseñados especialmente para ser usados con su pistola de aire.
SERVICIO DE REPARACIONES
Si la pistola de aire necesita repararse, le recomendamos que la lleve o envíe a su Estación de servicio autorizada Crosman más cercana.
¡NO INTENTE DESARMARLA! La pistola de aire requiere de herramientas y accesorios especiales para repararla. Si la desarma o modifica
cualquiera que no sea una Estación de servicio autorizada, se anulará la garantía.
UN SERVICIO ESPECIAL AL CLIENTE
Las Estaciones de servicio autorizadas Crosman desatascarán la pistola de aire sin costo durante el período de garantía.
GARANTÍA LIMITADA DE UN AÑO
Este producto está garantizado para el comprador al menudeo durante un año a partir de la fecha de compra al menudeo contra defectos en
materiales y mano de obra, y es transferible. Para registrar el número de serie de su arma, devuelva el formulario de registro de la pistola de
aire. La garantía no está condicionada a la devolución de la tarjeta. Debe conservar el recibo de ventas original como registro de la fecha de
compra.
QUÉ ESTÁ CUBIERTO
Refacciones y mano de obra. Se carga el transporte del producto reparado al consumidor.
QUÉ NO ESTÁ CUBIERTO
Cargos de transporte del producto a la Estación de servicio autorizada. Daños ocasionados por el abuso, modificación o negligencia en la
realización del mantenimiento normal, consulte el Manual del propietario. Ventas fuera de los Estados Unidos. Cualquier otro gasto. DAÑOS
CONSECUENCIALES, GASTOS INCIDENTALES INCLUIDOS LOS DE DAÑOS A LA PROPIEDAD. ALGUNOS ESTADOS NO PERMITEN
LA EXCLUSIÓN O LIMITACIÓN DE DAÑOS INCIDENTALES O CONSECUENCIALES, DE MODO QUE ES POSIBLE QUE LA LIMITACIÓN
ANTES SEÑALADA NO SE LE APLIQUE A USTED.
CÓMO HACER EFECTIVA LA GARANTÍA
Encuentre la estación de servicio más cercana (consulte www.Crosman.com o llame a servicio al cliente de Crosman al 800-724-7486 para
obtener una lista de estaciones). La estación de servicio le dará los detalles sobre cómo proceder con el envío del artículo para su
reparación. Debe ponerse en contacto con la estación antes de enviar el producto.
GARANTÍAS IMPLÍCITAS
CUALQUIER GARANTÍA IMPLÍCITA, INCLUIDAS LAS GARANTÍAS IMPLÍCITAS DE COMERCIABILIDAD Y ADECUACIÓN PARA UN
PROPÓSITO EN PARTICULAR TIENEN UNA DURACIÓN LIMITADA DE UN AÑO A PARTIR DE LA FECHA DE LA COMPRA AL MENUDEO.
ALGUNOS ESTADOS NO PERMITEN LIMITACIONES SOBRE LA DURACIÓN DE UNA GARANTÍA IMPLÍCITA, DE MODO QUE ES
POSIBLE QUE ESTAS LIMITACIONES NO SE LE APLIQUEN A USTED.
En la medida en que cualquier disposición de esta garantía esté prohibida por la ley federal, estatal o municipal, no será aplicable. Esta
garantía le otorga derechos legales concretos y es posible que usted tenga también otros derechos que varían según el estado.
BENJAMIN, CROSMAN, PELLGUNOIL y CROSBLOCK son marcas comerciales registradas de Crosman Corporation en los Estados Unidos.