1
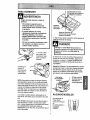
Owner's Manual
Manual Del Propietario
@
Vacuum Cleaner
Aspiradora
Model, Modelo
116.24212
116.24213
CAUTION:
Read and follow all
safety and operating
instructionsbefore first
use of this product.
CUIDADO:
Lea y siga todas las
instrucciones de operaci6n
y seguridad antes del uso de
este producto.
Sears, Roebuck and Co., Hoffman Estates, IL 60179 U.S.A.
www.sears.com
Part No, C_IZCHZ1QUalD-KC_IZCHZZ_U_
Printed in U.S.A.
Impreso en EUA
Before Using Your New Vacuum .......
Kenmore Vacuum Cleaner Warranty..,
Important Safety Instructions
Parts and Features .................
Assembly
Instructions
.........
.............
2
2
Canister Care ......................
Bag Changing .....................
Cleaning Exterior and Attachments .....
Motor Safety Filter Changing ..........
Exhaust Filter Changing ..............
3
4.5
6-7
Power.Mate
use
................................
B
How to Start ........................
How Your Vacuum Works
............
9
9
10
10
11
° Care
12
13
13
14
..................
14
Light Bulb Changing .................
15
Belt Changing and Brush Cleaning .,. 15-16
Agitator Servicing ...................
17
8
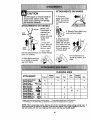
Vacuuming Tips .....................
Suggested Pile Height Settings .........
Attachments .......................
Attachment Use Chart ...............
Performance Features ...............
12
Troubleshooting
Requesting
Or Service
....................
Assistance
..................
18
Back Cover
12
Please read this guide. It will help you assemble
the safest and most effective way.
and operate your new Kenmore vacuum in
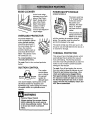
For more information about vacuum cleaner care and operation, call your nearest Sears store.
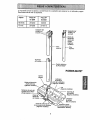
You will need the complete model and serial numbers when requesting information. Your vacuum's model and serial numbers are located on the Model and Serial Number Plate.
Use the space below to record the model number and serial number of your new Kenmore
vacuum,
Model No.
Serial No.
Date of Purchase
Keep this book and your sales check (receipt) in a safe place for future reference.
LIMITED ONEYEAR
WARRANTY
ON KENMORE
VACUUM CLEANER
This warranty is for one year from the date of purchase, and includes only private household
vacuum cleaner use. During the warranty year, when this vacuum cleaner is operated and
maintained according to the owner's manual instructions, Sears will repair any defects in
material or workmanship free of charge.
This warranty excludes vacuum bags, belts, light bulbs, and filters, which are expendable
and become worn during normal use.
For warranty service,
the United States.
parts
return this vacuum cleaner to the nearest Sears Service Center in
This warrantyapplies only while this productis in use in the United States. This warranty gives
you specific legal rights, and you may also have other rights which vary from state to state.
Sears, Roebuck and Co., D/817 WA, Hoffman Estates, IL 60179
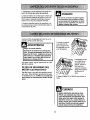
Yoursafety is importantto us.To reduce the risk of fire, electrical shock, injury
to persons or damagewhen using your vacuumcleaner,follow basic safety precautions including the following:
Read this manual before assembling or
usingyourvacuumcleaner.
Use your cleaner only as described in this
manual. Use only with Sears recommended
attachments.
Do not put any objects into openings.
Do not operate the cleaner with a punctured hose. The hose contains electrical
wires. Replace if cut or worn. Avoid picking
up sharp objects.
To reduce the risk of electrical shock - Do
not use outdoors or on wet surfaces.
Do not use with any opening blocked; keep
free of dust, lint, hair and anything that may
reduce air flow.
Disconnect electrical supply before servicing or cleaning out brush area. Failure to
do so could result in electrical shock or
brush suddenly starting.
Keep hair, loose clothing, fingers, and all
parts of body away from openings and moving parts.
Always turn off and unplug the cleaner
before connecting or disconnecting either
hose, Handi-Mate Jr.® (if applicable) or
nozzle.
Always turn cleaner off before unplugging.
Do not unplug by pulling on cord. To
unplug, grasp the plug, not the cord.
Hold plug when rewinding onto cord reel.
Do not allow plug to whip when rewinding.
Do not use with damaged cord or plug. If
cleaner is not working as it should, has
been dropped, damaged, left outdoors, or
dropped into water, return it to a Sears
Service Center.
Do not
handle,
around
cleaner
heated
pull or carry by cord, use cord as a
close door on cord, or pull cord
sharp edges or corners. Do not run
over cord. Keep cord away from
surfaces.
Do not leave cleaner when plugged in.
Unplug from outlet when not in use and
before servicing.
Do not allow to be used as a toy. Close
attention is necessary when used by or
near children.
Do not handle plug or cleaner with wet
hands.
Do not use cleaner withoutdust bag and/or
filters in place.
Always change the dust bag after vacuuming carpet cleaners or freshener, powders
and fine dust. These products clog the bag,
reduce airflow and can cause the bag to
burst. Failure to change bag, could cause
permanent damage to the cleaner.
Do not use the cleaner to pick up sharp
hard objects, small toys, pins, paper clips,
etc. They may damage the cleaner or dust
bag.
Do not pick up anything that is burning or
smoking, such as cigarettes, matches, or
hot ashes.
Do not use cleaner to pick up flammable or
combustible liquids (gasoline, cleaning fluids, perfumes, etc.), or use in areas where
they may be present. The fumes from these
substances can create a fire hazard or
explosion.
Use extra care when cleaning on stairs. Do
not put on chairs, tables, etc. Keep on floor.
You are responsible for making sure that
your vacuum cleaner is not used by anyone
unable to operate it properly.
Do not operate without exhaust
exhaust filter cover installed.
filter or
SAVE THESE INSTRUCTIONS
Proper assembly and safe use of your vacuum cleaner are your responsibilities. Your cleaner
is intended only for household use. Read this Owner's Manual carefully for important use and
safety information. This guide contains safety statements under warning and caution symbols.
Please pay special attention to these boxes and follow any instructions given. WARNING
statements alert you to such dangers as fire, electrical shock, burns and personal injury. CAU.
TION statements alert you to such dan,qers as personal inlurY and/or propertydama,qe.
3
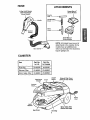
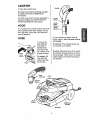
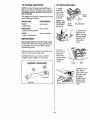
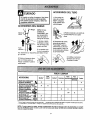
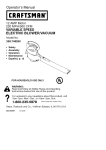
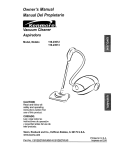
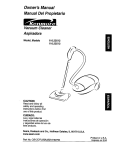
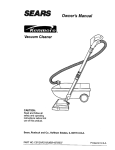
It is important to know your vacuum cleaner's
use. Review these before using your cleaner,
Item
Part No.
In U.S.
Part No.
In Canada
Headlight Bulb
20-5240
596181
Belt
20-5285
20-401 f 0
parts and features to assure its proper and safe
Cord and
Plug
Holder
Cord and
Cord Holder
Upper
Wand
Holder
-Cord
Power*Mate _
Power Cord
POWER-MATE®
Belt
(Underneath
Cord _
Holder
\
Headlight and Lens
(Some Models)
Power-Mate*
ModeYSerial Numbers
(on
Light Cover
(Some Models)
(Not Shown)
Hand_
Re_ase
Pedal
(Reset Button)
(Some
Pile Height Indicator
(Some Models)
Models)
4
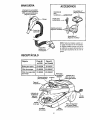
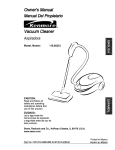
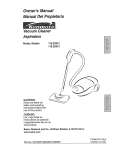
HOSE
ATTACHMENTS
Power_Mate Jr.®
(Some Models)
2.Way On/Off Switch
Bare Floor/Carpet
(Some Models)
Crevice
Tool
Combination
Brush
Handle
Floor
Brush
Handi.Mate Jr.6
(Some Models)
NOTE: All models have one set of
attachments in the canister. Some
models have an additional set,
which can be kept in the accessory
bag for garage use.
CANISTER
Item
Part No.
In U.S.
Part No.
In Canada
Dust Bag
20-50558
20-50555
Exhaust Filter
20-86880
20-86880C
Motor Safey Filter
20-86883
20-86883C
Attachment
Storage
Cover
On/Off
Switch
Exhaust Filter Cover
(Exhaust Filter Inside)
Canister
Power
Cord
Hood
Release
Motor Safety Filter
(Behind Dust Bag)
Bag
Dust Bag
5
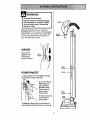
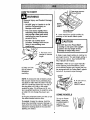
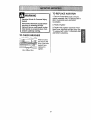
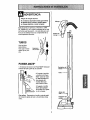
Electrical
Shock Hazard
DO NOT plug into electrical supply
until assembly is complete. Failure
to do so could result in electrical
Handle
shock or injury.
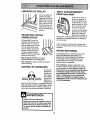
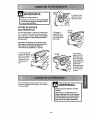
Before assembling vacuum, check the
PACKING LIST on the cover of the separate
Repair Parts List. Use this list to verify that
you have received all the components of
your new Kenmore vacuum.
Handle
WANDS
Slide wands
together until
wand button
snaps into place.
Holder_
/
/
POWER-MATE ®
1, Insert wands into Power-Mate" until the
wand buttons snaps into place.
2. Connect
Raised
.
_,
Power-
Mate_plug and
cord as shown.
DO NOT force.
Raised area of
plug must be
toward hand.
3. Secure cord into
cord holder on
wand swivel.
To remove: Disconnect cord and step on
wand release pedal, then pull up on wands,
6
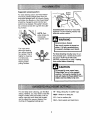
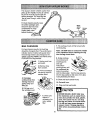
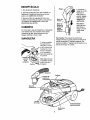
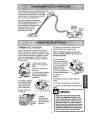
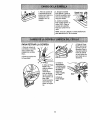
CANISTER
1. Open the canister hood.
2. Check to see that the dust bag is properly installed. See BAG CHANGING for
instructions.
3. Check to see that the motor safety filter is
properly installed. See MOTOR SAFETY
FILTER CLEANING for instructions.
Handle
BB
Handle
Qu_k
HOOD
Re_ase
_ome
It is normal for the canister hood to come off
when opened further than needed. Line up
the I_inge slots, insert them, and close the
hood to replace it.
2. Insert handle into wand until lock
HOSE
button snaps in place. Be sure hose is
not twisted.
1. Line up the
hose latch tab
and notch in
canister hood
and insert hose
into canister until
To remove: Press handle release button and pull up on handle.
To store: Disconnect
it snaps in place.
Latch
hose from wands
and canister to prevent stress on hose
during storage. Store hose in a loosely
coiled position so the hose covering is
not stressed.
To remove: Lift
hose latch tab
upward and pull
up on hose.
Notch
Hose
_._
Hose
Latch Tab
Cover
Hood
Re_ase
Attachment
Storage
Dust Bag
7
HOW TO START
!
Pile Height Indicator
WARNING
Personal
Hazard
Injury and Product
Damage
• DO NOT plug in if switch is in ON
position. Personal injury or
damage could result.
• The cord moves rapidly when
rewinding. Keep children away
and provide a clear path when
rewinding the cord to prevent
personal injury.
DO NOT use outlets above
counters. Damage from cord to
items in surrounding area
could occur.
1. Pull cord out of
canister to desired
length.
2. Snap cord into
grip to prevent
accidental
rewinding.
Handle
Release
Pedai
Pile Height Pedal
(Some Models)
4. Lower wand from upright position by
pressing on the handle release pedal.
1
CAUTION
DO NOT leave the Power-Mate *
running in one spot in the upright
position for any length of time.
Damage to carpet may occur.
5. Select a pile height setting by rotating the
pile height control. The pile height setting is
shown on the control. See SUGGESTED
PILE HEIGHT SETTINGS.
Attention:
Refer to your carpet manufacturers cleaning recommendations.
Some
more delicate carpets may require that they
be vacuumed with the Power-Mate * agitator
turned off, to prevent carpet damage.
ON/OFF
NOTE: To reduce the risk of electric shock,
this vacuum cleaner has a polarized plug;
one blade is wider than the other. This plug
will fit in a polarized outlet only one way. If
the plug does not fit fully in the outlet,
reverse the plug. If it still does not fit, contact a qualified electrician to install the proper outlet. Do not change the plug in any
way.
3. Plug the polarized power cord into a 120
Volt outlet located near the floor.
To rewind: Unplug the cleaner. Hold the
plug while rewinding to prevent damage or
injury from the moving cord. A slight tug will
release the locking pawls in the cord reel
allowing it to retract.
6. To turn unit on,
step on the
ON/OFF switch.
SOME MODELS
TO turn on PowerMate", move the
FLOOR/CARP ET
switch to the
CARPET
position.
[ FLOOI
I CA_PE
Suggested
sweeping
pattern.
Suction
Control
For best cleaning action, the Power-Mate"
should be pushed straight away from you
and pulled straight back. At the end of each
pull stroke, the direction of the Power-Mate *
should be changed to point into the next
section to be cleaned. This pattern should
be continued across the rug with slow, gliding motions.
\\
Carpeted stairs need to be vacuumed
regularly. For best cleaning results, fully
close the suction control.
NOTE: Fast,
jerky strokes do
not provide
complete cleaning.
WARNING
Personal Injury Hazard
Use care if canister is placed on
stairs, If it falls, personal injury
or property damage could result,
The hose swivel
allows the hose to
turn without moving
the canister. This is
For best cleaning results, keep the airflow passage open. Cheok each assembly area in HOW YOUR VACUUM
WORKS occasionally for clogs. Unplug
from outlet before checking.
helpful for cleaning
in small areas.
Check hose for
twisting before
pulling canister.
CAUTION
To prevent tip over, never leave
Power-Mate e on or in the upright
position.Turning
the handle to one
side will make the Power-Mate ° more
stable and less likely to tip over.
HI - Shag, deep pile, or scatter rugs.
For best deep down cleaning, use the XLO
setting. However, you may need to raise the
height to make some jobs easier, such as
scatter rugs and some deep pile carpets,
and to prevent the vacuum cleaner from
shutting off. Suggested settings are:
MED - Medium to deep pile.
LO - Low to medium pile,
XLO - Most carpets and bare floors.
9
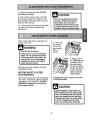
ATTACHMENTS ON WANDS
!
CAUTION
1. To remove
wands from PowerMate`*, lock wands
DO NOT attach or remove handle or
wands while cleaner is ON. This
could cause sparking and damage
the electrical contacts.
ATTACHMENTS
in straight-up
tion.
' ,,:;:'
posi-
ON HANDLE
NOTE: If the
Power-Mate s is
2. Remove Power-Mate e plug
and cord from holders.
attached, turn
cleaner off
Lock
Button
before removing
handle from
wands.
3. Disconnect
i
button, then pull
to remove handie from wand.
I
If your model
has the optional feature of a handle release,
press it in similarly.
2. Slide attachments firmly on handle as needed.
See chart below.
cord
and steady PowerMate '_ with foot and
turn wands until lock
button disappears,
then pull wands out
of Power-Mate *.
1. Press lock
"
'==
Upper
II
A
t
==
4. Put attachment on
wands as needed. See
chart.
__
CLEANING AREA
Between
ATTACHMENT
Furniture"
Cushions*
Combination
Brush
(Some
Models)
Crevice Tool
(Some Models)
_
&
X
X
Stairs
X
X
Bare
Floors
Carpeted
Floors/Rug_
Walls
X
x
Floor Brush
(Some Models)
Power-Mate`*
(Some Models)
Handi.Mate Jr.'*
(Some Models)***
Power-Mate Jr. ®
(Some Models)***
Drapes*
x
x
x**
_
X
x
4_i
X
x
x
x
"Alwaysclean attachmentsbefore usingon fabrics, ** 2-way switchshouldbe in FLOOR position.
Handi-Mate Jr. and Power-Mate Jr. attachmentinstructionsare includedwith the products,
NOTE: When separat!ng wands, depress lock button completely before pullingwands
apart. If
wand Io_ outton is airricul! to aepress_ push the two wanas more tightly togemer to line up
the lock outton with the no_e. uepress lock button and then pull wanas apart.
lO
EDGE CLEANER
POWER-MATE®STORAGE
SOME
Active brush edge
cleaners are on both
sides of the PowerMate". Guide either
side of the Power-
The lower wand has
a "U" shaped flange
in the area where
the power cord
attaches. The base
Mate s along baseboards or next to
has a "U" shaped
slot near the front
caster,
furniture to help
remove dirt trapped at
carpet edges.
The slot allows the
wands and PowerMate _ to be stored
OVERLOAD PROTECTOR
The Power-Mate ®has
with the canister to conserve storage
space. The canister must be stored on
end for this feature to be used.
built-in protection against
motor and belt damage
should the brush jam. If
the brush slows down or
The wand will slip out of the slot as it is lifted up for use and will slide into the slot as it
is lowered for storage.
stops, the overload
protector button pops up
and shuts off the PowerMate _. The canister motor
will continue to run,
THERMAL PROTECTOR
This vacuum has a thermal protector which
automatically trips to protect the vacuum
from overheating. The thermal protector
turns the motor off automatically to allow the
motor to cool in order to prevent possible
damage to the vacuum.
To correct problem: See
TROUBLESHOOTING,
To reset; Push in the overload protector
button.
SUCTION CONTROL
To reset: Turn off and unplug the vacuum
from the outlet to allow the vacuum to cool.
The suction
control allows
Check for and remove any clogs. Also
check and replace any clogged filters.
Wait approximately
50 minutes and plug
the vacuum in and turn back on to see if
the thermal protector
has reset. In some
cases, the unit may suddenly restart. DO
NOT leave unattended.
you to change
the vacuum
Suction
_Suction
MODELS
suction for
different fabric
and carpet weights. Opening the control
decreases suction for draperies and
lightweight rugs, while closing the control
increases suction for upholsteries and
carpets.
Personal Injury Hazard
Always unplug the vacuum cleaner
before cleaning the brush area as
brush may suddenly restart. Failure
to do so can result in personal
injury.
11
The vacuum cleaner creates suction that
picks up dirt. Rapidly moving air carries
the dirt to the dust bag through the
/./F_=:::_
airflow passages. The dust bag lets
_
the air pass through, while it traps
_'_
the dirt.
For best cleaning
///
_,_,/7"
results, keep
,
/
It
the airflow passage open.
_,7
Check the starred areas
_
occasionally for clogs.
M
Unplug from outlet
_
before checkin_
t
tl
Motor
I_
\
Safety
Filter
Exhaus
_"
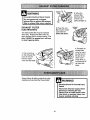
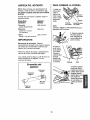
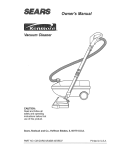
BAG CHANGING
7. The red bag mount will flip forward after
removing bag.
For best cleaning results, the dust bag
should be changed often. The performance
indicator (some models) will specify when
the dust bag needs to be changed or the
airflow is blocked. NOTE: See PARTS AND
FEATURES
_'
Note:
DO NOT bend or crease the middle
of the cardboard when installing the bag
into the bag mount slots.
8. Rotate red bag
mount down and
for Bag Number.
1. Unplug cord from
wall outlet.
install bag into
slots per
instructions
,...
pushing down until
the cardboard tab
_.
locks into position
and the holes align. Tuck the bag securely
into the bag cavity so that none of it is able
to be pinched by the hood.
2. Remove hose
from canister.
3. Pull hood release
out and up, then lift
canister hood.
4. Disengage
cardboard tab from
9. Close and latch canister hood.
red bag mount by
pulling away and
lifting up.
10. Reinstall
hose.
11. Plug cord into wall outlet.
5. Pull bag out of
the red bag mount.
NEVER REUSE A DUST BAG. Very
fine materials, such as carpet freshener, face powder, fine dust, plaster,
soot, new carpet lint, etc. can clog
the bag and cause it to burst before
it is full and may cause damage to
vacuum motor. Change bag more
often when vacuuming these materials.
6. Check and
Motor
Safety
ted Bag
Mount
replace, if
necessary, the
motor safety
filter.
12
1. Unplug cord from wail outlet. DO NOT
drip water on cleaner.
•
2. Clean exterior using a clean, soft cloth
that has been dipped in a solution of mild
liquid detergent and water, then wrung dry.
Wipe dry after cleaning.
Do not use attachments if they
are wet. Attachments used in
dirty areas, such as under a
refrigerator, should not be used
on other surfaces until they are
washed. They could leave marks.
3. To reduce static electricity and dust buildup, wipe outer surface of cleaner and
attachments.
Check motor safety filter occasionally and
change when dirty.
Electrical
CAUTION
1. Lift the rubber retainer
and pull out
motor safety
filter as
Shown.
Shock Hazard
Unplug power cord from electrical
outlet. Do not operate the cleaner
without the motor safety filter. Be
sure the filter is dry and properly
installed to prevent motor failure
and/or electrical shock.
2. Replace the filter, white side out,
by sliding it back
into place under
the ribs in the bag
cavity. Tuck filter in
so that it fits com-
Remove the bag as outlined in the BAG
CHANGING section.
pletely under the
rubber retainer.
MOTOR SAFETY FILTER
ELECTROSTATIC
3. Replace the bag as outlined
CHANGING section.
This white and grey filter must be replaced
when dirty. It should be replaced regularly
depending on use conditions. The filter
CANNOT be washed as it will lose its
dust trapping ability.
in the BAG
NEVER REUSE A DUST BAG. Very
fine materials, such as carpet freshener, face powder, fine dust, plaster,
soot, new carpet lint, etc. can clog
the bag and cause it to burst before
it is full. Change bag more often
when vacuuming these materials.
13
Exhaust_
Filter
WARNING
Fire and/or Electrical
2. When the
exhaust filter
Shock Hazard
becomes dirty,
remove it by
pulling straight up.
Do not operate with a clogged
exhaust filter or without the exhaust
filter or exhaust filter cover installed.
EXHAUST FILTER
ELECTROSTATIC
3. Place the new
filter into the motor
cover with the
white side down.
The electrostatic filter must be replaced
when dirty. Replace the filter when the
entire surface area is covered evenly. The
filter CANNOT be washed as it will lose
its dust trapping
Exhaust
ability.
Tab
_,,
Slot
1. Pull out and up
on the exhaust filter
cover to remove
from the motor
cover and lay aside.
')
4. Reinstall the
exhaust filter
cover by inserting the tab into
the slot in the
motor cover.
Press firmly to
snap exhaust illter cover into
place.
Always follow all safety precautions when
cleaning and servicing the Power-Mate ®.
Electrical
Hazard
Shock Or Personal Injury
Disconnect electrical supply before
servicing or cleaning the unit.
Failure to do so could result in electrical shock or personal injury from
cleaner suddenly starting.
14
1. Remove light
cover by pressing
in and lifting both
sides as shown.
Push In
And Turn
_"'JJ_
2. Push in and turn
bulb counterclockwise to remove.
3. Replace the bulb.
Bulb must not be
higher than 15 Watts
(130V). Close light
cover until it snaps in
place.
NOTE: See PARTS AND FEATURES
Bulb #.
TO REMOVE BELT
for
4. Turn PowerMate ® right side
up. Press handle
release pedal and
lower the swivel.
Rotate cover
-,forward from back
1. Remove light cover
and light bulb as shown
under LIGHT BULB
CHANGING.
2. Unscrew the PowerMate s cover screws.
until front snaps
free.
5. Carefully
insert and lift
screwdriver at
each brush
3. Turn PowerMate _ over. To
remove cover,
insert screwdriver
between nozzle
cover tab and the
support to
free brush
from base.
base. Pry up to
release tabs.
6. Remove
worn 15elt.
15
Suppo_
TO CLEAN AGITATOR:
TO REPLACE BELT
NOTE: In order to keep cleaning efficiency
high and to prevent damage to your vacuum,
the agitator must be cleaned every time th_
belt is changed.
1. Install
new belt
over motor
drive, then
over brush
sprocket.
The agitator must also be cleaned
to the following schedule:
according
Vf_¢uum Use
Clean A aitatqr
HEAVY
every week
-
NOTE: See
PARTS AND
FEATURES
for Belt #.
(used daily)
MODERATE
-
D_ve
Brush
Brush
Suppo_
Brush Sprocket
every month
(used 2-3 times/week)
LIGHT -
2. Snap brush
supports into
place on base.
Be sure brush
every 2 months
(used 1 time/week)
supports are
not upsidedown.
IMPORTANT
Disconnect cleaner from electrical outlet.
Check and remove hair, string and lint buildup frequently in the Power_Mate _ agitator
and end cap areas.
3, Line up
front of cover
and base.
Rest cover
Remove any dirt or debris in the belt path
area or in the brush roller area.
Carefully remove any string or debris
located on the agitator, or end caps.
on front edge
of base as
shown.
Agitator Assembly
Cover
Base
BeR
Pulley
4. Rotate cover
back. Press
cover firmly until
side tabs snap
into place.
Replace cover
screws, light
bulb and light
cover.
Brush
16
iiiiiiiiiiiiiiii
i iiiiiiiiiii iiiiii!i
iiii!iiiiiiiiiiii
iiiiiliiii!iii
iiiiii!
iiiiiiiii!ii iiiiill
iiiiili
!:,.,_:.::::::
::::
_:::;.
;_:,,.,_.:.:::::::::::
::-
:::; ........
::>:_
:;::_,::
:
_._
i
:_:
! @ii i i i l@ l i
_ _._._._:_,._
_.
9:::
,.
_::-_
iill ii @iil
,,.,:.
.: ;,,,_;:::.:::::_:;;;_:
:::
...........
TO REPLACE AGITATOR
Electrical
Hazard
Shock Or Personal
1. Remove Power-Mate • cover, belt and
agitator assembly, See "To Remove Bell" in
BELT CHANGING AND AGITATOR
CLEANING.
Injury
Disconnect electrical supply before
servicing or cleaning the unit.
Failure to do so could result in elec-
2. Replace Agitator
3. Replace belt, agitator assembly. PowerMate®cover, light bulb and light cover. See
"To replace belt" in BELT CHANGING AND
AGITATOR CLEANING.
trical shock or personal injury from
cleaner suddenly starting.
TO CHECK BRUSHES
When brushes
are worn to the
level of the base
support bars,
replace the
agitator.
17
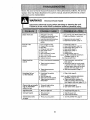
I
Review this chart to find do-it-yourself solutions for minor performance problems. Any service
needed, other than those described in this owner's manual, should be performed by a Sears
authorized
!
service
representative.
@
Cleaner won't start.
PoorJobof dirt
pick-up.
Cleaner starts but
cuts off,
Power-Mate_will not
run when attached.
1. Unpluggedat wal[out(eL
2, Tripped circuit breaker/blownfuse
at household service panel.
3. Loose hoseeleclrical connections.
4, Tripped thermal protectorin
canister,
1.
2.
3.
4.
5.
6.
7.
Fufior cloggeddust bag,
Clogged airflow passages.
Dirty filters.
Wrong pile height setting.
Open suction co_treL
Hole in hose,
Worn Power-Mate_brushes.
6.
Worn or broken belt.
9. Dirty brush or brush supports.
tO. Canister hood open.
1,
Hose or hood electrical connections.
2.
Tripped overload protector in
Power,Mate_.
3.
Trippedthermal protector
in canister,
1. Power-MaW'connections
unplugged.
2. Wornor broken belt,
3. Dirty brush or brush supports.
4. Tripped overload protectorin
Power-MateTM
1. P{ug in firmly,push ONIOFF switchto ON.
2. Reset circuitbreaker or replacefuse.
3, Reconnecthose ends, (page7).
4. Reset thermal protector,(page 11),
1,
2.
3.
4.
5,
6.
7,
8 & 9.
Changebag, (page 12),
Clear airflow passages,(page 12),
Cleanibhangefilters. (page 13, 14).
Adjust setting, (page9).
Adjustcontrol,(page 11).
Replacehose.
Change brushes. (page 17).
See BELT CHANGING AND BRUSH
CLEANING, (pages 15, 16),
10, Close and latch hood.
1. Check connections,reconnect hose
ends,(page 7).
2. Remove any items thatmay be caught
or jammed, thenreset. If cleanerstarts
and stops again, clean brush and brush
supports,then reset,(pages 15.16).
3. Reset thermal protector,(page 11).
1. Plug in firmly,(page 6).
2 & 3. See BELTCHANGINGAND BRUSH
CLEANING, (pages15, 16),
4. Check brush area for excessivelint
build-uporjamming.Clean brushand
brushsupports,then reset, (pages 15, 16).
Cleaner picks up moveable
rugs ..or-Power-Mate"
)ushee too bard.
1. Wrong pile height setting,
2. Suction tooslreng.
1. Adjustsetting,(pageg),
2. Open suctioncontrol,(page 11),
Lightwon't work.
1. Burnedout light bulb,
1, Changelightbulb.(page 15).
Cord won't rewind.
1. Dirty power cord.
2. Cord jammed.
1. Clean the powercord.
2, Pulloutcordandrewind.
Cleanerleaves marks
on carpel
1. Wrongvacuumingpatlern,
1. SeeVACUUMINGTIPS, (page9)
18
Antes de usar su aspiradora
.....
1
Garantia de la aspiradora de Kenmore,,.
Instrucciones importantes de
seguridad ............................
nueva
1
Piezas y caracterfsticas
..............
Instrucciones de ensemblado .........
USO
..................................
2
3-4
5-6
7
Paracomenzar .......................
7
Sugerencias para aspirar ...............
Sugerencias sobre el ajuste de nivel de
pelo de la alfombra ....................
Accesorios ...........................
Uso de los accesorios ..................
Caracteristicas de rendimiento ...........
8
Funcionamiento
de su aspiradora ......
8
9
9
10
Cuidado del receptdculo
..............
Cambio de la bolsa ...................
11
11
Limpieza del exterior y de los accesorios .., 12
Cambio del filtro de seguridad del motor ... 12
Cambio del filtro de escape .............
13
Cuidado de la Power-Mate ° ............
Cambto de la bombilla .................
Cambio de la correay limpieza
del cepillo ........................
Cuidado del agitador ..................
Reconocimiento
Informaci6n de
13
14
14-15
16
de problemas .........
assistancia o servicio
.....
17
PosteriorCubierta
11
Por favor lea esta guia que le ayudara a assemblar y operar su aspiradora nueva de Kenmore en una manera
m_.ssegura y effectiva
Para mas informaci6n acerca del cuidadoy operaci6n de esta aspirador, Ilame a su tiendaSears mas cercana.
Cuando prequnte pot informaci6n usted ne¢isitard el n_mero completo de serie y modelo de la aspiradora que
est& rocadoen la placa de los ndmeros de modelo y serie.
Use el espacio de abajo para registrar el nSmero de modelo y serie para su nueva aspiradora de Kenmore.
N0mero de Modelo_
N0mero de Serie
Fecha de Compra
Matenga este libro y su recibo en u lugar seguropara referenciasfuturas.
GARANTIA tlMITADA DE UN ANO DE LA ASPIRADORA KENMORE
Esta garantia es por un aSo desde la fecha de compra, e incluyesolamente el usode la aspiradora en
hogares privados.Durante el aSo de garantia, cuando la aspiradora es operada y mantenida de acuerdo al
manual de instrucciones del dueSo,Sears reparard cualquier defecto en materiales o fabricaci6n tibre de cargo.
Esta garantia excluye las bolsas de colecci6n, correas, lamparillas, y filtros, las cualesson partes gastables que
se deterioran con e/uso normal.
Para el servicio de garant(a, retorne esta aspiradora al Centro de Servicio Sears rods cercano en los
Estados Unidos.
Esta garantia se aplica solamente mientras este productoesta en uso en los Estados UnJdos.Esta garantfale
da a usted derechos legales especificos, y usted puede tener tambi_n otros derechos los cuales varfan de
estado a estado.
Sears, Roebuck and Co., D/817 WA, Hoffman Estates, IL 60179
ADVERTENCIA
bdsicas
de
seguridad,
entrer_antoe
elias:
igor
iideasdi
6escorUpYdrmlPo°
sp_rati_i°z_S°t
rs°SasPparra
_erdaUC_rcte_ri_:
g° udeer
_nc_ndni
p;e_ha_ nes
Lea este manualantes de armar o utilizar su aspiraNo usela aspiradorasi Is mangueraest_ rota.La
dora.
mangueracontiene alambres eleclricos.Cambielasi
esta rotao desgastada.Evite aspirarobjetos
Use su aspiradora0nicamenteen la forma descrita
en este manual.Use 0nicamentecon acceaorios
agudos.
recomendados
per Sears,
No coloqueobjetos en las aberturas.
Para reducirel riesgo de cheque el_ctrico, no use
No utilice la aspiradorasi alguna aberturaest_ blosu aspiradoraal aire libre ni sobre superficies mojaqueada;rnant_ngalalibre de polvo, pelusa,cabelles
das.
y cualquieracosa que podria disminuirel flujo de
Descoeecte el cord6n electricoantes de composer
airs.
o limpiarel &tea del cepillo. De ]o contrario,el cepillo
Mantengael cabello, ropasuella, dedos y todas las
_odrfaarrancarde form imprevista o podrfa
partes del cuerpo alejadosde las aberturas y 10iezas
producirseun chequeelectrico.
mecanicas.
Siempreapagu_ y desconectela aspiradoraantes
No use la aspiradorasin tener instatadala bolsa
de conectaro desconectarla rnanguera,Handi-Mate
para polvoy/o losfiltros.
Jr.® (si aplicable),o la boquilla,
Cambiesiempre la bolsa para polvodespu6s de
aspirar limpiadoresde alfombraso desedorantes,
talcos y pelvesfines.Estos productosatascanla
bolsa, reducenel flujo de aire y pueden causar que
6sta se rompa.Si no cambia la bolsa podria ocasionar daSo permanentsa la aspiradora.
Siempredebe apagar su aspiradoraantes de desconectarla.
No desconecte la aspiradoratirando del cordon
el_ctrieo.Para desconectarla>hale el enchufe,no el
cord6n,
Sujete el enchufecon la mane al enrollar el cord6n
_l_ctrico.Para desconectada,hale en enchufe,no et
cord6n.
No use la aspiradorapara levantarobjetos agudos,
juguetes pequehos>affileres,sujetapapeles,etc.
PoddandaSarla aspiradorao la bolsa parapolvo.
No levante ningunacosa qua se est_ quemandoo
emitiendo humo.come cigarrillos,cerilloso cenizas
catientes.
No use la aspiradorasi el cord6no el enchufeest,.
dahado.Si la aspiradorano esta funcionandoadecuadamenteo si se ha dejado caer, est_ daRada,se
ha dejado expuestaa la intemperie o se ha dejado
caer en agua, devu61valaa un Centre de servicio de
Sears.
No use la aspiradorapara aspirar liquidosinflamahies o combustibles(gasolina,tiquidos paralimpieza, perfumes,etc.) ni la use en lugares donde
_stospodrianestar presentes.Los vaporesde estas
sustanciaspuedencrear un peligro de incendioo
explosi6n.
Tenga cuidadoespecial al utitizarla aspiradoraen
escalones.No la coloqae sobre sUlas,mesas,etc.
Mant_ngalaen el piso.
NOhale ni transports la aspiradoraper el cord6n; no
use el cord6ncome mango;no cierre puertas sobre
el cord6n; no hale el cord6n sobre rebordes agudos
ni esquinas.No pase la aspiradorasobre el cord6n.
Mantengael cord6n ale[ado de superficiescalientes.
No abandone la aspiradoracuandoeste conectada.
Desconectelacuandono la est_ usando y antes de
darle servicio.
Usted es responsablsde asegurarque su aspiradora no sea utilizadaper ninguna personaque no
pueda manejarla correctamente.
No permita quesea utilizadacome juguete.Se
requieretener mayorcuidadocuandosea utilizada
en la proximidad
de niSoso per niSos.
No toque la aspiradorani el enehufecon las manes
mojadas.
No opere sin el filtro de escape ni la cubierta del ilttro de escape instalados.
GUARDE ESTAS INSTRUCClONES
El armado y use seguro de su aspiradora son su reeponsabilidad. Esta aspiradora ha side disefiada
exclusivamente para use dom_stico. La aspiradora deber8almacenarse en un lugar secoyen el interior.
Lea este Manual del propietario detenidamente, pues contiene informaci6n importante sobre seguridad y
use. Esta quia contiene inlormaci6n sobre seguridad debajo de simbolos de advertiencia cuidado. Per
favor ponga atenci6n especial a estas instrucciones dadas. Advertencla: Este informacibn le alertar_,con
el poligro de fuego, cheques electricos, quemadas y lesiones. Culdado: Este informaci6nle alertara a
peli_ros come lesiones y daSosde propiedad.
2
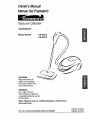
Es importante conocer las piezas y caracter_sticasde su aspiradora para asegurar su uso adecuado y seguro.
Exam{nelas antes de usar su aspiradora.
Objeto
Pieza N_
en EUA
Pieza Ng
Canad_
Bombilla
20-5240
596181
Correa
20-5285
20-40110
Sujetador del
cord6n y el
I-'- Sujetador del
cord6n y el
enchufe
r
--Bot6nde
I_era_6n
rdpida del
mango
(Algunos
mode_
Tubo
supeHor
_Tubo
supeHor
o
Sujetador
del cordon
Cord6n el_ctrico
de Power-Mate _
POWER-MATE®
Correa
(Abajo)
\
Pedal
de Iiberacl6n
Indicador
_,
rapida del tubo
(Aigunos
de nivel de
pelo
de- la alfombra
..,
_ . .
_._
modelos)
,
(Algunos
..,_'*_,_
mooelos)
//
{Algunos
N_meros
de aerie de/
p,,_
modeio
eowe,-Mate
° _._'_/J
(Parle
inferior)
"J_"
del mango
-._._'_
_
_)
F" _ /
"_1 (',_ I
,
_/._
_./_
_,_
", _ .=
_
/'_/_
_.._,_//_"
edal de selecci6n de
• P dal de a lecci6n de _J'_-J/D,
ravel de pelo de le alfombra -- _
(Algunos modelos)
3
modeloa)
c.bie._de
la bombilla
/.__./ Limpiador
,Jeor,laa
"
Hrotec_or
con_ra
_obrecargas
(Botbn de
restauraci6n
"Reset")
MANGUERA
ACCESORIOS
Interruptor de encendido/
apagado de dos poslciones
(Piso expuesto/Affombra)
(Algunos modelos)
Power-Mate Jr._'
(Algunos modelos)
Herramienta
Cepfllo para
_
combinaci6n ._,_.-
_
Cepilloparapisos
'Algunos modetos)--_-_
.._'_
_
_
Handi-Mat _Jr."
(Algunos modelos)
NOTA:Todoslos modeios cuentan con
un juego de accesorios en el receptdcuIo, Algunos modelos cuentan con un iuego adicional que puede almacenarse en
la bolsa para accesorios de uso e en el
garaje.
DisposiUvo
giratoriode
lamanguera
RECEPT. CULO
Objecto
Piezal_P.
en EUA
PiezaN _.
en Canadd
Bolsa para polvo
20-50558
20-50555
Filtro de escape
20-86880
20-86880C
Filtro de seguridad
del motor
20-86883
20-86883C
Almacenamlen_
para accesorios
Intertluptor
de encendldo/
apaga do
Cubie_a
Cubierta
de la
filtro de escape
(Filtro est_ dentro)
Tapa del
recept_culo
Indicador de
rendimiento
(algunoa
modelos)
Cordbn
eldctrtco
Pestlllo
de la tapa
Filtro de segurldad
de/motor
(Detr_s
de la bolsa para polvo)
Boise
para polvo
Sujetador
de la bolsa
4
ADVERTENCIA
Peligrode choque el_ctrico
No conecte la aspiradora hasta que termine
de armada. De Io contrario podria causar
un choque eldctrico o lesi6n corporal.
Antes de armar la aspiradora, chequee la LISTA
DE EMBALAJE en la cubierta separada de la Lista
de Partes para Reparaci6n. Use esta lista para verificar que ha recibido todas las componentes de su
nueva aspiradora Kenmore.
Vi
TUBOS
Una los tubos
desliz_ndolos
hasta que el botbn
quecle fijo en posici6n
B°a_;
od!Mango-__
Sujetador
del cord_n_!
POWER-MATE®
1. Introduzca los tubos en la Power-Mate" hasta que
el bot6n del tubo quede fijo en posici6n.
• Area
elevada
hacla ¢lentro_"
2. Conecte el enchufe
y cord6n de la PowerMate': como se muestra. NO LO fuerce. El
_rea elevada del
enchufe tiene que
estar hacia la mano.
3. Assgureel cord6n
dentro del sujetador
del cord6nen el giratorio de la mango.
Para retlrar: Desconecte el cordbn y pise el pedal
de liberaci6nr_pidadel tubo y tire del tubos hacia
arriba.
SuJetadordel
cord6n
Tubo
Bot6n del
tubo
SuJetadorde/
cord6n _
RECEPTACULO
1. Abra la tapa del recept_culo.
2. Examinela bolsa pare polvo este instalado correctamante.Consulte las instrucciones de instalaciSnen la CAMBIO DE LA BOLSA.
3. Examine el filtro de seguridad del motor este
instalado correctamante. Consulte las instrucciones
de instalaci6n en LIMPIEZA DEL FILTRO DE
SEGURIDADDF:LMOTOR.
Bot6n de/
Bot6n de
llberacibn
r_pida del
mango
(Algunos
CUBIERTA
Es normalque la tapa del recept_.culose desprenda
al ser abierta mas de Io necesario. Para colocar
nuevamente la tapa, alinee lasranuras de las
bisagra, ins_rtelas y cierre la tape.
MANGUERA
Para retirar:
oprima el boton
pare liberar el
mango y tire del
mango hacia
arriba.
Para Guarder: Para prevenir la precibn de la
mangua mientras se guarda, desuna la mangua del
tubo de la aspiradora. Guarde la magua en una
posicibn enrollada y flojamente de lal manera que la
tapa de la mangua no se estire.
1. Alinee la pestafia
de su)eci6n de la
manguera y la ranura de la cubierta del
recept_culo e introduzca la manguera
en el recept_.culo
hasta que quede fija
en posiciSn.
Ranura_
2. Introduzca el
mango en el tubo
hasta que el
bot6n quede en
posiciSn.Aseg_rese de que la
manguera no
est_ torcida.
Para retirar: levante
et pestillode la mangueray tire de la
manguera.
Manguera
Cubierta
Tape del
mcept_culo
Pestillo
de la tapa
Almacenamiento
pare a¢cesorios
Boise para
polvo
6
m_:_:_:_:::_::::::i:ii::
_:::_::_::::::::::ii:_:::::;:::_:_;_:_:_:;:_:::_::_:_::::;_::_:::_:_:i:i:_:_i:i:i:i:i:!:::::T:_:_:_:+:
................................................
;::::.:.;.:.;:.;.:.:;_.:.::;:._.:::;:.:.:,::,:,:.::,:,:,_
_:.:.:
..........
,:_,_:.:_,>:.7:.::.:._::.:;;.:.:,.,..._:,:,::_"_:.......................
:: .;.;... ,.,......
PARA COMENZAR
!
_... ;..,.....
_..,.......;.$::::
'.*.'.'.'.''_-.w_ *.*.*.,
,,._;_ .........................
::_ .....................
_
(_/ulndicador
de nivel
de pelo de la alfombra
ADVERTENCIA
nos modelos)
Peligro de lesibn personal y da_o al
produeto
• NO enchufe la aspiradora si el
interruptor est_ en la posicibn ON.
Podria causar lesi6n personal o da_o
al producto.
1_
delmang°/
• El cordon eldctrico se mueve
rdpidamente durante el enrollamiento.
Mantenga aleJadosa los ni_os y
asegure espacio Ubre suficlente para
evitar leslones personales al enrollar
el cord6n.
• NO use los enchufes Iocalizados sobre
los muebles, Los objetos cercanos
podrian resultar da_ados.
1. Tiredel cordbn
para sacarlo del
recept&culo hasta
tener ta Iongitud
deseada.
2. Detenga el
cordSnun
memento para
interrumpir el
enrollamiento.
Pedal de seleccl_nde
nivel de pelo de la alfombra
(Algunos
4. Baje el tubo desde la posiciSn vertical pisando el
pedal de liberaci5n del mango.
CUIDADO
5. Seleccione un nivel de peld_delaltura girando el
control de nivel pelo de la alfombra. Este nivel se
muestra en el control. Consulte SUGERENC]AS
SOBRE EL AJUSTE DE NIVEL DE PELO DE LA
ALFOMBRA.
Atencibn: Refi_rase alas recomendaciones
del fabricante para limpiar su alfombra. Algunas alfombras
m_s delicadas puedenrequerir el uso de la aspiradora con el agitador Power-Mate®desconectado
para prevenir que la alfombra sea daSada.
Interruptor
de encendido/
NOTA:Para reducirel riesgo de choque el_ctrico,
esta aspiradoracuentacon una clavijapolarizada,
unode los contactos es rods anchoque el otto.La
clavijas6lo puede introducirsede una manera en el
enchufe.Si la*clavijano cabe bien en el enchufe,
inviertala.Si at_nno cabe, llamea un electricista
para que instaleun enchufecorrecto.No altere la
claviiade ningunamanera.
3. Coneete el cordonel_ctdco polarizado en un
enchufe de 120 voltios que se encuentre cerca del
piso
Para enrollar: Desconecte la aspiradora. Sujete el
enchufe mientras enrolla el cordon para impedir
daSo o lesiSn corporal pot el movimiento del cordon.
Los sujetadores del carrete del cordbn se
desbloquean con un tirSn leve, Io que permite que et
oordSnse enrolle.
modelos)
apagado
X
6. Para encender
la unidad, pise la
interruptorde
cendido/apagado,
ALGUNOS MODELOS
Para encender la
Power-Mate_',
mueva el interruptor
de
FLOOR/CARPET a
la posici_n
CARPET.
|
I
Estilo de limpieza sugerido.
Control
de
Para obtener la mejor acciSn de limpieza se recomienda empujar la Power-Mate'_en direcci6ndirectamente opuesta a usted y jatarla en linea recta. AI
t_r_al
_ carla pasada de regreso, cambie la diracci6n de la Power_Mate
_ hacia la siguiente seccibn a
limpiar. ContinUeasl a tray,s de toda la alfombra de
una manera lenta y deslizante.
NOTA"las pasadas r,_pidasy
jalonadasno
Iogran una limpieza completa.
Los esealones alfombrados requieren limpieza
peri6dica.Cierre pot completoel control de aspiraci6n para Iograrlos mejoresresultados de limpieza,
ADVERTENCIA
Peligro de lesi6n personal
El dispositivo giratorio
de la manguera permite que esta gire sin eecesidad de mover el
recept_culo. Esto es
muy _til para timpiar ee
_reas peque_as. Asegerese de que la mangoera no est6 torcida
antes de jalar el recept_.culo.
Tenga cuidado si coloca el receptdculo
sobre escalones. Si se cae, podrla causar
lesi6n personal o dafio a la propiedad.
Mantenga el paso de aire abierto para Iograr los
mejores resultados de limpieza. Examine de vez
en cuando cada una de las ;_reasde uni6n en FUNCIONAMIENTO DE SU ASPIRADORA para asegurarse de que no est_n bloqueadas. Desconecte la
aspiradora antes de revisar.
Para evitar votcaduras, nunca deje la Power*
Mates encendida o en posici6n vertical.
Glrando el mango a un lado, la Power-Mate_
se hallard en una posici6n rods estable y
serf, mzts dilici| que se vuetque.
Use el ajuste XLO (bajo) para obtenerla rnejor lim*
pieza a rondo.Por otra parte, quiz&s se requiera elevar el nivel para facilitar algunas tareas, como por
ejemplo cuandose trata de tapetes y algunas alfombras de pelo largo, y para impedirque la aspiradora
se apague. Se sugieren los siguientes ajustes:
HI - Pelo muy largo y suelto, tapetes, alfombras
muy acojinadas.
MED - Pelo mediano a largo.
LO - Pelo corto a mediano.
XLO - La mayorla de las alfombras y pisos
descubieftos.
[_'_
.........................
.........................................
iiii.......
................................
iiTiiiiiiTili!
i!H_
.........
_"_
T_ '',_
................
............................
__ ..........
_ii _'_°_iiiliiiiilili_
l_iii!iiiiiiiiiiiiiii_i_iJi_iil
.................................
iii
i!iiii
i!i
!il
_i
i ili!ii
iliiiiiiliiii
_J_
_i_
_iiiiiiiiii
i_!iiI
.........................................
:::::::::r::::::::::::::::::::z:::::_
: :::;:;:
:::
,,,,,_:+:,_:_:_:.:.:::_:,:,:
............................
. ,,--,,.
:::::::::::::::::::::;:r:::
:_::::::::::::::;:;:;:::::::_:;:::_:
::; • ..:
*,.,
..
,,,. ,,,,_ ,,, _,,
:
.
:
_ •
._ ,., **3,
.,,,.,:,.,.:....................................
.
_#_,; ::: : >:_ _: :: :::_:;:_::::::::::::::_::::::::r::::::r
,:,_,,,,:,_,_:_:_:.r_:.:.:_:.:,:
................
::::::::::::;:_:::::::::r_:;:r:r:_:::::::::
ACCESORIOS DEL TUBe
CUIDADO
i"
1, Para retirarlos
tubes de la PowerMate®,col6quelos
en la posieibn vertical de bloqueo.
/Is
,, ,,,,,';
ACCESORIOS DEL MANGO
Bof6n
cierre
--_
NOTA:Si tiene
instaladala
Power-Matee, apague la aspiradora
antes de quitar el
mango de los tubes.
2, Retire el enchufe y el cord6n de
la Power-Mate®de los sujetadotes.
1. Oprima el botbn
de bloqueo y luego
tire del mango para
quitarlo del tube.
3. Desconecte el cord6n,
apoye el pie sobre la
Power-Mate_ y gire los
tubes hasta que el bot6n
desa-parezca y luego tire
de los tubes para retiralos
de la Power-Mate_.
Si su modelo cuenta con la caracterJstica adicional de un dispositivo para liberar el mango, oprimalo.
Ranu/ra
4. Coldhue el accesorio
deseado sobre el tube.
Consulte el cuadro.
2. Deslice el accesorio deseado con firmeza sobre el
mango. Consulte el cuadro a
continuaci6n.
AREA A LIMPIAR
ACCESORIO
Meubles'
Cepilio para comblna¢lon
(Algunos modelos)
X
Herramientapara hendiduras
(Algunos modelos)
X
Cepillo pare pisos
,(Algunos modelos)
Power-Mate',
(Algunos modelos) t_
Handi-mate Jr?
(Algunos modelos)*** 1_
Power-mate Jr?
(Algunos modelos!***
Entre
Plsos
Pisos
cojines* Cortinas' Escaloneslescubiertos
31fombradosParedes
Alfombras
X
.
X
X
x
x
x
x**
X
X
X
X
x
x
• Siempre limpie los accesorios antes de _r
sobre lelas. "' El interrupter de 2 posiciones debe estar en la posici_n FLOOR (piso descubierto).
"'" La Handi-Male Jr." y la Power-Mate Jr._ incluyen sus propias inst_ucciones para use de 8ccesorios,
NOTA:Cuando separe los tubes oprimacompetamente el bot6n de boqueo antes de separarlosper complete. Si se le dificultaoprimirel boron,junte m_.s os tubes para alinearel bot6ncon el orificio.Oprima el botSny
despu_s separe los tubes.
9
TAPAY ALMACENAMIENTO
PARA Power-Mate®
LIMPIADOR DE ORILLAS
Active los cepillos limpiadores de oriltas a
cada lado de la PowerMate_. Pase la PowerMate'_junto alas paredes o junto a los muehies para ayudar a eliminar la tierra acumu!ada en las orillasde la
alfombra.
El tubo inferiortiene un
reborde en forma de "U"
en la zona de fijaci6n del
cordon electrico. La base
tiene una ranuraen lorma
de "U" cerca de la parte
frontal del recept_.culo.
La ranura permite alrnacenar los tubos y la PowerMate'_con el tubo para
economizar el espacio requerido para su almacenamiento.Para usar esta caracteristicaes neCesado almacenar el reoeptacolo
en forma vertical.
PROTECTOR CONTRA
SOBRECARGAS
La Power-Mate
® cuenta con
protecci6nincorporada contra
da_o del motor y la correa en
caso de atasoamiento del cepiIIo.Si el cepillo pierde velcoidad o se detiene, el boton del
protector contra sobrecargas
se act'lvay apaga la PowerMate®.El motor del recept&culo
continuar_,
funcionando.
/
El tubose sale de la ranuraal ser levantado pare
usarloy se desliza dentro de esta al bajarlo para almacenarlo.
PROTECTOR TERMAL
Esta aspiradora tlene un protectortermal que se
ajusta automaticamente para protegera la
aspiradora del sobrecalentamiento. El protector
termal apaga el motor autom&ticamentepara
permitir que el motor se enfrie a fin de evitar
posib_esdafiosa la aspiradora.
Pars corregir el problema: Consulte el
RECONOCIMIENTO DE PROBLEMAS.
Para restablecer: Oprima O bot6n del protector
contra sobrecarga.
Para restablecer: Apague la aspiradora y desenchufe el cordbn del tomacordente para permitir
que la aspiradora se enfrie. Busque y saque las
obstrucciones, si es necesario. Examine tambi_n
y reemplece cualquler _tro obstruido. Espere
aproximadamente 50 minutos y enchufe la aspirsdora y volt_,elapara ver si el protector del
motor se ha reajustado. En algunos oasos,la
unidad puede volver a arrancar sObitamente,NO
LA DEJE desatendida.
CONTROL DE ASPIRACION
El control de
aspiraci6n te
permitecambiar la poten¢ia de aspiraci6n de la asaspiracl6n
aspiraci6n
piradoradependiendodel
gros0rde la tela o alfombra. La aspiraci6n se disminuye, pars limpiarcortinas y tapetesligeros, abriendo el control;pars aspirar muebles y alfombras,el
control debe cerrarsepars aumentar la aspiracibn.
Peligro de tesiones personales
Desconecte siempre la aspiradora antes de
limplar las dreas de los eepillos pues 6stos
podrian arrancar de manera Imprevista. El
ho hacerlo, podrfa resultar en lesiones personales.
lO
La aspiradora crea succi6n o aspiraci6n que levanta
la tierra. La tierra es impulsada a trav6s de las
vfas de flujo aire hasta la bolsa per una rapida ] _
corriente de aire. La bolsa para polvo permite
y,_
el flujo de aire. pero atrapa la tierra.
Para lograr los mejores resultados de
_//
limpieza, mantenga abiertas las vias de ._J/
aire. Examine peri6dicamente las
X'_7
_reas indicadas con asteriscos para Z*_
asegurarse de que no est6n
_'¢_v"
bloqueadas. Desconecte del
,_
recept,_culode revisarlo,
I
: ::::::
:::
::::::::
: ::
/
/A
Filtro de
seguridad
del motor Filtro de
_
\
,,_
II
t/"
:::::;_::::::
:
::::::,.::.:...:;,..:::2...
:+:<_ _¢_:.,_...:..._..:...:_:.
:,....;:.._.< _:.....::::.:_.,..:+:....+.<:_:.::: ..::+..: _ .:: .:.:....: _
::_ ::::
: :::_:::::
:::::::;
_::::::
:::_:
I
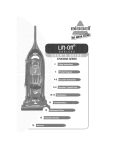
GAMBle
DE LA BOLSA
7. El montaje rojo de la bolsa se inclinara hacia
adelante despu_s de que retire la bolsa.
La bolsa debe cambiarse seguido para Iograr los
mejeres resultados de limpieza. El indicador de performance (en algunos modelos) especificar_ cu&ndo
la bolsa del polvo necesita set cambiada o la cordente de aire esta.bloqueada, NOTA: Consulte la
PIEZAS Y CARACTERISTICAS para determinar el
Ne,de la bolsa,
NOTA: NO doble ni pliegue el centre del
cart6n al instalar la bolsa en las ranuras del
montaje de la bolsa.
8. Gire hacia abajo el
soporte para la bolsa roja
y para insertar la bolsa en
las ranuras empuje hacia
abajo basraque las
lengOetasde cart6n
encierren seguramenteen
1. Desconecte et cord6n
el6ctrico de la clavija de la
pared.
2, Quite la manguera de [a
aspiradora.
3, Tire del pesti]lo de la tapa
hacia luera y hacia arriba;
luego levante la tapa del
recept_.culo.
4. Destrabe la pesta_a
de cart6n del montaje
rojo de la bolsa empujando hacia afuera y
tirando hacia arriba.
las posiciones apropiadas
corn se ve en el
diagrama.
9. Reemplacey cierre con ¢errojo la tapa del
tanque.
%
10. Introduzca la manguera en el recept_.culo,
11. Conecte el cord6n el6ctrico en la clavija de la
pared.
5, Saque la bolsa del
montaje rojo,
Filtro de ._
seguridad /
montage
rojo
NUNCA REUTILICE UNA BOLSA PARA
POLVO.Los materiales muy fines, tales
come desodorantes para alfombras, talco
facial, polvo fine, yeso_holffn, pelusa de
alfombras nuevas, etc. pueden atascar la
bolsa y causar que se rompa antes de que
est6 Ilena y puede dafiar el motor de la
aspiradora. Cambie la bolsa m_is seguido
! cuando aspire este tipo de materiales.
6. Revisey
cambie, cuando
sea necesario, el
filtro de seguridad
del motor.
11
f, Desconecte el cordonel6ctricode la clavijade la
pared. NO choree agua sobre la aspiradora.
CUIDADO
2. Limpieel exterior con un trapo suave y limpio, que
ha side exprimido despu6s de remojaren una soluci6n de agua y detergente ffquido ligero.Seque el
exterior con un trapo seco despu_s de limpiar.
No use los accesorios si estdn mojados.
Los accesorios que se utilicen en dreas
sucias, debajo del refrigerador, no deben
usarse en otras superficies sin antes ser
lavados. Podrian dejar marcas.
3. Limpieta superfioieexterior del receptdculoy de
tos accesorios para reducir la electricidad est_.ticay
la acumulaciSnde polvo.
Examine el fiitro de seguridad del motor de vez en
ouando y cambiocuandoest6 sucio.
1. Levante el dispositivo de retencionde
goma y saque el filtre
de seguridad come se
ve en el diagrama.
Peligro de cheque eldctrico
Desenchufe el ¢ord6n de ta cordente electrica. No opere la aspiradora sin el fittro de
seguridad del motor. Aseg_urese de que el
filtro est6 seco e instalado adecuadamente
para impedir que el motor falle y/o que se
produzca un cheque el_ctrico.
%
Paraquitar la boisa, siga las instrucciones en CAMBIO DE LA BOLSA.
FILTRO DE SEGURIDAD DEL
MOTOR ELECTROSTATICO
Dispositivo de
goma
Este filtroblanco y gris debe ser cambiado cuando
este sucio. Debe cambiarse peribdicamenteseg,'m
las condiciones de use. El filtro no se puede lavar
pues perdeHa su capacldad para atrapar atrapar
polvo.
Dispositivode
de goma
2. Reemplaceel liltro
con el lade blanco
encarado hacia el
exterior. Deslize el
fi_trohasta que
quepa per complete
debajo del dispositive
de retenciSnde
goma.
3. Vease CAMBIO DE LA BOLSA para cambiar la
bolsa.
NUNCA REUTILICE UNA BOLSA PARA
POLVO.Los materiales muy fines, tales
come desodorantes para alfombras, talco
facial, polvo fine, yeso, hollfn, pelusa de
alfombras nuevas, etc., pueden atascar la
bolsa y causar que se rompa antes de que
estd Ilena. Cambie la bolsa m_isseguido
cuando aspire este tipo de materiales.
12
I
Filtro de_
ADVERTENCIA
escape
2. Cuando el filtro
est_ sucio, tire del
filtro hacia arriba,
Peligro de choque el_ctrico
No opera con un filtro de escape bloqueado
o sin el filtro de escape o la cubierta del flltro de escape instalados.
FILTRO DE ESCAPE
ELECTROSTATICO
Filfro de
3. Coloque el
nuevo filtro an la
cubiertadel motor
con el ladoblanco
hacia abajo.
Este tiltro electrost,_ticose tiene que cambiar este
sucio. Cambie el liltmcuando el _[reasuperficial
este cubiertaporcompleto,El filtro no se puede
lavar pues prderia su capacidad para atrapar
altrapar polvo,
Repuestos de los filtros de extracci6n est_n
disponibles a trav,_sdel centro de servicio de
sears bajo el no. De parte 8175258. Ver
"lnformacidn de assistancia o servicio"
1. Tire hacia afuera y
_
arriba de la cubierta __4L?-._:;;.;:_.-.. _
del filtro de escape _-_'_'_
para remover de la
"_'_['_.
cubiertadel motor
_
]L,,,_
yoo, q.e,oauo
1)
k_
\\ _;_
_ "_.,
I f
4. Reinstale la
cubiertadel filtro
de escape insertando la lengOeta
en la ranura de la
cubierta del motor.
Apriete firmemente para calzar
la cubierta del illtro de escape en
su lugar,
d/
Siempre deber&n seguirse todas las precauciones de seguridad al limpiar y dar servicio a
la Power-M,_te®.
ADVERTENCIA
Peligro de choque eldctrico o lesibn
corporal
Desconecte la unidad antes de lim.
piarla o darle servicio. De Io contrario
podria producirse un choque eldctrico
o causar lesidn corporal st la aspiradora arranca de manera imprevista.
13
1. Retire la cubierta de
la bombillaejerciendo
presi6n hacia adentro y
levantando ambos
costados como se
muestra.
2. Empuje la bombilla
hacia adentro y gfrela en
direcciSn opuesta al sentido de las manecillas del
reloj para retirarla.
Empuje hacla
adentro y gire
3. Cambie la bombilla.
I_stano debe exceder 15
vatios (130V). Cierre la
cubierta de la bombilla
hasta que quede bien cerrada.
NOTA: Consultela PIEZAS Y CARACTER{STICAS
para determinar el N_.de la bombilla,
PARA RETIRAR LA CORREA
4. Voltee la PowerMate®hacia arriba.
Oprima la gu{a de
liberacidn y baje el
dispositivo giratorio.
Incline la cubierta
de atr_.shacia adelante hasta que se
desprenda.
1. Retire la cubierta de
la bombUlay la bombilla
como se indica bajo
CAMBIO DE LA BOMBILLA.
2. Retire los tornillosde
la Power-Mate_.
5. Inserte el
destornillador
cuidaclosamente
en cada soporte
del cepilloy
gfrelo para
retirar el cepillo
de la base.
3. Voltee el PowerMate_. Para
quitar la cubierta,
inserte el
destornillador
entre las lengGetas de la cubierta
de la boquilla y la
base. Abra
haciendo palanca
hacia arriba par
liberar las lengLietas
6. Retire la
banda desgastada.
14
LIMPIEZA DEL AGITADOR
PARA CAMBIAR LA CORREA
NOTA: Para mantener una alta eficiencia de
limpieza y evitar el da£to a la aspiradora, hay
aue limDiar el aaitador cada vez aue se cambia
1. Instale una
correa nueva
sobre el
impulsor del
motor y luego
sobre la rueda
dentada del
cepillo.
la correa.
Tambi_n hay que limpiar el agitador segun el
siguiente horario:
E! _o
de Ip
Frecuente (usada dirariamente)
Moderado
(usada 2 o 3 veces
por semana)
cada semana
Ligero (usada 1 vez por semana)
cada 2 meses
2. Instale los soportes
del cepillo sobrela
base. Aseg_rese de
que los soportes no
est_n invertidos.
Desconecte la aspiradora. Examine
frecuentemente el cepilto y las &teas de soporte
del mismo de la Power-Mate'* y elimine todo
cabelio, hilo y pelusa acumulada.
3. Alinee la
pafte frontal
de la cubierta
con la base.
Coloque la
cubierta sobre
el horde
delantero de
la base como
se muestra.
Retire todo indicio de basura o suciedad de la
zona de la correa y del rodillo del cepillo.
Con cuidado quite las tapas y quite el hilo o los
restos ubicados en el agitador, o en los
soportes del cepillo.
Ensamble del
agitador
Cubierta
Base
4. Inclinela cubierta
haciaatrds. Ejerza
presi6nfirme sobre la
cubierta hasta que las
pestaSas laterales
queden fijas en posi. iS
ci6n. Instale los
tornillos de la cubier,
ta, la bombilla y la
cubierta de la bornbilla.
Polea para
correa
agitador
Rueda denfada
cel cepillo
NOTA:
Consutte la PIEZAS Y CARACTERJSTICASpara
determinar el N". de correa.
cada mes
del
Cepillo
Soporte
del cepillo
IMPORTANTE
Unidad
Impulsor
del motor
|
n
_,_,_
extremo
15
PARA CAMBIAR MAZO DEL
AGITADOR
_1 ADVERTENCIA
1. Retirela cubierta, correa y ensamble del agitador
de la Power-Mate_'Consulte "Para retirar la correa"
bajo CAMBIO DE LA CORREA Y LIMPIEZA DEL
AGITADOR.
Peligrode choque el_ctrico o lesi6n corporal
Desconecte la unidad antes de limpiarla o
darle servicio. De Io contrario podria producirse un choque el_ctrico o causar
lesi6n corporal si la aspiradora arranca de
manera imprevista.
2. Reemplaceel agitador.
4. Cambie la correa, el ensamble det agitador, la cubierta de la Power-Matee, la bombilla y la cubierta de
la bombiUa.Consulte "Paracambiar la correa" bajo
CAMBIO DE LA CORREA Y LIMPIEZA DEL
AGITADOR,
PARA EXAMINAR EL CEPILLOS
cepillocuando
est_n desgastados
hastael nivelde
ambie
maze
ias
barras
de del
soporte de la base.
_._
Barra de soporte
de la base
16
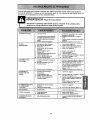
Consulte este cuadro para encontrar soluciones que usted mismo puede reatizar cuando tenga problemas
menores de rendimiento. Cualquier servicio que necesite aparte de otros descritos en este manual tienen que
set hechos por un represetante de servicio aulorizado Sears.
i;!iii;;;il
i'!- ""!'i'"
....
_ .. "iiii!ii!ii;
1. Est_ dest:onectada.
2, Cortaci_cuitos
botadoo fusiblequemado
en el tablerode servleiode le residencia.
3. Conexlenesel_'tdcasde la manguera
sueltas.
4, Protectortermalen et receptaculo.
No aspira
satisfactoriameflte.
1,
2.
3.
4.
5.
6.
7.
8,
9.
10.
La aspiradoraafral'_ca,
pero se apaga.
Bolsapara po_voIlenao atascada
V_asde flujode aim atascades.
Rttros sucios.
Ajuste incerreclode nivel de pelede
la allombra.
Controlde as_iraci_ ablerto.
Manguera rota.
Cepillos de ]a Power-Mate"desgastados.
Correa desgastadao rota.
Cepilloo soportesde este sucles.
Tapadel recept,_culoableda.
1. Conexionesel_*tricasde la rnanguerao
de la lapa.
2. Protectorcc_trasobrecargasde la
Power-Mate
_"hotade.
3. Protector termal en el recept_culo.
La Power-Mate*no
funelonacuandoest_
instalada.
1, Conexic_es de la Power-Mate _
desconeotadas.
2. Correa desgaelada o rota.
3. Copil]o o soportes de _sle s_cios.
4. Protector contm sobrecargas de la
Power-Male = botado,
1. Conecte bien, optima selector de encendidel
apagado s la posle_6n ON.
2. Reslablezca st ¢ortacircuilos o camble el
lusib_e,
3, Vuek,a a conactar los exlremos de la manguera,
(pdgina 6).
4. Restablezcae[prolec_or termel, (pagina 10}.
1, Camble le bolsa, (pagina 11).
2, Lim_e las vias de Ilejo de aim, (pdgina 11).
3, Limpielcamblelesfiltros,(pagina12.13).
4, Ajuste el nivel, (p&gina 8).
5.
6.
7.
B.&9,
Ajuste el control(p&gina10).
Cambie la ma.._guera.
Cambie loscepillos.(p_glea16).
Consutle CAMBIODE LACORREAY LIMPIEZI
DELCEP]LLO,(patinas 14. 15).
fO. Clerre bienle lapa,
Examine las conexlonesel_ctdcas,vuelvaa con
eclat los extrernosde le manguera,(p_gina6).
2. Relire cuelquierobjetoatorade o atascade,
luegorestablezca.S( la aspiraderaarrancapero
se vuelvea apagar,Iimpleel cepilloy los
soportes de _ste, luegoreslablezca,
(paginas 14, 15).
Reelablezcael protectorretinal (p_,gina10).
1,
I.
Conecte bien, (p._gina 5).
2.&3.
Consulte CAMBIO DE LA CORREA Y LIMPIEZJ
DEL CEPILLO, (pdginas 14, 15).
4. EXamine el area del cepillo para determlna.r
si hay acumula_b_ exceslva o I_oqueo de
delusa.
Limpie el cepille y sus soportes, luego
restablezca, (l_gleas 14, 15).
La aspiradora levanta tapetes
-c- es dlfic]l eXnpujar
a Power.Ma_.
1. Ajusteincorrectode nivel de pelode
le allombra.
2, AspimckSn
demasledopoteote.
1, Ajusteeln_vel, (p_gina8).
La luz no funcions.
1. Bombiilafundida.
1, Camble le bombiile, (p&gina 14).
El €ord6n no se entolla,
t. Cord_ electdcosucio.
2. Cord6natascado.
1. Umpie el cordenelectrico.
2. Tiredel cord6ny despu0senr611elo.
La esplmdoradeJamarcas
en la alfombra.
1. Estilode limpiezaincorreota.
1. ConsulteSUGERENCIA$PARAASPIRAR.
(pdglea8).
17
2. Abra el control de asplracide, (p&gina 10).
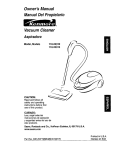
Your Home
For repair - in your home - of all major brand appliances,
lawn and garden equipment, or heating and cooling systems,
no matter who made it, no matter who sold it!
For the replacement parts, accessories and
owner's manuals that you need to do-it-yourself.
:%:::::::::::
iiiililiiiiiiiiiiiiiiiii
ii!iii!ilili_iiii!iiiiii
!i!ili!ililiiiiiiiiii!ii
iiiiiiiiiiiiiiiiiililili
::::::::::::
::::::::::::::::::::::
For Sears professional installation of home appliances
and items like garage door openers and water heaters.
1-800-4-MY-HOM E® Anytime, day or night
iiiiiiii!iiiiiiiiiiii!
(1-800-469-4663)
iiiiiiiiiiiiiiiiiiiiiil
(U.S.A. and Canada)
www.sears.com
::::::::::::::::::::::::::::::::::::::::::::::
;:::.:
:.::.:.:: :.:.:.:::
:::::::::::::::::::::
iiiiiiiiiiiiiiilililiiii
www.sears.ca
::
:::+::, _: :+:: :.__:: :.:.:._
::x
:_>: :::::.::
: :: : ::.:.:
Our Home
iiiiiiiiiii_ii!iiiiiiiii
For repair of carry-in products like vacuums, lawn equipment,
and electronics, call or go on-line for the nearest
Sears Parts and Repair Center.
1-800-488-1222
•
Anytime, day or night (U.S.A. only)
H
w_N.s_ar
To purchase a protection
or maintenance agreement (Canada)
iiiiiiiiiiiiiiiiiiii
1-800-.827-6655
s.P..,om
agreement (U.S.A.)
on a product serviced by Sears:
:i:iiiiiiii!iii:il
i
:::::::::::::::::::::
(U.S.A.)
P_ra pedir servicio de reparacibn
a domicilio, y para ordenasr_iezas:
1-888-SUJ,-IOGAR
(1-888-784-6427)
Au Canada pour service en fran_,ais:
1-800-LE-FOYER _c
(1-800-533-6937)
www.sea
rs.c_
© Sears, Roebuckand Co.
® Registered Trademark / T_Trademark / sMService Mark of Sears, Roebuck and Co.
® Marca Registrada / TMMama de Fdbrica / sMMarca de Servicio de Sears, Roebuck and Co.
ac Marque de commerce / MDMarque d_posde de Sears, Roebuck and Co.