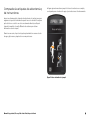
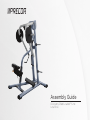
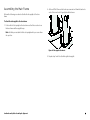
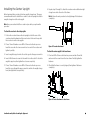
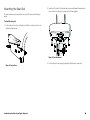
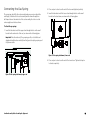
1
Manual del propietario Discovery Plate Loaded™ Line Normas de seguridad importantes para los propietarios Siga estas normas para conservar un buen estado de funcionamiento del equipo: Importante: No modifique el equipo ni ninguna de sus partes, ni extraiga de forma permanente ninguna pieza del equipo. No utilice accesorios adicionales que no estén recomendados por Precor, ya que podrían causar lesiones. El mantenimiento periódico debe llevarse a cabo por técnicos cualificados. Asegúrese de que los entrenadores, el personal de las instalaciones y los técnicos de mantenimiento saben cómo utilizar el equipo, conocen las normas de seguridad importantes y son capaces de reconocer problemas potenciales, como una soldadura agrietada. Los ejercicios de musculación requieren una dedicación considerable por parte de las instalaciones y de su personal para mantener la calidad del entorno de fitness. Si es posible, las instalaciones deben ofrecer en todo momento supervisión directa para el equipo de fitness por parte de personal que conozca el uso seguro del mismo y que esté formado para reconocer potenciales problemas. Si cualquier empleado de las instalaciones observa un uso no seguro del equipo, este debe dirigirse directamente al usuario, mostrarle la técnica adecuada y revisar la Información de seguridad importante para usuarios. Precor recomienda colocar una copia de la Información de seguridad importante para usuarios junto al equipo en un lugar visible. Asegúrese de que el equipo es estable y está colocado sobre un superficie sólida. El equipo está diseñado para no necesitar fijación; sin embargo, se puede atornillar al suelo para obtener una estabilidad extra. Precor recomienda que se atornille al suelo para reducir el riesgo de caídas debido a un uso inapropiado. Ya que la estructura del suelo varía, consulte a un ingeniero de construcción profesional para asegurarlo adecuadamente. Sitúelo a un mínimo de 1 metro (40 pulgadas) de distancia de paredes o muebles a ambos lados del equipo, y a por lo menos 1 metro (40 pulgadas) de distancia de objetos que se encuentren detrás de la máquina. Inspeccione el equipo detenidamente siguiendo los programas de inspección recomendados que se indican en este manual; incluidas las comprobaciones diarias, semanales, mensuales y anuales. Durante las labores de mantenimiento del equipo o de las zonas adyacentes, coloque un cartel de "Fuera de servicio" en él. Bajo ningún concepto debe permitirse que los usuarios utilicen el equipo hasta que no haya sido inspeccionado y funcione correctamente. Si una pieza del equipo necesita mantenimiento, manténgala fuera de servicio hasta que se haya reparado. Coloque un cartel de "Fuera de servicio" en el equipo y asegúrese de que el personal encargado de las instalaciones está informado de que no debe permitir a nadie utilizarlo hasta que funcione correctamente. No intente liberar los elementos atascados sin ayuda de otra persona, ya que se podrían producir lesiones. Con ayuda de otra persona, vuelva a colocar el mecanismo en su posición de reposo adecuada. No coloque el equipo al aire libre ni sobre superficies húmedas. Homologación de seguridad Determinados equipos de musculación comerciales de Precor cuentan con la certificación de Clase S/B, C con arreglo a los estándares EN957 -1/2. Consulte con un distribuidor autorizado de Precor para obtener una lista completa y actualizada de las máquinas certificadas. Manual del propietario (Discovery Plate Loaded Line): Normas de seguridad importantes para los propietarios 1 Información de seguridad importante para usuarios Antes de empezar cualquier programa de ejercicio físico, es aconsejable que se someta a un examen médico. Si nota dolor o un síntoma anormal, suspenda el ejercicio inmediatamente y consulte a su médico. Texto en francés equivalente al párrafo anterior para el mercado canadiense: Il est conseillé de subir un examen médical complet avant d'entreprendre tout programme d'exercise. Si vous avez des étourdissements ou des faiblesses, arrêtez les exercices immédiatement. Mientras el equipo está en uso, mantenga la cabeza, las extremidades, los dedos y el cabello alejados de todas las piezas móviles. Mantenga las manos alejadas de las clavijas de soporte. Nunca deje caer ni introduzca objetos en ninguna ranura del equipo. Cuando utilice los equipos de ejercicio, adopte siempre las precauciones básicas, incluidas las siguientes: Inspeccione siempre el equipo antes de utilizarlo. Si observa un posible problema, póngase en contacto de inmediato con algún empleado de las instalaciones. No utilice el equipo hasta que se haya verificado que funciona correctamente. No intente arreglar equipos rotos o atascados. No utilice el equipo al aire libre ni sobre superficies húmedas. No utilice el equipo si se ha colocado en él un cartel de "Fuera de servicio". Lea todas las instrucciones expuestas, incluidas todas las instrucciones de seguridad y advertencias. Si no sabe cómo se utiliza un equipo, pida a algún empleado de las instalaciones, por ejemplo a un entrenador, que le muestre cómo utilizarlo y le explique las instrucciones de seguridad. No permita que niños se suban ni se acerquen al equipo. No deje que los niños se acerquen al equipo sin la supervisión de un adulto. Utilice el equipo solo para su finalidad prevista. No utilice accesorios adicionales que no estén recomendados por el fabricante, ya que dichos accesorios podrían causar lesiones. Lleve la ropa y el calzado de deporte adecuados para el ejercicio y evite la utilización de prendas sueltas. No haga un esfuerzo excesivo ni llegue al agotamiento. Cuando trabaje con pesas, utilice un juicio razonable. Evite el uso de un peso excesivo, que podría provocar lesiones. Manual del propietario (Discovery Plate Loaded Line): Información de seguridad importante para usuarios 2 Contenido Normas de seguridad importantes para los propietarios .......... 1 Homologación de seguridad ............................................................... 1 Información de seguridad importante para usuarios .................2 Inspección semanal ..................................................................... 9 Acondicione y limpie en profundidad la tapicería ........................9 Inspeccione y lubrique los rodamientos y cojinetes ....................9 Inspeccione y lubrique el ajuste del asiento...................................9 Antes de comenzar ..................................................................... 4 Herramientas recomendadas ............................................................ 4 Obtención de asistencia ...................................................................... 5 Inspección mensual ................................................................... 10 Inspeccione los armazones y los brazos de movimiento ......... 10 Inspeccione todos los fijadores ....................................................... 10 Inspección diaria ......................................................................... 6 Limpie la tapicería .................................................................................6 Inspeccione las almohadillas en busca de signos de desgaste .............................................................................................6 Limpie e inspeccione los armazones ................................................6 Compruebe las etiquetas de advertencia y de instrucciones .... 7 Manual del propietario (Discovery Plate Loaded Line): Contenido 3 Antes de comenzar Precor recomienda la implementación de un programa de mantenimiento concienzudo que incorpore inspecciones de seguridad periódicas por parte de técnicos de mantenimiento cualificados, tal y como se indica en este manual. Este manual describe cómo mantener la línea Discovery con carga de discos de equipos de musculación comerciales de Precor. Proporciona información sobre los elementos que deben inspeccionarse y mantenerse de forma diaria, semanal, mensual y anual. Debe llevar a cabo las tareas que sean apropiadas para el equipo al que está realizando el mantenimiento y omitir aquellas que no sean pertinentes. Este manual cubre los procedimientos de mantenimiento generales que puede llevar a cabo en la instalación de fitness. Sin embargo, si el equipo requiere un servicio que vaya más allá de los procedimientos de mantenimiento incluidos en este manual, consulte el apartado Obtención de asistencia. Herramientas recomendadas Recomendamos que tenga a mano las siguientes herramientas para realizar la inspección y mantenimiento del equipo: Juego completo de llaves de tubo combinadas (tamaños métricos comunes) Juego completo de llaves de vaso (tamaños métricos comunes) Juego completo de llaves de vaso (tamaños métricos comunes) Llave inglesa ajustable de 12 pulgadas Mazo de goma Importante: Adquiera siempre sus piezas de repuesto y accesorios de Precor. Muchas piezas se comprueban y se fabrican específicamente para los equipos de musculación comerciales de Precor. Si emplea piezas que no hayan sido aprobadas por Precor, podría anular la Garantía Limitada Precor. El uso de piezas que no hayan sido aprobadas por Precor puede provocar lesiones. Precor recomienda que los técnicos de mantenimiento lean atentamente y comprendan las normas de seguridad y los procedimientos de mantenimiento que se incluyen en este manual. Nota: Si el equipo requiere montaje, se suministra un manual de montaje independiente. Si desea información sobre cómo utilizar una pieza del equipo, consulte la etiqueta de instrucciones que se encuentra en el mismo. Manual del propietario (Discovery Plate Loaded Line): Antes de comenzar 4 Obtención de asistencia Nº de modelo: No intente reparar el equipo de musculación excepto por lo que se refiere a las tareas de mantenimiento que se describen en este manual. Si falta alguna pieza, póngase en contacto con el minorista. Si necesita información sobre los números del servicio de atención al cliente, o la lista de los centros de servicio autorizados de Precor, consulte el sitio web de Precor en www.precor.com. Fecha de compra: Si tiene alguna duda respecto a una pieza del equipo, busque su número de serie y póngase en contacto con el Servicio de atención al cliente de Precor. Precor utilice el número de serie para determinar el modelo y el año del producto. Por lo general, podrá encontrar el número de serie bajo el soporte del asiento. Para que le sirva como referencia en el futuro, escriba los números de serie, los números de modelo y la fecha de compra de su equipo de musculación Precor en el espacio facilitado al efecto. Si lo desea, a continuación puede incluir toda la información del equipo para localizarla con facilidad. Nº de modelo: Nº de serie: Nº de modelo: Nº de serie: Nº de serie: Fecha de compra: Nº de modelo: Nº de serie: Fecha de compra: Nº de modelo: Nº de serie: Fecha de compra: Nº de modelo: Nº de serie: Fecha de compra: Fecha de compra: Nº de modelo: Nº de modelo: Nº de serie: Nº de serie: Fecha de compra: Fecha de compra: Nº de modelo: Nº de modelo: Nº de serie: Nº de serie: Fecha de compra: Fecha de compra: Nº de modelo: Nº de modelo: Nº de serie: Nº de serie: Fecha de compra: Fecha de compra: Manual del propietario (Discovery Plate Loaded Line): Antes de comenzar 5 Inspección diaria Cada día, deberá llevar a cabo las siguientes tareas para mantener el equipo y conservar un funcionamiento sin problemas: Limpie la tapicería del equipo. Inspeccione las almohadillas en busca de signos de desgaste. Limpie e inspeccione los armazones del equipo. Compruebe las etiquetas de advertencia y de instrucciones. Limpie la tapicería Para eliminar la suciedad superficial y los restos de sudor, limpie la tapicería diariamente pulverizándola con una solución de agua y jabón suave. Pulverice ligeramente las superficies tapizadas y séquelas con un paño limpio. Importante: Para limpiar la tapicería, no utilice productos de limpieza que contengan alguno de estos ingredientes: disolventes, alcohol, amoníaco o petróleo. En su lugar, utilice un limpiador con una base de detergente suave. Inspeccione las almohadillas en busca de signos de desgaste Inspeccione las almohadillas por si presentan grietas en la tapicería, grapas sueltas o pernos de montaje flojos. Si es necesario, sustituya las almohadillas (consulte el apartado Obtención de asistencia para adquirir nuevas almohadillas.) Importante: No tapice de nuevo las almohadillas ni utilice almohadillas que no hayan sido aprobadas por Precor. Limpie e inspeccione los armazones Para eliminar los restos de grasa y suciedad, limpie los armazones diariamente pulverizándolos con una solución de agua y jabón suave. Pase un paño suave por el equipo y séquelo completamente. Asegúrese de pasar el paño tanto por las zonas pintadas como por las zonas cromadas. Para recuperar y conservar el brillo de las piezas cromadas, utilice un limpiador de cromados comercial. Mientras esté realizando la limpieza, inspeccione los armazones en busca de grietas, óxido u otros daños. Asegúrese de que las soldaduras son firmes y de que los fijadores están correctamente apretados. Manual del propietario (Discovery Plate Loaded Line): Inspección diaria 6 Compruebe las etiquetas de advertencia y de instrucciones La figura siguiente muestra un ejemplo de letrero de instrucciones completo, con etiquetas para el nombre del equipo y las instrucciones del entrenamiento. Inspeccione diariamente las etiquetas de advertencia y de instrucciones para asegurarse de que toda la información puede leerse con claridad. Si cualquier parte de ellas no es visible o no está correctamente adherida, sustituya la etiqueta de inmediato (consulte Obtención de asistencia para obtener información sobre la compra). Cuando sea necesario, limpie las etiquetas pulverizándolas con una solución de agua y jabón suave y séquelas bien con un paño suave. Figura 1: Letrero instructivo de ejemplo Manual del propietario (Discovery Plate Loaded Line): Inspección diaria 7 Los productos Precor están equipados con un número de etiquetas de advertencia estándar. Las siguientes dos figuras muestran ejemplos de las etiquetas de advertencia que se pueden ver en los equipos en función del modelo y de la línea de producto: Figura 2: Etiqueta de advertencia que indica peligro de aprisionamiento Figura 3: Etiqueta de advertencia general colocada en el armazón del equipo Manual del propietario (Discovery Plate Loaded Line): Inspección diaria 8 Inspección semanal Esta sección abarca las tareas que debe llevar a cabo cada semana para realizar el mantenimiento del equipo. Realice las siguientes tareas según corresponda para la unidad a la que está realizando el mantenimiento: Acondicione y limpie en profundidad la tapicería. Inspeccione y lubrique los rodamientos y cojinetes. Compruebe y lubrique el mecanismo de ajuste del asiento. Acondicione y limpie en profundidad la tapicería Inspeccione y lubrique los rodamientos y cojinetes Precor utiliza cojinetes de alta calidad diseñados para las aplicaciones de fuerza y una vida útil duradera. Cada semana, realice las siguientes tareas para mantener los rodamientos y cojinetes del equipo: Cojinetes de bronce: Precor recomienda el uso de una pequeña cantidad de lubricante de silicona en spray para lubricar estos cojinetes, que suelen ser el soporte de los ejes de rotación. Pulverícelo directamente sobre el eje y, a continuación, gire el eje por todo su rango de movimiento varias veces. Inspeccione los cojinetes en busca de signos de desgaste excesivo o daños. Tenga cuidado al utilizar el lubricante en spray, ya que podría manchar la moqueta y la ropa. Elimine cualquier exceso de lubricante con un paño. Puntos de rodamiento del eje central sellados: Estas zonas están protegidas del entorno externo y no requieren lubricación. Cuando esté limpiando el equipo, pase un paño por los ejes y la superficie externa de los rodamientos para evitar que se acumulen restos de polvo y sudor. Semanalmente, acondicione y limpie en profundidad la tapicería con un limpiador manual a base de lanolina o un limpiador de tapicerías. Importante: Para limpiar la tapicería, no utilice productos de limpieza que contengan alguno de estos ingredientes: disolventes, alcohol, amoníaco o petróleo. En su lugar, utilice un limpiador con una base de detergente suave. Inspeccione y lubrique el ajuste del asiento El mecanismo de ajuste del asiento requiere poco mantenimiento. No obstante, puesto que la seguridad del asiento es vital para la seguridad de un ejercicio, debería inspeccionar la palanca del asiento de forma periódica para comprobar si se queda fija cuando se utiliza. Para comprobar si la palanca de un asiento necesita lubricación, eleve el asiento ligeramente al tiempo que presiona y libera la palanca. La palanca debería retroceder con facilidad. Si se queda fija, lubrique su pivote con un lubricante de silicona en spray. Elimine cualquier exceso de lubricante con un paño. Manual del propietario (Discovery Plate Loaded Line): Inspección semanal 9 Inspección mensual Esta sección abarca las tareas que debe llevar a cabo cada mes para realizar el mantenimiento del equipo. Realice las siguientes tareas según corresponda para la unidad a la que está realizando el mantenimiento: Inspeccione los armazones y los brazos de movimiento. Inspeccione y lubrique la palanca del asiento con trinquetes. Inspeccione todos los fijadores. Inspeccione los armazones y los brazos de movimiento Todos los meses, inspeccione los armazones y los brazos de movimiento para comprobar su correcto funcionamiento e integridad. Compruebe que no presentan grietas, pintura desconchada u óxido. Retoque las abolladuras y los desconchones en la pintura según sea necesario. En cuanto detecte los primeros signos de desgaste, sustituya cualquier componente. Nota: Puede solicitar a Precor pintura para retoques llamando al Servicio de atención al cliente. Consulte el apartado Obtención de asistencia. Inspeccione los armazones en busca de grietas, especialmente en las juntas. Si observa alguna grieta, aparte el equipo del servicio inmediatamente y haga que un técnico en mantenimiento cualificado lo repare. Consulte los apartados y Obtención de asistencia. Manual del propietario (Discovery Plate Loaded Line): Inspección mensual Para eliminar el óxido superficial del armazón, frótelo suavemente con una lija húmeda/seca o con lana de acero fina. Si es necesario, finalice el proceso con pintura de retoque de Precor. Conserve el brillo de la pintura aplicando un producto de cera para automóviles suave. Para realizar el mantenimiento de las piezas con acabado lacado y cromadas, utilice un detergente suave para eliminar la suciedad ligera y las manchas. Para eliminar restos de suciedad más fuerte y de grasa y para pulir las piezas, utilice en buen abrillantador para automóviles. Para los arañazos y marcas que no se eliminen con los método anteriores, utilice un producto limpiador de granulado fino. No utilice disolvente, diluyente para lacado, acetona o quitaesmalte. Inspeccione todos los fijadores Con el uso normal, los fijadores pueden aflojarse. Inspeccione todas las tuercas, pernos, tornillos y otros fijadores para asegurarse de que están correctamente instalados y apretados. Asegúrese de inspeccionar los fijadores de las uniones atornilladas para comprobar que las conexiones son seguras. Si un fijador está suelto pero en buenas condiciones, vuelva a apretarlo. Si no está seguro de la integridad del fijador , extráigalo, limpie las roscas e inspecciónelo en busca de cualquier tipo de daño, como grietas, roscas dañadas, corrosión u óxido. Si está en buenas condiciones, vuelva a instalar el fijador. Si no es así, retire del servicio el equipo hasta que se haya instalado correctamente un nuevo fijador. Puede pedir nuevos fijadores al Servicio de atención al cliente. Para más información, consulte el apartado Obtención de asistencia. 10 Notas: Manual del propietario (Discovery Plate Loaded Line): Notas 11 Notas: Manual del propietario (Discovery Plate Loaded Line): Notas 12 Precor es una marca comercial registrada de Precor Incorporated. Copyright 2012 Precor Incorporated. Especificaciones sujetas a cambio sin previo aviso. www.precor.com Precor Incorporated 20031 142nd Ave NE P.O. Box 7202 Woodinville, WA USA 98072-4002 1-800-347-4404 AVISO: Precor goza de gran reconocimiento por sus diseños innovadores de equipos de ejercicio, que han obtenido diversos premios. Precor busca activamente patentes en EE.UU. y en otros países, tanto en materia de construcción mecánica como de aspectos visuales del diseño de sus productos. Se advierte a toda persona que contemple la posibilidad de utilizar los diseños de productos de Precor que Precor considera la apropiación no autorizada de sus derechos de propiedad una cuestión muy grave. Precor perseguirá enérgicamente toda apropiación no autorizada de sus derechos de propiedad. Manual del propietario (Discovery Plate Loaded™ Line) CWP997777-561 rev A, es 30 de abril 2012 Assembly Guide Discovery Plate Loaded™ Line Low Row Table of Contents Getting Started ............................................................................2 Opening the Boxes ................................................................................ 2 Installation Requirements ................................................................... 2 Hardware Kit (not to scale) ................................................................ 3 Assembling the Equipment ........................................................ 6 Stabilizing the Equipment.................................................................... 7 Assembling the Main Frame ............................................................. 8 Installing the Center Upright ..............................................................9 Installing the Movement Arms ........................................................ 10 Attaching the Seat Pad........................................................................ 11 Connecting the Gas Spring ............................................................... 12 Adjusting the Seat Rollers ................................................................. 13 Attaching Weight Horns to the Movement Arms...................... 14 Attaching Weight Storage Horns.................................................... 14 Attaching the Instructional Placard and Safety Labels ............. 15 Low Row Assembly Guide: Table of Contents 1 Getting Started Opening the Boxes Open the boxes and remove the packing materials. Be careful to open the boxes and assemble the components in the sequence presented in this manual. Box 1 2 Contents Frame members Movement arms Weight horns Weight storage horns Instructional placard Warning labels Hardware kit Seat pads Installation Requirements WARNING You will need assistance to assemble this unit. DO NOT attempt assembly by yourself. Follow these installation requirements when assembling the unit: Assemble the unit near the place where you plan to use it. Locate the equipment at least 40 inches (1 meter) away from walls or furniture on either side of the equipment, and 40 inches (1 meter) away from objects behind the equipment. Set up the unit on a solid, flat surface, so that it remains level and stable. A level unit has fewer malfunctions. Open the box and assemble the components in the sequence presented in this guide. Insert, align, and thread all fasteners with your fingers. This helps prevent cross-threading. Do not wrench tighten fasteners until instructed to do so. Important: Before you wrench tighten a fastener, check that its head is flush with the surface of the product. If not, cross-threading may have occurred. Do not attempt to rework the assembly as more damage to the equipment will occur. Instead, contact Customer Support as described in Obtaining Service. Low Row Assembly Guide: Getting Started If you plan to move the unit, get help and use a hand truck. 2 Hardware Kit (not to scale) The following pieces of hardware are provided on a shrink-wrapped card. Each part is labeled on the card for easy reference. Table 1. Hardware kit contents Fastener Low Row Assembly Guide: Getting Started Socket head cap screw (M12 x 35 mm) Quantity 12 Flat washer (9 mm internal diameter) 5 Buttonhead cap screw (M8 x 15 mm) 1 Set screw (M8 x 6 mm) 8 Flat washer (13 mm internal diameter) 12 Hex head cap screw (⁵₁₆-inch x 1¹₂-inch) 4 3 Fastener Axle mount end Quantity 4 Flat head hex cap screw (M12 x 30 mm) 6 ⁵₁₆-inch nylon lock nut 2 Weight horn Quantity 2 Weight storage horn 4 Arm pivot axle 2 Weight horn bumper 2 Table 2. Other Components Part Low Row Assembly Guide: Getting Started 4 Part Low Row Assembly Guide: Getting Started Weight horn end cap Quantity 2 Weight storage horn bumper 4 Gas spring 1 Instructional placard 1 5 Assembling the Equipment CAUTION: At least two people are required to position the parts of this equipment successfully. Do not attempt to assemble the equipment by yourself. The following figure shows the names used in this manual for the major components of the equipment. Proper alignment and adjustment of the equipment is critical. When you install fasteners, leave room for adjustments. Do not tighten the fasteners completely until you are instructed to do so. Make sure the equipment is stable and placed on a solid surface. The equipment is designed to be freestanding, but it can be bolted to the floor for extra stability. Precor highly recommends that the equipment be bolted to the floor to reduce the risk of toppling due to improper use. Because floor construction varies, consult a professional building engineer for proper fastening. Figure 1: Major Low Row components Low Row Assembly Guide: Assembling the Equipment 6 Stabilizing the Equipment Once you have positioned the base frame where you want the equipment to be used, test it for stability by pushing down on its corners. If the base frame rocks or wobbles at all, the height of the adjustable foot will need to be set. To stabilize the equipment: 1. Locate the round, adjustable foot at one of the corners of the base frame. 4. Using the same open-end wrench, turn the positioning bolt to the left or the right to move the adjustable foot to the appropriate level, as shown in the following figure. If you want to move the adjustable foot ... Then turn the bolt ... Upward To the right Downward To the left 2. Remove the two small buttonhead screws retaining the end cap at that corner of the frame, as shown in the following figure. Pull out the end cap, then set the cap and the screws aside. Figure 3: Adjustable foot positioning Figure 2: End cap removal 3. Using an open-end wrench, turn the jam nut to the left to loosen it. 5. Once the foot appears to be positioned correctly, test it by pressing down on the corners of the base frame. If it continues to shift or rock, readjust the foot as needed. 6. Re-tighten the jam nut. 7. Reinsert the end cap and its retaining screws. Tighten the screws completely. Low Row Assembly Guide: Assembling the Equipment 7 Assembling the Main Frame Perform the following procedure to attach both side uprights to the base frame. 2. Add one M12 x 35mm socket head cap screw and one 13mm flat washer to each of the screw holes. Finger tighten the fasteners. To attach the side uprights to the base frame: 1. Position the left side upright on the base frame so that the screw holes on the base frame and the upright line up. Note: Ask that your assistant hold the side uprights while you secure them into position. Figure 4: Side upright attachment 3. Repeat steps 1 and 2 to attach the right side upright. Low Row Assembly Guide: Assembling the Equipment 8 Installing the Center Upright Before beginning this procedure, obtain two weight storage horns. The upper screw and washer used to attach the crossbar to each side upright also attach a weight storage horn to the side upright. 6. Repeat steps 2 through 5 to attach the crossbar and an additional weight storage horn on the other side of the frame. Note: Perform the next procedure before tightening all the fasteners completely. Note: Have your assistant hold the crossbar in place while you perform this procedure. To attach the crossbar to the side uprights: 1. Position the crossbar between the side uprights so that the curve of the crossbar extends backward and the screw holes at either end line up with the screw holes on the side uprights. 2. Place a 13 mm flat washer over a M12 x 35 mm socket head cap screw. Insert the screw into the lower screw hole at one end of the crossbar and tighten it partially. 3. Insert a weight storage horn into the socket opposite the upper screw hole. 4. Insert a M8 x 6mm set screw into the small hole in the socket. Position the weight storage horn, then tighten the set screw completely. 5. Place a 13 mm flat washer over a M12 x 35 mm socket head cap screw. Insert the screw through the upper screw hole and into the weight storage horn, then tighten the screw partially. Figure 5: Crossbar attachment To attach the center upright to the base frame: 1. Place two M12 x 35 mm socket head cap screws and two 13 mm flat washers into the screw holes in the base frame. Partially tighten the fasteners. 2. Check that the frame is correctly aligned, then tighten all fasteners completely. Figure 6: Center attachment to base frame Low Row Assembly Guide: Assembling the Equipment 9 Installing the Movement Arms You will need an assistant to hold the movement arms in place while you complete this procedure. 3. Place an axle mount end on each end of the axle and attach a M12 x 30 mm flat head screw to each end, as shown in the following figure. To install the movement arms: 1. Position the axle end of one movement arm within its pivot bracket on the frame so that the openings in the bracket and the movement arm are aligned. 2. Press an axle through the openings in the bracket and the movement arm. Note: The axle should slide easily through the openings. You should not need to do anything more than tapping it lightly with a rubber mallet to move it into place. If the axle becomes jammed during this step, check to make sure the movement arm and the bracket are still aligned. If the axle remains jammed, remove it and contact Customer Support. Figure 7: Movement arm axle installation 4. Check that the axle is properly positioned and centered, then tighten the screws completely. Important: The screws should be tight enough to prevent the movement arm from rocking from side to side when in use. 5. Repeat steps 1 through 4 to install the other movement arm. Important: Test the operation of the movement arms after you have installed them. Make sure they move smoothly through their entire range, without binding or shifting. Low Row Assembly Guide: Assembling the Equipment 10 Attaching the Seat Pad 2. Insert four ⁵₁₆-inch x 1¹₂-inch hex head screws with 9mm flat washers into the screw holes in the pad, as shown in the following figure. The seat mechanism is preassembled, except for the seat pad and the gas spring. To attach the seat pad: 1. Position the pad over the seat bracket so that the screw holes in the seat and the bracket line up. Figure 9: Seat attachment Figure 8: Seat position Low Row Assembly Guide: Assembling the Equipment 3. Position the pad if necessary, then tighten the fasteners completely. 11 Connecting the Gas Spring 2. Place a nylon lock nut over the end of the stem and tighten it partially. The gas spring, which lifts the seat assembly when an exerciser adjusts the seat height, is attached to the seat assembly and the frame through two ball-shaped stems. the underside of the seat assembly; the other is on the center upright near the base frame. 3. Insert the threaded end of the lower stem through the hole in the small bracket on the base frame, as shown in the following figure. To attach the gas spring: 1. Insert the threaded end of the upper stem through the hole in the small bracket on the underside of the seat, as shown in the following figure. Important: Place the wide end of the gas spring up. Also, note that the seat adjustment handle has been omitted from this figure to keep the gas spring and its fasteners visible. Figure 11: Gas spring attachment, lower end 4. Place a nylon lock nut over the end of the lower stem. Tighten both nylon lock nuts completely. Figure 10: Gas spring attachment, upper end Low Row Assembly Guide: Assembling the Equipment 12 Adjusting the Seat Rollers After you have installed the gas spring, test the seat. It should not rock from side to side or from front to back, and it should move smoothly up and down when you adjust it. If the seat is not stable or cannot be positioned smoothly, you will need to adjust the seat rollers. Note: You will need assistance to complete this procedure. To adjust the rollers: 1. Loosen the screws securing the upper front roller. The following figure shows the location of one of these screws. 2. Have your assistant press the seat pad down until the back roller contacts the black plastic plate on the back of the frame. 3. Move the upper front roller until it contacts the black plastic plate on the front of the frame, then tighten the screws again. 4. Have your assistant release the seat pad, then adjust the seat position up and down a few times. Make sure that the seat moves upward and downward freely but does not rock or shift in any direction. If the seat cannot be adjusted easily, or if it continues to rock or shift, repeat this procedure to readjust the upper front roller. Figure 12: Upper front roller location Low Row Assembly Guide: Assembling the Equipment 13 Attaching Weight Horns to the Movement Arms The weight horns that attach to the movement arms are slightly larger than the weight storage horns. Before you begin this procedure, compare the available parts to make sure you are installing the correct weight horns on the movement arms. Attaching Weight Storage Horns Repeat this procedure as needed to attach all of the weight storage horns to the equipment. Figure 14: Weight storage horn attachment To attach a weight storage horn: Figure 13: Weight horn attachment To attach the weight horns: 1. Insert a weight horn into the outward side of the weight horn fitting on the movement arm. Slide the weight horn into the fitting until it stops. 2. Place a weight horn cap over the inward side of the fitting. 1. Insert the horn into one of the weight storage horn fittings on the equipment frame. Slide the horn in until it stops. 2. Insert a M12 x 35 mm socket head cap screw with 13 mm flat washer through the screw hole opposite the weight storage horn fitting and into the horn itself. Tighten the screw completely. 3. Insert a M8 x 6 mm set screw into the screw hole in the fitting. Position the weight storage horn as needed, then tighten the set screw completely. 3. Insert a M12 x 30 mm flat head cap screw through the cap, the movement arm, and the weight horn. Tighten the screw completely. 4. Insert two M8 x 6 mm set screws into the screw holes on the weight horn fitting. Tighten the set screws completely. 5. Slide a bumper down over the weight horn until it rests against the movement arm. 6. Repeat steps 1 through 5 to attach a weight horn to the other movement arm. Low Row Assembly Guide: Assembling the Equipment 14 Attaching the Instructional Placard and Safety Labels 2. Place the large hole near the bottom of the placard over the button, then slide the placard downward to lock it into place as shown in the following figure. The equipment includes a metal bracket for the instructional placard. The placard slides over a metal button near the bottom of the bracket. A small screw then holds it in place. To attach the instructional placard: 1. Remove the protective backings from the machine name label. Attach the label carefully to the recess at the upper front of the placard, as shown in the following figure. Figure 16: Placard mounting Figure 15: Placard label positioning Low Row Assembly Guide: Assembling the Equipment 15 3. Insert an M8 x 15 mm buttonhead screw with 9mm flat washer into the screw hole near the top of the bracket, as shown in the following figure. Tighten the screw completely. Note: If you are installing labels in a language other than English, remove the general warning label attached to the equipment. Apply the general warning label in the appropriate language where the English label was originally applied. Figure 17: Securing the placard in place Low Row Assembly Guide: Assembling the Equipment 16 Precor is a registered trademark of Precor Incorporated. Copyright 2012 Precor Incorporated. Specifications subject to change without notice. www.precor.com Precor Incorporated 20031 142nd Ave NE P.O. Box 7202 Woodinville, WA USA 98072-4002 1-800-347-4404 NOTICE: Precor is widely recognized for its innovative, award winning designs of exercise equipment. Precor aggressively seeks U.S. and foreign patents for both the mechanical construction and the visual aspects of its product design. Any party contemplating the use of Precor product designs is hereby forewarned that Precor considers the unauthorized appropriation of its proprietary rights to be a very serious matter. Precor will vigorously pursue all unauthorized appropriation of its proprietary rights. Discovery Plate Loaded™ Low Row Assembly Guide CWP047777-101 rev A, en March 2012