1
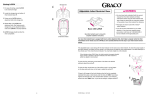
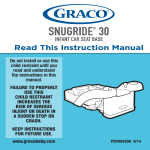
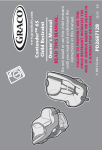
SnugRide® Click ConnectTM Base Infant Restraint Base Owner’s Manual See infant restraint owner’s manual for complete installation instructions. © 2012 Graco PD229521B 12/12 DO NOT PLACE THIS INFANT RESTRAINT IN A VEHICLE SEATING LOCATION THAT HAS A FRONT AIR BAG . If the air bag inflates, it can hit the infant restraint with great force and cause serious injury or death to your child. Check vehicle owner’s manual for information about side air bags and infant restraint installation. You MUST read and understand both the owner’s manual from the infant restraint and these instructions before using the infant restraint and base. Keep this sheet with the instruction booklet in the base for reference. This base can only be used with a Graco® SnugRide® Click Connect™ 30 and Graco® SnugRide® Click Connect™ 35. If you do not have instructions for your infant restraint or if you have any questions about your product, call Graco at 1-800-345-4109. Your infant restraint base is equipped with Graco’s recline adjustment foot, which helps to properly recline the infant restraint/base on the vehicle seat. Use it AFTER you have carefully followed all of the steps in your infant restraint owner’s manual. Locking clip (See infant restraint owner’s manual) 2 Installing the Base Using Vehicle Belt You must carefully follow the instructions provided by your vehicle manufacturer, in addition to the information in this manual. If a front passenger seat is used, slide the vehicle seat rearward as far as possible from the dashboard. If a rear seat is used, make sure the seat in front of it is moved forward enough and is upright enough to allow room for the infant restraint. 1. Make sure vehicle is on level ground in order to get the correct recline position . 2. Place the base in a rear-facing position in a forward-facing vehicle seat. Lap/Shoulder Belt Lap Belt 3. Buckle the vehicle belt. Make sure the buckle tongue goes into the correct buckle . The seat belt should not be twisted or turned. 3 4. To create a secure installation, while pushing down on the base, pull the free end of the lap belt or the shoulder portion of the lap/shoulder belt to tighten . 5. Check that belt does not move by pulling and pushing hard on base with hands near the vehicle belt path. If belt loosens or lengthens, repeat procedure. If it does not stay tight, try another seating position or contact Graco at 1-800-345-4109. 6. Push the infant restraint down into the base and make sure that you hear a “click” . Pull up on the infant restraint to be sure it is latched securely into the base. If the infant restraint does not securely latch into the base, the infant restraint provides NO protection for your child. DO NOT use the infant restraint/base if the infant restraint does not securely latch into the base. 7. Test infant restraint for secure installation as described in infant restraint “Final Safety Check” page 9. CLICK! 4 Using LATCH to Install Base LATCH locations Newer vehicles may have one or more seating positions with LATCH anchorage systems. If vehicle is equipped with LATCH, the vehicle lower anchor points may be visible at the vehicle seat crease. If not visible, they may be marked with the symbol . See your vehicle owner’s manual for exact locations, anchor identification, and requirements for use with an infant restraint. Typical seat in a passenger vehicle. Vehicle Lower Other vehicle types may have Anchor Points different LATCH locations or different markings. Vehicle Seat Crease 1. MAKE SURE vehicle is on level ground. Make sure to check your vehicle owner's manual for LATCH seating positions. 2. For ease of installation, press button to extend LATCH to its MAXIMUM LENGTH . 3. Position base in vehicle seat as shown. 4. Make sure LATCH is through vehicle/LATCH belt path normally used for vehicle seat belt. . Belt must lie flat and not be twisted. 5 5. Attach connectors to vehicle lower anchors. Pull firmly on connectors to be sure they are attached . 6. Tighten LATCH by pushing down hard on base and pulling the adjustment belt back through belt path . 7. NEVER put two LATCH connectors on one vehicle LATCH anchor . 8. Test infant restraint for secure installation as described in infant restraint “Final Safety Check” page 9. 9. Check that the LATCH stays tight and does not slip from the tightened position. If it does not stay tight, try another seating position or contact Graco at 1-800-345-4109. 10. To remove LATCH, push button while pulling on the LATCH belt as shown . 11. Press and hold LATCH release hinge . 12. Push connector in, lift connector up and pull out (away from anchor point) . 13. Repeat steps 11 and 12 for other connector. 6 CLICK! Reclining Infant Restraint/Base 1) Vehicle MUST be level with ground to get correct recline position. 2) Use level indicator on base. When reading the level indicator on base, view it directly from side of the indicator. Check the level indicator. You must look straight on at the indicator. WHEN READING THE LEVEL INDICATOR, Use corrected age for preemies. - If the indicator shows light blue in the window, the restraint is level for infants 0+ months in age. - If the indicator shows light blue and dark blue in the window, the restraint is level for a child 3+ months in age. 3+ months (meses) - If any RED is showing, child restraint is NOT level. You must adjust your recline position. 7 Turn the knob counter clockwise to the desired setting to lower the foot . Turn the knob clockwise to raise the foot . If there is still red in the level indicator when the foot is completely extended then raise the foot and place a rolled towel under the foot until ONLY blue shows. Re-adjust the vehicle seat belt as necessary to secure the infant restraint firmly in the vehicle seat. 8 Final Safety Check: Every time you drive with your child, PUSH DOWN on the top of the infant restraint slowly but 1" firmly to make sure the vehicle belt does not lengthen at all and that the vehicle belt or LATCH is fastened securely around the infant restraint/base. Holding the infant restraintor base near the vehicle belt path, TWIST AND PULL the infant restraint forward and to both sides to make sure the vehicle belt or LATCH does not lengthen or loosen and the infant restraint does not easily move. The infant restraint should not move side to side or forward more than 1 inch (2.5 cm). Storing LATCH 1. For ease of storing, extend LATCH to its maximum length . 2. LATCH storage should look like this when complete . 9 Replacement Parts Bottom of Base To purchase parts or accessories or for warranty information in the United States, please contact us at the following: www.gracobaby.com or 1-800-345-4109 10 SnugRide® Click ConnectTM Base Base del sistema de seguridad para niños Manual del propietario Vea el manual del propietario del sistema de seguridad para niños para obtener instrucciones copletas sobre la instalación. © 2012 Graco PD229521B 12/12 NO PONGA ESTE SISTEMA DE SEGURIDAD PARA BEBÉS EN UN ASIENTO DEL VEHÍCULO EQUIPADO CON UNA BOLSA DE AIRE DELANTERA. Si la bolsa de aire se infla, puede golpear al sistema de seguridad para bebés con mucha fuerza y causar lesiones serias o la muerte de su niño. Consulte el manual del propietario del vehículo para obtener información sobre las bolsas de aire laterales y la instalación del sistema de seguridad para niños. Antes de usar la base y el sistema de seguridad para niños, DEBE leer y entender el manual del propietario del sistema de seguridad y estas instrucciones. Guarde esta hoja con el libro de instrucciones como referencia en la base. Esta base se puede usar solamente con un sistema de seguridad SnugRide® Click Connect™ 30 y SnugRide® Click Connect™ 35 de Graco. Si no recibió instrucciones con su sistema de seguridad o si tuviera alguna pregunta sobre su producto, llame a Graco al 1-800-345-4109. La base de su nuevo sistema de seguridad para niños está equipada con el pie Graco de ajuste inclinable que ayuda a reclinar debidamente la base/sistema del seguridad sobre el asiento del vehículo. Úselo DESPUÉS de haber seguido detenidamente todos los pasos en el manual del propietario de su sistema de seguridad para niños. Traba de seguridad (Vea el manual del propietario del sistema de seguridad) 12 2 Instalación de la base usando el cinturón del vehículo Debe seguir detenidamente las instrucciones provistas por el fabricante de su vehículo, además de la información de este manual. Si va a usar el asiento delantero del pasajero mueva el asiento del vehículo para atrás todo lo posible. Si usa un asiento trasero, asegúrese que el asiento de adelante está lo más adelante posible y en posición vertical para que haya suficiente espacio para el sistema de seguridad para bebés. 1. Asegúrese de que el vehículo esté sobre piso nivelado para poder obtener la posición correcta de reclinación . 2. Coloque el sistema de Cinturón seguridad para bebés sin de la falda la base orientado hacia atrás en un asiento del vehículo . Cinturón del hombro/falda 3. Trabe el cinturón del asiento. Asegúrese que la lengua de la hebilla pase por la hebilla correcta . El cinturón del vehículo no deberá estar doblado ni dar vuelta. 3 4. Para crear una instalación bien ajustada, mientras empuja a la base hacia abajo, tire la punta libre del cinturón para la cintura o la parte del hombro del cinturón para el hombro/cintura para apretarlo . 5. Verifique que al cinturón no se mueve tirando y empujando con fuerza la base. Si el cinturón se afloja o se alarga, repita el procedimiento. De no mantenerse apretado, colóquelo en otro lugar en el asiento o póngase en contacto con Graco llamando al 1-800-345-4109. 6. Empuje el sistema de seguridad para bebés hacia abajo en la base y asegúrese de que escucha un “clic” . Tire hacia arriba del sistema de seguridad para bebés para asegurarse que esté trabado apretadamente en la base. Si el sistema de seguridad para bebés no se traba apretadamente en la base, el sistema de seguridad para bebés NO proporciona ninguna protección a su niño. NO use la base/sistema de seguridad si el sistema de seguridad para bebés no está debidamente trabado en la base. 7. Pruebe el sistema de seguridad para bebés para determinar si la instalación está segura como se describe en la sección “Verificación final de seguridad” en la página 9. 14 4 ¡CLIC! Utilización del LATCH para instalar la base Ubicación del LATCH Los vehículos nuevos tienen uno o varios asientos equipados con sistemas de anclaje LATCH. Si el vehículo viene equipado con el sistema LATCH, se pueden ver los puntos de anclaje inferiores en el pliegue del asiento del vehículo. Si no están visibles, pueden estar marcados con el símbolo . Vea su manual del dueño del vehículo para informarse sobre las ubicaciones exactas, la identificación de los anclajes y los requisitos de uso con un sistema de seguridad para bebés. Puntos de Un asiento típico de un vehículo de anclaje pasajeros. Otros tipos de vehículos inferiores del pueden tener otras ubicaciones del vehículo sistema LATCH o marcas diferentes. Pliegue del asiento del vehículo 1. ASEGÚRESE de que el vehículo esté en un piso nivelado. Asegúrese de verificar el manual del propietario de su vehículo para obtener las posiciones de asiento con LATCH. 2. Para facilitar la instalación, extienda el LATCH hasta su máxima longitud . 3. Ponga la base en el asiento del vehículo como se indica. 4. Pase el LATCH por el recorrido del cinturón/ LATCH en la base que normalmente se usa para el cinturón del asiento del vehículo . El cinturón debe mantenerse en posición plana sin doblarse. 5 5. Sujete los conectores a los anclajes inferiores del vehículo. Tire firmemente de los conectores para asegurarse de que estén enganchados . 6. Ajuste el LATCH empujando con fuerza hacia abajo sobre la base y tirando el cinturón de ajuste a través de la vía del cinturón . 7. NUNCA ponga dos conectores LATCH en un anclaje LATCH del vehículo . 8. Pruebe el sistema de seguridad para niños para determinar si la instalación está segura como se describe en la sección “Verificación final de seguridad” en la página 9. 9. Verifique que el LATCH se mantiene apretado y no se suelta de la posición apretada. De no mantenerse apretado, colóquelo en otro lugar en el asiento o póngase en contacto con Graco llamando al 1-800-345-4109. 10. Para sacar el LATCH, oprima el botón mientras tira del cinturón LATCH como se indica . 11. Oprima y sujete la bisagra LATCH . 12. Empuje el conector hacia dentro, levante el conector y jálelo (en el sentido opuesto al punto de anclaje) . 13. Repita los pasos 11 y 12 para el otro conector. ¡CLIC! 16 6 Inclinación del sistema de seguridad para bebés/base 1) El vehículo DEBE estar nivelado con el piso para obtener la posición correcta de reclinación. 2) Use el indicador del nivel en la base. Cuando lee el indicador del nivel en la base, véalo directamente desde el costado del indicador. Verifique el indicador del nivel. Debe mirar de frente al indicador. CUANDO LEE EL INDICADOR DEL NIVEL, Use la edad corregida para prematuros. - Si el indicador aparece azul claro en la ventana, el sistema de seguridad está nivelado para recién nacidos. - Si el indicador aparece azul claro y oscuro en la ventana, el sistema de seguridad está nivelado para niños de 3 meses de edad y más. - Si aparece el color ROJO el sistema de seguridad para niños NO está nivelado. Debe ajustar su posición de reclinación. 7 3+ months (meses) Gire la perilla en el sentido contrario a las agujas del reloj hasta alcanzar el valor deseado para bajar el pie . Gire la perilla en el sentido de las agujas del reloj para levantar el pie . Si todavía aparece la zona de color roja en el indicador de nivel cuando el pie está completamente extendido, levante el pie y coloque una toalla enrollada debajo del pie SOLAMENTE hasta que aparezca la zona de color azul. Vuelva a ajustar el cinturón de seguridad del vehículo lo necesario para sujetar firmemente el sistema de seguridad para niños al asiento del vehículo. 18 8 Verificación final de seguridad: Cada ez que sale en automóvil con su niño, EMPUJE HACIA ABAJO lenta pero firmemente la parte de arriba del sistema de seguridad para bebés para asegurarse que el cinturón del vehículo no se alarga y que el cinturón del vehículo 1" o el LATCH esté sujetado apretadamente alrededor de la base/sistema de seguridad para bebés. Agarrando el sistema de seguridad para bebé o base cerca del recorrido del cinturón del vehículo, GIRE Y TIRE el asiento hacia adelante y hacia ambos costados para asegurarse que el cinturón del vehículo o LATCH no se alargue ni se afloje y que no se pueda mover el sistema de seguridad para bebés con facilidad. El sistema de seguridad para bebés no deberá moverse de un lado a otro ni hacia adelante más de 1 pulgada (2,5 cm). Almacenamiento del LATCH 1. Para facilitar el almacenamiento, extienda el LATCH hasta su máxima longitud . 2. El almacenamiento del LATCH debería tener este aspecto cuando esté terminado . 9 Piezas de repuesto El lado inferior de la base Para comprar piezas o accesorios o para obtener información sobre la garantía en los Estados Unidos, por favor comuníquese con nosotros en: www.gracobaby.com o 1-800-345-4109 10 20