1
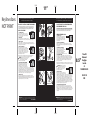
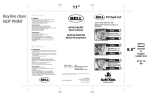
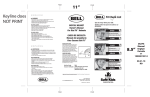
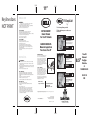
FOLD
Keyline does
NOT PRINT
11”
FOLD
ENGLISH
Fit Check List
WARNINGS
• Impact forces, even in a common low speed accident, can result in
serious injury or death, even when a helmet is worn.
• Helmets can’t prevent all head injuries. Brains can be injured through
rotational motions, which helmets cannot prevent.
• A helmet can only help protect what it covers.
Use it every time you ride.
Úselo cada vez que se sube a su
bicicleta.
BICYCLE HELMET
Owner’s Manual
For True Fit Helmets
YOU SHOULD ALWAYS:
• Wear your helmet low in the front to protect the forehead.
• Fasten the buckle and check strap adjustment often.
• Replace your helmet immediately if it shows any visible signs of damage.
• Clean your helmet with mild soap and water only.
• Store your helmet in a cool dry place.
• Ride safely, and obey all traffic laws.
EYES
®
YOU SHOULD NEVER:
EYES: The rim of the helmet should be 1-to-2
finger-widths above the eyebrows.
• Wear anything under your helmet.
• Wear a bicycle helmet while on a motor vehicle.
• Attach anything to your helmet.
• Let your child play with a helmet, as they may damage it.
• Wear a helmet that does not fit or cannot be adjusted properly.
• Leave a helmet in direct sun or in a car on a sunny day. Do not use
heat-damaged helmets.
• Wear a helmet while climbing, as the helmet may snag, resulting in
strangulation.
OJOS: El borde del casco debe quedar a uno o
dos anchos de dedo por arriba de las cejas.
CASCO DE BICICLETA
Manual del propietario
Para Cascos True Fit
OJOS
®
HELMETS WITH VISORS
E S PA Ñ O L
EARS
Some helmets come with removable snap-on
visors. To remove the visor, pull the ends of
the visor loose from the helmet and then lift
away from the helmet. To replace the visor,
center it on the helmet and then snap the pins
(A) on the visor into the holes (B) in the
helmet. DO NOT try to remove the visor by
pulling forward on the center. This will damage
the helmet and the visor.
ADVERTENCIAS:
• Las fuerzas de impacto, aun en un accidente común y corriente a baja
velocidad, pueden resultar en lesiones graves o la muerte, aun cuando
se trae puesto un casco.
• Los cascos no pueden prevenir todas las lesiones en la cabeza. El cerebro
puede lesionarse debido a movimientos de rotación, los cuales los cascos
no pueden prevenir.
• Un casco sólo puede proteger lo que cubre.
EARS: The straps should form a "V" under
just beneath the ear lobe.
OÍDOS: Las correas deben formar una “V”
justamente abajo del lóbulo de la oreja.
OÍDOS
CASCOS CON VISERAS
Algunos cascos se presentan con viseras
desmontables instaladas a presión. Para
desmontar la visera, jale y suelte los extremos
de la visera del casco y luego separe la visera
del casco. Para poner la visera en el casco,
centre la visera en el casco y luego presione
sobre las clavijas (A) de la visera en los
agujeros (B) en el caso. NO intente desmontar
la visera jalándola hacia el frente por el centro.
Esto dañara el casco y la visera.
USTED SIEMPRE DEBE:
• Usar su casco de manera tal que cubra su frente para protegerla.
• Abrocharse la hebilla y verificar seguido el ajuste de las correas.
• Reemplazar su casco inmediatamente si muestra cualquier señal visible
de daño.
• Limpiar su casco con jabón suave y agua únicamente.
• Guardar su casco en un sitio seco y fresco.
• Conducir con seguridad y obedecer todas las leyes de tráfico.
Notified Body
Cuerpo notificado
USTED NUNCA DEBE:
• Traer cosa alguna puesta bajo su casco.
• Traer puesto un casco de bicicleta al estar dentro de un vehículo
motorizado.
• Fijar cosa alguna a su casco.
• Dejar que su hijo/a juegue con un casco, ya que lo pueden dañar.
• Usar un casco que no se adapta o no se ajusta correctamente.
• Dejar un casco bajo los rayos directos del sol o en el interior de un
automóvil en un día asoleado. No use cascos dañados por el calor.
• Usar un casco al escalar, ya que el casco se puede enganchar, dando
por resultado en la estrangulación.
A
B
MOUTH
MOUTH: When the rider opens his mouth,
the buckle should feel snug on the chin and
the helmet should hug the head.
BOCA: Cuando el/la ciclista abre su boca, la
hebilla debe sentirse ajustada en el mentón
o barbilla y el casco debe sentirse ajustado
alrededor de la cabeza.
BSI
389 Chiswick High Road
London, W4 4AL
Notified Body No. 0086
BOCA
Bell®, Quick Fit™, Cam-Lock™, Smart Fit®, Half Nelson Pro Fit™, Dial Fit™, Infant Fit Bridge™, TrueFit® and the Bell
ellipse logo® are all trademarks of Bell Sports, Inc., Rantoul, IL
www.belltruefit.com
© 2010 Bell Sports, Inc.
Rantoul, IL 61866 USA 1-800 456 BELL
Printed in China - Impreso en China
Part#/Pieza No. 1000012512
FOLD
FOLD
TrueFit
Manual
EngSpn
Outside
v1
10000012512
8.5”
09.21.10
RO
FOLD
Keyline does
NOT PRINT
11”
FOLD
All safety equipment has limits. Read this helmet manual
carefully and follow the instructions completely.
Todo equipo de seguridad tiene sus límites. Lea el manual de este
casco cuidadosamente y siga fielmente todas las instrucciones.
PROPER FIT IS CRITICAL TO HELMET PERFORMANCE
2
1
Helmets that slip to the front, back or side of the head expose parts of the skull.
Loose or unbuckled straps can allow the helmet to completely fall off the head in
an accident. If the helmet cannot be fitted correctly, try a different size helmet.
EL AJUSTE CORRECTO ES DE IMPORTANCIA VITAL
EN EL RENDIMIENTO DEL CASCO
Los cascos que se deslizan hacia el frente, la parte posterior o el lado de la cabeza
exponen partes del cráneo. Las correas sueltas o no abrochadas pueden permitir
que el casco se caiga completamente de la cabeza en un accidente. Si el casco no
se puede ajustar correctamente, pruébese un casco de tamaño diferente.
HOW TO FIT A HELMET
1: PUT THE HELMET ON
The rim of the helmet should be 1-to-2 fingerwidths above the eyebrows. The helmet needs
to be low in front to protect the forehead (Fig. 1).
If so, proceed to step 2.
EYES
CÓMO AJUSTAR UN CASCO
1: PÓNGASE EL CASCO
El borde del casco debe quedar a uno o dos
anchos de dedo por arriba de las cejas. El
casco necesita quedar hacia abajo sobre la
frente para protegerla (Figura 1). De ser así,
proceda al paso 2.
2: SIDE STRAPS
For a correct fit, the side straps should join at a point
slightly below and in front of the ears, forming a ‘V’ under the ear lobe (Fig. 2).
3: REAR FIT SYSTEM
2: AJUSTE LAS CORREAS LATERALES
Position the helmet on your head so that the elastic fit belt is below the bony
protrusion at the back of your head (Occipital Lobe) (Fig. 3).You want the system
to be snug, but not uncomfortable.
Al quedar correctamente, las correas laterales deben unirse en un punto
ligeramente abajo y adelante de las orejas. formando una “V” bajo el lóbulo de
la oreja (Figura 2).
4: ADJUST THE CHIN STRAP
Always wear the helmet with the chin strap
buckle fastened and the strap pulled tight. Make
sure the strap is against the throat, NOT on the
point of the chin. Straps worn on the point of the
chin increase the chance of the helmet coming off
in an accident. Figures 4a and 4b show how to
fasten and release the buckle.
OJOS
3: SISTEMA DE AJUSTE POSTERIOR
EARS
Coloque el casco sobre su cabeza de
OÍDOS
manera tal que el sistema de ajuste posterior
(si corresponde) queda debajo de la
protuberancia ósea en la parte posterior de
su cabeza (Lóbulo occipital) (Figura 3).
El sistema debe quedar ajustado pero no incómodo.
Make sure the buckle is flush against the skin under the chin and that when
you open your mouth, it is snug on the chin and hugging your head.
4: AJUSTE LA MENTONERA
3
WARNING: Make sure the loose end of the strap
passes through the rubber “O” ring (Fig. 4c). If it
does not, the strap may slide loose and the
MOUTH
helmet can come off accidentally.
Use siempre el casco con la hebilla de la correa mentonera o barbillera
abrochada y la correa ajustada firmemente. Asegúrese de que la correa quede
contra la garganta, NO en la punta del mentón o barbilla. Las correas utilizadas
en la punta del mentón pueden incrementar la posibilidad de que el casco se
separe de su cabeza en un accidente. Las figuras 4a y 4b muestran cómo
abrochar y soltar la hebilla.
4a
True Fit®
5: CHECK THE FIT AND ADJUSTMENTS
Asegúrese que la hebilla queda al ras contra la piel bajo el mentón y que cuando
usted abre su boca, se siente ajustado contra el mentón y firme sobre su cabeza.
Before using the helmet, stand in front of the
mirror and grab the helmet with both hands
and twist it to the left and to the right. If the
helmet fits right, the skin on the forehead will
move as the helmet moves. If it does not, then the helmet is too loose and is
unsafe for use and you need to start over using the steps above. Now grab the
helmet with both hands and try to remove it by rolling the helmet forward and
backward. If you can roll it off the head completely or so far that it blocks vision
or backward far enough to expose the forehead, then it doesn’t fit right and is
unsafe for use and you need to start over using the steps above.
ADVERTENCIA: Asegúrese que el extremo
suelto de la correa pasa por la junta tórica de
caucho (Figura 4c). De no ser así, la correa
puede deslizarse y soltarse y el casco se
puede caer accidentalmente.
BOCA
TrueFit
Manual
EngSpn
Inside
v1
10000012512
8.5”
5: REVISE LOS AJUSTES
Antes de usar el casco, párese frente al espejo,
tome el casco con ambas manos y gírelo hacia
la izquierda y hacia la derecha. Si el casco está correctamente ajustado, la piel de
la frente se moverá a medida que el casco se mueve. Si no lo hace, entonces el
casco está muy suelto y no proporciona seguridad al usarlo, por lo que necesita
volver a empezar otra vez con los pasos anteriores. Ahora agarre el casco con
ambas manos y trate de quitárselo al girar el casco hacia delante y hacia atrás.
Si el casco se separa de su cabeza totalmente o lo suficiente como para taparle la
vista, o hacia atrás hasta dejar despejada la frente, entonces dicho casco no esta
perfectamente ajustado y no proporciona seguridad al usarlo, por lo que usted
necesita volver a empezar con los pasos anteriores.
6: TAKE A TEST RIDE
Once you are satisfied that the helmet fits correctly and that all straps are
properly adjusted and tightened, take a short test ride. Pay attention to overall
comfort and helmet stability while riding. Make any minor adjustments to the
fit pads and straps to improve comfort or stability.
4b
“0” ring
Junta tórica
4c
6: HAGA UN VIAJE EN BICICLETA DE PRUEBA
Una vez que usted está satisfecho/a de que el casco está correctamente
ajustado y que todas las correas están correctamente ajustadas y apretadas,
haga un corto recorrido en bicicleta. Ponga especial atención a la comodidad y
estabilidad del casco mientras viaja en bicicleta. Haga todos los ajustes menores
necesarios a los cojines de ajuste y a las correas para mejorar la comodidad o
estabilidad.
ADVERTENCIA: NO USE ESTE CASCO si usted no puede ajustar el casco para que
quede correctamente ajustado de acuerdo con estas instrucciones o de manera tal que
se sienta cómodo y estable al viajar en bicicleta. Devuélvalo a la tienda donde lo compró
o contáctenos para solicita ayuda.
WARNING: If you cannot adjust the helmet so that it fits correctly according to these
instructions or so that it is comfortable and stable while riding, DO NOT USE IT. Return it
to your store or contact us for assistance.
1.800.456.BELL
FOLD
1.800.456.BELL
FOLD
09.21.10
RO