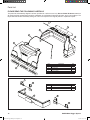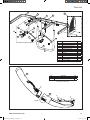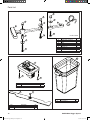
1
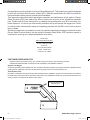
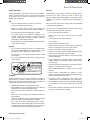
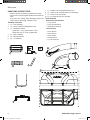
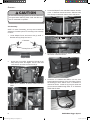
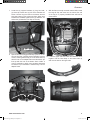
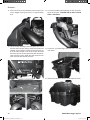
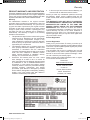
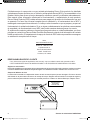
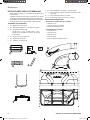
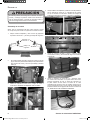
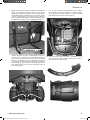
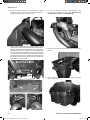
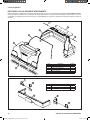
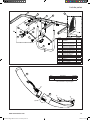
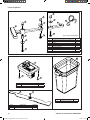
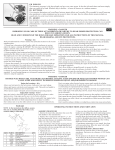
B463 GRASS BAGGER OWNER’S MANUAL PRODUCT FOR RESIDENTIAL USE ONLY D142100:R1.11.14 D142100 R1 Bagger Manual_Final - English.indd 1 4/9/2015 8:50:21 AM Congratulations on the purchase of your new Raven Bagging unit. This product was carefully designed to work with the Raven Multi Purpose Vehicle (MPV), and was assembled in the USA to provide the best performance when properly operated and maintained. This manual provides information regarding the operation and maintenance of this product. Denver Global Products (DGP) has made every effort to ensure the accuracy of the information presented here. Please read the entire manual prior to installing and operating with your MPV and retain it for further reference. It instructs you how to safely and easily set up and operate the bagger unit. Failure to carefully follow recommended safety and operating practices with the MPV could result in serious injury or death. Should you experience any problems or have any questions regarding your bagger unit please contact Denver Global Products directly via the contact information listed below. DGP customer support is committed to ensuring your complete satisfaction at all times. Please visit: www.ravenamerica.com/ Or call: 1-888-321-5700 Or write to: Denver Global Products 1000 E. Powell Drive Lincolnton, NC 28092 CUSTOMER RESPONSIBILITIES • Read and observe the safety rules in this manual and exercise caution when operating your MPV. • READ AND UNDERSTAND ALL INSTRUCTION, WARNING, AND DANGER LABELS. Register Your Bagger To receive important product updates and other important information register your product with Denver Global Products by filling out the registration card in the manual packet or going on-line to www.ravenamerica.com. Serial Number Label Information contained on the serial number label is essential to the registration process. The serial number is located on the inside of the body mount frame. Record this information on the registration card and for your personal reference in the event you need to contact Denver Global for any reason. Denver Global Products MPV Bagger Model# B463 S/N B463-XXXX 2 D142100 R1 Bagger Manual_Final - English.indd 2 RAVEN B463 Bagger System 4/9/2015 8:50:21 AM TABLE OF CONTENTS SAFETY & PRECAUTIONS............................................................................................................... 4 UNPACKING...................................................................................................................................... 6 ASSEMBLY........................................................................................................................................ 7 OPERATION.....................................................................................................................................11 PARTS LISTS.................................................................................................................................. 12 WARRANTY..................................................................................................................................... 15 WARNING! SERIOUS INJURY OR EVEN DEATH CAN OCCUR IF INSTRUCTIONS ARE NOT FOLLOWED. FAILURE TO READ THIS MANUAL BEFORE OPERATING THIS PRODUCT CAN RESULT IN SERIOUS INJURY OR DEATH. www.ravenamerica.com D142100 R1 Bagger Manual_Final - English.indd 3 3 4/9/2015 8:50:21 AM Safety & Precautions SAFETY AND OPERATING SYMBOLS Familiarize yourself with the safety and warning symbols present on the MPV and their meanings to ensure safe & proper operation. Safety labels warn of potentially dangerous situations and areas of the MPV that can cause serious injury. Read and understand all labels. If a label becomes damaged and you are no longer able to read it, please contact DGP at 1-888-321-5700 for a replacement. Your safety and the safety of others is very important. There are important safety messages in this manual and on the generator. Please read this information carefully. A safety message alerts you to potential hazards. Each safety message is preceded by one of these words: DANGER, WARNING, CAUTION or IMPORTANT. DANGER! DEATH OR SERIOUS INJURY WILL OCCUR IF INSTRUCTIONS ARE NOT FOLLOWED. WARNING! SERIOUS INJURY OR EVEN DEATH CAN OCCUR IF INSTRUCTIONS ARE NOT FOLLOWED. CAUTION! INJURY CAN OCCUR IF INSTRUCTIONS ARE NOT FOLLOWED. IMPORTANT DAMAGE TO THE MPV OR OTHER PROPERTY COULD RESULT IF INSTRUCTIONS ARE NOT FOLLOWED General Operation • Read, understand and follow all instructions in the manual and on the machine before starting. • Only allow responsible adults, who are familiar with the instructions, to operate the machine. • Clear the area of objects such as rocks, stones, etc., which could be thrown by the blades. • Be sure the area is clear of all people and pets before mowing. Stop the machine if anyone enters the area. • Do not mow in reverse unless absolutely necessary. Always look down and behind before and while backing. • Be aware of the mower discharge direction and do not direct it towards anyone. Do not operate the mower without either the entire grass catcher or the guard in place. • Slow down before turning. • Never leave the machine unattended when the engine is running. Always turn off the blades, set the parking brake, stop the engine and remove the key before leaving the machine. • Turn off blades when not mowing. • Stop engine before removing grass catcher or unclogging chute. • Mow only in daylight or good artificial light. • Do not operate the machine while under the influence of alcohol or drugs. • Watch out for traffic when operating near or crossing roadways. • Use extra care when loading and unloading the machine onto a trailer or truck. • Keep machine free buildup from debris which can burn if they contact hot exhaust/ engine parts. Plowing leaves or other debris can cause buildup to occur. • Clean any oil or fuel spillage before operating or storing the machine. • Allow machine to cool before storage. WARNING The operation of any mower can result in foreign objects thrown into the eyes, which can result in severe eye damage. ALWAYS wear safety glasses or eye shields before starting your mower and while mowing. We recommend a wide vision safety mask for over the spectacles or standard safety glasses. DANGER THE CUTTING MACHINE IS CAPABLE OF AMPUTATING HANDS AND FEET AND THROWING OBJECTS. FAILURE TO OBSERVE THE FOLLOWING SAFETY INSTRUCTIONS COULD RESULT IN SERIOUS INJURY OR DEATH. • Never carry passengers or children even with blades off. 4 D142100 R1 Bagger Manual_Final - English.indd 4 RAVEN B463 Bagger System 4/9/2015 8:50:21 AM Safety & Precautions Slope Operation Service Slopes are related to loss-of-control and tip-over accidents, which can cause severe injury or death. Exercise caution on all slopes. Do not mow on a slope with an incline of greater than 15 degrees. The operation of any mower can result in foreign objects thrown into the eyes, which can result in severe eye damage. Always wear safety glasses or eye shields while operating your mower or performing any adjustments or repairs. DO • Mow up and down slopes (15° Max.), not across. • Remove obstacles before mowing. We recommend a wide vision safety mask over spectacles or standard safety glasses. • Watch for uneven terrain which could overturn the machine. Be aware that tall grass can hide obstacles. Use extra care in handling gasoline and other fuels. They are flammable and vapors are explosive. • Use slow speed and avoid stopping on a slope. • The grass catcher can change the stability of the machine. Keep all movement on slopes slow and gradual. Avoid sudden changes in speed or direction and stopping and starting on slopes. • If tires lose traction,stop the blades and guide the MPV slowly down the slope. DO NOT • Do not mow near drop-off, ditches, or embankments. The mower could suddenly turn over if a wheel is over the edge of a cliff or ditch,or if an edge caves in. • Do not mow on wet grass. Reduced traction could cause sliding. • Do not try to stabilize the machine by putting your foot on the ground. CAUTION PRECAUCIÓN WHEN OPERATING ON VARIABLE INCLINATIONS IT IS SUGGESTED TO USE THE RAVEN FRONT WEIGHT KIT. SI TRABAJA EN INCLINACIONES VARIABLES SE SUGIERE UTILIZAR EL KIT RAVEN ENFRENTE PARA AGREGAR PESO. Children Tragic accidents can occur if the operator is not alert to the presence of children. Children are often attracted to the machine and the mowing activity. Never assume that children will remain where you last saw them. • NEVER allow children to operate the machine. • Keep children out of the mowing area and under the watchful care of another responsible adult. • Be alert and turn off the machine if children enter the area. • Before and when backing, look behind and down for small children. • Never carry children. They may fall off and be seriously injured or interfere with safe machine operation. • Use extra care when approaching blind corners, shrubs, trees, or other objects that may obscure vision. • Remove & store key when machine is not in operation or unattended to prevent unauthorized operation. www.ravenamerica.com D142100 R1 Bagger Manual_Final - English.indd 5 • Use only an approved container. • Never remove gas cap or add fuel with the engine running. • Allow engine to cool before refueling. • Do not smoke. • Never refuel the machine indoors. • Never store the machine or fuel container inside where there is an open flame, such as a water heater. • Never run a machine inside a closed area. • Keep nuts and bolts, especially blade attachment bolts, tight and keep equipment in good condition. • Never tamper with safety devices. Check their proper operation regularly. • Keep machine free of grass, leaves, or other debris buildup. Clean oil or fuel spillage. Allow machine to cool before storing. • Stop and inspect the equipment if you strike an object. Repair, if necessary, before restarting. • Never make adjustments or repairs with the engine running. • Grass catcher components are subject to wear, damage, and deterioration, which could expose moving parts or allow objects to be thrown. • Frequently check components and replace with manufacturer’s recommended parts, when necessary. • Mower blades are sharp and can cut. Wrap the blade(s) or wear gloves, and use extra caution when servicing them. • Check brake operation frequently. Adjust and service as shown in the Operator’s Manual. 5 4/9/2015 8:50:22 AM Unpacking UNPACKING INSTRUCTIONS • Remove all parts and packing materials from carton • Check carton contents against list. Be sure all parts are there. • If any parts are missing and/or damaged, please call DGP Customer Service @ 1-888-321-5700. Container Contents 1. (3 ) - Soft Grassbag 2. (1) - Owner’s Manual w/Registration Card 3. (1) - Hardware Package (4) M6 Bolt - Long, (2) M6 Screw - Short, (6) M6 Hex Nut, (1) R-Clip, (2) Blade Nut 4. (2) - High Lift Blades 5. (2) - Support Brackets 6. (1) - “U” Subframe 7. (1) 8. (1) 9. (1) 10. (1) - Adapter Frame w/Angle Bracket & Pins - Upper Chute (located inside of Lid Assembly) - Lower Chute with Straps - Lid Assembly w/Frame & Straps Tools Required Blade Removal/Installation • 17mm Socket • Ft/Lbs Torque Wrench • Wood Block (optional) Unit Assembly • 12mm Wrench • 10mm Wrench • 10mm Socket • Socket Wrench • 1/4” Hex Drive Bit 8 B460 GRASS BAGGER OWNER’S MANUAL PRODUCT FOR RESIDENTIAL USE ONLY D142100:R1.11.14 1 3 2 5 4 9 10 (Bottom view shown for clarity) 6 7 6 D142100 R1 Bagger Manual_Final - English.indd 6 RAVEN B463 Bagger System 4/9/2015 8:50:22 AM Assembly ASSEMBLY INSTRUCTIONS CAUTION 5. Replace the domed washer onto the new blades with the curved side up (Fig. D). Domed Washer Curved Side Up Before assembling your RAVEN Grass Catcher to you MPV: • Locate your MPV on a firm and level surface. • Set parking brake. • Place all motion controls to “NEUTRAL”. • Turn ignition to “OFF” and remove the key. • Ensure that the blades and all moving parts have completely stopped. • Disconnect the spark plug and place wire where it cannot come in contact with the plug. Wear ANSI-approved eye protection and work gloves when assembling this unit. Seat Blade on Adapter 6. Thread the new locking nut onto the stud and use a torque wrench to tighten to 40 ft/lbs. NOTE: Ensure the blade is seated properly on the blade adapter before torquing down the locking nut. Tighten to 40 ft/lbs 17mm Socket Wrench High Lift Blade Installation For more detailed instructions concerning removing the mower deck and the installation of new mower blades, please refer to your MPV Owner’s Manual. 1. Turn the deck over - this requires two people. 2. Use a 17mm socket wrench to remove the old locking nut and discard. Remove the domed washer and set aside. 3. Remove the old blades. 4. Fit the high-lift mulch blades included with the bagger assembly onto the blade adapter with the blade text showing 7. Carefully turn the deck back over and reattach to your MPV. New Blade Blade Adapter Text on Blades www.ravenamerica.com D142100 R1 Bagger Manual_Final - English.indd 7 7 4/9/2015 8:50:25 AM Assembly CAUTION 4. Locate the Adapter Frame and slide it between the tabs of the “L” Brackets oriented as shown. Slide the Snap Pins through the brackets and the frame and secure. Do not remove discharge guard from mower. Raise and hold guard when attaching lower chute and allow it to rest on chute while in operation. LEFT Tab RIGHT Tab Unit Assembly NOTE: For ease of assembly, you may wish to obtain the assistance of another person for mounting cover assembly to tractor. 1. Locate Adapter Frame and remove the (2) small “L” Brackets and (2) Snap Pins from it. Snap Pin Snap Pin Rear View - Fully Assembled “L” Brackets Snap Pins 5. Locate the Lid/Frame Assembly place it on a smooth, flat surface oriented as shown. Adapter Frame 2 On the rear of your MPV, located the (4) bolts (2 per side) directly below the tailgate. Use a 10mm and 12mm wrench to loosen and remove all (4). 3. Mount the “L” Brackets as below. HAND TIGHTEN ONLY. Left Bracket 8 D142100 R1 Bagger Manual_Final - English.indd 8 6. Locate the “U” Subframe and slide it onto the short stubs located at the bottom of the main frame. Ensure the locating pin at the bottom of the “U” Subframe is oriented as shown. Locate the (2) long hex bolts and (2) hex nuts and install through holes of “U” Subframe HAND TIGHT ONLY. Right Bracket RAVEN B463 Bagger System 4/9/2015 8:50:49 AM Assembly 7. Locate the (2) support brackets, (2) long hex bolts, (2) short cap screws and (4) hex nuts. Assemble as shown. Use the long hex bolts on the bottom and the short cap screws on top at the main frame. When both brackets are installed, tighten these (4) fasteners, as well as the (2) fasteners from Step 6, securely. Short Caps Screws 9. With the frame correctly mounted onto the MPV, locate the large R Clip and insert into the hole at the end of the top pin. A properly installed frame will look as shown below. R Clip Installed Long Hex Bolts 8. Open lid and lift the bagger assembly by the two center arms of the frame. Carefully set the assembly onto the mower, ensuring that the top pin on the frame lines up with the hole on the adapter frame and the bottom pin lines up with the hole in the bottom hitch of MPV. It may be necessary to apply some pressure downward so that the top of the frame is seated firmly onto the adapter frame. www.ravenamerica.com D142100 R1 Bagger Manual_Final - English.indd 9 10. Locate the upper and lower tubes and assemble them together. Pull the Tube Strap on the bottom tube up and onto the stud on the upper tube. 9 4/9/2015 8:51:07 AM Assembly 11. Insert round end of tube assembly into the open hole on the bagger housing and push it in approximately 8-10”. 12. Lift the mower discharge chute and guide the end of the tube down onto the opening. Keep the top tube end inserted into the bagger housing. Ensure that the top lip of the tube chute is on top of the mower deck and the bottom lip is under the support bar. With the bottom chute correctly in place, attach the chute hooks into the holes near the deck wheels as shown. 13. A correctly installed tube assembly will look as shown below. At this point, TIGHTEN THE (4) BOLTS FROM STEP 3 SECURELY. 14. Locate the (3) Grass Bags and slide them onto the main frame. Lift Discharge Chute 15. Close lid and secure it with the (2) lid straps as shown. 10 D142100 R1 Bagger Manual_Final - English.indd 10 RAVEN B463 Bagger System 4/9/2015 8:51:33 AM Operation OPERATION Your bagger is equipped with a full bagger indicator. CAUTION • Do not operate mower with grass catcher partially installed. • Disengage blades and stop engine before leaving tractor seat to empty containers, unclogging chutes, etc. • Close cover before starting. • Disengage mower when crossing drive ways or gravel surfaces and other areas where thrown objects could be a hazard. • Do not attempt to vacuum up cans or other potentially hazardous projectiles. EMPTY FULL NOTE: To help prevent clogging of chutes, check/empty bags when the indicator is up. Experience will teach you the best time to empty the bags. Care should be taken not to damage the parts and that the indicator moves freely at the beginning of each use. CAUTION If the grass catcher fails to pick up cut grass or leaves, it is an indication that clogging has occurred in the system or that the grass catcher containers are full. WHEN OPERATING ON VARIABLE INCLINATIONS IT IS SUGGESTED TO USE THE RAVEN FRONT WEIGHT KIT. Usually this is indicated by the raising of the full bagger indicator. PRECAUCIÓN SI TRABAJA EN INCLINACIONES VARIABLES SE SUGIERE UTILIZAR EL KIT RAVEN ENFRENTE PARA AGREGAR PESO. Follow the mower operation instructions in your tractor owner’s manual. When operating your grass catcher on a lawn where grass and leaf bagging equipment has not been used, you are picking up thatch and debris that has accumulated for long periods of time. The amount collected and the total time of operation may be greater than you will experience with regular use of your grass catcher. • Always run throttle at full speed when bagging. • Select a gear low enough to give good mower cutting performance, good quality cut and good bagging performance. It may be necessary to overlap width of cut to suit your conditions. • If grass is extremely tall, it should be mowed twice. The first time relatively high, the second time to desired height. • Use left hand side of mower for trimming. • Plastic trash bags can be inserted inside grass catcher containers for ease of debris disposal. • Avoid cutting wet grass or in the morning while the dew is still heavy. Grass clippings collected under these conditions tend to be sticky and adhere to the walls of the flow path causing clogging. • Disengage blades, shift into neutral, engage the parking brake and stop the engine. • Unlatch and raise lid. • Slide out containers and dispose of clippings . • Replace containers, close lid, and latch. • Unlatch chutes and check for clogging. • Remove all debris in chutes. • Reassemble and latch chutes • Check to insure full bagger indicator has not become clogged. • The air passage hole must be clear of debris. • Gently insert a small twig or wire into pas sage way to clear. General Recommendations • Always observe safety rules when performing any maintenance. • Before each use check for loose fasteners. • Clean unit thoroughly after each use. Blade Care For best results mower blades must be kept sharp. Replace bent or damaged blades. See BLADE CARE instructions in your tractor owner’s manual. Storage When grass catcher is to be stored for a period of time, clean it thoroughly, remove all dirt, grass, leaves, etc. Store in a clean, dry place. www.ravenamerica.com D142100 R1 Bagger Manual_Final - English.indd 11 11 4/9/2015 8:51:33 AM Parts List PLEASE READ THE FOLLOWING CAREFULLY This parts list and assembly diagram has been provided as a reference tool only. Denver Global Products states that all repairs and part replacements should be undertaken by certified and licensed technicians, and not by the Buyer. The Buyer assumes all risks and liability arising out of his or her repairs to the original product or replacement parts. 4 5 3 2 4 1 6 Part 1 2 3 4 5 6 Description COVER LID GASKET, TRIM LID COVER BODY HINGE ROD R CLIP - SMALL GASKET, FRONT LIP Qty 1 1 1 2 4 3 Part 7 8 9 Description ADAPTER FRAME L BRACKET LOCKING PIN Qty 1 2 2 9 8 7 8 9 12 D142100 R1 Bagger Manual_Final - English.indd 12 RAVEN B463 Bagger System 4/9/2015 8:51:33 AM Parts List 10 12 18 17 17 16 15 16 2x 14 20 15 15 13 15 19 Part 10 11 12 11 13 14 15 16 17 18 19 20 Description UPPER FRAME WELDMENT U SUBFRAME WELDMENT DISCHARGE SCREEN ASSY DISCHARGE SCREEN DOMED BLIND RIVET SUPPORT BRACKET LID STRAP, T-HANDLE HEX NUT FLAT WASHER SCREW SCREW SCREW R CLIP - LARGE Qty 1 1 1 1 2 2 2 8 4 4 2 2 1 21 Part 21 22 Description Qty 1 1 UPPER TUBE LOWER TUBE * See Details on Next Page * 22 * * * www.ravenamerica.com D142100 R1 Bagger Manual_Final - English.indd 13 13 4/9/2015 8:51:34 AM Parts List 26 26 27 26 24 27 25 23 30 28 31 * 2x Per Chute Part 23 24 25 26 27 28 29 30 31 27 29 Description TUBE STRAP, T-HANDLE CHUTE STRAP HOOK CAP NUT FLAT WASHER SPRING CLIP BOLT BOLT BOLT Qty 1 2 2 4 4 1 1 1 2 34 32 33 33 Part 32 33 Description INDICATOR ASSEMBLY SCREW 35 Qty 1 2 36 Part 34 Part 35 36 Description HI-LIFT BLADE BLADE NUT 14 D142100 R1 Bagger Manual_Final - English.indd 14 Description BAG ASSEMBLY Qty 3 Qty 2 2 RAVEN B463 Bagger System 4/9/2015 8:51:34 AM Warranty PRODUCT WARRANTY AND REGISTRATION Fill out the registration card in the owner’s manual packet or go on-line to www.ravenamerica.com to register. Registered owners will receive important product updates and other important information from Denver Global Products. Warranty The Manufacturer warrants to the original consumer purchaser that this product as manufactured is free from defects in materials and workmanship. For a period of two (2) years from date of purchase by the original consumer purchaser, we will repair or replace, at our option, without charge for parts or labor incurred in replacing parts, any part which we find to be defective due to materials or workmanship. This Warranty is subject to the following limitations and exclusions: 1 Transportation charges for the movement of any power equipment unit or attachment are the responsibility of the purchaser. Transportation charges for any parts submitted for replacement under this Warranty must be paid by the purchaser unless such return is requested by the manufacturer. 2 This Warranty applies only to products which have been properly assembled, adjusted, operated, and maintained in accordance with the instructions furnished. This Warranty does not apply to any product which has been subjected to alteration, misuse, abuse, improper assembly or installation, delivery damage, or to normal wear of the product. 3 Exclusions: This warranty does not cover: normal wear; damage as a result of use in a manner for which the product was not designed; damage caused by modification or use of unsuitable attachments or accessories, or other misuse and neglect; damage caused by failure to follow the prescribed warnings, operating practices, maintenance, and storage procedures; parts affected or damaged by accident and/or collision; damage due to transporting, handling, storage or any other causes other than defects in material or workmanship of the product. 4 In the event you have a claim under this Warranty, you must work with an authorized service location. Should you have any unanswered questions concerning this Warranty, please contact 1-888-321-5700 with the model number, serial number and date of purchase of your product. THIS WARRANTY DOES NOT APPLY TO INCIDENTAL OR CONSEQUENTIAL DAMAGES AND ANY IMPLIED WARRANTIES ARE LIMITED TO THE SAME TIME PERIODS STATED HEREIN FOR OUR EXPRESSED WARRANTIES. Some areas do not allow the limitation of consequential damages or limitations of how long an implied Warranty may last, so the above limitations or exclusions may not apply to you. This warranty gives you specific legal rights, and you may have other rights which vary from locale to locale. Product Registration Product Registration Thank you for your Purchase. To ensure you receive up to the minute information regarding your MPV Bagger System in the event of product updates, please register your product within 30 days of purchase. Your information will be held in confidence and not sold to third parties for any reason. While registration provides benefits of current and future product knowledge, it does not void or diminish your warranty rights. Please complete the included registration card, or register on-line at www.ravenamerica.com. Please visit: www.ravenamerica.com/ Or call: 1-888-321-5700 Or write to: Denver Global Products 1000 E. Powell Drive Lincolnton, NC 28092 B4 6 3 B4 6 3- X X X X S �� � � 13 1 3 J � � � M� � � � � � � � � � A � �� � � � � LN 1 0 0 OR 55 5 1 2 1 2 12 3 45 � � � � � �� � � @ ��� � � . � � � 01 0 120 1 5 www.ravenamerica.com D142100 R1 Bagger Manual_Final - English.indd 15 15 4/9/2015 8:51:35 AM DGP CUSTOMER SERVICE CONTACT INFORMATION: Have your unit’s model number and serial number ready when contacting DGP. Phone (Toll Free):1-888-321-5700 Email: [email protected]. Please allow up to 24 hours for a response. Additional details about your product can be found at www.ravenamerica.com. D142100 R1 Bagger Manual_Final - English.indd 17 4/9/2015 8:51:35 AM EMBOLSADORA DE CÉSPED B463 MANUAL DEL PROPIETARIO ESTE PRODUCTO ES SOLO PARA USO RESIDENCIAL D142100:R1.11.14 D142100 R1 Bagger Manual - 032415 - For Review_SP.indd 1 08/04/15 2:14 AM Felicitaciones por la compra de su nueva unidad embolsadora Raven. Este producto fue diseñado cuidadosamente para funcionar con el Vehículo multipropósito Raven (MPV) y fue ensamblado en los Estados Unidos para ofrecer el mejor desempeño cuando es operado y mantenido adecuadamente. Este manual ofrece información relacionada al funcionamiento y mantenimiento de este producto. Denver Global Products (DGP) realiza esfuerzos para asegurar la precisión de la información que aquí se presenta. Por favor lea el manual completo para la instalación y el funcionamiento de su MPV y manténgalo a mano para futura referencia. Le instruye sobre la manera en que se prepara y se pone en funcionamiento la unidad embolsadora. Si no se siguen cuidadosamente las prácticas recomendadas de seguridad y de funcionamiento con el MPV, esto podría ocasionar lesiones graves o la muerte. Si experimenta cualquier problema o tiene alguna pregunta sobre su unidad enbolsadora, por favor póngase en contacto con Denver Global Products directamente a través de la información de contacto listada a continuación. El departamento de apoyo al cliente de DGP está comprometido con asegurar su satisfacción completa todo el tiempo. Visite: www.ravenamerica.com/ O llame al: 1-888-321-5700 O puede escribir a: Denver Global Products 1000 E. Powell Drive Lincolnton, NC 28092 RESPONSABILIDADES DEL CLIENTE • Lea y observe las reglas de seguridad en este manual y vaya con cuidado cuando esté operando su MPV. • LEA Y COMPRENDA TODAS LAS INSTRUCCIONES Y LAS ETIQUETAS DE ADVERTENCIA Y PELIGRO. Registre su embolsadora Para recibir actualizaciones importantes de los productos además de otro tipo de información importante, registre su producto con Denver Global Products llenando la tarjeta de registro en el bolsillo del manual o visitando www.ravenamerica.com. Etiqueta del Número de Serie La información contenida en la etiqueta del número de serie es esencial para el proceso de registro. El número de serie está ubicado en la parte interior del marco de montaje del cuerpo. Registre esta información en la tarjeta de registro y para su referencia personal dado el evento que necesite ponerse en contacto con Denver Global por cualquier motivo. Denver Global Products Embolsadora MPV Modelo B463 S/N B463-XXXX 2 D142100 R1 Bagger Manual - 032415 - For Review_SP.indd 2 Sistema de embolsadora RAVEN B463 08/04/15 2:14 AM TABLA DE CONTENIDO SEGURIDAD Y PRECAUCIONES..................................................................................................... 4 DESEMPAQUE.................................................................................................................................. 6 ENSAMBLAJE................................................................................................................................... 7 FUNCIONAMIENTO..........................................................................................................................11 LISTAS DE PARTES........................................................................................................................ 12 GARANTÍA....................................................................................................................................... 15 ¡ADVERTENCIA! PUEDEN PRODUCIRSE LESIONES GRAVES O INCLUSO LA MUERTE SI NO SE SIGUEN LAS INSTRUCCIONES. NO LEER ESTE MANUAL ANTES DE OPERAR EL PRODUCTO PUEDE PROVOCAR LESIONES GRAVES O LA MUERTE. www.ravenamerica.com D142100 R1 Bagger Manual - 032415 - For Review_SP.indd 3 3 08/04/15 2:14 AM Seguridad y Precauciones SÍMBOLOS DE SEGURIDAD Y FUNCIONAMIENTO Familiarícese con los símbolos de seguridad y aviso que se encuentran en el MPV y su significado para asegurar un funcionamiento adecuado y seguro. Las etiquetas de seguridad avisan sobre situaciones potencialmente peligrosas y áreas del MPV que pueden causar lesiones graves. Lea y comprenda todas las etiquetas. Si una etiqueta se deteriora y no es posible leerla, por favor póngase en contacto con el DGP al 1-888-321-5700 para su reemplazo. Su seguridad y la seguridad de los demás es muy importante. Hay mensajes importantes de seguridad en este manual y en el generador. Por favor lea esta información cuidadosamente. Un mensaje de seguridad lo alerta contra peligros potenciales. Cada mensaje de seguridad está precedido por una de las siguientes palabras: PELIGRO, ADVERTENCIA, PRECAUCIÓN o IMPORTANTE. ¡PELIGRO! SE PRODUCIRÁ LA MUERTE O LESIONES GRAVES SI NO SE SIGUEN LAS INSTRUCCIONES. ADVERTENCIA PUEDEN PRODUCIRSE LESIONES GRAVES O INCLUSO LA MUERTE SI NO SE SIGUEN LAS INSTRUCCIONES. ¡PRECAUCIÓN! PUEDEN PRODUCIRSE LESIONES SI NO SE SIGUEN LAS INSTRUCCIONES. IMPORTANTE PUEDEN PRODUCIRSE DAÑOS AL MPV U OTROS ARTÍCULOS SI NO SE SIGUEN LAS INSTRUCCIONES. Funcionamiento general • Lea, comprenda y siga todas las instrucciones de este manual y las que se encuentran en la máquina antes de empezar. • Sólo permita que adultos responsables, quienes estén familiarizados con las instrucciones, pongan a funcionar esta máquina. • Limpie el área de objetos tales como piedras, peñascos, etc. que podrían ser lanzados por las hojas de corte (cuchillas). • Asegúrese de que no haya personas ni mascotas en el área antes de empezar a cortar el césped. Detenga la máquina si alguien ingresa en esta área. • No corte el césped en reversa a menos que sea absolutamente necesario. Siempre mire hacia abajo y hacia atrás antes y mientras está retrocediendo. • Esté pendiente de la dirección de descarga del cortador de césped y no lo dirija hacia ninguna persona. No ponga a funcionar el cortador de césped sin antes haber colocado el receptor de hierba o el protector. • Reduzca la velocidad antes de cambiar de dirección. • Nunca deje la unidad desatendida mientras el motor esté funcionando. Siempre desconecte las hojas de corte (cuchillas), fije el freno de estacionamiento, detenga el motor y extraiga la llave antes de dejar la máquina. • Apague las hojas de corte (cuchillas) cuando no esté cortando césped. • Detenga el motor antes de extraer el receptor de hierba o de destapar el tubo de descarga. • Corte el césped solamente durante las horas del día o bajo una luz artificial potente. • No ponga a funcionar la máquina mientras esté bajo la influencia de alcohol o drogas. • Esté pendiente del tráfico cuando éste operando la máquina cerca de, o cruzando, las calles. • Vaya con mucho más cuidado cuando esté cargando o descargando la máquina sobre un tráiler o camión. • Mantenga la máquina libre de acumulación de suciedad, que podría quemarse si se pone en contacto con el escape u otras partes del motor calientes. El arado de hojas u otro tipo de desechos puede causar este tipo de acumulación. • Limpie cualquier derrame de aceite o combustible antes de poner a funcionar o de almacenar la máquina. • Permita que la máquina se enfríe antes de almacenarla. ADVERTENCIA El funcionamiento de cualquier cortadora de césped puede provocar el lanzamiento de objetos hacia los ojos, lo que podría causar daños severos en los ojos. SIEMPRE use lentes de seguridad o protectores para los ojos antes de arrancar su cortadora de césped y mientras esté en el proceso de cortar el césped. Recomendamos una máscara de seguridad de amplia visión colocada encima de lentes o lentes estándares de seguridad. PELIGRO LA MÁQUINA DE CORTE ES CAPAZ DE AMPUTAR MANOS Y PIES Y DE LANZAR OBJETOS. NO OBSERVAR LAS SIGUIENTES INSTRUCCIONES DE SEGURIDAD PODRÍA OCASIONAR LESIONES GRAVES O LA MUERTE. • Nunca lleve pasajeros ni niños aunque haya desconectado las cuchillas. 4 D142100 R1 Bagger Manual - 032415 - For Review_SP.indd 4 Sistema de embolsadora RAVEN B463 08/04/15 2:14 AM Seguridad y Precauciones Funcionamiento en superficies inclinadas Las superficies inclinadas se relacionan con accidentes de pérdida de control o de volcaduras, que podrían causar lesiones graves o la muerte. Vaya con cuidado por todas las superficies inclinadas. No corte el césped sobre una superficie con una inclinación mayor de 15°. HAGA ESTO • Cuando se trata de superficies inclinadas, mueva la máquina de arriba a abajo en la superficie (15° máximo), y no de lado a lado. • Retire cualquier obstáculo antes de empezar a cortar el césped. • Esté pendiente de terrenos desiguales que podrían voltear la máquina. Esté pendiente de que la hierba alta pueda esconder obstáculos. • Use una velocidad lenta y evite detenerse sobre una superficie inclinada. • El receptor de hierba puede cambiar la estabilidad de la máquina. Mantenga un movimiento lento y gradual cuando esté sobre superficies inclinadas. Evite cambios abruptos en velocidad o dirección o cuando se detiene o arranca sobre una superficie inclinada. • Si las llantas pierden tracción, detenga las cuchillas y guíe el MPV lentamente hacia abajo de la superficie inclinada. NO HAGA ESTO • No corte el césped cerca de acantilados, zanjas o diques. El cortador de césped podría voltearse si una rueda se encuentra en el borde de un acantilado o zanja o si un borde llega a ceder. • No corte el césped cuando está mojado. La tracción reducida podría causar un deslizamiento. • No trate de estabilizar la máquina poniendo un pie sobre el piso. CAUTION PRECAUCIÓN WHEN OPERATING ON VARIABLE INCLINATIONS IT IS SUGGESTED TO USE THE RAVEN FRONT WEIGHT KIT. SI TRABAJA EN INCLINACIONES VARIABLES SE SUGIERE UTILIZAR EL KIT RAVEN FRONT PARA AGREGAR PESO. • Vaya con mucho más cuidado cuando esté acercándose a esquinas tapadas, arbustos, árboles u otros objetos que podrían oscurecer la visión. • Extraiga y almacene la llave cuando la máquina no está en funcionamiento o desatendida para evitar un funcionamiento sin autorización. Servicio El funcionamiento de cualquier cortadora de césped puede provocar el lanzamiento de objetos hacia los ojos, lo que podría causar daños severos en los ojos. Siempre utilice lentes de seguridad o protectores para los ojos mientras esté operando su cortadora de césped o realizando cualquier ajuste o reparación. Recomendamos una máscara de seguridad de amplia visión en vez de lentes o lentes estándares de seguridad. Vaya con mucho más cuidado cuando esté manejando la gasolina y otros combustibles. Son inflamables y sus vapores son explosivos. • Utilice solamente un recipiente aprobado. • Nunca retire la tapa de la gasolina ni agregue combustible mientras esté funcionando el motor. • Permita que la máquina se enfríe antes de rellenar combustible. • No fume. • Nunca eche combustible a la máquina en espacios interiores. • Nunca almacene la máquina o el recipiente de combustible en interiores en donde pueda haber una llama, tal como la de un calentador de agua. • Nunca ponga a funcionar la máquina dentro de un área cerrada. • Mantenga las tuercas y los tornillos, especialmente los pernos de fijación de las cuchillas, apretados y mantenga su equipo en buenas condiciones. • Nunca trate de modificar los dispositivos de seguridad. Revise regularmente el funcionamiento correcto. • Mantenga la máquina libre de hierba, hojas o la acumulación de otro tipo de desechos. Limpie cualquier derrame de aceite o combustible. Permita que la máquina se enfríe antes de almacenarla. • Deténgase e inspeccione el equipo si golpea algún objeto. Repare los daños, si es necesario, antes de arrancar de nuevo. Niños • Nunca realice ningún ajuste ni reparación mientras el motor está en funcionamiento. Pueden ocurrir accidentes trágicos si el operador no está al tanto de la presencia de los niños. Los niños generalmente son atraídos a la máquina y a la actividad de corte. Nunca asuma que los niños se mantendrán en el mismo lugar en que los vio anteriormente. • Los componentes receptores de hierba están sujetos al desgaste, daños y deterioro, que podrían exponer las partes en movimiento o permitir que se lance algún objeto. • NUNCA permita que un niño ponga a funcionar la máquina. • Mantenga a los niños alejados del área de corte de césped y bajo el ojo atento de otro adulto responsable. • Manténgase alerta y apague la máquina si entra algún niño al área. • Antes de, y cuando esté retrocediendo, mire hacia atrás y hacia abajo por si hay algún niño pequeño. • Nunca suba niños a la máquina. Se pueden caer y lesionarse seriamente o interferir con el funcionamiento seguro de la máquina. www.ravenamerica.com D142100 R1 Bagger Manual - 032415 - For Review_SP.indd 5 • Verifique los componentes frecuentemente y reemplácelos con partes recomendadas por el fabricante, cuando sea necesario. • Las cuchillas de la cortadora de césped son filosas y pueden cortar. Envuelva la(s) cuchilla(s) o use guantes, y vaya con mucho más cuidado cuando les esté prestando servicio. • Verifique el funcionamiento del freno con frecuencia. Ajústelo y préstele servicio según lo indica el Manual del operador. 5 08/04/15 2:14 AM Desempaque INSTRUCCIONES PARA EL DESEMPAQUE • Retire todas las partes y los materiales de empaque de la caja de cartón. • Verifique el contenido de la caja en comparación con la lista de empaque. Asegúrese de que estén ahí todas las piezas. • Si está faltando o está deteriorada alguna pieza, por favor llame al número de Servicio al cliente de DGP, 1-888-321-5700. Contenido del contenedor 1. (3) - Bolsa blanda para hierba 2. (1) - Manual del propietario con su tarjeta de registro 3. (1) - Paquete de herramentaje (4) M6 Perno - Largo, (2) M6 Tornillo - Corto, (6) M6 Tuerca Hexagonal, (1) Click-R, (2) Tuerca de la Cuchilla 4. (2) - Hojas de corte (cuchillas) alto 5. (2) - Estructuras de soporte 6. (1) - Submarco en forma de “U” 7. (1) - Marco adaptador con clavijas y soporte angular 8. (1) - Tubo de drenaje superior (ubicado dentro del Conjunto de la tapa) 9. (1) - Tubo de drenaje inferior con correas 10. (1) - Conjunto de la tapa con su marco y correas Herramientas Requeridas Extracción o instalación de la cuchilla • Dado de 17 mm • Llave de torsión en pies/libras • Bloque de madera (opcional) Ensamblaje de la unidad • • • • • Llave de 12 mm Llave de 10 mm Dado de 10 mm Llave de dados Broca acopladora hexagonal de 1/4" 8 B460 GRASS BAGGER OWNER’S MANUAL PRODUCT FOR RESIDENTIAL USE ONLY 1 D142100:R1.11.14 2 5 4 3 9 10 (Se muestra la parte inferior para mayor claridad ) 6 7 6 D142100 R1 Bagger Manual - 032415 - For Review_SP.indd 6 Sistema de embolsadora RAVEN B463 08/04/15 2:14 AM Ensamblaje INSTRUCCIONES DE ENSAMBLAJE PRECAUCIÓN Antes de ensamblar su Receptor de hierba RAVEN a su MPV. • Coloque su MPV sobre una superficie firme y nivelada. • Coloque el freno de estacionamiento. • Coloque todos los controles de movimiento en “NEUTRAL”. • Apague la ignición colocándola en “OFF” y retire la llave. • Asegúrese de que las cuchillas y todas las partes en movimiento hayan sido detenidas por completo. • Desconecte la bujía y coloque el cable en donde no pueda establecer contacto con la bujía. Utilice protección para los ojos aprobada por la ANSI además de guantes de trabajo cuando esté ensamblando esta unidad. 5. Reemplace la arandela de domo sobre las nuevas cuchillas con el lado curvo hacia arriba (Fig. D). Arandela en forma de domo con la curva hacia arriba Coloque la cuchilla sobre el adaptador 6. Enrosque la nueva tuerca de bloqueo sobre el poste y use la llave de torsión para apretar la hasta 40 pies/lb. NOTA: Asegúrese de que la cuchilla esté colocada adecuadamente sobre el adaptador de la cuchilla antes de aplicar torsión a la tuerca de bloqueo. Apriete hasta 40 pies/lb Llave de dados de 17 mm Instalación de la cuchilla de alto levantamiento Para unas instrucciones más detalladas sobre el retiro de la plataforma de la cortadora de césped y la instalación de nuevas hojas de corte (cuchillas) de la cortadora de césped, por favor refiérase al Manual del propietario del MPV 1. Voltee la plataforma, esto requiere 2 personas 2. Utilice una llave de dados de 17 mm para retirar la tuerca de bloqueo antigua y desecharla. Retire la arandela con domo y póngala a un lado. 7. Cuidadosamente voltee de regreso la plataforma y fíjela de nuevo a su MPV. 3. Retire las cuchillas viejas. 4. Ajuste las cuchillas de alto levantamiento para la capa desmenuzada con el conjunto de la embolsadora sobre el adaptador de la cuchilla de manera que se muestre el texto escrito en la cuchilla Cuchilla nueva Adaptador para la cuchilla Textos sobre las cuchillas www.ravenamerica.com D142100 R1 Bagger Manual - 032415 - For Review_SP.indd 7 7 08/04/15 2:14 AM Ensamblaje PRECAUCIÓN No retire el protector de descarga de la cortadora de césped. Levante y sostenga el protector cuando esté colocando el tubo de descarga inferior y permita que descanse sobre el tubo de descarga mientras está en funcionamiento. 4. Ubique el Marco del adaptador y deslícelo entre las pestañas de los Soportes en forma de “L” orientados de la manera en que se muestra a continuación. Deslice las clavijas de enganche a través de los soportes y del marco y asegúrelos. IZQUIERDA Pestaña DERECHA Pestaña Ensamblaje de la unidad NOTA: Para un ensamblaje más fácil, podría obtener la ayuda de otra persona para montar el conjunto de la cubierta al tractor. 1. Ubique el Marco adaptador y retire los dos (2) pequeños soportes en forma de “L” y las dos (2) Clavijas de enganche. Clavija de enganche Clavija de enganche Vista trasera - Ensamblado por completo Soportes en forma de “L” Clavija de enganche 5. Ubique el Conjunto de etapa y marco y colóquelo sobre una superficie suave y plana orientada según se muestra a continuación. Marco adaptador 2 En la parte trasera de su MPV, ubique los cuatro (4) pernos (2 por cada lado) directamente debajo de la puerta trasera. Use una llave de 10 mm y de 12 mm para aflojar y retirarlos todos (4). 3. Instale los soportes en forma de “L” según se indica a continuación. APRIETE SOLAMENTE CON LA MANO Soporte izquierdo 8 D142100 R1 Bagger Manual - 032415 - For Review_SP.indd 8 6. Ubique el submarco en forma de “U” y deslícelo sobre los bordes cortos ubicados en la parte inferior del marco principal. Asegúrese de que la clavija de ubicación en la parte inferior del sub marco en forma de “U” esté orientada de la manera en que se muestra. Ubique los (2) pernos hexagonales largos y las (2) tuercas hexagonales e instálelas a través de los agujeros del submarco en forma de “U”, APRIÉTELO CON LA MANO SOLAMENTE. Soporte derecho Sistema de embolsadora RAVEN B463 08/04/15 2:14 AM Ensamblaje 7. Ubique los (2) soportes de apoyo, los (2) pernos hexagonales largos, los 2 tornillos de cabeza corta y las (4) tuercas hexagonales. Ensámblelos según se muestra. Use los pernos hexagonales largos en la parte inferior y los tornillos de cabeza corta en la parte superior en el marco principal. Cuando se hayan instalado ambos soportes, apriete con seguridad estos (4) sujetadores, al igual que los (2) sujetadores del Paso 6. Tornillos de cabeza corta 9. Con el marco montado adecuadamente sobre el MPV, ubique el Clip “R” grande e insértelo en el agujero ubicado en el extremo de la clavija superior. Un marco instalado adecuadamente lucirá de la manera siguiente. Clip “R” instalado Pernos hexagonales largos 8. Abra la tapa y levante el conjunto de la embolsadora por los 2 brazos centrales del marco. Cuidadosamente coloque el conjunto sobre la cortadora de césped, asegurándose de que la clavija superior del marco se alinee con el agujero del marco del adaptador y que la clavija inferior se alinee con el agujero en el enganche inferior del MPV. Puede ser necesario aplicar algo de presión hacia abajo para que la parte superior del marco se asiente firmemente sobre el marco del adaptador. www.ravenamerica.com D142100 R1 Bagger Manual - 032415 - For Review_SP.indd 9 10. Ubique los tubos superior e inferior y ensámblelos uno al otro. Jale la cinta del tubo inferior hacia arriba y sobre el poste ubicado en el tubo superior. 9 08/04/15 2:14 AM Ensamblaje 11. Inserte el extremo redondo del conjunto del tubo dentro del agujero abierto en el alojamiento de la embolsadora y empújelo aproximadamente de unas 8 a 10". 12. Levante el tubo de descarga de la cortadora de césped y guíe el extremo del tubo hacia abajo sobre la apertura. Mantenga el tubo superior insertado dentro del alojamiento de la embolsadora. Asegúrese de que la parte superior del tubo de descarga esté en la parte superior de la plataforma de la cortadora de césped y que el pliegue inferior esté por debajo de la barra de soporte. Con el tubo inferior colocado correctamente, instale los ganchos del tubo de descarga en los agujeros cercanos a las ruedas de la plataforma según se muestra. 13. Un tubo de descarga instalado adecuadamente lucirá de la manera siguiente. En este punto, APRIETE LOS (4) PERNOS DEL PASO 3 CON SEGURIDAD. 14. Ubique las (3) bolsas para hierba y deslícelas sobre el marco principal. Tubo de descarga de elevante 15. Cierre la tapa y asegúrela con las (2) cintas para la tapa según se muestra. 10 D142100 R1 Bagger Manual - 032415 - For Review_SP.indd 10 Sistema de embolsadora RAVEN B463 08/04/15 2:14 AM Funcionamiento FUNCIONAMIENTO Su embolsadora está equipada con un indicador de bolsa llena. PRECAUCIÓN VACÍO • No opere la cortadora de césped con el receptor de hierba instalado parcialmente. • Desconecte las cuchillas y apague el motor antes de dejar el asiento del tractor para vaciar recipientes, desbloquear tubos de descarga, etc. • Cierre la cubierta antes de iniciar. • Desenganche la cortadora de césped cuando esté cruzando calles o superficies con gravilla u otras áreas en donde el lanzamiento de objetos podría resultar peligroso. • No intente recoger latas o otros proyectiles potencialmente peligrosos. CAUTION PRECAUCIÓN WHEN OPERATING ON VARIABLE INCLINATIONS IT IS SUGGESTED TO USE THE RAVEN FRONT WEIGHT KIT. SI TRABAJA EN INCLINACIONES VARIABLES SE SUGIERE UTILIZAR EL KIT RAVEN FRONT PARA AGREGAR PESO. Siga las instrucciones de funcionamiento de la cortadora de césped en el manual del propietario del tractor. Cuando esté operando el receptor de hierba en un césped en donde no se haya utilizado equipo para capturar la hierba y las hojas, va a recoger desechos que se habrán acumulado por largos períodos de tiempo. La cantidad recolectada y el tiempo total de funcionamiento puede ser mayor de lo que experimentaría con uso regular del receptor de hierba. • Siempre use el acelerador a la velocidad total cuando éste cargando en la bolsa. • Seleccione un cambio de velocidad lo suficientemente bajo como para obtener un buen desempeño de corte, una buena calidad de corte y un buen desempeño de embolsado. Puede ser necesario traspasar el ancho del corte para ajustarse a sus condiciones. • Si el césped está extremadamente alto, debe ser cortado 2 veces. El primer corte debe realizarse a mayor altura, y la segunda vez a la altura deseada. • Use el lado izquierdo de la cortadora de césped para recortar. • Las bolsas de basura plásticas pueden insertarse dentro de recipientes del receptor de hierba para facilitar el desecho de estos materiales. • Evite cortar hierba mojada por la mañana mientras haya aún mucho rocío. Los recortes de hierba recolectados bajo estas condiciones tienden a ser pegajosos y se adhieren a las paredes de la ruta del flujo, lo que causa obstrucciones. LLENO NOTA: Para evitar la obstrucción de los tubos de descarga, verifique y vacíe las bolsas cuando el indicador esté hacia arriba. La experiencia le mostrará cuál es el mejor momento de vaciar las bolsas. Debe ir con cuidado de no causar daño a las piezas y que el indicador se mueva con libertad desde que empiece a usarlo. Si el receptor de hierba no llega a recoger la hierba o las hojas, esto es una indicación de que ha ocurrido una obstrucción en el sistema y que los recipientes receptores de hierba están llenos. Generalmente esto lo indica el indicador de embolsadora llena. • Desenganche las cuchillas, ponga el cambio de velocidad en neutro, fije el freno de estacionamiento y apague el motor. • Desenganche la tapa y levántela. • Deslice hacia fuera los contenedores y deseche los recortes. • Reemplace los contenedores, cierre la tapa y el enganche. • Desenganche los tubos de descarga y verifique que no estén obstruidos. • Retire todo el desecho que se encuentre en los tubos de descarga. • Ensamble de nuevo y enganche los tubos de descarga. • Verifique para asegurar que el indicador de embolsadora llena no se haya tapado. • El agujero de paso de aire debe estar libre de cualquier desecho. • Suavemente inserte una pequeña ramita o alambre en el pasadizo para limpiarlo. Recomendaciones generales • Siempre esté pendiente de las reglas de seguridad cuando esté realizando cualquier tipo de mantenimiento. • Verifique que no haya sujetadores flojos antes de usar el equipo. • Limpie la unidad por completo después de cada uso. Cuidado de las cuchillas Para mejores resultados, las cuchillas de la cortadora de césped deben mantenerse siempre afiladas. Reemplace las cuchillas dobladas o dañadas. Siga las instrucciones del CUIDADO DE LAS CUCHILLAS del manual del propietario de su tractor. Almacenamiento Cuando se va a almacenar el receptor de hierba por cierto periodo de tiempo, límpielo por completo, retire todo la suciedad, la hierba, hojas, etc. Almacénelo en un lugar limpio y seco. www.ravenamerica.com D142100 R1 Bagger Manual - 032415 - For Review_SP.indd 11 11 08/04/15 2:14 AM Lista de partes POR FAVOR, LEA LO SIGUIENTE ATENTAMENTE Esta lista de piezas y diagrama de montaje se ha proporcionado solo como una herramienta de referencia. Denver Global Products indica que todas las reparaciones y reemplazos de piezas deben llevarse a cabo por técnicos certificados y licenciados, y no por el Comprador. El comprador asume todos los riesgos y responsabilidad que surja de sus reparaciones al producto original o piezas de repuesto. 4 5 3 2 4 1 6 Parte 1 2 3 4 5 6 Descripción TAPA DE CUBIERTA EMPAQUE, TAPA DEL ADORNO CUERPO DEL COBERTOR BARRA DE BISAGRA CLIP R - PEQUEÑO EMPAQUE, PLIEGUE FRONTAL Cantidad 1 1 1 2 4 3 Parte 7 8 9 Descripción MARCO ADAPTADOR SOPORTE EN FORMA DE “L” CLAVIJA DE BLOQUEO Cantidad 1 2 2 9 8 7 8 9 12 D142100 R1 Bagger Manual - 032415 - For Review_SP.indd 12 Sistema de embolsadora RAVEN B463 08/04/15 2:14 AM Lista de partes 10 12 18 17 17 16 15 16 2x 14 20 15 15 13 15 19 Parte 11 Descripción Cantidad 10 SOLDADURA DEL MARCO SUPERIOR 1 11 SOLDADURA DEL SUBMARCO EN FORMA DE U 1 12 13 14 15 16 17 18 19 20 ENSAMBLAJE DE LA PANTALLA DE DESCARGA PANTALLA DE DESCARGA RIBETE CIEGO CON DOMO ESTRUCTURAS DE APOYO CINTA PARA LA TAPA, MANGO EN FORMA DE T TUERCA HEXAGONAL ARANDELA PLANA TORNILLO TORNILLO TORNILLO CLIP R - GRANDE 1 1 2 2 2 8 4 4 2 2 1 21 Parte 21 22 Descripción TUBO SUPERIOR TUBO INFERIOR Cantidad 1 1 * Vea los detalles en la gente página * 22 * * * www.ravenamerica.com D142100 R1 Bagger Manual - 032415 - For Review_SP.indd 13 13 08/04/15 2:14 AM Lista de partes 26 26 27 26 24 27 25 23 31 30 28 * 2x por tubo de descarga Parte 23 24 25 26 27 28 29 30 31 27 29 Descripción CINTA PARA EL TUBO, MANGO EN FORMA DE T CINTA PARA EL TUBO DE DESCARGA GANCHO TUERCA DE LA TAPA ARANDELA PLANA CLIP CON RESORTE PERNO PERNO PERNO Cantidad 1 2 2 4 4 1 1 1 2 34 32 33 33 Parte 32 33 Descripción CONJUNTO DE INDICADOR TORNILLO 35 Cantidad 1 2 36 Parte 34 Parte 35 36 Descripción CUCHILLA DE ELEVACIÓN ALTA TUERCA DE LA CUCHILLA 14 D142100 R1 Bagger Manual - 032415 - For Review_SP.indd 14 Descripción ENSAMBLE DE LA BOLSA Cantidad 3 Cantidad 2 2 Sistema de embolsadora RAVEN B463 08/04/15 2:14 AM Garantía GARANTÍA Y REGISTRO DEL PRODUCTO 4 Llene la tarjeta de registro del paquete del manual del propietario o visite en línea www.ravenamerica.com para registrarse. Los propietarios registrados recibirán actualizaciones importantes de los productos y otro tipo de información de parte de Denver Global Products. Garantía El fabricante le garantiza al comprador consumidor original que este producto según ha sido manufacturado está libre de defectos de materiales y mano de obra. Durante un período de dos (2) años a partir de la fecha de compra por el comprador original, repararemos o reemplazaremos, a nuestro criterio, sin cargos, las piezas o la mano de obra incurrida en el reemplazo de estas piezas, y cualquier pieza que encontremos defectuosa por causa de los materiales o mano de obra. La Garantía está sujeta a las siguientes limitaciones y exclusiones: 1 Los cargos por el transporte de cualquier unidad de equipos de potencia o aditamento es responsabilidad del comprador Los cargos por el transporte de cualquier pieza enviada para su reemplazo bajo esta garantía deben ser pagados por el comprador a menos que tal devolución sea solicitada por el fabricante. 2 Esta Garantía aplica exclusivamente para los productos que han sido ensamblados, ajustados, operados y mantenidos adecuadamente, de acuerdo con las instrucciones incluidas. Esta Garantía no aplica para cualquier producto que haya estado sujeto a alteración, mal uso, abuso, ensamblaje o instalación inadecuada, daños por transporte o el desgaste normal del producto. 3 Exclusiones: Esta garantía no cubre el desgaste normal, los daños como resultado del uso para el que el producto no fue diseñado, daños causados por modificaciones o uso de aditamentos o accesorios no adecuados, o el mal uso y la negligencia, daños causados por no observar los avisos prescritos, las prácticas de operación, el mantenimiento y los procedimientos de almacenamiento, partes afectadas o dañadas por accidente o colisiones, daños debido al transporte, manejo, almacenamiento o cualquier causa que no se trate de defectos en los materiales o la mano de obra del producto. En caso de que tenga algún reclamo bajo esta garantía, debe realizar su reclamación a una ubicación de servicios autorizada. Si tiene alguna pregunta relacionada con esta Garantía, llame al número 1-888-321-5700 y tenga a la mano el número de modelo, el número de serie y la fecha de compra de su producto. ESTA GARANTÍA NO APLICA PARA DAÑOS INCIDENTALES O CONSECUENTES Y CUALQUIER GARANTÍA IMPLÍCITA ESTÁ LIMITADA A LOS MISMOS PERÍODOS DE TIEMPO INDICADOS EN ESTE DOCUMENTO PARA NUESTRAS GARANTÍAS EXPRESAS. Algunas áreas no permiten la limitación de daños incidentes o consecuentes, ni las limitaciones sobre el periodo de tiempo que una garantía podría durar, de modo que las limitaciones indicadas arriba podrían no aplicarle a usted. Esta garantía le otorga derechos legales específicos, y usted puede tener otros derechos que varían según su ubicación local. Registro del producto Registro del producto Gracias por su compra. Para asegurarse de que reciba información actualizada relacionada con su Sistema de embolsadora MPV en caso de existir alguna actualización del producto, registre su producto en menos de 30 días de la fecha de compra. Su información se mantendrá confidencial y no será vendida a terceros por ningún motivo. Aunque el registro ofrece beneficios sobre conocimientos actuales y futuros del producto, no anula ni disminuye sus derechos de garantía. Por favor complete la tarjeta de registro incluida o regístrese en línea en www.ravenamerica.com. Visite: www.ravenamerica.com/ O llame al: 1-888-321-5700 O puede escribir a: Denver Global Products 1000 E. Powell Drive Lincolnton, NC 28092 Número de modelo B4 6 3 Número de serie B4 6 3- X X X X Apellido del propietario Nombre S �� � � J � � � Dirección Teléfono 13 1 3 M� � � � � � � � � � LN 1 0 0 Ciudad E � 55 5 1 2 1 2 Estado Código postal � � � � � � � � � � � � � � O 12 3 45 Dirección de correo electrónico � � � � � �� � � @ ��� � � . � � � Fecha de compra 01 0 120 1 5 www.ravenamerica.com D142100 R1 Bagger Manual - 032415 - For Review_SP.indd 15 Aplicación (seleccione uno) Commercial No comercial Para alquiler 15 08/04/15 2:14 AM INFORMACIÓN DE CONTACTO DEL SERVICIO DE ATENCIÓN AL CLIENTE DGP Tenga listo el número de modelo y el número de serie cuando se ponga en contacto con DGP. Teléfono (sin cargo): 1-888-321-5700 Correo electrónico [email protected]. Sírvase permitirnos hasta 24 horas para una respuesta. Puede encontrar más detalles sobre su producto en www.ravenamerica.com. D142100 R1 Bagger Manual - 032415 - For Review_SP.indd 17 08/04/15 2:14 AM