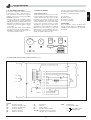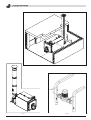
1
AZIENDA CERTIFICATA ISO 9001:2000
AR SW
Caldaie pressurizzate in acciaio AR SW
Manuale Tecnico - Installazione - Uso e Manutenzione
pag.
4
Pressurised steel boilers AR SW
Technical Manual - Installation - User and Maintenance
page 14
GB
page 24
FR
pág. 34
ES
sd. 44
DK
seite 54
DE
pag. 64
NL
pág. 74
PT
sid. 84
SE
sivu 94
FI
стр 104
RU
Chaudières pressurisées en acier AR SW
Notice Technique - Installation - Utilisation et Entretien
Calderas presurizadas de acero AR SW
Manual Técnico - Instalación - Uso y Mantenimiento
Stålkedler under tryk AR SW
Tecknisk Vejledning - Installation - Anvendelse og Vedligeholdelse
Druckkessel aus Stahl AR SW
Technisches Handbuch - Installation - Bedienung und Wartung
Stalen overdrukketels AR SW
Technische Handleiding - IInstallatie - Gebruik en Onderhoud
Caldeiras pressurizadas em aço AR SW
Manual Técnico - Instalação - Uso e Manutenção
Tryckpannor av stål AR SW
Teknisk Handbok - Installation - Drift och Underhåll
Paineistetut teräslämmityskattilat AR SW
Tekninen Kayttoopas - Asennus - Käyttö ja Huolto
Газоплотные стальные водогрейные котлы AR SW
Техническое руководство - Монтаж, Эксплуатация и Обслуживание
IT
INDICE
1.
2.
3.
4.
5.
6.
7.
8.
9.
10.
Presentazione . . . . . . . . . . . . . . . . . . . . . . . . . . . . . . . . . . . . . . . . . . . . . . . . . . . . . . . . . . . . . . . . . . . . . . . . . . . . . . . . . . . . . . . . . . . . . . . . . . . . . pag. 5
Avvertenze generali . . . . . . . . . . . . . . . . . . . . . . . . . . . . . . . . . . . . . . . . . . . . . . . . . . . . . . . . . . . . . . . . . . . . . . . . . . . . . . . . . . . . . . . . . . . . . . . . . pag. 5
Certificazione . . . . . . . . . . . . . . . . . . . . . . . . . . . . . . . . . . . . . . . . . . . . . . . . . . . . . . . . . . . . . . . . . . . . . . . . . . . . . . . . . . . . . . . . . . . . . . . . . . . . . . pag. 5
Caratteristiche tecniche, costruttive e dimensionali . . . . . . . . . . . . . . . . . . . . . . . . . . . . . . . . . . . . . . . . . . . . . . . . . . . . . . . . . . . . . . . . . . . . . . . . . pag. 5
4.1 Descrizione dell’apparecchio . . . . . . . . . . . . . . . . . . . . . . . . . . . . . . . . . . . . . . . . . . . . . . . . . . . . . . . . . . . . . . . . . . . . . . . . . . . . . . . . . . . . . . pag. 5
4.2 Principio di funzionamento . . . . . . . . . . . . . . . . . . . . . . . . . . . . . . . . . . . . . . . . . . . . . . . . . . . . . . . . . . . . . . . . . . . . . . . . . . . . . . . . . . . . . . . . pag. 5
4.3 Dati tecnici . . . . . . . . . . . . . . . . . . . . . . . . . . . . . . . . . . . . . . . . . . . . . . . . . . . . . . . . . . . . . . . . . . . . . . . . . . . . . . . . . . . . . . . . . . . . . . . . . . . . pag. 5
4.4 Identificazione . . . . . . . . . . . . . . . . . . . . . . . . . . . . . . . . . . . . . . . . . . . . . . . . . . . . . . . . . . . . . . . . . . . . . . . . . . . . . . . . . . . . . . . . . . . . . . . . . pag. 5
Installazione . . . . . . . . . . . . . . . . . . . . . . . . . . . . . . . . . . . . . . . . . . . . . . . . . . . . . . . . . . . . . . . . . . . . . . . . . . . . . . . . . . . . . . . . . . . . . . . . . . . . . . . . pag. 7
5.1 Imballo . . . . . . . . . . . . . . . . . . . . . . . . . . . . . . . . . . . . . . . . . . . . . . . . . . . . . . . . . . . . . . . . . . . . . . . . . . . . . . . . . . . . . . . . . . . . . . . . . . . . . . . pag. 7
5.2 Movimentazione . . . . . . . . . . . . . . . . . . . . . . . . . . . . . . . . . . . . . . . . . . . . . . . . . . . . . . . . . . . . . . . . . . . . . . . . . . . . . . . . . . . . . . . . . . . . . . . . pag. 7
5.3 Locale di installazione della caldaia . . . . . . . . . . . . . . . . . . . . . . . . . . . . . . . . . . . . . . . . . . . . . . . . . . . . . . . . . . . . . . . . . . . . . . . . . . . . . . . . . pag. 7
5.4 Scarico dei prodotti della combustione . . . . . . . . . . . . . . . . . . . . . . . . . . . . . . . . . . . . . . . . . . . . . . . . . . . . . . . . . . . . . . . . . . . . . . . . . . . . . . pag. 7
5.5 Collegamenti idraulici . . . . . . . . . . . . . . . . . . . . . . . . . . . . . . . . . . . . . . . . . . . . . . . . . . . . . . . . . . . . . . . . . . . . . . . . . . . . . . . . . . . . . . . . . . . . pag. 7
5.5.1 Acqua di alimentazione . . . . . . . . . . . . . . . . . . . . . . . . . . . . . . . . . . . . . . . . . . . . . . . . . . . . . . . . . . . . . . . . . . . . . . . . . . . . . . . . . . . . . pag. 7
5.5.2 Tubazioni mandata/ritorno impianto . . . . . . . . . . . . . . . . . . . . . . . . . . . . . . . . . . . . . . . . . . . . . . . . . . . . . . . . . . . . . . . . . . . . . . . . . . . . pag. 7
5.5.3 Tubazioni riempimento/scarico impianto . . . . . . . . . . . . . . . . . . . . . . . . . . . . . . . . . . . . . . . . . . . . . . . . . . . . . . . . . . . . . . . . . . . . . . . . pag. 7
5.5.4 Tubazioni vaso espansione e valvola di sicurezza . . . . . . . . . . . . . . . . . . . . . . . . . . . . . . . . . . . . . . . . . . . . . . . . . . . . . . . . . . . . . . . . pag. 7
5.5.5 Pompa ricircolo . . . . . . . . . . . . . . . . . . . . . . . . . . . . . . . . . . . . . . . . . . . . . . . . . . . . . . . . . . . . . . . . . . . . . . . . . . . . . . . . . . . . . . . . . . . pag. 8
5.6 Porta anteriore apertura e regolazione . . . . . . . . . . . . . . . . . . . . . . . . . . . . . . . . . . . . . . . . . . . . . . . . . . . . . . . . . . . . . . . . . . . . . . . . . . . . . . pag. 8
5.7 Montaggio del bruciatore . . . . . . . . . . . . . . . . . . . . . . . . . . . . . . . . . . . . . . . . . . . . . . . . . . . . . . . . . . . . . . . . . . . . . . . . . . . . . . . . . . . . . . . . . pag. 8
5.8 Collegamento spia controllo fiamma . . . . . . . . . . . . . . . . . . . . . . . . . . . . . . . . . . . . . . . . . . . . . . . . . . . . . . . . . . . . . . . . . . . . . . . . . . . . . . . . pag. 8
5.9 Montaggio pannellatura mod. 92÷300 . . . . . . . . . . . . . . . . . . . . . . . . . . . . . . . . . . . . . . . . . . . . . . . . . . . . . . . . . . . . . . . . . . . . . . . . . . . . . . . pag. 8
5.10 Montaggio pannellatura mod. 350÷1060 . . . . . . . . . . . . . . . . . . . . . . . . . . . . . . . . . . . . . . . . . . . . . . . . . . . . . . . . . . . . . . . . . . . . . . . . . . . . . pag. 8
Allacciamento elettrico . . . . . . . . . . . . . . . . . . . . . . . . . . . . . . . . . . . . . . . . . . . . . . . . . . . . . . . . . . . . . . . . . . . . . . . . . . . . . . . . . . . . . . . . . . . . . . . . pag. 9
Pannello comando . . . . . . . . . . . . . . . . . . . . . . . . . . . . . . . . . . . . . . . . . . . . . . . . . . . . . . . . . . . . . . . . . . . . . . . . . . . . . . . . . . . . . . . . . . . . . . . . . . . pag. 9
7.1 Descrizione funzioni . . . . . . . . . . . . . . . . . . . . . . . . . . . . . . . . . . . . . . . . . . . . . . . . . . . . . . . . . . . . . . . . . . . . . . . . . . . . . . . . . . . . . . . . . . . . . pag. 9
7.2 Schema elettrico per bruciatore e pompa monofase . . . . . . . . . . . . . . . . . . . . . . . . . . . . . . . . . . . . . . . . . . . . . . . . . . . . . . . . . . . . . . . . . . . . pag. 9
Schema di principio - impianto per riscaldamento e produzione di acqua sanitaria . . . . . . . . . . . . . . . . . . . . . . . . . . . . . . . . . . . . . . . . . . . . . . . . . pag. 10
Avviamento . . . . . . . . . . . . . . . . . . . . . . . . . . . . . . . . . . . . . . . . . . . . . . . . . . . . . . . . . . . . . . . . . . . . . . . . . . . . . . . . . . . . . . . . . . . . . . . . . . . . . . . . pag. 10
9.1 Controlli preliminari . . . . . . . . . . . . . . . . . . . . . . . . . . . . . . . . . . . . . . . . . . . . . . . . . . . . . . . . . . . . . . . . . . . . . . . . . . . . . . . . . . . . . . . . . . . . . pag. 10
9.2 Prima accensione . . . . . . . . . . . . . . . . . . . . . . . . . . . . . . . . . . . . . . . . . . . . . . . . . . . . . . . . . . . . . . . . . . . . . . . . . . . . . . . . . . . . . . . . . . . . . . . pag. 10
9.3 Spegnimento caldaia . . . . . . . . . . . . . . . . . . . . . . . . . . . . . . . . . . . . . . . . . . . . . . . . . . . . . . . . . . . . . . . . . . . . . . . . . . . . . . . . . . . . . . . . . . . . pag. 11
Manutenzione . . . . . . . . . . . . . . . . . . . . . . . . . . . . . . . . . . . . . . . . . . . . . . . . . . . . . . . . . . . . . . . . . . . . . . . . . . . . . . . . . . . . . . . . . . . . . . . . . . . . . . pag. 11
10.1 Norme generali . . . . . . . . . . . . . . . . . . . . . . . . . . . . . . . . . . . . . . . . . . . . . . . . . . . . . . . . . . . . . . . . . . . . . . . . . . . . . . . . . . . . . . . . . . . . . . . . . pag. 11
10.2 Manutenzione ordinaria . . . . . . . . . . . . . . . . . . . . . . . . . . . . . . . . . . . . . . . . . . . . . . . . . . . . . . . . . . . . . . . . . . . . . . . . . . . . . . . . . . . . . . . . . . pag. 11
10.3 Manutenzione straordinaria . . . . . . . . . . . . . . . . . . . . . . . . . . . . . . . . . . . . . . . . . . . . . . . . . . . . . . . . . . . . . . . . . . . . . . . . . . . . . . . . . . . . . . . pag. 11
10.4 Pulizia della caldaia . . . . . . . . . . . . . . . . . . . . . . . . . . . . . . . . . . . . . . . . . . . . . . . . . . . . . . . . . . . . . . . . . . . . . . . . . . . . . . . . . . . . . . . . . . . . . pag. 11
10.5 Verifica di funzionamento della caldaia . . . . . . . . . . . . . . . . . . . . . . . . . . . . . . . . . . . . . . . . . . . . . . . . . . . . . . . . . . . . . . . . . . . . . . . . . . . . . . pag. 11
10.6 Verifica di funzionamento del bruciatore . . . . . . . . . . . . . . . . . . . . . . . . . . . . . . . . . . . . . . . . . . . . . . . . . . . . . . . . . . . . . . . . . . . . . . . . . . . . . pag. 11
10.7 Possibili guasti e rimedi . . . . . . . . . . . . . . . . . . . . . . . . . . . . . . . . . . . . . . . . . . . . . . . . . . . . . . . . . . . . . . . . . . . . . . . . . . . . . . . . . . . . . . . . . . pag. 12
-4-
1. PRESENTAZIONE
Gentile Cliente,
La ringraziamo per aver scelto una caldaia AR SW.
Questo manuale è stato preparato per
informarLa, con avvertenze e consigli, sulla
installazione, il corretto uso e la manutenzione
2. AVVERTENZE GENERALI
- Il manuale istruzioni è parte integrante del prodotto e fornisce una descrizione di tutto ciò
che deve essere osservato in fase di installazione, uso e manutenzione.
- Questo apparecchio deve essere destinato
solo all’uso per il quale è stato espressamente
previsto.
- Questo apparecchio serve a riscaldare
acqua a una temperatura inferiore a quella
di ebollizione a pressione atmosferica e
deve essere allacciato a un impianto di
riscaldamento e/o a un impianto di distribuzione acqua calda per uso sanitario,
compatibilmente alle sue caratteristiche e
prestazioni e alla potenza termica.
- È opportuno verificare, prima dell’installazione,
che la caldaia non abbia subito danni derivanti
dalla movimentazione e dal trasporto.
- L’installazione deve essere effettuata in ottemperanza alle norme vigenti, da personale
opportunamente qualificato.
della caldaia. La preghiamo quindi di leggerlo
attentamente e di conservarlo con cura per ogni
ulteriore consultazione. Nel suo interesse, La
invitiamo a seguire e osservare con attenzione
quanto in esso contenuto per poter al meglio e
con piena soddisfazione usufruire di questo pro-
dotto di alta qualità. L’inadempienza e l’inosservanza di quanto riportato in questo manuale,
esonerano la Ditta Costruttrice da qualsiasi
responsabilità e invalida la garanzia stessa.
- Prima di effettuare qualsiasi operazione di
pulizia o di manutenzione, disinserire l’apparecchio dalla rete di alimentazione.
- La Ferroli S.p.A. non risponde per danni a persone e/a cose dovuti ad errori di installazione,
di regolazione, di manutenzione e da usi impropri.
- L’avviamento della caldaia e del relativo
impianto devono essere eseguiti da persona
autorizzata.
- Il primo avviamento ha lo scopo di verificare il
buon funzionamento di tutti i dispositivi di
regolazione e di controllo.
- Il non utilizzo dell’apparecchio per un lungo
periodo necessita dell’intervento di personale
qualificato.
ne; che il collegamento e il camino siano a perfetta tenuta; i collegamenti del combustibile,
degli impianti elettrici ed eventuali altre disposizioni per quanto riguarda la sicurezza.
Condizioni di garanzia
La validità della garanzia è subordinata
all’osservanza delle norme e dei consigli di utilizzo contenute in questo manuale. Ogni inosservanza o modifica la renderà nulla. Non sono
assolutamente riconosciuti dalla garanzia danni
dovuti alla corrosione da condensa acida dei
prodotti della combustione o conseguenti alla
formazione di incrostazioni causate dall’uso di
acque dure o aggressive, in quanto imputabili
alla sola conduzione dell’impianto.
Normative
L’installatore deve rispettare le regolamentazioni locali e vigenti per quanto riguarda: la scelta del luogo di installazione della caldaia, il
rispetto delle necessarie condizioni di aerazio-
3. CERTIFICAZIONE
La marcatura CE documenta che gli apparecchi
Ferroli S.p.A. sono conformi ai requisiti contenuti
nelle direttive europee ad essi applicabili.
In particolare questo apparecchio è conforme
alle seguenti direttive CE:
- Direttiva apparecchi a gas (2009/142/CE)
- Direttiva rendimenti (92/42 CE)
- Direttiva Bassa Tensione 73/23 CE
(modificata dalla 93/68)
- Direttiva CE Compatibilità Elettromagnetica
89/336 (modificata dalla 93/68)
4. CARATTERISTICHE TECNICHE,
COSTRUTTIVE E DIMENSIONALI
Le caldaie sono provviste di 2 attacchi da 1/2”
per guaine porta bulbi (adatte ad alloggiare 3
bulbi ciascuna).
Il pannello di comando già precablato è posto
sopra la caldaia e consente il funzionamento
automatico della stessa.
4.4 Identificazione
La caldaia è identificabile attraverso:
- Busta documenti
È applicata sul portellone e contiene:
MANUALE TECNICO
CERTIFICATO DI GARANZIA
ETICHETTE CON CODICE A BARRE
TARGHETTA TECNICA
CERTIFICATO DI COSTRUZIONE
(attestante il buon esito della prova idraulica)
4.1 Descrizione dell’apparecchio
La tipologia costruttiva delle caldaie serie AR SW
garantisce potenzialità e rendimenti elevati con
basse temperature fumi, si ottengono così emissioni inquinanti ridotte.
La costruzione segue la norma EN 303 parte 1ª.
Gli elementi tecnici principali della progettazione
sono:
- lo studio accurato delle geometrie, per ottenere un rapporto ottimale tra i volumi di combustione e le superfici di scambio
- la scelta dei materiali utilizzati, per una lunga
durata della caldaia.
Le caldaie sono a combustione pressurizzata,
a 3 giri di fumo, del tipo cilindrico orizzontale
con inversione di fiamma nel focolare, completamente bagnato, la fiamma prodotta dal bruciatore si rovescia perifericamente verso la
parte anteriore, dove i fumi imboccano il fascio
tubiero, nei quali sono inseriti i turbolatori che
creano un percorso vorticoso aumentando lo
scambio termico per convezione. In uscita dal
fascio tubiero i fumi sono raccolti nella camera
posteriore e convogliati al camino. Le caldaie
sono equipaggiate di una porta incernierata
per una apertura a destra o a sinistra e regolabile in altezza e in profondità. Il fasciame del
corpo è isolato con uno spesso materassino di
lana di vetro e ricoperto con un ulteriore strato
di materiale antistrappo. La finitura esterna è
composta da pannelli in acciaio verniciato. I
ganci di sollevamento si trovano sulla parte
superiore del fasciame.
4.2 Principio di funzionamento
Le caldaie AR SW sono dotate di un focolare
cilindrico cieco, nel quale la fiamma del bruciatore si rovescia perifericamente verso il davanti, da
dove i gas combusti entrano nei tubi fumo.
All’uscita, gli stessi vengono raccolti nella camera
fumo e da qui inviati al camino. La camera di
combustione durante il funzionamento del bruciatore è sempre in pressione. Per il valore di questa
pressione vedere le tabelle di pag. 6, alla colonna
Perdite di carico lato fumi. Il canale da fumo e il
raccordo alla canna fumaria devono essere realizzati in conformità alle Norme e alla
Legislazione vigente, con condotti rigidi, resistenti
alla temperatura, alla condensa, alle sollecitazioni
meccaniche e a tenuta. (Fig. 1)
4.3 Dati tecnici - Dimensioni - Attacchi idraulici
Legenda (Fig. 2 e 3)
1 Quadro comandi
2 Flangia attacco bruciatore
3 Portina di pulizia camera fumo
4 Spia controllo fiamma
T1 Mandata riscaldamento
T2 Ritorno riscaldamento
T3 Attacco vaso espansione
T4 Scarico caldaia
T5 Attacco camino
T6 Attacco bruciatore
-5-
- Targhetta Tecnica
Riporta i dati tecnici e le prestazioni
dell’apparecchio (Fig. 4).
È inserita nella busta documenti e DEVE
ESSERE APPLICATA OBBLIGATORIAMENTE, dall’installatore dell’apparecchio, ad installazione ultimata, nella parte alta anteriore di
uno dei pannelli laterali della mantellatura, in
modo visibile.
In caso di smarrimento richiederne un duplicato al Servizio Tecnico di Assistenza Ferroli.
La manomissione, l’asportazione, la mancanza
della targhetta di identificazione o quant’altro
non permetta la sicura identificazione del prodotto, rende difficoltosa qualsiasi operazione di
installazione e manutenzione.
Legenda (Fig. 4)
1 Busta documenti
IT
AR SW
Potenzialità nominale
Potenzialità focolare
Capacità totale caldaia
Perdite di carico lato acqua
Perdite di carico lato fumi
Peso a secco
DIMENSIONI
Mandata acqua calda
Ritorno acqua calda
Attacco vaso espansione
Scarico caldaia
Uscita fumo
AR SW
Potenzialità nominale
Potenzialità focolare
Capacità totale caldaia
Perdite di carico lato acqua
Perdite di carico lato fumi
Peso a secco
DIMENSIONI
Mandata acqua calda
Ritorno acqua calda
Attacco vaso espansione
Scarico caldaia
Uscita fumo
kW
kW
kW
kW
l
Δt 10°C mbar
Δt 15°C mbar
Δt 20°C mbar
mbar
kg
mm
A
mm
B
mm
C
mm
D
mm
E
mm
F
mm
G
mm
H
mm
I
mm
L
mm
L1
mm
M
mm
N
mm
O
mm
P
mm
Q
mm
R
DN T1
DN T2
DN T3
DN T4
Ø T5
min
max
min
max
kW
kW
kW
kW
l
Δt 10°C mbar
Δt 15°C mbar
Δt 20°C mbar
mbar
kg
mm
A
mm
B
mm
C
mm
D
mm
E
mm
F
mm
G
mm
H
mm
I
mm
L
mm
L1
mm
M
mm
N
mm
O
mm
P
mm
Q
DN T1
DN T2
DN T3
DN T4
Ø T5
min
max
min
max
92
60
92
64,3
99,5
121
8
4
2
0,5
260
760
764
866
165
130
152
515
395
1046
100
121
925
147
150
250
700
740
2”
2”
1” 1/4
3/4”
200
107
70
107
75
116
121
11
6
2,5
0,7
260
760
764
856
165
130
152
515
395
1046
100
121
925
147
150
250
700
740
2”
2”
1” 1/4
3/4”
200
2360
1535
2360
1668
2565
1925
150
70
42
7,2
3900
1610
2772
1810
–
210
250
1005
860
3232
145
195
1950
662
650
1000
1000
150
150
100
1” 1/2
450
152
100
152
107,3
165
186
20
12
5
1,2
350
810
1014
911
165
130
152
545
420
1296
100
121
980
167
230
350
750
990
2” 1/2
2” 1/2
1” 1/2
3/4”
220
190
137
190
147,4
206
186
12
7
3
1,2
350
810
1014
911
165
130
152
545
420
1296
100
121
980
167
230
350
750
990
2” 1/2
2” 1/2
1” 1/2
3/4”
220
240
160
240
170,9
261
232
17
10
4
2,3
440
810
1264
911
165
130
152
545
420
1516
100
121
980
217
330
450
750
1240
2” 1/2
2” 1/2
1” 1/2
3/4”
220
300
196
300
209,5
326
304
40
17
9
3,3
480
950
1264
1031
165
150
152
630
495
1546
100
121
1100
217
330
450
890
1240
2” 1/2
2” 1/2
1” 1/2
3/4”
220
350
228
350
277,5
378
362
48
23
13
3,5
550
950
1514
1031
165
150
152
630
495
1816
100
121
1100
217
380
600
890
1490
2” 1/2
2” 1/2
1” 1/2
3/4”
220
3000
1950
3000
2113
3250
2600
145
65
45
7,5
5300
1800
2976
2000
–
220
250
1100
940
3446
145
195
2140
716
650
1150
1170
200
200
125
1” 1/2
500
399
260
399
364,5
432
337
43
31
16
4,4
590
950
1515
1031
165
150
152
630
485
1817
100
120
1100
218
380
600
890
1491
2” 1/2
2” 1/2
1” 1/2
3/4”
220
3600
2340
3600
2536
3900
2920
190
90
61
8,2
5800
1800
3346
2000
–
220
250
1100
940
3816
145
195
2140
786
650
1450
1170
200
200
125
1” 1/2
500
-6-
525
341
525
417
567
405
40
22
12
4,3
860
1060
1516
1181
165
170
152
725
570
1838
100
120
1250
218
380
600
1000
1492
80
80
2”
3/4”
250
600
390
600
495
648
471
51
28
16
4,8
970
1060
1776
1181
165
170
152
725
570
2098
100
120
1250
218
440
700
1000
1752
80
80
2”
3/4”
250
4000
2600
4000
2819
4334
4425
250
120
70
9,5
7500
1980
3596
2180
–
240
250
1190
960
4086
145
195
2325
786
650
1700
1350
200
200
125
1” 1/2
600
720
468
720
502
777
735
32
18
10
4,5
1250
1260
1776
1331
165
170
212
815
615
2158
100
180
1400
228
440
700
1200
1752
100
100
2” 1/2
3/4”
350
820
533
820
566
881
735
40
25
18
5,6
1250
1260
1776
1331
165
170
212
815
615
2158
100
180
1400
218
440
700
1200
1752
100
100
2” 1/2
3/4”
350
940
611
940
651
1011
850
51
25
16
5,4
1420
1260
2016
1331
165
170
212
815
615
2398
100
180
1400
218
480
900
1200
1992
100
100
2” 1/2
3/4”
350
4500
2926
4500
3165
4868
4790
280
135
80
10,5
8000
1980
3946
2180
–
240
250
1190
960
4436
145
195
2325
786
650
2050
1350
200
200
125
1” 1/2
600
1060
689
1060
731
1140
1240
65
33
20
6
1580
1450
2018
1511
165
190
212
900
670
2420
90
178
1580
218
480
900
1390
1994
125
125
3”
3/4”
400
1250
813
1250
884
1359
1240
86
40
25
6,5
2250
1450
2018
1511
165
190
212
900
670
2420
90
178
1580
220
480
900
1390
1994
125
125
3”
3/4”
400
5000
3251
5000
3515
5407
6150
200
85
55
10,8
9600
2180
3948
2380
–
260
250
1290
1015
4458
145
195
2525
786
750
1950
1550
250
250
150
1” 1/2
650
1480
1600 1890
962
1040 1229
1480
1600 1890
1046
1128 1336
1608
1736 2054
1490
1490 1620
110
115
100
55
60
45
32
40
29
6,5
6,8
7
2650
2700 2850
1530
1530 1530
2320
2320 2520
1661
1661 1661
165
165
165
190
190
190
212
212
212
1013
1013 1013
743
743
743
2722
2722 2722
120
120
120
199
199
199
1730
1730 1730
220
220
220
580
580
580
1100
1100 1200
1470
1470 1470
2296
2296 2496
150
150
150
150
150
150
DN100 DN100 DN100
1” 1/2 1” 1/2 1” 1/2
450
450
450
6000
3902
6000
4215
6483
6800
215
105
65
12
11500
2180
4448
2380
–
260
250
1290
1015
4958
145
195
2525
786
750
2450
1550
250
250
150
1” 1/2
650
5. INSTALLAZIONE
5.1 Imballo
Le caldaie AR SW modello 92-1890 vengono
fornite complete di porta e camera fumo montate e isolamento sul corpo, mentre la mantellatura è contenuta in imballo di cartone.
Il pannello strumenti viene fornito in una scatola di cartone e posizionato nella camera di
combustione. Le caldaie AR SW modello
2360-6000 vengono fornite complete di isolamento e mantello.
Il pannello strumenti viene fornito in una scatola di cartone e posizionato nella camera di
combustione.
5.2 Movimentazione
Le caldaie AR SW sono dotate di golfare di
sollevamento. Porre attenzione alla movimentazione e avvalersi di attrezzatura idonea ai
loro pesi. Prima di posizionare la caldaia
togliere il basamento in legno svitando le viti di
fissaggio (Fig. 5).
5.3 Locale di installazione (Fig. 6)
Le caldaie AR SW vanno installate in locali ad
uso esclusivo, rispondenti alle Norme Tecniche e
alla Legislazione vigente e dotati di aperture di
aerazione adeguatamente dimensionate. Le
aperture di aerazione dovranno essere permanenti, comunicanti direttamente con l’esterno e
posizionate a livello alto e basso in conformità
con le normative vigenti. L’ubicazione delle aperture di aerazione, i circuiti di adduzione del combustibile, di distribuzione dell’energia elettrica e di
illuminazione dovranno rispettare le disposizioni
di legge vigenti in relazione al tipo di combustibile
impiegato. Per agevolare la pulizia del circuito
fumo, nella parte anteriore della caldaia, dovrà
essere lasciato uno spazio libero non inferiore
alla lunghezza del corpo caldaia e, in ogni caso,
mai inferiore a 1300 mm e si dovrà verificare che
con la porta aperta a 90° la distanza tra la porta e
la parete adiacente (X), sia almeno pari alla lunghezza del bruciatore.
Il piano d’appoggio della caldaia deve essere
perfettamente orizzontale. È consigliabile prevedere uno zoccolo di cemento piano e in grado di
sopportare il peso totale della caldaia più il contenuto d’acqua. Per le dimensioni dello zoccolo,
vedere le quote R x Q (tabella dimensioni).
Nel caso in cui il bruciatore sia alimentato con
gas combustibile di peso specifico superiore a
quello dell’aria, le parti elettriche dovranno essere
poste ad una quota da terra superiore a 500 mm.
L’apparecchio non può essere installato all’aperto
perché non è progettato per funzionare all’esterno e non dispone di sistemi antigelo automatici.
INSTALLAZIONE SU IMPIANTI VECCHI
O DA RIMODERNARE
Quando la caldaia viene installata su impianti
vecchi o da rimodernare, verificare che:
- La canna fumaria sia adatta alle temperature
dei prodotti della combustione, calcolata e
costruita secondo le Normative vigenti e che
sia a tenuta, isolata e non abbia occlusioni o
restringimenti.
- L’impianto elettrico sia realizzato nel rispetto
delle Norme vigenti e da personale qualificato.
- La linea di adduzione del combustibile e
l’eventuale serbatoio siano realizzati secondo
le Norme vigenti.
- Il vaso/i di espansione assicuri il totale
assorbimento della dilatazione del fluido
contenuto nell’impianto.
- La portata, la prevalenza e la direzione del flusso delle pompe di circolazione sia appropriata.
- L’impianto sia lavato, pulito da fanghi, da
incrostazioni, disaerato e che siano state verificate le tenute.
- Sia previsto un sistema di trattamento acqua
di alimentazione/reintegro (vedi valori di riferimento).
5.4 Scarico dei prodotti della combustione
(Fig. 7)
Il canale da fumo e il raccordo alla canna fumaria
devono essere realizzati in conformità alle Norme
e alla Legislazione vigente, con condotti rigidi,
resistenti alla temperatura, alla condensa, alle
sollecitazioni meccaniche e a tenuta. La canna
fumaria deve assicurare la depressione minima
prevista dalle Norme vigenti, considerando pressione “zero” al raccordo con canale da fumi.
Canne fumarie e canali da fumo inadeguati o mal
dimensionati possono ampliare la rumorosità di
combustione, generare problemi di condensazione e influire negativamente sui parametri di combustione. I condotti di scarico non coibentati sono
fonte di potenziale pericolo. Le tenute delle giunzioni vanno realizzate con materiali resistenti a
temperature di almeno 250°C. Nel tratto di collegamento tra caldaia e canna fumaria, si devono
prevedere idonei punti di misura per la temperatura fumi e l’analisi dei prodotti della combustione. Per quanto riguarda la sezione e l’altezza del
camino, è necessario fare riferimento alle regolamentazioni nazionali e locali in vigore.
5.5 Collegamenti idraulici
5.5.1 Acqua di alimentazione
Le caratteristiche chimiche dell’acqua dell’impianto e di reintegro, sono fondamentali per il buon
funzionamento e la sicurezza della caldaia,
vanno condizionate con opportuni sistemi di trattamento. Come valori di riferimento possono
essere considerati quelli riportati nella tabella.
DUREZZA TOTALE
ALCALINITA’
PH
SILICE
CLORURI
ppm
mg/l CaCO3
ppm
ppm
10
750
8÷9
100
3500
È assolutamente indispensabile il trattamento
dell’acqua utilizzata per l’impianto di riscaldamento nei seguenti casi:
- Impianti molto estesi
- Acqua con elevata durezza
- Frequenti immissioni di acqua di reintegro
nell’impianto
Nel caso si rendesse necessario lo svuotamento
parziale o totale dell’impianto, si prescrive di effettuare il successivo riempimento con acqua trattata. Per il controllo dell’entità dei reintegri si consiglia di installare sulla tubazione un contatore.
I fenomeni più comuni che si verificano negli
impianti termici sono:
- Incrostazioni di calcare
Il calcare si concentra nei punti dove maggiore è la temperatura di parete. Le incrostazioni
calcaree a causa della loro bassa conduttività
termica riducono lo scambio termico così che
la presenza di pochi millimetri, contrastano lo
-7-
scambio termico tra i fumi e l’acqua, comportando un aumento della temperatura delle
parti esposte alla fiamma e quindi rotture
(cricche) sulla piastra tubiera.
- Corrosione lato acqua
La corrosione delle superfici metalliche della
caldaia lato acqua è dovuta al passaggio in
soluzione del ferro attraverso i suoi ioni. In
questo processo ha molta importanza la presenza dei gas disciolti e in particolare
dell’ossigeno e dell’anidride carbonica. In presenza di acque addolcite e/o demineralizzate,
si è al riparo da fenomeni di incrostazione,
ma non altrettanto per quanto riguarda le corrosioni. È necessario quindi condizionare
l’acqua con inibitori di processi corrosivi.
5.5.2 Tubazioni mandata/ritorno impianto
Le dimensioni delle tubazioni di mandata e ritorno sono indicate per ogni modello di caldaia
nella tabella DIMENSIONI.
Assicurarsi che sull’impianto ci sia un numero
sufficiente di sfiati. Gli attacchi della caldaia non
devono essere sollecitati dal peso delle tubazioni d’allacciamento all’impianto; installare pertanto appositi supporti.
5.5.3 Tubazioni riempimento/scarico impianto
Per il riempimento e lo scarico della caldaia un
rubinetto può essere collegato all’attacco T4
che si trova nella parte posteriore (vedi disegno DIMENSIONI).
5.5.4 Tubazioni vaso espansione e valvola di
sicurezza
Le caldaie AR SW sono adatte per funzionare
con circolazione d’acqua forzata sia con vaso
d’espansione aperto che chiuso. Un vaso di
espansione è sempre necessario, per compensare l’aumento di volume dell’acqua dovuto al
riscaldamento. Nel primo caso, l’altezza della
colonna idrostatica dovrà essere pari almeno a
3 metri sopra il mantello della caldaia e dovrà
essere di capacità tale da contenere, tra il pelo
libero dell’acqua nel vaso e il tubo di troppo
pieno, l’aumento di volume di tutta l’acqua
dell’impianto. Sono da preferirsi vasi alti e stretti
in modo da esporre a contatto con l’aria la minor
superficie d’acqua possibile, riducendo in tal
modo l’evaporazione. Nel secondo caso, la
capacità del vaso di espansione chiuso deve
essere calcolata tenendo conto di:
- volume totale dell’acqua contenuta nell’impianto
- pressione massima di esercizio dell’impianto
- pressione massima di esercizio del vaso di
espansione
- pressione di precarica iniziale del vaso di
espansione
- temperatura massima di esercizio della caldaia (la temperatura massima del termostato
montato sul pannello è 90°C; ai fini di questo
calcolo si consiglia di considerare 100°C).
La tubazione di espansione collega il vaso di
espansione con l’impianto. Questa tubazione che
partirà dall’attacco T3 (vedere tabella Dimensioni),
non dovrà avere alcuna valvola di intercettazione.
Installare sull’attacco T3 o sulla tubazione di mandata entro 0,5 metri dalla flangia di partenza, una
valvola di sicurezza dimensionata per la capacità
della caldaia e in conformità con le normative locali
e vigenti. È vietato interporre qualsiasi tipo d’intercettazione tra la caldaia e il vaso d’espansione e
tra la caldaia e le valvole di sicurezza, e si racco-
IT
manda di usare valvole regolate per intervento non
oltre la pressione massima di esercizio consentita.
5.5.5 Pompa ricircolo (Fig. 8)
La condensazione del vapore d’acqua contenuto
nei fumi di scarico della caldaia (condensa) si
presenta quando la temperatura dell’acqua di
ritorno è minore di 55°C ed è rilevante soprattutto
durante l’accensione mattutina, dopo che la caldaia è rimasta spenta tutta la notte. La condensa
è acida e corrosiva e, con il tempo, intacca le
lamiere della caldaia. È quindi auspicabile l’adozione di una pompa di ricircolo, con funzione di
anticondensa, installata tra gli attacchi di mandata e di ritorno, a monte della eventuale valvola
miscelatrice. La pompa deve assicurare, durante
i periodi di funzionamento dell’impianto, una portata compresa tra il 20 e il 30% di quella totale;
deve assicurare una temperatura dell’acqua di
ritorno non inferiore a 55°C, mentre la prevalenza
richiesta è modesta in quanto deve vincere solo
la resistenza della caldaia e delle valvole. Per
rilevare l’effettiva temperatura di ritorno impianto
con lo scopo di comandare la pompa anticondensa o per gestire le funzioni di messa a regime in
sistemi di termoregolazione, è necessario predisporre un pozzetto portasonda da posizionare a
una distanza equivalente a 3÷5 diametri del tubo
di ritorno a monte del punto di innesto idraulico.
5.6 Porta anteriore apertura e regolazione
Per i modelli AR SW 92÷1890 l’incernieramento, il
fissaggio e l’inversione dell’apertura della porta
avvengono secondo la fig. 9. A tale scopo si rendono necessarie le seguenti operazioni:
- La porta viene fornita di quattro staffe (pos. 3)
e cerniere uguali.
- Per stabilire il senso di apertura DESTRA o
SINISTRA svitare il dado (pos. 7), svitare e
togliere il dado (pos. 6) DX o SX, avremo così
il lato di apertura della porta.
- La regolazione in altezza della porta avviene
tramite il dado (pos. 2); a regolazione ultimata
bloccare infine i grani (pos. 1).
- La regolazione longitudinale avviene tramite
la vite (pos. 8).
Legenda (Fig. 9)
1 Grano di fissaggio
2 Dado di sostegno/regolazione porta
3 Staffa cerniera
4 Perno cerniera
5 Vite cerniera
6 Dado di fissaggio cerniera
7 Dado di fissaggio
8 Viti e dadi di fissaggio/regolazione staffa
cerniera
Per i modelli AR SW 2360÷6000 l’incernieramento, il fissaggio e l’inversione dell’apertura
della porta avvengono secondo la fig. 10.
A tale scopo si rendono necessarie le seguenti
operazioni:
- La porta viene fornita di quattro cerniere
uguali (pos. 3).
- Per stabilire il senso di apertura DESTRA o
SINISTRA svitare il dado (pos. 7), svitare e
togliere il dado (pos. 6) DX o SX, avremo così
il lato di apertura della porta.
- La regolazione in altezza della porta avviene
tramite il dado (pos. 2); a regolazione ultimata
bloccare infine i grani (pos. 1).
Legenda (Fig. 10)
1 Grano di fissaggio
2 Dado di sostegno/regolazione porta
3 Staffa cerniera
4 Perno cerniera
5 Vite cerniera
6 Dado di fissaggio cerniera
7 Dado di fissaggio
5.7 Montaggio del bruciatore (Fig. 11)
Il montaggio del bruciatore alla porta della caldaia,
deve garantire una perfetta tenuta ai prodotti della
combustione. Installato il bruciatore sulla caldaia,
lo spazio tra il boccaglio del bruciatore e il materiale refrattario del portellone deve essere riempito
con il materassino ceramico (A) fornito a corredo.
Questa operazione evita il surriscaldamento del
portellone che altrimenti si deformerebbe in
maniera irrimediabile. Gli allacciamenti del combustibile al bruciatore dovranno essere posti in
modo da consentire la completa apertura del portellone della caldaia con il bruciatore installato.
AR SW
92-152
190-399
525-600
720-940
1060-1250
1480-1890
2360
3000-3600
4000-4500
5000
6000
L min. (mm)
230
250
290
320
320
350
350
370
450
500
500
L max. (mm)
300
320
360
390
390
420
420
450
500
550
550
5.8 Collegamento spia controllo fiamma
(Fig. 12)
La spia controllo fiamma è munita di una presa di
pressione (1) da collegarsi tramite un tubo di silicone o rame alla presa sul bruciatore (2). Questa
operazione permette all’aria soffiata dal ventilatore di raffreddare il vetro spia e impedirne l’annerimento. Il mancato collegamento del tubo alla spia
può provocare la rottura del vetro di controllo.
5.9 Montaggio pannellatura mod. 92÷399
Sequenza di montaggio (Fig. 13)
a) Posizionare i pannelli laterali destro e sinistro
(pos. 1-2) agganciandoli al supporto (pos.
13). Per determinare quale dei due fianchi sia
il destro o il sinistro, fare riferimento al foro
per la piastrina passacavi (pos. 6), deve
essere verso il davanti della caldaia.
b) Fissare il pannello comandi al pannello superiore (pos. 3).
c) Appoggiare il pannello superiore destro (pos.
3), completo del pannello comandi, al pannello laterale (pos. 1) completo di molle, piolini e
dadi (pos. 10-11-12).
d) Inserire nelle guaine i bulbi degli strumenti
come indicato in Fig. 20 ed eseguire il collegamento elettrico del pannello comandi alla linea
di alimentazione, al bruciatore e alle eventuali
pompe etc. Si raccomanda di inserire le sonde
fino in fondo ai relativi pozzetti per migliorarne
il contatto. Bloccare quindi i capillari con le
mollette. Richiudere il coperchio del quadro
elettrico, far passare la spina del bruciatore
attraverso la piastrina laterale (pos. 6) e bloccare il cavo con il passacavo fornito. Fissare
la piastrina (pos. 6) con le viti (pos. 7).
-8-
e) Montare il pannello superiore sinistro (pos. 4)
al pannello laterale sinistro (pos. 2) completo
di molle, piolini e dadi (pos. 10-11-12).
f) Inserire nelle guaine i bulbi degli strumenti
come indicato in fig. 13-20 ed eseguire il collegamento elettrico del pannello comandi alla
linea di alimentazione, al bruciatore e alle eventuali pompe etc. Si raccomanda di inserire le
sonde fino in fondo ai relativi pozzetti per
migliorarne il contatto. Bloccare quindi i capillari
con le mollette. Richiudere il coperchio del quadro elettrico, far passare la spina del bruciatore
attraverso la piastrina laterale (pos. 9) e bloccare il cavo con il passacavo fornito. Fissare la
piastrine (pos. 9) con le viti (pos. 10).
g) Montare il pannello superiore (pos. 6) al pannello laterale (pos. 3) completo di molle, piolini e dadi (pos.14-15-16).
h) Montare il pannello posteriore (pos. 8) alla caldaia tramite le viti (pos. 13) con i dadi (pos. 14).
i) Montare il pannello anteriore (pos. 5) sulla
porta tramite le viti (pos. 8) e i dadi (pos. 9).
l) Fissare la targhetta dati della caldaia ved.
Cap. 1.4, dopo aver pulito e sgrassato con
adeguato solvente la zona interessata, e
applicarla facendola aderire perfettamente.
Non rimuovere la targhetta perché se ne
comprometterebbe l’adesività.
La targhetta è inserita nella busta documenti.
5.10 Montaggio pannellatura mod. 525÷1890
Sequenza di montaggio (Fig. 14)
a) Posizionare i pannelli laterali (pos. 1-2 e 3-4)
agganciandoli ai supporti (pos. 19).
b) Posizionare i pannelli laterali superiori destri
(pos. 5-6) e successivamente i sinistri (7-8)
agganciandoli ai supporti della caldaia (pos.
19) e al traverso (pos. 18).
c) Fissare il pannello comandi al pannello superiore destro (pos. 5).
d) Appoggiare il pannello superiore (pos. 5),
completo del pannello comandi, al pannello
laterale (pos. 1) completo di molle, piolini e
dadi (pos. 15-16-17).
e) Inserire nelle guaine i bulbi degli strumenti
come indicato in Fig. 21 ed eseguire il collegamento elettrico del pannello comandi alla linea
di alimentazione, al bruciatore e alle eventuali
pompe etc. Si raccomanda di inserire le sonde
fino in fondo ai relativi pozzetti per migliorarne
il contatto. Bloccare quindi i capillari con le
mollette. Richiudere il coperchio del quadro
elettrico, far passare la spina del bruciatore
attraverso la piastrina laterale (pos. 11) e bloccare il cavo con il passacavo fornito. Fissare la
piastrina (pos. 11) con le viti (pos. 12).
f) Montare il sostegno (pos. 18).
g) Montare i pannelli superiori (pos. 5-6-7-8)
agganciandoli ai pannelli laterali (pos. 1-2-34) completi di molle, piolini e dadi (15-16-17).
h) Montare i pannelli anteriori (pos. 9-10) sulla
porta anteriore tramite le viti (pos. 14) e i dadi
(pos. 13).
i) Fissare la targhetta dati della caldaia ved.
Cap. 1.4, dopo aver pulito e sgrassato con
adeguato solvente la zona interessata, e
applicarla facendola aderire perfettamente.
Non rimuovere la targhetta perché se ne
comprometterebbe l’adesività.
La targhetta è inserita nella busta documenti.
6. ALLACCIAMENTO ELETTRICO
È necessario collegare la caldaia ad una rete
di alimentazione 230V - 50Hz monofase +
terra rispettando le indicazioni seguenti.
L’impianto deve essere conforme alle VIGENTI NORME di sicurezza.
- Prevedere l'impiego di un interruttore bipolare, sezionatore di linea, conforme alle Norme
CEI-EN (apertura dei contatti di almeno 3 mm)
- Rispettare il collegamento L (Fase) - N (Neutro)
- Utilizzare cavi con sezione uguale o maggiore di 1,5 mm2
- Riferirsi agli schemi elettrici di questo libretto
per qualsiasi intervento di natura elettrica
- Realizzare i collegamenti di terra ad un efficace impianto di messa a terra.
7. PANNELLO COMANDO
7.1 Descrizione funzioni
Tramite l’interruttore generale (11) si pone sotto
tensione il quadro e le apparecchiature ad esso
collegate. Gli interruttori (12) e (13) a loro volta,
interrompono la tensione al bruciatore ed alla
pompa dell’impianto. Con il termostato (21) si
regola la temperatura di esercizio della caldaia.
Il termostato di minima arresta la pompa
dell’impianto in fase di messa a regime sino al
raggiungimento della temperatura in caldaia di
50°C. Nel caso di bruciatori e/o di pompa
impianto trifase o con assorbimento superiore a
3A, si dovranno prevedere contattori di telecomando tra il quadro caldaia ed il carico.
Sulla linea elettrica di alimentazione del quadro
di comando della caldaia, si dovrà prevedere un
interruttore con fusibili di protezione.
T
R
S
C
Termometro
Riarmo manuale
Spia blocco bruciatore
Contaore (eventuale)
AVVERTENZA
Per il collegamento elettrico di caldaie aventi
potenza nominale superiore a 300.000 kcal/h,
l’installatore deve predisporre un 2° termostato
di sicurezza.
7.2 Schema elettrico per bruciatore e pompa monofase (Fig. 17)
Fig. 17
Legenda
IG
TS
TM
TA
IB
SB
Interruttore generale
Termostato sicurezza 110°C
Termostato di minima 45°C
Termostato ambiente
Interruttore bruciatore
Spia blocco bruciatore
SL
Ch
PI
IPi
TR1-TR2
Spia di linea
Contaore
Pompa impianto
Interruttore pompa impianto
Termostato 2 stadi 1°-2° fiamma
(30°-90°C Δt 1°-2° fiamma=7°C)
-9-
F4/K4
Collegamento
Termoregolazione RVP
L
Morsetti Morsettiera
N
di Collegamento
3-20
IT
8. SCHEMA DI PRINCIPIO - IMPIANTO PER
RISCALDAMENTO E PRODUZIONE DI
ACQUA SANITARIA (Fig. 18)
La scelta e l’installazione dei componenti
dell’impianto è demandata per competenza
all’installatore, che dovrà operare secondo le
regole della buona tecnica e della Legislazione
vigente. Gli impianti caricati con antigelo obbligano l’impiego di disconnettori idrici. Si ricorda
che lo schema di Fig. 18 è uno schema di principio. Nel caso di impianti diversi, Vi preghiamo
contattare il nostro Servizio Post Vendita che Vi
fornirà tutti gli elementi da Voi richiesti.
Legenda
A Mandata impianto
B Ritorno impianto
1 Generatore di calore
2 Bruciatore completo di valvole di blocco
e regolazione
3 Bollitore
4 Collettori impianto
5 Valvole di sezionamento
6 Pompa di circolazione
7 Valvole di non ritorno
8 Vaso di espansione impianto
9 Valvola di sfiato automatico
10 Valvola di sicurezza
11 Filtro addolcitore
12 Caricamento impianto
13
14
15
16
17
18
19
20
21
22
23
24
25
26
27
28
9. AVVIAMENTO
- Il voltaggio e la frequenza di rete siano compatibili con il bruciatore e l’equipaggiamento
elettrico della caldaia.
- L’impianto sia in grado di assorbire la quantità
di calore che verrà prodotta.
- La pompa di ricircolo sia installata come prescritto al par. 5.5.5.
accensione e per la regolazione che compete
unicamente al tecnico abilitato.
Durante la prima accensione si dovrà verificare
che la porta, la flangia bruciatore e le connessioni
con il camino risultino a tenuta e che la base
della canna fumaria abbia una leggera depressione. La portata di combustibile dovrà corrispondere ai dati di targa della caldaia e per nessun motivo dovrà eccedere rispetto al valore di potenza
nominale massima dichiarata. La temperatura dei
fumi non dovrà mai scendere sotto i 160°C.
9.1 Controlli preliminari
Eseguiti i collegamenti idraulici, elettrici e del
combustibile alla caldaia, prima dell’avviamento
controllare che:
- Il vaso di espansione e la valvola di sicurezza
(se necessaria) siano collegati in maniera corretta e non siano in alcun modo intercettabili.
- I bulbi dei termostati di esercizio, di sicurezza,
di minima e del termometro, siano bloccati
entro le rispettive guaine.
- I turbolatori siano posizionati in tutti i tubi fumo.
- L’impianto risulti riempito d’acqua e completamente disaerato.
- La pompa o le pompe funzionino regolarmente.
- I collegamenti idraulici, elettrici e delle sicurezze necessarie e del combustibile siano stati
eseguiti in conformità alle disposizioni nazionali e locali in vigore.
- Il bruciatore sia montato secondo le istruzioni
contenute nel manuale del costruttore.
10. MANUTENZIONE
10.1 Norme generali
La manutenzione periodica è essenziale per la
sicurezza, il rendimento e la durata dell’apparecchio. Tutte le operazioni devono essere eseguite da personale qualificato. Ogni operazione
di pulizia e di manutenzione deve essere preceduta dalla chiusura dell’alimentazione combustibile, dopo aver tolto la tensione elettrica.
Per ottenere un buon funzionamento e il massimo rendimento della caldaia, è necessaria una
pulizia regolare della camera di combustione,
dei tubi fumo e della camera fumo.
10.2 Manutenzione ordinaria
La manutenzione deve essere stabilita in base
al combustibile usato, dal numero di accensioni,
dalle caratteristiche dell’impianto ecc., per cui
non è possibile stabilire a priori un intervallo di
tempo tra una manutenzione e la successiva.
In linea di principio consigliamo i seguenti intervalli di pulizia a seconda del combustibile:
- Caldaie a gas: una volta all’anno
- Caldaie a gasolio: due volte all’anno
- Caldaie ad olio combustibile:
ogni 300 ore di funzionamento
In ogni caso vanno rispettate eventuali norme
locali in fatto di manutenzione. Durante le operazioni di manutenzione ordinaria, dopo aver
rimosso i turbolatori si dovrà scovolare il fascio
9.2 Prima accensione
Dopo l’esito positivo degli accertamenti indicati
nel paragrafo precedente, si potrà procedere
alla prima accensione del bruciatore che deve
essere effettuata da un tecnico abilitato e riconosciuto dalla Ditta costruttrice del bruciatore.
Il tecnico si assume ogni responsabilità per
quanto riguarda il campo di taratura entro il
campo di potenza dichiarato e omologato della
caldaia. Dopo aver aperto i rubinetti di intercettazione del combustibile e controllato che non vi
siano perdite nella rete di adduzione, porre tutti
gli interruttori sulla posizione ON (inserito). Il
bruciatore risulta così predisposto per la prima
tubiero e il focolare. Rimuovere i depositi accumulati nella cassa fumi attraverso l’apertura
delle portine di ispezione. Nel caso di azioni più
energiche rimuovere la camera fumo posteriore e,
se deteriorata, sostituire la guarnizione di tenuta
fumi. Controllare che lo scarico condensa non
sia ostruito. Si dovrà accertare il buon funzionamento degli organi di controllo e di misura al
servizio del generatore. In questa occasione si
dovrà rilevare la quantità di acqua di reintegro
utilizzata, dopo aver analizzato l’acqua, intervenire con una disincrostazione preventiva. I sali
di calcio e magnesio disciolti nell’acqua grezza,
con ripetuti rabbocchi, danno origine a depositi
in caldaia e causano il surriscaldamento delle
lamiere con possibili danni che non possono
essere attribuiti ai materiali o alla tecnica
costruttiva, e quindi, non coperti da garanzia.
Dopo aver effettuato le operazioni di manutenzione e di pulizia e la successiva accensione,
verificare le tenute del portellone e della camera
fumo, in caso di perdite di prodotti della combustione, sostituire le relative guarnizioni.
Le operazioni eseguite andranno trascritte
sul libretto di centrale.
10.3 Manutenzione straordinaria
Manutenzione straordinaria di fine stagione o
per lunghi periodi di inattività.
Si dovranno eseguire tutte le operazioni descritte nel capitolo precedente e inoltre:
- 10 -
Valvola di intercettazione combustibile
Stabilizzatore di pressione gas
Valvola di intercettazione manuale
Filtro gas
Giunto antivibrante
Pompa
Manometro
Termostato di sicurezza
Termostato di regolazione
Rubinetto a tre vie
Pressostato a riarmo manuale
Flussostato
Termostato di regolazione
Termostato a riarmo manuale
Pozzetto prova temperatura
Valvola termoregolatrice
9.3 Spegnimento caldaia
- Regolare il termostato di esercizio al minimo.
- Togliere tensione al bruciatore e chiudere
l’alimentazione del combustibile.
- Lasciare funzionare le pompe fino a quando
non vengano fermate dal termostato di minima.
- Togliere tensione al quadro elettrico.
- Controllare lo stato di usura dei turbolatori.
- Dopo la pulizia del circuito fumi è opportuno
passare uno straccio imbevuto di soluzione
diluita di soda caustica. Dopo aver lasciato
asciugare, ripassare tutte le superfici con uno
straccio imbevuto di olio.
- È consigliabile collocare all’interno del focolare
sostanze igroscopiche (calce viva, silicogel in
piccoli contenitori) e chiudere infine ermeticamente in modo che non entri aria.
- Non vuotare l’impianto e la caldaia.
- Proteggere con grasso grafitato viti, dadi e
perni della porta.
Le operazioni eseguite andranno trascritte
sul libretto di centrale.
10.4 Pulizia della caldaia (Fig. 19)
Per effettuare la pulizia procedere nel seguente
modo:
- Aprire il portello anteriore (1) ed estrarre i
turbolatori (2).
- Pulire le superfici interne della camera di combustione e del percorso fumi utilizzando uno
scovolo (3) o altri utensili adeguati allo scopo.
- Rimuovere i depositi accumulati nella cassa
fumi attraverso l’apertura liberata dalla portina
di ispezione (4). Nel caso di azioni più energiche rimuovere la chiusura cassa fumi (5) sostituendo la guarnizione prima del montaggio.
- Controllare periodicamente che lo scarico
condensa (6) non sia ostruito.
10.5 Verifica di funzionamento della caldaia
Prima di effettuare l’accensione e il collaudo
funzionale della caldaia verificare che:
- i turbolatori siano posizionati in battuta con i
tubi di scambio.
- I rubinetti del circuito idraulico e quelli del
combustibile siano aperti.
- Ci sia disponibilità di combustibile.
- Il vaso di espansione sia adeguatamente caricato.
- La pressione, a freddo, del circuito idraulico
sia superiore a 1 bar e inferiore al limite
massimo previsto per la caldaia.
- I circuiti idraulici siano disaerati.
- Siano stati eseguiti i collegamenti elettrici alla
rete di alimentazione e dei componenti
(bruciatore, pompa, quadro di comando,
termostati ecc.).
- Il collegamento fase-neutro deve essere assolutamente rispettato, il collegamento di terra è
obbligatorio.
Dopo aver effettuato le operazioni sopra descritte, per avviare la caldaia è necessario:
- Se l’impianto è dotato di termoregolatore o di
cronotermostato/i verificare che sia/siano in
stato “attivo”.
- Regolare il/i cronotermostato/i ambiente o la
termoregolazione alla temperatura desiderata.
- Posizionare l’interruttore generale dell’impianto su “acceso”
- Regolare il termostato caldaia posto sul quadro di comando.
- Posizionare l’interruttore principale del quadro
di comando su “on” e verificare l’accensione
della segnalazione verde.
La caldaia effettuerà la fase di accensione e
resterà in funzione fino a quando saranno raggiunte le temperature regolate. Nel caso si verifichino anomalie di accensione o di funzionamento la caldaia effettuerà un “ARRESTO DI
BLOCCO” segnalato dalla spia rossa posta sul
bruciatore e dalla segnalazione rossa del quadro di comando. Dopo un “ARRESTO DI BLOCCO” attendere circa 30 secondi prima di ripristinare le condizioni di avviamento. Per ripristinare
le condizioni di avviamento premere il “pulsante/spia” del bruciatore e attendere che si accenda la fiamma. In caso di insuccesso questa operazione può essere ripetuta 2-3 volte massimo,
poi verificare:
- Quanto previsto nel libretto di istruzioni del
bruciatore.
- Il capitolo “VERIFICA DI FUNZIONAMENTO
DELLA CALDAIA”.
- I collegamenti elettrici previsti dallo schema a
corredo del quadro di comando.
Ad avviamento effettuato si deve verificare che
l’apparecchio esegua un arresto e la successiva
riaccensione:
- 11 -
- Modificando la taratura del termostato della
caldaia.
- Intervenendo sull’interruttore principale del
quadro di comando.
- Intervenendo sul termostato ambiente o sul
programmatore orario o sulla termoregolazione.
- Verificando la libera e corretta rotazione dei
circolatori.
- Verificando l’arresto totale della caldaia intervenendo sull’interruttore generale dell’impianto.
Se tutte le condizioni sono rispettate, riavviare
l’apparecchio, eseguire un controllo della combusione (analisi fumi), della portata del combustibile e della tenuta delle guarnizioni del portellone e della camera fumo.
10.6 Verifica di funzionamento del bruciatore
- Consultare il manuale d’istruzioni del bruciatore.
- Seguire tutte le prescrizioni di norme locali in
materia di manutenzione al bruciatore.
10.7 Possibili guasti e rimedi
Di seguito una lista con le indicazioni dei principali guasti o anomalie che si possono verificare
nella gestione della caldaia, con specificate le
possibili cause e i relativi rimedi.
IT
ANOMALIA
IL GENERATORE SI SPORCA FACILMENTE
CAUSA:
Bruciatore mal regolato
RIMEDIO:
Controllare regolazione bruciatore (analisi fumi )
Canna fumaria intasata
Pulire percorso fumi e canna fumaria
Percorso aria bruciatore sporco
Pulire voluta aria bruciatore
IL GENERATORE NON VA IN TEMPERATURA
CAUSA:
Corpo generatore sporco
RIMEDIO:
Pulire percorso fumi
Abbinamento generatore/bruciatore
Controllare dati e regolazioni
Portata bruciatore insufficiente
Controllare regolazione bruciatore
Termostato di regolazione
Verificare corretto funzionamento
Verificare temperatura impostata
IL GENERATORE VA IN BLOCCO DI SICUREZZA TERMICA CON SEGNALAZIONE LUMINOSA
SUL QUADRO DI COMANDO
CAUSA:
Termostato di regolazione
RIMEDIO:
Verificare corretto funzionamento
Verificare temperatura impostata
Verificare cablaggio elettrico
Verificare bulbi sonde
Mancanza di acqua
Verificare pressione circuito
Presenza di aria
Verificare valvola sfiato
IL GENERATORE È IN TEMPERATURA MA IL SISTEMA SCALDANTE È FREDDO
CAUSA:
Presenza aria nell’impianto
RIMEDIO:
Sfiatare l’impianto
Circolatore in avaria
Sbloccare il circolatore
Termostato di minima (se presente)
Verificare temperatura impostata
ODORE DI PRODOTTI INCOMBUSTI
CAUSA:
Dispersione fumi in ambiente
RIMEDIO:
Verificare pulizia corpo generatore
Verificare pulizia condotto fumi
Verificare ermeticità generatore,
condotto fumi e canna fumaria
FREQUENTE INTERVENTO DELLA VALVOLA DI SICUREZZA
CAUSA:
Pressione circuito impianto
RIMEDIO:
Verificare pressione carico
Verificare circuito impianto
Verificare taratura
Verificare temperatura impostata
Vaso espansione impianto
Verificare
- 12 -
IT
- 13 -
CONTENTS
1.
2.
3.
4.
5.
6.
7.
8.
9.
10.
Presentation . . . . . . . . . . . . . . . . . . . . . . . . . . . . . . . . . . . . . . . . . . . . . . . . . . . . . . . . . . . . . . . . . . . . . . . . . . . . . . . . . . . . . . . . . . . . . . . . . . . . . . page 15
General warnings . . . . . . . . . . . . . . . . . . . . . . . . . . . . . . . . . . . . . . . . . . . . . . . . . . . . . . . . . . . . . . . . . . . . . . . . . . . . . . . . . . . . . . . . . . . . . . . . . . page 15
Certification . . . . . . . . . . . . . . . . . . . . . . . . . . . . . . . . . . . . . . . . . . . . . . . . . . . . . . . . . . . . . . . . . . . . . . . . . . . . . . . . . . . . . . . . . . . . . . . . . . . . . . . page 15
Technical and constructional specifications, dimensions . . . . . . . . . . . . . . . . . . . . . . . . . . . . . . . . . . . . . . . . . . . . . . . . . . . . . . . . . . . . . . . . . . . . page 15
4.1 Description of the appliance . . . . . . . . . . . . . . . . . . . . . . . . . . . . . . . . . . . . . . . . . . . . . . . . . . . . . . . . . . . . . . . . . . . . . . . . . . . . . . . . . . . . . . . page 15
4.2 Operating principle . . . . . . . . . . . . . . . . . . . . . . . . . . . . . . . . . . . . . . . . . . . . . . . . . . . . . . . . . . . . . . . . . . . . . . . . . . . . . . . . . . . . . . . . . . . . . page 15
4.3 Technical specifications . . . . . . . . . . . . . . . . . . . . . . . . . . . . . . . . . . . . . . . . . . . . . . . . . . . . . . . . . . . . . . . . . . . . . . . . . . . . . . . . . . . . . . . . . page 15
4.4 Identification . . . . . . . . . . . . . . . . . . . . . . . . . . . . . . . . . . . . . . . . . . . . . . . . . . . . . . . . . . . . . . . . . . . . . . . . . . . . . . . . . . . . . . . . . . . . . . . . . . page 15
Installation . . . . . . . . . . . . . . . . . . . . . . . . . . . . . . . . . . . . . . . . . . . . . . . . . . . . . . . . . . . . . . . . . . . . . . . . . . . . . . . . . . . . . . . . . . . . . . . . . . . . . . . . page 17
5.1 Packaging . . . . . . . . . . . . . . . . . . . . . . . . . . . . . . . . . . . . . . . . . . . . . . . . . . . . . . . . . . . . . . . . . . . . . . . . . . . . . . . . . . . . . . . . . . . . . . . . . . . . page 17
5.2 Handling . . . . . . . . . . . . . . . . . . . . . . . . . . . . . . . . . . . . . . . . . . . . . . . . . . . . . . . . . . . . . . . . . . . . . . . . . . . . . . . . . . . . . . . . . . . . . . . . . . . . . page 17
5.3 Boiler room . . . . . . . . . . . . . . . . . . . . . . . . . . . . . . . . . . . . . . . . . . . . . . . . . . . . . . . . . . . . . . . . . . . . . . . . . . . . . . . . . . . . . . . . . . . . . . . . . . . page 17
5.4 Discharge of the products of combustion . . . . . . . . . . . . . . . . . . . . . . . . . . . . . . . . . . . . . . . . . . . . . . . . . . . . . . . . . . . . . . . . . . . . . . . . . . . . page 17
5.5 Water connections . . . . . . . . . . . . . . . . . . . . . . . . . . . . . . . . . . . . . . . . . . . . . . . . . . . . . . . . . . . . . . . . . . . . . . . . . . . . . . . . . . . . . . . . . . . . . page 17
5.5.1 Supply water . . . . . . . . . . . . . . . . . . . . . . . . . . . . . . . . . . . . . . . . . . . . . . . . . . . . . . . . . . . . . . . . . . . . . . . . . . . . . . . . . . . . . . . . . . . . . page 17
5.5.2 Central heating outlet/return pipes . . . . . . . . . . . . . . . . . . . . . . . . . . . . . . . . . . . . . . . . . . . . . . . . . . . . . . . . . . . . . . . . . . . . . . . . . . . . page 17
5.5.3 System fill/drain pipes . . . . . . . . . . . . . . . . . . . . . . . . . . . . . . . . . . . . . . . . . . . . . . . . . . . . . . . . . . . . . . . . . . . . . . . . . . . . . . . . . . . . . . page 17
5.5.4 Expansion vessel and safety valve pipes . . . . . . . . . . . . . . . . . . . . . . . . . . . . . . . . . . . . . . . . . . . . . . . . . . . . . . . . . . . . . . . . . . . . . . . page 17
5.5.5 Recirculating pump . . . . . . . . . . . . . . . . . . . . . . . . . . . . . . . . . . . . . . . . . . . . . . . . . . . . . . . . . . . . . . . . . . . . . . . . . . . . . . . . . . . . . . . . page 18
5.6 Opening and adjusting the front door . . . . . . . . . . . . . . . . . . . . . . . . . . . . . . . . . . . . . . . . . . . . . . . . . . . . . . . . . . . . . . . . . . . . . . . . . . . . . . . page 18
5.7 Assembling the burner . . . . . . . . . . . . . . . . . . . . . . . . . . . . . . . . . . . . . . . . . . . . . . . . . . . . . . . . . . . . . . . . . . . . . . . . . . . . . . . . . . . . . . . . . . page 18
5.8 Connecting the flame inspection window . . . . . . . . . . . . . . . . . . . . . . . . . . . . . . . . . . . . . . . . . . . . . . . . . . . . . . . . . . . . . . . . . . . . . . . . . . . . page 18
5.9 Assembling the panels, models 92÷300 . . . . . . . . . . . . . . . . . . . . . . . . . . . . . . . . . . . . . . . . . . . . . . . . . . . . . . . . . . . . . . . . . . . . . . . . . . . . . page 18
5.10 Assembling the panels, models 350÷1060 . . . . . . . . . . . . . . . . . . . . . . . . . . . . . . . . . . . . . . . . . . . . . . . . . . . . . . . . . . . . . . . . . . . . . . . . . . . page 18
Electrical connection . . . . . . . . . . . . . . . . . . . . . . . . . . . . . . . . . . . . . . . . . . . . . . . . . . . . . . . . . . . . . . . . . . . . . . . . . . . . . . . . . . . . . . . . . . . . . . . . . page 19
Standard instrument panel . . . . . . . . . . . . . . . . . . . . . . . . . . . . . . . . . . . . . . . . . . . . . . . . . . . . . . . . . . . . . . . . . . . . . . . . . . . . . . . . . . . . . . . . . . . page 19
7.1 Functional description . . . . . . . . . . . . . . . . . . . . . . . . . . . . . . . . . . . . . . . . . . . . . . . . . . . . . . . . . . . . . . . . . . . . . . . . . . . . . . . . . . . . . . . . . . . page 19
7.2 Single-phase burner and pump wiring diagram . . . . . . . . . . . . . . . . . . . . . . . . . . . . . . . . . . . . . . . . . . . . . . . . . . . . . . . . . . . . . . . . . . . . . . . page 19
Principle diagram - system for central heating and the production of domestic hot water . . . . . . . . . . . . . . . . . . . . . . . . . . . . . . . . . . . . . . . . . . . . page 20
Commissioning . . . . . . . . . . . . . . . . . . . . . . . . . . . . . . . . . . . . . . . . . . . . . . . . . . . . . . . . . . . . . . . . . . . . . . . . . . . . . . . . . . . . . . . . . . . . . . . . . . . . . page 20
9.1 Preliminary checks . . . . . . . . . . . . . . . . . . . . . . . . . . . . . . . . . . . . . . . . . . . . . . . . . . . . . . . . . . . . . . . . . . . . . . . . . . . . . . . . . . . . . . . . . . . . . page 20
9.2 Starting for the first time . . . . . . . . . . . . . . . . . . . . . . . . . . . . . . . . . . . . . . . . . . . . . . . . . . . . . . . . . . . . . . . . . . . . . . . . . . . . . . . . . . . . . . . . . page 20
9.3 Shutting down the boiler . . . . . . . . . . . . . . . . . . . . . . . . . . . . . . . . . . . . . . . . . . . . . . . . . . . . . . . . . . . . . . . . . . . . . . . . . . . . . . . . . . . . . . . . . page 21
Maintenance . . . . . . . . . . . . . . . . . . . . . . . . . . . . . . . . . . . . . . . . . . . . . . . . . . . . . . . . . . . . . . . . . . . . . . . . . . . . . . . . . . . . . . . . . . . . . . . . . . . . . . . page 21
10.1 General instructions . . . . . . . . . . . . . . . . . . . . . . . . . . . . . . . . . . . . . . . . . . . . . . . . . . . . . . . . . . . . . . . . . . . . . . . . . . . . . . . . . . . . . . . . . . . . page 21
10.2 Routine maintenance . . . . . . . . . . . . . . . . . . . . . . . . . . . . . . . . . . . . . . . . . . . . . . . . . . . . . . . . . . . . . . . . . . . . . . . . . . . . . . . . . . . . . . . . . . . page 21
10.3 Special maintenance . . . . . . . . . . . . . . . . . . . . . . . . . . . . . . . . . . . . . . . . . . . . . . . . . . . . . . . . . . . . . . . . . . . . . . . . . . . . . . . . . . . . . . . . . . . . page 21
10.4 Cleaning the boiler . . . . . . . . . . . . . . . . . . . . . . . . . . . . . . . . . . . . . . . . . . . . . . . . . . . . . . . . . . . . . . . . . . . . . . . . . . . . . . . . . . . . . . . . . . . . . page 21
10.5 Checking the operation of the boiler . . . . . . . . . . . . . . . . . . . . . . . . . . . . . . . . . . . . . . . . . . . . . . . . . . . . . . . . . . . . . . . . . . . . . . . . . . . . . . . . page 21
10.6 Checking the operation of the burner . . . . . . . . . . . . . . . . . . . . . . . . . . . . . . . . . . . . . . . . . . . . . . . . . . . . . . . . . . . . . . . . . . . . . . . . . . . . . . . page 21
10.7 Troubleshooting . . . . . . . . . . . . . . . . . . . . . . . . . . . . . . . . . . . . . . . . . . . . . . . . . . . . . . . . . . . . . . . . . . . . . . . . . . . . . . . . . . . . . . . . . . . . . . . page 22
- 14 -
1. PRESENTATION
Dear Customer,
Thank you for having chosen a AR SW boiler.
This manual has been prepared to provide you
with information, warnings and suggestions on
the installation, correct use and maintenance of
the boiler. Please therefore read it thoroughly
and keep it with care for future reference.
In your interest, we suggest that you carefully
observe the contents of this manual, so as to
be able to get the most from this high quality
product.
The Manufacturer declines all liability and the
warranty will be void in the event where the
instructions described in this manual are not
observed.
2. GENERAL WARNINGS
- This instruction manual is an integral part of
the product, and provides important instructions for installation, operation and maintenance.
- This appliance must only be used for the purposes it has been specifically designed for.
- This appliance is used to heat water to
below-boiling temperatures at atmospheric
pressure, and must be connected to a central heating and/or domestic hot water
distribution system, according to its characteristics, performance and heat output.
- Before installation, check that the boiler has
not been damaged due to handling and
transport.
- The boiler must be installed in compliance
with the standards in force, by suitably qualified personnel.
- Before performing any cleaning or maintenance operations, disconnect the appliance from
the mains power supply.
- Ferroli S.p.A. is not liable for any damage to persons people and/or things due to errors in
installation, control, maintenance and
improper use.
- The boiler and the corresponding system must
be commissioned by authorised personnel.
- Commissioning is performed in order to check
the correct operation of all the control devices.
- Qualified personnel must be contacted if the
appliance is not used for an extended period.
required ventilation conditions; the tightness of
the connection to the chimney; the connections
of the fuel lines, electrical systems and any
other relevant safety standards.
3. CERTIFICATION
The CE Mark attests that Ferroli appliances
conform to the requirements specified in the
applicable European directives.
In particular, this appliance conforms to the following EEC directives:
- Gas directive (2009/142/CE)
- Efficiency directive (92/42 EEC)
- Low voltage directive 73/23 EEC
(amended by 93/68)
- Electromagnetic compatibility directive 89/336
(amended by 93/68)
4. TECHNICAL AND CONSTRUCTIONAL
SPECIFICATIONS, DIMENSIONS
The pre-wired control panel is located above the
boiler, and allows automatic operation.
4.1 Description of the appliance
The construction of the AR SW series boilers
guarantees high output and efficiency at low flue
gas temperatures, thus ensuring reduced polluting emissions.
The appliances are made according to the EN
303 standard, part 1.
The main technical elements of the design are:
- the careful design of the shapes, to ensure an
optimum ratio between the combustion volumes and the heat exchange surfaces
- the choice of materials used, for the long life of
the boiler.
The boilers feature pressurised combustion,
with three flue passes, a horizontal-cylinder configuration and flame reversal in the furnace,
completely cooled; the flame produced by the
burner is reversed peripherally towards the
front, where the flue gas enters the tube bundle,
featuring turbulators to create a swirling path
that increases the heat exchange by convection.
On leaving the tube bundle, the flue gas enters
the rear chamber and is transferred to the chimney. The boilers are fitted with a door featuring
hinges that can be reversed for opening to the
right or the left, and is adjustable in both height
and depth. The body plating is insulated with a
thick layer of glass wool, and covered with a
further layer of tearproof material. The external
finish consists of painted steel panels. The hoisting hooks are fitted on the top of the plating.
The boilers feature two 1/2” fittings for bulb
sheaths (able to house three bulbs each).
4.2 Operating principle
The AR SW boilers are fitted with a closed cylindrical furnace, in which the flame produced by
the burner is reversed peripherally towards the
front, from where the burned gas enters the fire
tubes. At the outlet, the gas is collected in the
smokebox and is then sent to the chimney. The
combustion chamber is always pressurised
during the operation of the burner.
For the pressure values, see the tables on page
16, under the column Flue gas side pressure drop.
The flue and the flue stack fitting must be made
in compliance with the standards and the legislation in force, using rigid pipes that are resistant to
high temperatures, condensate and mechanical
stress, and are airtight. (Fig. 1)
4.4 Identification
The boiler can be identified from the:
- Document envelope
This is applied to the door, and contains:
TECHNICAL MANUAL
WARRANTY CERTIFICATE
LABELS WITH BARCODE
RATING LABEL
CONSTRUCTION CERTIFICATE
(certifying that the water pressure tests have
been passed)
Standards
The installer must observe the local standards
in force as regards: the choice of the site of
installation of the boiler, the compliance with the
4.3 Technical specifications - Dimensions Water fittings
Key (Fig. 2 and 3)
1 Control panel
2 Burner mounting flange
3 Smoke box cleaning door
4 Flame inspection window
T1 Water delivery
T2 Water return
T3 Expansion vessel connection
T4 Discharge/exhaust boiler
T5 Chimney connection
T6 Burner connection
- 15 -
Warranty conditions
The warranty is only valid if the standards and
the suggestions for use described in this manual
are observed. Failure to observe such standards and suggestions will void the warranty.
The warranty excludes all damage due to corrosion from the acidic condensate of the products of combustion or the formation of deposits caused by the use of hard or aggressive
water, as such are solely due to the operation
of the system.
- Rating label
This describes the technical specifications
and the performance of the appliance (Fig. 4).
It is included in the document envelope and
MUST BE APPLIED by the installer, when
installation is complete, to the top front part of
one of the side panels of the casing, in a visible position.
If the label is lost, contact the Ferroli
Technical Service for a duplicate.
Tampering with or the removal or absence of
rating labels or other means enabling the unit to
be identified causes problems during installation
and maintenance.
Key (Fig. 4)
1 Document envelope
GB
AR SW
Heat output
Heat input
Total water content
Water side load. loss
Flues side load. loss
Weight
DIMENSIONS
Hot water flow
Hot water return
Expansion vessel conn.
Boiler drain
Flue outlet
AR SW
Heat output
Heat input
Total water content
Water side load. loss
Flues side load. loss
Weight
DIMENSIONS
Hot water flow
Hot water return
Expansion vessel conn.
Boiler drain
Flue outlet
kW
kW
kW
kW
l
Δt 10°C mbar
Δt 15°C mbar
Δt 20°C mbar
mbar
kg
mm
A
mm
B
mm
C
mm
D
mm
E
mm
F
mm
G
mm
H
mm
I
mm
L
mm
L1
mm
M
mm
N
mm
O
mm
P
mm
Q
mm
R
DN T1
DN T2
DN T3
DN T4
Ø T5
min
max
min
max
kW
kW
kW
kW
l
Δt 10°C mbar
Δt 15°C mbar
Δt 20°C mbar
mbar
kg
mm
A
mm
B
mm
C
mm
D
mm
E
mm
F
mm
G
mm
H
mm
I
mm
L
mm
L1
mm
M
mm
N
mm
O
mm
P
mm
Q
DN T1
DN T2
DN T3
DN T4
Ø T5
min
max
min
max
92
60
92
64,3
99,5
121
8
4
2
0,5
260
760
764
866
165
130
152
515
395
1046
100
121
925
147
150
250
700
740
2”
2”
1” 1/4
3/4”
200
107
70
107
75
116
121
11
6
2,5
0,7
260
760
764
856
165
130
152
515
395
1046
100
121
925
147
150
250
700
740
2”
2”
1” 1/4
3/4”
200
2360
1535
2360
1668
2565
1925
150
70
42
7,2
3900
1610
2772
1810
–
210
250
1005
860
3232
145
195
1950
662
650
1000
1000
150
150
100
1” 1/2
450
152
100
152
107,3
165
186
20
12
5
1,2
350
810
1014
911
165
130
152
545
420
1296
100
121
980
167
230
350
750
990
2” 1/2
2” 1/2
1” 1/2
3/4”
220
190
137
190
147,4
206
186
12
7
3
1,2
350
810
1014
911
165
130
152
545
420
1296
100
121
980
167
230
350
750
990
2” 1/2
2” 1/2
1” 1/2
3/4”
220
240
160
240
170,9
261
232
17
10
4
2,3
440
810
1264
911
165
130
152
545
420
1516
100
121
980
217
330
450
750
1240
2” 1/2
2” 1/2
1” 1/2
3/4”
220
3000
1950
3000
2113
3250
2600
145
65
45
7,5
5300
1800
2976
2000
–
220
250
1100
940
3446
145
195
2140
716
650
1150
1170
200
200
125
1” 1/2
500
300
196
300
209,5
326
304
40
17
9
3,3
480
950
1264
1031
165
150
152
630
495
1546
100
121
1100
217
330
450
890
1240
2” 1/2
2” 1/2
1” 1/2
3/4”
220
350
228
350
277,5
378
362
48
23
13
3,5
550
950
1514
1031
165
150
152
630
495
1816
100
121
1100
217
380
600
890
1490
2” 1/2
2” 1/2
1” 1/2
3/4”
220
399
260
399
364,5
432
337
43
31
16
4,4
590
950
1515
1031
165
150
152
630
485
1817
100
120
1100
218
380
600
890
1491
2” 1/2
2” 1/2
1” 1/2
3/4”
220
3600
2340
3600
2536
3900
2920
190
90
61
8,2
5800
1800
3346
2000
–
220
250
1100
940
3816
145
195
2140
786
650
1450
1170
200
200
125
1” 1/2
500
- 16 -
525
341
525
417
567
405
40
22
12
4,3
860
1060
1516
1181
165
170
152
725
570
1838
100
120
1250
218
380
600
1000
1492
80
80
2”
3/4”
250
600
390
600
495
648
471
51
28
16
4,8
970
1060
1776
1181
165
170
152
725
570
2098
100
120
1250
218
440
700
1000
1752
80
80
2”
3/4”
250
4000
2600
4000
2819
4334
4425
250
120
70
9,5
7500
1980
3596
2180
–
240
250
1190
960
4086
145
195
2325
786
650
1700
1350
200
200
125
1” 1/2
600
720
468
720
502
777
735
32
18
10
4,5
1250
1260
1776
1331
165
170
212
815
615
2158
100
180
1400
228
440
700
1200
1752
100
100
2” 1/2
3/4”
350
820
533
820
566
881
735
40
25
18
5,6
1250
1260
1776
1331
165
170
212
815
615
2158
100
180
1400
218
440
700
1200
1752
100
100
2” 1/2
3/4”
350
940
611
940
651
1011
850
51
25
16
5,4
1420
1260
2016
1331
165
170
212
815
615
2398
100
180
1400
218
480
900
1200
1992
100
100
2” 1/2
3/4”
350
4500
2926
4500
3165
4868
4790
280
135
80
10,5
8000
1980
3946
2180
–
240
250
1190
960
4436
145
195
2325
786
650
2050
1350
200
200
125
1” 1/2
600
1060
689
1060
731
1140
1240
65
33
20
6
1580
1450
2018
1511
165
190
212
900
670
2420
90
178
1580
218
480
900
1390
1994
125
125
3”
3/4”
400
1250
813
1250
884
1359
1240
86
40
25
6,5
2250
1450
2018
1511
165
190
212
900
670
2420
90
178
1580
220
480
900
1390
1994
125
125
3”
3/4”
400
5000
3251
5000
3515
5407
6150
200
85
55
10,8
9600
2180
3948
2380
–
260
250
1290
1015
4458
145
195
2525
786
750
1950
1550
250
250
150
1” 1/2
650
1480
1600 1890
962
1040 1229
1480
1600 1890
1046
1128 1336
1608
1736 2054
1490
1490 1620
110
115
100
55
60
45
32
40
29
6,5
6,8
7
2650
2700 2850
1530
1530 1530
2320
2320 2520
1661
1661 1661
165
165
165
190
190
190
212
212
212
1013
1013 1013
743
743
743
2722
2722 2722
120
120
120
199
199
199
1730
1730 1730
220
220
220
580
580
580
1100
1100 1200
1470
1470 1470
2296
2296 2496
150
150
150
150
150
150
DN100 DN100 DN100
1” 1/2 1” 1/2 1” 1/2
450
450
450
6000
3902
6000
4215
6483
6800
215
105
65
12
11500
2180
4448
2380
–
260
250
1290
1015
4958
145
195
2525
786
750
2450
1550
250
250
150
1” 1/2
650
5. INSTALLATION
5.1 Packaging
The AR SW model 92-1890 boilers are supplied complete with the door and smokebox fitted and insulation on the body, while the
casing is contained in a separate cardboard
box. The instrument panel is supplied in a
cardboard box and positioned inside the combustion chamber.
The AR SW model 2360- 6000 boilers are supplied complete with insulation and casing.
The instrument panel is supplied in a cardboard box and positioned inside the combustion chamber.
5.2 Handling
The AR SW boilers are fitted with eyebolts for
lifting. Make sure the hoisting equipment used is
suitable for the weight being lifted.
Before positioning the boiler, remove the wooden base support by unscrewing the fastening
screws (Fig. 5).
5.3 Boiler room (Fig. 6)
The AR SW boilers should be installed in rooms
exclusively used for this purpose, in accordance
with the technical standards and legislation in
force and featuring adequately sized ventilation
openings.
The ventilation openings must be permanent,
directly communicating with the outside and
located in both a high and low position, in compliance with the standards in force.
The location of the ventilation openings, the fuel
supply, power and lighting circuits must comply
with the legislation in force in relation to the type
of fuel used. To assist the cleaning of the flue gas
circuit, free space must be left at the front of the
boiler no less than the length of the boiler body
and, in any case, never less than 1300 mm,
checking that with the door open at 90° the distance between the door and the adjacent wall (X), is
at least equal to the length of the burner. The boiler support surface must be perfectly horizontal. A
flat cement base should be used that is able to
support the overall weight of the boiler plus the
water content. For the dimensions of the base,
see the distances R x Q (table of dimensions). If
the burner is supplied with gas fuel whose specific
weight is higher than air, the electrical parts must
be located more than 500 mm from the floor. The
appliance cannot be installed outdoors as it is not
designed to operate outside and does not feature
automatic frost protection systems.
INSTALLATION IN OLD SYSTEMS
OR SYSTEMS TO BE UPGRADED
When the boiler is installed in old systems or
systems to be upgraded, check that:
- The flue stack is suitable for the temperature
of the products of combustion, calculated and
manufactured according to the standards in
force, airtight, insulated and not blocked or
choked.
- The electrical system has been installed in
compliance with the relevant standards by
qualified personnel.
- The fuel supply line and any tanks are made
according to the relevant standards.
- The expansion vessel/vessels can completely
absorb the expansion of the fluid contained in
the system.
- The flow-rate, discharge head and the direction of the flow of the circulating pumps are
suitable.
- The system is washed, cleaned of slime, fouling, vented and watertight.
- A treatment system is available for special
supply/top-up water requirements (see the
reference values).
5.4 Discharge of the products of combustion
(Fig. 7)
The flue and the flue fitting must be made in
compliance with the standards and the legislation in force, using rigid pipes that are resistant
to high temperatures, condensate and mechanical stress, and are airtight.
The flue must ensure the minimum negative
pressure specified by the standards in force,
considering “zero” pressure at the fitting to the
flue. Unsuitable or incorrectly sized flues may
increase the noise produced due to combustion,
generate problems involving condensation and
negatively affect the combustion parameters.
Non-insulated flues are a source of potential
danger. The joint seals should be made using
materials that can resist temperatures of at least
250°C. Suitable points for measuring the flue
gas temperature and analysing the products of
combustion must be prepared in the connection
between the boiler and the flue. As regards the
cross-section and the height of the chimney,
refer to the national and local standards in force.
5.5 Water connections
5.5.1 Supply water
The chemical characteristics of the supply and
top-up water are fundamental for the correct operation and the safety of the boiler. The water
should be treated using suitable systems.
The values shown in the table below can be used
as references.
TOTAL HARDNESS
ALKALINITY
PH
SILICA
CHLORIDES
ppm
mg/l CaCO3
ppm
ppm
10
750
8÷9
100
3500
The water used in the central heating system
must be treated in the following cases:
- Very large systems
- Very hard water
- Frequent introduction of water to top up the
system.
If, in these cases, the system needs to be partially or completely emptied, it must be refilled
with treated water. To control the volume of
water automatically refilled, an hour counter
should be installed. The most common phenomena that occur in heating systems are:
- Lime scale deposits
Lime scale tends to concentrate at the points
where the temperature of the wall is higher.
Due to their low heat conductivity, lime scale
deposits cause a reduction in heat exchange
to the extent that even when just a few millimetres thick, the heat exchange between the
flue gas and the water is limited, bringing an
increase in the temperature of the parts exposed to the flame and consequently breakages
(cracks) on the tube plate.
- 17 -
- Corrosion on the water side
Corrosion of the metal surfaces on the water
side of the boiler is due to the dissolution of
iron into its ions. The presence of dissolved
gases, in particular oxygen and carbonic
dioxide, play and important part in this process. Softened and/or demineralised water
provides protection against lime scale and
other deposits, however does not protect
against corrosion. The water therefore must
be treated with corrosion inhibitors.
5.5.2 Central heating outlet/return pipes
The dimensions of the outlet and return pipes
are shown for each model of the boiler, in the
table of DIMENSIONS.
Check that the system features a sufficient number of vent openings. The boiler fittings must not
be stressed by the weight of the connection
pipes to the system, and consequently special
supports must be installed.
5.5.3 System fill/drain pipes
To fill and drain the boiler, a cock can be connected to fitting T4 at the rear (see the drawing
of the DIMENSIONS).
5.5.4 Expansion vessel and safety valve pipes
The AR SW boilers are suitable for operation
with forced water circulation, both with open and
closed expansion vessels.
An expansion vessel is always required, to allow
for the increase in water volume due to heating.
In the first case, the height of the hydrostatic
column must be at least 3 metres above the boiler casing and must have a sufficient capacity to
contain, between the surface of the water in the
vessel and the overflow pipe, the increase in
volume of all the water in the system.
High and narrow vessels are better, as they
ensure minimum contact between the water surface and the air, thus reducing evaporation.
In the second case, the capacity of the closed
expansion vessel must be calculated considering:
- the total volume of water contained in the system
- the maximum operating pressure of the system
- the maximum operating pressure of the
expansion vessel
- the initial pre-charge pressure of the expansion vessel
- the maximum operating temperature of the
boiler (the maximum temperature of the thermostat fitted on the panel is 90°C; when
performing this calculation, use the value
100°C).
The expansion pipes connect the expansion
vessel to the system. This pipes that run from
fitting T3 (see the table of Dimensions), must
not be fitted with on-off valves. On fitting T3, or
on the outlet pipe, within 0.5 metres from the
first flange, install a safety valve sized for the
capacity of the boiler and in compliance with the
local standards in force. No type of shut-off device may be installed between the boiler and the
expansion vessel, and between the boiler and
the safety valves, while the valves should calibrated for activation at values no higher than the
maximum admissible operating pressure.
GB
5.5.5 Recirculating pump (Fig. 8)
The condensation of the water vapour contained
in the flue gas leaving the boiler (condensate)
occurs when the return water temperature is
less than 55°C and is significant above all when
starting in the morning, after the boiler has been
off all night. This condensate is acidic and corrosive and, over time, attacks the metal plate on
the boiler. Consequently, a recirculating pump
with the function of preventing condensate
should be installed between the outlet and
return fittings, upstream of any mixing valve.
The pump must ensure, when the system is
operating, a flow-rate of between 20 and 30% of
the total; it must also ensure a return water temperature no less than 55°C, while the required
discharge head is quite low, as it only needs to
overcome the resistance of the boiler and the
valves. To measure the effective central heating
return inlet temperature for the purpose of controlling the condensate prevention pump or
managing the functions for getting the system to
stable temperature operation, a probe socket
must be fitted at a distance equivalent to 3-5
times the diameter of the return pipe upstream
of the water coupling.
5.6 Opening and adjusting the front door
For AR SW models 92-1890 the door is hinged,
fastened and reversed as regards the direction
of opening as shown in Fig. 9.
The following operations are required:
- The door is supplied with four equal brackets
(pos. 3) and hinges.
- To establish the direction of opening, RIGHT
or LEFT, unscrew the nut (pos. 7), unscrew
and remove the R or L nut (pos. 6), depending on which side the door opens from.
- Height adjustment of the door is performed
using the nut (pos. 2); after having completed
the adjustments tighten the dowels (pos. 1).
- Longitudinal adjustment is performed using
the screw (pos. 8).
Key (Fig. 9)
1 Fastening dowel
2 Door support/adjustment nut
3 Hinge bracket
4 Hinge pin
5 Hinge screw
6 Hinge fastening nut
7 Fastening nut
8 Hinge bracket fastening/adjustment screws
and nuts
For AR SW 2360-6000 the door is hinged,
fastened and reversed as regards the direction
of opening as shown in Fig. 10.
The following operations are required:
- The door is supplied with four equal hinges
(pos. 3).
- To establish the direction of opening, RIGHT
or LEFT unscrew the nut (pos. 7), unscrew
and remove the R or L nut (pos. 6), depending on which side the door opens from.
- Height adjustment of the door is performed
using the nut (pos. 2); after having completed
the adjustments tighten the dowels (pos. 1).
Key (Fig. 10)
1 Fastening dowel
2 Door support/adjustment nut
3 Hinge bracket
4 Hinge pin
5 Hinge screw
6 Hinge fastening nut
7 Fastening nut
5.7 Assembling the burner (Fig. 11)
The assembly of the burner to the door of the
boiler must ensure perfect tightness to the products of combustion.
Once having installed the burner on the boiler,
the space between the burner draught tube and
the refractory material on the door must be filled
with the layer of ceramic fibre (A) supplied.
This prevents the door from overheating and
consequently from being irreversibly deformed.
The fuel connections to the burner must be located so as to allow the complete opening of the
boiler door with the burner installed.
AR SW
92-152
190-399
525-600
720-940
1060-1250
1480-1890
2360
3000-3600
4000-4500
5000
6000
L min. (mm)
230
250
290
320
320
350
350
370
450
500
500
L max. (mm)
300
320
360
390
390
420
420
450
500
550
550
5.8 Connecting the flame inspection window
(Fig. 12)
The flame inspection window features a pressure fitting (1) to be connected via a silicone hose
or copper pipe to the outlet on the burner (2).
This operation allows the air blown by the fan to
cool the glass and prevent it from turning black.
Failure to connect the hose or pipe to the window may cause the glass to break.
5.9 Assembling the panels, models 92÷399
Assembly sequence (Fig. 13)
a) Position the right and left side panels (pos. 12) hooking them to the support (pos. 13).
To know which of the two sides is the right or
the left, refer to the hole for the cable gland
plate (pos. 6), which must be facing the front
of the boiler.
b) Fasten the control panel to the top panel
(pos. 3).
c) Rest the top right panel (pos. 3), complete
with the control panel, to the side panel (pos.
1) complete with springs, closing pins and
nuts (pos. 10-11-12).
d) Insert the bulbs of the instruments into the
sheaths as shown in Fig. 20 and make the
electrical connection between the control
panel and the power line, burner and any
pumps etc. The probes should be inserted
fully into the corresponding sockets, to improve contact. Then secure the capillary tubes
with the springs. Close the cover on the electrical panel, pass the burner plug through the
side plate (pos. 6) and secure the cable with
the cable gland supplied. Fasten the plate
(pos. 6) with the screws (pos. 7).
- 18 -
e) Fit the panel left top (pos. 4) to the left side
panel (pos. 2) complete with springs, closing
pins and nuts (pos. 10-11-12).
f) Insert the bulbs of the instruments into the
sheaths as shown in Fig. 13-20 and make the
electrical connection between the control
panel and the power line, burner and any
pumps etc. The probes should be inserted
fully into the corresponding sockets, to improve contact. Then secure the capillary tubes
with the springs. Close the cover on the electrical panel, pass the burner plug through the
side plate (pos. 9) and secure the cable with
the cable gland supplied. Fasten the plates
(pos. 9) with the screws (pos. 10).
g) Fit the top panel (pos. 6) to the side panel
(pos. 3) complete with springs, closing pins
and nuts (pos.14-15-16).
h) Fit the rear panel (pos. 8) to the boiler using the
screws (pos. 13) and the nuts (pos. 14).
i) Fit the front panel (pos. 5) to the door using
the screws (pos. 8) and the nuts (pos. 9).
l) Fasten the rating label to the boiler, see
Chap. 1, after having cleaned and degreased
the part in question using a suitable solvent,
and apply it so as to ensure perfect adhesion.
Do not remove the rating label, as it will lose
its adhesiveness.
The rating label is included in the document
envelope.
5.10 Assembling the panels, models 525÷1890
Assembly sequence (Fig. 14)
a) Position the side panels (pos. 1-2 and 3-4)
hooking them to the supports (pos. 19).
b) Position the top right panel (pos. 5-6) and
then the left panel (7-8) hooking them to the
supports on the boiler (pos. 19) and to the
crossbeam (pos. 18).
c) Fasten the control panel to the top right panel
(pos. 5).
d) Rest the top panel (pos. 5), complete with the
control panel, to the side panel (pos. 1) complete with springs, closing pins and nuts (pos.
15-16-17).
e) Insert the bulbs of the instruments into the sheats
as shown in Fig. 21 and make the electrical
connection between the control panel and the
power line, burner and any pumps etc. The probes should be inserted fully into the corresponding sockets, to improve contact. Then secure
the capillary tubes with the springs. Close the
cover on the electrical panel, pass the burner
plug through the side plate (pos. 11) and secure
the cable with the cable gland supplied. Fasten
the plate (pos. 11) with the screws (pos. 12).
f) Fit the support (pos. 18).
g) Fit the top panels (pos. 5-6-7-8) hooking them
to the side panels (pos. 1-2-3-4) complete
with springs, closing pins and nuts (15-16-17).
h) Fit the front panels (pos. 9-10) to the front
door using the screws (pos. 14) and the nuts
(pos. 13).
i) Fasten the rating label to the boiler, see
Chap. 1, after having cleaned and degreased
the part in question using a suitable solvent,
and apply it so as to ensure perfect adhesion.
Do not remove the rating label, as it will lose
its adhesiveness.
The rating label is included in the document
envelope.
6. ELECTRICAL CONNECTION
The boiler must be connected to 230V - 50Hz
single-phase + earth mains power, in compliance with the following requirements
The system must be compliant with the safety
STANDARDS IN FORCE.
- Use a two-pole disconnect switch compliant
with IEC-EN standards (minimum contact opening 3 mm)
- Ensure correct connection L (Phase) - N (Neutral)
- Use cables with a minimum cross-section of
1.5 mm2
- Refer to the wiring diagrams in this booklet for
any electrical work
- Connect the appliance to an effective earth
system.
7. CONTROL PANEL
7.1 Functional description
The main switch (11) powers the control panel
and connected equipment.
Switches (12) and (13) disconnect power to the
burner and system pump respectively.
The thermostat (21) is used to set the boiler
operating temperature.
The minimum thermostat stops the system
pump until the temperature inside the boiler reaches 50°C.
For three-phase burners and/or of system
pumps or if current draw exceeds 3 A, contactors should be installed between the boiler panel
and the load.
A switch with protection fuses must be installed
on the boiler control panel power supply line.
T
R
S
C
Thermometer
Manual reset
Burner lockout indicator light
Hour counter (optional)
WARNING
For electrical connections to boilers with a rated
output exceeding 300,000 kcal/h, installers must
fit a second safety thermostat.
7.2 Single-phase burner and pump wiring diagram (Fig. 17)
BURNER CONTROLLER WITH
HOUR COUNTER START +
BURNER LOCKOUT SIGNALS.
BURNER CONNECTOR
2nd flame
Fig. 17
Key
IG
TS
TM
TA
IB
SB
Main switch
Safety thermostat 110°C
Minimum thermostat 45°C
Room thermostat
Burner switch
Burner lockout indicator light
SL
Ch
PI
IPi
TR1-TR2
Power indicator light
Hour counter
System pump
System pump switch
2-stage thermostat 1st-2nd flame
(30°-90°C Δt 1st-2nd flame = 7°C)
- 19 -
F4/K4
RVP Temperature controller
connection
L
Connection
N
terminals
3-20
GB
8. PRINCIPLE DIAGRAM - SYSTEM FOR
CENTRAL HEATING AND THE PRODUCTION
DI DOMESTIC HOT WATER (Fig. 18)
The choice and installation of the components
making up the system is left to the expertise of
the installer, who must operate in a workmanlike
manner and according to the legislation in force.
The systems loaded with antifreeze require the
use of water disconnecting devices. It should be
stressed that the diagram in Fig. 18 is a principle diagram. In the case of different systems,
please contact our After-Sales Service, which
will provide you all the details required.
Key
A Central heating flow outlet
B Central heating return inlet
1 Heat generator
2 Burner complete with shutdown
and control valves
3 Storage heater
4 System manifolds
5 On-off valves
6 Circulating pump
7 Non-return valves
8 System expansion vessel
9 Automatic vent valve
10 Safety valve
11 Softener filter
12 System fill
13
14
15
16
17
18
19
20
21
22
23
24
25
26
27
28
9. COMMISSIONING
- The burner is installed according to the
instructions contained in the manual provided
by the manufacturer.
- The mains voltage and frequency are compatible with the rating of the burner and the boiler’s electrical equipment.
- The system is able to absorb the quantity of
heat that will be produced.
- The recirculating pump is installed, as described in par. 5.5.5.
cocks and checked that there are no leaks in the
supply line, place all the switches on the ON position. The burner will thus be ready for first ignition
and for the adjustments to be made by the authorised technician. On first ignition, check that the
door, the burner flange and the connections to the
chimney are tight and that there is a slight negative
pressure at the base of the flue. The fuel rate must
correspond to the boiler's rated data and under no
circumstances must exceed the maximum output
value declared. The temperature of the flue gas
must never fall below 160°C.
9.1 Preliminary checks
Once having completed the water, electrical and
fuel connections to the boiler, before starting,
check that:
- The expansion vessel and the safety valve (if
required) are connected correctly and cannot
be shut-off.
- The bulbs of the thermostats and the thermometer are secured inside the corresponding
sheaths.
- The turbulators are positioned in all the flues.
- The system is filled with water and completely
vented of air.
- The pump or the pumps are working properly.
- The water, electrical, safety device and fuel
connections have been performed in compliance with the national and local legislation
in force.
10. MAINTENANCE
10.1 General instructions
Periodical maintenance is essential for the
safety, efficiency and long life of the appliance.
All the operations must be carried out by qualified
personnel. All cleaning and maintenance operations must be performed after having closed the
fuel supply and disconnected the power supply.
For the correct operation and maximum efficiency
of the boiler, the combustion chamber, fire tubes
and smokebox must be cleaned regularly.
10.2 Routine maintenance
The interval between cleaning operations must
be established by the user based on the experience acquired on each individual system, consequently the maintenance intervals cannot be
established in advance.
In any case, the following minimum intervals are
recommended, according to the fuel used:
- Gas: once a year
- Oil: twice a year
- Fuel oil: every 300 hours of operation
In any case, any local maintenance standards in
force should be observed. During the routine
maintenance operations, after having removed
the turbulators, brush the tube bundle and the
furnace. Remove the deposits accumulated in
the smokebox by opening the inspection doors.
For more intense cleaning, remove the rear
smokebox and, if deteriorated, replace the flue
gas seal. Check that the condensate drain is not
blocked. Ensure that the control and measure-
9.2 Starting for the first time
After the positive outcome of the checks described
in the previous paragraph, the burner can be ignited for the first time; this operation must be performed by a technician who has been authorised by
the Manufacturer of the burner. The technician has
full responsibility as regards the field of calibration,
within the declared and approved output range of
the boiler. After having opened the fuel on-off
ment devices serving the boiler are working correctly. Measure the amount of top-up water
added, and after having analysed the water, add
descaler. The calcium and magnesium salts dissolved in the water will, after repeated refills,
cause deposits in the boiler and the overheating
of the metal plate, with possible damage that is
not attributable to materials or workmanship,
and consequently not covered by the warranty.
After having completed the maintenance and
cleaning operations and started the boiler again,
check the tightness of the door and the smokebox, and in the event of gas leaks, replace the
corresponding gaskets.
The operations carried out must be entered
in the system logbook.
10.3 Special maintenance
Special maintenance to be performed at the end
of the season or for extended shutdowns.
All the operations described in the previous
chapter must be completed, plus the following
additional operations:
- Check the condition of the turbulators for wear.
- After cleaning the flue gas circuit, wipe with a
rag dipped in a diluted solution of caustic soda.
After having left to dry, wipe all the surfaces
with a rag dipped in oil.
- Hygroscopic substances (quicklime, silica gel
in small containers) should be placed inside
the furnace, which must then be closed hermetically so that air cannot enter.
- Do not empty the system and the boiler.
- 20 -
Fuel on-off valve
Gas pressure stabiliser
Manual on-off valve
Gas filter
Vibration-damping joint
Pump
Pressure gauge
Safety thermostat
Control thermostat
Three-way cock
Pressure switch with manual reset
Flow switch
Control thermostat
Thermostat with manual reset
Temperature test socket
Temperature control valve
9.3 Shutting down the boiler
- Set the temperature controller to the minimum.
- Disconnect power from the burner and close
the fuel supply.
- Let the pumps operate until they are stopped
by the temperature controller.
- Disconnect power from the electrical panel.
- Protect the screws, nuts and pins on the door
with graphite grease.
The operations carried out must be entered
in the system logbook.
10.4 Cleaning the boiler (Fig. 19)
To clean the boiler, proceed as follows:
- Open the front door (1) and remove the turbulators (2).
- Clean the inside surfaces of the combustion
chamber and the flue gas path using a brush
(3) or other suitable implements.
- Remove the deposits accumulated in the
smokebox by opening the inspection door (4).
For more intense cleaning, remove the smokebox cover (5) and replace the gasket before
reassembling.
- Periodically check that the condensate drain
(6) is not blocked.
10.5 Checking the operation of the boiler
Before staring and running the functional tests
on the boiler, make sure that:
- The turbulators are positioned against the
exchanger tubes.
- The cocks in the water circuit and on the fuel
lines are open.
- Fuel is available.
- The expansion vessel is suitably filled.
- The pressure of the water circuit, when cold, is
more than 1 bar and less than the maximum
limit allowed for the boiler.
- The water circuits have been vented.
- The electrical connections to the mains power
and the components (burner, pump, control
panel, thermostats etc.) have been completed.
- The phase-neutral connection must be observed, and the earth must be connected.
After having performed the operations described
above, the following operations are necessary
to start the boiler:
- If the system is fitted with a temperature controller or timer-thermostat, check that these
are “on”.
- Set the room timer-thermostat or the temperature controller to the desired temperature.
- Move the main system switch to “on”
- Set the boiler thermostat located on the
control panel
- Move the main switch on the control panel to
“on” and check that the green indicator light
comes on.
The boiler will run the ignition phase and will
remain on until the set temperature has been
reached. If problems occur during ignition or
operation, the boiler will “LOCKOUT”, as signalled by the red light on the burner and the red
indicator on the control panel. After a
“LOCKOUT”, wait around 30 seconds before
restoring the ignition conditions. To restore the
ignition conditions, press the burner
“button/light” and wait for the flame to ignite. If
this operation fails, it can be repeated a maximum 2-3 times, then check:
- The information provided in the burner instruction booklet.
- The chapter on “CHECKING THE OPERATION OF THE BOILER”.
- The electrical connections described on the
diagram supplied with the control panel.
When the boiler has started, check that it stops
and starts again:
- Adjust the setting of the boiler thermostat.
- Move the main switch on the control panel.
- Set the room thermostat, the timer or the temperature controller.
- 21 -
- Check that the pumps are not blocked and
rotate in the correct direction.
- Check the total shutdown of the boiler using
the main system switch.
If all the conditions are correct, restart the
appliance, check the combustion (flue gas
analysis), the fuel rate and the tightness of the
gaskets on the door and the smokebox.
10.6 Checking the operation of the burner
- Refer to the burner instruction manual.
- Follow all the local legislation in force on
burner maintenance.
10.7 Troubleshooting
The following is a list with information on the
main faults or problems that may occur during
the operation of the boiler, showing the possible
causes and corresponding solutions.
GB
FAULT
THE BOILER DIRTIES QUITE EASILY
CAUSE:
Burner poorly adjusted
SOLUTION:
Check the burner adjustment (flue gas analysis)
Flue blocked
Clean the flue gas path and the flue
Burner air intake path dirty
Clean the burner air intake
THE BOILER DOES NOT REACH THE SET TEMPERATURE
CAUSE:
Boiler body dirty
SOLUTION:
Clean the flue gas path
Boiler/burner combination
Check the data and adjustments
Burner flow-rate insufficient
Check the burner adjustment
Control thermostat
Check correct operation
Check the set temperature
BOILER THERMAL SAFETY SHUTDOWN WITH INDICATOR LIGHT
ON THE CONTROL PANEL
CAUSE:
Control thermostat
SOLUTION:
Check correct operation
Check the set temperature
Check the wiring
Check the probe bulbs
No water
Check the circuit pressure
Air present
Check the vent valve
THE BOILER REACHES THE SET TEMPERATURE BUT THE CENTRAL HEATING SYSTEM IS COLD
CAUSE:
Air in the system
SOLUTION:
Vent the system
Pump fault
Reset the pump
Minimum thermostat (if featured)
Check the set temperature
ODOUR OF UNBURNED SUBSTANCES
CAUSE:
Flue gas leaking into the environment
SOLUTION:
Check and if necessary clean the boiler body
Check and if necessary clean the flue
Check the tightness of the boiler and the flue
FREQUENT ACTIVATION OF THE SAFETY VALVE
CAUSE:
System circuit pressure
SOLUTION:
Check the fill pressure
Check the system circuit
Check the calibration
Check the set temperature
System expansion vessel
Check
- 22 -
GB
- 23 -
INDICE
1.
2.
3.
4.
5.
6.
7.
8.
9.
10.
Présentation . . . . . . . . . . . . . . . . . . . . . . . . . . . . . . . . . . . . . . . . . . . . . . . . . . . . . . . . . . . . . . . . . . . . . . . . . . . . . . . . . . . . . . . . . . . . . . . . . . . . . . page 25
Généralités . . . . . . . . . . . . . . . . . . . . . . . . . . . . . . . . . . . . . . . . . . . . . . . . . . . . . . . . . . . . . . . . . . . . . . . . . . . . . . . . . . . . . . . . . . . . . . . . . . . . . . . page 25
Certification . . . . . . . . . . . . . . . . . . . . . . . . . . . . . . . . . . . . . . . . . . . . . . . . . . . . . . . . . . . . . . . . . . . . . . . . . . . . . . . . . . . . . . . . . . . . . . . . . . . . . . . page 25
Caractéristiques techniques, de construction et dimensions . . . . . . . . . . . . . . . . . . . . . . . . . . . . . . . . . . . . . . . . . . . . . . . . . . . . . . . . . . . . . . . . . page 25
4.1 Description de l'appareil . . . . . . . . . . . . . . . . . . . . . . . . . . . . . . . . . . . . . . . . . . . . . . . . . . . . . . . . . . . . . . . . . . . . . . . . . . . . . . . . . . . . . . . . . . page 25
4.2 Principe de fonctionnement . . . . . . . . . . . . . . . . . . . . . . . . . . . . . . . . . . . . . . . . . . . . . . . . . . . . . . . . . . . . . . . . . . . . . . . . . . . . . . . . . . . . . . . page 25
4.3 Caractéristiques techniques . . . . . . . . . . . . . . . . . . . . . . . . . . . . . . . . . . . . . . . . . . . . . . . . . . . . . . . . . . . . . . . . . . . . . . . . . . . . . . . . . . . . . . page 25
4.4 Identification . . . . . . . . . . . . . . . . . . . . . . . . . . . . . . . . . . . . . . . . . . . . . . . . . . . . . . . . . . . . . . . . . . . . . . . . . . . . . . . . . . . . . . . . . . . . . . . . . . page 25
Installation . . . . . . . . . . . . . . . . . . . . . . . . . . . . . . . . . . . . . . . . . . . . . . . . . . . . . . . . . . . . . . . . . . . . . . . . . . . . . . . . . . . . . . . . . . . . . . . . . . . . . . . . page 27
5.1 Emballage . . . . . . . . . . . . . . . . . . . . . . . . . . . . . . . . . . . . . . . . . . . . . . . . . . . . . . . . . . . . . . . . . . . . . . . . . . . . . . . . . . . . . . . . . . . . . . . . . . . . page 27
5.2 Manutention . . . . . . . . . . . . . . . . . . . . . . . . . . . . . . . . . . . . . . . . . . . . . . . . . . . . . . . . . . . . . . . . . . . . . . . . . . . . . . . . . . . . . . . . . . . . . . . . . . page 27
5.3 Local d'installation de la chaudière . . . . . . . . . . . . . . . . . . . . . . . . . . . . . . . . . . . . . . . . . . . . . . . . . . . . . . . . . . . . . . . . . . . . . . . . . . . . . . . . . page 27
5.4 Evacuation des produits de combustion . . . . . . . . . . . . . . . . . . . . . . . . . . . . . . . . . . . . . . . . . . . . . . . . . . . . . . . . . . . . . . . . . . . . . . . . . . . . . page 27
5.5 Raccordements hydrauliques . . . . . . . . . . . . . . . . . . . . . . . . . . . . . . . . . . . . . . . . . . . . . . . . . . . . . . . . . . . . . . . . . . . . . . . . . . . . . . . . . . . . . page 27
5.5.1 Eau d'alimentation . . . . . . . . . . . . . . . . . . . . . . . . . . . . . . . . . . . . . . . . . . . . . . . . . . . . . . . . . . . . . . . . . . . . . . . . . . . . . . . . . . . . . . . . . page 27
5.5.2 Tuyauteries départ/retour installation . . . . . . . . . . . . . . . . . . . . . . . . . . . . . . . . . . . . . . . . . . . . . . . . . . . . . . . . . . . . . . . . . . . . . . . . . . page 27
5.5.3 Tuyauteries remplissage/évacuation installation . . . . . . . . . . . . . . . . . . . . . . . . . . . . . . . . . . . . . . . . . . . . . . . . . . . . . . . . . . . . . . . . . . page 27
5.5.4 Tuyauteries vase d'expansion et vanne de sécurité . . . . . . . . . . . . . . . . . . . . . . . . . . . . . . . . . . . . . . . . . . . . . . . . . . . . . . . . . . . . . . . page 27
5.5.5 Pompe de recirculation . . . . . . . . . . . . . . . . . . . . . . . . . . . . . . . . . . . . . . . . . . . . . . . . . . . . . . . . . . . . . . . . . . . . . . . . . . . . . . . . . . . . . page 28
5.6 Porte arrière ouverture et réglage . . . . . . . . . . . . . . . . . . . . . . . . . . . . . . . . . . . . . . . . . . . . . . . . . . . . . . . . . . . . . . . . . . . . . . . . . . . . . . . . . . page 28
5.7 Montage du brûleur . . . . . . . . . . . . . . . . . . . . . . . . . . . . . . . . . . . . . . . . . . . . . . . . . . . . . . . . . . . . . . . . . . . . . . . . . . . . . . . . . . . . . . . . . . . . . page 28
5.8 Raccordement voyant contrôle flamme . . . . . . . . . . . . . . . . . . . . . . . . . . . . . . . . . . . . . . . . . . . . . . . . . . . . . . . . . . . . . . . . . . . . . . . . . . . . . . page 28
5.9 Montage habillage mod. 92÷300 . . . . . . . . . . . . . . . . . . . . . . . . . . . . . . . . . . . . . . . . . . . . . . . . . . . . . . . . . . . . . . . . . . . . . . . . . . . . . . . . . . . page 28
5.10 Montage habillage mod. 350÷1060 . . . . . . . . . . . . . . . . . . . . . . . . . . . . . . . . . . . . . . . . . . . . . . . . . . . . . . . . . . . . . . . . . . . . . . . . . . . . . . . . . page 28
Branchement électrique . . . . . . . . . . . . . . . . . . . . . . . . . . . . . . . . . . . . . . . . . . . . . . . . . . . . . . . . . . . . . . . . . . . . . . . . . . . . . . . . . . . . . . . . . . . . . . page 29
Panneau de commandes . . . . . . . . . . . . . . . . . . . . . . . . . . . . . . . . . . . . . . . . . . . . . . . . . . . . . . . . . . . . . . . . . . . . . . . . . . . . . . . . . . . . . . . . . . . . page 29
7.1 Description des fonctions . . . . . . . . . . . . . . . . . . . . . . . . . . . . . . . . . . . . . . . . . . . . . . . . . . . . . . . . . . . . . . . . . . . . . . . . . . . . . . . . . . . . . . . . page 29
7.2 Schéma électrique pour brûleur et pompe monophasé . . . . . . . . . . . . . . . . . . . . . . . . . . . . . . . . . . . . . . . . . . . . . . . . . . . . . . . . . . . . . . . . . page 29
Schéma de principe - Installation pour chauffage et production d'eau sanitaire . . . . . . . . . . . . . . . . . . . . . . . . . . . . . . . . . . . . . . . . . . . . . . . . . . . page 30
Mise en marche . . . . . . . . . . . . . . . . . . . . . . . . . . . . . . . . . . . . . . . . . . . . . . . . . . . . . . . . . . . . . . . . . . . . . . . . . . . . . . . . . . . . . . . . . . . . . . . . . . . . page 30
8.1 Contrôles préalables . . . . . . . . . . . . . . . . . . . . . . . . . . . . . . . . . . . . . . . . . . . . . . . . . . . . . . . . . . . . . . . . . . . . . . . . . . . . . . . . . . . . . . . . . . . . page 30
8.2 Première mise en marche . . . . . . . . . . . . . . . . . . . . . . . . . . . . . . . . . . . . . . . . . . . . . . . . . . . . . . . . . . . . . . . . . . . . . . . . . . . . . . . . . . . . . . . . page 30
8.3 Arrêt chaudière . . . . . . . . . . . . . . . . . . . . . . . . . . . . . . . . . . . . . . . . . . . . . . . . . . . . . . . . . . . . . . . . . . . . . . . . . . . . . . . . . . . . . . . . . . . . . . . . page 31
Entretien . . . . . . . . . . . . . . . . . . . . . . . . . . . . . . . . . . . . . . . . . . . . . . . . . . . . . . . . . . . . . . . . . . . . . . . . . . . . . . . . . . . . . . . . . . . . . . . . . . . . . . . . . . page 31
10.1 Normes générales . . . . . . . . . . . . . . . . . . . . . . . . . . . . . . . . . . . . . . . . . . . . . . . . . . . . . . . . . . . . . . . . . . . . . . . . . . . . . . . . . . . . . . . . . . . . . . page 31
10.2 Entretien ordinaire . . . . . . . . . . . . . . . . . . . . . . . . . . . . . . . . . . . . . . . . . . . . . . . . . . . . . . . . . . . . . . . . . . . . . . . . . . . . . . . . . . . . . . . . . . . . . . page 31
10.3 Entretien extraordinaire . . . . . . . . . . . . . . . . . . . . . . . . . . . . . . . . . . . . . . . . . . . . . . . . . . . . . . . . . . . . . . . . . . . . . . . . . . . . . . . . . . . . . . . . . . page 31
10.4 Nettoyage de la chaudière . . . . . . . . . . . . . . . . . . . . . . . . . . . . . . . . . . . . . . . . . . . . . . . . . . . . . . . . . . . . . . . . . . . . . . . . . . . . . . . . . . . . . . . page 31
10.5 Vérification du fonctionnement de la chaudière . . . . . . . . . . . . . . . . . . . . . . . . . . . . . . . . . . . . . . . . . . . . . . . . . . . . . . . . . . . . . . . . . . . . . . . page 31
10.6 Vérification du fonctionnement du brûleur . . . . . . . . . . . . . . . . . . . . . . . . . . . . . . . . . . . . . . . . . . . . . . . . . . . . . . . . . . . . . . . . . . . . . . . . . . . . page 31
10.7 Pannes possibles et remèdes . . . . . . . . . . . . . . . . . . . . . . . . . . . . . . . . . . . . . . . . . . . . . . . . . . . . . . . . . . . . . . . . . . . . . . . . . . . . . . . . . . . . . page 32
- 24 -
1. PRESENTATION
Cher client,
Nous vous remercions d'avoir choisi une chaudière PREX W.
Cette notice a été préparée pour vous informer,
avec des recommandations et des conseils, sur
2. GENERALITES
- La notice d'instructions fait partie intégrante du
produit et décrit tout ce qui doit être fait au
moment de l'installation, utilisation et entretien.
- Cet appareil doit être réservé exclusivement à
l'usage pour lequel il a été conçu.
- Cet appareil sert à chauffer de l'eau à une
température inférieure à celle d'ébullition à
la pression atmosphérique et il doit être
raccordé à un système de chauffage et/ ou
un système de distribution d'eau chaude
pour usage sanitaire, conformément à ses
caractéristiques et performances et à la
puissance thermique.
- Il faut vérifier, avant l'installation, que la chaudière n'a pas été endommagée au cours de la
manutention et du transport.
- L'installation doit être effectuée conformément
à la réglementation et aux normes en vigueur,
par un professionnel qualifié.
son installation, la bonne utilisation et l'entretien
de la chaudière. Nous vous prions donc de la
lire attentivement et de la conserver soigneusement afin de pouvoir la consulter au besoin.
Dans votre intérêt, nous vous conseillons de
respecter scrupuleusement ce qu'elle indique
- Avant d'effectuer toute opération de nettoyage
ou d'entretien, débrancher l'appareil du réseau
d'alimentation.
- La Ferroli S.p.A. n'est pas responsable des
dommages aux personnes et/ou aux choses
dus à des erreurs d'installation, de réglage,
d'entretien et d'une mauvaise utilisation.
- La mise en marche de la chaudière et de l'installation doit être effectuée par un professionnel qualifié.
- La première mise en marche a pour but de
vérifier le bon fonctionnement de tous les
dispositifs de réglage et de contrôle.
- Si l'appareil n'est pas utilisé pendant une
longue période s'adresser à un professionnel
qualifié.
pour que ce produit de haute qualité vous
donne toute satisfaction. Le fabricant décline
toute responsabilité en cas de non-respect de
ces instructions et la garantie sera annulée.
Réglementation
L'installateur doit respecter la réglementation en
vigueur pour ce qui concerne: le choix de l'emplacement de la chaudière, l'aération des
locaux; l'étanchéité des raccordements et de la
cheminée; les raccordements du combustible,
des installations électriques et toute autre disposition concernant la sécurité.
Garantie
La validité de la garantie est liée au respect
des normes et des conseils d'utilisation contenues dans cette notice. Le non-respect ou
toute modification la rendra nulle. Sont absolument exclus de la garantie les dommages dus
à la corrosion par condensation acide des produits de combustion ou dérivant de la formation d'incrustations causées par l'utilisation
d'eaux dures ou agressives, car imputables à
la conduite de l'installation.
3. CERTIFICATION
La marque CE prouve que les appareils Ferroli
S.p.A sont conformes aux directives européennes qui leur sont applicables.
En particulier cet appareil est conforme aux
directives CEE suivantes:
- Directive appareils à gaz (2009/142/CE)
- Directive rendements (92/42 CEE)
- Directive Basse Tension 73/23 CEE
(modifiée par la directive 93/68)
- Directive Compatibilité Electromagnétique
89/336 (modifiée par la directive 93/68)
4. CARACTERISTIQUES TECHNIQUES,
DE CONSTRUCTION ET DIMENSIONS
Le tableau de commande déjà précâblé est
placé au-dessus de la chaudière et permet le
fonctionnement automatique de celle-ci.
4.4 Identification
La chaudière peut être identifiée grâce à:
- Enveloppe documents
elle est appliquée sur la porte et contient:
NOTICE TECHNIQUE
CERTIFICAT DE GARANTIE
ETIQUETTES AVEC CODE-BARRE
PLAQUETTE TECHNIQUE
CERTIFICAT DE CONSTRUCTION
(attestant le bon résultat de l'essai hydraulique)
4.1 Description de l'appareil
La construction des chaudières série AR SW
garantit un rendement élevé avec des basses
températures des fumées, afin d'obtenir moins
de rejets polluants.
La construction est conforme à la norme EN
303 partie 1. Les principaux éléments techniques de la conception sont:
- l'étude soignée des géométries, pour obtenir
un rapport optimal entre les volumes de combustion et les surfaces d'échange
- le choix des matériaux utilisés, pour une longue durée de la chaudière.
Les chaudières sont pressurisées, à 3 parcours
de fumée, de type cylindrique horizontal à inversion de flamme dans le foyer, entièrement
mouillé, la flamme produite par le brûleur s'inverse contre la paroi vers la partie avant, où les
fumées s'engagent dans le faisceau de tubes,
dans lesquels sont insérés les turbulateurs
conçus pour créer une turbulence qui accroît l'échange thermique par convection. À la sortie du
faisceau de tubes les fumées sont recueillies
dans la boîte à fumées arrière et amenées vers
la cheminée. Les chaudières sont équipées
d'une porte foyère montée sur charnière droite
ou gauche et réglable en hauteur et en profondeur. Le corps de chaudière est fortement isolé
avec de la laine de verre et recouvert d'une couche de matériau anti-déchirure. La finition extérieure est composée d'un habillage en acier
peint. Les crochets de levage se trouvent sur la
partie supérieure du corps.
Les chaudières sont munies de 2 raccords de
1/2" pour gaines porte-bulbe (permettent de
loger 3 bulbes chacune).
4.2 Principe de fonctionnement
Les chaudières AR SW sont munies d'un foyer
cylindrique borgne, dans lequel la flamme du
brûleur se renverse à la périphérie vers l'avant,
où les gaz de combustion entrent dans les
tubes de fumée. À la sortie, celles-ci sont
recueillies dans la boîte à fumées puis poussées dans la cheminée. La chambre de combustion pendant le fonctionnement du brûleur est
toujours sous pression. Voir les tableaux page
26, à la colonne Pertes de charge côté fumées,
pour la valeur de cette pression. Le conduit de
fumées et le raccord au conduit de cheminée
doivent être réalisés conformément aux Normes
et à la Réglementation en vigueur, avec des
conduits rigides, résistants à la température, à
la condensation, aux contraintes mécaniques et
étanches. (Fig.1)
4.3 Caractéristiques techniques - Dimensions
- Raccords hydrauliques
Légende (Fig. 2 et 3)
1 Tableau commandes
2 Bride raccord brûleur
3 Trappe de ramonage boîte à fumées
4 Viseur contrôle flamme
T1 Départ chauffage
T2 Retour chauffage
T3 Raccord vase d'expansion
T4 Evacuation chaudière
T5 Raccord cheminée
T6 Raccord brûleur
- 25 -
- Plaquette technique
Indique les caractéristiques techniques et les
performances de l'appareil (Fig. 4).
Elle se trouve dans l'enveloppe des documents et DOIT ETRE APPLIQUEE OBLIGATOIREMENT, par l'installateur de l'appareil,
lorsque l'installation est terminée, en haut sur
l'avant d'un des panneaux latéraux de la
jaquette, de façon visible.
En cas de perte en demander un duplicata au
Service Technique d'Assistance Ferroli.
La modification, la suppression, le manque de
la plaquette d'identification ou tout ce qui ne
permet pas d'identifier de façon sûre le produit, rend les opérations d'installation et d'entretien plus difficiles.
Légende (Fig. 4)
1 Enveloppe documents
FR
AR SW
Puissance nominale
kW
kW
kW
Puissance foyer
kW
l
Capacité totale chaudière
Pertes de charge côté eau Δt 10°C mbar
Δt 15°C mbar
Δt 20°C mbar
mbar
Pertes de charge côté fumées
kg
Poids à sec
mm
DIMENSIONS
A
mm
B
mm
C
mm
D
mm
E
mm
F
mm
G
mm
H
mm
I
mm
L
mm
L1
mm
M
mm
N
mm
O
mm
P
mm
Q
mm
R
DEPART EAU CHAUDE
DN T1
RETOUR EAU CHAUDE
DN T2
RACCORD VASE EXPANSION
DN T3
EVACUATION CHAUDIERE
DN T4
SORTIE FUMEE
Ø T5
AR SW
Puissance nominale
min
max
min
max
kW
kW
kW
Puissance foyer
kW
l
Capacité totale chaudière
Pertes de charge côté eau Δt 10°C mbar
Δt 15°C mbar
Δt 20°C mbar
mbar
Pertes de charge côté fumées
kg
Poids à sec
mm
DIMENSIONS
A
mm
B
mm
C
mm
D
mm
E
mm
F
mm
G
mm
H
mm
I
mm
L
mm
L1
mm
M
mm
N
mm
O
mm
P
mm
Q
DEPART EAU CHAUDE
DN T1
RETOUR EAU CHAUDE
DN T2
RACCORD VASE EXPANSION
DN T3
EVACUATION CHAUDIERE
DN T4
SORTIE FUMEE
Ø T5
min
max
min
max
92
60
92
64,3
99,5
121
8
4
2
0,5
260
760
764
866
165
130
152
515
395
1046
100
121
925
147
150
250
700
740
2”
2”
1” 1/4
3/4”
200
107
70
107
75
116
121
11
6
2,5
0,7
260
760
764
856
165
130
152
515
395
1046
100
121
925
147
150
250
700
740
2”
2”
1” 1/4
3/4”
200
2360
1535
2360
1668
2565
1925
150
70
42
7,2
3900
1610
2772
1810
–
210
250
1005
860
3232
145
195
1950
662
650
1000
1000
150
150
100
1” 1/2
450
152
100
152
107,3
165
186
20
12
5
1,2
350
810
1014
911
165
130
152
545
420
1296
100
121
980
167
230
350
750
990
2” 1/2
2” 1/2
1” 1/2
3/4”
220
190
137
190
147,4
206
186
12
7
3
1,2
350
810
1014
911
165
130
152
545
420
1296
100
121
980
167
230
350
750
990
2” 1/2
2” 1/2
1” 1/2
3/4”
220
240
160
240
170,9
261
232
17
10
4
2,3
440
810
1264
911
165
130
152
545
420
1516
100
121
980
217
330
450
750
1240
2” 1/2
2” 1/2
1” 1/2
3/4”
220
3000
1950
3000
2113
3250
2600
145
65
45
7,5
5300
1800
2976
2000
–
220
250
1100
940
3446
145
195
2140
716
650
1150
1170
200
200
125
1” 1/2
500
300
196
300
209,5
326
304
40
17
9
3,3
480
950
1264
1031
165
150
152
630
495
1546
100
121
1100
217
330
450
890
1240
2” 1/2
2” 1/2
1” 1/2
3/4”
220
350
228
350
277,5
378
362
48
23
13
3,5
550
950
1514
1031
165
150
152
630
495
1816
100
121
1100
217
380
600
890
1490
2” 1/2
2” 1/2
1” 1/2
3/4”
220
399
260
399
364,5
432
337
43
31
16
4,4
590
950
1515
1031
165
150
152
630
485
1817
100
120
1100
218
380
600
890
1491
2” 1/2
2” 1/2
1” 1/2
3/4”
220
3600
2340
3600
2536
3900
2920
190
90
61
8,2
5800
1800
3346
2000
–
220
250
1100
940
3816
145
195
2140
786
650
1450
1170
200
200
125
1” 1/2
500
- 26 -
525
341
525
417
567
405
40
22
12
4,3
860
1060
1516
1181
165
170
152
725
570
1838
100
120
1250
218
380
600
1000
1492
80
80
2”
3/4”
250
600
390
600
495
648
471
51
28
16
4,8
970
1060
1776
1181
165
170
152
725
570
2098
100
120
1250
218
440
700
1000
1752
80
80
2”
3/4”
250
4000
2600
4000
2819
4334
4425
250
120
70
9,5
7500
1980
3596
2180
–
240
250
1190
960
4086
145
195
2325
786
650
1700
1350
200
200
125
1” 1/2
600
720
468
720
502
777
735
32
18
10
4,5
1250
1260
1776
1331
165
170
212
815
615
2158
100
180
1400
228
440
700
1200
1752
100
100
2” 1/2
3/4”
350
820
533
820
566
881
735
40
25
18
5,6
1250
1260
1776
1331
165
170
212
815
615
2158
100
180
1400
218
440
700
1200
1752
100
100
2” 1/2
3/4”
350
940
611
940
651
1011
850
51
25
16
5,4
1420
1260
2016
1331
165
170
212
815
615
2398
100
180
1400
218
480
900
1200
1992
100
100
2” 1/2
3/4”
350
4500
2926
4500
3165
4868
4790
280
135
80
10,5
8000
1980
3946
2180
–
240
250
1190
960
4436
145
195
2325
786
650
2050
1350
200
200
125
1” 1/2
600
1060
689
1060
731
1140
1240
65
33
20
6
1580
1450
2018
1511
165
190
212
900
670
2420
90
178
1580
218
480
900
1390
1994
125
125
3”
3/4”
400
1250
813
1250
884
1359
1240
86
40
25
6,5
2250
1450
2018
1511
165
190
212
900
670
2420
90
178
1580
220
480
900
1390
1994
125
125
3”
3/4”
400
5000
3251
5000
3515
5407
6150
200
85
55
10,8
9600
2180
3948
2380
–
260
250
1290
1015
4458
145
195
2525
786
750
1950
1550
250
250
150
1” 1/2
650
1480
1600 1890
962
1040 1229
1480
1600 1890
1046
1128 1336
1608
1736 2054
1490
1490 1620
110
115
100
55
60
45
32
40
29
6,5
6,8
7
2650
2700 2850
1530
1530 1530
2320
2320 2520
1661
1661 1661
165
165
165
190
190
190
212
212
212
1013
1013 1013
743
743
743
2722
2722 2722
120
120
120
199
199
199
1730
1730 1730
220
220
220
580
580
580
1100
1100 1200
1470
1470 1470
2296
2296 2496
150
150
150
150
150
150
DN100 DN100 DN100
1” 1/2 1” 1/2 1” 1/2
450
450
450
6000
3902
6000
4215
6483
6800
215
105
65
12
11500
2180
4448
2380
–
260
250
1290
1015
4958
145
195
2525
786
750
2450
1550
250
250
150
1” 1/2
650
5. INSTALLATION
5.1 Emballage
Les chaudières AR SW modèle 92-1890 sont
fournies dotées de porte et boîte à fumées
montées et isolation sur le corps, tandis que
la jaquette est contenue dans un emballage
en carton.
Le panneau instruments est livré dans une
boîte en carton et placé dans la chambre de
combustion.
Les chaudières AR SW modèle 2360-6000 sont
livrées avec isolation et jaquette. Le panneau
instruments est livré dans une boîte en carton et
placé dans la chambre de combustion.
5.2 Manutention
Les chaudières sont munies d'anneaux de levage.
Manutentionner avec soin et s'équiper d'un
matériel adapté à leur poids.
Avant de positionner la chaudière retirer le socle
en bois en dévissant les vis de fixation (Fig.5).
5.3 Local d'installation (Fig. 6)
Les chaudières AR SW doivent être installées
dans des locaux à usage exclusif conformes aux
Normes techniques et à la Réglementation en
vigueur et munis d'ouvertures d'aération suffisamment dimensionnés. Les ouvertures d'aération doivent être permanentes, communiquant
directement avec l'extérieur et placées en haut et
en bas conformément aux réglementations en
vigueur. L'emplacement des ouvertures d'aération, les circuits d'alimentation en combustible,
de distribution de l'énergie électrique et d'éclairage devront respecter les réglementations en
vigueur selon le type de combustible employé.
Pour faciliter le nettoyage du parcours fumées, il
faudra laisser un espace libre devant la chaudière, au moins égal à la longueur du corps de
chaudière et, dans tous les cas, au minimum de
1300 mm et il faudra vérifier que lorsque la porte
est ouverte à 90° la distance entre la porte et le
mur adjacent (X) est au moins égale à la longueur du brûleur. Le plan d'appui de la chaudière
doit être parfaitement horizontal. Il est conseillé
de prévoir un socle en ciment, plat, et en mesure
de supporter le poids total de la chaudière plus le
contenu d'eau. Pour les dimensions du socle,
voir les cotes R x Q (tableaux dimensions). Si le
brûleur est alimenté avec un gaz combustible
dont le poids spécifique est supérieur à celui de
l'air, les parties électriques devront être placées
à plus de 500 mm du sol. L'appareil ne peut pas
être installé en plein air car il n'est pas conçu
pour fonctionner à l'extérieur et ne dispose pas
de systèmes anti-gel automatiques.
MONTAGE SUR DES INSTALLATIONS
ANCIENNES OU A RENOVER
Quand la chaudière est installée sur des installations anciennes ou à rénover, vérifier que:
- le conduit de cheminée est adapté aux températures des produits de la combustion, calculé et
construit selon les réglementations en vigueur;
qu'il est étanche, isolé et qu'il ne présente pas
d'étranglements ou de rétrécissements.
- L'installation électrique a été réalisée
conformément à la réglementation en vigueur
par un professionnel qualifié.
- La ligne d'alimentation en combustible et l'éventuel réservoir sont réalisés selon les réglementations et normes en vigueur.
- Le (les) vase(s) d'expansion peut(peuvent)
absorber la dilation du fluide contenu dans
l'installation.
- Le débit, la hauteur de refoulement et la direction du flux des pompes de circulation sont
appropriés.
- L'installation a été lavée et que les boues,
dépôts ont été éliminés, qu'elle a été désaérée
et que l'étanchéité a été vérifiée.
- Un système de traitement d'eau d'alimentation
/appoint a été prévu (voir valeurs de référence).
5.4 Evacuation des produits de la combustion
(Fig. 7)
Le conduit de fumée et le raccord au conduit de
cheminée doivent être réalisés conformément
aux Normes et Réglementation en vigueur, avec
des conduits rigides, résistant à la température,
à la condensation, aux contraintes mécaniques
et étanches. Le conduit de cheminée doit assurer la dépression minimum prévue par les normes en vigueur, en considérant que la pression
au raccord avec le carneau est ."zéro". Des cheminées et des carneaux inadaptés ou mal
dimensionnés peuvent augmenter le niveau
sonore, provoquer des problèmes de condensation et influer négativement sur les paramètres
de combustion. Les conduits d'évacuation non
isolés sont une source de danger potentiel.
L'étanchéité des raccords doit être réalisée avec
des matériaux résistant à des températures d'au
moins 250°C. Dans le tronçon de raccordement
entre chaudière et conduit de cheminée, on doit
prévoir des points de mesure pour la température des fumées et l'analyse des produits de la
combustion. Pour ce qui concerne la section et
la hauteur de la cheminée, se reporter aux réglementations nationales et locales en vigueur.
5.5 Raccordements hydrauliques
5.5.1 Eau d'alimentation
Les caractéristiques chimiques de l'eau d'installation et d'appoint sont fondamentales pour le
bon fonctionnement et la sécurité de la chaudière, elles doivent être traitées avec des systèmes
de traitement adaptés. Les valeurs indiquées
dans le tableau peuvent être considérées
comme des valeurs de référence.
DURETE TOTALE
ALCALINITE
PH
SILICE
CHLORURES
ppm
mg/l CaCO3
ppm
ppm
10
750
8÷9
100
3500
Il est absolument indispensable de traiter l'eau
utilisée pour l'installation de chauffage en cas de:
- Installations très étendues
- Eau très dure
- Fréquentes introduction d'eau d'appoint dans
l'installation
S'il s'avère nécessaire de vidanger partiellement
ou totalement l'installation, il est recommandé
d'effectuer le prochain remplissage avec de l'eau
traitée. Pour contrôler la quantité des appoints il
est conseillé d'installer un compteur sur la tuyauterie. Les phénomènes les plus courants qui se
produisent dans les installations thermiques sont:
- Dépôts de tartre
Le tartre se concentre dans les endroits où la
température de paroi est la plus élevée. Les
dépôts de tartre à cause de leur basse con-
- 27 -
ductivité thermique réduisent l'échange thermique de sorte que la présence de quelques
millimètres empêche l'échange thermique
entre les fumées et l'eau, entraînant une augmentation de la température des parties
exposées à la flamme et donc des ruptures
(fissures) sur la plaque tubulaire.
- Corrosion côté eau
La corrosion des surfaces métalliques de la
chaudière côté eau est due au passage de fer
en dissolution à travers ses ions. La présence
des gaz dissous est très importante dans ce
processus et en particulier de l'oxygène et de
l'anhydride carbonique. En présence d'eaux
adoucies et/ou déminéralisées, on est à l'abri
de phénomènes de tartre, mais pas de corrosions. Il est donc nécessaire de traiter l'eau
avec des inhibiteurs de corrosion.
5.5.2 Tuyauteries départ/retour installation
Les dimensions des tuyauteries de départ et
retour sont indiquées pour chaque modèle de
chaudière dans le tableau DIMENSIONS.
S'assurer qu'il y ait un nombre suffisant de purgeurs sur l'installation. Les raccords de la chaudière ne doivent pas être sollicités par le poids
des tuyauteries de raccordement à l'installation;
installer par conséquent des supports adaptés.
5.5.3 Tuyauteries remplissage/appoint
Pour le remplissage et la vidange de la chaudière
un robinet peut être raccordé au raccord T4 qui
se trouve à l'arrière (voir dessin DIMENSIONS).
5.5.4 Tuyauteries vase d'expansion et vanne
de sécurité
Les chaudières AR SW sont conçues pour fonctionner avec une circulation d'eau forcée avec
vase d'expansion ouvert ou fermé. Un vase
d'expansion est toujours nécessaire, pour compenser l'augmentation de volume de l'eau qui se
dilate lors du chauffage. Dans le premier cas la
hauteur de la colonne d'eau devra être égale au
moins à 3 mètres au-dessus du manteau de la
chaudière et devra permettre de contenir, entre
la surface libre de l'eau dans le vase et le tuyau
de trop plein, l'augmentation de volume de toute
l'eau de l'installation. Préférer des vases hauts
et étroits de façon à exposer au contact avec
l'air la plus petite surface d'eau possible, pour
réduire l'évaporation. Dans le deuxième cas, la
capacité du vase d'expansion fermé doit être
calculée en tenant compte de:
- volume total de l'eau contenue dans l'installation
- pression maximale d'exercice de l'installation
- pression maximale d'exercice du vase d'expansion
- pression de précharge initiale du vase d'expansion
- température maximale d'exercice de la chaudière (la température maximale du thermostat
monté sur le panneau est 90°C; pour ce calcul il est conseillé de considérer 100°C).
La tuyauterie d'expansion raccorde le vase d'expansion à l'installation. Cette tuyauterie qui partira du raccord T3 (voir tableau Dimensions) ne devra avoir
aucune vanne d'arrêt. Installer sur le raccord T3 ou
sur la tuyauterie de départ, au maximum 0,5 mètres
après de la bride de départ, une vanne de sécurité
dimensionnée pour la capacité de la chaudière et
conforme aux normes locales en vigueur. Il est interdit
d'interposer un dispositif d'arrêt quel qu'il soit entre la
chaudière et la vase d'expansion et entre la chaudière
FR
et les vannes de sécurité, et il est recommandé d'utiliser des vannes réglées pour se déclencher lorsque la
pression maximale d'exercice autorisée est atteinte.
5.5.5 Pompe de recirculation (Fig. 8)
La condensation de la vapeur d'eau contenue dans
les fumées d'évacuation de la chaudière (condensats) se produit quand la température de l'eau de
retour est inférieure à 55°C et est importante surtout
pendant le démarrage le matin, quand la chaudière
a été arrêtée toute la nuit. La condensation est acide
et corrosive, et avec le temps elle attaque les tôles
de la chaudière. Et il est donc souhaitable d'adopter
une pompe de recirculation, avec fonction d'anti-condensation, installée entre les raccords de départ et
de retour, en amont de l'éventuelle vanne mélangeuse. La pompe doit assurer, pendant les périodes de
fonctionnement de l'installation, un débit compris
entre 20 et 30% du débit total; elle doit assurer une
température de retour pas inférieure à 55°C, alors
que la hauteur de refoulement nécessaire est modeste car elle ne doit surmonter que la résistance de la
chaudière et des vannes. Pour mesurer la température réelle de retour installation dans le but de commander la pompe anti-condensation ou pour gérer
des fonctions de mise en régime dans des systèmes
de régulation thermique, il est nécessaire de prévoir
un doigt de gant porte-sonde à positionner à une
distance équivalente à 3÷5 diamètres du tuyau de
retour en amont du point de raccord hydraulique.
5.6 Porte avant ouverture et réglage
Pour les modèles AR SW 92÷1890 le montage
des charnières, la fixation et l'inversion de
l’ouverture de la porte se font selon la fig. 9. Les
opérations nécessaires sont les suivantes:
- La porte est dotée de quatre étriers (pos. 3)
et charnières identiques.
- Pour établir le sens d’ouverture DROITE ou
GAUCHE, dévisser l’écrou (pos. 7), dévisser et
retirer l’écrou (pos. 6) DROITE ou GAUCHE
pour obtenir ainsi le côté d’ouverture de la porte.
- Le réglage en hauteur de la porte s’effectue
avec l’écrou (pos. 2); une fois le réglage terminé, bloquer enfin avec les écrous (pos. 1).
- Le réglage longitudinal s’effectue avec la vis
(pos. 8).
Légende (Fig. 9)
1 Ecrou de fixation
2 Ecrou de support/réglage porte
3 Etrier charnière
4 Axe charnière
5 Vis charnière
6 Ecrou de fixation charnière
7 Ecrou de fixation
8 Vis et écrous de fixation/réglage étrier
charnière
Pour les modèles AR SW 2360÷6000 le montage des charnières, la fixation et l'inversion de
l’ouverture de la porte se font selon la fig. 10.
Les opérations nécessaires sont les suivantes:
- La porte est dotée de quatre charnières identiques (pos. 3).
- Pour établir le sens d’ouverture DROITE ou
GAUCHE, dévisser l’écrou (pos. 7), dévisser et
retirer l’écrou (pos. 6) DROITE ou GAUCHE pour
obtenir ainsi le côté d’ouverture de la porte.
- Le réglage en hauteur de la porte s’effectue
avec l’écrou (pos. 2); une fois le réglage terminé, bloquer enfin avec les écrous (pos. 1).
Légende (Fig. 10)
1 Ecrou de fixation
2 Ecrou de support/réglage porte
3 Etrier charnière
4 Axe charnière
5 Vis charnière
6 Ecrou de fixation charnière
7 Ecrou de fixation
5.7 Montage du brûleur (Fig. 11)
Le montage du brûleur sur la porte de la chaudière doit garantir une parfaite étanchéité aux produits de la combustion. Lorsque le brûleur est
installé sur la chaudière, l'espace entre la tuyère
du brûleur et le matériau réfractaire de la porte
doit être rempli avec le matelas céramique (A)
fourni avec la chaudière. Cette opération évite la
surchauffe de la porte qui autrement se déformerait irrémédiablement. Les raccordements du
combustible au brûleur devront être placés de
façon à permettre l'ouverture complète de la porte
de la chaudière lorsque le brûleur est installé.
AR SW
92-152
190-399
525-600
720-940
1060-1250
1480-1890
2360
3000-3600
4000-4500
5000
6000
L min. (mm)
230
250
290
320
320
350
350
370
450
500
500
L max. (mm)
300
320
360
390
390
420
420
450
500
550
550
5.8 Raccordement viseur contrôle flamme
(Fig. 12)
Le viseur contrôle flamme est muni d'une prise
de pression (1) à raccorder à l'aide d'un tube de
silicone ou de cuivre à la prise sur le brûleur (2).
Cette opération permet à l'air soufflé par le ventilateur de refroidir la vitre viseur et l'empêcher de
noircir. Le non raccordement du tube du viseur
peut provoquer la rupture de la vitre du viseur.
5.9 Montage habillage mod. 92÷399
Ordre de montage (Fig. 13)
a) Positionner les panneaux latéraux droit et
gauche (pos. 1-2) en les accrochant au support (pos. 13). Pour déterminer lequel des
deux côtés est le droit ou le gauche, se référer
au trou sur la plaque passe-câbles (pos. 6) qui
doit être tourné vers l'avant de la chaudière.
b) Fixer le panneau commandes au panneau
supérieur (pos. 3).
c) Poser le panneau supérieur droit (pos. 3)
équipé du panneau de commandes, sur le
panneau latéral (pos. 1) muni de ressorts,
chevilles et écrous (pos. 10-11-12).
d) Insérer dans les gaines les bulbes des instruments comme indiqué Fig. 20 et raccorder
électriquement le panneau de commandes à
la ligne d'alimentation, au brûleur et aux
éventuelles pompes, etc. Il est recommandé
d'insérer les sondes jusqu'au fond des doigts
de gant pour améliorer le contact. Bloquer
ensuite les capillaires avec les pinces.
Refermer le couvercle du tableau électrique,
faire passer la fiche du brûleur à travers la
plaque latérale (pos. 6) et bloquer le câble
avec le passe-câble fourni. Fixer la plaque
(pos. 6) avec les vis (pos. 7).
- 28 -
e) Monter le panneau supérieur gauche (pos. 4)
au panneau latéral gauche (pos. 2) muni de
ressorts, chevilles et écrous (pos. 10-11-12).
f) Insérer dans les gaines les bulbes des instruments voir fig. 13-20 et raccorder électriquement le panneau de commandes à la ligne d'alimentation, au brûleur et aux éventuelles pompes etc. Il est recommandé d'insérer les sondes
jusqu'au fond des doigts de gant pour améliorer
le contact. Bloquer ensuite les capillaires avec
les pinces. Refermer le couvercle du tableau
électrique, faire passer la fiche du brûleur à travers la plaque latérale (pos. 9) et bloquer le
câble avec le passe-câble fourni. Fixer les plaques (pos. 9) avec les vis (pos. 10).
g) Monter le panneau supérieur (pos. 6) sur le
panneau latéral (pos. 3) muni de ressorts,
chevilles et écrous (pos. 14-15-16).
h) Monter le panneau postérieur (pos. 8) sur la
chaudière à l'aide des vis (pos. 13) avec les
écrous (pos. 14).
i) Monter le panneau antérieur (pos. 5) sur la porte
à l'aide des vis (pos. 8) et des écrous (pos. 9).
l) Fixer la plaque d'identification de la chaudière
voir chap. 1.4 après avoir nettoyé et dégraissé l'endroit avec un solvant adapté, et la coller en appuyant bien. Ne pas enlever la plaque car il serait difficile de la recoller.
La plaque se trouve dans l'enveloppe des
documents.
5.10 Montage habillage mod. 525÷1890
Ordre de montage (Fig. 14)
a) Positionner les panneaux latéraux (pos. 1-2 et
3-4) en les accrochant aux supports (pos. 19).
b) Positionner les panneaux latéraux supérieurs
droits (pos. 5-6), puis gauches (7-8 en les
accrochant aux supports de la chaudière
(pos. 19) et à la traverse (pos. 18).
c) Fixer le panneau de commandes sur le panneau supérieur droit (pos. 5).
d) Poser le panneau supérieur (pos. 5) équipé
du panneau de commandes, sur le panneau
latéral (pos. 1) muni de ressorts, chevilles et
écrous (pos. 15-16-17).
e) Insérer dans les gaines les bulbes des instruments comme indiqué Fig. 21 et raccorder
électriquement le panneau de commandes à la
ligne d'alimentation, au brûleur et aux éventuelles pompes, etc. Il est recommandé d'insérer
les sondes jusqu'au fond des doigts de gant
pour améliorer le contact. Bloquer ensuite les
capillaires avec les pinces. Refermer le couvercle du tableau électrique, faire passer la fiche
du brûleur à travers la plaque latérale (pos. 11)
et bloquer le câble avec le passe-câble fourni.
Fixer la plaque (pos. 11) avec les vis (pos. 12).
f) Monter le support (pos. 18).
g) Monter les panneaux supérieurs (pos. 5-6-78) en les accrochant aux panneaux latéraux
(pos. 1-2-3-4) munis de ressorts, chevilles et
écrous (15-16-17).
h) Monter les panneaux antérieurs (pos. 9-10)
sur la porte antérieure à l'aide des vis (pos.
14) et des écrous (pos. 13).
i) Fixer la plaque d'identification de la chaudière
voir chap. 1.4 après avoir nettoyé et dégraissé l'endroit avec un solvant adapté, et la coller en appuyant bien. Ne pas enlever la plaque car il serait difficile de la recoller.
La plaque se trouve dans l'enveloppe des
documents.
6. BRANCHEMENT ÉLECTRIQUE
Il est nécessaire de brancher la chaudière à
un réseau 230V - 50 Hz monophasé + terre en
respectant les indications suivantes.
L'installation doit être conforme aux NORMES
DE SÉCURITÉ en vigueur.
- Employer un interrupteur bipolaire, sectionneur de ligne, conforme aux Normes CEI-EN
(ouverture des contacts de 3 mm au moins).
- Respecter le raccordement L (phase) - N (neutre)
- Utiliser des câbles de section de 1,5 mm 2
minimum.
- Se reporter aux schémas électriques de cette
notice pour toute intervention de nature
électrique.
- Relier à une installation de mise à la terre efficace.
7. PANNEAU DE COMMANDES
7.1 Description des fonctions
L'interrupteur général (11) permet de mettre
sous tension le tableau et les appareils qui y
sont raccordés. Les interrupteurs (12) et (13)
quant à eux, coupent le courant au brûleur et à
la pompe de l'installation. Le thermostat (21) permet de régler la température de fonctionnement
de la chaudière. Le thermostat de température
minimum arrête la pompe de l'installation au
cours de la mise en régime jusqu'à ce que la
température dans la chaudière ait atteint 50°C.
En cas de brûleurs et ou de pompe installation
triphasé ou avec un courant absorbé supérieur à
3A, il faudra prévoir des contacteurs de télécom-
mande entre le tableau chaudière et la charge.
Sur la ligne électrique d'alimentation du tableau
de commande de la chaudière il faudra prévoir
un interrupteur avec des fusibles de protection.
T
R
S
C
Thermomètre
Réarmement manuel
Voyant blocage brûleur
Compteur horaire (Option)
ATTENTION
Pour le branchement électrique de chaudières
ayant une puissance nominale supérieure à
300.000 Kcal/h, l'installateur doit prévoir un 2ème
thermostat de sécurité.6.4 Schéma électrique
pour brûleur et pompe monophasé (Fig. 17)
FR
7.2 Schéma électrique pour brûleur et pompe monophasé (Fig. 17)
APP. CONTRÔLE BRULEUR AVEC
SIG. DE START COMPTEUR HORAIRE
+ SIGNAL BLOCAGE BRULEUR.
CONNECTEUR RACCORDEMENT BRULEUR
2ème flamme
Fig. 17
Légende
IG
TS
TM
TA
IB
SB
Interrupteur général
Thermostat sécurité 110°C
Thermostat température minimum 45°C
Thermostat d'ambiance
Interrupteur brûleur
Voyant blocage brûleur
SL
Ch
PI
IPi
TR1-TR2
Voyant de ligne
Compteur horaire
Pompe installation
Interrupteur Pompe Installation
Thermostat 2 allures 1ère-2ème allure
(30°-90C Δt 1ère-2ème allure = 7°C)
- 29 -
F4/K4
Raccordement Régulateur
température RVP
L
Bornes Bornier
N
de raccordement
3-20
8. SCHEMA DE PRINCIPE - INSTALLATION
POUR CHAUFFAGE ET PRODUCTION D'EAU
SANITAIRE (Fig. 18)
Les composants de l'installation doivent être
choisis et montés par l'installateur, selon les
règles de l'art et la réglementation en vigueur.
Les installations chargées avec de l'antigel exigent l'emploi de disconnecteurs hydrauliques.
Rappelons que le schéma Fig. 18 est un schéma de principe. En cas d'installations différentes, nous vous prions de contacter notre SAV
qui vous fournira tous les renseignements
nécessaires.
Légende
A Départ installation
B Retour installation
1 Générateur de chaleur
2 Brûleur muni de soupapes d'arrêt et réglage
3 Bouilleur
4 Collecteurs installation
5 Vannes de sectionnement
6 Pompe de circulation
7 Clapets de non retour
8 Vase d'expansion installation
9 Purgeur automatique
10 Vanne de sécurité
11 Filtre adoucisseur
12 Remplissage installation
13 Vanne d'arrêt combustible
9. MISE EN SERVICE
- Le brûleur a été installé selon les instructions
données dans la notice du fabricant.
- La tension et la fréquence du réseau sont
compatibles avec le brûleur et l'équipement
électrique de la chaudière.
- L'installation est en mesure d'absorber la
quantité de chaleur qui sera produite.
- La pompe de recirculation est installée selon
le par. 5.5.5.
9.1 Contrôles préalables
Lorsque les raccordements hydrauliques, électriques et du combustible sur la chaudière sont terminés, avant la mise en service contrôler que:
- Le vase d'expansion et la vanne de sécurité
(si nécessaire) sont raccordés correctement et
ne peuvent pas être fermés.
- Les bulbes des thermostats de fonctionnement,
de sécurité, de température minimale et du
thermomètre sont bloqués dans leurs gaines.
- Les turbulateurs sont positionnés dans tous
les tubes fumées.
- L'installation est remplie d'eau et complètement désaérée.
- La pompe ou les pompes fonctionnent normalement.
- Les raccordements hydrauliques, électriques
et des sécurités nécessaires ainsi que les raccordements du combustible ont été exécutés
conformément aux réglementations locales et
nationales en vigueur.
10. ENTRETIEN
10.1 Normes générales
L'entretien périodique est essentiel pour la
sécurité, le rendement et la durée de l'appareil.
Toutes les opérations doivent être exécutées
par un chauffagiste qualifié. Avant toute opération de nettoyage et d'entretien fermer l'alimentation en combustible, après avoir coupé
le courant. Pour obtenir un bon fonctionnement et un rendement maximal de la chaudière, il est nécessaire de nettoyer régulièrement
la chambre de combustion, les tubes de
fumée et la boîte à fumée.
10.2 Entretien
L'entretien doit être établi selon le combustible
utilisé, le nombre d'allumages, les caractéristiques de l'installation etc. il n'est donc pas possible de fixer à priori une fréquence d'entretien.
Selon le combustible nous conseillons un
nettoyage:
- Chaudières au gaz: une fois par an
- Chaudières au mazout: deux fois par an
- Chaudières au fioul:
toutes les 300 heures de fonctionnement
Dans tous les cas il faut respecter la réglementation locale en matière d'entretien des chaudières. Pendant les opérations d'entretien ordinaire, après avoir retiré les turbulateurs, il faudra
ramoner le faisceau de tubes et le foyer.
9.2 Première mise en service
Lorsque les contrôles indiqués au paragraphe
précédent ont été effectués, on peut procéder
au premier allumage du brûleur qui doit être
effectué par un technicien agréé par le fabricant
du brûleur. Le technicien est chargé du tarage
dans la plage de puissance déclarée et homologuée de la chaudière. Après avoir ouvert les
robinets d'arrêt du combustible et contrôlé qu'il
n'y a pas de fuite sur le réseau d'adduction,
mettre tous les interrupteurs sur ON (allumé).
Le brûleur est ainsi prêt pour le premier allumage et pour le réglage réservé au technicien
Éliminer les dépôts qui se accumulés dans la
boîte à fumée à travers l'ouverture des trappes
d'inspection. En cas d'actions plus énergiques
enlever la boîte à fumée arrière et, si elle est
abîmée, remplacer le joint d'étanchéité fumées.
Contrôler que l'évacuation des condensats ne
soit pas bouché. Il faudra vérifier le bon fonctionnement des organes de contrôle et de
mesure au service du générateur. À cette occasion il faudra mesurer la quantité d'eau d'appoint utilisée, après avoir analysé l'eau, détartrer. Les sels de calcium et de magnésium dissous dans l'eau brute, avec des appoints
répétés, produisent des dépôts dans la chaudière et provoquent une surchauffe des tôles pouvant entraîner des dommages qui ne peuvent
pas être attribués aux matériaux ou à la technique de construction, et qui ne sont donc pas
couverts par la garantie. Après avoir effectué
les opérations d'entretien et de nettoyage puis
avoir allumé la chaudière, vérifier l'étanchéité de
la porte et de la boîte à fumée, en cas de fuites
de produits de combustion, remplacer les joints.
Les opérations effectuées devront être
notées dans le livret central.
10.3 Entretien extraordinaire
Entretien extraordinaire en fin de saison ou en
cas de longues périodes d'inactivité.
Il faudra exécuter toutes les opérations décrites
dans le chapitre précédent plus:
- 30 -
14
15
16
17
18
19
20
21
22
23
24
25
26
27
28
Stabilisateur de pression gaz
Vanne d'arrêt manuelle
Filtre gaz
Manchon antivibratoire
Pompe
Manomètre
Thermostat de sécurité
Thermostat de réglage
Vanne à trois voies
Pressostat à réarmement manuel
Contrôleur de débit
Thermostat de régulation
Thermostat à réarmement manuel
Doigt de gant mesure température
Vanne de régulation de température
agréé. Pendant le premier allumage il faudra
vérifier que la porte, la bride du brûleur et les
raccordements avec la cheminée sont étanches et que la base du conduit de cheminée a
une légère dépression.
Le débit de combustible devra correspondre aux
caractéristiques indiquées sur la plaque signalétique de la chaudière et il ne devra pour aucune
raison excéder la puissance maximale déclarée.
La température des fumées ne devra jamais
être inférieure à 160°C.
9.3 Arrêt de la chaudière
- Régler le thermostat d'exercice au minimum.
- Couper le courant au brûleur et fermer l'alimentation du combustible.
- Laisser fonctionner les pompes jusqu'à ce
qu'elles soient arrêtées par le thermostat de
température minimale.
- Couper le courant au tableau électrique.
- Contrôler l'usure des turbulateurs.
- Après le nettoyage du circuit de fumées il faut
passer un linge mouillé d'une solution diluée de
soude caustique. Après avoir laissé sécher,
repasser sur toutes les surfaces avec un chiffon
imprégné d'huile.
- Il est conseillé de placer à l'intérieur du foyer
des substances hygroscopiques (chaux vive,
gel de silice dans de petits sachets) et fermer
enfin hermétiquement de façon à ce que l'air
n'entre pas.
- Ne pas vider l'installation et la chaudière
- Protéger avec de la graisse graphitée les vis,
écrous et axes de la porte.
Les opérations effectuées devront être
notées dans le livret central.
10.4 Nettoyage de la chaudière (Fig. 19)
Pour nettoyer la chaudière procéder comme suit:
- Ouvrir la porte avant (1) et retirer les turbulateurs (2).
- Nettoyer l'intérieur de la chambre de combustion et du parcours fumées à l'aide d'un goupillon (3) ou tout autre outil adapté.
- Eliminer les dépôts qui se sont accumulés
dans la boîte à fumée à travers la trappe d'inspection (4). En cas d'actions plus énergiques
retirer la fermeture de la boîte à fumée (5) et
remplacer le joint avant de la remonter.
- Contrôler périodiquement que l'évacuation des
condensats (6) n'est pas bouchée.
10.5 Vérification du fonctionnement de la
chaudière
Avant l'allumage et l'essai fonctionnel de la
chaudière vérifier que:
- le turbulateurs sont positionnés contre les
tubes d'échange.
- Les robinets du circuit hydraulique et du combustible sont ouverts.
- Qu'il y a du combustible.
- Le vase d'expansion est chargé correctement.
- La pression, à froid, du circuit hydraulique est
supérieure à 1 bar et inférieure à la limite
maximale prévue pour la chaudière.
- Les circuits hydrauliques sont désaérés.
- Les raccordements électriques au réseau d'alimentation et des composants (brûleur,
pompe, tableau de commandes, thermostats
etc.) ont été réalisés.
- Le raccordement phase-neutre doit être absolument respecté, le raccordement à la terre est
obligatoire.
Après avoir effectué toutes les opérations ci-dessus, pour mettre la chaudière en marche il faut:
- Si l'installation est munie d'un régulateur thermique ou d'un chrono-thermostat(s) vérifier
qu'il(ils) est(sont) "actif(s)".
- Régler le(les) chrono-thermostat(s) d'ambiance ou le régulateur thermique à la température
voulue.
- Positionner l'interrupteur général de l'installation sur "allumé".
- Régler le thermostat chaudière placé sur le
tableau de commandes.
- Positionner l'interrupteur principal du tableau
de commandes sur "on" et vérifier que le
voyant vert s'éclaire.
La chaudière effectue la phase d'allumage et
reste en marche tant que les températures programmées ne sont atteintes. Si des anomalies
d'allumage ou de fonctionnement se produisent
la chaudière effectue un "ARRET AVEC BLOCAGE" signalé par le voyant rouge placé sur le
brûleur et le voyant rouge sur le tableau de commandes. Après un "ARRET AVEC BLOCAGE"
attendre 30 secondes avant de rétablir les conditions de mise en marche. Pour rétablir les conditions de mise en marche appuyer sur le "bouton/témoin" du brûleur et attendre que la flamme
s'allume. En cas d'insuccès cette opération peut
être répétée 2 à 3 fois maximum, puis vérifier:
- Ce que prévoit la notice d'instructions du brûleur.
- Le chapitre "VERIFICATION DU FONCTIONNEMENT DE LA CHAUDIERE".
- Les raccordements électriques prévus par le
schéma avec le tableau de commande.
Lorsque la chaudière est en marche il faut vérifier que l'appareil exécute un arrêt suivi d'une
remise en marche:
- 31 -
- en modifiant le tarage du thermostat de la
chaudière.
- En intervenant sur l'interrupteur principal du
tableau de commande.
- En intervenant sur le thermostat d'ambiance
ou sur le programmateur ou sur la thermorégulation.
- En vérifiant que les circulateurs tournent librement et correctement.
- En vérifiant l'arrêt total de la chaudière en
intervenant sur l'interrupteur général de
l'installation.
Si toutes les conditions sont respectées, remettre l'appareil en marche, contrôler la combustion
(analyse des fumées), le débit du combustible
et l'étanchéité des joints de la porte et de la
boîte à fumée.
10.6 Vérification du fonctionnement du brûleur
- Consulter la notice d'instructions du brûleur.
- Respecter toutes les réglementations locales
en matière d'entretien du brûleur.
10.7 Pannes possibles et remèdes
Voici une liste des principales pannes ou anomalies qui peuvent se produire pendant le fonctionnement de la chaudière, avec les causes
possibles et les remèdes.
FR
ANOMALIE
LA CHAUDIERE S'ENCRASSE FACILEMENT
CAUSE:
Brûleur mal réglé
REMEDE:
Contrôler le réglage brûleur (analyses fumées)
Conduit de cheminée bouché
Nettoyer le parcours fumées et le conduit de cheminée
Parcours air brûleur sale
Nettoyer volute air brûleur
LA CHAUDIERE NE MONTE PAS EN TEMPERATURE
CAUSE:
Corps chaudière sale
REMEDE:
Nettoyer parcours fumées
Association chaudière/brûleur
Contrôler données et réglages
Débit brûleur insuffisant
Contrôler réglage brûleur
Thermostat de régulation
Vérifier le bon fonctionnement
Vérifier la température programmée
LA SECURITE THERMIQUE DE LA CHAUDIERE SE DECLENCHE ET UN SIGNAL LUMINEUX S'ALLUME
SUR LE TABLEAU DE COMMANDE
CAUSE:
Thermostat de régulation
REMEDE:
Vérifier le bon fonctionnement
Vérifier la température programmée
Vérifier le câblage électrique
Vérifier les bulbes sondes
Manque d'eau
Vérifier la pression du circuit
Présence d'air
Vérifier le purgeur
LA CHAUDIERE A ATTEINT L A TEMPERATURE MAIS LE SYSTEME CHAUFFANT EST FROID
CAUSE:
Présence d'air dans l'installation
REMEDE:
Purger l'installation
Circulateur en panne
Débloquer le circulateur
Thermostat de température minimale (si présent)
Vérifier la température programmée
ODEUR DE PRODUITS IMBRULES
CAUSE:
Dispersion de fumées dans le local
REMEDE:
Vérifier que le corps générateur est propre
Vérifier que le conduit de fumées est propre
Vérifier que le générateur, le conduit fumées
et le conduit de cheminée sont hermétiques.
FREQUENT DECLENCHEMENT DE LA SOUPAPE DE SECURITE
CAUSE:
Pression circuit installation
REMEDE:
Vérifier pression de charge
Vérifier circuit installation
Vérifier tarage
Vérifier température programmée
Vase d'expansion installation
Vérifier
- 32 -
FR
- 33 -
ÍNDICE
1.
2.
3.
4.
5.
6.
7.
8.
9.
10.
Presentación . . . . . . . . . . . . . . . . . . . . . . . . . . . . . . . . . . . . . . . . . . . . . . . . . . . . . . . . . . . . . . . . . . . . . . . . . . . . . . . . . . . . . . . . . . . . . . . . . . . . . . pág. 35
Advertencias generales . . . . . . . . . . . . . . . . . . . . . . . . . . . . . . . . . . . . . . . . . . . . . . . . . . . . . . . . . . . . . . . . . . . . . . . . . . . . . . . . . . . . . . . . . . . . . . pág. 35
Certificación . . . . . . . . . . . . . . . . . . . . . . . . . . . . . . . . . . . . . . . . . . . . . . . . . . . . . . . . . . . . . . . . . . . . . . . . . . . . . . . . . . . . . . . . . . . . . . . . . . . . . . . pág. 35
Características técnicas, de fabricación y medidas . . . . . . . . . . . . . . . . . . . . . . . . . . . . . . . . . . . . . . . . . . . . . . . . . . . . . . . . . . . . . . . . . . . . . . . . . pág. 35
4.1 Descripción del aparato . . . . . . . . . . . . . . . . . . . . . . . . . . . . . . . . . . . . . . . . . . . . . . . . . . . . . . . . . . . . . . . . . . . . . . . . . . . . . . . . . . . . . . . . . . pág. 35
4.2 Principio de funcionamiento . . . . . . . . . . . . . . . . . . . . . . . . . . . . . . . . . . . . . . . . . . . . . . . . . . . . . . . . . . . . . . . . . . . . . . . . . . . . . . . . . . . . . . . pág. 35
4.3 Datos técnicos . . . . . . . . . . . . . . . . . . . . . . . . . . . . . . . . . . . . . . . . . . . . . . . . . . . . . . . . . . . . . . . . . . . . . . . . . . . . . . . . . . . . . . . . . . . . . . . . . pág. 35
4.4 Identificación . . . . . . . . . . . . . . . . . . . . . . . . . . . . . . . . . . . . . . . . . . . . . . . . . . . . . . . . . . . . . . . . . . . . . . . . . . . . . . . . . . . . . . . . . . . . . . . . . . pág. 35
Instalación . . . . . . . . . . . . . . . . . . . . . . . . . . . . . . . . . . . . . . . . . . . . . . . . . . . . . . . . . . . . . . . . . . . . . . . . . . . . . . . . . . . . . . . . . . . . . . . . . . . . . . . . . pág. 37
5.1 Embalaje . . . . . . . . . . . . . . . . . . . . . . . . . . . . . . . . . . . . . . . . . . . . . . . . . . . . . . . . . . . . . . . . . . . . . . . . . . . . . . . . . . . . . . . . . . . . . . . . . . . . . pág. 37
5.2 Manipulación . . . . . . . . . . . . . . . . . . . . . . . . . . . . . . . . . . . . . . . . . . . . . . . . . . . . . . . . . . . . . . . . . . . . . . . . . . . . . . . . . . . . . . . . . . . . . . . . . . pág. 37
5.3 Local de instalación de la caldera . . . . . . . . . . . . . . . . . . . . . . . . . . . . . . . . . . . . . . . . . . . . . . . . . . . . . . . . . . . . . . . . . . . . . . . . . . . . . . . . . . pág. 37
5.4 Evacuación de los productos de combustión . . . . . . . . . . . . . . . . . . . . . . . . . . . . . . . . . . . . . . . . . . . . . . . . . . . . . . . . . . . . . . . . . . . . . . . . . . pág. 37
5.5 Conexiones hidráulicas . . . . . . . . . . . . . . . . . . . . . . . . . . . . . . . . . . . . . . . . . . . . . . . . . . . . . . . . . . . . . . . . . . . . . . . . . . . . . . . . . . . . . . . . . . pág. 37
5.5.1 Agua de alimentación . . . . . . . . . . . . . . . . . . . . . . . . . . . . . . . . . . . . . . . . . . . . . . . . . . . . . . . . . . . . . . . . . . . . . . . . . . . . . . . . . . . . . . . pág. 37
5.5.2 Tuberías de descarga/regreso instalación . . . . . . . . . . . . . . . . . . . . . . . . . . . . . . . . . . . . . . . . . . . . . . . . . . . . . . . . . . . . . . . . . . . . . . . pág. 37
5.5.3 Tuberías de llenado/descarga instalación . . . . . . . . . . . . . . . . . . . . . . . . . . . . . . . . . . . . . . . . . . . . . . . . . . . . . . . . . . . . . . . . . . . . . . . pág. 37
5.5.4 Tuberías vaso de expansión y válvula de seguridad . . . . . . . . . . . . . . . . . . . . . . . . . . . . . . . . . . . . . . . . . . . . . . . . . . . . . . . . . . . . . . . pág. 37
5.5.5 Bomba de recirculación . . . . . . . . . . . . . . . . . . . . . . . . . . . . . . . . . . . . . . . . . . . . . . . . . . . . . . . . . . . . . . . . . . . . . . . . . . . . . . . . . . . . . pág. 38
5.6 Puerta anterior apertura y regulación . . . . . . . . . . . . . . . . . . . . . . . . . . . . . . . . . . . . . . . . . . . . . . . . . . . . . . . . . . . . . . . . . . . . . . . . . . . . . . . . pág. 38
5.7 Montaje del quemador . . . . . . . . . . . . . . . . . . . . . . . . . . . . . . . . . . . . . . . . . . . . . . . . . . . . . . . . . . . . . . . . . . . . . . . . . . . . . . . . . . . . . . . . . . . pág. 38
5.8 Conexión piloto control llama . . . . . . . . . . . . . . . . . . . . . . . . . . . . . . . . . . . . . . . . . . . . . . . . . . . . . . . . . . . . . . . . . . . . . . . . . . . . . . . . . . . . . . pág. 38
5.9 Montaje revestimiento de paneles mod. 92÷300 . . . . . . . . . . . . . . . . . . . . . . . . . . . . . . . . . . . . . . . . . . . . . . . . . . . . . . . . . . . . . . . . . . . . . . . pág. 38
5.10 Montaje revestimiento de paneles mod. 350÷1060 . . . . . . . . . . . . . . . . . . . . . . . . . . . . . . . . . . . . . . . . . . . . . . . . . . . . . . . . . . . . . . . . . . . . . pág. 38
Conexión eléctrica . . . . . . . . . . . . . . . . . . . . . . . . . . . . . . . . . . . . . . . . . . . . . . . . . . . . . . . . . . . . . . . . . . . . . . . . . . . . . . . . . . . . . . . . . . . . . . . . . . . pág. 39
Panel de mando . . . . . . . . . . . . . . . . . . . . . . . . . . . . . . . . . . . . . . . . . . . . . . . . . . . . . . . . . . . . . . . . . . . . . . . . . . . . . . . . . . . . . . . . . . . . . . . . . . . pág. 39
7.1 Descripción de las funciones . . . . . . . . . . . . . . . . . . . . . . . . . . . . . . . . . . . . . . . . . . . . . . . . . . . . . . . . . . . . . . . . . . . . . . . . . . . . . . . . . . . . . . pág. 39
7.2 Esquema eléctrico para quemador y bomba monofásico . . . . . . . . . . . . . . . . . . . . . . . . . . . . . . . . . . . . . . . . . . . . . . . . . . . . . . . . . . . . . . . . pág. 39
Esquema de principio - instalación para calefacción y producción de agua sanitaria . . . . . . . . . . . . . . . . . . . . . . . . . . . . . . . . . . . . . . . . . . . . . . . . pág. 40
Puesta en marcha . . . . . . . . . . . . . . . . . . . . . . . . . . . . . . . . . . . . . . . . . . . . . . . . . . . . . . . . . . . . . . . . . . . . . . . . . . . . . . . . . . . . . . . . . . . . . . . . . . . pág. 40
9.1 Controles preliminares . . . . . . . . . . . . . . . . . . . . . . . . . . . . . . . . . . . . . . . . . . . . . . . . . . . . . . . . . . . . . . . . . . . . . . . . . . . . . . . . . . . . . . . . . . . pág. 40
9.2 Primer encendido . . . . . . . . . . . . . . . . . . . . . . . . . . . . . . . . . . . . . . . . . . . . . . . . . . . . . . . . . . . . . . . . . . . . . . . . . . . . . . . . . . . . . . . . . . . . . . . pág. 40
9.3 Apagado de la caldera . . . . . . . . . . . . . . . . . . . . . . . . . . . . . . . . . . . . . . . . . . . . . . . . . . . . . . . . . . . . . . . . . . . . . . . . . . . . . . . . . . . . . . . . . . . pág. 41
Mantenimiento . . . . . . . . . . . . . . . . . . . . . . . . . . . . . . . . . . . . . . . . . . . . . . . . . . . . . . . . . . . . . . . . . . . . . . . . . . . . . . . . . . . . . . . . . . . . . . . . . . . . . . pág. 41
10.1 Normas generales . . . . . . . . . . . . . . . . . . . . . . . . . . . . . . . . . . . . . . . . . . . . . . . . . . . . . . . . . . . . . . . . . . . . . . . . . . . . . . . . . . . . . . . . . . . . . . pág. 41
10.2 Mantenimiento ordinario . . . . . . . . . . . . . . . . . . . . . . . . . . . . . . . . . . . . . . . . . . . . . . . . . . . . . . . . . . . . . . . . . . . . . . . . . . . . . . . . . . . . . . . . . . pág. 41
10.3 Mantenimiento extraordinario . . . . . . . . . . . . . . . . . . . . . . . . . . . . . . . . . . . . . . . . . . . . . . . . . . . . . . . . . . . . . . . . . . . . . . . . . . . . . . . . . . . . . . pág. 41
10.4 Limpieza de la caldera . . . . . . . . . . . . . . . . . . . . . . . . . . . . . . . . . . . . . . . . . . . . . . . . . . . . . . . . . . . . . . . . . . . . . . . . . . . . . . . . . . . . . . . . . . . pág. 41
10.5 Verificación del funcionamiento de la caldera . . . . . . . . . . . . . . . . . . . . . . . . . . . . . . . . . . . . . . . . . . . . . . . . . . . . . . . . . . . . . . . . . . . . . . . . . pág. 41
10.6 Verificación del funcionamiento del quemador . . . . . . . . . . . . . . . . . . . . . . . . . . . . . . . . . . . . . . . . . . . . . . . . . . . . . . . . . . . . . . . . . . . . . . . . pág. 41
10.7 Posibles averías y soluciones . . . . . . . . . . . . . . . . . . . . . . . . . . . . . . . . . . . . . . . . . . . . . . . . . . . . . . . . . . . . . . . . . . . . . . . . . . . . . . . . . . . . . pág. 42
- 34 -
1. PRESENTACIÓN
Estimado cliente,
Le damos las gracias por haber elegido una caldera PREX W.
Este manual se ha elaborado para informarle,
con advertencias y consejos, sobre la instala-
ción, uso correcto y mantenimiento de la caldera. Le rogamos que lo lea atentamente y lo
guarde para consultas posteriores. Por su propio interés le invitamos a seguir y observar
atentamente las instrucciones que se dan en el
presente manual para poder disfrutar plena-
mente de este producto de alta calidad.
El incumplimiento y la no observación de cuanto
figura en el presente manual exoneran a la
empresa fabricante de cualquier responsabilidad e invalidan la garantía.
2. ADVERTENCIAS GENERALES
- El manual de instrucciones forma parte del
producto y proporciona una descripción de
todo aquello que se debe observar en la fase
de instalación, uso y mantenimiento.
- Este aparato debe destinarse sólo al uso para
el que ha sido expresamente previsto.
- Este aparato sirve para calentar agua a una
temperatura inferior a la de ebullición a la
presión atmosférica y debe unirse a una
instalación de calefacción y/o a una instalación de distribución de agua caliente
para uso sanitario, de acuerdo con sus
características y prestaciones y a la potencia calorífica.
- Antes de la instalación debe comprobarse que
la caldera no haya sufrido ningún daño derivado de la manipulación y el transporte.
- La instalación debe ser realizada por personal
debidamente cualificado y de acuerdo con las
normas vigentes.
- Antes de realizar cualquier operación de limpieza o de mantenimiento, desenchufe el aparato de la red de suministro eléctrico.
- Ferroli S.p.A. no responde de los daños ocasionados a personas y/o a cosas debidos a errores en la instalación, de regulación, de mantenimiento y a usos incorrectos.
- La puesta en marcha de la caldera y de la correspondiente instalación debe ser realizada
por una persona autorizada.
- La primera puesta en marcha tiene por objetivo verificar el buen funcionamiento de todos
los dispositivos de regulación y de control.
- La no utilización del aparato durante un largo
período de tiempo requiere la intervención de
personal cualificado.
el respeto de las condiciones de ventilación
necesarias, que la conexión y la chimenea se
encuentren en perfectas condiciones, las
conexiones del combustible, de las instalaciones eléctricas y otras disposiciones eventuales
por cuanto respecta a la seguridad.
3. CERTIFICACIÓN
La marca CE certifica que los aparatos Ferroli
S.p.A. cumplen con los requisitos contenidos en
las directivas europeas que les son aplicables.
En especial este aparato cumple con las
siguientes directivas CEE:
- Directiva de los aparatos de gas (2009/142/CE)
- Directiva de los rendimientos (92/42 CEE)
- Directiva de la Baja Tensión 73/23 CEE
modificada por la 93/68)
- Directiva de la Compatibilidad Electromagnética
89/336 (modificada por la 93/68)
4. CARACTERÍSTICAS TÉCNICAS,
DE FABRICACIÓN Y MEDIDAS
provistas de 2 conexiones de 1/2” para vainas
porta bulbos (aptas para alojar 3 bulbos cada
una). El panel de mando que ya está precableado
se halla situado sobre la caldera y permite el funcionamiento automático de la misma.
4.4 Identificación
La caldera se puede identificar mediante:
- Sobre portadocumentos
Está pegado a la puerta y contiene:
MANUAL TÉCNICO
CERTIFICADO DE GARANTÍA
ETIQUETAS CON CÓDIGO DE BARRAS
PLACA TÉCNICA
CERTIFICADO DE FABRICACIÓN
(que atestigua el buen resultado de la prueba
hidráulica)
4.1 Descripción del aparato
El tipo de construcción de las calderas de la
serie AR SW garantiza potencia y elevados
rendimientos con bajas temperaturas de
humos, obteniéndose así escasas emisiones
contaminantes. La fabricación sigue la norma
EN 303 parte 1. Los principales elementos técnicos del diseño son:
- el cuidadoso estudio de las geometrías, para
obtener una relación óptima entre los volúmenes de combustión y las superficies de intercambio
- la elección de los materiales usados, para una
larga duración de la caldera.
Las calderas son de combustión presurizada, con
3 pasos de humos, de tipo cilíndrico horizontal
con inversión de llama en el hogar, completamente rodeado por el agua que lo enfria, la llama producida por el quemador se invierte periféricamente hacia la parte anterior, donde los humos entran
en el haz tubular en los que se insertan los turbohélices que crean un recorrido vertiginoso que
aumenta el intercambio térmico por convección. A
la salida del haz tubular los humos se recogen en
la cámara posterior y se encauzan hacia la chimenea. Las calderas están equipadas con una
puerta con bisagra para su apertura hacia la derecha o hacia la izquierda y regulable en altura y
profundidad. El revestimiento estanco del cuerpo
está aislado mediante un grueso colchón de lana
de vidrio recubierto con una capa posterior de
material antiroturas. El acabado externo está formado por paneles de acero barnizado. Los ganchos de elevación se hallan en la parte superior
del revestimiento estanco. Las calderas están
Normativas
El instalador debe respetar la reglamentación
local y vigente en cuanto corresponde a: la
elección del lugar de instalación de la caldera,
4.2 Principio de funcionamiento
Las calderas AR SW están provistas de un hogar
cilíndrico ciego, en la que la llama del quemador
se invierte periféricamente hacia delante y desde
donde los gases de la combustión entran en los
tubos de humos. A la salida, estos se recogen en
la cámarade humos y de ahí se envían a la chimenea. Durante el funcionamiento del quemador
la cámara de combustión siempre está a presión.
Para el conocer el valor de esta presión vea la
tabla de la Pág. 36, en la columna Pérdidas de
carga lado humos. El conducto de humos y la
conexión a la chimenea deben realizarse de
acuerdo con las Normas y la Legislación vigente,
con conductos rígidos, resistentes a la temperatura, el agua de condensación, los esfuerzos mecánicos y la estanquidad. (Fig. 1)
4.3 Datos técnicos - Medidas Conexiones hidráulicas
Pie (Fig. 2 y 3)
1 Cuadro de mandos
2 Brida conexión quemador
3 Puerta de limpieza de la cámara de humos
4 Piloto control llama
T1 Entrada calefacción
T2 Retorno calefacción
T3 Conexión vaso de expansión
T4 Descarga caldera
T5 Conexión chimenea
T6 Conexión quemador
- 35 -
Condiciones de garantía
La validez de la garantía está subordinada a la
observación de las normas y consejos de uso
contenidos en el presente manual. Cualquier
incumplimiento o modificación la hará nula. La
garantía no cubre los daños ocasionados por la
corrosión de condensado ácido de los productos de la combustión o debidos a la formación
de incrustaciones causadas por el uso de aguas
duras o agresivas, ya que sólo son imputables a
la explotación de la instalación.
- Placa técnica
En la placa técnica figuran los datos técnicos
y las prestaciones del aparato (Fig. 4).
Se halla en el sobre portadocumentos y, una
vez finalizada la instalación, el instalador DEBE
COLOCARLA OBLIGATORIAMENTE en la
parte anterior superior de uno de los paneles
laterales de la carcasa, de modo visible.
En caso de pérdida pedir un duplicado al
Servicio técnico de asistencia Ferroli.
La alteración, retirada, falta de placas de identificación o todo aquello que no permita la identificación segura del producto, dificulta las operaciones de instalación y mantenimiento.
Pie (Fig. 4)
1 Sobre porta documentos
ES
AR SW
Potencia nominal
kW
kW
kW
Potencia de la cámara
kW
de combustión
l
Capacidad total de la caldera
Pérdidas de carga lado agua Δt 10°C mbar
Δt 15°C mbar
Δt 20°C mbar
mbar
Pérdidas de carga lado humos
kg
Peso en seco
mm
MEDIDAS
A
mm
B
mm
C
mm
D
mm
E
mm
F
mm
G
mm
H
mm
I
mm
L
mm
L1
mm
M
mm
N
mm
O
mm
P
mm
Q
mm
R
ENTRADA AGUA CALIENTE
DN T1
RETORNO AGUA CALIENTE
DN T2
CONEXIÓN TANQUE DE EXPANSIÓN DN T3
DESCARGA CALDERA
DN T4
SALIDA HUMO
Ø T5
AR SW
Potencia nominal
mín.
máx.
mín.
máx.
kW
kW
kW
Potencia de la cámara
kW
de combustión
l
Capacidad total de la caldera
Pérdidas de carga lado agua Δt 10°C mbar
Δt 15°C mbar
Δt 20°C mbar
mbar
Pérdidas de carga lado humos
kg
Peso en seco
mm
MEDIDAS
A
mm
B
mm
C
mm
D
mm
E
mm
F
mm
G
mm
H
mm
I
mm
L
mm
L1
mm
M
mm
N
mm
O
mm
P
mm
Q
ENTRADA AGUA CALIENTE
DN T1
RETORNO AGUA CALIENTE
DN T2
CONEXIÓN TANQUE DE EXPANSIÓN DN T3
DESCARGA CALDERA
DN T4
SALIDA HUMO
Ø T5
mín.
máx.
mín.
máx.
92
60
92
64,3
99,5
121
8
4
2
0,5
260
760
764
866
165
130
152
515
395
1046
100
121
925
147
150
250
700
740
2”
2”
1” 1/4
3/4”
200
107
70
107
75
116
121
11
6
2,5
0,7
260
760
764
856
165
130
152
515
395
1046
100
121
925
147
150
250
700
740
2”
2”
1” 1/4
3/4”
200
2360
1535
2360
1668
2565
1925
150
70
42
7,2
3900
1610
2772
1810
–
210
250
1005
860
3232
145
195
1950
662
650
1000
1000
150
150
100
1” 1/2
450
152
100
152
107,3
165
186
20
12
5
1,2
350
810
1014
911
165
130
152
545
420
1296
100
121
980
167
230
350
750
990
2” 1/2
2” 1/2
1” 1/2
3/4”
220
190
137
190
147,4
206
186
12
7
3
1,2
350
810
1014
911
165
130
152
545
420
1296
100
121
980
167
230
350
750
990
2” 1/2
2” 1/2
1” 1/2
3/4”
220
240
160
240
170,9
261
232
17
10
4
2,3
440
810
1264
911
165
130
152
545
420
1516
100
121
980
217
330
450
750
1240
2” 1/2
2” 1/2
1” 1/2
3/4”
220
3000
1950
3000
2113
3250
2600
145
65
45
7,5
5300
1800
2976
2000
–
220
250
1100
940
3446
145
195
2140
716
650
1150
1170
200
200
125
1” 1/2
500
300
196
300
209,5
326
304
40
17
9
3,3
480
950
1264
1031
165
150
152
630
495
1546
100
121
1100
217
330
450
890
1240
2” 1/2
2” 1/2
1” 1/2
3/4”
220
350
228
350
277,5
378
362
48
23
13
3,5
550
950
1514
1031
165
150
152
630
495
1816
100
121
1100
217
380
600
890
1490
2” 1/2
2” 1/2
1” 1/2
3/4”
220
399
260
399
364,5
432
337
43
31
16
4,4
590
950
1515
1031
165
150
152
630
485
1817
100
120
1100
218
380
600
890
1491
2” 1/2
2” 1/2
1” 1/2
3/4”
220
3600
2340
3600
2536
3900
2920
190
90
61
8,2
5800
1800
3346
2000
–
220
250
1100
940
3816
145
195
2140
786
650
1450
1170
200
200
125
1” 1/2
500
- 36 -
525
341
525
417
567
405
40
22
12
4,3
860
1060
1516
1181
165
170
152
725
570
1838
100
120
1250
218
380
600
1000
1492
80
80
2”
3/4”
250
600
390
600
495
648
471
51
28
16
4,8
970
1060
1776
1181
165
170
152
725
570
2098
100
120
1250
218
440
700
1000
1752
80
80
2”
3/4”
250
4000
2600
4000
2819
4334
4425
250
120
70
9,5
7500
1980
3596
2180
–
240
250
1190
960
4086
145
195
2325
786
650
1700
1350
200
200
125
1” 1/2
600
720
468
720
502
777
735
32
18
10
4,5
1250
1260
1776
1331
165
170
212
815
615
2158
100
180
1400
228
440
700
1200
1752
100
100
2” 1/2
3/4”
350
820
533
820
566
881
735
40
25
18
5,6
1250
1260
1776
1331
165
170
212
815
615
2158
100
180
1400
218
440
700
1200
1752
100
100
2” 1/2
3/4”
350
940
611
940
651
1011
850
51
25
16
5,4
1420
1260
2016
1331
165
170
212
815
615
2398
100
180
1400
218
480
900
1200
1992
100
100
2” 1/2
3/4”
350
4500
2926
4500
3165
4868
4790
280
135
80
10,5
8000
1980
3946
2180
–
240
250
1190
960
4436
145
195
2325
786
650
2050
1350
200
200
125
1” 1/2
600
1060
689
1060
731
1140
1240
65
33
20
6
1580
1450
2018
1511
165
190
212
900
670
2420
90
178
1580
218
480
900
1390
1994
125
125
3”
3/4”
400
1250
813
1250
884
1359
1240
86
40
25
6,5
2250
1450
2018
1511
165
190
212
900
670
2420
90
178
1580
220
480
900
1390
1994
125
125
3”
3/4”
400
5000
3251
5000
3515
5407
6150
200
85
55
10,8
9600
2180
3948
2380
–
260
250
1290
1015
4458
145
195
2525
786
750
1950
1550
250
250
150
1” 1/2
650
1480
1600 1890
962
1040 1229
1480
1600 1890
1046
1128 1336
1608
1736 2054
1490
1490 1620
110
115
100
55
60
45
32
40
29
6,5
6,8
7
2650
2700 2850
1530
1530 1530
2320
2320 2520
1661
1661 1661
165
165
165
190
190
190
212
212
212
1013
1013 1013
743
743
743
2722
2722 2722
120
120
120
199
199
199
1730
1730 1730
220
220
220
580
580
580
1100
1100 1200
1470
1470 1470
2296
2296 2496
150
150
150
150
150
150
DN100 DN100 DN100
1” 1/2 1” 1/2 1” 1/2
450
450
450
6000
3902
6000
4215
6483
6800
215
105
65
12
11500
2180
4448
2380
–
260
250
1290
1015
4958
145
195
2525
786
750
2450
1550
250
250
150
1” 1/2
650
5. INSTALACIÓN
5.1 Embalaje
Las calderas AR SW modelo 92-1890 se
entregan con: puerta, cámara de humos
montada e aislamiento en el cuerpo, mientras
que el revestimiento se halla en un embalaje
de cartón.
El panel de instrumentos se entrega en una caja
de cartón situada en la cámara de combustión.
Las calderas RSW modelo 2360- 6000 se entregan con aislamiento y carcasa.
El panel de instrumentos se entrega en una caja
de cartón situada en la cámara de combustión.
5.2 Manipulación
Las calderas AR SW están provistas de cáncamo de elevación. Realizar la manipulación con
precaución mediante instrumentos adecuados
para su peso. Antes de colocar la caldera retire
la base de madera desatornillando los tornillos
de fijación (Fig. 5).
5.3 Local de instalación (Fig. 6)
Las calderas AR SW se instalarán en locales
para su uso exclusivo, que respondan a las
Normas técnicas y a la Legislación vigente y
provistos de aperturas de ventilación de medidas adecuadas. La aperturas de ventilación
deberán ser permanentes, comunicando directamente con el exterior y situadas a nivel alto y
bajo de acuerdo con las normativas vigentes. La
ubicación de las aperturas de ventilación, los circuitos de suministro del combustible, de distribución de la energía eléctrica y de iluminación
deberán respetar las disposiciones legales
vigentes en relación con el tipo de combustible
empleado. Para facilitar la limpieza del circuito
de humos, en la parte anterior de la caldera,
deberá dejarse un espacio libre igual o mayor
que la longitud del cuerpo de la caldera y, en
ningún caso inferior a 1.300 mm y deberá verificarse que con la puerta abierta a 90º la distancia
entre la puerta y la pared adyacente (X), sea
como mínimo igual a la longitud del quemador.
El plano de apoyo de la caldera deberá ser
totalmente horizontal. Se recomienda prever un
zócalo de cemento, llano, capaz de soportar el
peso total de la caldera más el contenido de
agua. Para las medidas del zócalo, véase las
cotas R x Q (tabla de medidas). En caso de que
el quemador sea alimentado con gas combustible de peso específico superior al del aire, las
partes eléctricas deberán situarse a una distancia de tierra superior a los 500 mm. El aparato
no se puede instalar al aire libre porque no está
diseñado para funcionar en el exterior y no
dispone de sistemas antihielo automáticos.
COLOCACIÓN EN INSTALACIONES VIEJAS
O POR REMODELAR
Cuando se coloque la caldera en instalaciones
antiguas o por remodelar, verifique que:
- La chimenea sea adecuada para las temperaturas de los productos de la combustión, que
esté calculada y construida de acuerdo con la
normativa vigente, que sea estanca, aislada y
que no haya oclusiones o angosturas.
- La instalación eléctrica se haya realizado de
acuerdo con las Normas vigentes y por personal cualificado.
- La línea de suministro del combustible y el
eventual depósito se hayan realizado de
acuerdo con las normas vigentes.
- El/los vaso/s de expansión aseguran la total
absorción de la dilatación del fluido contenido
en la instalación.
- El caudal, la presión estática y la dirección del
flujo de las bombas de circulación sean
adecuados.
- La instalación esté lavada, limpia de fangos,
incrustaciones, eliminado el aire y que se
hayan verificado las estanquidades.
- Se haya previsto un sistema de tratamiento
del agua de alimentación/reabastecimiento
(véase valores de referencia).
5.4 Evacuación de los productos de combustión
(Fig. 7)
El conducto de humos y la conexión a la chimenea deben realizarse de acuerdo con las Normas
y la Legislación vigente, con conductos rígidos,
resistentes a la temperatura, el agua de condensación, los esfuerzos mecánicos y la estanquidad.
La chimenea debe asegurar la presión negativa
mínima prevista por las normas vigentes, considerando como presión “cero” la conexión con el conducto de humos. La chimenea y los conductos de
humos inadecuados o mal dimensionados pueden
ampliar el ruido de la combustión, generar problemas de condensación e influir negativamente en
los parámetros de combustión. Los conductos de
evacuación no aislados son una fuente de peligro
potencial. La estanquidad de las uniones se realizará con materiales resistentes a temperaturas de
cómo mínimo 250ºC. En el tramo de unión entre la
caldera y la chimenea, se tienen que prever puntos adecuados de medición de la temperatura de
los humos y el análisis de los productos de la combustión. En cuanto a la sección y la altura de la
chimenea, debe hacerse referencia a las reglamentaciones nacionales y locales en vigor.
5.5 Conexiones hidráulicas
5.5.1 Agua de alimentación
Las características químicas del agua de la instalación y de reabastecimiento, son fundamentales
para el buen funcionamiento y la seguridad de la
caldera; se aplicarán al agua los oportunos sistemas de tratamiento. Como valores de referencia
se pueden considerar los que figuran en la tabla.
DUREZA TOTAL
ALCALINIDAD
PH
SÍLICE
CLORUROS
ppm
mg/l CaCO3
ppm
ppm
10
750
8÷9
100
3500
Es absolutamente indispensable el tratamiento
del agua usada para la instalación de calefacción en los siguientes casos:
- Instalaciones muy extendidas
- Agua muy dura
- Frecuentes introducciones de agua de reabastecimiento en la instalación
En caso de que fuera necesario el vaciado parcial o total de la instalación, se recomienda realizar el sucesivo llenado con agua tratada. Para
el control del volumen de los reabastecimientos,
se aconseja instalar un contador sobre la
tubería. Los fenómenos más comunes que se
producen en las instalaciones térmicas son:
- Incrustaciones de cal
La cal se concentra en los puntos donde la temperatura de la pared es mayor. Las incrustaciones
- 37 -
de cal, debido a su baja conductividad térmica,
reducen el intercambio térmico incluso en caso de
la presencia de pocos milímetros, impiden el intercambio térmico entre los humos y el agua, comportando un aumento de la temperatura de las
partes expuestas a la llama y las consiguientes
rupturas (hendiduras) en la placa tubular.
- Corrosión lado agua
La corrosión de las superficies metálicas de la
caldera lado agua se debe al paso del hierro a
solución mediante sus iones. En este proceso
tiene gran importancia la presencia de gases
disueltos y en particular del oxígeno y del
anhídrido carbónico. En presencia de aguas
ablandadas y/o desmineralizadas, se estará
libre del fenómeno de incrustación, pero no
sucede lo mismo con las corrosiones. En este
caso es necesario condicionar el agua con
inhibidores de los procesos corrosivos.
5.5.2 Tuberías de descarga/regreso instalación
Las medidas de las tuberías de descarga y retorno
están indicadas para cada modelo de caldera en
la tabla MEDIDAS. Asegúrese en la instalación
que haya un número suficiente de respiraderos.
Las conexiones de la caldera no deben soportar el
peso de las tuberías de unión a la instalación, por
lo tanto deberá instalar los soportes adecuados.
5.5.3 Tuberías de llenado/descarga instalación
Para el llenado y la descarga de la caldera se
puede conectar un grifo a la conexión T4 que está
en la parte posterior (véase diseño MEDIDAS).
5.5.4 Tuberías vaso de expansión y válvula
de seguridad
Las calderas AR SW son aptas para funcionar con
circulación de agua forzada con vaso de expansión tanto abierto como cerrado. Un vaso de
expansión siempre es necesario, para compensar
el aumento de volumen del agua debido al calentamiento. En el primer caso, la altura de la columna hidrostática deberá ser igual al menos a 3
metros por encima de la carcasa de la caldera y
deberá tener una capacidad tal que contenga,
entre la superficie libre del agua en el vaso y el
tubo del rebosadero, el aumento del volumen de
toda el agua de la instalación. Son preferibles
vasos altos y estrechos de modo que se exponga
al contacto con el aire la menor superficie de agua
posible, reduciéndose así la evaporación. En el
segundo caso, la capacidad del vaso de expansión cerrado se debe calcular teniendo en cuenta:
- el volumen total del agua contenida en la
instalación
- la presión máxima de ejercicio de la instalación
- la presión máxima de ejercicio del vaso de
expansión
- la presión de precarga inicial del vaso de
expansión
- la temperatura máxima de ejercicio de la caldera (la temperatura máxima del termostato montado sobre el panel es de 90ºC. para realizar
este cálculo se recomienda considerar 100ºC).
La tubería de expansión une el vaso de expansión
con la instalación. Esta tubería que partirá de la
conexión T3 (véase tabla Medidas) no deberá tener
ninguna válvula de corte. Instale en la conexión T3
o en la tubería de descarga a 0,5 m de la brida de
partida, una válvula de seguridad adecuada para la
capacidad de la caldera que cumpla las normativas
locales en vigor. Se prohíbe interponer cualquier
tipo de interceptación entre la caldera y las válvulas
ES
de seguridad, y se recomienda que dichas válvulas
estén ajustadas para intervenir cuando se supere la
presión máxima de ejercicio permitida.
5.5.5 Bomba de recirculación (Fig. 8)
La condensación del vapor de agua contenida en los
humos de evacuación de la caldera (agua de condensación) se presenta cuando la temperatura del agua
de retorno es inferior a 55ºC y es considerable sobretodo cuando se enciende por la mañana después que
la caldera ha permanecido apagada durante toda la
noche. El agua de condensación es ácida y corrosiva,
y con el tiempo ataca las chapas de la caldera. Es por
lo tanto deseable la adopción de una bomba de recirculación, con una función de anticondensación, instalada entre las conexiones de descarga y de retorno,
por encima de la eventual válvula mezcladora. La
bomba debe asegurar, durante los períodos de funcionamiento de la instalación, un caudal incluido entre el
20 y el 30% del total, debe garantizar una temperatura
del agua de retorno igual o mayor que 55ºC, mientras
que la presión estática requerida es modesta ya que
sólo debe superar la resistencia de la caldera y la de
las válvulas. Para obtener la temperatura de retorno
de la instalación a fin de dirigir la bomba anticondensación o para manejar las funciones de puesta en régimen en sistemas de termorregulación, es necesario
disponer un sumidero portasonda a una distancia
equivalente a 3÷5 diámetros del tubo de retorno por
encima del punto de empalme hidráulico.
5.6 Puerta anterior apertura y regulación
Para los modelos AR SW 92÷1890 el encaje en
las bisagras, la fijación y la inversión de la abertura de la puerta se realizan de acuerdo con la
fig. 9. Para ello es necesario realizar las
siguientes operaciones:
- La puerta se entrega con cuatro abrazaderas
(pos. 3) y bisagras iguales.
- Para establecer el sentido de abertura
DERECHA o IZQUIERDA desatornille la tuerca (pos. 7), desatornille y retire la tuerca
(pos. 6) DCHA o IZQDA, así obtendremos el
lado de abertura de la puerta.
- La regulación en altura de la puerta se realiza
mediante la tuerca (pos. 2); una vez finalizada la regulación, bloquear los tornillos prisioneros (pos. 1).
- La regulación longitudinal se realiza mediante
el tornillo (pos. 8).
Pie (Fig. 9)
1 Espiga de fijación
2 Tuerca de sostén/regulación puerta
3 Abrazadera bisagra
4 Perno bisagra
5 Tornillo bisagra
6 Tuerca de fijación bisagra
7 Tuerca de fijación
8 Tornillos y tuercas de fijación/regulación
abrazadera bisagra
Para los modelos AR SW 2360÷6000 el encaje
en las bisagras, la fijación y la inversión de la
abertura de la puerta se realizan de acuerdo
con la fig. 10. Para ello es necesario realizar las
siguientes operaciones:
- La puerta se entrega con cuatro bisagras
iguales (pos. 3).
- Para establecer el sentido de abertura DERECHA
o IZQUIERDA desatornille la tuerca (pos. 7), desatornille y retire la tuerca (pos. 6) DCHA o IZQDA,
así obtendremos el lado de abertura de la puerta.
- La regulación en altura de la puerta se realiza me-
diante la tuerca (pos. 2); una vez finalizada la regulación, bloquear los tornillos prisioneros (pos. 1).
Pie (Fig. 10)
1 Espiga de fijación
2 Tuerca de sostén/regulación puerta
3 Abrazadera bisagra
4 Perno bisagra
5 Tornillo bisagra
6 Tuerca de fijación bisagra
7 Tuerca de fijación
5.7 Montaje del quemador (Fig. 11)
El montaje del quemador a la puerta de la caldera, debe garantizar una perfecta estanquidad a
los productos de la combustión. Instalado el quemador sobre la caldera, el espacio entre la tobera del quemador y el material refractario de la
puerta debe rellenarse con el colchón cerámico
(A) suministrado. Esta operación evita el sobrecalentamiento de la puerta que de otro modo se
deformaría irremediablemente. Las conexiones
del combustible al quemador deberán colocarse
de manera que permitan la total apertura de la
puerta de la caldera con el quemador instalado.
AR SW
92-152
190-399
525-600
720-940
1060-1250
1480-1890
2360
3000-3600
4000-4500
5000
6000
L mín. (mm)
230
250
290
320
320
350
350
370
450
500
500
L máx. (mm)
300
320
360
390
390
420
420
450
500
550
550
5.8 Conexión piloto control llama (Fig. 12)
El piloto de control de la llama está provisto de una
toma de presión 1 que debe conectarse mediante un
tubo de silicona o de cobre a la toma situada sobre el
quemador 2. Esta operación permite al aire soplado
por el ventilador enfriar el vidrio del piloto e impedir su
ennegrecimiento. La no conexión del tubo al piloto
puede ocasionar la ruptura del cristal de control.
5.9 Montaje del revestimiento de paneles
mod. 92÷399
Secuencia de montaje (Fig. 13)
a) Colocar los paneles laterales derecho e
izquierdo (pos. 1-2) enganchándolos al soporte
(pos. 13). Para determinar cuál de los dos lados
es el derecho o el izquierdo, referirse al orificio
para la placa pasacables (pos. 6), que debe
hallarse en la parte delantera de la caldera.
b) Fije el panel de mandos al panel superior
(pos. 3).
c) Apoye el panel superior derecho (pos. 3), que
incluye el panel de mandos, al panel lateral
(pos. 1) que incluye muelles, pernos de cierre
y tuercas (pos. 10-11-12).
d) Inserte los bulbos de los instrumentos en las vainas
como se indica en la fig. 20 y realice la conexión eléctrica del panel de mandos a la línea de alimentación, al
quemador y a las eventuales bombas, etc. Se recomienda insertar las sondas hasta el fondo de las correspondientes vainas para mejorar el contacto. Después
bloquear los capilares con los muelles. Vuelva a cerrar
la tapa del cuadro eléctrico, haga pasar el enchufe del
quemador a través de la placa lateral (pos. 6) y bloquee el cable con el pasacables suministrado. Fije la
placa (pos. 6) con los tornillos (pos. 7).
- 38 -
e) Monte el panel superior izquierdo (pos. 4) al
panel lateral izquierdo (pos. 2) que incluye muelles, pernos de cierre y tuercas (pos. 10-11-12).
f) Inserte los bulbos de los instrumentos en las
vainas como se indica en la fig. 13-20 y realice la
conexión eléctrica del panel de mandos a la línea
de alimentación, al quemador y a las eventuales
bombas, etc. Se recomienda insertar las sondas
hasta el fondo de las correspondientes vainas
para mejorar el contacto. Después bloquear los
capilares con los muelles. Vuelva a cerrar la tapa
del cuadro eléctrico, haga pasar el enchufe del
quemador a través de la placa lateral (pos. 9) y
bloquee el cable con el pasacables suministrado.
Fije la placa (pos. 9) con los tornillos (pos. 10).
g) Monte el panel superior (pos. 6) al panel lateral (pos. 3) que incluye muelles, pernos de
cierre y tuercas (pos. 14-15-16).
h) Monte el panel posterior (pos. 8) a la caldera
mediante los tornillos (pos. 13) con las tuercas (pos. 14).
i) Monte el panel anterior (pos. 5) a la puerta mediante
los tornillos (pos. 8) y las tuercas (pos. 9).
l) Fije la placa de datos de la caldera, véase Cap.
1.4, después de haber limpiado y desengrasado
con el disolvente adecuado la zona interesada, y
aplicarla adhiriéndola perfectamente. No retire la
placa porque su adherencia disminuiría.
La placa se halla dentro del sobre porta
documentos.
5.10 Montaje del revestimiento de paneles
mod. 525÷1890
Secuencia de montaje (Fig. 14)
a) Coloque los paneles laterales (pos. 1-2 y 3-4)
enganchándolos a los soportes (pos. 19).
b) Coloque los paneles laterales superiores
derechos (pos. 5-6) y luego los izquierdos (78) enganchándolos a los soportes de la caldera (pos. 19) y a la riostra (pos. 18).
c) Fije el panel de mandos al panel superior
derecho (pos. 5).
d) Apoye el panel superior (pos. 5), que incluye
el panel de mandos, al panel lateral (pos. 1)
que incluye muelles, pernos de cierre y tuercas (pos. 15-16-17).
e) Inserte los bulbos de los instrumentos en las vainas como se indica en la fig. 21 y realice la
conexión eléctrica del panel de mandos a la línea
de alimentación, al quemador y a las eventuales
bombas, etc. Se recomienda insertar las sondas
hasta el fondo de las correspondientes vainas
para mejorar el contacto. Después bloquear los
capilares con los muelles. Vuelva a cerrar la tapa
del cuadro eléctrico, haga pasar el enchufe del
quemador a través de la placa lateral (pos. 11) y
bloquee el cable con el pasacables suministrado.
Fije la placa (pos. 11) con los tornillos (pos. 12).
f) Monte el sostén (pos. 18).
g) Monte los paneles superiores (pos. 5-6-7-8)
enganchándolos a los paneles laterales (pos.
1-2-3-4) que incluye muelles, pernos de cierre y tuercas (15-16-17).
h) Monte los paneles anteriores (pos. 9-10) a la
puerta anterior mediante los tornillos (pos.
14) y las tuercas (pos. 13).
i) Fije la placa de datos de la caldera, véase Cap.
1.4, después de haber limpiado y desengrasado con el disolvente adecuado la zona interesada, y aplicarla adhiriéndola perfectamente. No
retire la placa porque su adherencia disminuiría.
La placa se halla dentro del sobre porta
documentos.
6. CONEXIÓN ELÉCTRICA
Es necesario conectar la caldera a una red de
alimentación de 230 V - 50 Hz monofásica +
tierra respetando las siguientes indicaciones
La instalación debe cumplir las NORMAS EN
VIGOR en materia de seguridad.
- Prever el uso de un interruptor bipolar, disyuntor
de línea, conforme a las normas CEI-EN (apertura de los contactos de cómo mínimo 3 mm)
- Respetar la conexión L (Fase) - N (Neutro)
- Usar cables de sección igual o superior a 1,5 mm2
- Para cualquier intervención de tipo eléctrico
remítase a los esquemas eléctricos de este
manual
- Realice las conexiones de tierra mediante una
instalación eficaz de toma de tierra.
7. PANEL DE MANDO
7.1 Descripción de las funciones
Mediante el interruptor general (11) se pone bajo
tensión el cuadro de mandos y los equipos
conectados al mismo. Los interruptores (12) y
(13) interrumpen a su vez la tensión en el quemador y en la bomba de la instalación. Con el
termostato (21) se regula la temperatura de ejercicio de la caldera. En la fase de puesta en funcionamiento, el termostato de mínima para la
bomba de la instalación hasta que en la caldera
se alcanza una temperatura de 50ºC. En el caso
de quemadores y/o bomba instalación trifásica o
con absorción superior a 3 A, deberán preverse
contactores con mando a distancia entre el cua-
dro de mandos de la caldera y la carga. Sobre la
línea eléctrica de alimentación del cuadro de
mandos de la caldera, deberá preverse un interruptor con fusibles de protección.
T
R
S
C
Termómetro
Rearme manual
Piloto de bloqueo quemador
Cuentahoras (eventual)
ADVERTENCIA
Para la conexión eléctrica de calderas con
una potencia nominal superior a 300.000
kcal/h, el instalador debe disponer un 2º termostato de seguridad.
ES
7.2 Esquema eléctrico para quemador y bomba monofásico (Fig. 17)
EQUIPO CONTROL QUEMADOR
CON SEÑ. INICIO CUENTAHORAS
+ SEÑAL BLOQUEO QUEMADOR
CONECTOR CONEXIÓN QUEMADOR
2ª llama
Fig. 17
Leyenda
IG
TS
TM
TA
IB
SB
Interruptor general
Termostato de seguridad 110°C
Termostato de mínima 45°C
Termostato ambiente
Interruptor quemador
Piloto de bloqueo quemador
SL
Ch
PI
IPi
TR1-TR2
Piloto de línea
Cuentahoras
Bomba instalación
Interruptor Bomba instalación
Termostato 2 fases 1ª- 2ª llama
(30°-90°C Δt 1ª- 2ª llama = 7°C)
- 39 -
F4/K4
Conexión Termorregulación RVP
L
Bornes Caja
N
de Conexiones
3-20
8. ESQUEMA DE PRINCIPIO - INSTALACIÓN
PARA CALEFACCIÓN Y PRODUCCIÓN DE
AGUA SANITARIA (Fig. 18)
La elección e instalación de los componentes de
la instalación se deja en manos del instalador,
que deberá trabajar de modo profesional y de
acuerdo con la legislación vigente. Las instalaciones cargas con antihielo obligan al uso de llaves de corte hidráulicas. Se recuerda que el
esquema de la Fig. 18 es un esquema de principio. En caso de que se trate de otro tipo de instalación, le rogamos que se pongan en contacto
con nuestro Servicio Posventa que le proporcionará todos los elementos que usted necesite.
Pie
A Descarga instalación
B Retorno instalación
1 Generador de calor
2 Quemador que incluye válvulas de bloqueo
y de regulación.
3 Hervidor
4 Colectores instalación
5 Válvulas de seccionamiento
6 Bomba de circulación
7 Válvulas antiretorno
8 Vaso de expansión instalación
9 Válvula de purga automática
10 Válvula de seguridad
11 Filtro ablandador
12 Carga instalación
13
14
15
16
17
18
19
20
21
22
23
24
25
26
27
28
9. PUESTA EN MARCHA
- El voltaje y la frecuencia de red sean compatibles con el quemador y el equipo eléctrico de
la caldera.
- La instalación sea capaz de absorber la cantidad de calor que se producirá.
- La bomba de recirculación esté instalada
como se describe en el apartado 5.5.5.
la regulación que compete únicamente al técnico autorizado. Durante el primer encendido se
deberá verificar que la puerta, la brida del quemador y las conexiones con la chimenea sean
estancas y que la base de la chimenea tenga
una ligera presión negativa. El caudal de combustible deberá corresponder a los datos de la
tarjeta de la caldera y bajo ningún concepto
deberá ser superior al valor máximo de potencia
nominal declarado. La temperatura de los
humos nunca deberá ser inferior a 160ºC.
9.1 Controles preliminares
Realizadas las conexiones hidráulicas, eléctricas y del combustible a la caldera, antes de la
puesta en marcha debe verificarse que:
- El vaso de expansión y la válvula de seguridad (si es necesaria) estén correctamente
conectados y no se puedan interceptar en
modo alguno.
- Los bulbos de los termostatos de ejercicio, de
seguridad de mínima y del termómetro, estén
bloqueados dentro de las respectivas vainas.
- Los turbohélices se hallen situados en todos
los tubos de humos.
- La instalación esté llena de agua y sin nada de aire.
- La bomba o las bombas funcionen regularmente.
- Las conexiones hidráulicas, eléctricas y de
seguridad necesarias y del combustible se
hayan realizado de acuerdo con las disposiciones nacionales y locales en vigor.
- El quemador se haya montado de acuerdo con las
instrucciones que figuran en el manual del fabricante.
10. MANTENIMIENTO
10.1 Normas generales
El mantenimiento periódico es esencial para la
seguridad, el rendimiento y la duración del aparato. Todas las operaciones deben ser realizadas por personal cualificado. Cada operación de
limpieza y de mantenimiento deberá ir precedida
del cierre de la alimentación de combustible,
después de haber quitado la tensión eléctrica.
Para obtener un buen funcionamiento y el máximo rendimiento de la caldera, es necesaria una
limpieza regular de la cámara de combustión, de
los tubos de humos y de la cámara de humos.
10.2 Mantenimiento ordinario
El mantenimiento debe establecerse en base al
combustible usado, el número de encendidos,
las características de la instalación, etc., por lo
que no es posible establecer a priori un intervalo
de tiempo entre un mantenimiento y el siguiente.
Como principio aconsejamos los siguientes intervalos de limpieza según el combustible:
- Calderas de gas: un vez al año
- Calderas de gasóleo: dos veces al año
- Calderas de aceite combustible:
cada 300 horas de funcionamiento
En todos los casos se respetarán las eventuales
normas locales respecto al mantenimiento. Durante
las operaciones de mantenimiento ordinario,
después de haber retirado los turbohélices se
deberá limpiar con el escobillón el haz tubular y el
9.2 Primer encendido
Después de la salida positiva de las comprobaciones que se indican en el párrafo anterior, se
podrá proceder al primer encendido del quemador que deberá ser realizada por un técnico en
servicio y reconocido por la empresa fabricante
del quemador.El técnico asumirá toda la
responsabilidad en cuanto al campo de la regulación dentro del campo de potencia declarado
y homologado de la caldera. Después de haber
abierto los grifos de interceptación del combustible y controlado que no haya pérdidas en la
red de suministro, poner todos los interruptores
en la posición ON (insertado). El quemador está
así preparado para el primer encendido y para
hogar. Retirar los depósitos acumulados en la caja
de humos por la apertura de las puertas de inspección. En caso de acciones más enérgicas retirar la
cámara de humos posterior y, si estuviera deteriorada, sustituir la masilla de estanqueidad de humos.
Controlar que la evacuación del agua de condensación no esté obstruida. Se deberá comprobar el
buen funcionamiento de los órganos de control y de
medición al servicio del generador. En esta ocasión
se deberá registrar la cantidad de agua de reabastecimiento usada, tras haber analizado el agua, realizar un desincrustación preventiva. Las sales de calcio y de magnesio disueltas en el agua ordinaria,
con repetidos rellenados, da origen a depósitos en
la caldera y provocan el sobrecalentamiento de las
chapas con la posibilidad de que se produzcan
daños que no se pueden atribuir ni a los materiales
ni a la técnica de fabricación y que, por lo tanto, no
están cubiertos por la garantía. Después de haber
realizado las operaciones de mantenimiento y limpieza y el siguiente encendido, verificar la estanqueidad de l puerta y de la cámara de humos, en
caso de pérdidas del producto de la combustión,
sustituir la masilla de estanqueidad correspondiente.
Las operaciones realizadas se anotarán en el
cuaderno de central.
10.3 Mantenimiento extraordinario
Mantenimiento extraordinario de final de temporada o para largos períodos de inactividad.
Se deben realizar todas las operaciones descritas en el capítulo precedente y además:
- 40 -
Válvula de corte combustible
Estabilizador de la presión del gas
Válvula de corte manual
Filtro gas
Antivibrantes
Bomba
Manómetro
Termostato de seguridad
Termostato de regulación
Grifo de tres vías
Presostato de rearme manual
Regulador de flujo
Termostato de regulación
Termostato de rearme manual
Sumidero prueba temperatura
Válvula termorreguladora
9.3 Apagado de la caldera
- Regular el termostato de ejercicio al mínimo.
- Quitar tensión al quemador y cerrar la alimentación del combustible.
- Dejar funcionar las bombas hasta que no las
cierre el termostato de mínima.
- Quitar la tensión del cuadro eléctrico.
- Controlar el estado de desgaste de los
turbohélices.
- Después de la limpiar el circuito de humos es
conveniente pasar un paño embebido con una
solución disuelta de sosa cáustica. Después de
haber dejado secar, repasar todas las superficies con un paño embebido en aceite.
- Se recomienda colocar dentro del hogar
sustancias higroscópicas (cal viva, silicogel en
pequeños contenedores) y cerrar herméticamente de manera que no entre aire.
- No vaciar la instalación ni la caldera.
- Proteger con una mezcla de aceite y grafito
los tornillos, tuercas y pernos de la puerta.
Las operaciones realizadas se anotarán en el
cuaderno de central.
10.4 Limpieza de la caldera (Fig. 19)
Para realizar la limpieza proceder del siguiente
modo:
- Abrir la puerta anterior (1) y extraer los tubos
vértex (2).
- Limpiar las superficies internas de la cámara
de combustión y del recorrido de los humos
usando un escobillón (3) u otro utensilio adecuado para dicho fin.
- Retirar los depósitos acumulados en la caja
de humos por la apertura liberada de las puertas de inspección (4). En caso de acciones
más enérgicas retirar el cierre de la caja de
humos (5) sustituyendo la masilla de estanqueidad antes de realizar el montaje.
- Controlar periódicamente que la evacuación del
agua de condensación (6) no esté obstruida.
10.5 Verificación del funcionamiento de la caldera
Antes de realizar el encendido y la prueba funcional de la caldera verificar que:
- los turbohélices se hallen situados contra los
tubos de intercambio.
- Los grifos del circuito hidráulico y los del combustible estén abiertos.
- Que haya combustible disponible.
- El vaso de expansión esté cargado adecuadamente.
- La presión en frío, del circuito hidráulico sea
superior a 1 bar e inferior al límite máximo
previsto por la caldera.
- Los circuitos hidráulicos no contengan aire.
- Se hayan realizado las conexiones eléctricas
a la red de alimentación y de los componentes
(quemador, bomba, cuadro de mandos, termostatos, etc.).
- La conexión fase-neutro debe ser absolutamente respetada, la conexión de tierra es
obligatoria.
Después de haber realizado las operaciones
anteriormente descritas, para poner en marcha
la caldera es necesario:
- si la instalación está provista de termorregulador o de cronotermostato(s) comprobar que
esté(n) en estado “activo”.
- Regular el(los) cronotermostato(s) ambiente(s)
o la termorregulación a la temperatura deseada.
- Colocar el interruptor general de la instalación
en posición “encendido”.
- Regular el termostato de la caldera situado en
el cuadro de mando.
- Colocar el interruptor principal del cuadro de
mandos en “on” y verificar el encendido de la
señalización verde.
La caldera realizará la fase de encendido y permanecerá en funcionamiento hasta que se
alcancen las temperaturas reguladas. en caso
de que se produzcan anomalías de encendido o
de funcionamiento la caldera realizará un
“PARO DE BLOQUEO” señalado por el piloto
rojo situado sobre el quemador y la señalización
roja del cuadro de mando. Después de un
“PARO DE BLOQUEO” esperar aproximadamente 30 segundos antes de restablecer las
condiciones de puesta en marcha, para restablecer las condiciones de puesta en marcha
pulse el "pulsador/piloto" del quemador y espere a que se encienda la llama En caso de que
no funcione se puede repetir esta operación 2 o
3 veces como máximo, luego verificar:
- Lo que figura en el manual de instrucciones
del quemador.
- El capítulo “VERIFICACIÓN DEL FUNCIONAMIENTO DE LA CALDERA”
- Las conexiones eléctricas previstas en el
esquema que se halla junto al cuadro de mando.
Una vez realizada la puesta en marcha se debe
verificar que el aparato realiza un paro y la
sucesiva nueva puesta en marcha:
- 41 -
- Modificando la regulación del termostato de la
caldera.
- Interviniendo en el interruptor principal del
cuadro de mandos.
- Interviniendo en el termostato ambiente o en el
programador horario o en la termorregulación.
- Verificando la libre y correcta rotación de los
circuladores.
- Verificando el paro total de la caldera actuando
sobre el interruptor general de la instalación.
Si se han respetado todas las condiciones, volver a poner en marcha el aparato, realizar un
control de la combustión (análisis de humos), del
caudal del combustible y de la estanqueidad de
la masilla de la puerta y de la cámara de humos.
10.6 Verificación del funcionamiento
del quemador
- Consultar el manual de instrucciones del
quemador.
- Seguir todas las reglas de las normas locales
en materia de mantenimiento del quemador.
10.7 Posibles averías y soluciones
Damos a continuación una lista con las indicaciones de las principales averías y anomalías que se
pueden producir en la gestión de la caldera, especificándose las posibles causas y sus soluciones.
ES
ANOMALÍA
EL GENERADOR SE ENSUCIA FÁCILMENTE
CAUSA:
Quemador mal regulado
SOLUCIÓN:
Controlar la regulación del quemador (análisis de humos)
Chimenea obstruido
Limpiar el recorrido de los humos y la chimenea
Recorrido del aire quemador sucio
Limpiar voluta aire quemador
EL GENERADOR NO CONSIGUE SUBIR LA TEMPERATURA
CAUSA:
Cuerpo del generador sucio
SOLUCIÓN:
Unión generador/quemador
Limpiar el recorrido de los humos
Controlar los datas y las regulaciones
Caudal quemador insuficiente
Controlar la regulación del quemador
Termostato de regulación
Verificar el correcto funcionamiento
Verificar la temperatura programada
EL GENERADOR EFECTUA UN BLOQUEO DE SEGURIDAD TÉRMICA CON SEÑALIZACIÓN LUMINOSA
EN EL CUADRO DE MANDOS
CAUSA:
Termostato de regulación
SOLUCIÓN:
Verificar el correcto funcionamiento
Verificar la temperatura programada
Verificar el cableado eléctrico
Verificar los bulbos de las sondas
Falta de agua
Verificar la presión del circuito
Presencia de aire
Verificar la válvula de purga
EL GENERADOR ADQUIERE TEMPERATURA PERO EL SISTEMA CALEFACTOR ESTÁ FRÍO
CAUSA:
Presencia de aire en la instalación
SOLUCIÓN:
Purgar la instalación
Circulador averiado
Desbloquear el circulador
Termostato de mínima (si existe)
Verificar la temperatura programada
OLORES DE PRODUCTOS NO QUEMADOS
CAUSA:
Dispersión de humos en el ambiente
SOLUCIÓN:
Verificar la limpieza del cuerpo del generador
Verificar la limpieza del conducto de humos
Verificar el carácter hermético del generador,
los conductos de humos y la chimenea.
FRECUENTE INTERVENCIÓN DE LA VÁLVULA DE SEGURIDAD
CAUSA:
Presión del circuito de la instalación
SOLUCIÓN:
Verificar la presión de carga
Verificar el circuito de la instalación
Verificar la regulación
Verificar la temperatura programada
Vaso de expansión de la instalación
Verificar
- 42 -
ES
- 43 -
INHALT
1.
2.
3.
4.
5.
6.
7.
8.
9.
10.
Vorwort . . . . . . . . . . . . . . . . . . . . . . . . . . . . . . . . . . . . . . . . . . . . . . . . . . . . . . . . . . . . . . . . . . . . . . . . . . . . . . . . . . . . . . . . . . . . . . . . . . . . . . . . . . Seite 55
Allgemeine Hinweise . . . . . . . . . . . . . . . . . . . . . . . . . . . . . . . . . . . . . . . . . . . . . . . . . . . . . . . . . . . . . . . . . . . . . . . . . . . . . . . . . . . . . . . . . . . . . . . Seite 55
Bescheinigung . . . . . . . . . . . . . . . . . . . . . . . . . . . . . . . . . . . . . . . . . . . . . . . . . . . . . . . . . . . . . . . . . . . . . . . . . . . . . . . . . . . . . . . . . . . . . . . . . . . . Seite 55
Technische Daten, bauliche Merkmale und Maße . . . . . . . . . . . . . . . . . . . . . . . . . . . . . . . . . . . . . . . . . . . . . . . . . . . . . . . . . . . . . . . . . . . . . . . . . Seite 55
4.1 Beschreibung des Geräts . . . . . . . . . . . . . . . . . . . . . . . . . . . . . . . . . . . . . . . . . . . . . . . . . . . . . . . . . . . . . . . . . . . . . . . . . . . . . . . . . . . . . . . . Seite 55
4.2 Funktionsprinzip . . . . . . . . . . . . . . . . . . . . . . . . . . . . . . . . . . . . . . . . . . . . . . . . . . . . . . . . . . . . . . . . . . . . . . . . . . . . . . . . . . . . . . . . . . . . . . . Seite 55
4.3 Technische Daten . . . . . . . . . . . . . . . . . . . . . . . . . . . . . . . . . . . . . . . . . . . . . . . . . . . . . . . . . . . . . . . . . . . . . . . . . . . . . . . . . . . . . . . . . . . . . . Seite 55
4.4 Kennzeichnung . . . . . . . . . . . . . . . . . . . . . . . . . . . . . . . . . . . . . . . . . . . . . . . . . . . . . . . . . . . . . . . . . . . . . . . . . . . . . . . . . . . . . . . . . . . . . . . . Seite 55
Installation . . . . . . . . . . . . . . . . . . . . . . . . . . . . . . . . . . . . . . . . . . . . . . . . . . . . . . . . . . . . . . . . . . . . . . . . . . . . . . . . . . . . . . . . . . . . . . . . . . . . . . . . Seite 57
5.1 Verpackung . . . . . . . . . . . . . . . . . . . . . . . . . . . . . . . . . . . . . . . . . . . . . . . . . . . . . . . . . . . . . . . . . . . . . . . . . . . . . . . . . . . . . . . . . . . . . . . . . . . Seite 57
5.2 Beförderung . . . . . . . . . . . . . . . . . . . . . . . . . . . . . . . . . . . . . . . . . . . . . . . . . . . . . . . . . . . . . . . . . . . . . . . . . . . . . . . . . . . . . . . . . . . . . . . . . . Seite 57
5.3 Aufstellungsraum des Kessels . . . . . . . . . . . . . . . . . . . . . . . . . . . . . . . . . . . . . . . . . . . . . . . . . . . . . . . . . . . . . . . . . . . . . . . . . . . . . . . . . . . . Seite 57
5.4 Abgasabführung . . . . . . . . . . . . . . . . . . . . . . . . . . . . . . . . . . . . . . . . . . . . . . . . . . . . . . . . . . . . . . . . . . . . . . . . . . . . . . . . . . . . . . . . . . . . . . . Seite 57
5.5 Wasseranschlüsse . . . . . . . . . . . . . . . . . . . . . . . . . . . . . . . . . . . . . . . . . . . . . . . . . . . . . . . . . . . . . . . . . . . . . . . . . . . . . . . . . . . . . . . . . . . . . Seite 57
5.5.1 Speisewasser . . . . . . . . . . . . . . . . . . . . . . . . . . . . . . . . . . . . . . . . . . . . . . . . . . . . . . . . . . . . . . . . . . . . . . . . . . . . . . . . . . . . . . . . . . . . Seite 57
5.5.2 Vor-/Rücklaufleitungen der Anlage . . . . . . . . . . . . . . . . . . . . . . . . . . . . . . . . . . . . . . . . . . . . . . . . . . . . . . . . . . . . . . . . . . . . . . . . . . . . Seite 57
5.5.3 Füll-/Ablaufleitungen der Anlage . . . . . . . . . . . . . . . . . . . . . . . . . . . . . . . . . . . . . . . . . . . . . . . . . . . . . . . . . . . . . . . . . . . . . . . . . . . . . . Seite 57
5.5.4 Leitungen Ausdehnungsgefäß und Sicherheitsventil . . . . . . . . . . . . . . . . . . . . . . . . . . . . . . . . . . . . . . . . . . . . . . . . . . . . . . . . . . . . . . Seite 57
5.5.5 Umwälzpumpe . . . . . . . . . . . . . . . . . . . . . . . . . . . . . . . . . . . . . . . . . . . . . . . . . . . . . . . . . . . . . . . . . . . . . . . . . . . . . . . . . . . . . . . . . . . Seite 58
5.6 Vordere Tür zur Öffnung und Regelung . . . . . . . . . . . . . . . . . . . . . . . . . . . . . . . . . . . . . . . . . . . . . . . . . . . . . . . . . . . . . . . . . . . . . . . . . . . . . Seite 58
5.7 Einbau des Brenners . . . . . . . . . . . . . . . . . . . . . . . . . . . . . . . . . . . . . . . . . . . . . . . . . . . . . . . . . . . . . . . . . . . . . . . . . . . . . . . . . . . . . . . . . . . Seite 58
5.8 Anschluss des Flammenschauglases . . . . . . . . . . . . . . . . . . . . . . . . . . . . . . . . . . . . . . . . . . . . . . . . . . . . . . . . . . . . . . . . . . . . . . . . . . . . . . . Seite 58
5.9 Montage Verkleidung Mod. 92÷300 . . . . . . . . . . . . . . . . . . . . . . . . . . . . . . . . . . . . . . . . . . . . . . . . . . . . . . . . . . . . . . . . . . . . . . . . . . . . . . . . Seite 58
5.10 Montage Verkleidung Mod. 350÷1060 . . . . . . . . . . . . . . . . . . . . . . . . . . . . . . . . . . . . . . . . . . . . . . . . . . . . . . . . . . . . . . . . . . . . . . . . . . . . . . Seite 58
Elektrischer Anschluss . . . . . . . . . . . . . . . . . . . . . . . . . . . . . . . . . . . . . . . . . . . . . . . . . . . . . . . . . . . . . . . . . . . . . . . . . . . . . . . . . . . . . . . . . . . . . . . Seite 59
Schaltfeld . . . . . . . . . . . . . . . . . . . . . . . . . . . . . . . . . . . . . . . . . . . . . . . . . . . . . . . . . . . . . . . . . . . . . . . . . . . . . . . . . . . . . . . . . . . . . . . . . . . . . . . . Seite 59
7.1 Beschreibung der Funktionen . . . . . . . . . . . . . . . . . . . . . . . . . . . . . . . . . . . . . . . . . . . . . . . . . . . . . . . . . . . . . . . . . . . . . . . . . . . . . . . . . . . . . Seite 59
7.2 Schaltplan für brenner und einphasenpumpe . . . . . . . . . . . . . . . . . . . . . . . . . . . . . . . . . . . . . . . . . . . . . . . . . . . . . . . . . . . . . . . . . . . . . . . . . Seite 59
Prinzipschaltbild - Heizungs- und Warmwasserbereitungsanlage . . . . . . . . . . . . . . . . . . . . . . . . . . . . . . . . . . . . . . . . . . . . . . . . . . . . . . . . . . . . . . Seite 60
Inbetriebnahme . . . . . . . . . . . . . . . . . . . . . . . . . . . . . . . . . . . . . . . . . . . . . . . . . . . . . . . . . . . . . . . . . . . . . . . . . . . . . . . . . . . . . . . . . . . . . . . . . . . . Seite 60
9.1 Vor Inbetriebnahme durchzuführende Kontrollen . . . . . . . . . . . . . . . . . . . . . . . . . . . . . . . . . . . . . . . . . . . . . . . . . . . . . . . . . . . . . . . . . . . . . . Seite 60
9.2 Erstmalige Einschaltung . . . . . . . . . . . . . . . . . . . . . . . . . . . . . . . . . . . . . . . . . . . . . . . . . . . . . . . . . . . . . . . . . . . . . . . . . . . . . . . . . . . . . . . . . Seite 60
9.3 Ausschalten des Kessels . . . . . . . . . . . . . . . . . . . . . . . . . . . . . . . . . . . . . . . . . . . . . . . . . . . . . . . . . . . . . . . . . . . . . . . . . . . . . . . . . . . . . . . . Seite 61
Wartung . . . . . . . . . . . . . . . . . . . . . . . . . . . . . . . . . . . . . . . . . . . . . . . . . . . . . . . . . . . . . . . . . . . . . . . . . . . . . . . . . . . . . . . . . . . . . . . . . . . . . . . . . . Seite 61
10.1 Allgemeine Bestimmungen . . . . . . . . . . . . . . . . . . . . . . . . . . . . . . . . . . . . . . . . . . . . . . . . . . . . . . . . . . . . . . . . . . . . . . . . . . . . . . . . . . . . . . . Seite 61
10.2 Planmäßige Wartung . . . . . . . . . . . . . . . . . . . . . . . . . . . . . . . . . . . . . . . . . . . . . . . . . . . . . . . . . . . . . . . . . . . . . . . . . . . . . . . . . . . . . . . . . . . Seite 61
10.3 Außerordentliche Wartung . . . . . . . . . . . . . . . . . . . . . . . . . . . . . . . . . . . . . . . . . . . . . . . . . . . . . . . . . . . . . . . . . . . . . . . . . . . . . . . . . . . . . . . Seite 61
10.4 Reinigung des Heizkessels . . . . . . . . . . . . . . . . . . . . . . . . . . . . . . . . . . . . . . . . . . . . . . . . . . . . . . . . . . . . . . . . . . . . . . . . . . . . . . . . . . . . . . . Seite 61
10.5 Betriebsprüfung des Kessels . . . . . . . . . . . . . . . . . . . . . . . . . . . . . . . . . . . . . . . . . . . . . . . . . . . . . . . . . . . . . . . . . . . . . . . . . . . . . . . . . . . . . Seite 61
10.6 Betriebsprüfung des Brenners . . . . . . . . . . . . . . . . . . . . . . . . . . . . . . . . . . . . . . . . . . . . . . . . . . . . . . . . . . . . . . . . . . . . . . . . . . . . . . . . . . . . Seite 61
10.7 Mögliche Defekte und Abhilfe . . . . . . . . . . . . . . . . . . . . . . . . . . . . . . . . . . . . . . . . . . . . . . . . . . . . . . . . . . . . . . . . . . . . . . . . . . . . . . . . . . . . . Seite 62
- 54 -
1. VORWORT
Verehrter Kunde,
Wir danken Ihnen für Ihre Wahl eines
Heizkessels PREX W.
Dieses Handbuch enthält Informationen, wichtige Hinweise und Ratschläge zur Installation,
2. ALLGEMEINE HINWEISE
- Diese Bedienungsanleitung ist ein wesentlicher Bestandteil des Produkts und enthält die
Beschreibung aller Vorschriften, die bei
Installation, Gebrauch und Wartung zu befolgen sind.
- Dieses Gerät darf nur für den Zweck benutzt
werden, für den es ausdrücklich vorgesehen
wurde.
- Dieses Gerät dient zur Erhitzung von
Wasser auf eine Temperatur unter dem
Siedepunkt bei Luftdruck. Entsprechend
seiner
technischen
Merkmale,
Leistungswerte und Wärmeleistung muss
es mit einer Heizanlage und/oder mit einer
Anlage zur Warmwasserverteilung für
sanitären Gebrauch verbunden werden.
- Vor der Installation sollte der Heizkessel unbedingt auf Transportschäden überprüft werden.
- Die Installation muss von qualifiziertem
Fachpersonal gemäß den geltenden
Bestimmungen ausgeführt werden.
zum korrekten Gebrauch und zur Wartung des
Heizkessels. Bitte lesen Sie es daher aufmerksam durch und bewahren Sie es für späteres
Nachschlagen sorgfältig auf. In Ihrem eigenen
Interesse bitten wir Sie, die darin enthaltenen
Anleitungen strikt zu befolgen, um dieses
- Vor jedem Reinigungs- oder Wartungseingriff
muss das Gerät vom Versorgungsnetz
getrennt werden.
- Die Firma Ferroli S.p.A. haftet nicht für
Personen- und/oder Sachschäden, die durch
fehlerhafte Installation, Regelung und Wartung
sowie durch zweckwidrigen Gebrauch verursacht werden.
- Die Inbetriebnahme des Heizkessels und der
dazugehörenden Anlage muss von einer hierzu befugten und qualifizierten Person vorgenommen werden.
- Die erstmalige Inbetriebnahme dient zur Überprüfung der einwandfreien Funktionstüchtigkeit aller
Regel- und Kontrolleinrichtungen.
- Wenn das Gerät für längere Zeit nicht
benutzt wird, ist der Eingriff von
Fachpersonal erforderlich.
hochwertige Produkt korrekt und zu Ihrer vollen
Zufriedenheit benutzen zu können.
Bei Missachtung der in diesem Handbuch
enthaltenen Anleitungen wird der Hersteller von
jeder Haftung befreit, außerdem verfällt jeder
Garantieanspruch.
Vorschriften
Hinsichtlich der folgenden Punkte muss der
Installateur
die geltenden örtlichen
Bestimmungen befolgen: Wahl des
Aufstellungsorts des Heizkessels, Einhaltung
der erforderlichen Lüftungsbedingungen; perfekte Abdichtung des Anschlusses und des
Kamins; Anschlüsse des Brennstoffs, der elektrischen Anlagen und eventuelle sonstige
Sicherheitsbestimmungen.
Garantiebedingungen
Die Gültigkeit der Garantie ist von der
Befolgung der in diesem Handbuch enthaltenen
Gebrauchsanweisungen und Ratschläge abhängig. Bei jeglicher Missachtung oder Änderung
verfällt jeder Garantieanspruch. Schäden infolge
Korrosion durch saures Abgaskondensat oder
infolge Verkalkung durch Benutzung von hartem
oder aggressivem Wasser sind auf keinen Fall
von der Garantie gedeckt, da sie nur auf die
Betreibung der Anlage zurückzuführen sind.
3. BESCHEINIGUNG
Die CE-Kennzeichnung bürgt dafür, dass die
Geräte von Ferroli S.p.A. den Anforderungen der
anwendbaren europäischen Richtlinien entsprechen. Insbesondere entspricht dieses Gerät fol-
genden EG-Richtlinien:
- Richtlinie über Gasverbrauchseinrichtungen
(2009/142/EWG)
- Richtlinie über die Wirkungsgrade (92/42/EWG)
- Niederspannungsrichtlinie 73/23/EWG
(geändert mit der Richtlinie 93/68/EWG)
- Richtlinie über die elektromagnetische
Verträglichkeit 89/336/EWG
(geändert mit der Richtlinie 93/68/EWG)
4. TECHNISCHE DATEN,
BAULICHE MERKMALE UND MASSE
sind mit 2 1/2"-Anschlüssen für Fühlerhülsen (für
je 3 Fühler) ausgestattet. Die bereits vorverdrahtete Schalttafel befindet sich oberhalb des
Kessels und gestattet den automatischen
Betrieb desselben.
4.4 Kennzeichnung
Der Heizkessel ist folgendermaßen gekennzeichnet:
- Umschlag mit Unterlagen
Dieser ist an der Klappe angebracht und
enthält folgende Unterlagen:
TECHNISCHES HANDBUCH
GARANTIESCHEIN
ETIKETTEN MIT BARCODE
TYPENSCHILD
BAUZEUGNIS
(mit dem das positive Ergebnis der
Wasserdruckprüfung bescheinigt wird)
4.1 Beschreibung des Geräts
Die Bauart der Kessel der Baureihe AR SW garantiert höchste Leistungen und Wirkungsgrade bei
niedrigen Abgastemperaturen, wodurch schadstoffarme Emissionen ermöglicht werden. Die
Konstruktion entspricht der Norm EN 303 Teil 1.
Die bei der Planung berücksichtigten wesentlichen
technischen Elemente sind:
- Akkurate Auslegung der Geometrie zur
Erzielung eines optimalen Verhältnisses zwischen
Verbrennungsvolumen
und
Austauschflächen.
- Wahl der verwendeten Materialien für eine
lange Lebensdauer des Heizkessels.
Die Kessel funktionieren mit Druckverbrennung,
mit Dreizugprinzip, Typ horizontal zylinderförmig
mit wassergekühltem Umkehrfeuerraum; die
vom Brenner erzeugte Flamme überschlägt sich
peripher nach vorn, wo die Abgase in das
Rohrbündel eintreten, in das die Heizgaswirbler
eingebaut sind, die eine wirbelartige Strömung
erzeugen, um den Konvektions-Wärmetausch zu
erhöhen. Die aus dem Rohrbündel austretenden
Abgase werden in der hinteren Kammer aufgefangen und zum Kamin geleitet. Die Kessel sind
mit einer Scharniertür mit Türanschlag rechts
oder links ausgestattet, und in Höhe und Tiefe
verstellbar. Der Mantel des Kesselkörpers ist mit
einer dicken Glaswollmatte isoliert, die mit einer
weiteren Schicht aus reißfestem Material
bedeckt ist. Die Außenverkleidung besteht aus
lackierten Stahlplatten. Die Hubhaken befinden
sich am oberen Teil des Mantels. Die Kessel
4.2 Funktionsprinzip
Die Heizkessel AR SW sind mit einem zylinderförmigen blinden Feuerraum ausgestattet, in dem
sich die Flamme des Brenners peripher zum vorderen Teil überschlägt, wo die Abgase in die
Abgasrohre eintreten. Die austretenden Abgase
werden in der Rauchkammer aufgefangen und von
dort zum Kamin geleitet. Während des
Brennerbetriebs steht die Verbrennungskammer
immer unter Druck. Druckwert siehe Tabelle auf
Seite 56, Spalte abgasseitige Druckverluste. Der
Rauchabzug und der Anschluss am
Schornsteinrohr müssen gemäß den geltenden
Bestimmungen und Rechtsvorschriften mit hitze-,
kondensatbeständigen und dichten Rohrleitungen
ausgeführt werden, die mechanischen
Beanspruchungen standhalten. (Abb. 1)
4.3 Technische Daten - Maße - Wasseranschlüsse
Legende (Abb. 2 und 3)
1 Bedienblende
2 Flansch Brenneranschluss
3 Reinigungstür Rauchkammer
4 Flammenschauglas
T1 Heizungsvorlauf
T2 Heizungsrücklauf
T3 Anschluss Ausdehnungsgefäß
T4 Kesselablass
T5 Kaminanschluss
T6 Brenneranschluss
- 55 -
- Typenschild
Enthält die technischen Daten und
Leistungsmerkmale des Geräts (Abb. 4).
Das Typenschild befindet sich im Umschlag
mit den Unterlagen und MUSS OBLIGATORISCH vom Installateur nach abgeschlossener Installation am oberen Vorderteil
einer der seitlichen Verkleidungen sichtbar
ANGEBRACHT WERDEN. Bei Verlust kann
beim technischen Kundendienst von Ferroli
ein Duplikat angefordert werden.
Durch Verändern, Entfernen, Fehlen des
Typenschilds und immer, wenn die sichere
Identifizierung des Produkts nicht möglich ist,
wird jeder Installations- und Wartungseingriff
erschwert.
Legende (Abb. 4)
1 Umschlag mit Unterlagen
DE
AR SW
Nennleistung
kW
kW
kW
Leistung Feuerraum
kW
l
Gesamtwasserinhalt Kessel
Wasserseitiger Druckverlust Δt 10°C mbar
Δt 15°C mbar
Δt 20°C mbar
mbar
Abgasseitiger Druckverlust
kg
Trockengewicht
mm
ABMESSUNGEN
A
mm
B
mm
C
mm
D
mm
E
mm
F
mm
G
mm
H
mm
I
mm
L
mm
L1
mm
M
mm
N
mm
O
mm
P
mm
Q
mm
R
VORLAUF HEISSWASSER
DN T1
RÜCKLAUF HEISSWASSER
DN T2
ANSCHLUSS AUSDEHNUNGSGEFÄSS DN T3
KESSELAUSTRITT
DN T4
ABGASAUSTRITT
Ø T5
AR SW
Nennleistung
min
max
min
max
kW
kW
kW
Leistung Feuerraum
kW
l
Gesamtwasserinhalt Kessel
Wasserseitiger Druckverlust Δt 10°C mbar
Δt 15°C mbar
Δt 20°C mbar
mbar
Abgasseitiger Druckverlust
kg
Trockengewicht
mm
ABMESSUNGEN
A
mm
B
mm
C
mm
D
mm
E
mm
F
mm
G
mm
H
mm
I
mm
L
mm
L1
mm
M
mm
N
mm
O
mm
P
mm
Q
VORLAUF HEISSWASSER
DN T1
RÜCKLAUF HEISSWASSER
DN T2
ANSCHLUSS AUSDEHNUNGSGEFÄSS DN T3
KESSELAUSTRITT
DN T4
ABGASAUSTRITT
Ø T5
min
max
min
max
92
60
92
64,3
99,5
121
8
4
2
0,5
260
760
764
866
165
130
152
515
395
1046
100
121
925
147
150
250
700
740
2”
2”
1” 1/4
3/4”
200
107
70
107
75
116
121
11
6
2,5
0,7
260
760
764
856
165
130
152
515
395
1046
100
121
925
147
150
250
700
740
2”
2”
1” 1/4
3/4”
200
2360
1535
2360
1668
2565
1925
150
70
42
7,2
3900
1610
2772
1810
–
210
250
1005
860
3232
145
195
1950
662
650
1000
1000
150
150
100
1” 1/2
450
152
100
152
107,3
165
186
20
12
5
1,2
350
810
1014
911
165
130
152
545
420
1296
100
121
980
167
230
350
750
990
2” 1/2
2” 1/2
1” 1/2
3/4”
220
190
137
190
147,4
206
186
12
7
3
1,2
350
810
1014
911
165
130
152
545
420
1296
100
121
980
167
230
350
750
990
2” 1/2
2” 1/2
1” 1/2
3/4”
220
240
160
240
170,9
261
232
17
10
4
2,3
440
810
1264
911
165
130
152
545
420
1516
100
121
980
217
330
450
750
1240
2” 1/2
2” 1/2
1” 1/2
3/4”
220
3000
1950
3000
2113
3250
2600
145
65
45
7,5
5300
1800
2976
2000
–
220
250
1100
940
3446
145
195
2140
716
650
1150
1170
200
200
125
1” 1/2
500
300
196
300
209,5
326
304
40
17
9
3,3
480
950
1264
1031
165
150
152
630
495
1546
100
121
1100
217
330
450
890
1240
2” 1/2
2” 1/2
1” 1/2
3/4”
220
350
228
350
277,5
378
362
48
23
13
3,5
550
950
1514
1031
165
150
152
630
495
1816
100
121
1100
217
380
600
890
1490
2” 1/2
2” 1/2
1” 1/2
3/4”
220
399
260
399
364,5
432
337
43
31
16
4,4
590
950
1515
1031
165
150
152
630
485
1817
100
120
1100
218
380
600
890
1491
2” 1/2
2” 1/2
1” 1/2
3/4”
220
3600
2340
3600
2536
3900
2920
190
90
61
8,2
5800
1800
3346
2000
–
220
250
1100
940
3816
145
195
2140
786
650
1450
1170
200
200
125
1” 1/2
500
- 56 -
525
341
525
417
567
405
40
22
12
4,3
860
1060
1516
1181
165
170
152
725
570
1838
100
120
1250
218
380
600
1000
1492
80
80
2”
3/4”
250
600
390
600
495
648
471
51
28
16
4,8
970
1060
1776
1181
165
170
152
725
570
2098
100
120
1250
218
440
700
1000
1752
80
80
2”
3/4”
250
4000
2600
4000
2819
4334
4425
250
120
70
9,5
7500
1980
3596
2180
–
240
250
1190
960
4086
145
195
2325
786
650
1700
1350
200
200
125
1” 1/2
600
720
468
720
502
777
735
32
18
10
4,5
1250
1260
1776
1331
165
170
212
815
615
2158
100
180
1400
228
440
700
1200
1752
100
100
2” 1/2
3/4”
350
820
533
820
566
881
735
40
25
18
5,6
1250
1260
1776
1331
165
170
212
815
615
2158
100
180
1400
218
440
700
1200
1752
100
100
2” 1/2
3/4”
350
940
611
940
651
1011
850
51
25
16
5,4
1420
1260
2016
1331
165
170
212
815
615
2398
100
180
1400
218
480
900
1200
1992
100
100
2” 1/2
3/4”
350
4500
2926
4500
3165
4868
4790
280
135
80
10,5
8000
1980
3946
2180
–
240
250
1190
960
4436
145
195
2325
786
650
2050
1350
200
200
125
1” 1/2
600
1060
689
1060
731
1140
1240
65
33
20
6
1580
1450
2018
1511
165
190
212
900
670
2420
90
178
1580
218
480
900
1390
1994
125
125
3”
3/4”
400
1250
813
1250
884
1359
1240
86
40
25
6,5
2250
1450
2018
1511
165
190
212
900
670
2420
90
178
1580
220
480
900
1390
1994
125
125
3”
3/4”
400
5000
3251
5000
3515
5407
6150
200
85
55
10,8
9600
2180
3948
2380
–
260
250
1290
1015
4458
145
195
2525
786
750
1950
1550
250
250
150
1” 1/2
650
1480
1600 1890
962
1040 1229
1480
1600 1890
1046
1128 1336
1608
1736 2054
1490
1490 1620
110
115
100
55
60
45
32
40
29
6,5
6,8
7
2650
2700 2850
1530
1530 1530
2320
2320 2520
1661
1661 1661
165
165
165
190
190
190
212
212
212
1013
1013 1013
743
743
743
2722
2722 2722
120
120
120
199
199
199
1730
1730 1730
220
220
220
580
580
580
1100
1100 1200
1470
1470 1470
2296
2296 2496
150
150
150
150
150
150
DN100 DN100 DN100
1” 1/2 1” 1/2 1” 1/2
450
450
450
6000
3902
6000
4215
6483
6800
215
105
65
12
11500
2180
4448
2380
–
260
250
1290
1015
4958
145
195
2525
786
750
2450
1550
250
250
150
1” 1/2
650
5. INSTALLATION
5.1 Verpackung
Bei Lieferung der Kessel AR SW Modell 921890 sind Tür, Rauchkammer und Isolierung
bereits am Kesselkörper montiert, während
die Verkleidung in einem Karton enthalten ist.
Die Bedienblende wird in einem Karton geliefert
und in der Verbrennungskammer verstaut.
Die Kessel AR SW Modell 2360-6000 werden komplett mit Isolierung und
Ummantelung geliefert. Die Bedienblende
wird in einem Karton geliefert und in der
Verbrennungskammer verstaut.
5.2 Beförderung
Die Kessel AR SW werden an den dafür vorgesehenen Ösenschrauben angehoben. Bei der
Beförderung vorsichtig vorgehen und
Förderzeug benutzen, das dem beförderten
Gewicht entspricht. Bevor der Kessel aufgestellt
wird, den Holzsockel durch Lösen der
Befestigungsschrauben entfernen (Abb. 5).
5.3 Aufstellungsraum (Abb. 6)
Die Kessel AR SW werden in eigens hierfür vorgesehenen Räumen aufgestellt, die den technischen
Normen und den geltenden Rechtsvorschriften
entsprechen, und mit angemessenen
Lüftungsöffnungen versehen sind.
Die Lüftungsöffnungen müssen permanent sein,
direkt ins Freie führen und gemäß den geltenden
Bestimmungen oben und unten angebracht sein.
Die Position der Lüftungsöffnungen, die Kreise für
Brennstoffzufuhr, Energieversorgung und
Beleuchtung müssen den für den verwendeten
Brennstoff geltenden Rechtsvorschriften entsprechen. Um die Reinigung des Rauchkreises zu erleichtern, muss an der Vorderseite des Kessels ein
Freiraum gelassen werden, der mindestens so lang
wie der Kesselkörper ist und jedenfalls nicht kleiner
als 1300 mm sein darf. Außerdem muss sichergestellt werden, dass der Abstand zwischen der Tür
und der angrenzenden Wand bei um 90° geöffneter
Tür (X) mindestens der Länge des Brenners entspricht. Die Aufstellfläche des Kessels muss perfekt
eben sein. Es empfiehlt sich, einen ebenen
Zementsockel vorzusehen, der in der Lage ist, das
Gesamtgewicht des Kessels plus Wasserinhalt zu
tragen. Bezüglich der Abmessungen des Sockels
gelten die Maße R x Q (Maßtabelle). Wenn der
Brenner mit Gas befeuert wird, dessen spezifisches
Gewicht höher als das von Luft ist, müssen die elektrischen Teile höher als 500 mm vom Boden angebracht werden. Das Gerät darf nicht im Freien installiert werden, weil es nicht für den Betrieb im
Außenbereich ausgelegt ist und keine automatischen Frostschutzsysteme besitzt.
INSTALLATION IN ALTEN ODER
MODERNISIERUNGSBEDÜRFTIGEN ANLAGEN
Wenn der Kessel in alten oder modernisierungsbedürftigen Anlagen installiert wird, muss auf
folgendes geachtet werden:
- Das Schornsteinrohr muss für die
Temperaturen der Abgase geeignet und
gemäß den geltenden Bestimmungen berechnet und gebaut sein. Außerdem muss es dicht
und isoliert sein und darf keine Verstopfungen
oder Verengungen aufweisen.
- Die elektrische Anlage muss von qualifiziertem
Fachpersonal gemäß den geltenden
Bestimmungen ausgeführt werden.
- Die Brennstoffzufuhrleitung und der eventuelle
-
-
-
Tank müssen gemäß den geltenden
Bestimmungen ausgeführt sein.
Das/die Ausdehnungsgefäß/e muss/müssen die
vollständige Aufnahme der Ausdehnung der in
der Anlage enthaltenen Flüssigkeit gewährleisten.
Durchsatz, Förderhöhe und Strömungsrichtung
der Umwälzpumpen müssen geeignet sein.
Die Anlage muss gesäubert, von Schlämmen
und Verkalkungen befreit und die Dichtungen
überprüft werden.
Es muss ein Aufbereitungssystem für das
Speise-/Nachfüllwasser vorhanden sein (siehe
Bezugswerte).
5.4 Abgasabführung (Abb. 7)
Der Rauchabzug und der Anschluss am
Schornsteinrohr müssen gemäß den geltenden
Bestimmungen und Rechtsvorschriften mit hitze-, kondensatbeständigen und dichten Rohrleitungen
ausgeführt
werden,
die
mechanischen
Beanspruchungen standhalten. Das Schornsteinrohr
muss den von den geltenden Bestimmungen vorgeschriebenen Unterdruck sicherstellen. Dabei gilt
Druckwert "Null" am Anschluss mit Rauchabzug.
Ungeeignete oder falsch bemessene Schornsteinrohre
und Rauchabzüge können die Geräuschentwicklung
bei
der
Verbrennung
verstärken,
Kondensationsprobleme verursachen und negative
Auswirkungen auf die Verbrennungsparameter haben.
Nicht wärmeisolierte Abzugsleitungen sind potenzielle
Gefahrenquellen.
Die
Dichtungen
der
Verbindungsstellen müssen mindestens bis 250°C hitzebeständig sein. Im Abschnitt der Verbindung zwischen Kessel und Schornsteinrohr müssen geeignete
Messstellen für die Abgastemperatur und die -analyse
vorgesehen werden. Was Querschnitt und Höhe des
Kamins betrifft, sind die geltenden nationalen und örtlichen Bestimmungen zu beachten.
5.5 Wasseranschlüsse
5.5.1 Speisewasser
Die chemischen Eigenschaften des Anlagenund des Nachfüllwassers sind von grundlegender Bedeutung für den einwandfreien Betrieb
und die Sicherheit des Kessels und müssen mit
geeigneten Aufbereitungssystemen sichergestellt werden. Die in der Tabelle aufgeführten
Werte dienen als Bezugswerte.
GESAMTWASSERHÄRTE
ALKALITÄT
PH
KIESELSÄURE
CHLORIDE
ppm
10
mg/l CaCO3 750
8÷9
ppm
100
ppm
3500
In folgenden Fällen ist die Aufbereitung des für
die Heizungsanlage verwendeten Wassers
absolut unentbehrlich:
- Sehr große Anlagen
- Sehr hartes Wasser
- Häufiges Nachfüllen von Wasser in die Anlage
Wenn die Anlage teilweise oder vollständig entleert
werden muss, muss sie anschließend mit aufbereitetem Wasser gefüllt werden. Zur Kontrolle der
Nachfüllmenge sollte an der Leitung ein Zähler
installiert werden. Die Phänomene, die in den
Wärmeanlagen am häufigsten auftreten, sind:
- Verkalkungen
Kalkablagerungen konzentrieren sich an den
Stellen mit der höchsten Wandtemperatur.
Aufgrund ihrer geringen Wärmeleitfähigkeit reduzieren die Verkalkungen den Wärmeaustausch,
so dass nur wenige Millimeter Kalkablagerungen
- 57 -
den Wärmeaustausch zwischen Abgas und
Wasser behindern, eine Erhöhung der
Temperatur jener Teile bewirken, die der
Flamme ausgesetzt sind, und folglich
Beschädigungen (Risse) verursachen.
- Wasserseitige Korrosion
Die
Korrosion
der
wasserseitigen
Metalloberflächen des Kessels wird durch die
Auflösung des Eisens in seine Ionen verursacht.
In diesem Prozess spielt die Präsenz aufgelöster
Gase, und insbesondere von Sauerstoff und
Kohlendioxid, eine bedeutende Rolle. Enthärtetes
und/oder entmineralisiertes Wasser bieten zwar
einen guten Schutz vor Verkalkung, jedoch nicht
vor Korrosion. Deshalb muss das Wasser mit
Korrosionshemmern aufbereitet werden.
5.5.2 Vor-/Rücklaufleitungen der Anlage
Die Maße der Vor- und Rücklaufleitungen sind für
jedes Kesselmodell in der Tabelle MASSE angegeben. Sicherstellen, dass in der Anlage ausreichend
Entlüftungsöffnungen vorhanden sind. Die
Anschlüsse des Kessels dürfen nicht vom Gewicht
der Anschlussleitungen der Anlage belastet werden,
daher sind geeignete Halterungen zu installieren.
5.5.3 Füll-/Ablaufleitungen der Anlage
Für Befüllung und Ablass des Kessels kann am
rückseitigen Anschluss T4 ein Wasserhahn
angebracht werden (siehe Zeichnung MASSE).
5.5.4 Leitungen Ausdehnungsgefäß und
Sicherheitsventil
Die Kessel AR SW sind für den Betrieb mit
Zwangsumlauf von Wasser sowohl mit offenem als
auch mit geschlossenem Ausdehnungsgefäß
ausgelegt. Ein Ausdehnungsgefäß ist immer erforderlich, um das erhöhte Wasservolumen infolge
Erhitzung auszugleichen. Im ersten Fall muss die
Höhe der hydrostatischen Säule mindestens 3
Meter über der Kesselummantelung betragen und
das Ausdehnungsgefäß ein ausreichendes
Fassungsvermögen besitzen, um zwischen dem
freien Spiegel im Ausdehnungsgefäß und dem
Überlaufrohr die Volumenerhöhung des gesamten
Anlagenwassers aufzunehmen. Hohe, schmale
Gefäße sind vorzuziehen, da sie den geringsten
Kontakt der Wasseroberfläche mit Luft garantieren
und somit die Verdampfung reduzieren. Im zweiten
Fall muss das Fassungsvermögen des geschlossenen Ausdehnungsgefäßes unter Berücksichtigung
folgender Faktoren berechnet werden:
- Gesamtwasservolumen in der Anlage
- Max. Betriebsdruck der Anlage
- Max. Betriebsdruck des Ausdehnungsgefäßes
- Vorfülldruck des Ausdehnungsgefäßes
- Max. Betriebstemperatur des Kessels (die
Höchsttemperatur des an der Bedienblende
montierten Thermostats beträgt 90°C; für diese
Berechnung sollten 100°C berücksichtigt werden).
Die Ausdehnungsleitung verbindet das
Ausdehnungsgefäß mit der Anlage. Diese Leitung
beginnt am Anschluss T3 (siehe Maßtabelle) und darf
kein Sperrventil haben. Am Anschluss T3 oder an der
Vorlaufleitung innerhalb 0,5 Meter vom ersten Flansch
ein Sicherheitsventil installieren, das entsprechend
dem Fassungsvermögen des Kessels und in
Konformität mit den geltenden örtlichen
Bestimmungen zu bemessen ist. Es ist verboten, zwischen Kessel und Ausdehnungsgefäß bzw. zwischen
Kessel und Sicherheitsventilen irgendeine Art von
Absperrorgan einzubauen. Der Ansprechdruck der
Ventile muss auf einen Wert eingestellt sein, der nicht
über dem höchsten zulässigen Betriebsdruck liegt.
DE
5.5.5 Umwälzpumpe (Abb. 8)
Die Kondensation des in den Abgasen des
Kessels enthaltenen Wasserdampfes (Kondensat)
tritt auf, wenn die Temperatur des
Rücklaufwassers unter 55°C liegt. Sie ist vor allem
relevant, wenn der Kessel morgens eingeschaltet
wird, nachdem er die ganze Nacht abgeschaltet
war. Das Kondensat ist sauer und korrosiv und
greift mit der Zeit die Blechteile des Kessels an.
Daher empfiehlt sich der Einsatz einer zwischen
den Vor- und Rücklaufanschlüssen, vor dem eventuellen Mischventil installierten Umwälzpumpe mit
Antikondensationsfunktion. Die Pumpe muss
während den Betriebszeiten der Anlage einen
Durchsatz zwischen 20 und 30% des
Gesamtdurchsatzes garantieren; außerdem muss
sie eine Temperatur des Rücklaufwassers von
max. 55°C sicherstellen, während die erforderliche
Förderhöhe gering ist, da nur der Widerstand des
Kessels und der Ventile zu überwinden ist. Zur
Messung der tatsächlichen Rücklauftemperatur
der Anlage, um die Antikondensationspumpe zu
steuern, bzw. um in temperaturgeführten
Systemen die Funktionen zum Erreichen der
Betriebstemperatur zu regeln, muss ein
Sondenschacht vorgesehen werden, der in einem
Abstand anzubringen ist, der dem 3 bis 5fachen
Durchmesser der Rücklaufleitung vor dem
Wasseranschluss entspricht.
5.6 Vordere Tür, Öffnung und Einstellung
Bei den Modellen AR SW 92÷1890 erfolgen
Scharnierung, Befestigung und Wechsel der
Anschlagseite wie auf Abbildung 9 dargestellt.
Zu diesem Zweck folgendermaßen vorgehen:
- Die Tür wird mit vier gleichen Bügeln (Pos. 3)
und Scharnieren geliefert.
- Um den Türanschlag RECHTS oder LINKS
zu bestimmen (Pos. 7), die Mutter (Pos. 6)
RE. oder LI. aufdrehen und entfernen, um so
die Öffnungsrichtung der Tür zu erhalten.
- Die Türhöhe wird mit der Mutter (Pos. 2) eingestellt; nach der Einstellung die Stifte
(Pos. 1) befestigen.
- Die Länge wird mit der Schraube (Pos. 8)
eingestellt.
Legende (Abb. 9)
1 Befestigungsstift
2 Mutter zur Befestigung/Einstellung der Tür
3 Scharnierbügel
4 Scharnierstift
5 Scharnierschraube
6 Befestigungsmutter Scharnier
7 Befestigungsmutter
8 Befestigungsschrauben und muttern/Einstellung Scharnierbügel
Bei den Modellen AR SW 2360÷6000 erfolgen
die Scharnierung, die Befestigung und der
Wechsel der Anschlagseite wie auf Abbildung
10 dargestellt.
Zu diesem Zweck folgendermaßen vorgehen:
- Die Tür wird mit vier gleichen Scharnieren
geliefert (Pos. 3).
- Um den Türanschlag RECHTS oder LINKS
zu bestimmen (Pos. 7), die Mutter (Pos. 6)
RE. oder LI. aufdrehen und entfernen, um so
die Öffnungsrichtung der Tür zu erhalten.
- Die Türhöhe wird mit der Mutter (Pos. 2) eingestellt; nach der Einstellung die Stifte
(Pos. 1) befestigen.
Legende (Abb. 10)
1 Befestigungsstift
2 Mutter zur Befestigung/Einstellung der Tür
3 Scharnierbügel
4 Scharnierstift
5 Scharnierschraube
6 Befestigungsmutter Scharnier
7 Befestigungsmutter
5.7 Einbau des Brenners (Abb. 11)
Der Einbau des Brenners an der Kesseltür muss
eine perfekte Abgasdichtung garantieren. Nachdem
der Brenner am Kessel installiert wurde, muss der
Raum zwischen der Brenner-Durchflussdüse und
dem feuerfesten Material der Klappe mit der mitgelieferten Keramikmatte (A) aufgefüllt werden.
Dadurch soll die Überhitzung der Klappe vermieden
werden, die sich sonst irreparabel verbiegen würde.
Die Brennstoffanschlüsse am Brenner müssen so
angebracht werden, dass sich die Kesselklappe mit
installiertem Brenner vollständig öffnen lässt.
AR SW
92-152
190-399
525-600
720-940
1060-1250
1480-1890
2360
3000-3600
4000-4500
5000
6000
L min. (mm)
230
250
290
320
320
350
350
370
450
500
500
L max. (mm)
300
320
360
390
390
420
420
450
500
550
550
5.8 Anschluss des Flammenschauglases (Abb. 12)
Das Flammenschauglas ist mit einem
Druckabgreifpunkt (1) ausgestattet, der über ein
Silikon- oder Kupferrohr mit dem Abgreifpunkt am
Brenner (2) zu verbinden ist. Dadurch kühlt die
vom Lüfter geblasene Luft das Flammenschauglas
und verhindert so, dass das Schauglas schwarz
wird. Wenn das Rohr nicht angeschlossen wird,
kann das Schauglas beschädigt werden.
5.9 Montage Verkleidung Mod. 92÷399
Montagefolge (Abb. 13)
a) Die rechte und die linke Seitenwand (Pos. 12) anbringen und an der Halterung (Pos. 13)
einhängen. Welche Verkleidung auf die rechte bzw. linke Seite gehört, ist an der Bohrung
für die Kabelplatte (Pos. 6) zu erkennen, die
zur Kesselvorderseite gerichtet sein muss.
b) Die Bedienblende an der oberen Verkleidung
(Pos. 3) befestigen.
c) Die obere rechte Verkleidung (Pos. 3) mitsamt Bedienblende an der mit Federn, Stiften
und Muttern (Pos. 10-11-12) versehenen
Seitenwand (Pos. 1) anbringen.
d) Die Fühler wie auf Abb. 20 dargestellt in die
Fühlerhülsen einführen und die Bedienblende an
das elektrische Netz sowie an den Brenner und an
die eventuellen Pumpen usw. anschließen. Die
Fühler müssen unbedingt ganz in die jeweiligen
Schächte eingeführt werden, damit ein optimaler
Kontakt gewährleistet ist. Dann die
Kapillarschläuche mit den Klammern befestigen.
Die Abdeckung des Schaltkastens wieder schließen. Den Stecker des Brenners durch die seitliche Platte (Pos. 6) ziehen und das Kabel mit der
mitgelieferten Kabelklemme blockieren. Die Platte
(Pos. 6) mit den Schrauben (Pos. 7) befestigen.
e) Die obere linke Verkleidung (Pos. 4) an der mit
Federn, Stiften und Muttern (Pos. 10-11-12) ver-
- 58 -
sehenen linken Seitenwand (Pos. 2) anbringen.
f) Die Fühler wie auf Abb. 13-20 dargestellt in die
Fühlerhülsen einführen und die Bedienblende an
das elektrische Netz sowie an den Brenner und an
die eventuellen Pumpen usw. anschließen. Die
Fühler müssen unbedingt ganz in die jeweiligen
Schächte eingeführt werden, damit ein optimaler
Kontakt gewährleistet ist. Dann die
Kapillarschläuche mit den Klammern befestigen.
Die Abdeckung des Schaltkastens wieder schließen. Den Stecker des Brenners durch die seitliche Platte (Pos. 9) ziehen und das Kabel mit der
mitgelieferten Kabelklemme blockieren. Die Platte
(Pos. 9) mit den Schrauben (Pos. 10) befestigen.
g) Die obere Verkleidung (Pos. 6) an der mit
Federn, Stiften und Muttern (Pos. 14-15-16)
versehenen Seitenwand (Pos. 3) anbringen.
h) Die Rückwand (Pos. 8) mit den Schrauben (Pos.
13) und Muttern (Pos. 14) am Kessel anbringen.
i) Die vordere Verkleidung (Pos. 5) mit den
Schrauben (Pos. 8) und Muttern (Pos. 9) an
der Tür anbringen.
l) Das Typenschild des Kessels (siehe Kap. 1.4)
anbringen und fest andrücken. Den Bereich
vorher mit einem geeigneten Lösemittel reinigen und entfetten. Das Typenschild nicht wieder entfernen, weil es sonst nicht mehr haftet.
Das Typenschild befindet sich im Umschlag
mit den Unterlagen.
5.10 Montage Verkleidung Mod. 525÷1890
Montagefolge (Abb. 14)
a) Die Seitenwände (Pos. 1-2 und 3-4) anbringen
und an den Halterungen (Pos. 19) einhängen.
b) Die oberen Seitenwände zuerst rechts (Pos.
5-6), dann links (7-8) anbringen und an den
Halterungen des Kessels (Pos. 19) sowie am
Querträger (Pos. 18) einhängen.
c) Die Bedienblende an der oberen rechten
Verkleidung (Pos. 5) befestigen.
d) Die obere Verkleidung (Pos. 5) mitsamt
Bedienblende an der mit Federn, Stiften und
Muttern (Pos. 15-16-17) versehenen
Seitenwand (Pos. 1) anbringen.
e) Die Fühler wie auf Abb. 21 dargestellt in die
Fühlerhülsen einführen und die Bedienblende an
das elektrische Netz sowie an den Brenner und an
die eventuellen Pumpen usw. anschließen. Die
Fühler müssen unbedingt ganz in die jeweiligen
Schächte eingeführt werden, damit ein optimaler
Kontakt gewährleistet ist. Dann die
Kapillarschläuche mit den Klammern befestigen.
Die Abdeckung des Schaltkastens wieder schließen. Den Stecker des Brenners durch die seitliche Platte (Pos. 11) ziehen und das Kabel mit der
mitgelieferten Kabelklemme blockieren. Die Platte
(Pos. 11) mit den Schrauben (Pos. 12) befestigen.
f) Den Träger (Pos. 18) montieren.
g) Die oberen Verkleidungen (Pos. 5-6-7-8)
montieren und an den mit Federn, Stiften und
Muttern
(15-16-17)
versehenen
Seitenwänden (Pos. 1-2-3-4) einhängen.
h) Die vorderen Verkleidungen (Pos. 9-10) mit
den Schrauben (Pos. 14) und Muttern (Pos.
13) an der vorderen Tür anbringen.
i) Das Typenschild des Kessels (siehe Kap. 1.4)
anbringen und fest andrücken. Den Bereich
vorher mit einem geeigneten Lösemittel reinigen und entfetten. Das Typenschild nicht wieder entfernen, weil es sonst nicht mehr haftet.
Das Typenschild befindet sich im Umschlag
mit den Unterlagen.
6. ELEKTRISCHER ANSCHLUSS
Der Kessel muss unter Befolgung der nachstehenden Anleitungen an ein EinphasenStromnetz 230 V - 50 Hz + Erdung angeschlossen werden. Die Anlage muss die GELTENDEN
SICHERHEITSVORSCHRIFTEN erfüllen.
- Einen zweipoligen Trennschalter gemäß
CEI-EN (Öffnungsweg der Kontakte mindestens 3 mm) installieren
- Den Anschluss L (Phase) - N (Nullleiter) beachten
- Kabel mit Querschnitt größer oder gleich 1,5
mm2 verwenden.
- Für jeden elektrischen Eingriff auf die elektrischen
Schaltpläne dieses Handbuchs Bezug nehmen.
- Die Anlage muss an eine effiziente Erdung
angeschlossen werden.
7. SCHALTFELD
7.1 Beschreibung der Funktionen
Mit dem Hauptschalter (11) werden die
Schalttafel und die damit verbundenen Geräte
unter Spannung gesetzt. Die Schalter (12) und
(13)
unterbrechen
ihrerseits
die
Spannungszufuhr zum Brenner und zur
Anlagenpumpe. Mit dem Thermostat (21) wird
die Betriebstemperatur des Kessels geregelt.
Der Mindesttemperaturregler hält die
Anlagenpumpe während des Hochfahrens an,
bis im Kessel eine Temperatur von 50°C erreicht ist. Im Fall von Drehstrombrennern und/oder
wenn die Anlagenpumpe drehstrombetrieben ist
bzw. eine Stromaufnahme über 3 A aufweist,
sind zwischen Kessel-Schalttafel und Last fernbetätigte Schaltschütze vorzusehen.
An der Netzleitung der Kessel-Schalttafel muss
ein Schalter mit Schmelzsicherungen installiert
werden.
T
R
S
C
Thermometer
Manuelle Rücksetzung
Kontrolllampe Brenner-Störabschaltung
Betriebsstundenzähler (eventuell)
HINWEIS
Für den elektrischen Anschluss von Kesseln
mit Nennleistung über 300.000 kcal/h muss
der Installateur einen 2. Sicherheitsthermostat
vorsehen.
7.2 Schaltplan für brenner und einphasenpumpe (Fig. 17)
DE
BRENNERSTEUERUNG MIT SIGNAL
START BETRIEBSSTUNDENZÄHLER
+ SIGNAL BRENNER-STÖRABSCHALTUNG
STECKVERBINDER FÜR DEN BRENNERANSCHLUSS
2. Flamme
Fig. 17
Legende
IG
TS
TM
TA
IB
SB
Hauptschalter
Sicherheitsthermostat 110°C
Mindesttemperaturregler 45°C
Raumthermostat
Brennerschalter
Kontrolllampe Brenner-Störabschaltung
SL
Ch
PI
IPi
TR1-TR2
Netzkontrolllampe
Betriebsstundenzähler
Anlagenpumpe
Schalter Anlagenpumpe
Thermostat 2 Stufen 1.- 2. Flamme
(30°-90°C Δt 1°- 2. Flamme = 7°C)
- 59 -
F4/K4
Anschluss Temperaturregelung RVP
L
Klemmen
N
Anschlussklemmenleiste
3-20
8. PRINZIPSCHALTBILD - HEIZUNGS- UND
WARMWASSERBEREITUNGSANLAGE
(Abb. 18)
Die Wahl und die Installation der Bauteile der
Anlage unterliegen der Kompetenz des
Installateurs, der gemäß den Regeln der
Technik und der geltenden Rechtsvorschriften
vorgehen muss. Mit Frostschutzmittel befüllte
Anlagen erfordern zwingend den Einsatz von
Wasser-Absperrorganen. Das Schaltbild auf
Abb. 18 ist ein Prinzipschaltbild. Im Falle verschiedener Anlagen wenden Sie sich bitte an
unseren After-Sales-Service, der Ihnen alle
gewünschten Auskünfte erteilen wird.
Legende
A Anlagenvorlauf
B Anlagenrücklauf
1 Wärmeerzeuger
2 Brenner mit Sperr- und Regelventilen
3 Boiler
4 Anlagen-Sammelleitungen
5 Trennventile
6 Umwälzpumpe
7 Rückschlagventile
8 Ausdehnungsgefäß der Anlage
9 Automatisches Entlüftungsventil
10 Sicherheitsventil
11 Enthärterfilter
12 Anlagenbefüllung
13 Brennstoff-Sperrventil
9. INBETRIEBNAHME
- Der Brenner muss gemäß den im Handbuch des
Herstellers enthaltenen Anleitungen eingebaut sein.
- Netzspannung und -frequenz müssen mit dem
Brenner und mit der elektrischen Ausrüstung
des Kessels kompatibel sein.
- Die Anlage muss in der Lage sein, die erzeugte Wärmemenge aufzunehmen.
- Die Umwälzpumpe muss installiert werden wie
im Abschn. 5.5.5 beschrieben.
9.1 Vor Inbetriebnahme durchzuführende
Kontrollen
Nach Durchführung der Wasser-, Strom- und
Brennstoffanschlüsse am Kessel sind vor
Inbetriebnahme folgende Kontrollen durchzuführen:
- Das
Ausdehnungsgefäß
und
das
Sicherheitsventil (falls erforderlich) müssen
ordnungsgemäß angeschlossen sein und dürfen in keiner Weise absperrbar sein.
- Die Fühler der Betriebs-, Sicherheits-,
Mindestthermostate und des Thermometers
müssen in den jeweiligen Hülsen befestigt sein.
- Die Heizgaswirbler müssen in allen
Abgasrohren vorhanden sein.
- Die Anlage muss mit Wasser gefüllt und vollständig entlüftet sein.
- Die Pumpe bzw. die Pumpen müssen ordnungsgemäß funktionieren.
- Die Wasser-, Strom-, Sicherheits- und
Brennstoffanschlüsse müssen den geltenden nationalen und örtlichen Bestimmungen entsprechen.
10. WARTUNG
10.1 Allgemeine Bestimmungen
Die regelmäßige Wartung ist von grundlegender
Bedeutung für die Sicherheit, die Leistungsfähigkeit
und die Lebensdauer des Geräts. Alle Eingriffe
müssen von Fachpersonal durchgeführt werden.
Vor jedem Reinigungs- und Wartungseingriff muss
zunächst die Spannungs-, und anschließend die
Brennstoffzufuhr unterbrochen werden. Um einen
einwandfreien Betrieb und einen maximalen
Wirkungsgrad zu gewährleisten, müssen die
Verbrennungskammer, die Abgasrohre und die
Rauchkammer regelmäßig gesäubert werden.
10.2 Planmäßige Wartung
Die Wartung hängt vom verwendeten Brennstoff,
von der Häufigkeit der Einschaltungen, von den
Merkmalen der Anlage usw. ab, deshalb kann im
Voraus kein Zeitintervall zwischen je zwei
Wartungseingriffen festgesetzt werden.
Grundsätzlich werden je nach Brennstoff folgende Reinigungsintervalle empfohlen:
- Gasbefeuerte Kessel: einmal jährlich
- Ölbefeuerte Kessel: zweimal jährlich
- Heizölbefeuerte Kessel:
alle 300 Betriebsstunden.
Auf jeden Fall sind die eventuellen örtlichen
Wartungsvorschriften zu befolgen. Während den
planmäßigen Wartungseingriffen muss nach
Ausbau der Heizgaswirbler das Rohrbündel und
der Feuerraum ausgebürstet werden. Die
9.2 Erstmalige Einschaltung
Nach positivem Ausgang der im vorherigen Abschnitt
aufgeführten Kontrollen kann der Brenner zum ersten
Mal eingeschaltet werden. Die erstmalige Einschaltung
muss von einem qualifizierten, vom Hersteller des
Brenners zugelassenen Techniker durchgeführt werden. Der Techniker haftet für die Einstellung innerhalb
des erklärten und zugelassenen Leistungsbereichs
des Kessels. Nachdem die Sperrhähne des
Brennstoffs geöffnet wurden und sichergestellt wurde,
dass im Zuleitungsnetz keine Leckstellen vorhanden
sind, werden alle Schalter auf ON (Ein) gestellt. Der
Brenner ist damit für die erstmalige Einschaltung und
Ablagerungen in der Rauchkammer über die Öffnung der Inspektionsluken entfernen. Für energischere Eingriffe die hintere Rauchkammer
ausbauen und die Abgasdichtung falls abgenutzt
auswechseln.
Kontrollieren, ob der
Kondensatablauf verstopft ist. Die einwandfreie
Funktionstüchtigkeit der Kontroll- und
Messorgane des Wärmeerzeugers überprüfen.
Bei dieser Gelegenheit muss die nachgefüllte
Wassermenge gemessen werden. Nach Analyse
des Wassers vorbeugend entkalken. Die
Kalzium- und Magnesiumsalze, die sich bei wiederholtem Nachfüllen im Rohwasser auflösen,
verursachen Ablagerungen im Kessel und die
Überhitzung der Bleche, was zu möglichen
Schäden führt, die nicht als Material- oder
Herstellungsfehler gelten und daher nicht von
der Garantie gedeckt sind. Nach Durchführung
der Wartungseingriffe und der anschließenden
Einschaltung müssen die Dichtungen der Klappe
und der Rauchkammer kontrolliert werden.
Wenn Abgase austreten, müssen die entsprechenden Dichtungen ausgewechselt werden.
Die durchgeführten Eingriffe sind im
Anlagenbuch zu verzeichnen.
10.3 Außerordentliche Wartung
Außerordentliche Wartung bei Saisonende oder
vor längeren Stillstandzeiten.
Es müssen alle im vorhergehenden Kapitel
beschriebenen Eingriffe durchgeführt werden
und außerdem:
- 60 -
14
15
16
17
18
19
20
21
22
23
24
25
26
27
28
Gasdruckstabilisator
Manuelles Sperrventil
Gasfilter
Schwingungsdämpfende Verbindung
Pumpe
Manometer
Sicherheitsthermostat
Regelthermostat
Dreiwegeventil
Druckwächter mit manueller Rücksetzung
Strömungswächter
Regelthermostat
Thermostat mit manueller Rücksetzung
Temperaturmessschacht
Temperaturregelventil
für die Einstellung bereit, die ausschließlich von dem
hierzu befugten Techniker vorgenommen werden darf.
Während der erstmaligen Einschaltung muss sichergestellt werden, dass die Tür, der Brennerflansch und
die Kaminanschlüsse perfekt dicht sind, und dass die
Basis des Schornsteinrohrs einen leichten Unterdruck
aufweist. Der Brennstoffdurchsatz muss den
Angaben auf dem Typenschild des Kessels entsprechen und darf die erklärte max. Nutzwärmeleistung
unter keinen Umständen überschreiten.
Die Abgastemperatur darf nie unter 160°C sinken.
9.3 Ausschalten des Kessels
- Den Betriebsthermostat auf den Mindestwert
einstellen.
- Die Spannungs- und Brennstoffzufuhr zum
Brenner trennen.
- Die Pumpen laufen lassen, bis sie vom
Mindestthermostat angehalten werden.
- Die Spannungszufuhr zur Schalttafel trennen.
- Den Verschleißzustand der Heizgaswirbler
kontrollieren.
- Nach der Reinigung des Rauchzuges mit
einem mit verdünnter Natronlaugenlösung
getränkten Tuch abwischen. Trocknen lassen
und anschließend alle Oberflächen mit einem
mit Öl getränkten Tuch abwischen.
- Es empfiehlt sich, hygroskopisches Material
(Branntkalk, Kieselgel in kleinen Behältern) in den
Feuerraum zu legen und diesen hermetisch zu
verschließen, damit keine Luft eindringen kann.
- Die Anlage und den Kessel nicht entleeren.
- Schrauben, Muttern und Stifte der Tür mit
Graphitfett schützen.
Die durchgeführten Eingriffe sind im
Anlagenbuch zu verzeichnen.
10.4 Reinigung des Heizkessels (Abb. 19)
Die Anlage folgendermaßen reinigen:
- Die vordere Tür (1) öffnen und die
Heizgaswirbler (2) ausbauen.
- Die Innenflächen der Verbrennungskammer
und des Rauchzugs mit einer Kaminbürste (3)
oder sonstigen geeigneten Utensilien säubern.
- Die Ablagerungen in der Rauchkammer über
die entsperrte Öffnung der Inspektionsluken
(4) entfernen. Für energischere Eingriffe den
Verschluss der Rauchkammer (5) ausbauen
und die Dichtung vor erneuter Montage
auswechseln.
- Regelmäßig
kontrollieren,
ob
der
Kondensatablauf (6) verstopft ist.
10.5 Betriebsprüfung des Kessels
Vor Einschaltung und Funktionstest des Kessels
folgende Kontrollen durchführen:
- Die Heizgaswirbler müssen bündig mit allen
Austauschrohren angebracht sein.
- Die Sperrhähne des Wasser- und des
Brennstoffkreises müssen offen sein.
- Es muss Brennstoff verfügbar sein.
- Das Ausdehnungsgefäß muss ausreichend
gefüllt sein.
- In der kalten Anlage muss der Druck des
Wasserkreises über 1 bar und unter dem für
den Kessel vorgesehenen Höchstwert liegen.
- Die Wasserkreise müssen entlüftet sein.
- Die einzelnen Komponenten (Brenner,
Pumpe, Schalttafel, Thermostate usw.) müssen an das elektrische Versorgungsnetz angeschlossen sein.
- Der Anschluss Phase-Nullleiter muss unbedingt eingehalten werden, die Erdung ist
obligatorisch.
Um den Kessel nach Durchführung der oben
beschriebenen Eingriffe zu starten, folgendermaßen vorgehen:
- Wenn die Anlage mit einem temperaturgeführten
Regler und Uhrenthermostat(en) ausgestattet ist,
muss kontrolliert werden, ob er/sie "aktiv" ist/sind.
- Den/die Raum-Uhrenthermostat(en) bzw. die
temperaturgeführte Regelung auf die gewünschte Temperatur einstellen.
- Den Hauptschalter der Anlage auf "Ein" stellen.
- Den Kesselthermostat an der Schalttafel
einstellen.
- Den Hauptschalter der Schalttafel auf "on"
stellen und kontrollieren, ob die grüne Anzeige
eingeschaltet wird.
Der Kessel führt die Einschaltphase durch und
bleibt so lange in Betrieb, bis die eingestellten
Temperaturen erreicht sind. Falls beim
Einschalten oder Betrieb Störungen auftreten sollten, erfolgt eine "STÖRABSCHALTUNG" des
Kessels, die von der roten Kontrolllampe am
Brenner und durch die rote Anzeige der Schalttafel
signalisiert
wird.
Nach
einer
"STÖRABSCHALTUNG" muss etwa 30 Sekunden
abgewartet
werden,
bevor
die
Einschaltbedingungen wieder hergestellt werden.
Um die Einschaltbedingungen wieder herzustellen,
die "Leuchttaste" des Brenners drücken und warten, bis die Flamme zündet. Bleibt dieser Vorgang
erfolglos, kann er höchstens 2-3 Mal wiederholt
werden. Danach folgendermaßen vorgehen:
- Die im Handbuch des Brenners vorgeschriebenen Kontrollen durchführen.
- Im Kapitel "BETRIEBSPRÜFUNG DES
KESSELS" nachschlagen.
- Die im Schaltplan der Schalttafel enthaltenen
elektrischen Anschlüsse kontrollieren.
Nach erfolgter Inbetriebsetzung muss kontrolliert werden, ob das Gerät eine Ab- und
Wiedereinschaltung korrekt ausführt:
- Die Einstellung des Kesselthermostats ändern.
- Den Hauptschalter an der Schalttafel betätigen.
- Den Raumthermostat bzw. die Zeitprogrammierung
oder die temperaturgeführte Regelung verstellen.
- Kontrollieren, ob die Umwälzpumpen ungehindert und korrekt drehen.
- Den Hauptschalter der Anlage betätigen und
kontrollieren, ob der Kessel vollständig abgeschaltet wird.
Wenn alle Bedingungen erfüllt werden, das
Gerät
wieder
einschalten,
eine
Verbrennungskontrolle (Abgasanalyse) durchführen, und den Brennstoffdurchsatz sowie
die Dichtheit der Dichtungen der Klappe und der
Rauchkammer überprüfen.
10.6 Betriebsprüfung des Brenners
- Im Benutzerhandbuch des Brenners nachschlagen.
- Alle Vorschriften örtlicher Bestimmungen über
die Brennerwartung befolgen.
10.7 Mögliche Defekte und Abhilfe
In der nachstehenden Liste sind die hauptsächlichen Defekte oder Betriebsstörungen aufgeführt,
die beim Betrieb des Kessels auftreten können,
sowie deren mögliche Ursachen und Abhilfen.
DE
- 61 -
BETRIEBSSTÖRUNG
DER WÄRMEERZEUGER VERSCHMUTZT SCHNELL
URSACHE:
Falsch eingestellter Brenner
ABHILFE:
Brennereinstellung kontrollieren (Abgasanalyse)
Schornsteinrohr verstopft
Rauchzug und Schornsteinrohr reinigen
Brennerluftweg verschmutzt
Luftvolute des Brenners reinigen
DER WÄRMEERZEUGER ERREICHT NICHT DIE BETRIEBSTEMPERATUR
URSACHE:
Geräteblock verschmutzt
ABHILFE:
Rauchzug säubern
Kombination Wärmeerzeuger/Brenner
Daten und Einstellungen kontrollieren
Ungenügender Brennerdurchsatz
Brennereinstellung kontrollieren
Regelthermostat
Funktionstüchtigkeit überprüfen
Eingestellte Temperatur kontrollieren
DER WÄRMEERZEUGER FÜHRT EINE WÄRME-STÖRABSCHALTUNG DURCH,
MIT LEUCHTANZEIGE AN DER SCHALTTAFEL
URSACHE:
Regelthermostat
ABHILFE:
Funktionstüchtigkeit überprüfen
Eingestellte Temperatur kontrollieren
Elektrische Verkabelung kontrollieren
Sondenfühler überprüfen
Wassermangel
Druck im Kreis überprüfen
Präsenz von Luft
Entlüftungsventil überprüfen
DER WÄRMEERZEUGER ERREICHT ZWAR DIE BETRIEBSTEMPERATUR, ABER DAS HEIZSYSTEM IST KALT
URSACHE:
Luft in der Anlage
ABHILFE:
Anlage entlüften
Umwälzpumpe defekt
Blockierung der Umwälzpumpe beseitigen
Mindestthermostat (sofern vorhanden)
Eingestellte Temperatur kontrollieren
GERUCH NACH UNVERBRANNTEN ABGASEN
URSACHE:
In den Raum austretende Abgase
ABHILFE:
Sauberkeit des Geräteblocks kontrollieren
Sauberkeit des Rauchzugs kontrollieren
Dichtheit von Wärmeerzeuger, Rauchzug und
Schornsteinrohr kontrollieren
HÄUFIGES ANSPRECHEN DES SICHERHEITSVENTILS
URSACHE:
Druck im Anlagenkreis
ABHILFE:
Lastdruck überprüfen
Anlagenkreis überprüfen
Einstellung überprüfen
Eingestellte Temperatur kontrollieren
Ausdehnungsgefäß der Anlage
Kontrollieren
- 62 -
DE
- 63 -
СОДЕРЖАНИЕ
1.
2.
3.
4.
5.
6.
7.
8.
9.
10.
Предисловие . . . . . . . . . . . . . . . . . . . . . . . . . . . . . . . . . . . . . . . . . . . . . . . . . . . . . . . . . . . . . . . . . . . . . . . . . . . . . . . . . . . . . . . . . . . . . . . . . . . . . стр 105
Общие рекомендации . . . . . . . . . . . . . . . . . . . . . . . . . . . . . . . . . . . . . . . . . . . . . . . . . . . . . . . . . . . . . . . . . . . . . . . . . . . . . . . . . . . . . . . . . . . . . . стр 105
Сертификация . . . . . . . . . . . . . . . . . . . . . . . . . . . . . . . . . . . . . . . . . . . . . . . . . . . . . . . . . . . . . . . . . . . . . . . . . . . . . . . . . . . . . . . . . . . . . . . . . . . . стр 105
Техническая и конструкционная спецификации, размеры . . . . . . . . . . . . . . . . . . . . . . . . . . . . . . . . . . . . . . . . . . . . . . . . . . . . . . . . . . . . . . . стр 105
4.1 Описание оборудования . . . . . . . . . . . . . . . . . . . . . . . . . . . . . . . . . . . . . . . . . . . . . . . . . . . . . . . . . . . . . . . . . . . . . . . . . . . . . . . . . . . . . . . . стр 105
4.2 Принцип работы . . . . . . . . . . . . . . . . . . . . . . . . . . . . . . . . . . . . . . . . . . . . . . . . . . . . . . . . . . . . . . . . . . . . . . . . . . . . . . . . . . . . . . . . . . . . . . . стр 105
4.3 Техническая спецификация . . . . . . . . . . . . . . . . . . . . . . . . . . . . . . . . . . . . . . . . . . . . . . . . . . . . . . . . . . . . . . . . . . . . . . . . . . . . . . . . . . . . стр 105
4.4 Идентификация . . . . . . . . . . . . . . . . . . . . . . . . . . . . . . . . . . . . . . . . . . . . . . . . . . . . . . . . . . . . . . . . . . . . . . . . . . . . . . . . . . . . . . . . . . . . . . . стр 105
Монтаж . . . . . . . . . . . . . . . . . . . . . . . . . . . . . . . . . . . . . . . . . . . . . . . . . . . . . . . . . . . . . . . . . . . . . . . . . . . . . . . . . . . . . . . . . . . . . . . . . . . . . . . . . . стр 107
5.1 Упаковка . . . . . . . . . . . . . . . . . . . . . . . . . . . . . . . . . . . . . . . . . . . . . . . . . . . . . . . . . . . . . . . . . . . . . . . . . . . . . . . . . . . . . . . . . . . . . . . . . . . . стр 107
5.2 Разгрузка . . . . . . . . . . . . . . . . . . . . . . . . . . . . . . . . . . . . . . . . . . . . . . . . . . . . . . . . . . . . . . . . . . . . . . . . . . . . . . . . . . . . . . . . . . . . . . . . . . . . стр 107
5.3 Помещение котельной . . . . . . . . . . . . . . . . . . . . . . . . . . . . . . . . . . . . . . . . . . . . . . . . . . . . . . . . . . . . . . . . . . . . . . . . . . . . . . . . . . . . . . . . . стр 107
5.4 Удаление продуктов сгорания . . . . . . . . . . . . . . . . . . . . . . . . . . . . . . . . . . . . . . . . . . . . . . . . . . . . . . . . . . . . . . . . . . . . . . . . . . . . . . . . . . . стр 107
5.5 Гидравлические подключения . . . . . . . . . . . . . . . . . . . . . . . . . . . . . . . . . . . . . . . . . . . . . . . . . . . . . . . . . . . . . . . . . . . . . . . . . . . . . . . . . . . стр 107
5.5.1 Питательная вода . . . . . . . . . . . . . . . . . . . . . . . . . . . . . . . . . . . . . . . . . . . . . . . . . . . . . . . . . . . . . . . . . . . . . . . . . . . . . . . . . . . . . . . . стр 107
5.5.2 Патрубки подачи/возврата системы отопления . . . . . . . . . . . . . . . . . . . . . . . . . . . . . . . . . . . . . . . . . . . . . . . . . . . . . . . . . . . . . . . стр 107
5.5.3 Система наполнения/дренажа . . . . . . . . . . . . . . . . . . . . . . . . . . . . . . . . . . . . . . . . . . . . . . . . . . . . . . . . . . . . . . . . . . . . . . . . . . . . . . стр 107
5.5.4 Расширительные баки и патрубки предохранительных клапанов . . . . . . . . . . . . . . . . . . . . . . . . . . . . . . . . . . . . . . . . . . . . . . . . стр 107
5.5.5 Рециркуляционный насос . . . . . . . . . . . . . . . . . . . . . . . . . . . . . . . . . . . . . . . . . . . . . . . . . . . . . . . . . . . . . . . . . . . . . . . . . . . . . . . . . . стр 108
5.6 Открытие и регулировка передней двери . . . . . . . . . . . . . . . . . . . . . . . . . . . . . . . . . . . . . . . . . . . . . . . . . . . . . . . . . . . . . . . . . . . . . . . . . стр 108
5.7 Монтаж горелки . . . . . . . . . . . . . . . . . . . . . . . . . . . . . . . . . . . . . . . . . . . . . . . . . . . . . . . . . . . . . . . . . . . . . . . . . . . . . . . . . . . . . . . . . . . . . . стр 108
5.8 Установка глазка контроля пламени . . . . . . . . . . . . . . . . . . . . . . . . . . . . . . . . . . . . . . . . . . . . . . . . . . . . . . . . . . . . . . . . . . . . . . . . . . . . . стр 108
5.9 Монтаж панелей обшивки, модели 92÷300 . . . . . . . . . . . . . . . . . . . . . . . . . . . . . . . . . . . . . . . . . . . . . . . . . . . . . . . . . . . . . . . . . . . . . . . . стр 108
5.10 Монтаж панелей обшивки, модели 350÷1060 . . . . . . . . . . . . . . . . . . . . . . . . . . . . . . . . . . . . . . . . . . . . . . . . . . . . . . . . . . . . . . . . . . . . . . стр 108
Подключение электроэнергии . . . . . . . . . . . . . . . . . . . . . . . . . . . . . . . . . . . . . . . . . . . . . . . . . . . . . . . . . . . . . . . . . . . . . . . . . . . . . . . . . . . . . . . . стр 109
Панель управления . . . . . . . . . . . . . . . . . . . . . . . . . . . . . . . . . . . . . . . . . . . . . . . . . . . . . . . . . . . . . . . . . . . . . . . . . . . . . . . . . . . . . . . . . . . . . . . . . стр 109
7.1 Описание функций . . . . . . . . . . . . . . . . . . . . . . . . . . . . . . . . . . . . . . . . . . . . . . . . . . . . . . . . . . . . . . . . . . . . . . . . . . . . . . . . . . . . . . . . . . . . стр 109
7.2 Электрическая схема горелки и однофазного насоса . . . . . . . . . . . . . . . . . . . . . . . . . . . . . . . . . . . . . . . . . . . . . . . . . . . . . . . . . . . . . . . стр 109
Принципиальная схема - система для центрального отопления и производства горячей воды . . . . . . . . . . . . . . . . . . . . . . . . . . . . . . . . . . стр 110
Приемка . . . . . . . . . . . . . . . . . . . . . . . . . . . . . . . . . . . . . . . . . . . . . . . . . . . . . . . . . . . . . . . . . . . . . . . . . . . . . . . . . . . . . . . . . . . . . . . . . . . . . . . . . . стр 110
9.1 Предварительные проверки . . . . . . . . . . . . . . . . . . . . . . . . . . . . . . . . . . . . . . . . . . . . . . . . . . . . . . . . . . . . . . . . . . . . . . . . . . . . . . . . . . . . стр 110
9.2 Первый запуск . . . . . . . . . . . . . . . . . . . . . . . . . . . . . . . . . . . . . . . . . . . . . . . . . . . . . . . . . . . . . . . . . . . . . . . . . . . . . . . . . . . . . . . . . . . . . . . . стр 110
9.3 Остановка котла . . . . . . . . . . . . . . . . . . . . . . . . . . . . . . . . . . . . . . . . . . . . . . . . . . . . . . . . . . . . . . . . . . . . . . . . . . . . . . . . . . . . . . . . . . . . . . стр 111
Обслуживание . . . . . . . . . . . . . . . . . . . . . . . . . . . . . . . . . . . . . . . . . . . . . . . . . . . . . . . . . . . . . . . . . . . . . . . . . . . . . . . . . . . . . . . . . . . . . . . . . . . . . стр 111
10.1 Общие указания . . . . . . . . . . . . . . . . . . . . . . . . . . . . . . . . . . . . . . . . . . . . . . . . . . . . . . . . . . . . . . . . . . . . . . . . . . . . . . . . . . . . . . . . . . . . . . стр 111
10.2 Текущее обслуживание . . . . . . . . . . . . . . . . . . . . . . . . . . . . . . . . . . . . . . . . . . . . . . . . . . . . . . . . . . . . . . . . . . . . . . . . . . . . . . . . . . . . . . . . стр 111
10.3 Специальное обслуживание . . . . . . . . . . . . . . . . . . . . . . . . . . . . . . . . . . . . . . . . . . . . . . . . . . . . . . . . . . . . . . . . . . . . . . . . . . . . . . . . . . . . . стр 111
10.4 Чистка котла . . . . . . . . . . . . . . . . . . . . . . . . . . . . . . . . . . . . . . . . . . . . . . . . . . . . . . . . . . . . . . . . . . . . . . . . . . . . . . . . . . . . . . . . . . . . . . . . . стр 111
10.5 Проверка работоспособности котла . . . . . . . . . . . . . . . . . . . . . . . . . . . . . . . . . . . . . . . . . . . . . . . . . . . . . . . . . . . . . . . . . . . . . . . . . . . . . . стр 111
10.6 Проверка работоспособности горелки . . . . . . . . . . . . . . . . . . . . . . . . . . . . . . . . . . . . . . . . . . . . . . . . . . . . . . . . . . . . . . . . . . . . . . . . . . . . стр 111
10.7 Устранение неисправностей . . . . . . . . . . . . . . . . . . . . . . . . . . . . . . . . . . . . . . . . . . . . . . . . . . . . . . . . . . . . . . . . . . . . . . . . . . . . . . . . . . . . стр 111
- 104 -
1. ПРЕДИСЛОВИЕ
Уважаемый Покупатель,
Благодарим Вас за ваш выбор котла PREX W.
Это руководство специально подготовлено
для того, чтобы снабдить вас информацией,
предупреждениями и рекомендациями по
монтажу, правильной эксплуатации и
обслуживанию котла. Пожалуйста, прочтите
его внимательно и неукоснительно следуйте
ему в дальнейшем. Для вашей пользы мы
советуем вам внимательно ознакомиться с
содержанием этого руководства, чтобы
максимально полно использовать это
высококачественное изделие.
Изготовитель
не
несет
никакой
ответственности и гарантии за ущерб,
вызванный несоблюдением рекомендаций и
указаний имеющихся в данном руководстве.
2. ОБЩИЕ РЕКОМЕНДАЦИИ
- Это руководство является неотъемлемой
частью изделия и предоставляет важные
рекомендации по монтажу, эксплуатации
обслуживанию.
- Настоящее оборудование допускается
использовать
только
по
тому
назначению,
для
которого
оно
спроектировано и изготовлено.
- Настоящее
оборудование
предназначено для нагрева воды до
температуры ниже точки кипения и
должно быть подключено к системе
центрального отопления и/или системе
бытового горячего водоснабжения, в
соответствии с его характеристиками,
особенностями и тепловой мощностью.
- Перед проведением монтажных работ,
убедитесь в том, что котел не имеет
повреждений
в
результате
погрузки/разгрузки и транспортировки.
- Установка котла должна производиться
квалифицированным персоналом и в
соответствии с действующими нормами.
- Перед проведением любых работ по чистке
или обслуживанию котла, отключите
оборудование от питающей электросети.
S.р.A.
не
несет
никакой
- Ferroli
ответственности за ущерб, причиненный
людям и/или вещам, вызванный ошибками
при установке, нaлaдкe, обслуживании
и неправильной эксплуатации.
- Котел и соответствующие системы
должны быть приняты в эксплуатацию
авторизованным персоналом.
- Сдача/приемка проводится для того,
чтобы убедиться в правильности работы
всех устройств управления и контроля.
- В случае длительного периода простоя
оборудования,
для
его
запуска
необходимо
привлечение
квалифицированного персонала.
и подготовке площадки под установку котла,
на соответствие требованиям по обеспечению
необходимых условий по вентиляции; по
плотности присоединения газоходов к дымовой
трубе; плотности соединений питательных
трубопроводов, безопасности электрических
систем и всех других действующих норм и
правил по безопасности и охране труда.
Нормы
Монтаж оборудования должен выполняться
при соблюдении действующих норм: по выбору
Гарантийные обязательства
Гарантийные обязательства являются
действительными только при условии
соблюдения всех действующих норм и
рекомендаций, имеющихся в данном
руководстве. Несоблюдение норм и приведенных
рекомендаций лишает права на гарантийную
поддержку. Гарантия не распространяется на все
случаи повреждения котла в результате
воздействия кислотного конденсата продуктов
сгорания или отложения накипи в результате
использования жесткой или агрессивной воды,
которые являются исключительно следствием
эксплуатации системы.
3. CEPTИФИКAЦИЯ
Маркировка аттестации СЕ означает, что
продукция Ferroli соответствует требованиям,
предъявляемым
соответствующими
Европейскими директивами. В частности,
оборудование отвечает требованиям
следующих директив ЕЭС:
- Директива по газовым приборам (2009/142 ЕЭС)
- Директива по коэффициенту полезного
действия (92/42 ЕЭС)
- Директива по низковольтным приборам
73/23 (заменена директивой 93/68)
- Директива по электромагнитной
совместимости 89/336
(заменена директивой 93/68)
4. ТЕХНИЧЕСКАЯ И КОНСТРУКЦИОННАЯ
СПЕЦИФИКАЦИИ, РАЗМЕРЫ
окрашенных порошковым способом стальных
панелей. Транспортировочные проушины
располагаются сверху корпуса. Котел оснащен
двумя 1/2" штуцерами для колодок сигнальных
лампочек (каждая на три лампочки). Пульт
управления, с предварительно выполненной
электроразводкой, размещен наверху котла и
позволяет
эксплуатировать
котел
в
автоматическом режиме.
T3
T4
T5
T6
4.1 Описание оборудования
Конструкция котлов серии AR SW гарантирует
высокую тепловую мощность и эффективность
при низкой температуре уходящих газов,
обеспечивая, таким образом, низкую эмиссию
вредных выбросов. Оборудование произведено в
соответствии со стандартом 303 EN, часть 1.
Основными отличительными особенностями
конструкции являются:
- тщательное проектирование поверхностей,
которое обеспечивает оптимальное
соотношение между oбъeмaми сгорания и
теплообменными поверхностями
- правильный
выбор
используемых
материалов, что влияет на долгий срок
службы котла.
Отличительной чертой котлов являются
газоплотное сгорание, горизонтальноцилиндрическая конфигурация и реверсирование
пламени в полностью водоохлаждаемой топке;
пламя, образуемое горелкой, возвращается по
периферии топки к фронтальной поверхности
котла, где уходящие газы поступают в трубный
пучок,
оснащенный
турбулизаторами
(завихрителями) создающими вращающийся
поток, который интенсифицирует конвективный
теплообмен. Покидая трубный пучок, уходящие
газы поступают в заднюю камеру – дымовой
коллектор и далее поступают в дымовую трубу.
Котлы оборудованы передними дверками,
оснащенными петлями, которые позволяют
изменять сторону открытия котла на правую или
левую, а также регулируются по высоте и
глубине. Корпус котла изолирован толстым
листом стекловаты, покрытой износостойким
материалом. Наружная отделка котла состоит из
4.2 Принцип работы
Котлы серии AR SW оборудованы закрытой
цилиндрической топкой, в которой пламя,
образуемое горелкой, возвращается по периферии
топки к фронтальной поверхности котла, где
уходящие газы поступают в дымогарные трубы. На
выходе из них, уходящие газы собираются в
дымовой коллектор и затем уходят в дымовую
трубу. Камера сгорания всегда является
герметичной и газоплотной при работе горелки. Для
определения избыточного давления, см. таблицы
на стр. 106, под колонкой Аэродинамическое
сопротивление по газовому тракту. Дымоходы и их
подключения должны быть выполнены в
соответствии с действующими стандартами и
нормами, с использованием жестких газоходов,
устойчивых к воздействию высоких температур,
конденсата, механических воздействий и
обладающих газоплотностью. (Рис. 1)
4.3 Техническая спецификация – Размеры –
Гидравлические подключения
Обозначения (Рис. 2 и 3)
1 Пульт управления
2 Монтажная плита для горелки
3 Люк чистки дымового коллектора
4 Окошко контроля пламени
T1 Подача воды
T2 Возврат воды
- 105 -
Присоединение расширительного бака
Слив/дренаж котла
Присоединение дымовой трубы
Присоединение горелки
4.4 Идентификация
Котел может быть идентифицирован по:
- Пакету документов
который имеется на передней двери и
содержит:
ТЕХНИЧЕСКОЕ РУКОВОДСТВО
ГАРАНТИЙНЫЙ СЕРТИФИКАТ
НАКЛЕЙКИ СО ШТРИХКОДАМИ
ШИЛЬДИК
СВИДЕТЕЛЬСТВО ПРИЕМКИ
(подтверждающее, что гидравлическое
испытание было выполнено)
- Шильдику
который
содержит
технические
характеристики и условия применения
(Рис.4). Он поставляется в пакете
документов
и
ДОЛЖЕН
БЫТЬ
ПРИКРЕПЛЕН монтажником, после
окончания монтажа установки, на видимом
месте в верхней части одной из боковых
панелей обшивки. Если шильдик утерян,
обратитесь в Службу Технической
Поддержки Ferroli для получения дубликата.
Исправление или удаление или отсутствие
шильдика или других документов, затрудняющие
идентификацию установки, вызывает проблемы
во время установки и обслуживания.
Обозначения (Рис. 4)
1 Пакет документов
RU
AR SW
Номинальная мощность
кВт
кВт
Топочная мощность
кВт
кВт
Общая емкость котла
л
Потеря напора воды
Δt 10°C мбар
Δt 15°C мбар
Δt 20°C мбар
Потеря напора дыма
мбар
Сухой вес
кг
РАЗМЕРЫ
A
мм
B
мм
C
мм
D
мм
E
мм
F
мм
G
мм
H
мм
I
мм
L
мм
L1
мм
M
мм
N
мм
O
мм
P
мм
Q
мм
R
мм
ПОДАЧА ГОРЯЧЕЙ ВОДЫ
DN T1
ВОЗВРАТ ГОРЯЧЕЙ ВОДЫ
DN T2
ПОДКЛЮЧЕНИЕ РАСШИРИТЕЛЬНОГО РЕЗЕРВУАРА DN T3
РАЗГРУЗКА КОТЛА
DN T4
ВЫХОД ДЫМА
Ø T5
AR SW
Номинальная мощность
мин.
макс.
мин.
макс.
мин.
макс.
мин.
макс.
кВт
кВт
Топочная мощность
кВт
кВт
Общая емкость котла
л
Потеря напора воды
Δt 10°C мбар
Δt 15°C мбар
Δt 20°C мбар
Потеря напора дыма
мбар
Сухой вес
кг
РАЗМЕРЫ
A
мм
B
мм
C
мм
D
мм
E
мм
F
мм
G
мм
H
мм
I
мм
L
мм
L1
мм
M
мм
N
мм
O
мм
P
мм
Q
мм
ПОДАЧА ГОРЯЧЕЙ ВОДЫ
DN T1
ВОЗВРАТ ГОРЯЧЕЙ ВОДЫ
DN T2
ПОДКЛЮЧЕНИЕ РАСШИРИТЕЛЬНОГО РЕЗЕРВУАРА DN T3
РАЗГРУЗКА КОТЛА
DN T4
ВЫХОД ДЫМА
Ø T5
92
60
92
64,3
99,5
121
8
4
2
0,5
260
760
764
866
165
130
152
515
395
1046
100
121
925
147
150
250
700
740
2”
2”
1” 1/4
3/4”
200
107
70
107
75
116
121
11
6
2,5
0,7
260
760
764
856
165
130
152
515
395
1046
100
121
925
147
150
250
700
740
2”
2”
1” 1/4
3/4”
200
2360
1535
2360
1668
2565
1925
150
70
42
7,2
3900
1610
2772
1810
–
210
250
1005
860
3232
145
195
1950
662
650
1000
1000
150
150
100
1” 1/2
450
152
100
152
107,3
165
186
20
12
5
1,2
350
810
1014
911
165
130
152
545
420
1296
100
121
980
167
230
350
750
990
2” 1/2
2” 1/2
1” 1/2
3/4”
220
190
137
190
147,4
206
186
12
7
3
1,2
350
810
1014
911
165
130
152
545
420
1296
100
121
980
167
230
350
750
990
2” 1/2
2” 1/2
1” 1/2
3/4”
220
240
160
240
170,9
261
232
17
10
4
2,3
440
810
1264
911
165
130
152
545
420
1516
100
121
980
217
330
450
750
1240
2” 1/2
2” 1/2
1” 1/2
3/4”
220
3000
1950
3000
2113
3250
2600
145
65
45
7,5
5300
1800
2976
2000
–
220
250
1100
940
3446
145
195
2140
716
650
1150
1170
200
200
125
1” 1/2
500
300
196
300
209,5
326
304
40
17
9
3,3
480
950
1264
1031
165
150
152
630
495
1546
100
121
1100
217
330
450
890
1240
2” 1/2
2” 1/2
1” 1/2
3/4”
220
350
228
350
277,5
378
362
48
23
13
3,5
550
950
1514
1031
165
150
152
630
495
1816
100
121
1100
217
380
600
890
1490
2” 1/2
2” 1/2
1” 1/2
3/4”
220
399
260
399
364,5
432
337
43
31
16
4,4
590
950
1515
1031
165
150
152
630
485
1817
100
120
1100
218
380
600
890
1491
2” 1/2
2” 1/2
1” 1/2
3/4”
220
3600
2340
3600
2536
3900
2920
190
90
61
8,2
5800
1800
3346
2000
–
220
250
1100
940
3816
145
195
2140
786
650
1450
1170
200
200
125
1” 1/2
500
- 106 -
525
341
525
417
567
405
40
22
12
4,3
860
1060
1516
1181
165
170
152
725
570
1838
100
120
1250
218
380
600
1000
1492
80
80
2”
3/4”
250
600
390
600
495
648
471
51
28
16
4,8
970
1060
1776
1181
165
170
152
725
570
2098
100
120
1250
218
440
700
1000
1752
80
80
2”
3/4”
250
4000
2600
4000
2819
4334
4425
250
120
70
9,5
7500
1980
3596
2180
–
240
250
1190
960
4086
145
195
2325
786
650
1700
1350
200
200
125
1” 1/2
600
720
468
720
502
777
735
32
18
10
4,5
1250
1260
1776
1331
165
170
212
815
615
2158
100
180
1400
228
440
700
1200
1752
100
100
2” 1/2
3/4”
350
820
533
820
566
881
735
40
25
18
5,6
1250
1260
1776
1331
165
170
212
815
615
2158
100
180
1400
218
440
700
1200
1752
100
100
2” 1/2
3/4”
350
940
611
940
651
1011
850
51
25
16
5,4
1420
1260
2016
1331
165
170
212
815
615
2398
100
180
1400
218
480
900
1200
1992
100
100
2” 1/2
3/4”
350
4500
2926
4500
3165
4868
4790
280
135
80
10,5
8000
1980
3946
2180
–
240
250
1190
960
4436
145
195
2325
786
650
2050
1350
200
200
125
1” 1/2
600
1060
689
1060
731
1140
1240
65
33
20
6
1580
1450
2018
1511
165
190
212
900
670
2420
90
178
1580
218
480
900
1390
1994
125
125
3”
3/4”
400
1250
813
1250
884
1359
1240
86
40
25
6,5
2250
1450
2018
1511
165
190
212
900
670
2420
90
178
1580
220
480
900
1390
1994
125
125
3”
3/4”
400
5000
3251
5000
3515
5407
6150
200
85
55
10,8
9600
2180
3948
2380
–
260
250
1290
1015
4458
145
195
2525
786
750
1950
1550
250
250
150
1” 1/2
650
1480
1600 1890
962
1040 1229
1480
1600 1890
1046
1128 1336
1608
1736 2054
1490
1490 1620
110
115
100
55
60
45
32
40
29
6,5
6,8
7
2650
2700 2850
1530
1530 1530
2320
2320 2520
1661
1661 1661
165
165
165
190
190
190
212
212
212
1013
1013 1013
743
743
743
2722
2722 2722
120
120
120
199
199
199
1730
1730 1730
220
220
220
580
580
580
1100
1100 1200
1470
1470 1470
2296
2296 2496
150
150
150
150
150
150
DN100 DN100 DN100
1” 1/2 1” 1/2 1” 1/2
450
450
450
6000
3902
6000
4215
6483
6800
215
105
65
12
11500
2180
4448
2380
–
260
250
1290
1015
4958
145
195
2525
786
750
2450
1550
250
250
150
1” 1/2
650
5. МОНТАЖ
5.1 Упаковка
Котлы AR SW модели 92-1890 поставляются
в комплекте с установленным люком и
дымовой камерой, а так же изоляцией
корпуса,
обшивка поставляется в
картонной упаковке. Инструментальная
панель поставляется в картонной коробке,
которая размещена в камере сгорания.
Котлы
RSW
модели
23606000
поставляются в комплекте с изоляцией и
кожухом. Инструментальная панель
поставляется в картонной коробке, которая
размещена в камере сгорания.
5.2 Разгрузкa
Котел AR SW оборудован рым-болтами для
разгрузки. Убедитесь, что используемые
строповочные приспособления соответствуют
весу поднимаемого груза. Перед установкой
котла удалите деревянные подставки путем
откручивания винтов крепления (Рис. 5).
5.3 Помещение котельной (Рис. 6)
Котел AR SW может быть установлен только в
помещение, приспособленное для этой цели, при
соблюдении технических норм и действующих
правил, и оснащенное соответствующими
вентиляционными проемами. Вентиляционные
проемы должны быть стационарными,
непосредственно выходящими наружу и должны
располагаться одновременно вверху и внизу
котельной, в соответствии с действующими
стандартами. Расположение вентиляционных
проемов, топливоподачи, силовой цепи и сети
освещения
должны
соответствовать
действующим нормам и отвечать типам
используемого топлива. Для облегчения чистки
системы газоходов, спереди котла должно быть
оставлено свободное пространство длиной не
менее длины корпуса котла, но, в любом случае,
не менее, чем 1300 мм, при условии, что
расстояние между открытой на 90° дверью и
соседней стеной (Х) будет не менее длины
горелки. Площадка под установку котла должна
быть абсолютна горизонтальной. Следует
использовать плоский бетонный фундамент,
способный выдержать полный вес котла плюс
вес полного объема воды; для определения
размеров фундамента см. расстояния R x Q
(таблица размеров). Если горелка поставляется
для газа, удельный вес которого тяжелее
воздуха, электрические части должны
располагаться не ниже, чем на 500 мм от пола.
Устройство не может быть установлено снаружи,
так как оно не спроектировано для наружной
установки и не оснащено автоматической
системой противообледенения.
МОНТАЖ ДЛЯ СТАРЫХ СИСТЕМ ИЛИ
РЕКОНСТРУИРУЕМЫХ СИСТЕМ
В случае установки котла в старых системах или
реконструируемых системах, убедитесь, что:
- Дымоход соответствует температуре
продуктов сгорания, рассчитан и
изготовлен
с
соблюдением
всех
действующих норм, таких как минимальная
кривизна, газоплотность, теплоизоляция, и
не загроможден или закоксован.
- Электрическая разводка выполнена в
строгом соответствии с действующими
соответствующими
правилами
квалифицированным персоналом.
- Система подачи топлива и все баки
выполнены в соответствии с действующими
соответствующими нормами и правилами.
- Расширительный бак/баки могут полностью
компенсировать
расширение
теплоносителя, содержащегося в системе.
- Производительность, напор и направление
подачи циркуляционных насосов –
выбраны правильно.
- Система промыта, прочищена от
отложений, загрязнений, продута и
опрессована.
- Система
водоподготовки
готова
обеспечить специальные требования для
питательной/подпитывающей воды (см
справочные величины).
5.4 Удаление продуктов сгорания
(Рис. 7)
Дымоход и подключение газохода должны
выполняться в строгом соответствии с
действующими нормами и правилами, с
использованием
жестких
газоходов,
устойчивых к воздействию высоких
температур, конденсата и механических
воздействий,
а
также
являющихся
газоплотными. Дымоход должен обеспечивать
минимальное разряжение (тягу) требуемое
действующими правилами, подразумевая под
«нулевым» давлением точку подключения к
дымоходу. Несоответствие или неправильный
выбор размеров дымоходов может привести к
увеличению шума образующегося в процессе
сгорания, появлении проблем с образованием
конденсата и негативным влиянием на
параметры
процесса
сгорания.
Неизолированные дымоходы являются
источником потенциальной опасности.
Герметизация соединений должна выполняться
с применением материалов, способных
выдерживать температуры не менее 250°С.
Соответствующие
точки
измерения
температуры газов и отбора проб продуктов
сгорания должны быть предусмотрены между
котлом и дымоходом. Поперечное сечение и
длина дымовой трубы должны выбираться в
соответствии с действующими национальными
и местными правилами.
5.5 Гидравлические подключения
5.5.1 Питательная вод
Химические свойства питательной и
подпитывающей
воды
являются
определяющими для правильной и безопасной
эксплуатации котла. Вода должна быть
подготовлена с применением соответствующих
систем. Величины, указанные ниже в таблице
могут использоваться как справочные.
ОБЩАЯ ЖЕСТКОСТЬA
ЩЕЛОЧНОСТЬ
PH
КРЕМНИЙ
ХЛОРИДЫ
ppm
мг/л CaCO3
ppm
ppm
10
750
8÷9
100
3500
При использовании воды в системах
центрального отопления вода должна
подготавливаться в следующих случаях:
- Очень большие системы
- Очень жесткая вода
- Частая подпитка системы водой
В этих случаях, если система нуждается в
частичном или полном опорожнении, то она
должна быть заполнена подготовленной
водой. Для контроля воды с автоматической
подпиткой, необходима установка часового
расходомера. Наиболее распространенными
явлениями, возникающими в системах
отопления, являются:
- 107 -
- Отложения накипи
Образование накипи обычно выше там, где
выше температура стенок. Из-за ее низкой
теплопроводности, отложения накипи
снижают теплообмен настолько, что даже
при толщине в несколько миллиметров
теплообмен между дымовыми газами и
водой ограничивается, вызывая перегрев
частей, обращенных к пламени и
соответственно разрушение (трещины) на
трубных досках.
- Коррозия по водяной стороне
Коррозия металлических поверхностей по
водяной стороне котла возникает из-за
диссоциации железа в его ионы. Наличие
растворенных газов, в частности кислорода
и углекислого газа, играют важную роль в
этом процессе. Умягченная и/или
деминерализованная вода препятствуют
образованию накипи и других отложений,
однако не предотвращают коррозии.
Поэтому вода должна быть обработана
ингибиторами коррозии.
5.5.2 Трубы подачи/возврата в системах
центрального отопления
Диаметры подающих и обратных патрубков
указаны для каждой модели котла в таблице
РАЗМЕРЫ. Убедитесь, что система
оборудована достаточным количеством
воздухоотводчиков. Патрубки котла не
должны
нести
нагрузку
от
веса
присоединенных труб системы, а значит
должны быть установлены специальные опоры.
5.5.3 Система наполнения/дренажа
Для наполнения и слива котла кран
должен быть присоединен к патрубку Т4
сзади котла (см. рисунок РАЗМЕРЫ).
5.5.4 Расширительные баки и подключение
предохранительных клапано
Котлы AR SW предназначены для эксплуатации
в системах с принудительной циркуляцией, как с
открытыми, так и с закрытыми расширительными
баками. Установка расширительного бака всегда
необходима для компенсации теплового
расширения воды. В первом случае высота
водяного столба должна быть, по крайней мере,
на 3 метра выше обшивки котла и бак должен
иметь достаточную емкость (между уровнем
воды в нем и переливной трубой), для
увеличения объема воды всей системы в
результате нагрева. Высокие и узкие
расширительные баки более предпочтительны,
поскольку они обеспечивают минимальный
контакт между водной поверхностью и
атмосферой, понижая, таким образом,
испарение. Во втором случае, емкость закрытого
расширительного бака должна быть рассчитана,
принимая во внимание:
- общий объем воды, находящийся в системе
- максимальное рабочее давление в системе
- максимальное
рабочее
давление
расширительного бака
- предустановленное
давление
в
расширительном баке
- максимальная рабочая температура котла
(максимальная температура термостата,
установленного на пульте управления котла,
составляет 90°С, однако проводя расчеты,
следует принимать значение 100°С).
Расширительный бак подключается к системе
трубами. Эти трубы, подключающиеся к патрубку
Т3 (см таблицу РАЗМЕРЫ), не должны
оборудоваться запорными кранами. На патрубке
Т3 или на патрубке подачи, на расстоянии 0,5 м от
RU
первого
фланца,
устанавливается
предохранительный клапан, размеры которого
определяются в соответствии с действующими
местными нормами и мощностью котла. Не
допускается устанавливать какую-либо запорную
арматуру между котлом и расширительным
баком и между котлом и предохранительными
клапанами,
которые
должны
быть
отрегулированы на давление, не превышающее
максимальное допустимое рабочее давление.
5.5.5 Рециркуляционный насос (Рис. 8)
Конденсация водяных паров, содержащихся в
дымовых газах, покидающих котел (конденсат)
появляется тогда, когда тепература воды в
обратной магистрали становится меньше 55°С и
является довольно значительной, особенно при
запуске котла утром, после ночного простоя. Этот
конденсат является кислотным и обладает
коррозионным эффектом, и , с течением времени,
воздействует на металл котла. Следовательно, с
целью предотвращения конденсации между
подающим и обратным патрубками следует
установить рециркуляционный насос для работы
с любым смесительным клапаном. При
работающей системе насос должен обеспечивать
расход в пределах 20 и 30% от общего расхода;
он также должен обеспечивать температуру на
обратном патрубке не ниже 55°С при низком
напоре, который определяется только
преодолением сопротивления котла и клапанов.
Для того, чтобы измерить эффективную
температуру на обратной магистрали системы
центрального отопления, с целью управления
рециркуляционным насосом или воздействия на
его функционирование для получения стабильной
температуры системы, штуцер зонда должен
быть расположен на расстоянии эквивалентном
3-5 диаметрам обратного трубопровода против
течения от места стыковки.
5.6 Открытие и регулировка передней двери
Петли, фиксаж и инверсия открытия люка
модели AR SW 92÷1890 указаны на рис. 9.
Для установки необходимо выполнить
следующие операции:
- Люк оснащен двумя скобами (поз. 3) и
одинаковыми петлями.
- Для определения направления открытия
ВПРАВО или ВЛЕВО отверните гайку
(поз. 7), отверните и снимите гайку (поз.
6) правую или левую, задавая
направление открытия люка.
- Регулировка люка по высоте производится
при помощи гайки (поз. 2), после завершения
регулировки заблокируйте винты (поз. 1).
- Продольная регулировка производится
при помощи винта (поз. 8).
Обозначения (рис. 9)
1 Фиксирующий винт
2 Гайка фиксации/регулировки люка
3 Скоба петли
4 Ось петли
5 Винт петли
6 Гайка фиксации петли
7 Фиксирующий винт
8 Винты и гайки фиксации/регулировки
скобы петли
Петли, фиксаж и инверсия открытия люка
модели AR SW 2360÷6000 указаны на рис.
10.
Для установки необходимо выполнить
следующие операции:
- Люк оснащен четырьмя одинаковыми
петлями (поз. 3).
- Для определения направления открытия
ВПРАВО или ВЛЕВО отверните гайку (поз. 7),
отверните и снимите гайку (поз. 6) правую или
левую, задавая направление открытия люка.
- Регулировка люка по высоте производится
при помощи гайки (поз. 2), после завершения
регулировки заблокируйте винты (поз. 1).
Обозначения (рис. 10)
1 Фиксирующий винт
2 Гайка фиксации/регулировки люка
3 Скоба петли
4 Ось шарнира
5 Винт петли
6 Гайка фиксации петли
7 Фиксирующий винт
5.7 Монтаж горелки (Рис. 11)
Монтаж горелки на дверь котла должен
обеспечивать абсолютную газоплотность для
продуктов сгорания. После монтажа горелки
на котел, зазор между гнездом горелки и
огнеупорным материалом на двери должен
быть заполнен слоем керамического шнура (А),
поставляемого с котлом. Это предотвращает
дверь от перегрева и, как следствие, от
остаточной деформации. Подключения подачи
топлива к горелке должны располагаться так,
чтобы позволять полное открытие двери котла
с установленной горелкой.
AR SW
92-152
190-399
525-600
720-940
1060-1250
1480-1890
2360
3000-3600
4000-4500
5000
6000
L мин. (мм)
230
250
290
320
320
350
350
370
450
500
500
L макс. (мм)
300
320
360
390
390
420
420
450
500
550
550
5.8 Установка глазка контроля пламени
(Рис. 12)
Глазок для визуального контроля пламени
оснащается герметичным соединением (1),
которое должно подключаться силиконовой
или медной трубкой к выходу на горелке (2).
Такая конструкция позволяет воздуху,
поступающему от вентилятора горелки
охлаждать стекло и предотвращает его от
закопчивания. Неисправность присоединения
трубки к глазку может вызвать поломку глазка.
5.9 Установка панелей обшивки,
модели 92÷399
Последовательность монтажа (рис. 13)
a) Установите боковые правые и левые
панели (поз. 1-2) закрепив их на держателе
(поз. 13). Для определения какая из сторон
правая или левая обратите внимание на
отверстие в пластине для проводки
кабелей (поз. 6), она должна быть
повернута в переднюю сторону котла.
б) закрепите панель управления на верхнюю
панель (поз. 3).
в) Установите верхнюю правую панель (поз.
б) с панелью управления на боковую
панель (поз. 1) вместе с пружиной,
перекладинами и гайками (поз. 10-11-12).
- 108 -
г) Вставьте в чехлы колбы датчиков, как
показано на рис. 20 и произведите
электрическое подключение панели
управления к линии питания, горелке, насосу
и т.д. Рекомендуется вставить датчики до
упора в соответствующие колодцы,
обеспечив их контакт. Затем закрепите
пружинками. Закройте крышку электрощита,
проведите вилку горелки через боковую
пластину (поз. 6) и заблокируйте кабель при
помощи поставленного блокиратора.
Закрепите пластину (поз. 6) винтами (поз. 7).
в) Установите верхнюю левую панель (поз.
в) в боковую левую панель (поз. 2) вместе
с пружиной, перекладинами и гайками
(поз. 10-11-12).
г) вставьте в чехлы колбы инструментов, как
показано на рис. 13-20 и произведите
электрическое подключение панели
управления к линии питания, горелке, насосу
и т.д. Рекомендуется вставить датчики до
упора в соответствующие колодцы,
обеспечив их контакт. Затем закрепите
пружинками. Закройте крышку электрощита,
проведите вилку горелки через боковую
пластину (поз. 9) и заблокируйте кабель при
помощи поставленного блокиратора.
Закрепите пластину (поз. 9) винтами (поз. 10).
д) Установите верхнюю панель (поз. 6) на
боковую панель (поз. 3) вместе с пружинами,
перекладинами и гайками (поз. 14-15-16).
е) Установите заднюю панель (поз. 8) на котел и
закрепите винтами (поз. 13) и гайками (поз. 14).
ж)Установите переднюю панель (поз. 5) на люк и
закрепите винтами (поз. 8) и гайками (поз. 9).
з) Плотно прикрепите табличку с данными
котла (см. гл. 1.4), очистив и обезжирив
растворителем зону установки. Не снимайте
табличку, так как она будет приклеиваться.
Табличка находится в конверте с
документами.
5.10 Монтаж панели мод. 525÷1890
Последовательность монтажа (рис. 14)
a) Установите боковые панели (поз. 1-2 и 34), закрепив их на держателях (поз. 19).
б) Установите боковые верхние панели (поз.
5-6), а затем и левые (7-8), закрепив их на
держателях котла (поз. 19) и на
поперечине (поз. 18).
в) Закрепите панель управления на
верхнюю правую панель (поз. 5).
г) Установите верхнюю панель (поз. б)
вместе с панелью управления на боковую
панель (поз. 1) вместе с пружиной,
перекладинами и гайками (поз. 15-16-17).
д) Вставьте в чехлы колбы инструментов, как
показано на рис. 21 и произведите
электрическое подключение панели
управления к линии питания, горелке, насосу и
т.д. Рекомендуется вставить датчики до упора
в соответствующие колодцы, обеспечив их
контакт. Затем закрепите пружинками.
Закройте крышку электрощита, проведите
вилку горелки через боковую пластину (поз.
11) и заблокируйте кабель при помощи
поставленного блокиратора. Закрепите
пластину (поз. 11) винтами (поз. 12).
е) Установите держатель (поз. 18).
ж)Установите верхние панели (поз. 5-6)
закрепив их на боковых панелях (поз. 1)
вместе с пружинами, перекладинами и
гайками (поз. 1415-16).
з) Установите передние панели (поз. 9-10)
на передний люк и закрепите винтами
(поз. 14) и гайками (поз. 13).
и) Плотно прикрепите табличку с данными
котла (см. гл. 1.4), очистив и обезжирив
растворителем зону установки.
Не снимайте табличку, так как она будет
приклеиваться.
Табличка находится в конверте с
документами.
-
-
норме CEI-EN (минимальное открытие
контактов 3 мм).
Правильно подключите проводники L
(фаза) – N (нейтральный).
Используйте проводники с сечением,
равным или большим 1,5 мм2.
Для выполнения любых работ с
электрооборудованием пользуйтесь
электросхемами.
Используйте эффективное заземление.
7. ПАНЕЛЬ УПРАВЛЕНИЯ
6. ПОДКЛЮЧЕНИЕ ЭЛЕКТРОЭНЕРГИИ
Котел
необходимо
подключить
к
однофазной электросети 230 В, 50 Гц с
заземлением, соблюдая следующие
указания. Электрооборудование должно
соответствовать ДЕЙСТВУЮЩИМ НОРМАМ
безопасности.
- Установить двухполюсный переключатель,
линейный разъединитель, соответствующие
7.1 Описание функций
При помощи главного выключателя 11
электропитание подается на щит и
подключенную к нему аппаратуру. В свою
очередь переключатели 12 и 13 прерывают
подачу напряжения к горелку и к насосу
установки. Термостат 21 регулирует рабочую
температуру котла. Термостат минимальной
температуры останавливает насос установки на
фазе выхода на режим до достижения
температуры в котле di 50°C.В случае
использования трехфазных горелок и/или насоса
или при потреблении свыше 3 А, необходимо
установить переключатель с дистанционным
управлением между котлом и нагрузкой. В линии
электропитания щита управления котла
необходимо предусмотреть переключатель с
защитными предохранителями.
T
R
S
C
Термометр
Ручной сброс
Индикатор блокировки грелки
Таймер (если присутствует)
ПРЕДУПРЕЖДЕНИЕ
При подключении электроэнергии к котлам,
имеющим номинальную мощность выше 300
000 ккал/ч необходимо установить второй
защитный термостат.
7.2 Электрическая схема горелки и однофазного насоса (Рис. 17)
АПП. КОНТРОЛЯ ГОРЕЛКИ С
СИГН. СТАРТА ТАЙМЕРА +
СИГНАЛ БЛОКИРОВКИ ГОРЕЛКИ
РАЗЪЕМ ПОДКЛЮЧЕНИЯ ГОРЕЛКИ
2-ое пламя
Рис. 17
Экспликация
IG
Главный выключатель
TS
Защитный термостат 110°C
TM
Термостат минимальной
температуры 45°C
TA
Термостат окружающей среды
IB
Переключатель горелки
SB
SL
Ch
PI
IPi
TR1-TR2
Индикатор блокировки грелки
Индикатор линии
Таймер
Насос установки
Переключатель насоса установки
Термостат 2 этапов 1-2-ое пламя
(30°-90°C Δt 1-2-ое пламя = 7°C)
- 109 -
F4/K4
Подключение
терморегулирования RVP
L
Зажимы
N
соединительной колодки
3-20
RU
8. ПPИHЦИПИAЛЬHAЯ CXEMA - УCTAHOBKA
ДЛЯ ЦEHTPAЛЬHOГO OTOПЛEHИЯ И
ГOPЯЧEГO BOДOCHAБЖEHИЯ (Рис. 18)
Подбор
и
установка
компонентов,
составляющих систему относится к компетенции
монтажной организации, которая должна
подходить к вопросу творчески и в соответствии
с действующими нормами и правилами.
Системы, заполненные антифризом, требуют
использования водоотключающих устройств.
Следует отметить, что схема на Рис. 18
является только принципиальной схемой. В
случае использования различных систем
следует обращаться в Сервисную службу,
которая поставит вам необходимое
дополнительное оборудование.
Обозначени
А Подача в систему центрального отопления
В Возврат из системы центрального отопления
1 Теплогенератор
2 Горелка, оборудованная клапанами
остановки и управления
3 Бойлер
4 Гребенки системы
5 Задвижки системы
6 Циркуляционный насос
7 Обратные клапаны
8 Расширительный бак системы
9 Автоматический воздухоотводчик
10 Предохранительный клапан
11 Фильтр умягчителя
12 Заполнение системы
13
14
15
16
17
18
19
20
21
22
23
9. ПPИEMKA
находятся в соответствии с техническими
данными горелки и электрооборудования котла.
- Система в состоянии принять все
количество тепла, которое может быть
произведено теплогенератором.
- Рециркуляционный насос установлен так,
как описано в разд. 5.5.5.
запуске убедитесь, что передняя дверь,
фланец горелки и подключения к дымовой
трубе
являются
газоплотными
и
присутствует небольшое отрицательное
давление (тяга) на входе в дымоход.
Производительность топливоподачи должна
соответствовать техническим данным по
мощности котла и не в коем случае не
должна превосходить максимальных
значений
заявленной
мощности.
Температура уходящих газов никогда не
должна понижаться менее 160°С.
9.1 Предварительные проверки
После выполнения гидравлических, электрических
и топливных подключений к установке, перед
первым запуском проверьте, что:
- Расширительный бак и предохранительный
клапан (если требуется) правильно
подключены и не могут быть перекрыты.
- Датчики термостатов и термометра надежно
фиксированы внутри соответствующих гильз.
- Турбулизаторы установлены во все
дымогарные трубы.
- Система заполнена водой и воздух
полностью стравлен.
- Насос или насосы работают правильно.
- Гидравлические, электрические устройства,
приборы безопасности и дымоходы
подключены в соответствии с действующими
национальными и местными нормами.
- Горелка установлена в соответствии с
инструкциями,
поставляемыми
изготовителем горелки.
- Напряжение и частота электрической сети
10. OБCЛУЖИBAHИE
10.1 Общие указания
Периодическое обслуживание является
важной составляющей для обеспечения
безопасности, эффективности и длительного
срока эксплуатации оборудования. Все
операции
должны
выполняться
квалифицированным персоналом. Все
операции по чистке и обслуживанию котла
должны производиться при закрытой подаче
топлива и отключенном электроснабжении.
Для правильной работы и максимальной
эффективности котла, камера сгорания,
дымогарные трубы и дымовой коллектор
должны регулярно чиститься.
10.2 Текущее обслуживание
Интервал между операциями чистки должен
определяться опытным путем для каждой
отдельной системы, и, следовательно, не
может устанавливаться заранее. В любом
случае, минимальными рекомендуемыми
интервалами,
в
зависимости
от
используемого топлива, являются:
- Газ: один раз в год
- Дизтопливо: дважды в год
- Мазут: каждые 300 часов работы
В любом случае, следует в первую очередь
придерживаться действующих местных норм
и стандартов. Во время текущего
обслуживания,
после
удаления
турбулизаторов, прочистите щетками трубный
пучок и топку. Удалите нагар и отложения,
9.2 Первый запуск
После успешного выполнения всех проверок,
описанных в предыдущем параграфе, можно
выполнить первый запуск горелки. Эта процедура
должна
выполняться
специалистом,
сертифицированным изготовителем горелки.
Этот специалист несет персональную
ответственность за калибровку и регулировку
горелки в пределах заявленного и утвержденного
диапазона мощности. После открытия
запирающих топливных задвижек и проверки
отсутствия утечек в линии подачи топлива,
переключите все выключатели в положение ВКЛ.
Теперь горелка готова к первому запуску и
настройте, которые должны производиться
сертифицированным специалистом. При первом
скопившиеся в дымовом коллекторе, путем
открытия инспекционных лючков. Для более
интенсивной очистки, удалите задний
дымовой коллектор и, в случае повреждения,
замените уплотнитель для дымовых газов.
Убедитесь, что система отвода конденсата не
блокирована. Убедитесь в том, что
устройства измерения и управления
функционируют нормально. Замерьте расход
подпиточной воды, и, после проведения
анализа воды, добавьте реагент против
накипи. Соли кальция и магния, растворенные
в воде, в случае повторяющихся подпиток
вызывают отложения накипи в котле и
перегрев металлических поверхностей, с
возможным их разрушением, что не может
являться основой для рекламации на
материал или качество изделия, и,
следовательно, не будет являться
гарантийным случаем. После окончания работ
по чистке и обслуживанию и повторного
запуска котла, проверьте плотность
прилегания двери и дымового коллектора, и,
в случае обнаружения неплотности, замените
соответствующие уплотнения.
Выполненные операции должны быть
занесены в журнал эксплуатации установки.
10.3 Специальное обслуживание
Специальное обслуживание производится в
конце отопительного сезона или перед
продолжительной остановкой котла. Должны
выполняться все операции, описанные в
предыдущем разделе, а также дополнительно:
- 110 -
24
25
26
27
Клапан подачи/отсечки топлива
Стабилизатор давления газа
Отсечные краны с ручным приводом
Газовый фильтр
Антивибрационная вставка
Насос
Манометр
Предохранительный термостат
Рабочий термостат
Трехходовой кран
Предохранительный прессостат с ручным
перезапуском
Реле потока
Рабочий термостат
Термостат с ручным перезапуском
Гнездо проверки температуры
9.3 Остановка котла
- Установите контроллер температуры на
минимум.
- Выключите горелку (обесточьте) и
перекройте подачу топлива.
- Оставьте насосы в работе до тех пор, пока
они не отключатся контроллером
температуры.
- Выключите главным выключателем
электрощит.
- Проверьте турбулизаторы на предмет
износа.
- После проведения чистки газоходов,
обработайте их раствором каустической
соды. После высыхания обработанных
поверхностей, протрите все поверхности
масляной тряпкой.
- Гигроскопические материалы (негашеная
известь, силикагель в небольших
емкостях) следует поместить внутрь топки,
которая затем должна быть герметично
закрыта, так чтобы предотвратить
свободный доступ воздуха.
- Не сливайте систему и котел.
- Обработайте винты, гайки, штифты двери
графитовой смазкой.
Выполненные операции должны быть
занесены в журнал эксплуатации установки.
10.4 Чистка котла (Рис. 19)
Для чистки котла, выполните следующие
процедуры:
- Откройте переднюю дверь (1) и удалите
турбулизаторы (2).
- Прочистите внутренние поверхности
камеры сгорания и газоходы, используя
щетку (3) или другие соответствующие
приспособления.
- Через открытый лючок обслуживания (4)
удалите отложения, накопившиеся в
дымовом коллекторе. Для лучшей очистки,
удалите крышку дымового коллектора (5)
и замените уплотнение перед повторной
сборкой.
- Периодически проверяйте, что система
слива конденсата (6) не закупорена.
10.5 Проверка работоспособности котла
Пред запуском и проверкой работоспособности
котла, убедитесь в том, что:
- Турбулизаторы располагаются напротив
теплообменных труб.
- Задвижки и вентили гидравлической системы
и системы подачи топлива – открыты.
- Топливо имеется в наличии.
- Расширительный бак достаточно наполнен.
- Давление в гидравлической системе, в
холодном состоянии, превышает 1 бар и не
достигает максимального разрешенного
давления котла.
- Воздух стравлен из гидравлической системы.
- Электрическая разводка к электрической
сети и компонентам электрической схемы
(горелка, насос, панель управления,
термостат и т.д.) полностью закончена.
- Подключение фазы и нейтрали должно
быть проверено и произведено заземление
установки.
После окончания описанных операций, для
запуска котла необходимо выполнить
следующие действия:
- Если система оборудована контроллером
температуры или таймер-термостатом,
убедитесь, что он находится в положении
«включено».
- Установите комнатный таймер-термостат
или контроллер температуры на желаемое
значение температуры.
- Поверните главный выключатель системы
в положение «включено»
- Установите
термостат
котла,
расположенный на пульте управления котла.
- Переключите выключатель котла на
панели управления в положение
«включено» и убедитесь, что зажегся
зеленый индикатор.
Котел перейдет в режим запуска, и будет
оставаться в нем до достижения установленной
температуры. При возникновении во время
запуска или работы котла каких либо
неисправностей, котел будет «ОСТАНОВЛЕН» и
на горелке и панели управления зажгутся
красные лампочки. Следует выждать не менее
30 секунд перед повторным запуском котла, в
случае блокировки котла. Для того, чтобы
восстановить условия запуска, нажмите кнопку
«сеть» на горелке и подождите появления
пламени. Если зажигание горелки не произошло,
операция может быть повторена максимум 2-3
раза, после чего следует обратиться:
- К информации, поставляемой в инструкции
изготовителем горелки.
- К
разделу
«ОБНАРУЖЕНИЕ
НЕИСПРАВНОСТЕЙ КОТЛА».
- К электрической схеме подключений,
поставляемой с пультом управления.
После запуска котла, убедитесь, что он
останавливается, и запустите его снова:
- Отрегулируйте настройку термостата котла.
- Переключите выключатель котла на
панели управления.
- Настройте комнатный термостат, таймер
или контроллер температуры.
- Проверьте, что роторы насосов свободно
вращаются в правильном направлении.
- Проверьте
срабатывание
полной
остановки котла, используя главный
выключатель.
После правильного срабатывания всех
устройств, перезапустите установку,
проверьте качество сгорания (по анализу
уходящих газов), расход топлива и плотность
уплотнений на двери и дымовом коллекторе.
10.6 Проверка работоспособности
горелки
- Обратитесь к руководству по эксплуатации
горелки.
- При обслуживании горелки выполняйте
операции согласно действующим нормам и
правилам.
10.7 Устранение неисправностей
Перечень основных неисправностей или
неполадок, которые могут возникнуть в
процессе эксплуатации котла, с указанием
их возможных причин и методов устранения
неисправностей, приведен ниже.
RU
- 111 -
НЕИСПРАВНОСТИ
НЕБОЛЬШАЯ ЗАКОПЧЕННОСТЬ КОТЛА
ПРИЧИНА:
Плохо отрегулирована горелка
УСТРАНЕНИЕ:
Проверить настройку горелки (анализ уходящих газов)
Закупоривание газоходов
Прочистите дымовой тракт и дымовую трубу
Загрязнилось устройство подачи воздуха горелки
Прочистите входное устройство горелки
КОТЕЛ НЕ НАГРЕВАЕТ ВОДУ ДО УСТАНОВЛЕННОЙ ТЕМПЕРАТУРЫ
ПРИЧИНА:
Загрязнение жаровой и дымогарных труб
УСТРАНЕНИЕ:
Прочистить жаровую и дымогарные трубы
Соответствие Котел/Горелка
Проверьте соответствие тех. данных и настроек
Недостаточная мощность горелки
Проверьте регулировку горелки
Рабочий термостат
Проверьте правильность функционирования
Проверьте настройки температуры
АВАРИЙНАЯ ОСТАНОВКА КОТЛА ПО ТЕМПЕРАТУРЕ С ИНДИКАЦИЕЙ
ЛАМПОЧКОЙ НА ПАНЕЛИ УПРАВЛЕНИЯ
ПРИЧИНА:
Рабочий термостат
УСТРАНЕНИЕ:
Проверьте правильность функционирования
Проверьте настройки температуры
Проверьте электроразводку
Проверьте установку и функционирование термодатчиков
Нет воды
Проверьте давление в гидросистеме
Воздух в системе
Проверьте функционирование воздухоотводчика
КОТЕЛ НАГРЕВАЕТ ВОДУ ДО УСТАНОВЛЕННОЙ ТЕМПЕРАТУРЫ, НО СИСТЕМА ЦЕНТРАЛЬНОГО ОТОПЛЕНИЯ ХОЛОДНАЯ
ПРИЧИНА:
Воздух в системе
УСТРАНЕНИЕ:
Проверьте функционирование воздухоотводчика
Остановка насоса
Перезапустите насос
Термостат минимальной температуры (если установлен)
Проверьте установку температуры
ЗАПАХ ДЫМА
ПРИЧИНА:
Утечка дымовых газов в помещение
УСТРАНЕНИЕ:
Проверьте и в случае необходимости очистите газоходы котла
Проверьте и в случае необходимости очистите дымовую трубу
Проверьте газоплотность присоединения
дымовой трубы к котлу
ЧАСТОЕ СРАБАТЫВАНИЕ ПРЕДОХРАНИТЕЛЬНОГО КЛАПАНА
ПРИЧИНА:
Давление в контуре системы
УСТРАНЕНИЕ:
Проверьте давление подпитки системы
Проверьте состояние контура системы
Проверьте калибровку клапана
Проверьте установку температуры
Расширительный бак системы
Проверьте расширительный бак
- 112 -
RU
- 113 -
Fig. 1
ATTENZIONE
35451110
Prima di accendere il bruciatore
assicurarsi della tenuta del portellone
onde evitare di rovinare la guarnizione.
Per la regolazione e l'apertura del
portellone vedere libretto istruzioni.
ATTENTION
Before firing the burner please
check the gas-side tightness onto the
ceramic fiber rope of the front door.
For door hinges adjustment see
instruction book.
XXXX
DIVISIONE CALDAIE INDUSTRIALI
VIA RITONDA 78/A - 37047 SAN BONIFACIO - VR - ITALY
OPGELET - De mogelijke spleet tussen branderpijp en
branderplaat met hittebestendig koord afluiten.
ACHTUNG - Ein moglicher Splat zwischen Brennerrohr und
feuerfester auskleidung ist mit keramikfaseres Seil
abzuschliessen.
cod.35450482
Portata Termica Nominale
Nominal Power Input
Dèbit thermique nominal
Caudal tèrmico nominal
Nominel termisk forsyning
kW
Potenza termica Nominale
Nominal Power Output
Puissance nominal
Potencia Nominal
Nominel Kraft
kW
Max Press. Riscaldamento
Max Pressure Heating
Pression maxi Chauffage
Presiòn màx. de Calefacciòn
Varmeanlaegets maks.-tryk
bar
Max Temp. Riscaldamento
Max Temp Heating
Temperature maxi Chauffage
Temper.màx.de Calefacciòn
Varmeanlaegets maks.-temperatur
°C
H 2O
l
Alimentazione elettrica
Electrical Input
Alimantation éléctrique
Alimentaciòn eléctrìca
Elektrisk forsyning
IT - GB - FR - ES - DK
Nennwarmeleistung
Nominal warmtevermogen
Dèbito tèrmico nominal
Nominell varmetillforsel
suurin nimellinen lampojakelu
Nennheizwert
Nominaal verwarmingsvermogen
Potencia Nominal
Nomineel effekt
Suurin nimmelisteho
Max. Wasserdruck
Max. waterdruk
Pressao màx. de caldeira
Max tryck
Boilerin suurin paine
Max. Kesseltemperatur
Max. Ketelstemperatuur
Temperatura màx. de caldeira
Max varmartemperatur
Boilerin suurin lampotila
230V - ~50 Hz
Stromspannung
Stroomspanning
Alimentacao elèctrica
Ingaende spanning
Sahkon syoton jannite
cod. 31350491
ATTENTION - L'interstice eventuel entre la tete du bruleur
et le revetement refactaire doit etre rempli par un
cordon en fibre ceramique.
DE - NL - PT - SE - FI
3545051/1
MANDATA
DEPART
VORLAUF
FLOW
AANVOER
Fig. 3
RITORNO
RETOUR
RUCKLAUF
RETURN
3540908/2
Fig. 2
3540907/2
4
Konstruktions-nr.
Herstellnr.
Fabrikaatnr.
No de construccao
Konstruktion Nr.
No. Matricola
Construction No.
No.de fabrication
Valmistusnumero
No.de fabricacion
ATTENZIONE - Chiudere con un cordone di fibra ceramica
l'eventuale fessura tra il canotto del bruciatore e il
foro esistente sulla porta.
CAUTION - The eventual gap between burner head and
refractory lining must be sealed by a ceramic fiber
rope.
Fig. 4
Fig. 5
Fig. 6
3÷5D
D
Fig. 7
Fig. 8
Fig. 9
1
2
3
4
5
6
Fig. 10
7
L
A
Fig. 11
Fig. 12
Per la messa a terra del
corpo caldaia è previsto sulla
testata anteriore un punto di
connessione.
A connection point is provided
on the front head for earthing
the boiler body.
Une connexion est prévue sur
la tête avant pour la mise à la
terre du corps de chaudière.
Para la puesta a tierra del
cuerpo de la caldera está previsto en el anterior un punto
de conexión.
Der findes et forbindelsessted
til kedelhovedelementets
jordforbindelse på forhovedet.
Für die Erdung des Kesselkörpers ist an der vorderen
Stirnseite ein Anschluss vorgesehen.
Voor de aardaansluiting van
het ketellichaam is een aansluitpunt voorzien op het voorste kopstuk.
Está previsto na cabeça frontal um ponto de conexão para
a ligação de terra do corpo da
caldeira.
Fig. 13
För att jorda värmepannans
struktur, har en anslutningspunkt förutsetts på främre
överstycket.
Etummaisessa päädyssä on
liitospiste lämmityskattilan
rungon maadoitusta varten.
Точка подключения на
передней
плите
для
заземления корпуса котла.
Fig. 14
B
C
5 4 3 2 1
C
14
13
12
A
Fig. 16
Fig. 15
Fig. 18
6
7 8 9 1011
Fig. 19
Fig. 20
Fig. 21
BRUCIATORI
CALDAIE MURALI E TERRA A GAS
GRUPPI TERMICI IN GHISA E IN ACCIAIO
GENERATORI DI ARIA CALDA
TRATTAMENTO ACQUA
CONDIZIONAMENTO
FINTERM S.p.A.
Corso Allamano, 11
10095 GRUGLIASCO, (TO) ITALY
TEL. 011/40221
FAX 011/7804059
Libretto cod. 35452071 (02/11)