1
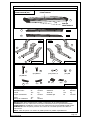
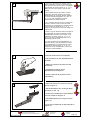
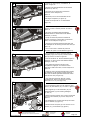
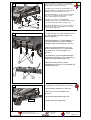
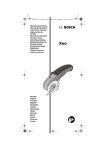
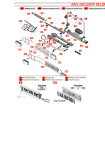
RAV4 TOYOTA 3 DOOR TÜV APPROVED - TÜV GENEHMIGT - APPROUVE TÜV - TÜV GOEDGEKEURD - APROBADO TÜV PARTNUMBER : PZ415-X1909-ZA (BLACK) PZ415-X1909-ZB (ALU) SIDE STEP SEITENTRITTBRETT MARCHEPIED LATERAL TREEPLANK SET Note: Endcaps are not part of side step function. Bemerkung: Auf die Abschlußkappen nicht steigen. Note: Ne pas monter sur les capuchons plastique dextremité. Opmerking: Plastieken eindstukken zijn geen deel van de opstapfunctie. Nota: No apoyar el pie en las tapas laterales. INSTALLATION MANUAL - ANBAUANLEITUNG - MANUEL DINSTALLATION - MONTAGE HANDLEIDING - MANUAL DE INSTALACION PZ415-X1909-ZA/ZB ISSUE: 4 Page: 1/13 Date: 31/01/2003 134374 ESTRIBO LATERAL KIT CONTENT - STÜCKLISTE - CONTENU - KIT - INHOUD - CONTENIDO KIT Antislip rubber (2x) PZ415-X1909-03 PZ415-X1909-1A (black) PZ415-X1909-1B (alu) 1 (2X) Endcaps PZ415-X0909-01 2 LHS 3 RHS LHS RHS 9 6 5 8 4 10 (6x) M8x20 (3x) (3x) 13 PZ415-X1909-02 16 15 19 (6x) M8x40 7 PZ415-X1909-01 17 (30x) 8x22x1,5 11 (6x) (18x) M8 (6x) 12 PZ415-X0909-60 -Weight: Installation time: 14.5 45 Kg minutes -Gewicht: Anbauzeit: 14.5 45 Kg Minuten -Poids: Temps dinstallation: 14.5 45 Kg minutes -Gewicht: Installatie tijd: 14.5 45 Kg minuten -Peso: Tiempo de instalación 14.5 45 Kg minutos NOTE:All parts where a separate part number is mentioned, can be ordered separately. HINWEIS:Alle mit einer Teilnummer bezeichneten Zubehörteile können separat bestellt werden. AANWIJZING:Alle onderdelen, voorzien van een stuknummer kunnen afzonderlijk besteld worden. REMARQUE:Toutes les pièces pourvues dun numéro de commande peuvent être obtenues séparement. NOTA: Todas las piezas con numero de pedido pueden ser pedidas separadamente. PZ415-X1909-ZA/ZB ISSUE: 4 Page: 2/13 Date: 31/01/2003 PARTNUMBER: PZ415-X1909-ZA / ZB PARTNAME: SIDE STEP MODELCODE: *CA2**-AZ*NKW APPLICATION/ANWENDUNG/APPLICATIE/APLICACIÓN VARIANTS: J L VEHICLE OPTION/FAHRZEUG OPTION/OPTION VEHICULE/VOERTUIG OPTIE/OPCIÓN VEHÍCULO 1 2 3 4 5 6 7 8 9 10 1 2 3 4 5 6 7 8 9 10 ACCESSORY/ZUBEHÖR/ACCESSOIRE/ACCESORIOS 1 SIDE BAR 2 3 4 5 6 7 8 9 10 1 2 3 4 5 6 7 8 9 10 PZ415-X190A-ZA/ZB SAFETY PRECAUTION/SICHERHEITSMASSNAHME/PRECAUTIONS DE SICURITE/VEILIGHEIDSVOORZIENINGEN/MEDIDAS DE SEGURIDAD Step/Punkt/Point/Stap/Punto Step/Punkt/Point/Stap/Punto Step/Punkt/Point/Stap/Punto Step/Punkt/Point/Stap/Punto TOOLS/WERKZEUGE/OUTILS/WERKTUIGEN/HERRAMIENTAS Screwdriver Schraubenzieher Tournevis Schroevendraaier Destornillador Alcohol Alkohol Alcool Alcohol Brush Pinsel Brosse Borstel Pincel PZ415-X1909-ZA/ZB ISSUE: 4 13mm (2x) 13mm T-shaped key T-förmiger Schlüssel Clé à T T-vormige sleutel Llave de dos manos Wrench Schlüssel Clé Steeksleutel LLave Antirust paint Rostschutzfarbe Vernis antirouille Anti-roest verf Pintura anticorrosiva Cloth Tuch Chiffon Doek Tela Knife Universalschneider Couteau type Stanley Cutter mes Cúter Measure Meßband Mètre Meter Cinta métrica Page: 3/13 Date: 31/01/2003 Remove the three caps by a screwdriver, as shown in figure 1. 1 Mit Hilfe eines Schraubenziehers die drei Deckel abnehmen (s. Abb. 1). Demonter les trois capouchons à laide dun tournevis, comme indiqué sur la figure 1. Met behulp van een schroevendraaier de drie moerdopjes verwijderen (zie figuur 1). Quitar los tres tapones con un destornillador (figura 1). Remove excessive protective material from under panel by a cutter at bracket positions as shown in figure 2. 2 Mit einem Universalschneider überflußiges Schutzmaterial vom Unterboden bei den Haltern entfernen (s. Abb.2). Couper le matériel de protéction excédent du panneau à laide dun couteau dans la position des étries, comme indiqué sur la figure 2. Verwijder de overtollige beschermingscoating aan de onderzijde van het voertuig met een cutter mes (zie figuur 2). Con un cúter cortar el material de protección excedente del panel en las abrazaderas (figura 2). If it is necessary to remove protective material completely, apply a thin layer of protective antirust paint by a brush, as shown in figure 3. 3 Falls es erforderlich ist, das Schutzmaterial ganz zu entfernen, mit einem Pinsel etwas Rostschutzfarbe auftragen (s. Abb. 3). Si le matériel de protéction doit être coupé complétément, appliquer une couche de vernis antirouille à laide dune brosse, comme indiqué sur la figure 3. Indien het nodig is de beschermingscoating volledig te verwijderen om de beugels te kunnen monteren dan moet de naakte oppervlakte beschermd worden met anti-roest verf (zie figuur 3). Si el material de protección debe ser cortado completamente, aplicar una capa fina de pintura anticorrosiva con un pincel (figura 3). 4 Fit the supporting profile (3) to the vehicle by using screws (19) and washers (16), as shown in figure 4. Das Tragprofil (3) mit den Schrauben (19) und Unterlegscheiben (16) am Fahrzeug befestigen (s. Abb. 4). 16 Monter la barre de support (3) à la voiture à laide des vis (19) et des rondelles (16), comme indiqué sur la figure 4. Het draagprofiel (3) monteren met behulp van bouten (19) en rondellen (16) (zie figuur 4). 3 Montar la barra de soporte (3) en el vehículo con los tornillos (19) y las arandelas (16) (figura 4). 19 16 19 Critical operation / Specifics tools Operación Critica / Herramientas especificas PZ415-X1909-ZA/ZB ISSUE: 4 Operator safety ¡Precaución! Check point Comprobar Page: 4/13 Date: 31/01/2003 Clean the required surface thoroughly, as shown in figure 5. 5 Die Berührungsfläche fleißig säubern (s. Abb. 5). Nettoyer la surface de contact minutieusement, comme indiqué sur la figure 5. 9 8 De contactoppervlakte zorgvuldig reinigen (zie figuur 5). 7 Limpiar la superficie de contacto cuidadosamente (figura 5). Remove protective film from spacers (11), (12), (13). 6 Die Schutzfolie von den Abstandsstücken (11), (12), (13) abziehen. 12 Détacher la pellicule de protection des entretoises (11), (12), (13). De beschermingsfolie (11), (12), (13) van de afstandsstukken verwijderen. 11 7 Quitar la película de protección de los separadores (11), (12), (13). 13 Place the spacers on the brackets concerned, as shown in figure 7. 12 11 13 Die Abstandsstücke an den entsprechenden Haltern anbringen (s. Abb. 7). Positionner les entrétoises sur les étriers correspondents, comme indiqué sur la figure 7. 9 8 De afstandsstukken op de overeenkomende beugels aanbrengen (zie figuur 7). 7 8 Posicionar los separadores en las abrazaderas correspondientes (figura 7). Push for one minute in order to assure good adhesion of the spacer, as shown in figure 8. Die Abstandsstücke eine Minute lang aufdrücken, damit das Klebeband gut anhaftet (s. Abb. 8). Presser les entretoises pendant une minute pour une bonne adhesion, comme indiqué sur la figure 8. De afstandsstukken gedurende een minuut goed aandrukken (zie figuur 8). 1MIN. Presionar los separadores durante un minuto para obtener una buena adhesión (figura 8). Critical operation / Specifics tools Operación Critica / Herramientas especificas PZ415-X1909-ZA/ZB ISSUE: 4 Operator safety ¡Precaución! Check point Comprobar Page: 5/13 Date: 31/01/2003 9 15 16 Fit the brackets (7), (8) and (9) to the supporting profile by screws (15), washers (16) and nuts (17) without tighten, as shown in figure 9. Die Halter (7), (8) und (9) mit den Schrauben (15), Unterlegscheiben (16) und Mutttern (17) am Tragprofil befestigen, aber nicht anziehen (s. Abb. 9). 7 Monter les étries (7), (8) et (9) à la barre de support avec vis (15), rondelles (16) et écroux (17) sans serrer, comme indiqué sur la figure 9. 8 9 17 Beugels (7), (8) en (9) op het draagprofiel bevestigen met bouten (15), rondellen (16) en moeren (17), zonder deze vast te zetten (zie figuur 9). Montar las abrazaderas (7), (8) y (9) en la barra de soporte con tornillos (15), arandelas (16) y tuercas (17) sin apretar (figura 9). 16 Fit the side step (1) to the brackets by nuts (17) and washers (16) without tighten, as shown in figure 10. 10 1 Das Seitentrittbrett (1) mit den Muttern (17) und Unterlegscheiben (16) an den Haltern befestigen, aber nicht anziehen (s. Abb. 10). Monter le marchepied latéral (1) sur les étriers à laide des écroux (17) et rondelles (16) sans serrer, comme indiqué sur la figure 10. De treeplank (1) op de beugels bevestigen met behulp van moeren (17) en rondellen (16), zonder deze vast te zetten (zie figuur 10). 16 17 16 Montar el estribo lateral (1) en las abrazaderas con tuercas (17) y arandelas (16) sin apretar (figura 10). 17 Tighten the screws as shown in figure 11. 11 Die Schrauben festziehen (s. Abb. 11). Serrer les vis comme indiqué sur la figure 11. De schroeven aandraaien (zie figuur 11). Apretar los tornillos (figura 11). 25 N·m Critical operation / Specifics tools Operación Critica / Herramientas especificas PZ415-X1909-ZA/ZB ISSUE: 4 Operator safety ¡Precaución! Check point Comprobar Page: 6/13 Date: 31/01/2003 If there is a gap between the brackets and the vehicle under panel, remove the bracket and glue other spacers to the previous ones to compensate the clearance as shown in figures 12, 13, 14, 15. Make sure the correct spacer is used for each bracket. 12 Beim Abstand zwischen den Haltern und dem Unterboden, den Halter entfernen und andere Abstandsstücke an vorherigen Stücken ankleben, so daß der Abstand ausgeglichen ist (s. Abb. 12, 13, 14, 15). Sich vergewissern, daß das Abstandsstück dem Halter entspricht. Sil y a despace entre les étries et le panneau de la voiture, demonter létrier et coller des autres entretoises sur la précédente pour égaliser la fente comme indiqué sur les figures 12, 13, 14, 15. Sassurer que lentretoise correcte soit utilisée pour chaque étrier. Indien er nog een afstand is tussen de beugels en de bodemplaat, de beugels verwijderen en extra afstandsstukken monteren op de vorigen, om de afstand weg te werken (figuur 12, 13, 14, 15). Zorg ervoor dat het juiste afstandsstuk voor de juiste beugel gebruikt wordt. En caso de espacio entre las abrazaderas y el panel del vehículo, quitar la abrazadera y encolar otros separadores en las piezas anteriores para compensar la distancia (figura 12, 13, 14, 15). Asegurarse de que el distanciador correcto esté colocado en cada abrazadera. Remove protective film from spacers . 13 Die Schutzfolie von den Abstandsstücken abziehen. Détacher la pellicule de protection des entretoises. De beschermingsfolie van de afstandsstukken verwijderen. Quitar la película de protección de los separadores. Place the spacer on the previous one as shown in figure 14. 14 Das Abstandsstück am vorherigen Stück ankleben (s. Abb. 14). Positionner lentretoise sur la précédente comme indiqué sur la figure 14. Het afstandsstuk op het vorige monteren (figuur 14). Posicionar el separador en la pieza anterior (figura 14). Critical operation / Specifics tools Operación Critica / Herramientas especificas PZ415-X1909-ZA/ZB ISSUE: 4 Operator safety ¡Precaución! Check point Comprobar Page: 7/13 Date: 31/01/2003 Push for one minute in order to assure a good adhesion of the spacer as shown in figure 15 and re-install the bracket correctly by following steps shown in figures 9, 10, 11. 15 Das Abstandsstück eine Minute lang aufdrücken, damit das Klebeband gut anhaftet (s. abb 15). Den Halter wieder befestigen (s. Arbeitsvorgänge 9, 10, 11). Presser pendant 1 minute pour assurer une bonne adhésion de lentretoise comme indiqué sur la figure 15 et monter létrier correctement en suivant les figures 9, 10, 11. Gedurende 1 minuut goed aandrukken (figuur 15) en opnieuw monteren (zie figuur 9, 10 en 11). 1MIN. Presionar el separador durante un minuto para obtener una buena adhesión (figura 15) y volver a montar la abrazadera correctamente (figuras 9, 10, 11). Align the side step to the vehicle and make sure there is 18 mm clearance between the endcap and the fender as shown in figure 16. 16 Das Seitentrittbrett mit dem Fahrzeug ausrichten. Sich vergewissern, daß der Abstand zwischen der Abschlußkappe und dem Kotflügel 18 mm ist (s. Abb. 16). Aligner le marchepied latéral à la voiture et sassurer quil y a 18 mm despace entre les capuchons plastiques dextrémités et le garde-boue comme indiqué sur la figure 16. De treeplank uitlijnen met het voertuig en ervoor zorgen dat er 18mm afstand is tussen de voorvleugel en het plastic deel. (zie figuur 16). 18mm Alinear el estribo lateral al vehículo y asegurarse de que haya un espacio de 18 mm entre las tapas de los extremos y el guardabarro como aparece en la figura 16. Tighten the side step screws as shown in figure 17. 17 Die Schrauben am Seitentrittbrett festziehen (s. Abb. 17). Serrer les vis du marchepied latéral comme indiqué sur la figure 17. De bouten van de treeplank aandraaien (figuur 17). 25 N·m Critical operation / Specifics tools Operación Critica / Herramientas especificas PZ415-X1909-ZA/ZB ISSUE: 4 Apretar los tornillos del estribo lateral (figura 17). Operator safety ¡Precaución! Check point Comprobar Page: 8/13 Date: 31/01/2003 Remove the three caps by a screwdriver, as shown in figure 18. 18 Mit Hilfe eines Schraubenziehers die drei Deckel abnehmen (s. Abb. 18). Demonter les trois capouchons à laide dun tournevis, comme indiqué sur la figure 18. Met behulp van een schroevendraaier de drie moerdopjes verwijderen (zie figuur 18). Quitar los tres tapones con un destornillador (figura 18). Remove excessive protective material from under panel by a cutter at bracket positions as shown in figure 19. 19 Mit einem Universalschneider überflußiges Schutzmaterial vom Unterboden bei den Haltern entfernen (s. Abb.19). Couper le matériel de protéction excédent du panneau à laide dun couteau dans la position des étries, comme indiqué sur la figure 19. Verwijder de overtollige beschermingscoating aan de onderzijde van het voertuig met een cutter mes (zie figuur 19). Con un cúter cortar el material de protección excedente del panel en las abrazaderas (figura 19). If it is necessary to remove protective material completely, apply a thin layer of protective antirust paint by a brush, as shown in figure 20. 20 Falls es erforderlich ist, das Schutzmaterial ganz zu entfernen, mit einem Pinsel etwas Rostschutzfarbe auftragen (s. Abb. 20). Si le matériel de protéction doit être coupé complétément, appliquer une couche de vernis antirouille à laide dune brosse, comme indiqué sur la figure 20. Indien het nodig is de beschermingscoating volledig te verwijderen om de beugels te kunnen monteren dan moet de naakte oppervlakte beschermd worden met anti-roest verf (zie figuur 20). Si el material de protección debe ser cortado completamente, aplicar una capa fina de pintura anticorrosiva con un pincel (figura 20). 21 Fit the supporting profile (2) to the vehicle by using screws (19) and washers (16), as shown in figure 21. Das Tragprofil (2) mit den Schrauben (19) und Unterlegscheiben (16) am Fahrzeug befestigen (s. Abb. 21). 16 Monter la barre de support (2) à la voiture à laide des vis (19) et des rondelles (16), comme indiqué sur la figure 21. 2 19 Het draagprofiel (2) monteren met behulp van bouten (19) en rondellen (16) (figuur 21). 19 16 Critical operation / Specifics tools Operación Critica / Herramientas especificas PZ415-X1909-ZA/ZB ISSUE: 4 Montar la barra de soporte (2) en el vehículo con los tornillos (19) y las arandelas (16) (figura 4). Operator safety ¡Precaución! Check point Comprobar Page: 9/13 Date: 31/01/2003 Clean the required surface thoroughly, as shown in figure 22. 22 6 Die Berührungsfläche fleißig säubern (s. Abb. 22). Nettoyer la surface de contact minutieusement, comme indiqué sur la figure 22. De contactoppervlakte zorgvuldig reinigen (zie figuur 22). 5 Limpiar la superficie de contacto cuidadosamente (figura 22). 4 Remove protective film from spacers (10), (11), (12). 23 Die Schutzfolie von den Abstandsstücken (10), (11), (12) abziehen. 12 Détacher la pellicule de protection des entretoises (10), (11), (12). De beschermingsfolie (10), (11), (12) van de afstandsstukken verwijderen. 11 Quitar la película de protección de los separadores (10), (11), (12). 10 24 Place the spacers on the brakets concerned, as shown in figure 24. 12 Die Abstandsstücke an den entsprechenden Haltern anbringen (s. Abb. 24). 11 10 6 Positionner les entrétoises sur les étriers correspondents, comme indiqué sur la figure 24. De afstandsstukken op de overeenkomende beugels aanbrengen (figuur 24). 5 Posicionar los separadores en las abrazaderas correspondientes (figura 24). 4 Push for one minute in order to assure good adhesion of the spacer, as shown in figure 25. 25 Die Abstandsstücke eine Minute lang aufdrücken, damit das Klebeband gut anhaftet (s. Abb. 25). Presser les entretoises pendant une minute pour une bonne adhesion, comme indiqué sur la figure 25. De afstandsstukken gedurende een minuut goed aandrukken (zie figuur 25). 1MIN. Critical operation / Specifics tools Operación Critica / Herramientas especificas PZ415-X1909-ZA/ZB ISSUE: 4 Presionar los separadores durante un minuto para obtener una buena adhesión (figura 25). Operator safety ¡Precaución! Check point Comprobar Page: 10/13 Date: 31/01/2003 26 16 Fit the brackets (4), (5) and (6) to the supporting profile by screws (15), washers (16) and nuts (17) without tighten, as shown in figure 26. 15 Die Halter (4), (5) und (6) mit den Schrauben (15), Unterlegscheiben (16) und Mutttern (17) am Tragprofil befestigen, aber nicht anziehen (s. Abb. 26). 4 5 Monter les étries (4), (5) et (6) à la barre de support avec vis (15), rondelles (16) et écroux (17) sans serrer, comme indiqué sur la figure 26. Beugels (4), (5) en (6) op het draagprofiel bevestigen met bouten (15), rondellen (16) en moeren (17), zonder deze vast te zetten (zie figuur 26). 6 16 17 Montar las abrazaderas (4), (5) y (6) en la barra de soporte con tornillos (15), arandelas (16) y tuercas (17) sin apretar (figura 26). Fit the side step (1) to the brackets by nuts (17) and washers (16) without tighten, as shown in figure 27. 27 1 Das Seitentrittbrett (1) mit den Muttern (17) und Unterlegscheiben (16) an den Haltern befestigen, aber nicht anziehen (s. Abb. 27). Monter le marchepied latéral (1) sur les étriers à laide des écroux (17) et rondelles (16) sans serrer, comme indiqué sur la figure 27. De treeplank (1) op de beugels bevestigen met behulp van moeren (17) en rondellen (16), zonder deze vast te zetten (figuur 27). 17 16 16 Montar el estribo lateral (1) en las abrazaderas con tuercas (17) y arandelas (16) sin apretar (figura 27). 17 Tighten the screws as shown in figure 28. 28 Die Schrauben festziehen (s. Abb. 28). Serrer les vis comme indiqué sur la figure 28. De schroeven aandraaien (figuur 28). 25 N·m Critical operation / Specifics tools Operación Critica / Herramientas especificas PZ415-X1909-ZA/ZB ISSUE: 4 Apretar los tornillos (figura 28). Operator safety ¡Precaución! Check point Comprobar Page: 11/13 Date: 31/01/2003 If there is a gap between the brackets and the vehicle under panel, remove the bracket and glue other spacers to the previous ones to compensate the clearance as shown in figures 29, 30, 31, 32. Make sure the correct spacer is used for each bracket. 29 Beim Abstand zwischen den Haltern und dem Unterboden, den Halter entfernen und andere Abstandsstücke an vorherigen Stücken ankleben, so daß der Abstand ausgeglichen ist (s. Abb. 29, 30, 31, 32). Sich vergewissern, daß das Abstandsstück dem Halter entspricht. Sil y a despace entre les étries et le panneau de la voiture, demonter létrier et coller des autres entretoises sur la précédente pour égaliser la fente comme indiqué sur les figures 29, 30, 31, 32. Sassurer que lentretoise correcte soit utilisée pour chaque étrier. Indien er nog een afstand is tussen de beugels en de bodemplaat, de beugels verwijderen en extra afstandsstukken monteren op de vorigen, om de afstand weg te werken (figuur 29, 30, 31, 32). Zorg ervoor dat het juiste afstandsstuk voor de juiste beugel gebruikt wordt. En caso de espacio entre las abrazaderas y el panel del vehículo, quitar la abrazadera y encolar otros separadores en las piezas anteriores para compensar la distancia (figura 29, 30, 31, 32). Asegurarse de que el distanciador correcto esté colocado en cada abrazadera. Remove protective film from spacers. 30 Die Schutzfolie von den Abstandsstücken abziehen. Détacher la pellicule de protection des entretoises. De beschermingsfolie van de afstandsstukken verwijderen. Quitar la película de protección de los separadores. Place the spacer on the previous one as shown in figure 31. 31 Das Abstandsstück am vorherigen Stück ankleben (s. Abb. 31). Positionner lentretoise sur la précédente comme indiqué sur la figure 31. Het afstandsstuk op het vorige monteren (figuur 31). Posicionar el separador en la pieza anterior (figura 31). Critical operation / Specifics tools Operación Critica / Herramientas especificas PZ415-X1909-ZA/ZB ISSUE: 4 Operator safety ¡Precaución! Check point Comprobar Page: 12/13 Date: 31/01/2003 Push for one minute in order to assure a good adhesion of the spacer as shown in figure 32 and reinstall the bracket correctly by following steps shown in figures 26, 27, 28. 32 Das Abstandsstück eine Minute lang aufdrücken, damit das Klebeband gut anhaftet (s. Abb. 32). Den Halter wieder befestigen (s. Arbeitsvorgänge 26, 27, 28). Presser pendant 1 minute pour assurer une bonne adhésion de lentretoise comme indiqué sur la figure 32 et monter létrier correctement en suivant les figures 26, 27, 28. Gedurende 1 minuut goed aandrukken (zie figuur 32) en opnieuw monteren (figuur 26, 27, 28). 1MIN. Presionar el separador durante un minuto para una obtener buena adhesión (figura 32) y volver a montar la abrazadera correctamente (figura 26, 27, 28). Align the side step to the vehicle and make sure there is 18 mm clearance between the endcap and the fender as shown in figure 33. 33 Das Seitentrittbrett mit dem Fahrzeug ausrichten. Sich vergewissern, daß der Abstand zwischen der Abschlußkappe und dem Kotflügel 18 mm ist (s. Abb. 33). Aligner le marchepied latéral à la voiture et sassurer quil y a 18 mm despace entre les capuchons plastuques dextrémités et le garde-boue comme indiqué sur la figure 33. De treeplank uitlijnen met het voertuig en ervoor zorgen dat er 18mm afstand is tussen de voorvleugel en het plastic deel. (zie figuur 33). Alinear el estribo lateral al vehículo y asegurarse de que haya un espacio de 18 mm entre las tapas de los extremos y el guardabarro (figura 33). 18mm Tighten the side step screws as shown in figure 34. 34 Die Schrauben am Seitentrittbrett festziehen (s. Abb. 34). Serrer les vis du marchepied latéral comme indiqué sur la figure 34. De bouten van de treeplank aandraaien (zie figuur 34). 25 N·m Critical operation / Specifics tools Operación Critica / Herramientas especificas PZ415-X1909-ZA/ZB ISSUE: 4 Apretar los tornillos del estribo lateral (figura 34). Operator safety ¡Precaución! Check point Comprobar Page: 13/13 Date: 31/01/2003