Transcript
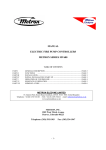
Abra el registro y deje correr bastante agua para eliminar las
suciedades de la cañeria.
La columna de agua hasta el punto de instalación del producto
debe tener como minimo 10kPa (1mca) y como maximo 400kPa
(40mca).
Para columnas de agua entre 80 y 400kPa (8 y 40mca) o salida de
agua proveniente de la calle (distribuidora), es necesario colocar el
reductor que acompaña el producto en la perforación del niple de
entrada del agua. Para que no ocurra perdidas, use cinta veda
rosca en la entrada del agua del producto (fig 2).
Haga correr bastante agua por la ducha antes de hacer la conexión
a la red eléctrica para llenar la cámara de calentamiento y evitar la
quema de la resistencia. Verifique si hay alguna perdida de agua.
Cierre el registro.
Fijacion del soporte de la duchita manual:
Fije el soporte a una altura adecuada al alcance de las manos y
tambien para facilitar la salida del agua por la manguera, llevando
en cuenta para no perforar los caños que estan en la pared (fig 3).
Ejemplo para abrir o cerrar la duchita (fig.04)
MAXI SHOWER
Potencia Selector de desconectado/off
(Watios) temperatura
0
IP24
220
127
0
0
0
0
0
230
0
0
tibio/warm* 2.250 2.400 2.800 3.000 3.200 3.000 3.200 3.200
Power
(Watts)
Select Key
Sección del conductor/Size of the cables (mm²) **
Sección del conductor/Size of the cables (AWG)
Presión de Funcionamiento/
Working water Pressure
MIN.
35
50
35
40
50
25
30
30
6
10
6
6
10
4
4
4
8
6
8
8
6
10
10
10
10 kPa o 1 mca.
MÁX. 400 kPa o 40 mca.
Conexión Hidráulica / Hydraulic Connection Entrada de agua: Rosca macho 1/2" / Water inlet: thread 1/2"
Cables blancos - Fase/Neutro (127 V~)– Fase/Fase (220 V~)
Cable verde o verde/amarillo - puesta a tierra
Conexión Eléctrica/
Electric Connection
White wires - single phase (127V~) – 2-phase (220V~)
Green wire or green/yellow wire - grounding wire.
Resistividad del agua
Water resistivity
a 22ºC no debe ser inferior a 1.300ohm x cm.
at 22ºC must be lower than 1.300ohm x cm.
*Potencia economica **Para distancias mayores que 30m, utilice conductores de mayor sección.
**For distances over 30 meters, wider cables must be used for the unit's installation.
*Economic Power
1
110-127 V~ / 127 V~ / 220-230 V~
2
Niple de entrada del agua
Water inlet nipple
Reductor
Reducer
Rosca: 1/2" BSP
Thread: 1/2" BSP
25A
4mm² / 10 AWG
220 - 230 V~
4400 W
!
3
DUCHITA MANUAL /
HAND SHOWER
SOPORTE/SUPPORT
5
4
CONECTOR /
CONNECTOR
MANGUERITA/HOSE
!
EVIT
F
KS O
ELÉ E CHOQ
CTR
E RIS CKS!
ICO! UE
ID TH SHO
AVO CTRIC
Conecte el cable de tierra
ELE
Connect the grounding wire properly.
al sistema de puesta a tierra!
BEFORE CONNECTING THE PRODUCT TO THE ELEC- ANTES DE CONECTAR A LA RED ELECTRICA,
TRICITY, LET WATER RUN THROUGH THE UNIT! ACCIONE EL PRODUCTO CON AGUA FRIA!
PUESTA A TIERRA
Importante para su seguridad: Para evitar riesgos de choques
eléctricos, conecte el cable de tierra del producto a un sistema de
puesta a tierra.
Para que se llegue a una maxima eficiencia, el sistema de puesta a
tierra deber ser hecho por un profesional calificado.
UTILIZACION
Despues de conectar los cables, el producto estara listo para
funcionar.
Conecte el disyuntor.
Coloque la tecla selectora en la posición deseada (fig 1).
Al abrir el registro, el producto funcionara automaticamente.
Para cambiar la potencia, cierre el registro y coloque la tecla de
temperaturas en la posición que mas le agrade. La temperatura de
salida de agua puede ser regulada a traves del registro.
Para su seguridad y mayor vida util de los componentes del
producto, accione la tecla selectora de temperaturas
solamente con el registro cerrado.
ATENCION!!
" Niños, personas de edad, enfermos, personas fisica o
mentalmente debilitadas deben ser supervisionadas cuando de la
utilización del aparato".
EVENTUALES PROBLEMAS Y RESPECTIVAS SOLUCIONES
FREQUENT QUESTIONS AND ANSWERS
PROBLEMA
PROBLEM
CAUSA PROBABLE
PROBABLE REASON
Circuit Breakers or Fuses are turn off.
Disyuntor o llave fusible desconectado.
La ducha no
conecta
automaticamente La tecla selectora está en la posición
al abrir el registro desconectado.
The water is cold The selection temperature key is in
the off position.
No sale agua
por la ducha
No water is
flowing through
the shower head
El calentador
calienta poco
mismo con la
tecla selectora
en la posición
caliente.
The shower
head is not
heating properly
even with select
key in the hot
position
El registro principal de su
cuarto de baño está cerrado
o existe aire en la cañeria.
The main register is closed
or there is air inside the pipes.
Cableado inadecuado.
The wires do not have the
properly size as specified
in the instruction manual.
Tensión electrica baja.
Low voltage. The voltage
of your system may be not
constant or under the
values specified.
SOLUCIÓN
SOLUTION
Turn the circuit breakers or fuses ON.
Accione el disyuntor o llave fusible.
Coloque la tecla selectora en la posición tibia o
caliente.
Put the selection temperature key in the hot
or warm position.
Abra el registro principal de su cuarto de baño que
pertenece al mismo circuito para retirar todo el aire.
Open the main register and/or the taps and let the
water flow to remove the air. The shower head must
be disconected of the electrical system.
Contacte un profesional habilitado para verificar si los
conductores están de acuerdo con las especificaciones
de este manual.
Contact a qualified technician, to check the your
electrical installation.
Contacte un profesional habilitado, para verificar si la tensión
eléctrica está abajo de los valores nominales de suministro
(110V/127V~ o 220V~) En caso positivo, comunique el
proveedor de energía eléctrica de su región.
Contact a qualified technician, to verify your electrical system.
If the nominal voltage of your system will be under the values
specified by your electrical supplier (110V~/ 127~ or 220V~),
contact the utility responsible for your electrical supply.
Desgaste natural por tiempo de utilización.
Wear due to the normal use.
Cambie la resistencia.
Heating Element Change.
Quema de
la resistencia
Burn of the
element
ENGLISH
PREPARING TO INSTALL
Caliente / hot 3.300 4.000 3.850 4.400 5.400 4.400 5.400 5.400
Disyuntor (Amperios)/Circuit breaker(Amper)
INSTALACION ELECTRICA
Conecte los cables del producto a los cables de la red eléctrica,
utilizando para esto, conector adecuado a la tensión y corriente
eléctrica del producto (este conector no acompaña el producto).
La altura ideal para la caja de derivación es de 13 cm arriba de la
salida de água (fig 05). Atencion! No use ningun tipo de enchufe o
toma para la instalación del producto.
110
Tensión / Tension (V~)
13 cm
INSTALACION HIDRAULICA - NO USE HERRAMIENTAS
ATTENTION! Read carefully all of the installation instructions
before installing the product. Keep this manual for further reference
in case needed. The installation of this equipment must be done by
someone able.
Grado de Protección
Protection level:
CLOSE / CERRADO
Certifiquese que el voltaje del producto correponde a la tensión de
la linea de instalación (110V~,127V~ o 220V~) Fig. 1.
Verifique o providencie una línea driecta del cuadro de distribución
usando cables y protección (disyuntor) llevando en consideración
los valores de voltaje, potencia y distancia del producto hasta el
cuadro de distribución, conforme tabla de caracteristicas técnicas.
Utilice disyuntor bipolar para 220V~(fase fase) y disyuntor unipolar
para 110V~, 127V~ o 220V~(fase-neutro).
Desconecte el disyuntor del cuadro de distribución de energia
eléctrica del circuito en el cual será instalado el producto, antes de
iniciar la instalación.
Modelo
Type:
OPEN / ABIERTO
PREPARACION DE LA INSTALACION
INSTALLATION INSTRUCTION.
40 cm
ATENCION! Lea las instrucciones de instalación, antes de instalar
el aparato. Guarde este manual para futuras consultas. La
instalación de este producto deber ser hecha por personas
capacitadas.
CARACTERISTICAS TECNICAS / TECHNICAL FEATURES
EVIT
F
KS O
ELÉ E CHOQ
CTR
E RIS CKS!
ICO! UE
ID TH SHO
AVO CTRIC
Conecte el cable de tierra
ELE
Connect the grounding wire properly.
al sistema de puesta a tierra!
ESPAÑOL
BEFORE CONNECTING THE PRODUCT TO THE ELEC- ANTES DE CONECTAR A LA RED ELECTRICA,
TRICITY, LET WATER RUN THROUGH THE UNIT! ACCIONE EL PRODUCTO CON AGUA FRIA!
INSTRUCCIONES DE INSTALACION
Instalación eléctrica
inadecuada.
Inadequate Electric
Installation.
Verificar la tensión y características de instalación eléctrica,
corregirlas y cambiar la resistencia conforme indicación arriba.
Check the voltage and characteristics from the electric installation,
correct them and change the element according indication above.
Make sure the voltage of the shower head is adequate to the
Voltage of the line which comes from the main switchboard (110V~,
127V~ Or 220V~) Pict 1. The unit must be installed to a direct line
which comes from the main switchboard using adequate cables
protection (circuit Brea-ker). Such installation should take into
consideration the voltage (volts), power rating (Watts) and distance
from the shower head to the switchboard, according to the technical
characteristics table.
Use two pole circuit breaker to 220V~ (two phase supply) and a
single pole circuit breaker to 110V~, 127V~ and 220V~ (single
phase supply) Pict.1
Before starting the installation switch off the circuit breaker from the
main switchboard where the shower unit will be connected.
HYDRAULIC INSTALLATION - TOOLS CAN NOT BE USED
Open the water's valve and let the water flow through out the tube
to remove the dirty.
The pipe system must supply a minimum water pressure of 10kPa
(1mca) up to a Maximum of 400kPa (40mca).
For pressures between 80 and 400kPa (8 and 40mca) place the
reducer, which comes along with the shower, into the water inlet
of the unit (Pict 2). Use a sealing tape in the water inlet
nipple of the unit, to avoid leakages.
Before connecting the unit to the wires, let water run through the
product so that once the water chamber is fulfilled with water the
heating element will not be damaged as as result of bad installation
procedures. While water runs through the unit, check if have any
leakage points and then close water's valve.
Installation of the hose holder support installation:
Install the bypass hose holder on the wall in a way that it does not
block the water to flow through it, and at a height easily reached by
ones hand. Note: check the positions of the pipes placed into the
wall just to make sure they are not holed during the installation
process ( pict. 03). To open or close the hose holder, pull or push
the pin ( pict. 04).
ELECTRICAL INSTALLATION
Connect the unit to the wires and make sure the connectors used
(Not supplied) match the right voltage and power rating of the
electrical circuit of the shower head.
The ideal height of the derivative box is 13 cm above the water
outlet (pict 05).
Attention!: do not use plugs neither sockets for the installation.
GROUNDING SYSTEM.
For your own safety: In order to avoid the risk of electric shocks,
make sure to connect the grounding wire of the shower unit into the
grounding system.
To reach the maximum efficiency, the grounding system must be
done by a qualified professional.
USAGE
After connected the wires accordingly, the shower head will be
ready to start working.
Switch on the circuit breaker.
Place the selector's key in the position desired (pict 1)
For changing the power rating, close the water's valve and place
the temperature selector in the position desired. The water
temperature can be controlled through the water's valve.
For your own safety and provide a longer life to the
components of the unit, only use the selector's key during the
water's valve (register) closed.
ATTENTION! “ Children and old, sick , weaked physically or
mentally people must be supervisioned if they need to use the
equipment ".
LORENZETTI S/A. INDÚSTRIAS BRASILEIRAS ELETROMETALÚRGICAS
Av. Presidente Wilson, 1230 - CEP 03107-901 - São Paulo - SP
C.N.P.J 61.413.282/0001-43 - HECHO EN BRASIL / MADE IN BRAZIL


![vista-7 [original final arreglado]](http://vs1.manualzilla.com/store/data/006208524_1-1dbf55d4eb0db4987487c96e508c34d7-150x150.png)