1
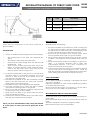
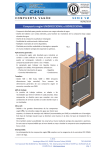
MANUAL DE INSTALACIÓN TOBOGAN PÚBLICO COD.: 18543
18545
* * * Lea atentamente este manual antes de proceder al montaje * * *
POS.
CÓDIGO
1
18543-0200
PISTA TOBOGAN RECTA
1
18545-0200
PISTA TOBOGAN CURVADA IZQUIERDA
2
18543-0100
BARANDILLA TOBOGAN
DESCRIPCIÓN
COMPROBACIÓN DEL EMBALAJE
MANTENIMIENTO
Comprobar que los componentes del modelo elegido se
encuentran en buen estado.
Comprobar regularmente :
INSTALACIÓN
1. Elegir el emplazamiento adecuado teniendo en cuenta
lo siguiente :
•
•
•
•
Las medidas del tobogán (adjuntamos croquis).
Las cotas mínimas de seguridad recomendadas.
Que el agua que fluirá por la pista, caerá en el interior de la piscina.
Que debe existir una toma de agua al pie de la escalera, para la conexión con la boquilla de impulsión
que alimentará de agua a la pista con una válvula
bajo una trampilla que pueda abrirse sólo con la
ayuda de una herramienta.
2. Para una correcta y sólida fijación al suelo, debe proveerse una zona hormigonada como cimentación, de
1m.x0.5m y 0.3 m tanto en el pie de la escalera cómo en
el soporte delantero de la pista .
3. Montar las barandillas del tobogán por separado introduciéndolas en la pista (primero por la parte superior y después colocándolas en el alojamiento inferior).
4. Montar los escalones que unirán las dos barandillas.
5. Una vez fraguado el hormigón, colocar el tobogán en su
emplazamiento y marcar los puntos de fijación al suelo.
6. Retirar el tobogán y taladrar sobre el cemento los puntos
previamente marcados, con una broca de widia de
10 mm.
7. Fijar firmemente el tobogán al suelo con los tornillos, tacos y arandelas suministradas.
8. Conectar la boquilla de la pista a la toma de agua con
el tubo transparente suministrado con el conjunto.
Una vez terminado el montaje guarde este manual en
lugar seguro por si alguna vez necesita algún recambio.
1. El buen estado de la boquilla de la pista, que no este obstruida ni averiada y que el agua fluya correctamente. Esto evitará el sobrecalentamiento de la pista, debido a la
acción del sol y favorece el deslizamiento de los usuarios
por la rampa.
2. Que el tubo transparente que conduce el agua hacia la
boquilla de la pista, se encuentra en condiciones.
3. El buen estado de las bandas antideslizantes de los peldaños y reemplazarlas inmediatamente cuando muestren
síntomas de desgaste.
4. El estado del perfil negro de los bordes. Si esta despegado, pegarlo con adhesivo de cianocrilato. Si se encuentra
en mal estado debe ser reemplazado ya que se trata de
una protección para evitar daños a los usuarios.
5. Que la superficie de poliéster no presente grietas ni golpes
que puedan provocar cortes o rozaduras a los usuarios y
limpiar el tobogán con detergente que contenga desinfectante y desincrustante de cal, procurando que no gotee dentro de las piscinas.
ADVERTENCIAS DE SEGURIDAD
No demorar la reparación o substitución de cualquier parte
dañada que pueda ser causa de un accidente.
Respetar las normas existentes en cada país en relación al
emplazamiento y cotas de seguridad.
Tener en cuenta que la cota * que debe sobrepasar al máximo el nivel de la pared de la piscina para mayor seguridad.
CONSEJOS PARA EVITAR ACCIDENTES
Asegurarse de que esta despejada de bañistas la zona de
seguridad antes de saltar.
Los usuarios deben bajar de uno a uno y no amontonarse bajo la rampa.
Este tobogán esta diseñado para soportar peso de adultos.
Bajar por la rampa del tobogán, adoptando una posición
adecuada.
Este producto esta fabricado según norma UNE-EN 1176-3
18543E200
INSTALLATION MANUAL OF PUBLIC SLIDE CODE: 18543
18545
* * * Read this manual carefully before assembling the slide * * *
POS.
CODE
1
18543-0200
STRAIGHT SLIDE RAMP
1
18545-0200
LEFT CURVED SLIDE RAMP
2
18543-0100
SLIDE HAND RAIL
DESCRIPTION
CHECK THE CONTENTS
MAINTENANCE
Check that the components of the chosen model are in
good condition.
Regularly check the following:
INSTALLATION
1. Choose a suitable position bearing in mind the following:
•
•
•
•
The measurements of the slide (see attached diagram).
The minimum safety levels recommended.
Ensure that the water flowing down the slide ram will
fall inside the pool.
There must be a water supply inlet at the foot of the
ladder, to connect with the nozzle, which will supply
water to the slide ramp, with a valve under a cover
that can only be opened using a tool.
2. To anchor the slide firmly to the ground, a concrete area
should be made as a foundation measuring 1m x 0.5 m
and 0.3 m., both at the foot of the ladder and at the
front support of the slide ramp.
3. Assemble the handrails of the slide separately inserting
them in the slide ramp (first the upper part and then
placing them in the lower housing).
4. Assemble the steps, which will join the two handrails.
5. Once the concrete has set, place the slide in position
and mark the fastening points on the ground.
6. Remove the slide and drill the previously marked points
on the cement, using a 10mm. drill bit.
7. Firmly anchor the slide to the ground with the screws,
plugs and washers provided.
8. Connect the nozzle of the slide ramp to the water supply
inlet with the transparent hose provided.
Once you have assembled the slide, keep this manual
in a safe place in case you need a spare part in the
future.
1. The good condition of the slide ramp nozzle, ensuring that
it is not blocked or broken and that water flows properly.
This will prevent the slide ramp from overheating from the
sunrays and will help users to slide down the ramp.
2. Ensure that the transparent hose through which water
flows to the slide ramp nozzle, is in good condition.
3. Ensure that the slip-proof bands on the steps are in good
condition, and replace them immediately when they are
worn.
4. Ensure that the black outline of the edges is in good condition.
If it becomes detached, stick it down with
cyanoacrylate adhesive. If it is worn, it should be replaced as it protects users from injury.
5. Check that the polyester surface is not cracked or dented
as they could cause cuts and grazes to users. Clean the
slide with detergent containing disinfectant and lime descaler, making sure that it does not drip into the pool.
SAFETY WARNINGS
Do not delay repairing or replacing a damaged part which
may cause accidents.
Follow the regulations of each country regarding the position
of the slide and safety levels.
Bear in mind that the length * must project out of the wall of
the pool as much as possible, for greater safety.
RECOMMENDATIONS TO AVOID ACCIDENTS
Check that there are no bathers in the safety area before using the slide.
Users should slide down one by one and not pile up under the
ramp.
This slide is designed to support the weight of adults.
Slide down the ramp in the normal position.
This product is manufactured in accordance with standard UNE-EN 1176.3
18543E200