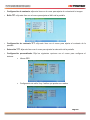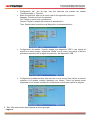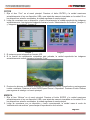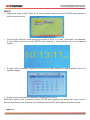
1
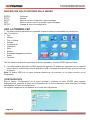
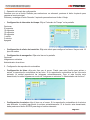
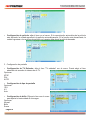
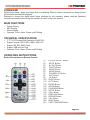
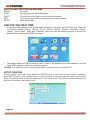
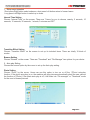
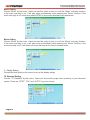
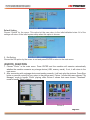
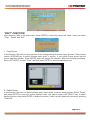
MANUAL DE INSTRUCCIONES
PORTA-RETRATOS DIGITAL
PF-4334LL
ESTIMADO CLIENTE
Con el fin de que obtenga el mayor desempeño de su producto, por favor lea este manual de
instrucciones cuidadosamente antes de comenzar a utilizarlo, y guárdelo para su futura referencia.
Si necesita soporte adicional, no dude en escribir a: [email protected]
PRECAUCIÓN
RIESGO DE CHOQUE
ELÉCTRICO , NO ABRA
Precaución: Para reducir el riesgo de choque eléctrico, no retire
la cubierta, no hay partes manipulables por el usuario al interior
de la unidad. Refiera todo mantenimiento o intervención técnica
a personal técnico calificado.
Este símbolo indica la existencia de voltaje peligroso al
interior de esta unidad que constituye un riesgo de choque
eléctrico.
Este símbolo indica que hay importantes instrucciones de
operación y mantenimiento en la literatura que acompaña a
esta unidad.
LÍNEAS DE SERVICIO AL CLIENTE PREMIER
Venezuela:
Colombia:
Panamá:
Sitio Web:
E-mail:
0800 – ELECTRIC (353-2874)
01-900-331-PEJC (7352)
300-5185
www.premiermundo.com
[email protected]
NOTA
Nos reservamos el derecho de modificar las especificaciones, características y/u operación de esta
unidad sin previo aviso, con el fin de continuar las mejoras y desarrollo del mismo.
Pagina 1
ÍNDICE
FUNCIONES PRINCIPALES ..................................................................................................................... 3!
ESPECIFICACIONES TÉCNICAS............................................................................................................. 3!
INSTRUCCIONES DE OPERACIÓN ......................................................................................................... 3!
CONTROL REMOTO ............................................................................................................................. 3!
DESCRIPCIÓN DE LOS BOTONES EN LA UNIDAD ............................................................................ 4!
USO LA PRIMERA VEZ ............................................................................................................................ 4!
CONFIGURACIÓN ................................................................................................................................. 4!
FOTOS ................................................................................................................................................... 9!
MÚSICA .................................................................................................................................................. 9!
FOTO + MÚSICA .................................................................................................................................. 10!
PELÍCULA ............................................................................................................................................ 10!
CALENDARIO ...................................................................................................................................... 11!
RELOJ .................................................................................................................................................. 12!
ALARMA ............................................................................................................................................... 13!
ENCENDIDO/APAGADO AUTOMÁTICO ............................................................................................ 14!
EDITAR................................................................................................................................................. 14!
FAVORITO ........................................................................................................................................... 15!
CAMBIAR FUNCIÓN ............................................................................................................................ 15!
PROTECTOR DE PANTALLA .............................................................................................................. 15!
SOLUCIÓN DE PROBLEMAS ................................................................................................................ 16!
Pagina 2
FUNCIONES PRINCIPALES
•
•
•
•
•
•
•
Reproducción de imagen
Reproducción MP3
Reproducción de películas
Calendario
Reloj
Alarma
Configuración de encendido/apagado automático
ESPECIFICACIONES TÉCNICAS
•
•
•
•
•
Pantalla LCD TFT de 7” con resolución de 480x234
Formatos Soportados: JPEG, MP3, WMA, VOB, AVI
Soporta tarjetas SD, MS, MMC
Soporta dispositivos USB y conexión en caliente.
Calendario, reloj, alarma, configuración de encendido/apagado automático
INSTRUCCIONES DE OPERACIÓN
CONTROL REMOTO
1. Encender / Apagar
2. Silenciar
3. Salida AV
4. Foto
5. Música
6. Película
7. Reproducir / Pausar
8. Salir
9. Arriba
10. Derecha
11. Izquierda
12. Ingresar
13. Abajo
14. Calendario
15. Configuración
16. Volumen+
17. Anterior
18. Retroceder
19. Volumen20. Siguiente
21. Adelantar
Pagina 3
DESCRIPCIÓN DE LOS BOTONES EN LA UNIDAD
ENTER:
STOP:
RIGHT:
LEFT:
SETUP:
Confirmar
Detener
Mover el cursor a la derecha o girar la imagen
Mover el cursor hacia la izquierda ó girar la imagen
Ingresar al menú de configuración
USO LA PRIMERA VEZ
1. Un menú principal aparecerá en la pantalla cuando la unidad es encendida por primera vez.
Hay 11 funciones:
• Foto
• Música
• Foto + música
• Película
• Configuración
• Calendario
• Reloj
• Alarma
• Encendido/Apagado automático
• Editar
• Favoritos
Use los botones de dirección para elegir la función deseada y el botón ENTER para confirmar.
2. La unidad soporta dispositivos USB ó tarjetas de memoria. Si ambos son ingresados en la unidad al
mismo tiempo, puede elegir entre el dispositivo USB ó la tarjeta de memoria para que sea leído por
el sistema.
Nota: El puerto USB solo es para conectar dispositivos de memoria, no es para conexión con el
computador.
CONFIGURACIÓN
Elija la función “Configuración” en el menú principal y presione el botón ENTER para ingresar.
Adicionalmente, presione el botón de Configuración en el control remoto en otras funciones, la unidad
para ingresar al modo de configuración.
La siguiente imagen es la que aparece en el modo de configuración:
Pagina 4
1. Operación del menú de configuración
Presione una vez el botón Derecho para seleccionar un submenú, presione el botón Izquierdo para
regresar al menú principal.
Presione y sostenga el botón Derecho / Izquierdo para seleccionar Arriba ó Abajo
•
Configuración de intervalos de tiempo: Elija el “Intervalo de Tiempo” en la pantalla.
Opciones:
5 segundos
10 segundos
15 segundos
30 segundos
1 minuto
3 minutos
Apagado
•
Configuración de efecto de transición: Elija este efecto para configurar los ítems. Hay en total 18
tipos de modos
• Configuración de navegación: Elija este ítem en la pantalla.
Opciones:
Imágenes en miniatura
Administrador de archivos
2. Configuración de reproducción automática
•
Configuración de fotos: elija este ítem con el cursor. Puede usar esta función para activar o
activar la reproducción automática de las fotos. Si la reproducción automática de las fotos esta
activada, la unidad reproducirá las imágenes automáticamente. Pero si esta función esta
desactivada, la unidad ingresara en modo de “Imágenes en miniatura” ó Administrador de Archivos”.
•
Configuración de música: elija el ítem con el cursor. Si la reproducción automática de la música
esta activada, la unidad reproducirá la música automáticamente. Si la función esta desactivada,
debe presionar el botón ENTER para elegir el archivo deseado.
Pagina 5
•
Configuración de película: elija el ítem con el cursor. Si la reproducción automática de la película
esta activada, la unidad reproducirá la película automáticamente. Si la función esta desactivada, la
unidad ingresara a los archivos de película y el usuario debe elegir la película deseada.
3. Configuración de pantalla
Configuración de TV Estándar: elija el ítem “TV estándar” con el cursor. Puede elegir el ítem
adecuado de acuerdo al sistema de su TV.
Opciones:
NTSC
PAL
AUTO
•
• Configuración de tipo de pantalla
Opciones:
16:9
4:3
Auto
Configuración de brillo: Elija este ítem con el cursor
para ajustar la luminosidad de la imagen.
Opciones:
Normal
Brillo
Suave
•
Pagina 6
•
Configuración de contraste: elija este ítem con el cursor para ajustar el contraste de la imagen.
•
Brillo TFT: elija este ítem con el cursor para ajustar el brillo de la pantalla.
•
Configuración de contraste TFT: elija este ítem con el cursor para ajustar el contraste de la
pantalla.
•
Saturación TFT: elija este ítem con el cursor para ajustar la saturación de la pantalla.
•
Configuración personalizada: Elija las siguientes opciones con el cursor para configurar el
sistema:
! Idioma OSD
!
Configuración de estilo: Hay 4 estilos que pueden ser usados
Pagina 7
!
!
Configuración del tipo de logo: Hay dos opciones que pueden ser usadas
“Predeterminada” y “Favorita”.
Modo de repetición: elija con el cursor una de las siguientes opciones:
Apagado: Cancela el modo de repetición
Uno: Repite un archivo de reproducción
Carpeta: Repite la carpeta de archivos de reproducción
Todo: Repite todos los archivos del dispositivo de almacenamiento
!
Configuración de medios: Cuando inserte una dispositivo USB o una tarjeta de
memoria al mismo tiempo, seleccione “Media” con el cursor, para elegir el archivo
que desea reproducir de la tarjeta de memoria o del dispositivo USB
!
Configuración predeterminada: elija este ítem con el cursor. Esta función le permite
regresar a los ajustes iniciales realizados por fabrica. Todos los ajustes serán
regresados a los valores iniciales de configuración cuando esta opción es elegida.
4. Salir: Elija esta función para regresar al menú principal.
Pagina 8
FOTOS
1. Elija el ítem “Foto” en el menú principal. Presione el botón ENTER y la unidad examinara
automáticamente si hay un dispositivo USB o una tarjeta de memoria insertadas en la unidad. Si no
hay dispositivos externos conectados, la unidad regresara al menú principal.
2. Luego de conectarse con un dispositivo y leerlo correctamente, la unidad reproducirá las imágenes
automáticamente. Las siguientes imágenes ilustran el modo “Administración de Archivos” (Imagen 1)
y “Imágenes en miniatura” (Imagen 2).
Imagen 1
Imagen 2
3. El sistema soporta imágenes en formato JPG.
4. Si la función de reproducción automática esta activada, la unidad reproducirá las imágenes
automáticamente cuando ingrese a la función “Foto”.
5. Presione los botones de Derecha/ Izquierda una vez para rotar la foto, o presiónelos y sostenga para
ir atrás o adelante. Presione el botón ENTER para Pausar ó Reproducir. Presione el botón Detener
para regresar al catalogo o al menú principal.
MÚSICA
1. Elija el ítem “Música” en el menú principal. Presione el botón ENTER y la unidad examinara
automáticamente si hay un dispositivo USB o una tarjeta de memoria insertadas en la unidad. Si no
hay dispositivos externos conectados, la unidad regresara al menú principal.
2. Luego de conectarse con un dispositivo y leerlo correctamente, la unidad usara el modo de
“administración de archivos” para manejar la reproducción de la música.
Pagina 9
3. El sistema soporta formatos de música MP3 y WMA.
4. Si la función de reproducción automática esta activada, la unidad reproducirá la música
automáticamente cuando ingrese a la función “Música”.
5. Presione los botones de Derecha/ Izquierda una vez para ajustar el volumen, o presiónelos y
sostenga para seleccionar reproducir hacia atrás o hacia delante y presione el botón ENTER para
confirmar. Presione el botón ENTER para Pausar ó Reproducir la música. Presione el botón Detener
para regresar al menú principal.
FOTO + MÚSICA
1. Elija el ítem “Foto + Música” en el menú principal. Presione el botón ENTER y la unidad examinara
automáticamente si hay un dispositivo USB o una tarjeta de memoria insertadas en la unidad. Si no
hay dispositivos externos conectados, la unidad regresara al menú principal.
2. El sistema soporta formatos JPG, MP3 y WMA.
3. Si la función de reproducción automática esta activada, la unidad reproducirá las fotos y la música
automáticamente cuando ingrese a la función “Foto + Música”.
4. Presione los botones de Derecha/ Izquierda una vez para ajustar el volumen, o presiónelos y
sostenga para seleccionar reproducir hacia atrás o hacia delante. Presione el botón ENTER para
Pausar ó Reproducir la música. Presione el botón Detener para regresar al menú principal.
PELÍCULA
1. Elija el ítem “Película” en el menú principal. Presione el botón ENTER y la unidad examinara
automáticamente si hay un dispositivo USB o una tarjeta de memoria insertadas en la unidad. Si no
hay dispositivos externos conectados, la unidad regresara al menú principal.
2. Luego de conectarse con un dispositivo y leerlo correctamente, la unidad usara el modo de
“administración de archivos” para manejar la reproducción.
Pagina 10
3. El sistema soporta formatos de DAT, MPG, VOB y AVI.
4. Si la función de reproducción automática esta activada, la unidad reproducirá la película
automáticamente cuando ingrese a la función “Película”.
5. Presione los botones de Derecha / Izquierda una vez para ajustar el volumen, o presiónelos y
sostenga para seleccionar reproducir hacia atrás o hacia delante. Presione el botón ENTER para
Pausar ó Reproducir la música. Presione el botón Detener para regresar al menú principal.
CALENDARIO
1. Mostrar: elija el ítem “Calendario” en el menú principal, y presione el botón ENTER para confirmar.
Luego, presione “Mostrar” y presione el botón ENTER para ingresar al calendario.
2. Información de la semana: presione los botones de dirección para ajustar el mes o el año con el fin
de informarse de las semanas
3. Configuración de fecha: después de elegir el ítem “Calendario” en el menú principal, presione el
botón ENTER para ingresar al modo de calendario. Seleccione “Ajustar fecha” y presione el botón
ENTER para confirmar. Use los botones de dirección para ajustar la fecha. Presione el botón “EXIT”
para regresar al menú principal.
Pagina 11
RELOJ
1. Después de elegir el ítem “Reloj” en el menú principal, presione el botón ENTER para ingresar al
modo de ajuste de reloj
•
Con la función “Mostrar” puede elegir entre mostrar el “Reloj” ó el “Reloj y Calendario” en la pantalla.
Si elije “Reloj”, presione el botón ENTER para confirmar y será mostrado como en la siguiente
imagen:
•
Si elige “Reloj y calendario” presione el botón ENTER para confirmar y será mostrado como en la
siguiente imagen:
2. Ajustar la hora: esta función le permite al usuario ajustar la hora.
Seleccione “Ajustar Hora” y presione el botón ENTER para ingresar a los ajustes de la hora. Use los
botones de dirección para ajustar la hora. Presione el botón EXIT para regresar al menú principal.
Pagina 12
ALARMA
Después de elegir el ítem “Alarma” en el menú principal, presione el botón ENTER para ingresar al
modo de ajuste de alarma.
1. Activar o desactivar la alarma: elija el ítem “Habilitar” para seleccionar Activar o Desactivar la
función.
2. Ajustar la hora: esta función le permite al usuario ajustar la hora.
Seleccione “Ajustar Hora” y presione el botón ENTER para ingresar a los ajustes de la hora. Use los
botones de dirección para ajustar la hora. Presione el botón EXIT para regresar al menú principal.
3. Timbre de la alarma: una imagen de recordatorio aparecerá en la pantalla cuando la alarma esta
activada. Presione cualquier botón para salir.
Pagina 13
ENCENDIDO/APAGADO AUTOMÁTICO
Después de elegir “Encendido Automático” en el menú principal, presione el botón ENTER para
ingresar a los ajustes de encendido automático.
1. Seleccione activar para habilitar la función
2. Presione desactivar para inhabilitar la función
3. Ajustar la hora: Seleccione este ítem para ajustar la hora de encendido/apagado automático. Use los
botones de dirección para ajustar la hora. Presione el botón EXIT para regresar al menú principal.
EDITAR
Después de elegir el ítem “Editar” en el menú principal, presione el botón ENTER para ingresar al modo
de edición.
Opciones:
Copiar
Borrar
Salir
1. Copiar imagen: en esta función, puede copiar imágenes del dispositivo de almacenamiento como
imágenes de fondo de pantalla.
Presione los botones Arriba/Abajo en el control remoto y presione el botón ENTER para confirmar. Un
marco con línea roja muestra que la imagen ha sido elegida. Presionando el botón ENTER nuevamente
se cancelara la selección. Después del proceso de elección, presione los botones de Izquierda y
derecha para seleccionar “Guardar” y luego presione el botón ENTER para guardar la imagen deseada.
2. Borrar imagen: en esta función, puede borrar las imágenes que han sido seleccionadas como
protector de pantalla.
Pagina 14
Seleccione “Borrar” y presione el botón ENTER para ingresar al modo de borrado de imágenes. Use los
botones Izquierdo/Derecho del control remoto para seleccionar la imagen deseada, luego presione el
botón ENTER para borrar la imagen. Pueden ser borradas todas la imágenes seleccionando “Borrar
todo”.
FAVORITO
Después de elegir el ítem “Favorito” en el menú principal, presione el botón ENTER para ingresar al
modo de protector de pantalla. Luego presione el botón ENTER para pausar ó reproducir la imagen del
protector de pantalla.
CAMBIAR FUNCIÓN
Presione el botón EXIT en el control remoto para regresar al menú principal. Use los botones de
dirección para cambiar todas las funciones.
PROTECTOR DE PANTALLA
1. Sin protector de pantalla: las siguientes son condiciones especiales, en las cuales el sistema no
ingresa en modo de protector de pantalla: Foto, Música, Foto + Música ó película. Si la pantalla esta
bajo el estado de “Reloj” ó “Reloj y Calendario”.
2. Modo de protector de pantalla: Si no hay archivos para reproducir continuamente, o no hay acción
por mas de 20 segundos, la unidad ingresara al modo de protector de pantalla para proteger la
pantalla hasta que presione el botón EXIT para regresar al menú principal.
Pagina 15
SOLUCIÓN DE PROBLEMAS
La siguiente tabla contiene problemas y soluciones que pueden presentarse al usar la unidad. Si aun
siguiendo las soluciones recomendadas la unidad sigue presentando problemas, contacte a un agente
de servicio autorizado para su revisión.
Problema
La unidad no puede ser
encendido
La pantalla no puede ser
encendida
La pantalla no muestra
imágenes cuando se elige
la función de “Foto”
Hay una imagen de video
pequeña en la pantalla
Pagina 16
Posibles causas y soluciones
•
Conecte el adaptador al tomacorriente de manera adecuada.
•
•
•
•
•
•
•
•
•
La tarjeta no ha sido insertada correctamente
No hay imágenes, música o video en el dispositivo externo conectado
El formato de los archivos no es soportado por la unidad
No inserte la tarjeta en la ranura bruscamente
El formato de archivos no es soportado
No hay imágenes en el dispositivo externo conectado
Nota: la unidad no soporta formatos tales como TIFF, BMP ó GIF.
La resolución de la imagen es muy baja
El escenario de imágenes tomadas por la mayoría de cámaras digitales
es de 320x240 o menos, y el mejor escenario de video es 640x480
INSTRUCTION MANUAL
DIGITAL PHOTO FRAME
PF-4334LL
DEAR CUSTOMER
In order to achieve the best performance of your product, please read this instruction manual carefully
before using, and keep it for future reference.
If you need extra support, please write to [email protected]
CAUTION
RISK OF ELECTRIC
SHOCK, DO NOT
OPEN
Caution: To reduce the risk of electric shock do not open
this device, there are not serviceable parts for customers.
Please refer any maintenance or repair to qualified
personnel.
This sign means the existence of dangerous voltage at
the inside of the unit, which states a risk of electric shock.
This sign means that there are important instructions of
operation and handling in the manual that comes with this
device.
PREMIER CUSTOMER SERVICE
Venezuela:
Colombia:
Panama:
Website
E-mail:
0800 – ELECTRIC (353-2874)
01-900-331-PEJC (7352)
300-5185
www.premiermundo.com
[email protected]
NOTE
This unit may be submitted to changes in specifications, characteristics and/or operation without prior
notice to the user, in order to continue improving and developing its technology.
Pagina 1
INDEX
!
FOREWORD .............................................................................................................................................. 3!
MAIN FUNCTIONS .................................................................................................................................... 3!
TECHNICAL SPECIFICATION .................................................................................................................. 3!
OPERATING INSTRUCTIONS .................................................................................................................. 3!
BUTTON DESCRIPTIONS ON MACHINE ............................................................................................. 4!
USE FOR THE FIRST TIME ...................................................................................................................... 4!
SETUP FUNCTION ................................................................................................................................ 4!
(PHOTO) FUNCTION ................................................................................................................................. 9!
MUSIC
FUNCTION ........................................................................................................................... 10!
PHOTO + MUSIC
FUNCTION........................................................................................................... 11!
MOVIE
FUNCTION ........................................................................................................................... 11!
CALENDAR
FUNCTION .................................................................................................................. 12!
CLOCK
FUNCTION ......................................................................................................................... 12!
[ALARM] FUNCTION .............................................................................................................................. 13!
[AUTO-POWER] FUNCTION .................................................................................................................. 14!
“EDIT” FUNCTION .................................................................................................................................. 15!
[FAVORITE] FUNCTION ......................................................................................................................... 16!
FUNCTION SWITCHOVER ..................................................................................................................... 16!
SCREEN SAVER ..................................................................................................................................... 16!
TROUBLE SHOOTING ............................................................................................................................ 17!
Pagina 2
FOREWORD
Digital photo frame---grasp your happy time in a twinkling. Without neither a computer nor being printed,
the wonderful moment will reappear.
Welcome to choose the digital photo frame produced by our company, please read the Operation
Instructions carefully before using the machine in order to enjoy the product.
MAIN FUNCTIONS
•
•
•
•
Picture Playing
MP3 Playing
Movie Playing
Calendar, Clock, Alarm, Power-on/off Setting
TECHNICAL SPECIFICATION
•
•
•
•
•
7 TFT-LCD Screen With Resolution of 480*234
Support Format: JPEG, MP3, WMA, VOB, AVI
Support SD, MS, MMC Cards
Support USB and Hot Plug
Calendar, Clock, Alarm, Power-on/off Setting
OPERATING INSTRUCTIONS
Button Descriptions on Remote Control
(1)
(2)
(3)
(4)
(5)
(6)
(7)
(8)
(9)
(10)
(11)
(12)
(13)
(14)
(15)
(16)
(17)
(18)
(19)
(20)
(21)
POWER ON/OFF Button
MUTE Button
AV-OUT Button
PHOTO Button
MUSIC Button
MOVIE Button
PAUSE/PLAY Button
EXIT Button
UP Button
RIGHT Button
LEFT Button
ENTER Button
DOWN Button
CALENDAR Button
SETUP Button
VOL+ Button
PREVIOUS Button
REWIND Button
VOL- Button
NEXT Button
FAST FORWARD Button
Pagina 3
BUTTON DESCRIPTIONS ON MACHINE
ENTER
STOP
RIGHT
LEFT
SETUP
To confirm
Stop play return to the forward menu
To move the cursor right or revolve picture clockwise
To move the cursor left or revolve picture counterclockwise
Enter setup menu
USE FOR THE FIRST TIME
•
A main menu will appear on the screen when the system is switched on for the first time. There are
11 functions, namely, (Photo), (Music), (Photo + Music), (Movie), (Setup), (Calendar), (Clock),
(Alarm), (Auto-Power), (Edit) and (Favorite). Users can use the direction buttons to choose the
desired function and press ENTER to confirm.
The product supports USB and memory cards. If both of the devices exist in the meantime, you can
select USB or memory cards to read by the system.
Remark: The USB slot just for connecting the memory media, but can’t be connect PC.
•
SETUP FUNCTION
Choose “Setup” in the main menu and press ENTER button to enter into the setup mode. In addition,
press SETUP button on the remote control in other functions, the machine can also enter into the setup
mode. The picture below is the initial appearance of the setup mode. The following is the introductions of
all kinds of functions under setup mode.
Pagina 4
1. Setup menu operation
Short press Right button select submenu, short press Left button return to forward menu.
Long press Left/Right button to select up or down.
Interval Time Setting
Choose “Interval Time” on the screen. There are 7 items for you to choose, namely, 5 seconds, 10
seconds, 15 seconds, 30 seconds, 1 minute, 3 minutes and OFF.
Transition Effect Setting
Choose “Transition Effect” on the screen to set up its included items. There are totally 18 kinds of
modes.
Browse Setting
Choose “Browse” on the screen. There are “Thumbnail” and “File Manager” two options for your choice.
2. Auto-play Setting
Choose the second option by the cursor to set up the Auto-play setting.
Photo Setting
Choose “Photo” by the cursor. Users can use this option to turn on or off the Photo�auto-play
function. If the photo auto-play is on, the machine will play pictures automatically when the user choose
the function of (Photo); If the photo auto-play is off, it will enter into “File manager” or “Thumbnail” mode
for the user to browse pictures.
Pagina 5
Music Setting
Choose “Music” by the cursor. Users can use this option to turn on or off the “Music” auto-play function.
If the music auto-play is on, it will play music automatically when entering into “Music” function; If the
music auto-play is off, users must press ENTER to choose the desired file by themselves.
Movie Setting
Choose “Movie” by the cursor. Users can use this option to turn on or off the “Movie” auto-play function.
If the movie auto-play is on, it will play movie automatically when entering into “Movie” function; If the
movie auto-play is off, it will enter into movie file browse for users to browse movie.
3. Display Setting
Choose the third option by the cursor to set up the display setting.
TV Standard Setting
Choose “TV Standard” by the cursor. Users can choose the proper item according to your television
system. There are “NTSC”, “PAL” and “AUTO” for you to choose.
Pagina 6
Display type Setting
Choose “Display type” by the cursor. “16:9” ,“4:3” and “Auto” three items are included.
Brightness Setting
Choose “Brightness” by the cursor to adjust the brightness of the picture. There are “Normal”, “Bright”
and “Soft” for your choice.
Contrast Setting
Choose “Contrast” by the cursor to adjust the contrast rate of the picture. From -4 to +4, there are 9
grades. The greater the number is, the higher the contrast rate is.
TFT Brightness
Choose “TFT Brightness” by the cursor to adjust the brightness of the screen. From -7 to +7, there are
15 grades. The greater the number is, the brighter the screen is.
TFT Contrast Setting
Choose “TFT Contrast” by the cursor to adjust the contrast rate of the screen. From -7 to +7, there are
15 grades. The greater the number is, the higher the contrast rate is.
TFT Saturation
Choose “TFT Saturation” by the cursor to adjust the saturation of the screen. From -7 to +7, there are 15
grades. The greater the number is, the higher saturation is.
4. Custom Setup
Choose the forth option by the cursor to set up the system.
Pagina 7
OSD Language
Choose “OSD Language” by the cursor to select the language of the system.
Style Setting
Choose “Style” by the cursor to select your desired style. There are four styles can be used.
Logo Type Setting
Choose “Logo Type” by the cursor. There are two options “Default” and “Favorite” for you to choose.
Repeat Mode
Choose “Repeat Mode” by the cursor to set up the repeat mode. Four items “Off”, “One”, “Folder” and
“All” are included.
Off: to cancel the repeat mode
One: to repeat the playing file
Folder: to repeat the playing file folder
All: to repeat all the files in the storage medium
Media Setting
When insert the USB and the card to the unit on same time , you can choose “Media” by the cursor,
select the play file from the USB or card.
Pagina 8
Default Setting
Choose “Default” by the cursor. This option let the user return to the initial defaulted state. All of the
settings will return to the initial system setup when this option is chosen.
5. Exit Setting
Choose the fifth option by the cursor to exit and press ENTER to return to the main menu.
(PHOTO) FUNCTION
1. Choose “Photo” in the main menu. Press ENTER and the machine will examine automatically
whether the machine connects any storage device (USB, memory cards). If not, it will return to the
main menu.
2. After connecting with a storage device and reading correctly, it will auto play the pictures. Press Stop
button or remove control Exit key. return to the picture menu .Picture 1 shows that users choose “File
Manager” mode to handle “Photo” playing; while Picture 2 shows that users choose “Thumbnail”
mode to handle “Photo” playing.
Picture 1
Picture 2
Pagina 9
3. Under “Photo” mode, the system just support picture display, and the format is JPG.
4. If the photo auto-play is on, the machine will display the photo automatically when entering “Photo”
function.
5. Short Left/Right button rotate the photo, long Left/Right button to select play forward/next photo;
press Enter button pause/play photo; press Stop button return catalogue or main menu.
MUSIC FUNCTION
1. 5.1 Choose “Music” in the main menu. Press ENTER and the machine will examine automatically
whether the machine connects any storage device (USB, memory cards). If not, it will return to the
main menu.
2. After connecting with a storage device and reading correctly, it will use “File Manager” mode to
handle playing music.
3. Under “Music” mode, the system just support music playing , and the formats are MP3 and WMA.
Pagina 10
4. If the music auto-play is on, the machine will play the music automatically when entering “Music”
function.
5. Short Left/Right button to adjust the volume, long Left/Right button to select play forward/next music
and press Enter to confirm; press Enter button pause/play music; press Stop button return main
menu.
PHOTO + MUSIC FUNCTION
1. Choose “Photo + Music” in the main menu. Press ENTER and the machine will examine
automatically whether the machine connects any storage device (USB, memory cards). If not, it will
return to the main menu.
2. Under “Photo + Music” mode, the system just support photo and music playing , and the formats are
JPG, MP3 and WMA.
3. If the photo and music auto-play is on, the machine will play the photo and music automatically when
entering “Photo + Music�function.
4. Short Left/Right button to adjust the volume, long Left/Right button to select play forward/next photo;
press Enter button pause/play music + photo; press Stop button return main menu.
MOVIE FUNCTION
1. Choose “Movie” in the main menu. Press ENTER and the machine will examine automatically
whether the machine connects any storage device (USB, memory cards). If not, it will return to the
main menu.
2. After connecting with a storage device and reading correctly, it will use “File Manager” mode to
handle playing movie.
Pagina 11
3. Under “Movie” mode, the system support movie playing , and the formats are DAT, MPG, VOB and
AVI.
4. If the movie auto-play is on, the machine will play the movie automatically when entering “Movie”
function.
5. When playing the movie ,Short Left/Right button to adjust the volume, long Left/Right button to select
play forward/next movie; press Enter button pause/play movie; press Stop button return to catalogue
or main menu.
CALENDAR FUNCTION
1. Display
Choose “Calendar” in the main menu, and press ENTER to confirm. Then select “Display” and press
ENTER to enter into the calendar.
2. Week Inquiry
Users can press direction buttons to adjust month or year in order to inquire about the week.
3. Date Setting
After choosing “Calendar” in the main menu, press ENTER to enter into calendar setting mode. Select
“Set Date” and press ENTER to confirm. Use direction buttons to adjust the date. Press “OK” or “Cancel”
after above settings to exit. Press “Exit” to return to the main menu.
CLOCK FUNCTION
1. After choosing “Clock” in the main menu, press ENTER to enter into clock setting mode.
•
The “Display” function get users to choose “Clock” or “Clock & Calendar” display on the screen.
Choose “Clock” and press ENTER to confirm, like picture below.
Pagina 12
•
Choose “Clock & Calendar” and press ENTER to confirm, like picture above.
2. Set Time
This function will get users to set the time.
Select “Set Time” and press ENTER to enter into the time setting. Use direction buttons to adjust the
time. Press “OK” or “Cancel” after above settings to exit. Press “Exit” to return to the main menu.
[ALARM] FUNCTION
After choosing “Alarm” in the main menu, press ENTER to enter into alarm setting mode.
1. Alarm On / Off Setting
Choose “Enable” to select alarm on or off function.
Pagina 13
2. Set Time
This function will get users to set the time.
Select “Set Time” and press ENTER to enter into the time setting. Use direction buttons to adjust the
time. Press “OK” or “Cancel” after above setting to exit. Press “Exit” to return to the main menu.
3. Alarm Ring-down
A reminded picture will appear on the screen when the alarm is on. Press any key to exit.
[AUTO-POWER] FUNCTION
After choosing “Auto-Power” in the main menu, press ENTER to enter into auto-power setting.
1. Power On Enable
Choose “Power On Enable” to select power-on on or off function.
2. Power Off Enable
Choose “Power Off Enable” to select power-off on or off function.
3. Set Time
Select “Set Time” and press ENTER to enter into the time setting for power-on or power-off. There are
“Power On” and “Power Off” to choose. Use direction buttons to adjust the time. Press “OK” or “Cancel”
after above settings to exit. Press “Exit” to return to the main menu.
Pagina 14
“EDIT” FUNCTION
After choosing “Edit” in the main menu, press ENTER to enter into picture edit mode. Users can select
“Copy”, “Delete” and “Exit”.
1. Copy Picture
In this function, the user can copy pictures in the storage device as screen saver pictures. Press remote
control UP/DOWN key to select pictures press enter to confirm. A red outline frame shows that the
picture has been chosen. Press ENTER again will cancel the selection. After the choosing processes,
press LEFT/RIGHT to select “Save” and then press ENTER to save the desired picture.
2. Delete Picture
In this function, the user can delete pictures which have saved as screen saver pictures. Select “Delete”
and press ENTER to enter into picture deletion mode. Use remote control LEFT/RIGHT Key to select
desired pictures, then press ENTER to delete the picture. Users can also delete all pictures by selecting
“Delete All”.
Pagina 15
[FAVORITE] FUNCTION
After choosing “Favorite” in the main menu, press ENTER to enter into screen saver mode. Then press
ENTER to pause or play the screen saver picture. Press EXIT to exit the screen saver mode.
FUNCTION SWITCHOVER
Press EXIT on the remote control to return to the main menu. Use direction keys to switch over all the
functions. The functions are Photo, Music, Photo + Music, Movie, Setup, Calendar, Clock, Alarm, AutoPower, Edit and Favorite.
SCREEN SAVER
1. Non-Screen Saver Mode
The following are some special conditions. In these conditions, the system will not enter into screen
saver mode:
The system is in any mode like Photo, Music, Photo + Music or Movie function; The screen is under the
sate of “Clock” or “Clock & Calendar” mode.
2. Mode of Screen Saver
Generally speaker, if there is no data to play continuously, nor there is no action for more than 20
seconds, the machine will enter into screen saver mode to protect the screen, until the users press EXIT
to return to the main menu.
Pagina 16
TROUBLE SHOOTING
Symptoms
Familiar reason and solution
The digital frame
The power adapter isn’t plugged correctly, please plug the power
can
not
be
adapter and make sure the connection is all right.
switched on.
" The card isn’t inserted correctly.
" There is no picture, music or video file in the memory card.
" The formats of files are different.
" Examine the method of your plug-in.
The screen can " Don't insert the card into the slot coarsely.
not be started up. " Make sure there is at least one picture, music or video file in
the memory card.
" Compatible picture format is JPEG
" Compatible music format is MP3,WMA
" Compatible video format are DAT, MPG, VOB and AVI.
The screen can
not show pictures
when you choose
“PHOTO”
function.
" The file format is not supported.
" There isn’t any picture in the memory card.
" Make sure there is at least one picture in the memory card.
" Compatible picture format is JPEG.
Notice: The digital frame is only compatible with JPEG format and
do not support other formats like TIFF�BMP or GIF.
" Resolution of the picture is low.
A small video
" The scenario of pictures taken by most digital cameras is
picture on the
320!240 or lower one, while the best video picture scenario is
screen
640!480.
Pagina 17