1
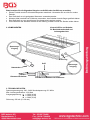
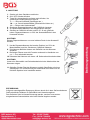
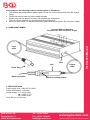
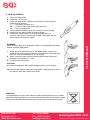
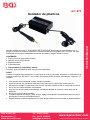
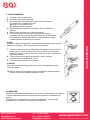
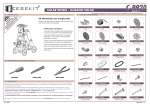
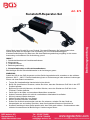
Art. 873 Kunststoff-Reparatur-Set Vielen Dank, dass Sie sich für unser Produkt "Kunststoff-Reparatur-Set" entschieden haben. Dieses Gerät dient der Reparatur und Verstärkung von z.B. Kunststoffstoßfängern, Kunststoffverkleidungen etc. Bitte lesen Sie diese Bedienungsanleitung sorgfältig vor der ersten Anwendung und bewahren Sie die Anleitung gut auf. INHALT 1. Sicherheitshinweise und Vorsichtsmaßnahmen 2. Komponenten 3. Technische Daten 4. Bedienungsanleitung 1. Sicherheitshinweise und Vorsichtsmaßnahmen Bitte befolgen Sie die Sicherheitshinweise in der Anleitungen genau. WARNUNG Sobald ein Stift in den Griff eingesetzt und das Gerät eingeschaltet wird, entstehen an der erhitzten Klammer 100°C ~ 200°C. Falsche Handhabung kann zu Verbrennungen oder anderen Verletzungen führen und einen Brand verursachen. Tragen Sie hitzebeständige Handschuhe bei der Arbeit. Bevor Sie eine Klammer einsetzen, stellen Sie sicher, dass der Schalter am Griff sich in der OFF Position befindet. Berühren Sie nicht die Klammer, mit bloßen Händen, wenn der Schalter am Griff sich in der "Erhitzen" Position befindet. Gerät nicht in der Nähe von brennbaren Materialien verwenden. Andere Personen dürfen sich nicht im unmittelbaren Arbeitsbereich aufhalten. Nicht mit nassen Händen benutzen. Halten Sie das Gerät fern von Wasser. Nicht in feuchten Räumen verwenden. Sollten Sie die Arbeit unterbrechen und den Ort verlassen, schalten Sie das Gerät am Hauptschalter aus und stellen Sie sicher, dass die eingesetzte Klammer nicht erhitzt ist. Kunststoff welches mit dem Gerät repariert wird, kann sich stark erhitzen. Geschmolzener oder erhitzter Kunststoff kann bei Berührung zu Verbrennungen führen. Bitte beachten Sie die folgenden Hinweise um Unfälle oder Ausfälle zu vermeiden. Dieses Produkt wurde für Kunststoff-Reparatur entwickelt. Verwenden Sie es nicht für andere Zwecke. Das Gerät darf nur mit geeigneten Klammern verwendet werden. Klammer bitte innerhalb von 3 Minuten verwenden, den Schalter niemals länger gedrückt halten. Das Gerät darf nur von autorisiertem Servicepersonal repariert werden. Zum Entfernen des Steckers niemals an der Leitung, sondern immer am Stecker selber ziehen. 2. KOMPONENTEN Kontroll-LED’s und Schalter für Betriebsbereitschaft und Leistungsbereiche Spannungseingang Sicherung Griff Spannungsausgang Netzstecker Klammernaufnahme Schalter zum Erhitzen der Klammern 3. TECHNISCHE DATEN Spannungsversorgung: 220 - 240V Wechselspannung 50 / 60Hz Max. Leistungsaufnahme: 12,6 Watt Ausgangsspannung: L = 0,62V (4,9A) M = 0,66V (5,2A) H = 0,68V (5,6A) Sicherung: 500 mA (5 x 20 mm) 4. ANLEITUNG 1. Stecker mit einer Steckdose verbinden. 2. ON / OFF Schalter drücken 3. Taste für Leistungbereich mehrere male drücken, bis gewünschte Leistungsstufe erreicht ist. L ------ Dünnes Kunststoff (Stoßfänger etc.) M ----- ca. 5mm Kunststoffstärke (Scheinwerfer-Halter etc.) H ----- Dickes oder Hartkunststoff 4. Geeignete Reparaturklammer in das Griffstück einsetzen. 5. Zu reparierendes Material in die Ausgangsform bringen. 6. Schalter am Griffstück drücken und für ca. 10 sek. gedrückt halten. Reparaturklammer ca. 50% der Kunststoffstärke in den Kunststoff drücken. ACHTUNG Erhitzte Reparaturklammer nur unter leichtem Druck in den Kunststoff drücken. 7. Hat die Reparaturklammer die korrekte Position (ca. 50% der Materialstärke) erreicht, Schalter am Griffstück loslassen. 8. Die Klammer abkühlen lassen und Griffstück von der Klammer abziehen. 9. Bei langen Rissen muss die Prozedur mehrmals in Abständen von ca. 1 - 3 cm wiederholt werden. 10. Überstand der Klammer mit einem z.B. Seitenschneider abschneiden. ACHTUNG Immer eine Schutzbrille und Schutzhandschuhe beim Abschneiden der Klammern tragen. 11. Schleifen Sie den Rest der Klammern und die Oberfläche mit einem Schleifgerät. Zur Verschönerung der Oberfläche kann diese nun mit üblichem Spachtel usw. bearbeitet werden. ENTSORGUNG Aufgrund unsachgemäßer Entsorgung können durch die in dem Gerät enthaltenen Stoffe erhebliche Gefahren für Gesundheit und Umwelt ausgehen. Das Gerät darf nicht im Hausmüll entsorgt werden, sondern muss an den ausgewiesenen Sammelstellen oder beim Händler abgeben werden. Art. 873 Thank you very much for choosing "HOT STAPLER - PLASTIC REPAIR KIT". This product is designed for equipment, which carries out repair reinforcement of the plastic article etc. Please read this instruction manual carefully before using and always keep this manual within easy reach. CONTENTS 1. SAFETY AND HANDLING PRECAUTIONS 2. COMPONENT NAMES 3. SPECIFICATIONS 4. HOW TO OPERATE Instruction Manual HOT STAPLER PLASTIC REPAIR KIT 1. SAFETY AND HANDLING PRECAUTIONS Please follow this manual strictly for your safety. WARNING Once a pin is set to a switch grip and switch is turned on, the temperature of a pin will become 100°C ~ 200°C. If handling is mistaken, it may cause burn, blindness, and a fire. Wear heat-resistant gloves when working. Before setting the pin, make sure that tip of the switch grip is cold. Do not touch heating repair pin with bare hands when it is set in the switch grip. Do not use near combustible materials. Since it becomes high temperature, let people around you know it is dangerous. Do not use with wet hands. Do not soak this product in water. Do not use in wet locations. When you suspend working, and leave the place, turn off the switch then make sure that the tip of the switch grip has fully got cold. Repairing objects get high temperature. Please be aware of burning by melted plastic. SW-Stahl und Werkzeugvertriebs GmbH Tel. +49 (0) 2191 / 46438-0 BGS technic Tel.: 02196 720480 KG Leverkuser Strasse 65 Fax +49 (0) 2191 / 46438-40 D-42897 Re3 mscheid -Mail: [email protected] Bandwirkerstr. Fax.: 02196 E7204820 42929 Wermelskirchen [email protected] www.bgstechnic.com © BGS technic KG, Copying and further use not allowed Please observe the following notes to avoid accident or breakdown. This product was designated for plastic repair. Do not use it for purposes other than the original usage. The device may be used only with suitable brackets. Please carry out use within 3 minutes, with a switch grip switched on. The unit must be repaired only by authorized service personnel. When you plug in and / or disconnect the plug, please hold the plug itself. (Do not pull the cable.) Control LEDs and Switches for power ON / OFF and power ranges Input cable Fuse Grip Output cable Power Plug Instruction Manual 2. COMPONENT NAMES Repair pin holder Switch for heating shaped 3. SPECIFICATIONS Power supply: 220 - 240V AC 50 / 60Hz Power consumption: 12.6 watts Output voltage: L = 0,62V (4,9A) M = 0,66V (5,2A) H = 0.68V (5.6A) Fuse: 500 mA (5 x 20 mm) SW-Stahl und Werkzeugvertriebs GmbH Tel. +49 (0) 2191 / 46438-0 BGS technic Tel.: 02196 720480 KG Leverkuser Strasse 65 Fax +49 (0) 2191 / 46438-40 D-42897 Re3 mscheid -Mail: [email protected] Bandwirkerstr. Fax.: 02196 E7204820 42929 Wermelskirchen [email protected] www.bgstechnic.com © BGS technic KG, Copying and further use not allowed 4. HOW TO OPERATE WARNING When heating repair pin is pressed too hard, it may penetrate the object. Please press by sllght power. 7. When the pin is taken half way to the repairing part, release the switch button on the grip then wait for a few seconds until repair part gets firm. After that draw the pin out of the grip. 8. When a repairing part reaches long and wide, please repeat the procedure at intervals of 1 - 3 cm. 9. Cut off the pin using pliers. CAUTION Be aware of fragments. Wear safety goggles when you cut off pins. 10. Grind off the excess of the pins using sander. Apply putty and paint if you wish to finish the surface more finely. Instruction Manual 1. Plug in to 240V outlet. 2. Press ON / OFF button 3. Press the range button (TC) for several times until the desired power level is reached. L ----- Thin plastic (bumper etc.) M ----- To about 5mm thick plastic (spot light etc.) H ----- Thick or hard plastic 4. Choose suitable heating repair pin and set it to tip of the grip. 5. Please form the part to repair as original shape. 6. Presses the switch button on the grip and hold about 10 seconds until the pin is hot enough to weld. Then press the pin gently against the place to repair. DISPOSAL An inappropriate recycling of this device leads to serious danger for our health and the environment. Never recycle this electrical unit with your domestic waste. Collect worn electrical devices and recycle them at your local collecting point. SW-Stahl und Werkzeugvertriebs GmbH Tel. +49 (0) 2191 / 46438-0 BGS technic Tel.: 02196 720480 KG Leverkuser Strasse 65 Fax +49 (0) 2191 / 46438-40 D-42897 Re3 mscheid -Mail: [email protected] Bandwirkerstr. Fax.: 02196 E7204820 42929 Wermelskirchen [email protected] www.bgstechnic.com © BGS technic KG, Copying and further use not allowed Art. 873 Muchas gracias por elegir el “SOLDADOR DE PLASTICOS” Esta producto está diseñado por un equipo, el cual lleva a cabo la reparación y refuerzo de artículos de plástico etc. Por favor, lea este manual de instrucciones cuidadosamente antes de usarlo y téngalo siempre a mano. CONTENIDO 1. Precauciones de seguridad y manejo. 2. Nombre de los componentes. 3. Especificaciones. 4. Funcionamiento. 1. Precauciones de seguridad y manejo Por favor, siga estrictamente este manual por su seguridad. Instruction Manual Soldador de plásticos AVISO Cuando una grapa está colocada en el interruptor de control y este está encendido, la temperatura de la grapa es de unos 100-200 ºC. si el manejo es erróneo puede causarse quemaduras, ceguera o un incendio. Use guantes termoresistente cuando maneje el soldador. Antes de colocar los clamps de reparación asegúrese que el soporte de control está frio. No toque los clamps de reparación con la mano desnuda cuando los fije en el soporte de control. No lo use cerca de materiales combustibles. Una vez que alcance altas temperaturas, manténgalo alejado de la gente, usted sabe que es peligroso. No lo use con las manos mojadas. Cuando suspenda el trabajo, y deje el lugar, apague el dispositivo asegurándose de que el tope del soporte de control está totalmente frio. Repara objetos a altas temperaturas, por favor tenga cuidado de no incendiar el material plástico. SW-Stahl und Werkzeugvertriebs GmbH Tel. +49 (0) 2191 / 46438-0 BGS technic Tel.: 02196 720480 KG Leverkuser Strasse 65 Fax +49 (0) 2191 / 46438-40 D-42897 Re3 mscheid -Mail: [email protected] Bandwirkerstr. Fax.: 02196 E7204820 42929 Wermelskirchen [email protected] www.bgstechnic.com © BGS technic KG, Copying and further use not allowed Por favor, observe las siguientes notas para prevenir accidentes o roturas. Este producto está diseñado para reparar plásticos. No lo use para otros propósitos distintos al de su uso original. Este dispositivo solo puede usarse con los clamps adecuados. Por favor, mantenga durante 3 minutos el soporte de control encendido. La unidad debe ser reparada solo por personal cualificado y autorizado. Cuando conecte o desconecte el dispositivo, por favor sostenga el enchufe (no tire del cable). 2. COMPONENTES Voltaje entrada Fusible Manejar Conector Voltaje salida Instruction Manual LEDs de control e interruptores para encender y rangos de potencia El gancho de agarre Interruptor para el calentamiento de los paréntesis 3. ESPECIFICACIONES. Suministro de energia: 220 - 240V 50 / 60Hz Consumo de energia: 12.6 W Voltaje de salida: L = 0,62V (4,9A) M = 0,66V (5,2A) H = 0,68V (5,6A) Fusible: 500 mA (5 x 20 mm) SW-Stahl und Werkzeugvertriebs GmbH Tel. +49 (0) 2191 / 46438-0 BGS technic Tel.: 02196 720480 KG Leverkuser Strasse 65 Fax +49 (0) 2191 / 46438-40 D-42897 Re3 mscheid -Mail: [email protected] Bandwirkerstr. Fax.: 02196 E7204820 42929 Wermelskirchen [email protected] www.bgstechnic.com © BGS technic KG, Copying and further use not allowed 4. FUNCIONAMIENTO AVISO: Cuando el clampo de reparacion es presionado demasiado fuerte, puede penetrar en el objeto. Por favor presione con suavidad. 7. Cuando el pasador está a medio camino de reparar la zona, suelte el botón que hay sobre el soporte de control y espere unos segundos hasta que la zona a reparar este firme, despues saque el pasador del soporte de control. 8. Cuando una zona a reparar sea grande y ancha, repita el procedimiento en intervalos de 1-3 cm 9. Corte los clamps usando unos alicates. CUIDADO Sea consiciente d elos fragmentos, use guantes de seguridad cuando corte los clamps. Instruction Manual 1. Conecte a una toma de 240V 2. Encienda el interruptor principal. 3. Fije el regulador de temperatura según el tipo de plástico. L = pástico fino (parachoques etc) M = sobre 5 mm (punto de luz) H = pásticos duros o gruesos. 4. Elija el clamp de reparacion adecuado y fíjelo al soporte de control. 5. Situe la zona a reparar en su posicion original. 6. Presione el boton que hay sobre el soporte de control y presiónelo durante unos 10 segundos hasta que el clamp esté suficientemente caliente para soldar. Luego presione el clamp cuidadosamente contra la zona a reparar. 10. Alise el exceso de los clamps usando una lijadora. Aplique masilla y pintura si desea un acabdo mas preciso y fino. ELIMINACIÓN Debido a la disposición inadecuada de los riesgos significativos para la salud y el medio ambiente puede ser causada por las sustancias contenidas en el equipo. El dispositivo no se debe tirar con la basura doméstica, sino que debe presentado en los puntos de recogida o el distribuidor. SW-Stahl und Werkzeugvertriebs GmbH Tel. +49 (0) 2191 / 46438-0 BGS technic Tel.: 02196 720480 KG Leverkuser Strasse 65 Fax +49 (0) 2191 / 46438-40 D-42897 Re3 mscheid -Mail: [email protected] Bandwirkerstr. Fax.: 02196 E7204820 42929 Wermelskirchen [email protected] www.bgstechnic.com © BGS technic KG, Copying and further use not allowed EU-Konformitätserklärung EC DECLARATION OF CONFORMITY DÉCLARATION „CE“ DE CONFORMITE DECLARATION DE CONFORMIDAD UE Wir erklären in alleiniger Verantwortung, dass die Bauart der: We declare that the following designated product: Nous déclarons sous propre responsabilité que ce produit: Declaramos bajo nuestra sola responsabilidad que este producto: folgenden einschlägigen Bestimmungen entspricht: complies with the requirements of the: est en conformité avec les réglementations ci-dessous: esta conforme a las normas: EMC Council Directive 2004/108/EC Angewandte Normen: Identification of regulations/standards: Norme appliquée: Normas aplicadas: EN 55014-1:2006+A1 EN 55014-2:1997+A1+A2 EN 61000-3-2:2006+A2 EN 61000-3-3:2008 CE-Erklärung Kunststoff-Schweissgerät ( BGS Art. 873 ) Plastic Welding Apparatus / Repair Equipment Appareil réparation plastique Aparato para reparación de plástico Registration No. : AE 50198936 0001/ YD-H02-L Test Report : 11024050 002 Wermelskirchen, den 03.12.2014 ppa. Frank Schottke, Prokurist BGS technic KG, Bandwirkerstrasse 3, D-42929 Wermelskirchen SW-Stahl und Werkzeugvertriebs GmbH Tel. +49 (0) 2191 / 46438-0 BGS technic Tel.: 02196 720480 KG Leverkuser Strasse 65 Fax +49 (0) 2191 / 46438-40 D-42897 Re3 mscheid -Mail: [email protected] Bandwirkerstr. Fax.: 02196 E7204820 42929 Wermelskirchen [email protected] www.bgstechnic.com