1
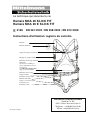
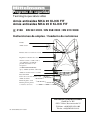
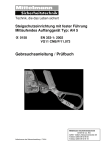
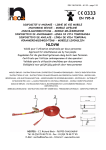
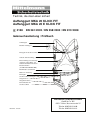
Technik, die das Leben sichert
Auffanggurt MKA 20 KLICK FIT
Auffanggurt MKA 20 E KLICK FIT
0158
EN 361:2002 / EN 358:2000 / EN 813:2008
Gebrauchsanleitung / Prüfbuch
Schultergurt
Rücken-Auffangöse
Brustgurt mit Steckverschluss
Zentrale Gurteinstellung
Brust-Auffangösen beidseitig
wahlweise mit D-Ring oder
Gurtbandschlaufen mit einem
Karabinerhaken
(bei MKA20 E KLICK FIT)
Rückenstütze (Zusatzteil)
Halteösen beidseitig
Bauchgurt
Steckverschluss Bauchgurt
Steigschutzöse
Sitzgurtband blau
Beinschlaufen mit
Steckverschluß
Mittelmann Sicherheitstechnik
Ident-Nr. 173395
GmbH & Co. KG
42551 Velbert, Bessemerstraße 25
Telefon: 02051/91219-00
Telefax: 02051/91219-19
Mittelmann
Sicherheitstechnik
Gebrauchsanleitung
1. Anwendung
Der Auffanggurt ist Teil der persönlichen Schutzausrüstung gegen Absturz. Er besteht aus Gurtbändern, die den Körper umschließen. Er fängt bei bestimmungsgemäßer Benutzung die abstürzende
Person auf, überträgt die auftretenden Kräfte auf geeignete Körperteile und hält den Körper in einer
aufrechten Lage. Die Verwendung als Auffanggurt ist nur in Verbindung mit zugelassenen
Verbindungsmitteln / Sicherheitsseilen nach EN 354 / EN 353, Falldämpfern nach EN 355,
Höhensicherungsgeräten nach EN 360 oder Abseilgeräten nach EN 341 zulässig.
Die Verwendung als Haltegurt ist nur in Verbindung mit zugelassenen Verbindungsmitteln für Haltegurte nach EN 358 zulässig. Bei Verwendung als Sitzgurt nach EN 813 werden die vorderen BrustAuffangösen als Halteösen benutzt. Für die Sicherheit des Benutzers ist es wichtig, dass er die
Gebrauchsanleitung gelesen und verstanden hat.
Vor Benutzung ist der Auffanggurt einer Sichtprüfung zu unterziehen. Beschädigte Auffanggurte nicht
verwenden. Der Anschlagpunkt nach EN 795 muss oberhalb des Benutzers liegen und eine Mindesttragfähigkeit von 10 kN gewährleisten.
Die erforderliche lichte Höhe unter den Füßen des Benutzers ist entsprechend der Gebrauchsanleitung
des verbindenden Teilsystems (z.B. Verbindungsmittel mit Falldämpfer, Höhensicherungsgerät, Mitlaufendes Auffanggerät an beweglicher Führung usw.) zu berücksichtigen.
2. Benutzung
Der Auffanggurt wird hierfür an der Rücken-Auffangöse erfasst, die geöffneten Beinschlaufen hängen
nach unten. Die Schultergurte sind wie Rucksackgurte anzulegen. Die Rücken-Auffangöse liegt mit
der Kunststoffplatte auf dem Rücken. Die losen Beinschlaufen von innen nach außen um die
Oberschenkel führen, die Steckverschlüsse schließen und anziehen. Steckverschluss vom Bauchgurt
und vom Brustgurt ebenfalls schließen und anziehen. Es ist für die Sicherheit wesentlich, dass das
ordnungsgemäße Schließen der Steckverschlüsse bei jedem Anlegen des Gurtes überprüft wird.
(z.B. ziehen an beiden, verbundenen Gurtseiten)
Mit der zentralen Gurteinstellung den richtigen Sitz des Auffanggurtes einstellen. Vor Erstbenutzung
sich mit der Funktion vertraut machen. Zur Probe in Bodennähe mit Sicherheitsseil anschlagen und
den Auffanggurt durch Körpergewicht belasten. Die Gurtbänder müssen den Körper einwandfrei
umschließen. Hängen im Gurt soll normalerweise keine Beschwerden verursachen, ansonsten Gurteinstellung überprüfen. Im Absturzfalle sollte jedoch langes Hängen im Gurt vermieden werden.
Vor und während der Benutzung sollte deshalb überlegt werden, wie eventuell erforderliche Rettungsmaßnahmen sicher, schnell und wirksam durchgeführt werden können. Für die Sicherheit ist es
wesentlich, die Lage der Anschlageinrichtung oder des Anschlagpunktes und die Art der
Arbeitsausführung so zu wählen, dass der freie Fall und die Absturzhöhe auf ein Mindestmaß
beschränkt werden.
Warnung: Variante (E)
Die beiden Brust-Auffangösen dürfen nur gemeinsam verwendet werden. Dazu ist das Verbindungselement (z.B. Karabinerhaken) des verwendeten Teilsystems unbedingt in beide Brustösen-D-Ringe
bzw. bei Ausführung der Brustösen mit Gurtbandschlaufen in den Karabinerhaken der in die beiden
Brustösen eingehakt ist einzuhängen. Als Verbindungselement für die beiden Brustösen darf nur der
vom Hersteller gelieferte Karabinerhaken verwendet werden. Es ist hier zu gewährleisten, dass das
Verbindungselement im Sturzfall bestimmungsgemäß beansprucht wird. (z.B. Hakenfalle nicht quer
belastbar).
Die seitlichen Halteösen dürfen nicht zu Auffangzwecken sondern nur in Verbindung mit einem
Verbindungsmittel für Haltegurte nach EN 358 benutzt werden. Das Verbindungsmittel ist dabei stets
straff zu halten. Bei längeren Arbeiten in Halteposition ist die Gurtvariante mit einer zusätzlichen
Rückenstütze auszuwählen.
Die Steigschutzöse darf nur in Verbindung mit einer Steigschutzeinrichtung benutzt werden. Sie muss
immer in der Mitte des Bauchgurtes ausgerichtet sein.
Bei Verwendung des Auffanggurtes mit Steigschutzöse ist durch einen Hängeversuch in der
Steigschutzeinrichtung die Erfordernis einer zusätzlichen Rückenstütze aus ergonomischen Gründen
zu überprüfen. Immer auf richtigen Sitz des Auffanggurtes und der Auffangöse in Rückenmitte
achten!
Bei Verwendung des Auffanggurtes als Sitzgurt werden die beiden vorderen Brust-Auffangösen als
Halteöse verwendet. Die max. Nennlast des Benutzers beträgt 100 kg.
Zur Verbesserung des Sitzkomfort empfehlen wir die Verwendung des Adapters SP 1.
Um den angelegten Auffanggurt mit dem Adapter SP 1 auszurüsten, werden als erstes die beiden lose
nach unten hängenden Gurtbandenden des Adapters SP 1 von außen nach innen durch die seitliche
Halteöse gezogen und danach mit dem Karabinerhaken verbunden. (siehe Bild 2)
Jetzt den Karabinerhaken in die beiden Brustösen einhaken. Die so geschaffene Verbindung
ermöglicht ein bequemes sitzen im Gurt.
Adapter SP 1 bestehend aus:
- Karabinerhaken
- Gurtband
- Sitzpolster
Vor Erstbenutzung als Sitzgurt sich mit der Funktion vertraut machen. Zur Probe in Bodennähe in den
Gurt setzen und eine Hängeprüfung vornehmen. Sitzen im Gurt soll normalerweise keine
Beschwerden verursachen, ansonsten Gurteinstellung überprüfen. Vor und während der Benutzung
sollte überlegt werden, wie eventuell erforderliche Rettungsmaßnahmen sicher, schnell und wirksam
durchgeführt werden können.
Achtung:
Beim Arbeiten im Sitzgurt muss die Sicherung gegen Absturz immer zusätzlich an
einer Auffangöse am Auffanggurt erfolgen.
Der Auffanggurt sollte nur durch ausgebildetes und/oder anderweitig sachkundiges Personal
angewendet werden, oder der Benutzer sollte unter direkter Aufsicht einer solchen Person stehen.
Der Auffanggurt sollte dem Benutzer persönlich gehören.
Auffanggurt vor scharfkantigen Gegenständen, Schweißfunken oder anderen zerstörenden oder
beschädigenden Gefahren schützen.
Der Auffanggurt ist bis zu einer Temperatur von 60°C temperaturbeständig.
Wenn der Auffanggurt in ein anderes Land weiterverkauft wird muß der Wiederverkäufer eine
Anleitung für den Gebrauch, die Instandhaltung, die regelmäßige Überprüfung und die Instandsetzung
in der Sprache des anderen Landes zur Verfügung stellen.
3. Bedeutung der Kennzeichnung
Der Benutzer muss die Gebrauchsanleitung lesen und beachten !
A
MKA20 KLICK FIT
EN 361 / EN358 / EN813
Mittelmann
0158
Baujahr: XX
Fabr.-Nr.: xx – xxxxxx
Nächste Revision
Auffangöse
Typbezeichnung
Norm des Dokuments der die Ausrüstung entspricht
Hersteller Mittelmann Sicherheitstechnik GmbH & Co. KG
Kennnummer der qualitätsüberwachenden notifizierten Prüfstelle
Hergestellt im Jahr z.B. 07 für 2007
Seriennummer des Auffanggurtes
Angabe wann die nächste Überprüfung erfolgen muß
4. Lagerung
• Nach Arbeitsende den Auffanggurt reinigen und trocken in luftigen und schattigen Räumen lagern.
• Während des Transports des Auffanggurtes ist dieser in einem geeigneten Transportbehälter
(z.B. Gerätebeutel oder Gerätekoffer) zu lagern.
• Berühren mit Säuren, ätzenden Flüssigkeiten und Ölen vermeiden. Wenn unvermeidbar, mit
Feinwaschmittel und reichlich Wasser (40°C) schnellstmöglich reinigen. Trocknung immer auf
natürliche Weise, niemals in der Nähe von Feuer oder anderen Hitzequellen.
A c h t u n g: Reinigungsvorschrift strikt einhalten!!
5. Werkstoffangaben
Der Auffanggurt besteht aus folgenden Werkstoffen.
Gurtbänder und Nähgarn aus Polyamid
Beschlagteile aus Aluminium und nichtrostendem Stahl,
Steckverschluss aus Aluminium und nichtrostendem Stahl
Plastikteile aus Kunststoff
Sitzpolster aus Kunststoff
Karabinerhaken aus Aluminium oder Stahl
6. Benutzungsdauer
Die Benutzungsdauer ist von den jeweiligen Einsatzbedingungen abhängig. Nach den bisherigen
Erfahrungen kann unter normalen Einsatzbedingungen bei Auffanggurten von einer Benutzungsdauer
von 6 bis 8 Jahren ausgegangen werden. Das Baujahr des Auffanggurtes ist auf dem Typenschild
eingetragen.
7. Kontrolle
• Vor Arbeitsbeginn Auffanggurt auf Verschleiß oder Beschädigungen untersuchen. Gängigkeit
prüfen. Lesbarkeit der Produktkennzeichnung prüfen.
• Sollten Zweifel am sicheren Zustand des Systems oder den Bestandteilen auftreten, sind diese
sofort zu ersetzen. Dies muß durch den Hersteller oder eine andere sachkundige Person ausgeführt
werden.
• Nach Bedarf, mindestens jedoch einmal im Jahr, Prüfung durch den Hersteller oder einen
Sachkundigen vornehmen lassen.
A c h t u n g: Beschädigte Auffanggurte und Seile dürfen nicht verwendet werden.
• Durch Absturz beanspruchte Systeme sind dem Gebrauch zu entziehen und dem Hersteller oder
einer sachkundigen Reparaturwerkstatt zur Wartung und erneuten Prüfung zurückzusenden.
A c h t u n g: Keine Veränderungen am Produkt vornehmen.
Reparaturen dürfen nur vom Hersteller durchgeführt werden.
Zu jedem Auffanggurt wird eine Gebrauchsanleitung / Prüfbuch mitgeliefert. Diese muss bei der Ausrüstung gehalten werden.
Beachten Sie auch unbedingt die Gebrauchsanleitungen der Produkte, die im Zusammenhang mit dem
Auffanggurt benutzt werden, sowie die jeweils gültigen Unfallverhütungsvorschriften.
Eingeschaltete notifizierte Stelle für die EG-Baumusterprüfung:
Fachausschuss Persönliche Schutzausrüstungen, Prüf- und Zertifizierungsstelle
0299
Zwengenberger Straße 68, D-42781 Haan, Kennnummer
Stand: 26.06.2012
Datum
Baujahr:
Produkt:
Typ:
Hersteller:
Grund der Bearbeitung
(regelmäßige Überprüfung
oder Instandsetzung)
Datum der ersten Benutzung:
Festgestellte Schäden
durchgeführte Instandsetzungen
und weitere wesentliche Angaben
Name und Unterschrift
der sachkundigen Person
Ablauf der regelmäßigen Überprüfung und Instandsetzung
Ablaufdatum:
Kaufdatum:
Datum der nächsten
regelmäßigen Überprüfung
Tel. 02051/91219-00
Fax. 02051/91219-19
EN 361:2002 EN 358:2000 EN 813:2008
Dokumentation der Ausrüstung
Auffanggurt
Norm:
MKA20 Klick Fit
MKA20 E Klick Fit
Fabr.-Nr.:
Mittelmann Sicherheitstechnik
Bessemerstraße 25
GmbH & Co. KG
42551 Velbert
Technology whish protects life
Full Body Harness MKA 20 KLICK FIT
Full Body Harness MKA 20 E KLICK FIT
0158
EN 361:2002 / EN 358:2000 / EN 813:2008
Instructions for Use / Test Book
Shoulder Strap
Back Fall Arrest Attachment
Element
Breast Strap with Click Fit
Fastener
Central Harness Adjustment
Breast Fall Arrest Attachment
Element on both sides optionally
with D-Ring or Webbing Loop with
a Karabiner Hook
(on MKA20 E KLICK FIT)
Back Support (Accessory)
Attachment Elements both sides
Abdominal Belt
Abdominal Belt Click Fit Fastener
Guided Type Fall Arrester Element
Sit Harness Belt Blue
Thigh Loop with Click
Fit Fastener
Mittelmann Sicherheitstechnik
Ident. No. 177949
GmbH & Co. KG
42551 Velbert, Bessemerstraße 25
Telephone: +49(0)2051/91219-00
Telefax: +49(0)2051/91219-19
Mittelmann
Sicherheitstechnik
Instructions for Use
1. Application
Full body harness is a part of the personal protection equipment against falling from a height. It
consists of webbing which encloses the body. When used correctly, it arrests the fall of the falling
person, transfers the forces occurring to suitable parts of the body and keeps the body in an upright
position. The use as full body harness is only authorized when used together with approved lanyards /
safety ropes in accordance with EN 354 / EN 353, energy absorbers in accordance with EN 355,
retractable type fall arresters in accordance with EN 360 or descender devices in accordance with EN
341.
The use as work positioning belt is only authorized when used together with approved lanyards for
work positioning belts in accordance with EN 358. When used as a sit harness in accordance with EN
813 the front breast fall arrest attachment elements are used as attachment elements. It is important for
the safety of the user that he has read and understood the Instructions for Use.
Before use the full body harness must undergo a visual inspection. Do not use damaged full body
harnesses. The anchor point, in accordance with EN 795, must be located above the user and guarantee
a minimum load bearing capacity of 10kN.
The necessary clear height below the feet of the user is to be taken in to account with respect to the
relevant instructions for use of the interconnected subsystems (for example, lanyards with energy
absorbers, retractable type fall arresters, guided type fall arresters with flexible anchor lines, etc.).
2. Use
For this, the full body harness is picked up by the back fall arrest attachment elements, the opened
thigh loops hang down. The shoulder straps are to be applied as rucksack straps. The back fall arrest
attachment elements lie with the plastic plate against the back. Guide the loose thigh loops over the
thigh from the middle towards the outside, close the click fit fastener and tighten it. Likewise, close
and tighten the abdominal straps and breast straps click fit fasteners. It is important for safety that the
correct closing of the click fit fasteners is checked each time the belt is fitted.
(For example, pulling on both sides of the attached belt)
With the central harness adjustment, set the correct sit of the full body harness. Before the first use,
familiarize yourself with the function. As a test, connect to a safety rope close to the ground and load
the full body harness with body weight. The straps must close faultlessly around the body. Hanging in
the harness should not normally cause any discomfort, otherwise check the harness adjustment. In the
event of a fall from height, however, hanging in the harness for a long time should be avoided.
Before and during use, it should be considered, therefore, how any potentially necessary rescue
measures can be safely, quickly and effectively carried out. For safety it is essential to choose the
anchor device or the anchor point and the manner of workmanship so that the free fall and the fall
height are reduced to a minimum.
Warning: Variant (E)
The two breast fall arrest attachment elements may only be used in combination. For this, the
connector of the subsystem used (for example, karabiner hooks) must, without fail, be connected to
both breast D-Ring elements or, in designs with the breast attachment elements with belt loops, to the
karabiner hooks which are hooked to the two breast attachment elements. Only karabiner hooks
supplied by the manufacturer may be used as connectors for the two breast attachment elements. Here
it must be ensured that the connector, in the event of a fall from height, is used in accordance with its
intended purpose. (For example, hook locks not transversely load bearing).
The side attachment elements may not be used for fall arrest purposes, but only in conjunction with a
lanyard for work positioning belts in accordance with EN 358. Here the lanyard must always be kept
taut. For long periods of work in a stationary position the harness variant with an additional back
support should be chosen.
The arrester loop may only be used in conjunction with a guided type fall arrester. It must always be
aligned in the centre of the abdominal belt.
When using the full body harness with arrester loops, the necessity for an additional back support for
ergonomic reasons must be checked by a hanging test in the guided type fall arrester. Always check
for correct sitting of the full body harness and that the arrester loops are in the middle of the back!
When using the full body harness as a sit harness the two, front breast fall arrest attachment elements
are used as attachment elements. The maximum rated load of the user is 100 kg.
To improve sitting comfort we recommend the use of the Adapter SP 1.
To fit the Adapter SP 1 to the full body harness being worn, firstly, the two loose, downward hanging
strap ends of the Adapter SP 1 are fed through the side attachment elements from the outside to the
inside and then joined to the karabiner hooks. (See Picture 2)
Now hook the karabiner hooks into the two breast attachment elements. This connection so made
enables comfortable sitting in the harness.
Adapter SP 1 consisting of:
- Karabiner Hooks
- Strap
- Seat Cushion
Before the first use as a sit harness familiarize yourself with the function. As a test, close to the
ground, sit in the harness and carry out a hanging test. Sitting in the harness should not normally cause
any discomfort, otherwise check the harness adjustment. Before and during use, it should be
considered how any potentially necessary rescue measures can be safely, quickly and effectively
carried out.
Attention:
When working in the sit harness, the protection against a fall from height must
always be effected by an additional fall arrest attachment element on the full body harness.
The full body harness should only be used by fully trained and/or otherwise competent personnel, or
the user should be under the direct supervision of such a person.
The full body harness should be the personal property of the user.
Protect the full body harness against sharp-edged objects, welding sparks and other destructive or
damaging hazards.
The full body harness is temperature resistant up to 60°C.
If the full body harness is resold in another country, the reseller must make available instructions for
use, servicing, regular checking and maintenance in the language of the other country.
.
3. Meaning of the Marking
The user must read and observe the Instructions for Use!
A
Fall Arrest Attachment Element
MKA20 KLICK FIT
Type Designation
EN 361 / EN358 / EN813 Standards Documentation to which the equipment complies
Mittelmann
Manufacturer Mittelmann Sicherheitstechnik GmbH & Co. KG
0158
Identification number of the quality inspection body
Year of Manufacturer: XX Manufactured in the year, for example, 07 for 2007
Factory No.: xx – xxxxxx Serial number of the full body harness
Next Revision
Statement of when the next inspection must take place
4. Storage
• On finishing work clean, dry and store the full body harness in well aired and shady rooms.
• During transportation of the full body harness it must be stored in a suitable transport container
(for example equipment bag or equipment case).
• Avoid contact with acids, corrosive fluids and oils. If unavoidable, clean with a mild detergent and
plenty of water (40°C) as soon as possible. Always allow to dry naturally, never close to fire or
other sources of heat.
Attention: Adhere strictly to the cleaning instructions!!
5. Material Specifications
The full body harness is made from the following materials.
Webbing and straps and sewing thread from Polyamide
Hardware from Aluminium and stainless steel
Click fit fasteners from Aluminium and stainless steel
Plastic parts from synthetic materials
Seat cushion from synthetic material
Karabiner hooks from Aluminium or steel
6. Length of Use
The length of use is dependant upon the respective operating conditions. From experience to date,
under normal operating conditions the length of use of the full body harness can be assumed to be
from 6 to 8 years. The year of manufacture of the full body harness is written on the name plate.
7. Kontrolle
• Before starting work inspect the full body harness for wear of damage. Check freedom of
movement. Check the legibility of the marking.
• Should there be any doubts about the safe condition of the system or its components, then they are
to be replaced immediately. This must be carried out by the manufacturer or another competent
person.
• As required, but at least once a year, have an inspection carried out by the manufacturer or a
competent person.
Attention: Damaged full body harnesses and ropes may not be used.
• Systems strained by falls are to be taken out of use and to be returned to the manufacturer or an
authorized repair work shop for servicing and a new inspection.
Attention:
Do not make any alterations to the product.
Repairs may only be carried out by the manufacturer.
An Instructions for Use / Test Book is supplied with every full body harness. This must be kept with
the equipment.
Also strictly observe the instructions for use of the products used in conjunction with the full body
harness as well as the appropriate, valid accident prevention regulations.
Notified Body involved for the EC Type Testing:
Fachausschuss Persönliche Schutzausrüstungen, Prüf- und Zertifizierungsstelle
Technical Committee for Personal Protective Equipment, Test and Certification Centre
Zwengenberger Straße 68, D-42781 Haan, Identification Number
0299
Issue: 26.06.2012
date
reason for revision
(periodic inspection
or repair)
Year of manufacture
detected damages
executed repairs
and other important information
Periodic inspection and repair procedure
Expiry date:
name and signature
of the competent person
Purchase Date:
Date of first use:
date of the next
periodic inspection
phone +49(0)2051/91219-00
fax +49(0)2051/91219-19
EN 361:2002 EN 358:2000 EN 813:2008
Documentation of equipment
Product:
Full Body Harness
standard:
Type:
MKA20 Klick Fit
MKA20 E Klick Fit
Serial number:
Manufacturer: Mittelmann Sicherheitstechnik
Bessemerstraße 25
GmbH & Co. KG
42551 Velbert
La technique qui sécurise la vie
Harnais MKA 20 KLICK FIT
Harnais MKA 20 E KLICK FIT
0158
EN 361:2002 / EN 358:2000 / EN 813:2008
Instructions d'utilisation/ registre de contrôle
Bretelle
Elément antichute
Sangle thoracique à fermeture
Réglage de sangle central
Eléments thoraciques antichute
bilatéraux
au choix avec D-Ring ou
ganses du baudrier avec un
mousqueton
(sur MKA20 E KLICK FIT)
Support dorsal (élément
Eléments d'accrochage
Sangle ventrale
Fermeture à clips sangle
Elément anti chute
Sang!e sous-fessière bleue
Cuissardes avec
Fermeture à clip
Mittelmann Sicherheitstechnik
N° ident. 177950
GmbH & Co. KG
42551 Velbert, Bessemerstraße 25
Téléphone : +49(0)2051/91219-00
Téléfax: +49(0)2051/91219-19
Mittelmann Sicherheitstechnik
Instructions d'utilisation
1. Utilisation
Le harnais antichute fait partie de l'équipement individuel contre les chutes. Il est constitué de sangles
qui ceignent le corps. Il retient la personne qui chute sous réserve d'un usage conforme, transfère les
efforts aux parties du corps appropriées et maintient le corps à l'horizontale. L'utilisation comme
harnais est seulement autorisée en liaison avec les longes et les éléments de sécurité autorisés définis
dans la norme EN 354 / EN 353, les absorbeurs d'énergie selon EN 355, les antichutes à rappel
automatique selon EN 360 ou les descendeurs EN 341.
L'utilisation comme ceinture de maintien n'est autorisée qu'en liaison avec des longes homologuées
pour les ceintures de maintien selon EN 358. Lors d'une utilisation comme ceinture à cuissarde selon
EN 813, les éléments dorsaux antichute sont utilisés comme éléments d'accrochage. Il est important
pour la sécurité de l'utilisateur qu'il ait lu et compris les instructions d'utilisation.
Un contrôle visuel du harnais antichute doit être effectué avant utilisation. Ne pas utiliser les harnais
endommagés. Selon la norme EN 795, le point d'ancrage doit être au-dessus de l'utilisateur et
supporter au moins une charge de 10 kN.
La hauteur libre nécessaire sous les pieds de l'utilisateur doit être conforme aux instructions
d'utilisation du sous-système à assembler (ex. longe avec absorbeur d'énergie, antichute à rappel
automatique, antichute mobile etc.).
2. Utilisation
Le harnais antichute est relié à l'élément dorsal antichute, les cuissardes ouvertes pendent vers le bas.
Les bretelles sont à poser comme des bretelles de sac à dos. L'élément antichute dorsal est placé avec
la plaque de plastique sur le dos. Engager les cuissardes détachées de l'intérieur vers l'extérieur autour
des cuisses, fermer et serrer les fermetures à clips. Fermer et serrer également la fermeture à clip de la
sangle ventrale et thoracique. Il est essentiel pour la sécurité de fermer correctement les fermetures à
clips à chaque fois que l'on utilise la sangle.
(ex. tirer sur les deux parties reliées de la sangle)
Régler correctement le harnais antichute avec le réglage central. Se familiariser avec le
fonctionnement avant la première utilisation. Pour tester, accrocher la corde de sécurité à proximité du
sol et appliquer le poids du corps sur le harnais. Les bretelles doivent ceindre parfaitement le corps.
Etre suspendu dans le harnais doit se faire normalement sans douleur, sinon vérifier le réglage du
harnais. En cas de chute, il convient toutefois d'éviter de rester suspendu longtemps dans le harnais.
Réfléchir avant et pendant l'utilisation comment effectuer des éventuelles opérations de sauvetage de
manière sûre, rapide et efficace. Pour la sécurité, il est essentiel de choisir la situation du dispositif ou
du point d'ancrage et le type d'exécution du travail de manière à restreindre à un minimum la chute
libre et la hauteur de chute.
Avertissement : Variante (E)
Les deux éléments thoraciques antichute doivent être toujours utilisés ensemble. A cet effet, le
connecteur (tel que le mousqueton) du sous-système utilisé doit être impérativement accroché dans
les D-rings des éléments thoraciques ou, si les éléments thoraciques sont exécutés avec des boucles de
sangles, dans le mousqueton accroché aux deux éléments thoraciques. N'utiliser que le mousqueton
fourni par le fabricant comme connecteur pour les deux éléments thoraciques. Il faut garantir ici que
les efforts subis par le connecteur soient conformes en cas de chute. (Ex. la fermeture à crochet ne
supporte pas les efforts transversaux).
Les éléments d'accrochage latéraux ne doivent pas être utilisés comme antichute mais uniquement en
liaison avec un connecteur pour harnais EN 358. Le connecteur doit toujours être maintenu tendu.
Pour les travaux prolongés en position accrochée, la variante de harnais choisie doit être dotée d'un
support dorsal supplémentaire.
L'élément antichute ne doit être utilisé qu'en liaison avec un antichute mobile. Il doit toujours être
installé au centre de la sangle ventrale.
Si l'on utilise le harnais avec un antichute mobile, il convient de vérifier la nécessité d'un support
dorsal supplémentaire pour des raisons d'ergonomie en réalisant un essai de suspension dans
l'antichute mobile. Veiller toujours à ce que le harnais soit correctement installé et que l'élément
antichute se trouve au centre du dos !
Les deux éléments antichute thoraciques antérieurs sont utilisés comme éléments d'accrochage en cas
d'utilisation du harnais comme ceinture à cuissardes. La charge nominale max. de l'utilisateur est de
100 kg.
Nous recommandons l'utilisation de l'adaptateur SP 1 comme améliorer le confort.
Afin d'équiper le harnais de l'adaptateur SP 1, les deux extrémités de sangle détachées et suspendues
de l'adaptateur SP 1 sont tirées de l'extérieur vers l'intérieur à travers l'élément d'accrochage latéral
puis connectés au mousqueton. (Voir figure 2)
Accrocher maintenant le mousqueton dans les deux éléments thoraciques. Réalisée ainsi, la connexion
permet d'être confortablement installé sur le harnais.
Adaptateur SP 1 constitué :
- Mousqueton
- Baudrier
- Siège
Se familiariser avec le fonctionnement avant la première utilisation comme ceinture à cuissarde Pour
un test, s'asseoir à proximité du sol et procéder à un essai de suspension. Etre assis dans le harnais doit
se faire normalement sans douleur, sinon vérifier le réglage du harnais. Réfléchir avant et pendant
l'utilisation comment effectuer des éventuelles opérations de sauvetage de manière sûre, rapide et
efficace.
Attention : Lors de travaux dans la ceinture à cuissardes, une sécurisation supplémentaire
contre la chute avec l'élément antichute sur le harnais doit être toujours prévue.
Le harnais ne doit être utilisé que par un personnel formé ou compétent d'une autre manière
ou l'utilisateur doit être placé sous la supervision directe d'une telle personne.
Le harnais doit appartenir personnellement à l'utilisateur.
Le harnais est à protéger des objets à arêtes vives, des étincelles de soudage ou autres dangers de
destruction et de détérioration.
Le harnais résiste à la température jusqu'à 60°C.
Si le harnais est revendu dans un autre pays, le revendeur doit
fournir des instructions pour l'utilisation, l'entretien, le contrôle régulier et la réparation dans la langue
de l'autre pays.
3. Signification des marquages :
L'utilisateur doit lire et observer les instructions d'utilisation !
A
Elément antichute
MKA20 KLICK FIT
EN 361 / EN358 / EN813
Mittelmann
Désignation du type
Norme du document à laquelle l'équipement correspond
Constructeur Mittelmann Sicherheitstechnik GmbH & Co. KG
0158
Identification de l'organisme notifié
Année de construction : XX Fabriqué ex. en 07 pour 2007
N° fab : xx – xxxxxx
Numéro de série du harnais
Prochaine révision
Indiquer quand le prochain contrôle doit avoir lieu
4. Stockage :
• Après la fin du travail, nettoyer le harnais et le conserver au sec dans des locaux aérés et ombragés.
• Pendant son transport, le harnais doit être conservé dans un contenant de transport appoprié
(housse ou malette).
• Eviter tout contact avec les acides, les liquides ou huiles corrosifs. Si cela est inévitable, nettoyer
le plus rapidement possible à la lessive pour linge délicat et abondamment à l'eau (40°C). Séchage
toujours naturel jamais à proximité de feu ou autres sources de chaleur.
A t t e n t i o n : Respecter scrupuleusement les consignes de nettoyage !
5. Matières utilisées
Le harnais est constitué des matériaux suivants.
Bretelles et fil à coudre en polyamide
Bouclerie en aluminium et en acier inoxydable,
Fermeture à clip en aluminium et en acier inoxydable,
Pièces en plastique
Siège en plastique
Mousqueton en aluminium ou en acier inoxydable
6. Durée d'utilisation
La durée d'utilisation est fonctions des conditions d'utilisation. L'expérience montre que l'on peut
estimer la durée d'utilisation à 6 à 8 ans dans des conditions d'utilisation normales des harnais mobiles.
L'année de construction de la harnais figure sur la plaque signalétique.
7. Contrôle
• Vérifier avant le début des travaux si le harnais ne comporte pas de traces d'usure ou de
détériorations. Vérifier la maniabilité. Vérifier la lisibilité du marquage du produit.
• Procéder à un remplacement immédiat en cas de doute quant à l'état de sécurité du système ou de
ses éléments. Ce travail est l'affaire exclusive du fabricant ou d'une autre personne compétente.
• Si besoin, faire vérifier au moins une fois par an par le fabricant ou un expert.
A t t e n t i o n : Ne pas utiliser les harnais et les cordes endommagés.
• Les systèmes ayant subi une chute doivent être retirés de la circulation et renvoyés au fabricant ou
à un atelier de réparation agréé en vue de la maintenance et d'un nouveau contrôle.
Attention:
Ne pas effectuer des modifications sur le produit.
Les réparations sont l'affaire exclusive du fabricant.
Des instructions d'utilisation / un carnet de contrôle sont fournis avec chaque harnais antichute. Ceuxci sont à conserver à proximité de l'équipement.
Observer aussi impérativement les modes d'emploi des produits utilisés en liaison avec l'antichute
mobile ainsi que les règles de prévention des accidents en vigueur.
Organisme notifié engagé pour l'attestation CE de type :
Fachausschuss Persönliche Schutzausrüstungen, Prüf- und Zertifizierungsstelle
Zwengenberger Straße 68, D-42781 Haan, Kennnummer
0299
Version : 26/06/2012
Date
Motif de l'intervention
(contrôle régulier ou
réparation)
Dégâts constatés, réparations effectuées et autres
remarques importantes
Nom et signature du
technicien
Date de première utilisation:
Contrôles réguliers et réparations
Date courante:
Date du prochain contrôle
régulier
Tél. +49(0)2051/91219-00
Fax. +49(0)2051/91219-19
Date d' achat:
EN 361:2002 EN 358:2000 EN 813:2008
Documentation de l'équipement
Norme:
MKA20 Klick Fit
MKA20 E Klick Fit
N° de fabrication:
Mittelmann Sicherheitstechnik
Bessemerstraße 25
GmbH & Co. KG
42551 Velbert
Harnais
Année de
construction:
Produit:
Type:
Fabricant:
Tecnología que salva vidas
Arnés anticaídas MKA 20 KLICK FIT
Arnés anticaídas MKA 20 E KLICK FIT
0158
EN 361:2002 / EN 358:2000 / EN 813:2008
Instrucciones de empleo / Cuaderno de revisiones
Tirante
Anilla dorsal
Banda torácica con cierre de resorte
Regulación central de la correa
Amarres torácicos a ambos lados,
opcionalmente con anilla D o
presillas de bandas con un
mosquetón
(en MKA20 E KLICK FIT)
Apoyo lumbar (elemento adicional)
Anillas de retención en los costados
Faja abdominal
Cierre de resorte del cinturón o faja
Anilla de amarre
Banda de glúteo, azul
Bandas para las piernas
con cierres de resorte
Mittelmann Sicherheitstechnik
GmbH & Co. KG
42551 Velbert, Bessemerstraße 25
Teléfono: +49(0)2051/91219-00
Telefax: +49(0)2051/91219-19
Nº de Identificación 177951
Técnica de seguridad de
Mittelmann
Instrucciones de empleo
1. Empleo
El arnés anticaídas forma parte del equipo personal de protección contra caídas. Lo constituyen una
serie de correas o bandas que se colocan rodeando el cuerpo. Si se utiliza reglamentariamente, sirve
para retener a la persona que cae, transmitiendo las fuerzas generadas a partes apropiadas del cuerpo y
manteniendo el cuerpo en una posición erguida. Solamente se puede utilizar junto con conectores /
cuerdas de seguridad homologadas según EN 354 / EN 353, absorbedores de energía según EN 355,
dispositivos de seguridad en altura según EN 360 o dispositivos de descenso según EN 341.
Solamente se admitirá su empleo como cinturón de retención en combinación con conectores
homologados para cinturones de retención según EN 358. Si se utiliza como arnés para trabajar
sentado según EN 813, se utilizarán las anillas delanteras de amarre como anillas de retención. Para la
seguridad del usuario es importante que haya leído y comprendido las instrucciones de empleo.
Antes de utilizarlo deberá someterse el arnés a una inspección visual. No utilizar arneses que
presenten daños. El punto de amarre según EN 795 deberá encontrarse por encima del usuario y
ofrecer una capacidad mínima de carga de 10 kN.
Deberá tenerse en cuenta la altura libre necesaria bajo los pies del usuario, de acuerdo con las
instrucciones de empleo del sistema de unión (p. ej. conectores con absorbedores de energía,
dispositivo anticaídas retráctil, dispositivo anticaídas deslizante sobre guía flexible, etc.).
2. Utilización
Se sujetará el arnés de la anilla dorsal, dejando que las perneras cuelguen libremente abiertas hacia
abajo. Los tirantes se colocarán del mismo modo que si se tratase de una mochila. La anilla dorsal de
amarre quedará a la espalda con la placa de plástico. Se pasarán, de adentro hacia afuera y al rededor
de los muslos, las correas para las piernas, cerrando y apretando los cierres de conexión. Cerrar y
apretar igualmente las hebillas de la correa abdominal y de la correa esternal. Es fundamental para
garantizar la seguridad el revisar el cierre correcto de las presillas cada vez que se coloque el arnés, (p.
ej. tirando de las dos partes unidas de las correas).
Ajustar el arnés con el sistema central de regulación, de forma que quede bien asentado. Familiarizarse
con su funcionamiento antes de usarlo por primera vez. A modo de prueba, y cerca del suelo, unirlo
con la línea de seguridad y cargar el arnés con el peso corporal. Las correas deberán abrazar
perfectamente el cuerpo. El estar suspendido en el arnés no deberá provocar normalmente ninguna
molestia; en caso contrario comprobar el ajuste del arnés. En caso de caída deberá evitarse, no
obstante, el quedar largo tiempo suspendido en el arnés.
Antes y durante su utilización deberá pensarse en la forma de aplicar de modo rápido, seguro y
efectivo, medidas de rescate que pudieran resultar necesarias. Para la seguridad será fundamental el
elegir de tal forma la posición del dispositivo de amarre o del punto de amarre, y la forma de ejecutar
el trabajo a realizar, que se reduzca a una distancia mínima la caída libre y la altura de la caída.
Advertencia: Variante (E)
Las dos anillas del pecho solamente se podrán utilizar de forma conjunta. Para ello ha de engancharse
obligatoriamente el elemento de unión (p. ej. mosquetón) del sistema parcial utilizado a las dos anillas
en D de los puntos de anclaje esternales o bien, cuando los puntos de anclaje esternales consistan en
trabillas, en el mosquetón enganchado en ambos puntos de anclaje esternales. Como elemento de
unión para los dos puntos de anclaje solamente se podrá utilizar el mosquetón suministrado por el
fabricante. Ha de garantizarse que el elemento de unión se vea sometido a un esfuerzo reglamentario
en caso de caída (p. ej. sin que el cierre del gancho quede cargado en sentido transversal).
Las anillas laterales de retención no se deberán utilizar para funciones anticaídas, sino únicamente en
combinación con un conector o medio de unión para arneses de retención según EN 358. El medio de
unión ha de mantenerse siempre tirante. Cuando se realicen trabajos de larga duración en posición de
retención, deberá elegirse la variante de arnés con apoyo dorsal adicional.
La anilla de seguridad para ascenso solamente se deberá utilizar con un dispositivo de seguridad de
ascenso. Deberá quedar siempre en el centro del cinturón o faja abdominal.
Cuando se utilice el arnés anticaídas con anilla de seguridad para ascenso deberá comprobarse,
realizando una prueba de suspensión en el dispositivo de protección de ascenso, la necesidad de
colocar un apoyo dorsal adicional por razones ergonómicas. ¡Prestar siempre atención al correcto
asiento del arnés y de la anilla anticaídas en el centro de la espalda!
Cuando se utilice el arnés anticaídas como arnés de asiento se utilizarán las dos anillas esternales
delanteras como anillas de sujeción. La carga máxima nominal del usuario será de 100 kg.
Para mejor la comodidad del asiento recomendamos que se utilice el adaptador SP 1.
Para equipar el arnés ya puesto con el adaptador SP 1 se procederá en primer lugar a introducir de
fuera hacia adentro los dos extremos sueltos de las correas que cuelgan hacia abajo del adaptador SP 1
a través de la anilla de sujeción lateral, uniéndose después con el mosquetón (ver Figura 2)
A continuación se enganchará el mosquetón en las dos anillas esternales. La unión así realizada
posibilita un cómodo asiento sobre el arnés.
Adaptador SP 1 compuesto por:
- Mosquetón
- Banda
- Almohadillado de asiento
Familiarizarse con su funcionamiento antes de utilizarlo por primera vez como asiento. A modo de
prueba, y cerca del suelo, sentarse en el arnés y realizar una prueba de suspensión. El estar sentado en
el arnés no deberá provocar normalmente molestia alguna. Antes y durante su utilización deberá
pensarse en la forma de aplicar de modo rápido, seguro y efectivo, medidas de rescate que pudieran
resultar necesarias.
Atención:
Cuando se utilice como arnés de asiento deberá procederse además garantizar la
seguridad contra caídas utilizando para ello una de las anillas del arnés.
El arnés anticaídas debería ser utilizado únicamente por personal formado para ello y/o preparado de
alguna otra manera, o el usuario debería utilizarlo bajo la supervisión directa de tales personas.
El arnés anticaídas deberá pertenecer personalmente al usuario.
Proteger el arnés de objetos con aristas cortantes, chispas de soldadura u otros peligros que puedan
destruirlo o dañarlo.
El arnés anticaídas es resistente a temperaturas de hasta 60°C.
Si se vende el arnés anticaídas a otro país, deberá facilitar el revendedor un manual de instrucciones de
empleo, mantenimiento, revisiones periódicas y conservación en el idioma del otro país.
3. Significado del marcado
¡El usuario deberá leer y observar las instrucciones de empleo!
A
MKA20 KLICK FIT
EN 361 / EN358 / EN813
Mittelmann
0158
Año de fabricación: XX
Nº de fabr.: xx – xxxxxx
Siguiente revisión
anilla anticaídas
Designación del tipo
Norma del documento que corresponde al equipo
Fabricante Mittelmann Sicherheitstechnik GmbH & Co. KG
Número de identificación del organismo notificado de inspección
Fabricado en el año, p. ej. 07 para 2007
Número de serie del arnés anticaídas
Indicación de la fecha en la que ha de realizarse la siguiente revisión
4. Almacenaje
• Al terminar el trabajo, limpiar y secar el arnés en lugares bien ventilados y con sombra.
• El arnés anticaídas se deberá transportar en un receptáculo apropiado (p. ej. una bolsa o un maletín
del aparato.
• Evite el contacto con ácidos, líquidos corrosivos y aceites. Si ello no se pudiera evitar, limpiar lo
antes posible con un producto de lavado fino y agua abundante (40°C). Secar siempre de forma
natural, nunca cerca del fuego u otras fuentes de calor.
A t e n c i ó n: ¡Observar estrictamente la norma de limpieza!
5. Datos sobre los materiales
El arnés anticaídas consta de los siguientes materiales.
Bandas o correas e hilos de poliamida
Herrajes de aluminio y acero inoxidable,
Cierres de aluminio y acero inoxidable
Piezas de materiales de plástico
Asiento acolchado de plástico
Mosquetones de aluminio o acero
6. Duración
La duración depende de las correspondientes condiciones de empleo. De acuerdo con nuestra
experiencia actual se puede partir de una duración, si se utiliza el arnés bajo condiciones normales, de
6 hasta 8 años. El año de fabricación del arnés anticaídas figura en la placa de características.
7. Control
• Antes de iniciar el trabajo comprobar si el arnés anticaídas presenta desgaste o daños. Comprobar
su manejabilidad. Comprobar la legibilidad del marcado.
• Si existieran dudas acerca del estado seguro del sistema o de los componentes, deberán sustituirse
de forma inmediata. Esto deberá ser realizado por el fabricante o por alguna persona competente.
• Siempre que sea necesario o, como mínimo, una vez al año deberá encargarse una revisión a
realizar por el fabricante o una persona competente.
A t e n c i ó n: Se prohíbe utilizar arneses anticaídas y cuerdas que presenten daños.
• Los sistemas que hayan soportado alguna caída se deberán retirar del uso, enviándolos al
fabricante o a un taller de reparaciones autorizado para su mantenimiento y nueva revisión.
A t e n c i ó n: No realizar modificaciones en el producto.
Las reparaciones solamente deberán ser realizadas por el fabricante.
Con cada arnés anticaídas se suministrará un manual de instrucciones de empleo / cuaderno de
revisiones, que deberá permanecer junto al equipo.
Deberán tenerse también en cuenta las instrucciones de empleo de los productos que se utilizan con el
arnés anticaídas, así como las correspondientes normas sobre prevención de accidentes.
Organismo notificado para el ensayo CE de tipo o modelo de construcción:
Comisión Técnica de Equipos Personales de Protección, Organismo de ensayos y certificaciones
0299
Zwengenberger Straße 68, D-42781 Haan, Número de identificación
Fecha: 26.06.2012
Documentación del equipamiento
Fecha
Motivo de la tarea
(inspección o mantenimiento
regulares)
Año de fabricación:
Fecha de la primera utilización:
Daños encontrados
reparaciones realizadas
y otros trabajos esenciales
Nombre y firma
de la persona encargada
Desarrollo de la inspección y reparación regulares
Fecha de caducidad:
Fecha de compra:
Fecha de la próxima
inspección regular
Producto: Arnés anticaídas
Norma:
EN 361:2002 EN 358:2000 EN 813:2008
Tipo:
MKA20 Klick Fit
MKA20 E Klick Fit
Número de fabricación:
Fabricante: Mittelmann Sicherheitstechnik
Bessemerstraße 25
Tel. +49(0)2051/91219-00
GmbH & Co. KG
42551 Velbert
Fax. +49(0)2051/91219-19