1
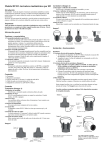
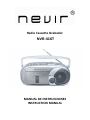
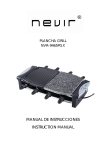
Radio Cassette Grabador
NVR-416T
MANUAL DE INSTRUCCIONES
INSTRUCTION MANUAL
MANUAL DE INSTRUCCIONES
UBICACIÓ N DE LOS MANDOS
1. Control de volumen
2. Interruptor de función
3. Selector de frecuencia
4. Micrófono
5. Botón Pausa
6. Botón Detener/Expulsar
7. Botón Avance rápido
8. Botón Retroceso
9. Botón Reproducción
10. Botón Grabar
11. Rueda de sintonización
12. Puerta del casete
13. Antena telescópica FM
14. Indicador de dial
15. Escala del dial
16. Compartimento de las pilas
17. Entrada del cable de alimentación CA
18.- Salida Auriculares
-Página 1
FUENTE DE ALIMENTACIÓ N Y CONEXIÓ N
FUNCIONAMIENTO CON PILAS
* Coloque el interruptor de FUNCIÓ N (2) en la posición TAPE.
* Retire la cubierta del compartimento de las pilas. (16)
* Introduzca cuatro pilas de tamaño D.
* Vuelva a colocar la cubierta del compartimento de las pilas. (16)
Nota:
*Compruebe con regularidad el estado de las pilas. Deben cambiarse las pilas viejas o gastadas.
* Si la unidad no se va a utilizar durante un largo período de tiempo o si está funcionando
únicamente con alimentación CA, quite las pilas para evitar que suelten líquido y dañen la
unidad.
FUNCIONAMIENTO CA
* Enchufe el cable de alimentación en la salida CA (127V/220V, 60Hz/50Hz)
Nota:
*Esta radio no puede funcionar con pilas si el cable CA está conectado a la unidad.
CONEXIONES
* Salida Estéreo Auriculares
Nota: Cuando conecte los auriculares (3.5mm) se silenciará el sonido desde el altavoz de la
unidad.
FUNCIÓ N
INTERRUPTOR DE FUNCIÓ N
* Posición RADIO para:
- Escuchar la radio
- Grabar un casete de la radio
* Posición TAPE para:
- Reproducir un casete
- Grabar a través del micrófono incorporado (4)
AJUSTE DEL VOLUMEN
VOLUMEN
El nivel de sonido reproducido por el altavoz o los auriculares estéreo se ajusta con el control
de VOLUMEN (1).
Nota:
Durante la grabación el ajuste del control de VOLUMEN (1) sólo afecta al sonido del monitor,
no al contenido de la grabación.
-Página 2
RADIO
FUNCIONAMIENTO
* Coloque el interruptor de FUNCIÓ N (2) en la posición RADIO.
* Seleccione la frecuencia de radio deseada con el SELECTOR DE FRECUENCIA (3).
La escala del dial muestra la frecuencia en MHz (para FM) o kHz (para AM).
* Gire la RUEDA DE SINTONIZACIÓ N (11) hasta que dé con la emisora de radio deseada.
* Para apagar la radio coloque el interruptor de FUNCIÓ N (2) en la posición TAPE.
ANTENA
NO CONECTE LA ANTENA FM A UNA ANTENA EXTERNA
* Para la recepción de FM despliegue la antena telescópica (13). Para mejorar la recepción,
incline y gire la antena (13).
Reduzca su longitud si la señal de FM es demasiado fuerte (está muy cerca de un transmisor).
* Para la recepción de AM las señales se captan a través de una antena de ferrita incorporada.
Gire la propia radio para mejorar la recepción.
GRABADOR DE CASSETTES
BOTONES
* Botón DETENER/EXPULSAR (6)
Púlselo mientras esté funcionando para detener todas las operaciones. Púlselo de nuevo para
abrir la puerta del casete.
* Botón AVANCE RÁPIDO (7) y botón RETROCESO (8).
Pulse para pasar rápido la cinta sea hacia adelante o hacia atrás.
* Botón REPRODUCIR (9)
Pulse para iniciar la reproducción.
* Botón PAUSA (5)
Pulse para detener momentáneamente el funcionamiento de la cinta. Púlselo de nuevo para
reanudar su funcionamiento.
* Botón GRABAR (10)
Pulse para empezar a grabar. El botón REPRODUCIR (9) se activará automáticamente.
INTRODUCIR Y QUITAR EL CASSETTE
* Pulse el botón DETENER/EXPULSAR (6) para abrir la puerta del casete.
* Introduzca un cassette en la posición correcta una vez abierta la puerta. La sección expuesta
debe estar hacia arriba (el lado a reproducir mirando hacia usted).
* Cierre totalmente la puerta del cassette antes de empezar.
* Una vez terminado, pulse el botón DETENER/EXPULSAR (6) para abrir la puerta del cassete y
quitar la cinta.
REPRODUCIR EL CASSETE
* Coloque el interruptor de FUNCIÓ N (2) en la posición TAPE.
* Pulse el botón DETENER/EXPULSAR (6).
* Introduzca una cinta ya grabada en el compartimento del cassete.
* Cierre la puerta con suavidad.
* Pulse el botón REPRODUCIR (9) para iniciar la reproducción.
* Ajuste el control de VOLUMEN (1) hasta obtener el nivel de sonido deseado.
* Pulse el botón DETENER/EXPULSAR (6) cuando haya terminado.
-Página 3
GRABACIÓ N
Grabar de la radio:
* Coloque el interruptor de FUNCIÓ N (2) en la posición RADIO.
* Sintonice la emisora de radio deseada.
* Abra la puerta del compartimento del cassette (12) pulsando el botón DETENER/EXPULSAR (6)
e introduzca una cinta en blanco en dicho compartimento. Cierre la puerta con suavidad.
* Pulse el botón GRABAR (10) y el botón REPRODUCIR (9) a la vez para iniciar el proceso de
grabación.
*Pulse el botón DETENER/EXPULSAR (6) cuando haya terminado.
Nota:
Puede controlar la reproducción durante la grabación. Puede ajustar el sonido con el control
de VOLUMEN (1). Este ajuste no afecta al contenido de la grabación.
Grabación a través del micrófono
* Coloque el interruptor de FUNCIÓ N (2) en la posición MIC.
* Abra la puerta del compartimento del cassete (12) pulsando el botón DETENER/EXPULSAR (6)
e introduzca una cinta en blanco en dicho compartimento. Cierre la puerta con suavidad.
* Pulse el botón GRABAR (10) y el botón REPRODUCIR (9) a la vez para iniciar el proceso de
grabación. Este proceso grabará las señales que se reciban a través del micrófono incorporado
a la unidad (4).
*Pulse el botón DETENER/EXPULSAR (6) cuando haya terminado.
Nota:
No es posible controlar la grabación que se está realizando a través del MICRÓ FONO.
Cómo evitar el borrado accidental
Para evitar que una grabación, de la cara A del cassete, por ejemplo, se borre accidentalmente,
rompe la lengüeta en la parte posterior de la cinta. De esta manera ya no es posible grabar en
la cara A. Si desea que la cara A vuelva a ser grabable, cubra de nuevo la abertura con cinta
adhesiva.
CARACTERÍSTICAS ESPECIALES
Parada automática
Esta unidad se apagará automáticamente al final de la cinta, sea durante la reproducción o la
grabación.
-Página 4
MANTENIMIENTO Y CUIDADOS
* Los productos electrónicos de este tipo no deben exponerse nunca a temperaturas extremas
ni a una humedad muy alta. Asíse asegura un funcionamiento normal durante mucho tiempo.
No coloque nunca la unidad en zonas de baño ni cerca de fogones o radiadores.
* Si es necesario, limpie la unidad con un trapo humedecido únicamente con agua. Asegúrese
de que la unidad esté desconectada de la toma de corriente CA.
* Los cabezales del cassette están en contacto constante con las cintas móviles. Si se manchan
de polvo o suciedad, se producirá un deterioro de su funcionamiento, tal como poco volumen,
distorsión o fluctuaciones. Pude limpiarlos con cuidado utilizando un paño y alcohol.
RESOLUCIÓ N DE PROBLEMAS
Vuelva a leer atentamente las instrucciones para asegurarse de que la unidad esté
funcionando adecuadamente. Compruebe la lista siguiente antes de llevar a su proveedor local
la unidad para repararla.
SÍNTOMA
No sale sonido a través de los altavoces.
La radio no funciona.
Hay demasiada electricidad estética durante
la recepción de FM.
No se puede introducir un casete en el
compartimento.
El botón REPRODUCIR no se bloquea en su
posición cuando hay una cinta metida.
No se puede pulsar el botón GRABAR cuando
hay una cinta metida.
No se reproduce en posición TAPE.
El sonido es débil o suena distorsionado
durante la reproducción.
No se puede borrar completamente una
grabación anterior.
CAUSA
El control de volumen está demasiado bajo.
El interruptor de FUNCIÓ N está en la posición
TAPE.
La antena no está correctamente
posicionada.
La cinta se ha introducido en la dirección
errónea.
La cinta ha llegado al final y la función autodetener se ha activado.
Se ha introducido una cinta a la que se ha
quitado la lengüeta de seguridad.
El botón PAUSA está pulsado.
El cabezal de grabación/reproducción está
sucio.
El cabezal de borrado está sucio.
Si tras haber consultado esta lista la unidad sigue sin funcionar correctamente, acuda a nuestro
centro técnico más cercano para repararlo. No trate de arreglarlo usted mismo. Consulte con
personal de servicio técnico cualificado.
No debe exponer este aparato a salpicaduras o mojaduras ni debe colocar sobre él objetos que
contengan líquidos, tales como un jarrón.
Este símbolo sobre el producto o en las instrucciones quiere decir que su
equipamiento eléctrico y electrónico debería ser depositado al final de su
vida útil por separado de la basura domestica. Hay sistemas de recogida para
el reciclaje en toda la UE. Para más información, consulte con las autoridades
locales o con la tienda donde adquirió el reproductor
“Para dar cumplimiento a la Norma UNE EN-60065, indicamos que si el cable flexible se daña,
únicamente puede ser sustituido por un taller de reparación reconocido por el fabricante
NEVIR, S.A., ya que se necesitan herramientas especiales”
-Página 5
INSTRUCTION MANUAL
1
5
6
7 8
13 12
FM
AM
2
9 10 18
3
4
11
14 15
53 60 70 80 100 150 170xKHz
88
92 96 100 104
108 MHz
- AM/FM RADIO CASSETTE RECORDER -
AUTO STOP SYSTEM
AUTO LEVEL CONTROL
16
17
CONTROL LOCATION
1. Volume Control
2. Function Switch
3. Band Selector
4. Built-in Condenser Microphone
5. Pause Button
6. Stop/Eject Button
7. Fast Forward Button
8. Rewind Button
9. Play Button
10. Record Button
11. Tuning Knob
12. Cassette Door
13. FM Telescopic Antenna
14. Dial Pointer
15. Dial Scale
16. Battery Compartment
17. AC Power Cord Socket
18. Headphone Jack
-Page 1
POWER SUPPLY AND CONNECTION
BATTERY OPERATION
Set the FUNCTION switch (2) to the TAPE position.
Remove the battery compartment cover. (16)
Insert four D-size batteries.
Replace the battery compartment cover. (16)
Note:
Check your batteries regularly. Old or exhausted batteries should be
replaced.
If the unit is not going to be used for a long period of time or is being run
exclusively on an AC power supply, remove the batteries to avoid leaking and
damage to the unit.
AC OPERATION
Plug the Power Cord into an AC outlet. (127V/220V, 60Hz/50Hz)
Note:
This radio cannot be operated by batteries if the AC power cord is connected
to the unit.
CONNECTION
Stereo Headphone Jack (18)
Note:
Connecting Stereo Headphones (3.5mm) will mute the sound from the main
speaker.
FUNCTION
FUNCTION SWITCH
Position to RADIO for:
-Radio reception
-Cassette recording from the radio
Position to TAPE for:
-Cassette playback
-Recording from built-in Condenser Microphone (4)
SOUND ADJUSTMENT
VOLUME
The level of sound reproduced by the loudspeaker or Stereo Headphones is
adjusted by the VOLUME control (1).
Note:
During recording, adjusting the VOLUME control (1) only affects the monitor
sound and not the content of recording.
-Page 2
RADIO
OPERATION
Set the FUNCTION switch (2) to the RADIO position.
Select the desired radio frequency band with the BAND SELECTOR (3).
The Dial Scale shows the frequency in MHz (for FM) or kHz (for AM).
Turn the TUNING KNOB (11) until desired radio station has been tuned in.
To turn off the radio, set the FUNCTION Switch (2) to the TAPE position.
ANTENNA
DO NOT CONNECT FM ANTENNA TO AN EXTERNAL ANTENNA
For FM reception, pull out the telescopic antenna (13). To improve reception,
incline and turn the antenna (13).
Reduce its length if the FM signal is too strong (very close to a transmitter).
For AM reception, the signals are picked up through the built-in ferrite antenna.
Rotate the radio itself to receive an optimum reception.
CASSETTE RECORDER
CONTROLS
STOP/EJECT button(6)
During operation, depress to stop all deck operation. Press again to open the
cassette door.
FAST FORWARD button(7) and REWIND button(8)
Press to rapidly advance the tape in either forward or reverse direction.
PLAY button(9)
Press to start playback.
PAUSE button(5)
Press to stop tape operation temporarily. Press again to resume tape operation.
RECORD button(10)
Press to start recording. PLAY button(9) will be activated automatically.
INSERTION AND REMOVAL OF CASSETTE TAPE
Press the STOP/EJECT button (6) to open the cassette door.
Insert a cassette into the holding position on the inside of the cassette door, with
the exposed section upward (playback side facing you).
Close the cassette door securely before starting.
When finished, press the STOP/EJECT button (6) to open the cassette door and
remove your cassette tape.
CASSETTE PLAYBACK
Set the FUNCTION switch (2) to the TAPE position.
Press the STOP/EJECT button (6).
Insert a pre-recorded tape into the cassette compartment.
Close the door gently.
Press the PLAY button (9) to activate playback.
Adjust the VOLUME control (1) to the desired sound level.
Press the STOP/EJECT button (6) when finished.
-Page 3
RECORDING
Recording from Radio
Set the FUNCTION switch (2) to the RADIO position.
Tune in desired radio station.
Open the Cassette Compartment Door (12) by pressing the STOP/EJECT button (6)
and insert a blank tape into the cassette compartment. Close the door gently.
Press the RECORD button (10) and PLAY button (9) simultaneously to start the
recording process.
Press the STOP/EJECT button (6) when finished.
Note:
You may want to monitor playback during recording. You can adjust the sound with
the VOLUME control (1). This adjustment does not affect the content of recording.
Recording from Built-in Condenser Microphone
Set the FUNCTION switch (2) to the MIC position.
Open the Cassette Compartment Door (12) by pressing the STOP/EJECT button (6)
and insert a blank tape into the cassette compartment. Close the door gently.
Press the RECORD button (10) and PLAY button (9) simultaneously to start the
recording process. This process will record the signals that are received by the
built-in Condenser Microphone (4).
Press the STOP/EJECT button (6) when finished.
Note:
Monitoring during MICROPHONE recording is not possible.
Prevention Against Accidental Erasure
To prevent a recording, e.g. side A, on the cassette tape from being erased
accidentally, break off the tab on the rear of the tape. Now, recording on side A is
no longer possible. If you wish to make side A recordable again, cover the hole
with adhesive tape.
SPECIAL FEATURES
Automatic Stop
During playback or recording, the unit will shut itself off automatically at the end of
tape.
-Page 4
MAINTENANCE & CARE
Electronic products of this kind should never be subjected to extreme
temperature nor high humidity to ensure normal functioning for a long lifetime.
For instance, never place the unit in bathing areas nor around stoves and
radiators.
If necessary, clean the unit with a piece of cloth dampened with water only.
Make sure the unit is disconnected from an AC power outlet.
The heads and capstans of the cassette are in constant contact with moving
tapes. If dirt and dust adheres to them, deterioration of performance, such as
sound decrease, distortion or fluctuation will result. A cloth and alcohol can be
used to clean the heads and capstans carefully.
TROUBLESHOOTING
Carefully re-read the instructions to make sure the unit is being operated properly.
Check the following before you take your unit to the local dealer for repair.
SYMPTOM
CAUSE
There is no sound from the speakers. - The Volume control is set too low.
- Headphones are connected to the unit.
The radio does not work.
The FUNCTION switch is in the TAPE
position.
There is excessive static during
FM reception.
The antenna is not properly
positioned.
A cassette cannot be inserted into
the compartment.
The tape is inserted in the wrong
direction.
The PLAY button does not lock in
position after inserting cassette tape.
The tape is at its end and auto-stop
function is in operation.
The RECORD button cannot be pressed
down with a cassette tape inside.
A tape with its safety tab removed
has been inserted.
The TAPE does not play.
The PAUSE button is depressed.
The sound is weak or distorted
during tape playback.
The record/playback head is dirty.
A previous recording cannot be
completely erased.
The erase head is dirty.
If you find the unit is not working properly after checking the above chart, please
take it to your nearest Services Centre. Do not attempt to repair it by yourself.
Refer all servicing to qualified service personnel.
This product shall not be exposed to dripping or splashing and that no objects filled
with liquids, such as vases, shall be placed on the apparatus.
This symbol indicates that when the end-user wishes to discard this product,
it must be sent to separate collection facilities for recovery and recycling. By
separating this products from other household-type waste, the volume of
waste sent to incinerators or land fields is reduced and natural resources will
thus be conserved.
“In order to fulfill ruling UNE EN-60065, we indicate that if the flexible wire is damaged, it
can only be substituted by a technical service recognized by NEVIR, S.A., as per special
tooling is required”
-Page 5
DECLARACIÓN DE CONFORMIDAD
NEVIR, S.A. declara bajo su responsabilidad que el aparato indicado cumple
los requisitos de las siguientes directivas:
DIRECTIVA EMC
EN55013:2001+A1:2003+A2:2006
EN61000-3-2:2006+A1:2009
EN61000-3-3:2008
EN55020:2007
EN61000-4-2:2009
EN61000-4-4:2004+A1:2010
EN61000-4-5:2006
EN61000-4-6:2009
EN61000-4-8:2001
EN61000-4-11:2004
Descripción del aparato:
LOW VOLTAGE DIRECTIVA EEC
EN60065-1:2006
Radio Cassette Grabador
Modelo NEVIR: NVR-416T
Importador: NEVIR, S.A.
Dirección del importador: Nevir S.A.
C/ Canteros, 14
Parque Empresarial Puerta de Madrid
28830 San Fernando de Henares - Madrid
-Page 6
Anexo V, según Real Decreto 1787/1996, de 19 de julio
Declaración de conformidad para equipos receptores
Responsable del mantenimiento de las especificaciones
técnicas declaradas:
Nombre o razón social: Nevir, S.A.
Dirección: C/ Canteros 14, Parque Empresarial Puerta de Madrid
28830 San Fernando de Henares - Madrid
Teléfono: 902 767 777, •Fax: 91-754 24 18
Documento de identificación (CIF / NIF): A-28/966307
Declara que:
El equipo:
Radio Cassette Grabador
Marca: NEVIR
modelo: NVR – 416T
tiene incorporadas las siguientes funcionalidades y sólo éstas:
Radio AM /FM con Cassette
Y es conforme a la normativa de telecomunicaciones siguiente:
Orden 29-07-96 y Orden 18-12-96
-Page 7


![DC120 Presentador Visual Manual de usuario [Importante]](http://vs1.manualzilla.com/store/data/006288580_1-aca0e5742aa9594a933f1ffe2c1c4ba1-150x150.png)