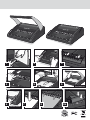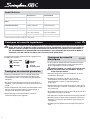
1
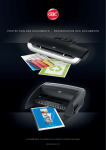
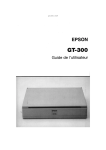
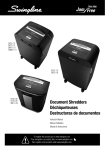
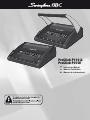
ProClick P110 &
ProClick P210E
US Instruction Manual
o
CA Manuel d’utilisation
o
MX
o Manual de instrucciones
www.swingline.com
www.swingline.com
US English
CA Français
MX Español
4
6
8
1
2
3
4
5
6
6
ProClick P210E
7
8
ProClick P110
8a
Specifications
ProClick P110
ProClick P210E
Punching capacity paper
Max. 15 sheets (80gsm)
Max. 15 sheets (80gsm)
Net weight
8.3lbs (3.8kg)
Electrical
-
Max. width of paper
Letter, DIN A4 – 297mm
Punching capacity, plastic covers
Max 2 sheets, 0.2mm each
Dimensions (W x D x H)
14” x 13 1/2” x 5”
(377x343x140mm)
Letter, DIN A4 – 297mm
Max 2 sheets, 0.2mm each
9.3lbs (4.2kg)
14” x 13 1/2” x 5”
(377x316x125mm)
120-127V
Subject to technical changes without prior notice.
Important safeguards
m
P210E
m
FOR YOUR PROTECTION, DO NOT CONNECT THE PROCLICK P210E TO ELECTRICAL POWER UNTIL YOU
READ THESE INSTRUCTIONS COMPLETELY. KEEP THESE INSTRUCTIONS IN A CONVENIENT LOCATION
FOR FUTURE REFERENCE. TO GUARD AGAINST INJURY, THE FOLLOWING BASIC SAFETY PRECAUTIONS
MUST BE OBSERVED IN THE SET-UP AND USE OF THIS PRODUCT.
The following symbols appear on this product, and their
meaning is as follows:
Power on/
off
Punch
Jam
Chip tray full
General safeguards
• Use the ProClick P110 or P210E only for its intended
purpose of punching and binding paper and covers
according to the indicated specifications.
• Do not place anything in the punch opening of the
machine other than paper and cover stock.
• Place unit on a secure, stable work area to prevent the
machine falling and possibly causing personal injury and
damage to the unit.
• Follow all warnings and instructions marked on the
product.
Electrical safeguards
P210E
• The ProClick P210E must be connected to a supply
voltage corresponding to the electrical rating of the
machine as indicated on the serial/rating plate or in this
manual.
m
CAUTION: THE POWER RECEPTACLE MUST
BE LOCATED NEAR THE EQUIPMENT AND BE
EASILY ACCESSIBLE.
• Unplug the ProClick P210E before moving it, or when it is
not in use for an extended period of time.
• Do not operate with a damaged supply cord or plug,
after it malfunctions, or after it has been damaged in any
manner.
• Do not overload electrical outlets beyond their capacity
as this can result in fire or electrical shock.
• Do not alter attachment plug. Plug is configured for the
appropriate electrical supply.
• The unit is intended for indoor use only.
• Never push objects into this product through cabinet
slots. Do not spill liquid of any kind on this product.
• Do not operate if the product has been exposed to rain
or water.
4
US
o
How to bind
1 Measure document using colour coded guide
(fig.1)
2 Select Click spine which fits your document (fig.2)
Use the table to choose a suitable Click spine size.
Please note that this guide is based on 80gsm paper.
3 Load Click onto machine (fig.3)
Fully open the selected Click spine and secure it
under the hooks in the binding channel at the front of
the machine, with the open rings of the spine facing
upwards.
4 Select document size (fig.4)
Rotate the edge guide to the paper / cover size you
wish to bind; A4 (297mm x 210mm) or Letter (215mm x
279mm). When using oversized covers, rotate the edge
guide to the oversize position, punch the covers for your
document and set aside. Then rotate the edge guide to
select either A4 or Letter and proceed.
5 Load pages into slot (fig.5)
You can punch 2 cover sheets (0.2mm) or up to 15
sheets of paper (80gsm) at a time. Select the quantity
of sheets to punch and tap the edge of the sheet stack
against a flat surface to ensure that all sheets are
aligned. Push the side of the stack to be punched into
the punching slot as far as it will go, and slide left to
align with the edge guide. When properly aligned, both
of the two red flags visible on the top cover of the binder
will turn green.
6 Punch pages (fig.6)
ProClick P110 (Manual Punch)
Punch pages by pulling handle down.
Then lift the handle back to the vertical position and
remove the punched sheets.
ProClick P210E (Electric Punch)
Press the ON / OFF button . A blue light will illuminate
to indicate that the power is on. And the punch button
will light up in green.
To punch, press the illuminated green punch button
.
When finished punching turn the machine OFF by
button.
pressing the ON / OFF
will illuminate to
If the punch jams the red jam light
indicate that the machine has jammed. The machine
will automatically reverse the punches to clear the jam
and the red jam light will remain illuminated. Remove the
paper and push the punch button to re-set the machine.
The red jam light will turn off indicating that the machine
is ready to punch. Reduce some of the sheets and
repeat steps 2 to 4 to avoid jams on additional lifts.
Note: If the red light remains on, unplug the unit and
contact an authorised Swingline™ GBC® service
representative for any required repairs.
When finished punching turn the machine OFF by
button.
pressing the ON / OFF
7 Combine pages with Click (fig.7)
Remove the sheets from the punch slot and insert on to
the fingers of the Click.
8 Repeat process as required
Repeat stages 5-7 until your document is fully loaded
on the Click spine.
9 Close the Click spine (fig.8)
Close the Click spine by firmly snapping the open Click
spine fingers together with your hands, or alternatively
the ClickBind closing tool (fig.8a).
Maintenance
Please ensure that the
clippings tray is emptied on a
regular basis. This will prevent
blockage and ensure that the
unit is always ready to punch.
The clippings tray can be
accessed from the back of the
machine.
Service
Contact an authorised Swingline™ GBC® service
representative for any required repairs.
In order to prevent overloading never try and punch more
than the maximum numbers of sheets recommended (15
sheets of 80gsm). The unit is maintenance free if handled
correctly.
5
Spécifications
ProClick P110
ProClick P210E
Capacité de perforation maxi,
papier
15 feuilles (80 g/m²)
15 feuilles (80 g/m²)
Capacité de perforation maxi,
couvertures plastique
2 feuilles de couverture de
0,2 mm d’épaisseur
Poids net
8,3 lbs (3,8 kg)
2 feuilles de couverture de
0,2 mm d’épaisseur
Dimensions (l x p x h)
14” x 13 1/2” x 5”
(377 x 343 x 140 mm)
Spécifications électriques
-
14” x 13 1/2” x 5”
(377 x 316 x 125 mm)
Largeur papier maxi
Letter, DIN A4 – 297 mm
Letter, DIN A4 – 297 mm
9,3 lbs (4,2 kg)
120 - 127 V
Données techniques sujettes à modification sans préavis.
Consignes de sécurité importantes
m
P210E
m
POUR VOTRE PROTECTION, NE BRANCHEZ PAS LA PERFORELIEUSE P210E À UNE PRISE ÉLECTRIQUE
AVANT D’AVOIR LU L’INTÉGRALITÉ DE CES INSTRUCTIONS. CONSERVEZ CES INSTRUCTIONS DANS UN
ENDROIT FACILE D’ACCÈS POUR TOUTE RÉFÉRENCE ULTÉRIEURE. POUR ÉVITER TOUT ACCIDENT, IL
EST INDISPENSABLE DE RESPECTER RIGOUREUSEMENT LES CONSIGNES DE SÉCURITÉ DE BASE CIDESSOUS LORS DE L’INSTALLATION ET DE L’UTILISATION DE CE PRODUIT.
Les symboles suivants apparaissent sur l’appareil et ont
la signification suivante :
Sous / Hors
tension
Blocage
Perforer
papier
Tiroir à
confettis plein
Consignes de sécurité générales
• Utilisez la perforelieuse P110 ou P210E uniquement
afin de perforer et relier des feuilles de papier et des
couvertures de reliure en respectant les spécifications
indiquées.
• Ne placez aucun objet dans la fente de perforation de
l’appareil, à part des feuilles de papier et couvertures de
reliure.
• Placez l’appareil sur une surface de travail stable et sûre
afin qu’il ne puisse pas tomber, ni s’endommager, ni
provoquer des blessures personnelles.
• Respectez tous les avertissements et toutes les
instructions indiqués sur l’appareil.
Consignes de sécurité
électriques
P210E
• La perforelieuse P210E doit être branchée à une prise
de courant correspondant à la tension précisée sur la
plaque signalétique ou dans ce manuel.
m
MISE EN GARDE : LA PRISE ÉLECTRIQUE DOIT
SE TROUVER PRÈS DE L’APPAREIL ET DOIT
ÊTRE FACILE D’ACCÈS.
• Débranchez l’appareil avant de le déplacer ou en cas
d’inutilisation prolongée.
• N’utilisez pas l’appareil si la prise ou le cordon
d’alimentation est endommagé, après un mauvais
fonctionnement ou après un endommagement
quelconque.
• Ne surchargez pas les prises électriques au-delà de leur
capacité, au risque de causer un incendie ou de subir un
choc électrique.
• Ne modifiez pas la fiche. La fiche est configurée pour une
alimentation électrique spécifique.
• Cet appareil est destiné uniquement à un usage intérieur.
• N’insérez jamais d’objets dans cet appareil à travers les
fentes de la carrosserie. Ne répandez aucun liquide sur
cet appareil.
• N’utilisez pas cet appareil s’il a été exposé à la pluie ou
l’eau.
6
CA
o
Comment relier
1 Mesurez l’épaisseur du document à l’aide du guide
à codage couleur (fig. 1)
2 Sélectionnez le boudin Click adapté à votre
document (fig. 2)
Utilisez le tableau pour choisir un boudin Click de taille
appropriée. Veuillez noter que ce guide est basé sur
l’utilisation de papier de 80 g/m2.
3 Chargez le boudin Click sur l’appareil (fig. 3)
Ouvrez entièrement le boudin Click sélectionné et
placez-le sous les crochets de la fente de reliure à
l’avant de l’appareil, en faisant en sorte que les boucles
du boudin s’ouvrent vers le haut.
4 Sélectionnez le format du document (fig. 4)
Réglez la butée papier avec la molette de butée en
fonction du format des feuilles/couvertures utilisées :
A4 (297 mm x 210 mm) ou Letter (215 mm x 279 mm).
En cas d’utilisation de couvertures surdimensionnées,
faites tourner cette molette jusqu’à la position « oversize
», perforez les couvertures du document et mettezles de côté. Tournez ensuite la molette de butée pour
sélectionner A4 ou Letter, puis continuez.
5 Insérez les feuilles dans la fente de perforation
(fig. 5)
Vous pouvez perforer 2 feuilles de couverture (0,2
mm) ou jusqu’à 15 feuilles de papier (80 g/m2) à la fois.
Sélectionnez la quantité de feuilles à perforer et taquez
la pile de feuilles sur une surface plate pour qu’elle soit
bien homogène. Insérez le bord des feuilles à perforer
dans la fente de perforation. Insérez les feuilles aussi
profondément que possible et faites-les glisser vers
la gauche afin de bien les positionner contre la butée
papier. Une fois que les feuilles sont bien alignées, les
deux drapeaux rouges visibles sur la partie supérieure
de l’appareil deviennent verts.
6 Perforez les feuilles (fig. 6)
ProClick P110 (perforation manuelle) :
Perforez les feuilles en abaissant la poignée.
Remettez ensuite la poignée à la verticale et retirez les
feuilles perforées.
ProClick P210E (perforation électrique) :
Appuyez sur le bouton marche/arrêt . Un voyant bleu
s’allume pour indiquer que l’appareil est sous tension et
devient alors vert.
le bouton de perforation
Pour perforer, appuyez sur le bouton de perforation vert
.
Quand vous avez terminé la perforation, éteignez
l’appareil en appuyant sur le bouton marche/arrêt
.
Si le perforateur se bloque, le voyant rouge
s’allume pour indiquer que la machine est bloquée. La
machine inverse automatiquement les poinçons pour
débloquer l’appareil et le voyant rouge restera allumé.
Retirez le papier et poussez le bouton de perforation
pour réinitialiser la machine. Le voyant rouge s’éteint
indiquant que la machine est prête à perforer. Réduisez
le nombre de feuilles et répétez les étapes 2 à 4 pour
éviter les bourrages pour les passages suivants.
R
emarque : Si le voyant rouge reste allumé,
débranchez l’appareil et contactez un réparateur
Swingline™ GBC® agréé pour effectuer les réparations
nécessaires.
Quand vous avez terminé la perforation, éteignez
l’appareil en appuyant sur le bouton marche/arrêt
.
7 Chargez le document sur le boudin Click (fig. 7)
Retirez les feuilles de la fente de perforation et insérezles sur les anneaux du boudin ouvert.
8 Répétez cette procédure autant de fois que
nécessaire Répétez les étapes 5 – 7 jusqu’au
chargement de toutes les feuilles du document sur le
boudin Click.
9 Fermez le boudin Click (fig. 8)
Fermez le boudin Click en poussant fermement avec
les mains sur les anneaux du boudin Click ou bien en
utilisant l’outil de fermeture ClickBind (fig. 8a).
Maintenance
Veuillez vider le bac à confettis
à intervalles réguliers pour
éviter les blocages et vous
assurer que la machine est
toujours prête à perforer. Le
bac à confettis est accessible à
partir de l’arrière de la machine.
Pour éviter toute surcharge,
n’essayez jamais de perforer un nombre de feuilles
supérieur à la capacité de perforation (15 feuilles de 80
g/m2). La machine ne nécessite aucun entretien en cas
d’utilisation correcte.
Dépannage
Contactez un représentant de dépannage Swingline™
GBC® agréé pour toute réparation requise.
7
Especificaciones
Anchura del papel máxima
Capacidad de perforación, papel
ProClick P110
ProClick P210E
Máximo de 15 hojas
(80 g/m2)
Máximo de 15 hojas
(80 g/m2)
Carta, DIN A4 (297 mm)
Carta, DIN A4 (297 mm)
Capacidad de perforación, tapas
de plástico
Máximo de 2 tapa
(0,2 mm cada una)
Máximo de 2 tapa
(0,2 mm cada una)
14” x 13 1/2” x 5”
(377 x 316 x 125 mm)
Peso neto
8,3 lbs (3,8 kg)
Dimensiones (A x P x A)
14” x 13 1/2” x 5”
(377x343x140mm)
Especificaciones eléctricas
-
9,3 lbs (4,2 kg)
120 - 127 V
Sujeto a cambios técnicos sin previo aviso.
P210E
Medidas de seguridad importantes
m
m
PARA SU PROTECCIÓN NO CONECTE LA PROCLICK P210E A LA RED ELÉCTRICA HASTA QUE HAYA
LEÍDO ESTAS INSTRUCCIONES COMPLETAMENTE. MANTENGA ESTAS INSTRUCCIONES EN UN LUGAR
CONVENIENTE PARA SU CONSULTA FUTURA. PARA PROTEGERSE CONTRA LAS LESIONES, SE DEBEN
OBSERVAR LAS SIGUIENTES PRECAUCIONES BÁSICAS DE SEGURIDAD EN LA PREPARACIÓN Y EMPLEO DE
ESTE PRODUCTO.
Los símbolos siguientes aparecen en este producto y su
significado es el siguiente:
Encendido/
Apagado
Atasco
Perforar
papel
Cajón de
residuos lleno
Precauciones generales
• Utilice la ProClick P110 o P210E sólo para su propósito de
perforar y encuadernar papel y tapas, de acuerdo con las
especificaciones indicadas.
• Aparte de papel o de tapas de encuadernación, no coloque
ningún objeto en la apertura de perforación de la máquina.
• Sitúe la unidad en un lugar de trabajo seguro y estable para
prevenir su caída, la cual podría causar lesiones personales
y daños a la unidad.
• Siga todos los avisos e instrucciones marcados en el
producto.
Medidas preventivas
eléctricas
P210E
•L
a ProClick P210E debe conectarse a un suministro
eléctrico que corresponda con la clasificación eléctrica de
la máquina indicada en la placa de serie/clasificación o en
este manual.
m
PRECAUCIÓN: LA TOMA ELÉCTRICA DEBE ESTAR
SITUADA CERCA DEL EQUIPO Y PERMANECER
FÁCILMENTE ACCESIBLE.
•D
esenchufe la ProClick P210E antes de moverla, o cuando
no la vaya a utilizar durante un periodo prolongado de
tiempo.
•N
o la utilice con un cable o un enchufe en mal estado
después de que funcione incorrectamente o de que haya
resultado dañada de alguna manera.
•N
o sobrecargue los enchufes más allá de su capacidad ya
que podría causar incendios o descargas eléctricas.
•N
o modifique el enchufe de la máquina. Éste está
configurado para la alimentación eléctrica indicada.
• La unidad está fabricada sólo para su empleo en interiores.
•N
unca introduzca objetos en el producto a través de las
ranuras de la carcasa.
• No derrame líquidos de ningún tipo sobre este producto.
•N
o utilice el producto si éste ha estado expuesto a la lluvia
o al agua.
8
MX
o
Instrucciones para encuadernar
1 Use la guía de colores para medir el documento (fig.
1)
2 Seleccione el canutillo Click que se ajuste a su
documento (fig. 2)
Utilice la tabla para elegir el tamaño correcto de canutillo
Click. Tenga en cuenta que esta guía se basa en papel de
80 g/m2.
3 Cargue el canutillo Click en la máquina. (fig. 3)
Abra el canutillo Click seleccionado completamente
y colóquelo debajo de los ganchos del canal de
encuadernación de la parte delantera de la máquina con
las anillas abiertas del canutillo hacia arriba.
4 Elija el tamaño del documento (fig. 4)
Gire la rueda del tope de papel hasta el tamaño de papel/
tapa que necesite: A4 (297 mm x 210 mm) o Letter (215
mm x 279 mm). Si utiliza tapas de tamaño superior, gire
la rueda del tope de papel hasta la posición “oversize”,
perfore las tapas para el documento y déjelas a un lado.
A continuación, gire la rueda del tope de papel hasta la
posición A4 o Letter y continúe.
5 Inserte las hojas en la ranura de perforación (fig. 5)
Puede perforar 2 tapas (0,2 mm) o un máximo de 15 hojas
de papel (80 g/m2) cada vez. Seleccione la cantidad de
hojas que desea perforar y golpee suavemente la pila de
hojas sobre una superficie plana para asegurarse de que
todas las hojas están alineadas. Inserte el borde de las
hojas que se va a perforar en la ranura de perforación.
Inserte las hojas al máximo que permitan y deslícelas
hacia la izquierda para alinearlas con el tope del papel.
Una vez que las hojas estén alineadas correctamente, los
dos indicadores de color rojo que están visibles en la parte
superior de la encuadernadora se pondrán de color verde.
6 Perfore las páginas (fig. 6)
ProClick P110 (perforación manual):
Tire del asa hacia abajo para perforar las hojas.
A continuación, levante el asa de nuevo hasta la posición
vertical y extraiga las hojas perforadas.
ProClick P210E (perforación eléctrica):
Pulse el botón de encendido/apagado . Se encenderá
una luz azul para indicar que la máquina está encendida y
se encenderá en color verde.
el botón de perforación
Para perforar, pulse el botón de perforación iluminado en
color verde .
Cuando haya terminado de perforar, pulse el botón de
para apagar la máquina.
encendido/apagado
Si la perforadora se atasca , la luz roja de atascos se
encenderá para indicar que la máquina se ha atascado. La
máquina perforará en sentido contrario automáticamente
para eliminar el atasco y la luz roja de atasco permanecerá
encendida. Retire el papel y presione el botón de perforar
para volver a configurar la máquina. La luz roja de atasco
se apagará indicando que la máquina está lista para
perforar. Reduzca un poco la cantidad de hojas y repita los
pasos del 2 al 4 para evitar atascos en cargas adicionales.
N
ota: Si la luz roja permanece encendida, desenchufe
la encuadernadora y póngase en contacto con un
representante de servicio autorizado de Swingline™ GBC®
para realizar las reparaciones necesarias.
Cuando haya terminado de perforar, pulse el botón de
para apagar la máquina.
encendido/apagado
7 Cargue el documento en el canutillo Click (fig. 7)
Extraiga las hojas de la ranura de perforación e insértelas
en las lengüetas del canutillo Click.
8 Repita el proceso según sea necesario
Repita los pasos 5-7 hasta que el documento esté cargado
en su totalidad en el canutillo Click.
9 Cierre el canutillo Click (fig. 8)
Para cerrar el canutillo Click, cierre las lengüetas abiertas
del canutillo Click con las manos o utilice la herramienta de
cierre ClickBind (fig 8a).
Mantenimiento
No olvide vaciar la bandeja de
residuos con frecuencia. Con
esto se evitarán los atascos y se
garantizará que la unidad esté
siempre lista para perforar hojas.
Puede tener acceso a la bandeja
de residuos desde la parte
trasera de la encuadernadora.
Para impedir la sobrecarga, no intente perforar nunca más del
número máximo recomendado de hojas (15 hojas de 80 g/
m2). Si se manipula de forma correcta, la encuadernadora no
requiere ningún mantenimiento.
Servicio
Para cualquier reparación necesaria, póngase en contacto
con un representante de servicio autorizado de Swingline™
GBC®.
9
Made in Portugal
Made in Portugal
Imported in USA by ACCO Brands (Returns Center)
101 Bolton Ave. 9E, Booneville, MS 38829
Imported in CANADA by ACCO Brands Canada Inc.
7381 Bramalea Road, Mississauga, ON L5S 1C4
In USA call 1-800-541-0094
In Canada call 1-800-268-3447
www.swingline.com
www.swingline.com
Fabriqué au Portugal
Hecho en Portugal
Importé au CANADA par ACCO Brands Canada Inc.
7381 Bramalea Road, Mississauga, ON L5S 1C4
Importado en MEXICO por ACCO MEXICANA S.A. DE C.V.
Circuito de la Industria Norte No. 6, Parque Industrial Lerma,
Lerma Edo. de México, C.P. 52000 México
Au Canada, composez le 1-800-268-3447
www.swingline.com
En México Ilame al 52.55.15005700
Desde el extranjero: 52.72.22656501
www.accomexico.com
©2014 ACCO Brands. All rights reserved.
ACCO® is a registered trademark of ACCO Brands. Swingline™, EasyView™ and Intelligent™ are trademarks of
ACCO Brands. GBC®, ZipBind® and CombBind® are registered trademarks of General Binding LLC. QuickStep™ is a
trademark of General Binding LLC.
©2014 ACCO Brands. Tous droits réservés.
ACCO® est une marque de commerce enregistrée d’ACCO Brands. SwinglineMC, EasyViewMC et IntelligentMC sont des
marques de commerce d’ACCO Brands. GBC®, ZipBind® et CombBind® sont des marques de commerce enregistrées
de General Binding LLC. QuickStepMC est une marque de commerce de General Binding LLC.
Ref: ClickBind150-150E/0715
Issue: 1 (11/14)
©2014 ACCO Brands. Todos los derechos reservados.
ACCO® es una marca registrada de ACCO Brands. Swingline™, EasyView™ y Intelligent™ son marcas de ACCO
Brands. GBC®, ZipBind® y CombBind® son marcas registradas de General Binding LLC. QuickStep™ es una marca
de General Binding LLC.