1
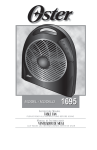
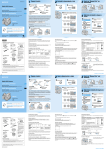
MODEL/MODELO
1696
Instruction Manual
POWER FAN WITH ROTATING GRILL
READ ALL INSTRUCTIONS BEFORE USING THIS APPLIANCE
Manual de Instrucciones
VENTILADOR POTENTE CON REJILLA ROTATIVA
LEA TODAS LAS INSTRUCCIONES ANTES DE USAR ESTE ARTEFACTO
I M P O R T A N T S A F E GUARDS
When using electrical appliances, basic safety precautions should always be followed
to reduce the risk of fire, electric shock, and injury to persons, including the following:
READ ALL INSTRUCTIONS BEFORE USING THE APPLIANCE.
• Use fan only for purposes described in the instruction manual
• To protect against electrical shock do not immerse unit, plug or cord in water or spray with
liquids. Plug the appliance directly into an electrical outlet of the same voltage as that of the
rating plate in the unit
• Close supervision is necessary when any appliance is used by or near children
• Unplug from outlet when not in use, when moving fan from one location to another, before
putting on or taking off parts and before cleaning
• Avoid contact with moving parts
• DO NOT operate in the presence of explosives and/or flammable fumes
• To avoid fire hazard, NEVER place the cord under rugs or any parts near an open
flame, cooking or other heating appliances
• DO NOT operate any appliance with a damaged cord or plug or after the appliance
malfunctions or has been damaged in any manner. Return this appliance only to the nearest
Authorized Oster® Service Center for examination, repair or adjustment
• The use of attachments not recommended or sold by the appliance manufacturer may cause
hazards
• DO NOT let the cord hang over the edge of a table, counter or come in contact with hot
surfaces or leave exposed to high traffic areas
• DO NOT use outdoors
• To disconnect, grip plug and pull from wall outlet. Never yank on cord
• Always use on a dry, level surface
• DO NOT operate fan until fully assembled with all parts properly in place
• This product is intended for household use ONLY and not for commercial or industrial
applications
• WARNING: To reduce the risk of electrical shock and injury to persons, DO NOT use in
window
• WARNING: To reduce the risk of fire or electric shock, DO NOT use this fan with any
solid-state speed control device
THESE INSTRUCTIONS
S A V ESAVE
THESE
INSTRUCTIONS
(For 120 & 127 Volts Only)
(For
120 &the
127risk
Volts
Only) shock, this appliance has a polarized plug (one blade is
To reduce
of electrical
wider than the other). This plug fits a polarized outlet only one way. This is a safety
To reduce the risk of electrical shock, this appliance has a polarized plug (one blade is
featurethan
intended
to help
reduce
thearisk
of electrical
If the
plug
does
fit fully
wider
the other).
This
plug fits
polarized
outletshock.
only one
way.
This
is anot
safety
into theintended
outlet, reverse
plug.the
If itrisk
still of
does
not fit,shock.
contactIf athe
qualified
electrician.
Do
feature
to helpthe
reduce
electrical
plug does
not fit fully
not
attempt
to
defeat
this
safety
feature.
into the outlet, reverse the plug. If it still does not fit, contact a qualified electrician. Do
not attempt to defeat this safety feature.
DESCRIPTION
OF THE
THEAPPLIANCE
APPLIANCE
DESCRIPTION OF
9
1
2
1
2
3
6
3
1h
2h
4h
4
8h
5
7
8
10
1. Power
Button
1. Power
Button
2. Oscillation
Button
2. Oscillation
Button
3. 3-Speed
Button
3. 3-Speed Button
4. Adjustable Timer Button
4. Adjustable Timer
5. 2-Breeze Mode Button 5. 2-Breeze Mode Button
RotatingGrill
Grill
6.6.Rotating
7.7.Blade
Blade
8.8.Fan
FanHousing
Housing
9. Fan Handle
9. Fan Handle
10. Remote Control
10. Remote Control
INSTRUCTIONS FOR USE
BEFORE USING FOR THE FIRST TIME
Read and follow all the instructions for this section on use and care and find a place to
keep this instruction manual ready for future reference.
NOTE: The use of attachments not recommended or sold by the manufacturer may
cause fire, electrical shock, injury or damage to the product.
OPERATING INSTRUCTIONS
1. Set the fan on a dry, level surface.
2. Plug cord into an electric outlet.
3. Press the power on/off button (
4. Press the fan speed (
) to start the fan.
) button to select the desired speed setting.
5. Press the timer button ( ) to begin the timer sequence to off setting.
Continue to press repeatedly until the desired time remaining is selected. The time
setting are 1 hour, 2 hours, 4 hours and 8 hours. These seetings will be indicated by
the appropriate LED light.
6. Press the breeze mode button to choose between the normal setting ( ) and the
sleep mode (
). The breeze modes switch speeds randomly to mimic the natural
feeling of the wind.
7. Press the oscillation button (
) to operate the rotating front grill. The grill spokes
each have a different pitch angle that focuses the air in a particular direction. When
rotating, the airflow will cover a wider area.
8. To stop the fan, press the power on/off button (
).
REMOTE CONTROL INSTRUCTIONS
1. Insert (2) AAA batteries (not included) into the back of the remote control.
2. The remote controls all the functions as the base unit for convenience. Follow the
same instructions above to operate the fan remotely. NOTE: Do not mix new and old
batteries. Do not mix alkaline, standard (carbon-zinc), or rechargeable
(nickel-cadmium) batteries.
MAINTENANCE AND CLEANING
Follow these instructions to correctly and safely care for your fan. Please remember:
• Always unplug the fan before cleaning
• Do not allow water to drip on or enter into fan housing
• Do not use any of the following agents to clean your Fan: gasoline, solvents, benzene
FAN CLEANING
Clean the fan grill, housing and base with a soft, damp cloth. DO NOT ATTEMPT TO
REMOVE THE FAN BLADE. Please use caution around the motor housing area. Do
not allow the motor or other electrical components to be exposed to water.
FAN STORAGE
When storing your fan in the off season, it is important to keep it in a safe dry location.
It is important to protect the fan head from dust. WE STRONGLY RECOMMEND
USING THE ORIGINAL BOX FROM PURCHASE.
PR E C A UC I O N E S I M P ORTANTES
Para reducir el riesgo de incendio, descarga eléctrica o daños personales, siempre se deben
seguir precauciones de seguridad cuando se utiliza cualquier artefacto eléctrico, incluyendo
las siguientes:
LEA TODAS LAS INSTRUCCIONES ANTES DE UTILIZAR SU VENTILADOR POTENTE
CON REJILLA ROTATORIA.
• Utilice este Ventilador sólo para los propósitos descritos en este manual
• Para protegerse de descargas eléctricas, no sumerja la unidad, enchufe o cordón en agua
ni rocíe con ningún líquido, y enchúfela en un tomacorriente del mismo voltaje que el que
está indicado en la placa de características eléctricas del artefacto
• Es necesaria una supervisión cercana cada vez que un artefacto eléctrico es utilizado por
niños o cerca de ellos
• Desenchufe el cable del tomacorriente cuando no esté utilizando su Ventilador cuando lo
mueva de un lugar a otro, antes de colocarle o retirarle piezas o antes de limpiarlo
• Evite el contacto con piezas en movimiento
• NO opere en presencia de explosivos y/o gases inflamables
• Para evitar el riesgo de incendios, NUNCA coloque el cable debajo de alfombras o ninguna
de las partes cerca de una llama, cocina o cualquier otro artefacto que se caliente
• NO opere ningún artefacto con un cordón o enchufe dañados, después de que el artefacto
haya fallado o si se cae al suelo o se daña de cualquier otra manera. Regrese el artefacto
al Centro de Servicio Oster® Autorizado más cercano para examinarlo, repararlo o para
ajustarlo mecánica o eléctricamente
• El uso de accesorios no recomendados o vendidos por el fabricante podría llegar a ser
peligroso
• NO permita que el cable cuelgue del borde de la mesa o mostrador, ni lo deje expuesto a
áreas de alto tráfico
• NO utilice este artefacto al aire libre
• Para desconectarlo, tome el enchufe y retírelo del tomacorriente de la pared, nunca hale el
cable
• Utilice siempre su Ventilador sobre una superficie seca y plana
• NO opere este artefacto hasta que lo haya ensamblado completamente con todas sus
partes colocadas apropiadamente en su lugar
• Este artefacto es SOLO para uso doméstico y no debe de utilizarse para ningún propósito
comercial o industrial
• ADVERTENCIA: Para reducir el riesgo de descarga eléctrica o daños físicos, NO utilice
este artefacto en una ventana
• ADVERTENCIA: Para reducir el riesgo de una descarga eléctrica, NO utilice este ventilador
con ningún control de velocidad “solid-state”
THESE INSTRUCTIONS
C O N S E R VSAVE
E ESTAS
INSTRUCCIONES
(For 120 & 127 Volts Only)
(Para 120 Y 127 Voltios)
To reduce the risk of electrical shock, this appliance has a polarized plug (one blade is
Este
enchufe
polarizadooutlet
(unaonly
clavija
másThis
ancha
la
widerartefacto
than thecuenta
other). con
Thisun
plug
fits a polarized
oneesway.
is aque
safety
otra).
Este
enchufe
entra
sólo
de
una
manera
en
un
tomacorriente
polarizado.
Si
feature intended to help reduce the risk of electrical shock. If the plug does not fitelfully
enchufe no entra correctamente en el tomacorriente, simplemente colóquelo al revés.
into
the outlet,
reverse
the plug. If con
it stillundoes
not fit, contact
a qualified
electrician.
Do
Si
todavía
no entra,
comuníquese
electricista
competente.
De ninguna
manera
not
attempt
to
defeat
this
safety
feature.
intente modificar o forzar la conexión diseñada como medida de seguridad.
DESCRIPCIONOFDEL
DESCRIPTION
THEARTEFACTO
APPLIANCE
9
1
2
1
2
3
6
3
1h
2h
4h
4
8h
5
7
8
10
1. Botón
Encendido/Apagado
1. de
Power
Button
2. Botón
Control de
Oscilación
2. de
Oscillation
Button
3. Botón de Velocidad
3. 3-Speed Button
4. Botón de Tiempo
4. Adjustable
Timer
5. Botón
de Selección
de Modo de Brisa
5. 2-Breeze Mode Button
6. Rotating Grill
6. Rejilla Rotativa
7. Aspas 7. Blade
8. Caja del Ventilador
8. Fan Housing
9. Mango del Ventilador
Fan Handle
10. Control9.Remoto
10. Remote Control
INSTRUCCIONES DE OPERACION
ANTES DE UTILIZAR SU VENTILADOR POTENTE CON REJILLA ROTATORIA
POR PRIMERA VEZ
Lea y siga todas las instrucciones de operación y seleccione un lugar para conservar
este manual de instrucciones listo para referencia futura.
NOTA: El uso de dispositivos no recomendados o vendidos por el fabricante
podrían causar un incendio, descarga eléctrica, heridas o daños al producto.
COMO OPERAR SU VENTILADOR
1. Coloque el Ventilador en una superficie seca y nivelada.
2. Enchufe el cable en cualquier tomacorriente estándar.
3. Presione el botón de encendido/apagado (
4. Presione el botón selector de velocidad (
de velocidad deseado.
) para prenderlo.
) del ventilador para seleccionar el ajuste
5. Presione el botón de función del tiempo ( ) para comenzar el conteo de tiempo
hasta llegar a la selección de apagado. Continúe presionando repetidamente hasta
que la memoria del tiempo haya sido seleccionada. El ciclo de ajuste de tiempo es de
1 hora, 2 horas, 4 horas o 8 horas y es indicado por una apropiada iluminación LED.
6. Presione el botón de modo de brisa para escoger entre la selección de brisa natural
( ) o para dormir (
). Los modos de brisa cambian de velocidad de manera
aleatoria para que se sienta como el viento natural.
7. Presione el botón de oscilación (
) para operar la rejilla frontal rotatoria. Cada
una de las barras que conforman la rejilla cuentan con un diferente ángulo de grado
de inclinación que envía el aire a una dirección en particular.
8. Para detener el ventilador, presione el botón de apagado (
).
INSTRUCCIONES PARA EL CONTROL REMOTO
1. Inserte (2) baterías AAA (no incluidas) en la parte posterior del control remoto.
2. El control remoto cuenta con todas las funciones de la unidad principal para su
conveniencia. Siga las mismas instrucciones descritas anteriormente para operar
su Ventilador remotamente. NOTA: No mezcle baterías nuevas con baterías viejas.
No mezcle baterías alcalinas con baterías estándar (carbón-zinc) o baterías
recargables (níkel-cadmium).
Mantenimiento y Limpieza
Siga las siguientes instrucciones para un correcto y seguro cuidado de su ventilador,
por favor recuerde:
• Siempre desenchufe el ventilador antes de limpiarlo o desarmarlo
• No permita que gotee agua en la caja del motor del ventilador
• No utilice ninguno de los siguientes productos como limpiadores: gasolina, disolvente,
bencina
LIMPIEZA DEL VENTILADOR
Limpie las rejillas del ventilador, la caja del motor y la base con una toalla suave y
húmeda con una solución jabonosa delicada. NO INTENTE REMOVER LAS ASPAS
DEL VENTILADOR. Por favor tenga cuidado alrededor del área de la caja del motor.
No permita que el motor o cualquier otro componente eléctrico estén expuestos al agua.
ALMACENAJE
Cuando desee guardar su ventilador es importante mantenerlo en un sitio seguro y seco.
Es importante proteger su ventilador del polvo. RECOMENDAMOS EN GRAN MANERA
UTILIZAR LA CAJA ORIGINAL DEL PRODUCTO.
©2007 Sunbeam Products, Inc. All rights reserved. Distributed by Sunbeam Latin
America, LLC, 5200 Blue Lagoon Drive, Suite 470, Miami, FL 33126.
One year limited warranty – please see insert for details.
©2007 Sunbeam Products, Inc. Todos los derechos reservados. Distribuido por Sunbeam
Latin America, LLC, 5200 Blue Lagoon Drive, Suite 470, Miami, FL 33126.
Garantía limitada de un año – por favor consulte los detalles en el inserto.
Printed in China
Impreso en China
P.N. 124531
CBA-102307