1
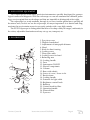
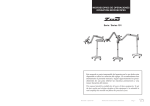
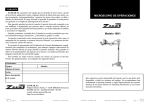
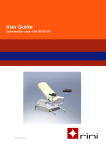
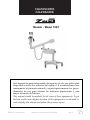
COLPOSCOPIO COLPOSCOPE Modelo - Model 192/1 Este manual es parte inseparable del aparato por lo que debe estar disponible a todos los usuarios del equipo. Le recomendamos leer atentamente el presente manual y seguir rigurosamente los procedimientos de uso para obtener las máximas prestaciones y una mayor duración del mismo. This manual should be available for all users of these equipments. To get the best results and a higher duration of this equipment it is advisable to read carefully this manual and follow the processes of use. Revisión 1 de Junio-00 Manual de instrucciones 50192010 Pág. 1 ESPAÑOL Gracias por elegir un Colposcopio ZUZI, su alta calidad mecánica y óptica le permitirá disponer de este instrumento por muchos años, no obstante le recomendamos leer atentamente el presente manual y seguir rigurosamente los procedimientos de uso para obtener las máximas prestaciones y una mayor duración de la misma. Tenga especialmente presente lo siguiente: Este manual es parte inseparable del aparato por lo que debe estar disponible a todos los usuarios del equipo. Cualquier duda puede ser aclarada contactando con el servicio técnico de ZUZI. Como instrumento de precisión, debe manipularse siempre con cuidado evitando los movimientos bruscos y los golpes. Nunca desmonte las diferentes partes del colposcopio para repararlas usted mismo, además de perder la garantía, podría producir un funcionamiento deficiente de todo el conjunto. No utilizar el equipo con fluidos que puedan desprender vapores o formar mezclas explosivas o inflamables. ¡ATENCION! NO SE ADMITIRA NINGUN APARATO PARA REPARAR QUE NO ESTE DEBIDAMENTE LIMPIO Y DESINFECTADO. INDICE DE CONTENIDOS 1. APLICACIONES 3 2. DESCRIPCIÓN 3 3. ESPECIFICACIONES TÉCNICAS 4 4. INSTALACIÓN 4 5. INSTRUCCIONES DE USO 5 6. RECOMENDACIONES PRÁCTICAS 5 7. MANTENIMIENTO 6 8. RESOLUCIÓN DE PROBLEMAS 6 ANEXO I: GARANTIA 7 Pág. 2 Manual de instrucciones 50192010 Revisión 1 de Junio-00 1. APLICACIONES La colposcopia es el método de estudio, mediante el cual se visualiza el tracto genital, especialmente todo el cuello de la matriz, para ello utilizamos el colposcopio, su mayor importancia radica en detectar y diagnosticar el cáncer cervicouterino en etapas muy tempranas con una certeza diagnóstica muy alta. Los Colposcopios ZUZI se caracterizan por la claridad de las imágenes, uniformidad en la visión, gran campo de visión, iluminación ajustable y facilidad de montaje, uso, transporte, etc. 2. DESCRIPCIÓN 1 2 3 4 5 25 24 6 23 22 21 8 9 20 10 19 18 12 13 14 15 17 16 Revisión 1 de Junio-00 11 7 1. Cubre oculares 2. Compensación dióptrica 3. Ajuste de la distancia interpupilar 4. Cabezal 5. Ajuste fino 6. Tornillo de fijación 7. Cable de fibra óptica 8. Tornillo de fijación del cabezal 9. Brazo con contrapeso 10. Tornillo de fijación 11. Fusible 12. Interruptor ON/OFF 13. Componentes eléctricos 14. Columna soporte 15. Base con ruedas 16. Tornillo de fijación 17. Sistema antideslizamiento 18. Tornillo de fijación 19. Entrada de cable de luz 20. Control intensidad de la luz 21. Contrapeso 22. Cambio de posición del filtro 23. Mando inclinación del cabezal 24. Filtro exterior 25. Cubreobjetivo Manual de instrucciones 50192010 Pág. 3 ESPAÑOL Los Colposcopios ZUZI son unos instrumentos de precisión óptica desarrollados especialmente para exámenes ginecológicos y diagnosis. Con ellos conseguimos ver aumentadas las diferentes patologías cervicovaginales que se pueden desarrollar y que son imposibles de diferenciar a simple vista. ESPAÑOL 3. ESPECIFICACIONES TÉCNICAS Especificaciones mecánicas SOPORTE: Soporte con 5 ruedas muy estables dos de las ruedas tiene un sistema de freno lo que dota de estabilidad al colposcopio. Equipado con un brazo extensible y giratorio. CABEZAL: Los portaoculares están dotados de ajuste dióptrico y distancia interpupilar ajustable. ILUMINACION: Lámpara halógena para iluminación fría 12V/ 100W, alimentador incorporado (220-230V 50Hz). Diámetro del haz de luz emitido: 60 mm. Nota: El Colposcopio tiene la posibilidad de trabajar a 110V o a 220V, compruebe antes de enchufar el equipo que el interruptor situado en la parte de abajo del cuerpo del microscopio se encuentra en la posición adecuada (220V). Especificaciones ópticas Aumento del ocular Aumentos totales Campo de visión Resolución Diámetro de pupila de salida Distancia de pupila de salida Distancia de trabajo Rango de ajuste fino Distancia Interpupilar Altura de elevación del equipo Radio de rotación máximo Angulo de rotación Inclinación del cabezal 16x 10x 26 mm 80 LP/mm 1.3 mm 11.3 mm 280 mm ± 9 mm 56 - 72 mm 310 mm 730 mm 320 º ±45º 4. INSTALACIÓN Desembale el colposcopio y asegúrese de que no presenta ningún daño debido al transporte. De ser así, comuníquelo inmediatamente a su transportista o suministrador. Guarde el embalaje, siempre se deben realizar las devoluciones en su embalaje original, con todos los accesorios suministrados. Coloque el soporte del microscopio, sobre una superficie plana, horizontal, manteniéndolo alejado de humedad, calor, polvo y vibraciones. Pág. 4 Manual de instrucciones 50192010 Revisión 1 de Junio-00 Inserte las diferentes partes del microscopio según dibujo, inserte entre sí las diferentes 5. INSTRUCCIONES DE USO Encienda el microscopio mediante el interruptor (12) situado en la parte superior de (13). Gradúe la altura y posición del brazo articulado en función de la altura de la muestra a observar. Ajuste la posición del cabezal, mediante el mando (23). Con el movimiento del brazo móvil desplace el cabezal a la posición adecuada. Ajuste la distancia interpupilar a su medida ajustando los dos oculares a la distancia precisa, se consigue cuando hay una total fusión de las dos imágenes. Mientras la observación son necesarios pequeños retoques como es la compensación dióptrica de los tubos; cerrando alternativamente un ojo y después el otro se apreciará una diferencia más o menos acusada del enfoque; Para corregir este defecto habrá que accionar el mando de ajuste dióptrico situado en los tubos portaoculares, para ello realizamos el enfoque por uno de los oculares poniendo el ajuste dióptrico a 0, el otro ojo lo graduamos desde el mando de ajuste dióptrico del otro ocular. Nota: Es conveniente una vez hallados estos valores memorizarlos, sobre todo si el microscopio es compartido por más de un usuario, para evitar tener que repetir la localización de los valores idóneos cada vez que el microscopio es manipulado. El enfoque de las observaciones se realiza con el mando (5), tenga en cuenta que la distancia de enfoque son 260 mm. 6. RECOMENDACIONES PRÁCTICAS Es necesario limpiar la lente después de cada observación, ¡Nunca debe usarse gamuza! debe hacerse con un papel especial para la limpieza de gafas o con un trozo de tela de hilo. No debe sumergirse nunca el extremo del objetivo en ningún tipo de líquido, dado que puede provocar el desprendimiento de la lente. Posibles causas de una mala imagen En caso de una imagen deficiente comprobar: Que la iluminación esté bien realizada, que la intensidad lumínica no sea excesiva ni demasiado débil. La limpieza de todo el sistema óptico, procediendo de la siguiente manera; hacer girar los oculares contemplando si las motitas se mueven, si es así limpiarlos. Revisión 1 de Junio-00 Manual de instrucciones 50192010 Pág. 5 ESPAÑOL partes del mismo, fije el pie con los frenos que se encuentran en dos de las ruedas (17), coloque la columna fijándola con el tornillo (16), inserte la pieza donde se encuentran los componentes eléctricos, fíjelo con los tornillos (10) y (18), inserte en el brazo articulado con el contrapeso, y en este el cabezal fijándolo con (8). ESPAÑOL 7. MANTENIMIENTO Todas las normas de utilización citadas anteriormente carecerán de valor alguno si no se realiza una continua labor de mantenimiento. El mantenimiento necesario para estos microscopios es el mismo que para otros instrumentos ópticos. Siempre deben mantenerse limpios y cubiertos para evitar que les entre el polvo. Las lentes no deben ser desmontadas nunca por el usuario, si hubiese cualquier suciedad en las superficies externas de las lentes límpielas con un paño suave que no desprenda pelusa. Para eliminar el polvo posado sobre las lentes sople con una pera o límpielo con un cepillo o pincel suave de pelo natural. En la limpieza de las partes mecánicas utilice lubricantes no corrosivos, para no dañar la pintura o acabados. Teniendo especial cuidado de no tocar las partes ópticas. Use siempre detergente neutro. Si se funde la lámpara reemplácela por una lámpara halógena ZUZI de 12V 100W, teniendo cuidado de no tocarla. IMPORTANTE: Antes de reemplazar la bombilla asegúrese de desconectar el microscopio de la red eléctrica. Asegúrese de utilizar lámparas halógenas de 12V 100W originales ZUZI, el uso de otro tipo de lámparas puede provocar un mal funcionamiento del instrumento. Para el cambio de lámpara, junto a la entrada de luz (19) encontramos dos botones negros en los que tiene que apretar y tirar hacia fuera girando un poco la lámpara, para sustituirla espere a que se enfríe y una vez fría, desplace el muelle que la sujeta y sáquela, tirando de ella saque las patas de la bombilla del portalámparas y sustitúyala. Para el cambio de fusible desenrosque el botón Fuse (11) y sustituya el fusible de su interior. 8. RESOLUCION DE PROBLEMAS Consulte los siguientes puntos antes de remitir el microscopio al Servicio Técnico: Si la lámpara no enciende: Compruebe que exista una buena conexión a una toma de corriente apropiada. Compruebe que el fusible y la lámpara están en buen estado. Si existe polvo o suciedad visible en el campo de visión: Compruebe la existencia de polvo en los objetivos, lente superior del ocular. Una vez localizada la zona causante del problema proceda a su limpieza según lo citado. Pág. 6 Manual de instrucciones 50192010 Revisión 1 de Junio-00 GARANTÍA Esta garantía quedará sin efecto cuando el aparato haya sido sometido a un uso indebido o manipulado por persona ajena a nuestro Servicio Oficial, así como por haber sido instalado incorrectamente o por haber utilizado recambios y accesorios no originales. Quedan, asimismo, excluidas de la Garantía las averías producidas por causas catastróficas (fuego, inundación...), atmosféricas, golpes y caídas. Los gastos ocasionados como consecuencia de esta reparación, tales como el transporte de los aparatos a nuestros Servicios Oficiales y su posterior devolución, serán por cuenta del usuario. Es necesaria la presentación del Certificado de Garantía debidamente cumplimentado (sin enmiendas ni tachaduras), para obtener cualquier intervención de nuestro Servicio Oficial sin cargo durante el período indicado. Esta garantía no cubre ni el mantenimiento del aparato ni las piezas o los daños producidos por desgaste natural del uso normal del equipo. Para facilitar un mejor servicio cuando nos envíen un aparato al Servicio Técnico les agradeceríamos nos indiquen los siguientes datos: Distribuidor: Equipo: Modelo: Número de Serie: Fecha: Breve descripción de la avería: AUXILAB, S.L. Polígono Morea Norte, 8 - 31191 BERIAIN (Navarra) Tel(948) 310 513 - Fax(948) 310 500 - 312 071 e-mail: [email protected] http://www.auxilab.es Revisión 1 de Junio-00 Manual de instrucciones 50192010 Pág. 7 ESPAÑOL AUXILAB S.L. garantiza este equipo por un período de doce meses a partir de la fecha de adquisición contra cualquier defecto de fabricación que afecte a su funcionamiento, comprometiéndose a reponer las piezas cuya rotura, se deba a defecto de fabricación. El canje, durante el período de garantía, de estas piezas será gratuito y no implicará prolongación de la misma. Thank you for choosing a Colcoscope ZUZI. Its high mechanical quality will allow you to make use of this equipment for a long time. Nevertheless, to get the best results and a longer life out ot this equipment we recommend to read carefully this manual and follow the enclosed instructions. In order to use this equipment, please take in mind the following points: This manual is inseparable from the Colcoscope ZUZI and it must be available to all the users of this equipment. Any doubts can be clarified by getting in touch with the ZUZI technical service. As it is a precission instrument, it should be handled carefully avoiding sudden movements and bumps. Never dismantle the different pieces of the Coloscope to repare them yourself. In addition to lossing the warranty, it could lead to a faulty performance of this equipment. ENGLISH Do not use fluids that can liberate steam or form explosive o inflamable mixtures. ATTENTION! NO EQUIPMENT WILL BE REPAIRED BY OUR TECHNICAL SERVICE UNLESS IT IS PROPERLY CLEAN AND DESINFECTED. INDEX OF CONTENTS 1. USES OF THE EQUIPMENT 9 2. DESCRIPTION 9 3. TECHNICAL SPECIFICATIONS 10 4. INSTALLATION 10 5. INSTRUCTIONS OF USE 11 6. USEFUL ADVICE 11 7. MAINTENANCE 12 8. TROUBLESHOOTING 12 ANNEX I: WARRANTY 13 Page 8 Instruction manual 50192010 Version 1 June-00 1. USES OF THE EQUIPMENT The Colposcope ZUZI are optic precission instrumentos specially developed for gynaecological exames and diagnosis. With the colcoscope we can see aumented the different pathologys cervicovaginal that can develope and that are imposible to distinguish at first sight. The colposcope is a study methode, through it you can visualize genital tract, specially all the uteros neck, for this we use the colposcope, its mayor importance is to detecte and diagnosticate the cervicouterin cancer in very early periods with a very high certaity. The ZUZI Colposcope is distinguished because of its sharp clarity in images, uniformity in the vision, adjustable ilumination and easy set up, use, transport, etc. 2. DESCRIPTION 1 2 25 24 6 23 22 21 8 9 20 10 19 18 12 13 14 15 17 16 Version 1 June-00 11 7 Instruction manual 50192010 Page 9 ENGLISH 3 4 5 1. Eye piece cover 2. Dioptric handwheel 3. Adjustment of interpupila distance 4. Head 5. Knob for fine focusing 6. Locking screw 7. Fibre optic cable 8. Locking screw for head 9. Balancing arm 10. Locking handle 11. Fuse 12. Interruptor ON/OFF 13. Electric components 14. Column 15. Base with wheels 16. Screw of cover / Screw to fix 17. Break sistem 18. Locking handle 19. Entrance for light cable 20. Brightness control knob 21. Balancer 22. Control knob for filter 23. Operation handle 24. External filter 25. Eyecover 3. TECHNICAL SPECIFICATIONS Mechanical specifications SUPPORT: Stand with 5 very stable wheels, 2 of the wheels have a break sistem that gives great stability for the colposcope Equiped with a extensible and rotating arm BINOCULAR HEAD: The eyepiece slides have a dioptric adjustment and an adjustable interpupilar distance. ILLUMINATION: Halogen lamp for cold light ilumination 12V/ 100W, incorporated with a power supply (220-230V 50Hz). Diameter of the emitid bim of light: 60 mm. Note: The Colposcope has the posibility of working at 110V to 220V, before plugging the equipment to the interrupter situated on the bottom of the body of the microscope please check that it is placed in the correct position (220V). ENGLISH Optical specifications Increase of eyepiece Total increase Field of view Resolution Exit pupil ∅ Exit pupil distance Working distance Rank of fine ajustment Interpupil distance Elevation Radius of rotation Rotation angle Inclination of the head 16x 10x 26 mm 80 LP/mm 1.3 mm 11.3 mm 280 mm ± 9 mm 56 - 72 mm 310 mm 730 mm 320 º ±45º 4. INSTALLATION Please take the wrapping of the colposcope and check that you have received all the accessories. Examine it carefully to make sure no damage has occurred during shipping. If there is any damage, notify to your dealer/forwarding agency. Keep all packing material until you are sure that the instrument works correctly. All defective items must be returned in the original packing together with any other supplied accessories. Put the support of the microscope, on a plane surface, horizontal, far away from humidity, heat, dust and vibrations. Page 10 Instruction manual 50192010 Version 1 June-00 Insert the different parts of the microscope as the picture indicates, fix the base with the break that you will find on two of the wheels (17), place the column fixing it with the screws (10) and (18), insert in the articulated arm with the counterweight, and in this one the head fixed to (8). 5. INSTRUCTIONS OF USE Switch on the microscope by the interruptor (12) situated on the top of (13). Graduate the hight and position of the articulated arm according to the height of the sample you can observe. Adjust the position of the head, by the andel (23). With the movement of the mobil arm put the head in the correct position. Adjust the interpupula distance in its measure adjusting the two eye pieces at the precise distance, you can obtain when there is a total fusion of the two images. While the observation you will need little finishing touches as the dioptric compensation Note: It will be convinience to memorize once you locate these adjusments, very indicated to memorize if the microscope is shared by different users, you can avoid repeating the localization of the ideal values every time the microscope is manipulated. The focusing of the observations is realized with the knob (5), please take in mind that the distance for focus is 260 mm. 6. USEFUL ADVICE It is necessary to clean the lense after every observation. Never use chamoise for cleaning! You should do it with special paper for glass cleaning or with a piece of linen cloth. You should never submerge the extrem of the objective in any liquid, because it can cause the detachement of the lens. Posible causes of a defective image In case of a bad image please make sure that: The brightness is made ok, and that the ilumination intensity is not excesive or to weak. The cleaning of all the optic sistem, is made correctly: if you turn the eyepieces and you can see dust moving, you should clean them. Version 1 June-00 Instruction manual 50192010 Page 11 ENGLISH of the tubes: alternately closing one eye and then the other you will be able to appreciate a difference more or less pronaunced of the focuing; to correct this defect you will have to accionate the knob of dioptric adjustment situated in the eyecover tubes, for this we have to focus by one of the eyepieces putting the dioptric adjustment on 0, and the other eyepiece we will graduate it by the knob of dioptric adjusment of the other eyepiece. 7. MAINTENANCE Every indication mentioned before will lack of value if you do not realize in continuity all the work of maintenance. The manteinence necessary for these microscopies is the same than for other optic instruments. They should always be covered to avoid dust. The eyepieces should not be dissasembled by the user, if the is any dust in the extern surface of the lence clean them with a soft material that does not leave fluff. To eliminate the dust over the lence apply wind/blow with a special object or clean with a soft brush. In the cleaning the mechanical parts use non corrosive lubricants, this way you will not damage the paint or the endings. Please have special caution in not touching the optical parts. Allways use a neutral detergent. If the lamp blows you should chainge it for an alojen lamp ZUZI of 12V 100W, having spe- ENGLISH cial caution in not toching it. IMPORTANT: Before changing the lamp please make sure you disconect the microscope of the electric net. Make sure you use the original ZUZI halogen lamps of 12V 100W, the usage of other tipe of lamps can cause a bad operating of the instrument. For the changing of the lamp, with the entrance of the light (19) we will find two black buttons that you have to press and pull out turning a bit the lamp, to substitute it wait until the lamp is cold, once it is cold, move the spring that is holding it and take it out, pulling it take of the holders of the light bulb and substitute it. For the changing of the fuse unscrew the boton "Fuse" (11) and substitute the interior fuse. 8. TROUBLESHOOTING Please check the following points before sending the colposcope to the technical service: If the lamp does not go on: Chek that there is a good conexion to an appropiate current net. Chek that the fuse and lamp are in a good state. If there is dust or dirt in the field of view: Check the dust on the objective, superior lence of the eyepiece. Once you have localized the zone that causes the problem clean it as mentioned before. Page 12 Instruction manual 50192010 Version 1 June-00 WARRANTY AUXILAB, S.L. warrants this equipment be free from defects in material and workmanship for a period of one year from date of purchase from AUXILAB S.L. or an authorised AUXILAB S.L. dealer. This warranty is limited to such purchaser and is not transferable. During the year warranty period, AUXILAB S.L. will repair or replace, at its option, any defective equipments or pieces at no additional charge, provided that the product is returned, shipping prepaid, to AUXILAB S.L., an authorised dealer or an authorised service location. The purchaser is responsible for insuring any returned product and assumes the risk of loss during shipping. All replaced parts become the property of AUXILAB. This limited warranty does not extend to any products which have been damaged as a result of accident, misuse, abuse or as a result of service or modification by anyone other than AUXILAB, an authorised dealer or an authorised service location. Except as expressly set forth above, no other warranties are expressed or implied, including, but not limited to, any implied warranties of merchantability or fitness for a particular purpose. AUXILAB expressly disclaims all expressed or implied warranties not stated herein. Some states do not allow the exclusion or limitation of incidental or consequential damages for consumer products, and some states do not allow limitations on how long an implied warranty lasts, so the above limitations or exclusions may not apply to you. This limited warranty gives you specific legal rights, and you may also have other rights which vary from state to state. Dealer: Equipment: Model: Serial Number: Date: Brief failure description: AUXILAB, S.L. Polígono Morea Norte, 8 - 31191 BERIAIN (Navarra) Tel(948) 310 513 - Fax(948) 310 500 - 312 071 e-mail: [email protected] http://www.auxilab.es Version 1 June-00 Instruction manual 50192010 Page 13 ENGLISH In order to obtain a free reparation or a free piece-replacement by our Technical Service over the above-mentioned period of time, it is absolutely necessary to submit the Warranty Certificate. This warranty doesn't apply for the maintenance of the equipment or for damaged caused by a natural, everyday use.