1
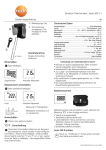
Thermo-Anemometer · testo 405-V1
Instruction manual
en
5.9 t
o 11
.8 in
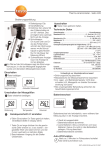
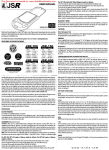
{ Multi-purpose clip
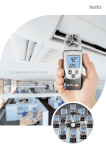
|Holder for positioning
stick in duct.
}Twist ring: The lower part
of the probe stem can
be twisted by 90°. This
allows an optimum view
of the display
~ Protective cap:
The velocity sensor is
protected by a quick
twist of the bottom of
the probe stem ¯ the
protective cap is closed.
Should only be left open
for the duration of the
measurement.
Swivel head. The display
can always be read.
An arrow on the protective cap shows the wind
direction in which the instrument was calibrated
and the best readings obtained.
Commissioning
Remove the protective film on the display.
Switching on
Press button once
Switching off
Keep button pressed for 3 seconds.
Technical data
Type of application: ..................................................Short measurement
Measuring range m/s: ..........................................0 to 5m/s at -20 to 0°C;
0 to 10 m/s at 0 to +50 °C
Measuring range m3/h: ................................................0 to 99990 m3/h
Measuring range °C: ..........................................................-20 to +50 °C
Resolution: ....................................................................0.01 m/s; 0.1 °C
Accuracy: (system accuracy at calibration temp. +25°C)
±(0.1 m/s + 5 % of m.v.) (to 2 m/s);
±(0.3 m/s + 5% of m.v.) (over 2 m/s)
± 0.5 °C
Ambient temperature: ............................................................0 to +50 °C
Storage temperature: ........................................................-20 to +70 °C
Battery type: ................................................................................3 x AAA
Battery lifetime: ..................................................................Approx. 20 h
(approx. 750 measurements lasting 2 minutes each)
Probe stem: ........................................................Ø 0.5 in/0.6 in / Length:
5.9 to 11.8 in
Warranty: ....................................................................................2 years
CE guideline ....................................................................2004/108/EEC
Please read before using instrument
• Observe flow direction
• Adhere to sensor measuring ranges
• Do not exceed maximum storage and operating
temperatures (e.g. protect measuring instrument
from direct sunlight)!
• Inexpert handling cancels your warranty.
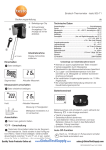
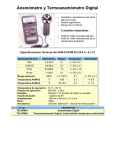
Changing the battery
Segmenttest
Current reading
Changing the parameters
Press button repeatedly:
The battery has to be changed if the
symbol
appears in the display during the measurement.
Velocity
Temperature
Volume
Set duct cross-section m2
Keep On button pressed when switching on.1st
position flashes.
1 Keep On button pressed until desired digit appears.
Wait 2 seconds and the digit will apply. The cursor
then changes to the next position.
2 Repeat the described procedure for all positions.
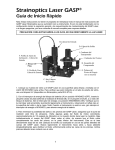
Instrument is switched off.
1 Open battery compartment cover.
2 Remove spent batteries and insert new batteries
(3 x AAA) into the battery compartment. Observe
polarity!
3.Close battery compartment cover.
Auto Off function
If no button has been pressed in approx.5 minutes, the instrument switches itself off
automatically.
Termoanemómetro · testo 405-V1
Manual de instrucciones
es
150
- 30
0 mm
{ Clip multi-uso
| Sujeciones para posicionar el mini en conducto, ej. en un conducto de aire, ver fig.
}Anillo de rotación: la
punta de la sonda
puede rotar 90°
permitiendo una lectura
óptima del visualizador
~ Cabezal de protección:
El sensor de velocidad
está protegido por un
cabezal en la punta de la
sonda ¯ el cierre de
protección estará
cerrado. Se debe dejar
abierto solamente
durante la medición.
Cabezal giratorio.El visualizador puede leerse
siempre.
En la cubierta de protección hay una flecha que
señala la dirección del flujo en la que se calibró el
instrumento de medición y con la que se obtienen
los mejores resultados.
Conexión
Tirar cuidadosamente del film protector del
visualizador.
Poner en marcha
Pulsar la tecla
2 Repetir el procedimiento anteriormente descrito para
todas las posiciones.
Desconexión
Presionar la tecla durante 3 segundos.
Datos técnicos
Tipo de aplicación: ..........................................................medición breve
Rango m/s:............................................................0 a 5m/s de -20 a 0°C;
0 a 10 m/s de 0 a +50 °C
Rango m3/h:....................................................................0 a 99990 m3/h
Rango °C:............................................................................-20 a +50 °C
Resolución: ....................................................................0.01 m/s; 0.1 °C
Exactitud: (exactitud del sistema a una temperatura de calibración +25°C)
±(0.1 m/s + 5 % del v.m.) (hasta 2 m/s);
±(0.3 m/s + 5% del v.m.) (más de 2 m/s)
± 0.5 °C
Temperatura ambiente: ..........................................................0 a +50 °C
Temperatura almacenamiento: ............................................-20 a +70 °C
Tipo pila:......................................................................................3 x AAA
Vida pila:................................................................................Aprox. 20 h
(aprox. 750 mediciones de 2 minutos de duración)
Sonda: ..............................................................Ø 12 mm/16 mm / Long:
150...300 mm
Garantía: ......................................................................................2 años
Directiva CE: ....................................................................2004/108/CEE
Leer antes de utilizar
• Respetar la dirección del flujo
• Respetar el rango de medición del sensor.
• No exceder la temperatura de almacenamiento y
funcionamiento (ej. protejer el instrumento de medición de la luz solar directa)!
• Un uso inadecuado invalida la garantía.
Cambio de la pila
test de segmentos Valor de medición actual
Cambiar parámetro
Pulsar la tecla repetidas veces:
Velocidad
Temperatura
Cuando aparece en el visualizador durante la medición
el simbolo
la pila debe cambiarse.
Volumen
Ajuste de la sección del conducto m2
Al conectar, presionar la tecla On; en el visualizador
parpadeará la posición ajustable.
1 Presionar la tecla On hasta obtener la cifra deseada.
Esperar 2 segundos = se aplica el valor ajustado y el
cursor pasa a la siguiente posición.
El instrumento se encuentra apagado.
1 Retirar la tapa del compartimento para pilas.
2 Sacar las pilas/baterías agotadas e introducir
pilas/baterías (3 de AAA) nuevas en el
compartimento para pilas. Respetar la polaridad.
3 Cerrar la tapa del compartimento para pilas.
Función de auto-desconexión
Si no se pulsa la tecla en aprox. 5 minutos, el
instrumento se apaga automaticamente.