1
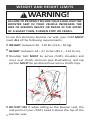
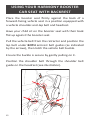
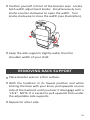
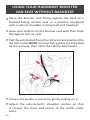
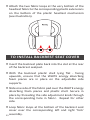
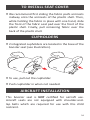
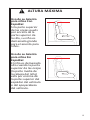
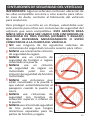
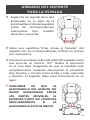
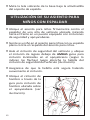
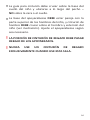
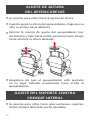
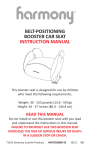
BABY ARMOR
BELT-POSITIONING
BOOSTER CAR SEAT
INSTRUCTION MANUAL
This child restraint is designed for use by children who
meet the following requirements:
Weight: 30 – 110 pounds (13.6 – 50 kg)
Height: 34 – 57 inches (85.1 – 114.8 cm)
READ THIS MANUAL
Do not install or use this car seat until you read and
understand the instructions in this manual.
FAILURE TO PROPERLY USE THIS CAR SEAT INCREASES
THE RISK OF SERIOUS INJURY OR DEATH
IN A SUDDEN STOP OR CRASH.
™2009 Harmony Juvenile Products
HMYBABBB-A
03/09
US
Welcome to the HARMONY Family!
Thank you for choosing Harmony`s Baby Armor
Belt-Positioning Booster Car Seat. You have chosen one
of the safest and most comfortable options available for
your child on the market today.
At Harmony, we pride ourselves on bringing the
most innovative, feature-rich products to our valued
customers. This booster car seat model fully contains
your child’s upper, mid- and lower body whereby
protecting your child in the event of a front, rear or side
impact collision.
Although it is not possible to predict if the use of a child
restraint will prevent injury or death in the event of a
collision, extensive testing has shown that this child
restraint, when used properly, can reduce the risk of a
child’s injury or death in most accidents.
remember to always buckle-up
and drive safely!
Harmony Juvenile Products
Website: www.harmonyjuvenile.com
Mailing Address: 2450 Cohen Street
Montreal, Quebec,
Canada H4R 2N6
Telephone: 1-877-306-1001
1
Table of Contents
Welcome to the Harmony family
Registration information
If you need help
Warnings
Important safety notes
Parts list
Weight and height limits
Vehicle safety belts
Vehicle seating positions
Assembling back support
Using your Harmony booster
car seat with backrest
Headrest height adjustment
Side-impact support width adjustment
Removing back support
Using your Harmony booster
car seat without backrest
Installing belt guide on backless booster car seat
Removing belt guide on backless booster car seat
To remove headrest seat cover
To remove backrest seat cover
To remove seat cover
To install headrest seat cover
To install backrest seat cover
To install seat cover
Cupholders
Aircraft installation
Care and maintenance
Warranty
1
3
3
4
7
9
11
12
13
13
15
17
17
18
19
20
20
21
21
22
22
23
24
24
24
25
26
2
registration information
Visit www.harmonyjuvenile.com
to register your restraint online!
Child restraints could be recalled for safety reasons.
You must register this restraint to be reached in the
unlikely event of a recall.
Send your name, address and the restraint’s model
number and manufacturing date to: Harmony Juvenile Products
1600 53rd Street
North Bergen, NJ
07047 USA
or call 1-877-306-1001
For recall information, call the U.S. Government’s Auto
Safety Hotline at 1-888-327-4236 (TTY: 1-800-424-9153)
or go to www.NHTSA.gov.
if you need help...
Our customer service department is standing by to
help you with any questions or concerns you may have
regarding installation, use, care and/or maintenance.
Please have your product’s model number available
when contacting us. This number can be found on a
sticker on the underside of your booster seat.
3
warnings
!
warning!
FAILURE TO PROPERLY SECURE YOUR CHILD AND THE
BOOSTER SEAT IN YOUR VEHICLE INCREASES THE RISK
OF SERIOUS INJURY OR DEATH IN THE EVENT OF A
SHARP TURN, SUDDEN STOP OR CRASH.
! Follow all instructions on this booster seat and in the
written instructions. DO NOT INSTALL OR USE THIS
BOOSTER SEAT UNTIL YOU READ AND UNDERSTAND
THE INSTRUCTIONS IN THIS MANUAL AND IN YOUR
VEHICLE’S OWNER’S MANUAL. DO NOT allow others to
install or use the booster seat unless they understand
how to use it.
! USE THIS BOOSTER SEAT FORWARD FACING ONLY.
! Register your child restraint with the manufacturer
in case of questions, concerns or if the manufacturer
must contact you in case of a product recall.
! A booster seat cannot guarantee protection when the
vehicle is seriously impacted. However, when correctly
installed, a booster seat will substantially improve the
chances for survival and reduce the risk of serious
injury in most crashes.
! YOUR CHILD CAN BE INJURED IN A VEHICLE EVEN
IF YOU ARE NOT IN A CRASH. Sudden braking and
sharp turns can injure your child if the booster seat is
not properly installed or if your child is not properly
secured in the booster seat.
4
! This
booster seat is not compatible with vehicle
child-restraint anchorage systems (LATCH).
! Use ONLY the vehicle’s lap-and-shoulder-belt system
when restraining a child in this booster seat. DO NOT
use this booster seat with two-point vehicle belts (lapbelt only or shoulder-belt only). Your child would be
seriously injured in the event of a crash.
! To ensure proper restraint use, keep and store this
user guide and refer to it when necessary.
! This booster seat conforms to all applicable Federal
Motor Vehicle Safety Standards and is certified for use
in motor vehicles only. This seat must NOT be used in
the home, in aircraft, in boats, or other noncertified
applications.
! DO NOT MODIFY YOUR BOOSTER SEAT or use any
accessories or parts by other manufacturers.
! NEVER
LEAVE A BOOSTER SEAT UNSECURED IN
YOUR VEHICLE. In a sharp turn, sudden stop or in a
crash, an unsecured booster seat may injure vehicle
occupants.
! To
prevent injury due to deterioration, hidden
damage, lost instructions, outdated technology, etc.,
discontinue use of a booster seat that is older than
six years.
! REPLACE THE BOOSTER SEAT AFTER AN ACCIDENT
OF ANY KIND. An accident can cause damage to the
booster seat that you cannot see.
! According
5
to accident statistics, children are safer
when properly restrained in REAR vehicle seating
positions, rather than front seating positions. Please
study the section on Vehicle Safety Belts in this
booklet to ensure the child’s safety. If in doubt about
installing this booster seat, consult the vehicle owner’s
manual.
! DO
NOT leave folding vehicle seats unlatched. In
the event of a sudden stop, a loose seat back could
prevent the booster seat from protecting the child as
well as it should.
! DO NOT use anything to raise the booster seat off the
vehicle seat.
! DO NOT allow children to play with this booster seat.
! DO NOT leave children alone in a vehicle.
! NEVER PLACE THIS BOOSTER SEAT IN A VEHICLE
SEATING LOCATION THAT HAS AN AIRBAG. If an airbag
inflates, it can hit the child and booster seat with great
force and cause serious injury or death to your child.
Refer to your vehicle owner’s manual for information
about airbags and booster seat installation.
! DO NOT leave loose objects, e.g. books, bags, etc., in
the back of a vehicle. In the event of a sudden stop,
loose objects will keep moving, potentially causing
serious injuries.
! DO NOT USE BOOSTER SEAT IF IT HAS DAMAGED OR
MISSING PARTS.
! NEVER
use a cut, frayed or damaged vehicle seat
belt.
! DO NOT GIVE THIS BOOSTER SEAT to someone else
without also giving them this manual.
6
! DO NOT USE A SECOND-HAND BOOSTER SEAT or a
booster seat whose history you do not know.
! The booster seat CAN BECOME VERY HOT IF LEFT IN
THE SUN. Contact with these parts can injure your
child. ALWAYS touch the surface of any metal or plastic
parts before putting your child in the booster seat.
important safety notes
Set a good example by always wearing your seat belt.
Make it a firm rule that the vehicle does not move until
everyone is buckled up. Make no exceptions.
Cover the booster seat with a towel or blanket when
the vehicle is parked in direct sunlight. PARTS OF THE
BOOSTER SEAT COULD BECOME HOT ENOUGH TO
BURN THE CHILD.
Store the booster seat in a safe place when not in use.
Do not place heavy objects on top of the booster seat
while in storage.
7
! maximum height
With Back Support:
Child is too tall when
top of ears (mid-point
of child’s head) are
above the top of the
booster seat.
Without Back
Support:
Child is too tall when
top of ears (midpoint of child’s head)
are above the top of
the vehicle seat back
or vehicle headrest.
8
parts list
A
B
B
C
H
H
K
D
F
F
L
G
E
I
I
9
J
parts list
A.
Headrest
B.
Shoulder Belt Positioning Guides
C.
Backrest
D.
Backrest ‘Fork’ Assembly
E.
Base
F.
Cup Holders
G.Headrest Height Adjustment Handle
H.
Adjustable Side-Impact Supports
I.
Side-Impact Support Width
Adjustment Knobs
J.
Shoulder Belt Guide
K.Instruction storage
L.
Fabric Seat Pad (pre-installed)
TO PURCHASE REPLACEMENT PARTS:
In the United States or Canada, please
contact us at www.harmonyjuvenile.com or
by calling 1-877-306-1001.
10
weight and height limits
!
warning!
FAILURE TO PROPERLY SECURE YOUR CHILD AND THE
BOOSTER SEAT IN YOUR VEHICLE INCREASES THE
RISK OF SERIOUS INJURY OR DEATH IN THE EVENT
OF A SHARP TURN, SUDDEN STOP OR CRASH.
To use this Harmony booster car seat, your child MUST
meet ALL of the following requirements:
• WEIGHT: between 30 - 110 lbs (13.6 – 50 kg).
• HEIGHT: between 34 – 57 inches (85.1 – 114.8 cm).
• Shoulder belt MUST lie across child’s shoulder and
cross over child’s sternum (see illustration), and lap
portion MUST be positioned low across child’s hips.
• DO NOT USE if, when sitting on the booster seat, the
11
mid-point of your child’s head is above the top of the
booster seat.
vehicle safety belts
IMPORTANT: Some vehicles have no seating positions
compatible with this or any other booster seat. If in
doubt, contact the vehicle manufacturer for assistance.
To protect your child in a crash, you must use this booster
seat with vehicle safety belts that are compatible.
THIS BOOSTER SEAT CAN ONLY BE USED WITH THREEPOINT (SHOULDER-AND-LAP) SAFETY BELTS THAT ARE
NOT MOTORIZED OR ANCHORED ON THE VEHICLE
DOOR.
! DO NOT use any of the following vehicle belt systems
with this booster seat:
! NEVER use a lap-only belt.
! NEVER use a Passive-Restraint
!
!
!
!
Lap or Shoulder Belt Mounted
on Door.
NEVER use a Passive Restraint
Lap Belt with Motorized
Shoulder Belt.
NEVER use vehicle belts that
are attached to the door in
any way or that automatically
surround the passenger when
the door is closed.
NEVER use front vehicle belts
with top or bottom anchorage
points in the door.
NEVER use three-point belts
that have separate retractors for
the shoulder and lap sections.
12
The vehicle owner’s manual will have information on
the types of seat belts in the vehicle. If the belt type is
listed above, select another seating position.
vehicle seating positions
!
warning!
• The U.S. Department of Transportation warns that
children aged 12 and under must ride in the rear
seats, away from front airbags. The only exception
is if the airbag is turned off. When using in a
vehicle with airbags, refer to the vehicle owner’s
manual for additional booster seat installation
instructions and precautions.
• Only use this booster seat in forward-facing
vehicle seats. Side-facing or rear-facing seats in
vans, station wagons or trucks CANNOT be used.
Assembling Back Support
• Hook the fabric loops located at
the bottom of the fabric backrest
pad over the corresponding
left and right backrest fork
extensions.
13
• On a firm surface, align backrest ‘fork’ with the
corresponding holes in base (see illustration).
• Press down on ONE SIDE of the backrest until you
hear a distinct “click”. Repeat for other side. Ensure
that the backrest is completely installed by visually
checking the fork assembly and by pulling upwards on
both the left and right side. The backrest should be
firmly in place.
! ENSURE THAT THE SEAT PAD DOES NOT GET CAUGHT
BETWEEN THE MOVING PARTS. THE BACKREST MAY
NOT CONNECT PROPERLY IF THE PAD IS IN THE WAY.
• Tuck the extra fabric on the base under the back
support pad.
14
Using your Harmony Booster
CAR Seat With Backrest
Place the booster seat firmly against the back of a
forward-facing vehicle seat in a position equipped with
a vehicle shoulder-and-lap belt and headrest.
Have your child sit on the booster seat with their back
flat up against the booster seat.
Pull the vehicle belt from the retractor and position the
lap belt under BOTH armrest belt guides (as indicated
by the arrows), then latch the vehicle belt buckle.
Ensure the buckle is secure by gently pulling on it.
Position the shoulder belt through the shoulder belt
guide on the headrest (see illustration).
15
The belt guide should cross the base of the child’s neck
and lay across the chest – NOT the face or neck.
The bottom of the headrest MUST be even with the
top of the child’s shoulders, and the shoulder belt
MUST cross over the child’s shoulder and sternum (see
illustration). Adjust head support as necessary.
! THE
LAP BELT PORTION MUST PASS UNDER
BOTH ARMRESTS.
! NEVER USE A VEHICLE LAP-ONLY BELT WHEN USING
THIS SEAT.
16
Headrest Height Adjustment
• Your booster seat has 8-height adjustments.
• When adjusting the headrest height, have your child
lean forward.
• Squeeze the Headrest Adjustment Handle (see
illustration) and pull upwards (push downwards) until
desired height is achieved.
• Make sure the headrest is locked in place by lightly
pulling up on the head support.
Side-Impact Support
Width Adjustment
• Your booster seat has unique width adjustable sideimpact protection supports.
17
• Position yourself in front of the booster seat. Locate
both width adjustment knobs. Simultaneously turn
knobs counter-clockwise to open the width. Turn
knobs clockwise to close the width (see illustration).
• Keep the side supports slightly wider than the
shoulder width of your child.
REMOVing Back Support
• Place booster seat on a firm surface.
• With the headrest in its lowest position and while
bracing the base with your knee, pull upwards on one
side of the backrest until you hear it disengage with a
“click”. NOTE: It is easiest to pull upwards from under
the adjustable side supports.
• Repeat for other side.
18
Using your Harmony Booster
CAR Seat Without Backrest
• Place the booster seat firmly against the back of a
forward-facing vehicle seat in a position equipped
with a vehicle shoulder-and-lap belt and headrest.
• Have your child sit on the booster seat with their back
flat against the car seat.
• Pull the vehicle belt from the retractor and position the
lap belt under BOTH armrest belt guides (as indicated
by the arrows), then latch the vehicle belt buckle.
• Ensure the buckle is secure by gently pulling on it.
• Adjust the vehicle-belt’s shoulder section so that
it crosses the chest and center of the child’s collar
bone.
19
Installing SHOULDER Belt Guide
on Backless Booster CAR Seat
Use the Harmony shoulder belt guide if the above
cannot be achieved with the vehicle’s shoulder-and-lap
belt alone:
• Insert plastic button into the end of the belt guide.
• With LIGHT force, gently press the button into the
hole on the bottom of the plastic seat base.
! OPENING
OF RED BELT GUIDE CLIP MUST FACE
FORWARD.
• Slide
the
vehicle
shoulder belt into the
red clip and pull strap
down to tighten clip
against child’s shoulder.
! Straps
should be tight and not twisted. All slack
should be removed from lap and shoulder portions
of the vehicle belt to ensure a snug fit. THE LAP BELT
PORTION MUST PASS UNDER BOTH ARMRESTS AND
BE POSITIONED LOW ON THE HIPS.
REMOVING SHOULDER Belt Guide
on Backless Booster CAR Seat
• Gently pull upwards on belt and plastic button until
removed.
20
TO REMOVE HEADREST SEAT COVER
• Remove backrest and lay flat, facing upwards.
• Raise headrest to maximum height.
• Unthread Velcro fabric pieces that pass through the
headrest belt guides. Next, undo the snap on the
back of the headrest. Gently slide the headrest cover
off the shell and foam. Remove the EPE foam insert
from the fabric pocket.
NOTE: WHITE energy absorbing foam pieces are
attached to the plastic shell. However, over
time, they might become unsecured. This is
not a concern as the fabric seatpad will hold
them firmly in place.
TO REMOVE backREST SEAT COVER
• Unhook fabric over the Side Adjustment Support
Knobs. Gently slide the fabric cover off the shell and
foam. Remove back plating from the center piece
using the opening on the back of the pad.
NOTE: WHITE energy absorbing foam pieces are
attached to the plastic shell. However, over
time, they might become unsecured. This is
not a concern as the fabric seatpad will hold
them firmly in place.
21
TO REMOVE SEAT COVER
• Gently grasp the back of the fabric seat pad and slide
the cover off the plastic shell from the back of the
booster seat towards the front of the seat.
TO install headrest SEAT COVER
• Lay the backrest plastic shell flat - facing upwards.
• Insert EPE foam piece into headrest fabric ‘pocket’
and place side supports into the fabric.
• Ensure that the WHITE energy absorbing foam pieces
are laying properly against the plastic shell.
• With the entire backrest lying flat, wrap one side
of the fabric (and EPE foam) over the white foam
and shell until properly in place. Do the same with
the other side. Properly place all the fabric, and
secure the fabric by attaching the snap on the rear of
headrest.
• Thread Velcro fabric extensions through the headrest
belt guides and secure Velcro to underside of fabric.
22
• Attach the two fabric loops at the very bottom of the
headrest fabric to the corresponding plastic extensions
on the bottom of the plastic headrest mechanism
(see illustration).
TO install backrest SEAT COVER
• Insert the backrest plate back into the slot at the rear
of the backrest seatpad.
• With the backrest plastic shell lying flat - facing
upwards, ensure that the WHITE energy absorbing
foam pieces are in place on the adjustable side
supports.
• Slide one side of the fabric pad over the WHITE energy
absorbing foam pieces and plastic shell. Secure in
place by threading the side adjustment knob through
the corresponding hole in fabric. Repeat for other
side.
• Loop fabric loops at the bottom of the backrest seat
23
cover over the corresponding left and right ‘fork’
assembly.
TO install SEAT COVER
• We recommend first sliding the fabric pad’s armrests
midway onto the armrests of the plastic shell. Then,
while holding the fabric in place with one hand, slide
the front of the fabric seat pad over the front of the
plastic shell. Finally, pull remaining fabric over the
back of the plastic shell.
CUPHOLDERS
• 2 integrated cupholders are located in the base of the
booster seat (see illustration).
• To use, pull out the cupholder.
• Push cupholder in when not needed.
AIRCRAFT INSTALLATION
This booster seat is NOT certified for aircraft use.
Aircraft seats are not equipped with shoulder-andlap belts which are required for use with this child
restraint.
24
CARE AND MAINTENANCE
Your booster seat is made using a Seat-Saving design.
However, continuous use of a booster seat may cause
damage to your vehicle’s seat. Use a booster seat mat,
towel or thin blanket to protect upholstery.
CLEANING YOUR PREMIUM SEAT PAD:
• HAND WASH using cold water and mild soap.
• AIR DRY to prevent cover from shrinking.
• DO NOT bleach, machine wash or machine dry.
CLEANING THE PLASTIC SHELL:
SPONGE CLEAN using warm water and mild soap.
TOWEL DRY. DO NOT use solvents, abrasive cleaners or
disassemble booster in any way, except as instructed.
25
warranty
This booster seat was manufactured by Harmony
Juvenile Products (HJP). HJP warrants this product to
the original retail purchaser as follows:
Limited One-Year Warranty
This booster seat is warranted against defective materials
or workmanship for one year from the date of original
purchase. An original receipt is required to validate your
warranty. HJP will, at its option, provide replacement
parts for this product or replace this product. HJP
reserves the right to discontinue or change fabrics,
parts, models or products, or to make substitutions.
To make a claim under this warranty, you must contact
HJP Customer Service at www.harmonyjuvenile.com,
or call 1-877-306-1001, or write to 2450 Cohen Street,
Montreal, Quebec, Canada, H4R 2N6.
Proof of purchase is required and shipping charges are
the responsibility of the consumer.
Warranty Limitations
This warranty does not include damages which arise
from negligence, misuse, or use not in accordance with
this instruction manual.
26
The use of non-Harmony branded covers, inserts, toys,
accessories or tightening devices is not approved by HJP.
Their use could cause this booster seat to fail federal
safety standards or perform worse in a crash. Their use
automatically voids the HJP warranty.
Limitations of Damages
The warranty and remedies as set forth above are
exclusive and in lieu of all others, oral or written, express
or implied. In no event will HJP or the retailer selling
this product be liable to you for any damages, including
incidental or consequential damages, or loss of use
arising out of the use or inability to use this product.
Limitations of Warranties and Other Warranty Terms
and State Law Rights
Any implied warranties, including implied warranties
of merchantability and fitness for a particular purpose,
shall be limited to the duration and terms of the express
written warranty. Some states do not allow limitations
on how long an implied warranty lasts or the exclusion
or limitation of incidental or consequential damages,
so the above limitations may not apply. This warranty
gives you specific legal rights, and you may have other
rights which vary from state to state. Neither HJP, nor
the retailer selling this product, authorize any person to
create for it any other warranty, obligation, or liability in
connection with this product.
PLEASE REGISTER THIS BOOSTER SEAT WITHIN 30 DAYS
OF PURCHASE TO EXPEDITE WARRANTY CLAIMS AND
TO VERIFY ORIGINAL DATE OF PURCHASE.
27
BABY ARMOR
ASIENTO PARA NIÑOS
MANUAL DE INSTRUCCIONES
Este asiento para niños está diseñado para ser usado
por niños con las siguientes características:
Peso: 30 - 110 libras (13.6 - 50 kilogramos)
Altura: 34 - 57 pulgadas (85.1 - 114.8 centímetros)
LEA ESTE MANUAL
No instale ni utilice este asiento para niños hasta que
usted lea y entienda las instrucciones en este manual.
EL USO INCORRECTO DE ESTE ASIENTO PARA NIÑOS
AUMENTA EL RIESGO DE LESIONES SERIAS O DE
MUERTE EN CASO DE ACCIDENTE O
FRENADA REPENTINA.
™2009 Harmony Juvenile Products
HMYBABBB-A
03/09
US
Bienvenido A LA FAMILIA HARMONY
Gracias por elegir el asiento para niños Baby Armor
de Harmony. Usted ha elegido una de las opciones
más seguras y cómodas para su niño disponibles en el
mercado.
En Harmony, nos sentimos orgullosos de ofrecer
los productos más innovadores, y de características
más variadas a nuestros apreciados clientes. Este
modelo de asiento para niños cubre completamente
la parte superior, media y baja del cuerpo de su niño,
protegiéndolo en caso de choque frontal, trasero o
lateral.
A pesar de que no es posible predecir si el uso del asiento
para niños prevendrá heridas o muerte en caso de un
choque, numerosas investigaciones han mostrado que
este dispositivo de seguridad, al ser usado de manera
correcta, puede reducir el riesgo de heridas o muerte de
un niño en la mayoría de los accidentes.
Por tanto, ¡abroche el cierre del
asiento y maneje seguro!
Harmony Juvenile Products
Website: www.harmonyjuvenile.com
Mailing Address: 2450 Cohen Street
Montreal, Quebec,
Canada H4R 2N6
Telephone: 1-877-306-1001
1
índice DE materias
Bienvenido a la familia Harmony
Inscripción del producto
Si necesita ayuda
¡Advertencias!
Aspectos de seguridad importantes
Lista de partes
Límites de peso y altura
Cinturones de seguridad del vehículo
Posiciones del asiento para niños
Armado del soporte para la espalda
Utilización de su asiento para niños con espaldar
Ajuste de altura del apoyacabezas
Ajuste del soporte contra choque lateral
Remoción del soporte para la espalda
Uso de su asiento para niños sin espaldar
Instalación de la guía para cinturón
en el espaldar del asiento para niños
Remoción del forro del apoyacabezas
Remoción del forro del espaldar
Para quitar la cubierta del asiento
Instalación del forro del apoyacabezas
Instalación del forro del espaldar
Para instalar la cubierta del asiento
Porta vasos
Uso en aviones
Cuidado y mantenimiento
Garantía
1
3
3
4
7
9
11
12
13
14
15
17
17
18
19
20
21
21
22
22
23
24
24
24
25
26
2
INSCRIPCIÓN Del PROducto
¡Visite www.harmonyjuvenile.com
para inscribirse en línea!
Por motivos de seguridad, los asientos para niños pueden
ser recolectados. Usted debe estar inscrito en Internet
para poder ser localizado en la posibilidad remota
de tal recolección. Envíe su nombre, dirección y el
número del modelo y fecha de fabricación de su
asiento para niños a: Harmony Juvenile Products
1600 53rd Street
North Bergen, NJ
07047 USA
o llame al 1-877-306-1001
Para información sobre la recolección del producto, llame
a la línea de atención al cliente de Seguridad Automotriz
del Gobierno de los Estados Unidos al 1-888-327-4236
(Línea: 1-800-424-9153) o vaya a www.NHTSA.gov.
SI NECESITA AYUDA…
Nuestro departamento de servicio al cliente está listo para
ayudarlo con cualquier pregunta o inquietud relacionada
con la instalación, uso, cuidado y/o mantenimiento del
producto. Por favor, tenga listo el número del modelo
de su producto cuando nos contacte. Este número se
encuentra en un adhesivo localizado en la parte inferior
de su asiento para niños.
3
¡ADVERTENCIAS!
!
¡ADVERTENCIA!
LA FALTA DE ASEGURAMIENTO ADECUADO DE SU
NIÑO Y DEL ASIENTO PARA NIÑOS EN SU VEHÍCULO
AUMENTA EL RIESGO DE LESIONES SERIAS O MUERTE
EN CASO DE GIRO BRUSCO, FRENADA REPENTINA O
CHOQUE.
todas las instrucciones ubicadas en el asiento de
! Siga
seguridad y en las instrucciones escritas. NO INSTALE
O USE ESTE ASIENTO PARA NIÑOS HASTA QUE USTED
HAYA LEÍDO Y ENTENDIDO LAS INSTRUCCIONES DE
ESTE MANUAL Y DEL MANUAL PARA EL PROPIETARIO
DEL VEHÍCULO. NO PERMITA QUE OTROS INSTALEN
O USEN ESTE ASIENTO PARA NIÑOS A MENOS QUE
ENTIENDAN CÓMO USARLO.
! USE ESTE ASIENTO PARA NIÑOS ÚNICAMENTE HACIA
EL FRENTE.
su asiento para niños con el fabricante por
! Registre
si usted tiene preguntas, quejas o por si el fabricante
debe contactarlo en caso de una recolección del
producto.
asiento para niños no puede garantizar protección
! Un
cuando el vehículo ha sido gravemente chocado.
Sin embargo, estando correctamente instalado, un
asiento para niños incrementará substancialmente las
probabilidades de sobrevivencia y reducirá el riesgo
de lesiones en la mayoría de los choques.
! SU
NIÑO PUEDE LESIONARSE EN UN VEHÍCULO
INCLUSO SI USTED NO SE HA CHOCADO. Frenadas
repentinas y giros abruptos pueden lesionar a su
niño si el asiento para niños no está propiamente
instalado o su niño no está propiamente asegurado
en el asiento.
4
! Este asiento para niños no es compatible con sistema
de sujeción para sillas de seguridad para niños
(LATCH).
UNICAMENTE el cinturón de seguridad de hombro
! Use
y regazo de su vehículo para asegurar el niño en el
asiento para niños. NO use este asiento para niños
con cinturón de seguridad de dos puntas (cinturón de
seguridad de hombro o de cinturón de seguridad de
regazo). Su niño puede lesionarse seriamente en caso
de choque.
asegurar el uso adecuado de este asiento,
! Para
conserve este manual de instrucciones y consúltelo
cuando sea necesario.
asiento para niños cumple con todas los estándares
! Este
federales de seguridad de vehículos (Federal Motor
Vehicle Safety Standards) y está certificada para ser
usado en vehículos únicamente. Este asiento NO debe
ser usado en casa, en un avión, en un barco o en otros
lugares para los cuáles no está certificado.
ALTERE SU ASIENTO PARA NIÑOS ni use accesorios
! NO
o partes elaborados por otras compañías.
DEJE UN ASIENTO PARA NIÑOS SIN QUE ESTÉ
! NUNCA
ASEGURADO A SU VEHÍCULO. En un giro brusco, en
una frenada repentina o en un choque, un asiento
no asegurado puede lesionar a los ocupantes del
vehículo.
prevenir lesiones causadas por el deterioro, daño
! Para
oculto, instrucciones perdidas, tecnología en desuso,
etc., deje de usar el asiento para niños cuando tenga
más de seis años de uso.
EL ASIENTO PARA NIÑOS DESPUÉS DE UN
! REMPLACE
ACCIDENTE DE CUALQUEIR TIPO. Un accidente puede
causar daño al asiento para niños que usted no puede
detectar.
5
acuerdo con las estadísticas sobre accidentes, los
! De
niños están más seguros cuando están adecuadamente
!
!
!
asegurados en los asientos TRASEROS del vehículo,
en lugar de en los asientos delanteros. Por favor,
lea la sección relativa a Cinturones de Seguridad del
Vehículo de este manual para garantizar la seguridad
de su niño. En caso de duda acerca de la instalación
de este asiento para niños, consulte el manual del
usuario del vehículo.
NO deje las sillas plegables del vehículo desabrochadas.
En caso de una frenada repentina, el espaldar de un
asiento desabrochado puede hacer que el asiento para
niños no proteja a su niño tan bien como debería.
NO use nada para elevar el asiento para niños sobre el
nivel de la silla del vehículo.
NO permita que los niños jueguen con este asiento
de seguridad.
NO deje los niños solos en el vehículo.
!
UBIQUE ESTE ASIENTO PARA NIÑOS EN
! NUNCA
UNA SILLA DEL VEHÍCULO QUE TENGA BOLSA DE
!
!
!
!
AIRE. Si una bolsa de aire se infla, ésta puede golpear
fuertemente al niño y al asiento para niños causando
serias lesiones o muerte de su niño. Acuda al manual
del propietario del vehículo para obtener información
relativa a bolsas de aire e instalación de asientos de
seguridad.
NO deje objetos sueltos, por ejemplo, libros, maletas,
etc., en la parte trasera del vehículo. En caso de una
frenada repentina, los objetos sueltos se moverán y
podrán causar serias lesiones.
NO USE UN ASIENTO PARA NIÑOS SI ÉSTE TIENE
PARTES DAÑADAS O FALTANTES.
NUNCA use un cinturón de seguridad cortado,
dañado o raído.
NO ENTREGUE ESTE ASIENTO PARA NIÑOS A OTRA
PERSONA sin antes entregarle este manual de
instrucciones.
6
! NO USE UN ASIENTO PARA NIÑOS DE SEGUNDA MANO
o una silla de seguridad cuya historia desconozca.
! El asiento para niños PUEDE CALENTARSE DEMASIADO
SI SE DEJA EXPUESTO AL SOL. El contacto con las partes
calientes puede lesionar su niño. Toque SIEMPRE la
superficie de cualquier parte metálica o plástica antes
de ubicar su niño en el asiento para niños.
Aspectos de seguridad
importantes
Dé un buen ejemplo al usar siempre su cinturón de
seguridad. Tenga el firme propósito de no mover el
vehículo antes de que todos los pasajeros se hayan
puesto su cinturón de seguridad. No haga excepciones.
Cubra el asiento para niños con una toalla o una manta
cuando el vehículo esté parqueado dándole la cara al
sol. CIERTAS PARTES DEL ASIENTO PARA NIÑOS PUEDEN
CALENTARSE TANTO QUE PUEDEN QUEMAR AL NIÑO.
Guarde el asiento para niños en un lugar seguro cuando
no lo esté usando. No ubique objetos pesados sobre el
asiento cuando esté almacenado.
7
! ALTURA MÁXIMA
Uso de su Asiento
para niños Con
Espaldar:
Si la parte superior
de las orejas queds
por encima de la
parte superior de
la silla, su niño es
demasiado grande
para el asiento para
niños.
Uso de su Asiento
para niños Sin
Espaldar: El niño es demasiado
alto cuando la punta
superior de las orejas
(la parte media de
la cabeza del niño)
está por encima de
la parte superior del
espaldar del vehículo
o del apoyacabeza
del vehículo.
8
Lista de partes
A
B
B
C
H
H
K
D
F
F
L
G
E
I
I
9
J
Lista de partes
A.
Apoyacabeza
B.
Guías para la ubicación del cinturón
de hombro
C.
Espaldar
D.Ensamble tipo ‘tenedor’ para el
espaldar
E.
Base
F.
Porta vasos
G.
Manija de ajuste de altura del
apoyacabezas
H.
Soporte contra choque lateral
ajustable
I.
Botón de ajuste del ancho del
soporte contra choque lateral
J.
K.
L.
Correa-guía del hombro
Compartimento para instrucciones
Almohadilla de tela (preinstalado)
PARA COMPRAR PIEZAS DE REPUESTO en los Estados
Unidos o el Canadá, por favor contáctenos en
www.harmonyjuvenile.com o llámenos al
1-877-306-1001
10
Límites de peso y altura
!
¡ADVERTENCIA!
LA FALTA DE USO de este asiento en la manera
adecuada para el tamaño de su hijo puede aumentar
el riesgo de lesiones serias o muerte.
Para utilizar este asiento para niños Harmony, su niño
DEBE reunir TODOS los siguientes requisitos:
• PESO entre 30 y 110 libras (13.6 - 50 kilogramos).
• ALTURA entre 34 - 57 pulgadas (85.1 - 114.8 centímetros).
• La correa de hombro DEBE localizarse atravesando los
hombros del niño y cruzar sobre el esternón del niño
(ver gráfica), y la parte del regazo DEBE estar ubicada
en la parte baja-diagonal de las caderas del niño.
• NO USE el asiento en caso de que al sentar al niño
sobre éste el punto medio de la cabeza de su niño está
arriba de la parte superior del asiento para niños.
11
cinturones de seguridad del vehículo
IMPORTANTE: Algunos vehículos no tienen ubicación de
las sillas compatible con éste u otro asiento para niños.
En caso de duda, contacte al fabricante del vehículo
para asistencia.
Para proteger a su niño en un choque, usted debe usar
este asiento para niños con cinturones de seguridad del
vehículo que sean compatibles. ESTE ASIENTO PARA
NIÑOS SÓLO PUEDE SER USADO CON CINTURONES DE
SEGURIDAD DE TRES PUNTAS (HOMBRO Y REGAZO)
QUE NO DEPENDAN MECÁNICAMENTE O ESTÉN
CONECTADOS A LA PUERTA DEL VEHÍCULO.
use ninguno de los siguientes sistemas de
! NO
cinturones de seguridad con este asiento para niños:
use únicamente cinturón
! NUNCA
de seguridad de regazo.
use un cinturón de
! NUNCA
seguridad de hombro o regazo
conectado a la puerta.
use un cinturón
! NUNCA
de seguridad de regazo no
motorizado junto con un
cinturón de seguridad de hombro
motorizado.
use cinturones que
! NUNCA
estén conectados a la puerta o
que cubran automáticamente al
pasajeron cuando la puerta se
cierra.
use cinturones de
! NUNCA
seguridad con broches de
conección superior o inferior en
la puerta.
use cinturón de seguridad
! NUNCA
de tres puntas que tengan
retractores separados para las
partes de hombro y regazo.
12
El manual del propietario del vehículo tiene información
sobre los tipos de cinturones de seguridad del vehículo.
Si el tipo de cinturón es de los mencionados arriba,
seleccione otra posición del asiento que reúna las
condiciones de seguridad requeridas.
POSICIONES DEL ASIENTO
PARA NIÑOS
!
¡ADVERTENCIA!
• El Departamento de Transporte de Estados
Unidos advierte que niños de 12 años o menos
deben viajar en la silla trasera, lejos de las
bolsas de aire. Se puede hacer una excepción
únicamente cuando el sistema de bolsa de aire
esté apagado. Cuando use un vehículo con bolsa
de aire, consulte el manual de instrucciones del
propietario del vehículo para mayor información
sobre la instalación y precauciones con el asiento
para niños.
• Use este asiento para niños únicamente en sillas
ubicadas mirando hacia el frente. Sillas ubicadas
lateralmente o sillas ubicadas mirando hacia atrás
en camionetas, camiones o vehículos familiares
NO PUEDEN ser usadas.
13
Armado del Soporte
para la Espalda
• Enganche las argollas de la tela
localizadas en la base de la
almohadilla en tela del espaldar
sobre las correspondientes
extensiones tipo tenedor
derecha e izquierda.
• Sobre una superficie firme, alinee el ‘tenedor’ del
espaldar con los correspondientes orificios en la base
(ver ilustración).
• Presione hacia abajo sobre UN LADO del espaldar hasta
que escuche un notorio “clic”. Repita la operación
en el otro lado. Asegúrese de que el espaldar está
completamente instalado observando el ensamble
tipo tenedor y tirando hacia arriba a lado izquierdo
y derecho. El espaldar debe estar firmemente en su
lugar.
! ASEGÚRESE
DE
QUE
LA
ALMOHADILLA DEL ASIENTO NO
QUEDE APRISIONADA ENTRE
LAS PARTES MOVIBLES. EL
ESPALDAR PUEDE NO CONECTAR
ADECUADAMENTE
SI
LA
ALMOHADILLA ESTÁ EN MEDIO.
14
• Meta la tela sobrante de la base bajo la almohadilla
del soporte de espalda.
Utilización de su Asiento para
niños Con Espaldar
• Ubique el asiento para niños firmemente contra el
espaldar de una silla de vehículo ubicada mirando
hacia el frente en un puesto equipado con cinturones
de seguridad y apoyacabezas.
• Siente a su niño en el asiento para niños con su espalda
plana contra el respaldo del asiento para niños.
• Hale el cinturón de seguridad del vehículo y ubique
el cinturón de regazo debajo de AMBAS guías para
cinturón localizadas en el apoyabrazos (según lo
indican las flechas) luego abroche la hebilla del
cinturón de seguridad del vehículo (ilustración).
• Asegúrese de que la hebilla está segura halando
suavemente el cinturón.
• Ubique el cinturón de
hombro a través de la
guía para cinturón de
hombro ubicada sobre
el apoyacabeza (ver
ilustración).
15
• La guía para cinturón debe cruzar sobre la base del
cuello del niño y ubicarse a lo largo del pecho –
NO sobre la cara o el cuello.
• La base del apoyacabezas DEBE estar pareja con la
parte superior de los hombros del niño, y cinturón de
hombro DEBE cruzar sobre el hombro y esternón del
niño (ver ilustración). Ajuste el apoyacabezas según
sea necesario.
! LA PORCIÓN DE CINTURÓN DE REGAZO DEBE PASAR
DEBAJO DE LOS APOYABRAZOS.
! NUNCA
USE UN CINTURÓN DE REGAZO
EXCLUSIVAMENTE CUANDO USE ESTA SILLA.
16
Ajuste de Altura
del Apoyacabezas
• Su asiento para niños tiene 8 ajustes de altura.
• Cuando ajuste la altura del apoyacabezas, haga que su
niño se incline hacia adelante.
• Oprima la manija de ajuste del apoyacabezas (ver
ilustración) y hale hacia arriba (presione hacia abajo)
hasta alcanzar la altura deseada.
• Asegúrese de que el apoyacabezas está ajustado
en su lugar halando suavemente hacia arriba el
apoyacabezas.
Ajuste del Soporte contra
Choque lateral
• Su asiento para niños tiene unos exclusivos soportes
contra choque lateral de ancho ajustable.
17
• Ubíquese al frente del asiento para niños. Ubique
ambos botones de ajuste de ancho. Gire de manera
simultánea los botones en dirección contraria a las
manecillas del reloj para expandir el ancho. Gire los
botones en el sentido de las manecillas del reloj para
contraer el ancho (ver ilustración).
• Conserve el soporte lateral ligeramente más ancho
que el ancho de los hombros de su niño.
Remoción del Soporte
para la Espalda
• Ubique el asiento para niños sobre una superficie
firme.
• Con el apoyacabezas en su posición más baja y
mientras tiene firmemente la base con su rodilla, hale
hacia arriba en un lado del espaldar hasta escuchar que
se desconecta con un “clic”. NOTA: Es más fácil halar
hacia arriba de abajo del soporte lateral ajustable.
• Repita el procedimiento para el otro lado.
18
Uso de su Asiento para
niños Sin Espaldar
• Ubique el asiento para niños firmemente contra el
espaldar de una silla de vehículo ubicada mirando
hacia el frente en un puesto equipado con cinturones
de seguridad y apoyacabezas.
• Siente a su niño en el asiento para niños con su espalda
plana contra el espaldar del asiento.
• Hale el cinturón de seguridad del vehículo y ubique
el cinturón de regazo debajo de AMBAS guías para
cinturón localizadas en el apoyabrazos (según lo
indican las flechas) luego abroche la hebilla del
cinturón de seguridad del vehículo (ilustración).
• Asegúrese de que la hebilla está segura halando
suavemente el cinturón.
• Ajuste la parte de los hombros del cinturón de
19
seguridad del vehículo de tal forma que cruce el pecho
y el centro de la clavícula de su niño.
Instalación de La Guía para
Cinturón en el Espaldar del
Asiento para niños
Use la guía de cinturón de hombro Harmony si lo anterior
no se logra únicamente con el cinturón de hombro y
regazo del vehículo:
• Inserte el botón plástico al final de la guía para
cinturón.
• Con fuerza LIGERA, presione suavemente el botón
hacia el interior del agujero ubicado sobre el fondo de
la silla plástica de base.
! LA ABERTURA DEL CLIP GUÍA ROJO PARA CINTURÓN
DEBE ESTAR MIRANDO HACIA ARRIBA.
• Deslice el cinturón de
hombro del vehículo
dentro del gancho rojo
(ver ilustración) y hale
la tira hacia abajo para
apretar el gancho contra
el hombro del niño.
correas deben estar firmes y no estar torcidas.
! Las
Toda porción suelta debe ser removida de la parte del
regazo y los hombros del cinturón de seguridad del
vehículo para asegurar un ajuste cómodo. LA PARTE
DEL REGAZO DEL CINTURÓN DEBE PASAR DEBAJO DE
AMBOS APOYABRAZOS Y DEBE ESTAR UBICADA EN LA
PARTE INFERIOR DE LAS CADERAS DEL NIÑO.
Remoción de la Guía para
Cinturón en el Espaldar de la
Silla para Niños
• Hale hacia arriba suavemente el cinturón y el botón
plástico hasta removerlos.
20
Remoción del forro
del apoyacabezas
• Remueva el espaldar y recuéstelo boca arriba.
• Suba el apoyacabezas a su máxima altura.
• Retire las piezas de Velcro que pasan a través de la guía
para cinturón del apoyacabezas. Después, desabroche
la hebilla de la parte de atrás del apoyacabezas.
Deslice suavemente el forro del apoyacabezas hacia
fuera de la carcaza y la espuma. Remueva la inserción
de espuma EPE del bolsillo de tela.
NOTA: Piezas BLANCAS de espuma de absorción
de impacto están pegadas a la carcaza
plástica. Sin embargo, con el tiempo, podrían
desasegurarse. Esto no es un problema ya que
la almohadilla de tela va a mantenerlas firmes
en su lugar.
Remoción del Forro
del Espaldar
• Desenganche el forro ubicado sobre los Botones de
Ajuste de Soporte Lateral. Remueva suavemente el
forro de la carcaza y la espuma. Remueva la platina
del espaldar de la pieza central usando la abertura al
respaldo de la almohadilla.
21
NOTA: Piezas BLANCAS de espuma de absorción
de impacto están pegadas a la carcaza
plástica. Sin embargo, con el tiempo, podrían
desasegurarse. Esto no es un problema ya que
la almohadilla de tela va a mantenerlas firmes
en su lugar.
PARA QUITAR LA CUBIERTA
DEL ASIENTO
• Agarre suavemente la parte de atrás de la tela del
asiento y retire la cubierta del molde plástico del
espaldar del asiento para niños hacia el frente de la
silla.
Instalación del Forro
del Apoyacabezas
• Recueste la carcaza plástica del espaldar – boca
arriba.
• Inserte la pieza de espuma EPE dentro del ‘bolsillo’ de
tela del apoyacabezas y ubique los soportes laterales
dentro de la tela.
• Asegúrese de que las piezas BLANCAS de espuma de
absorción de impacto reposan apropiadamente contra
la carcaza plástica.
• Con el espaldar completo recostado, envuelva un
lado de la tela (y espuma EPE) sobre la espuma
blanca y la carcaza hasta que esté apropiadamente
en su lugar. Haga lo mismo con el otro lado. Ubique
apropiadamente toda la tela, y asegure la tela
abrochando la hebilla ubicado en la parte de atrás del
apoya cabezas.
22
• Extienda las extensiones de tela Velcro a través de la
guía para cinturón y asegure el Velcro adentro de la
tela.
• Ensarte las dos argollas de tela ubicadas al final de la
tela del apoyacabezas a las extensiones de plástico
correspondientes en la base del mecanismo plástico
del apoyacabezas (ver ilustración).
Instalación del Forro
del Espaldar
• Inserte de nuevo la placa del espaldar dentro de la
ranura ubicada en la parte de atrás de la almohadilla
del espaldar.
• Con la carcaza del espaldar acostada – boca arriba,
asegúrese de que las piezas de espuma BLANCA
de absorción de impacto estén en su lugar sobre el
soporte lateral ajustable.
• Deslice un lado de la almohadilla de tela sobre las
23
piezas de espuma BLANCA de absorción de impacto
y la carcaza plástica. Asegure en su sitio enhebrando
el botón de ajuste lateral a través del orificio
correspondiente en la tela. Repita el procedimiento
en el otro lado.
• Anille las argollas de la tela ubicadas en la parte de
abajo del forro de asiento sobre el correspondiente
ensamble tipo ‘tenedor’ derecho e izquierdo.
PARA INSTALAR LA CUBIERTA
DEL ASIENTO
• Recomendamos primero deslizar la tela acolchada de
los apoyabrazos hasta la mitad del molde de plástico
de los apoyabrazos. Luego, mientras tiene la tela en
ese lugar con una mano, deslice la parte de delante
de la tela acolchada sobre el frente del molde plástico.
Finalmente, jale la tela restante sobre la parte de atrás
del molde plástico.
Porta vasos
• 2 portavasos integrados están localizados en la base
del asiento para niños (ver ilustración).
• Para usar, hale hacia afuera el portavasos.
• Presione el portavasos hacia adentro cuando no lo
necesite.
USO EN AVIONES
Este asiento para niños NO está certificado para uso en
aviones. Las sillas de los aviones no están equipadas con
cinturones de seguridad de hombro y regazo los cuales
son necesarios para el uso de este asiento para niños.
24
cuidado y mantenimiento
Su asiento para niños está diseñado para no dañar la silla
del vehículo. Sin embargo, el uso continuo del asiento
para niños puede causar daño a la silla del vehículo. Use
una colchoneta para asiento para niños, toalla o manta
para proteger la tapicería.
Instrucciones Para La Limpieza De Su Tela Acolchada:
• LAVAR A MANO usando agua fría y jabón suave.
• SECAR AL AMBIENTE para prevenir el encogimiento
de la tela.
• NO USE BLANQUEADORES, no lave a máquina ni
use secadora.
Instrucciones Para La Limpieza Del Molde Plástico:
LIMPIE CON ESPONJA usando agua tibia y jabón suave.
SEQUE CON TOALLA. NO use disolventes, limpiadores
abrasivos ni desarme el asiento para niños, excepto
como se indica en las instrucciones.
25
garantía
Este asiento fue fabricado por Harmony Juvenile
Products (HJP). HJP garantiza este producto al
comprador original bajo los siguientes términos:
Garantía limitada de un año:
Este asiento para niños está garantizado en caso de
materiales defectuosos o fabricación defectuosa por
el lapso de un año contado a partir de la fecha de
compra. Se exigirá el recibo original para hacer válida
la garantía. HJP proveerá, según la compañía lo escoja,
o bien el reemplazo de las partes defectuosas o bien
el reemplazo del producto. HJP se reserva el derecho
de descontinuar o cambiar telas, partes, modelos o
productos, o de hacer cambios en el modelo.
Para hacer algún reclamo bajo las condiciones de esta
garantía, usted debe contactar el servicio al cliente
de HJP en www.harmonyjuvenile.com, o llamar al
1-877-306-1001, o escribir a 2450 Cohen Street,
Montreal, Québec, Canadá, H4R 2N6.
Se requiere prueba de compra y el costo del envío estará
a cargo del consumidor.
Limitaciones de la garantía:
Esta garantía no incluye daños que provengan de
negligencia, mal uso, o uso que no esté de acuerdo con
las instrucciones del presente manual.
El uso de cobertores, objetos insertables, juguetes,
accesorios o ajustadores que no sean de la marca
Harmony no está aprobado por HJP. Su uso puede
causar el incumplimiento de los Estándares Federales
de Seguridad o el inadecuado desempeño en caso
de choque. El uso de los objetos mencionados limita
inmediatamente la garantía a proveer por HJP.
26
Limitaciones de daños
La garantía y las soluciones según lo establecido
anteriormente son taxativas y excluyen cualquiera
otras escritas, orales expresas o implícitas. En ningún
caso HJP o el minorista vendedor de este producto
será responsable ante usted por algún daño, incluidos
daños incidentales o consecuenciales, o por la pérdida
de uso derivada del uso o la inhabilidad de uso de este
producto.
Limitación de Garantías u otros Términos de Garantías
y Derechos bajo leyes Estatales
Cualquier garantía implícita, incluyendo garantías
de comercialización y adecuación para un propósito
particular, deberá estar limitada al tiempo de duración
de la garantía expresa escrita. Algunos estados no
permiten limitaciones en el tiempo en el cual debe durar
una garantía implícita o en la exclusión o limitación de
daños incidentales o consecuenciales; por tanto, las
anteriores limitaciones no serán aplicables. Esta garantía
le da a usted ciertos derechos legales, y usted puede
tener otros derechos que varían de estado en estado. Ni
HJP, ni el minorista vendedor de este producto, autoriza
a alguna persona para crear por sí mismo alguna otra
garantía, obligación o responsabilidad en relación con
este producto.
POR FAVOR REGISTRE ESTE ASIENTO PARA NIÑOS EN EL
TÉRMINO DE 30 DÍAS SIGUIENTES A LA COMPRA PARA
AGILIZAR LA EXIGIBILIDAD DE LA GARANTÍA Y PARA
VERIFICAR LA FECHA ORIGINAL DE COMPRA.
27