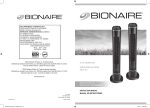
1
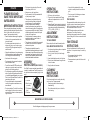
VENTILADOR MINI-TURBO de 20 cm
8” MINI-TURBO FAN
MODELOS/MODELS:
BANF76G/BANF76L/BANF76P
MANUAL DE INSTRUCCIONES
INSTRUCTION MANUAL
BANF76G_BANF76L_BANF76P-LA_15ESM1.indd 1
7/9/15 09:21
ESPAÑOL
•
POR FAVOR LEA Y GUARDE
ESTAS PRECAUCIONES
IMPORTANTES
INSTRUCCIONES
IMPORTANTES
•
•
•
Para disminuir el riesgo de incendio, descarga
eléctrica y lesiones personales, se deben seguir
siempre las precauciones básicas de seguridad al
utilizar artefactos eléctricos. Dichas precauciones
comprenden:
• Leer todas las instrucciones antes de utilizar
este artefacto eléctrico.
• Utilice el ventilador sólo para los fines que se
describen en el manual de instrucciones.
• Para protegerse contra descargas eléctricas,
no sumerja la unidad, el enchufe ni el cable
en agua, ni en ningún otro líquido. Enchufe el
electrodoméstico directamente en un tomacorriente.
• Desconéctelo del tomacorriente cuando no esté
en funcionamiento, cuando vaya a trasladar el
ventilador de un lugar a otro, antes de colocar
o quitarle piezas y antes de limpiarlo.
• Evite el contacto con piezas en movimiento.
• No haga funcionar en presencia de gases
explosivos o inflamables.
• Para evitar riesgos de incendios, NUNCA
coloque el cable por debajo de alfombras, ni
coloque ninguna de sus piezas cerca de llamas
vivas, artefactos de cocina, ni de ningún otro
electrodoméstico que despida calor.
• No utilice un electrodoméstico que tenga un
cable o un enchufe dañado, o después de
que el artefacto haya presentado fallas, se
haya caído o haya sufrido cualquier otro daño.
Llévelo a un Centro de Servicio Autorizado
para su inspección o reparación.
• El uso de aditamentos no recomendados
•
•
•
•
o vendidos por el fabricante del artefacto
eléctrico puede ocasionar peligros o lesiones.
No utilice al aire libre. No permita que el cable
cuelgue del borde de una mesa o mesada, ni
que entre en contacto con superficies calientes o
quede expuesto en áreas muy concurridas.
Para desconectar, sujete el enchufe y sáquelo
del tomacorriente. Nunca lo hale por el cable.
Coloque siempre sobre una superficie seca y
nivelada.
No haga funcionar el ventilador hasta que esté
completamente ensamblado y con todas las
piezas colocadas en su lugar correspondiente.
Este artefacto eléctrico no está destinado
para ser usado por personas (incluyendo
niños) cuyas capacidades físicas, sensoriales
o mentales estén disminuidas, o carezcan
de experiencia y conocimiento, a menos que
una persona responsable por su seguridad
les haya supervisado o instruido en el uso
de este electrodoméstico. Los niños deberán
estar bajo supervisión para cerciorarse de que
no jueguen con el artefacto eléctrico.
Se requiere estricta supervisión cuando las
personas discapacitadas o los niños utilicen
cualquier electrodoméstico o estén cerca de él.
Las instrucciones deben indicar que los
electrodomésticos no están diseñados para
funcionar mediante un temporizador externo
ni un sistema de control remoto.
Este artefacto ha sido diseñado para uso
doméstico o en aplicaciones similares tales
como: áreas de cocina del personal de
tiendas, oficinas y otros ambientes de trabajo,
granjas, clientes de hoteles, moteles y otros
ambientes de tipo residencial, así como en
ambientes de hospederías.
INSTRUCCIONES DE
MONTAJE (CONSULTE LA FIGURA 1)
El ventilador de mesa viene completamente
ensamblado y está listo para su uso inmediato.
Desempaque cuidadosamente el ventilador,
Figura 1
A
A. Cabezal del
ventilador
B. Carcasa del motor
(no se muestra)
C. Perilla de ajuste
de inclinación
D. Base del ventilador
5. Cuelgue el ventilador en los tornillos.
B
INSTRUCCIONES
DE LIMPIEZA Y
MANTENIMIENTO
C
Siga estas instrucciones para cuidar el ventilador
de manera segura y correcta. Recuerde:
• Siempre desconecte el ventilador antes de
limpiarlo o desmontarlo.
• No permita que caiga o entre agua en la
carcasa del motor del ventilador.
•Use un paño suave humedecido con una
solución de jabón para limpiar cuidadosamente
las rejillas de las partes delantera y posterior.
• No utilice ninguno de los siguientes líquidos
como limpiador: gasolina, diluyente o benceno.
D
lea las instrucciones por completo, conéctelo al
tomacorriente y disfrútelo.
INSTRUCCIONES DE
OPERACIÓN
1. Coloque el ventilador en una superficie seca y
nivelada.
2. Conecte el cable en un tomacorriente estándar.
Asegúrese de que el control de velocidad esté
en la posición de APAGADO (0).
3. El control selector (de velocidad) se encuentra
en la parte posterior de la carcasa del motor
del ventilador. Para ajustar la velocidad, gire
el interruptor de control a la configuración que
desee: APAGADO (0), ALTA (II) o BAJA (I).
LIMPIEZA DEL VENTILADOR
Recomendamos que limpie periódicamente el
ventilador pasando suavemente la boquilla de una
aspiradora por la rejilla del ventilador, para quitar
todo el polvo o suciedad que se hayan acumulado
al interior o sobre la unidad.
NOTA: Sea cuidadoso alrededor del área de la
carcasa del motor. No permita que el motor o los
componentes eléctricos queden expuestos al agua.
No intente sacar las rejillas de este ventilador ni
intente acceder a las aspas de ninguna manera.
INSTRUCCIONES DE
AJUSTE
AJUSTE DE LA INCLINACIÓN
INSTRUCCIONES PARA
EL ALMACENAMIENTO
DEL VENTILADOR
Mueva o ajuste el cabezal del ventilador a la
posición deseada.
INSTRUCCIONES PARA EL MONTAJE
EN MURO
El ventilador se debe almacenar en su caja
original al final de la temporada. Es importante
guardarlo en un lugar seguro y seco.
• Recomendamos que use la caja original
(o una del tamaño adecuado).
• Recuerde proteger el ventilador del polvo y
la humedad.
1. Use la guía de ubicación para el montaje como
una plantilla para calcular la ubicación del orificio.
2. Con una broca de 6,35 mm (¼ inch), haga un
orificio guía en la pared.
3. Inserte los anclajes plásticos que se incluyen
en los orificios.
4. Atornille los dos tornillos que se incluyen a
través de los dos orificios en la base.
GUÍA DE UBICACIÓN PARA EL MONTAJE
Use este diagrama como ayuda para alinear correctamente los tornillos.
1
BANF76G_BANF76L_BANF76P-LA_15ESM1.indd 1-2
2
7/9/15 09:21
• To disconnect, grip plug and pull from wall
outlet. Never yank on cord.
• Always use on a dry, level surface.
• Do not operate fan until fully assembled with
all parts properly in place.
• This appliance is not intended for use by
persons (including children) with reduced
physical, sensory or mental capabilities,
or lack of experience and knowledge,
unless they have been given supervision or
instruction concerning use of the appliance by
a person responsible for their safety. Children
should be supervised to ensure that they do
not play with the appliance.
• Close supervision is necessary when any
appliance is used by or near children, or
incapacitated individuals.
• This appliance is not intended to be operated
by means of an external timer or separate
remote-control system.
• This appliance is intended to be used in
household and similar applications such as: staff
kitchen areas in shops, offices and other working
environments; farm houses; by clients in hotels,
motels and other residential type environments,
and bed and breakfast environments.
ENGLISH
PLEASE READ AND
SAVE THESE IMPORTANT
SAFEGUARDS
IMPORTANT INSTRUCTIONS
When using electrical appliances, basic safety
precautions should always be followed to reduce
the risk of fire, electric shock, and injury to
persons. These precautions include:
• Read all instructions before using this appliance.
• Use fan only for purposes described in the
instruction manual.
• To protect against electrical shock do not
immerse unit, plug or cord in water or spray
with liquids. Plug the appliance directly into
electrical outlet.
• Unplug from outlet when not in use, when moving
fan from one location to another, before putting
on or taking off parts and before cleaning.
• Avoid contact with moving parts.
• Do not operate in the presence of explosive
and/or flammable fumes.
• To avoid fire hazard, NEVER place the cord
under rugs or any parts near an open flame,
cooking or other heating appliance.
• Do not operate any appliance with a damaged
cord or plug after the appliance malfunctions,
or has been dropped/damaged in any manner.
Take it to an Authorized Service Center for its
examination and/or repair.
• The use of attachments not recommended
or sold by the appliance manufacturer may
cause hazards.
• Do not use outdoors. Do not let the cord hang
over the edge of a table, counter or come in
contact with hot surfaces or leave exposed to
high traffic areas.
ASSEMBLY
INSTRUCTIONS (SEE FIGURE 1)
Your Table Fan comes completely assembled and
is ready for immediate use. Carefully unpack your
fan, read the instructions completely, plug it in and
enjoy!
Figure 1
A
A. Fan Head
B. Motor Housing
(not visible)
C. Tilt Adjustment
Knob
D
D. Fan Base
B
C
OPERATING
INSTRUCTIONS
•Use a soft cloth moistened with a soap
solution to carefully clean the front and rear
grills.
• Do not use any of the following as a cleaner:
gasoline, thinner, benzene.
1. Set fan on a dry, level surface.
2. Plug cord into any standard outlet. Please
make sure the speed control is in the OFF
position (o).
3. Selector (Speed) Control is located on the back of
the Fan Motor Housing. The speed is adjusted by
turning the control switch to the desired setting:
OFF - (o), HIGH - (II), LOW - (I).
FAN CLEANING
We recommend the periodic cleaning of your fan
by lightly running a vacuum cleaner nozzle over
the fan grill to remove any dust or dirt that may
have accumulated inside or on the unit.
NOTE: Please be cautious around the motor
housing area. Do not allow the motor or
electronics to be exposed to water. Do not attempt
to take off the grills of this fan or access the blade
in any way.
ADJUSTMENT
INSTRUCTIONS
TILT ADJUSTMENT
FAN STORAGE
INSTRUCTIONS
Move or adjust the fan head to desired position.
WALL MOUNTING INSTRUCTION
Your fan should be stored in the off-season in its
original box. It is important to keep it in a safe, dry
location.
• We recommend using the original (or
appropriately sized) box.
• Please remember to protect the fan from dust
or moisture.
1. Use the mounting location guide as a template
to outline the hole location.
2. Using ¼ inch drill bit, drill pilot hole through
the wall.
3. Insert included plastic anchors into the holes.
4. Screw in two included screws through the two
holes in the base.
5. Hang the fan onto the screws.
CLEANING/
MAINTENANCE
INSTRUCTIONS
Follow these instructions to correctly and safely
care for your fan. Please remember:
• Always unplug the fan before cleaning or
disassembling.
• Do not allow water to drip on or into the fan
motor housing.
MOUNTING LOCATION GUIDE
Use this diagram to help properly line up screws.
3
BANF76G_BANF76L_BANF76P-LA_15ESM1.indd 3-4
4
7/9/15 09:21
©2015 Sunbeam Products, Inc. All rights reserved.
Distributed by Sunbeam Latin America, LLC, 5200 Blue Lagoon Drive, Suite 860, Miami, FL 33126.
One year limited warranty – please see insert for details.
©2015 Sunbeam Products, Inc. Todos los derechos reservados.
Distribuido por Sunbeam Latin America, LLC, 5200 Blue Lagoon Drive, Suite 860, Miami, FL 33126.
Garantía limitada de un año – por favor consulte los detalles en el inserto.
www.bionaire.com
Printed in China
P.N. 181567
Impreso en China
BANF76G_BANF76L_BANF76P-LA_15ESM1
BANF76G_BANF76L_BANF76P-LA_15ESM1.indd 1
GCDS-BIO38681-JC
7/9/15 09:21