1
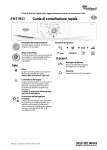
BLACK
EN
ES
Quick Reference Guide
Note
Be sure to first read the “Important Safety Instructions” in the Operation Manual.
Refer to the Operation Manual for detailed instructions.
English screens are used for basic explanations.
●● Use a blade and mat combination appropriate for the material to be cut, as indicated in the following table. (Depending on your machine model, additional purchases may
be required.) In addition, adjust the blade extension and cutting pressure.
Guía de referencia rápida
Nota
●● Utilice la combinación de cuchilla y tapete más adecuada para el material a cortar, tal como se indica en la siguiente tabla. (Dependiendo del modelo de su máquina, es
Lea primero la sección “Instrucciones de seguridad importantes” en el Manual de instrucciones.
Consulte las instrucciones detalladas en el Manual de instrucciones.
Para las explicaciones básicas se utilizan pantallas en inglés.
posible que deba realizar compras adicionales). Además, deberá ajustar la extensión de la cuchilla y la presión de corte.
●This table provides general guidelines. Before making your project, perform trial cutting with the same material.
Cutting blade
Mat
Material and its thickness
Printer paper/ 0.1mm
Scrapbook paper (thin)/ 0.15mm
Standard mat
(turquoise
and purple)
Low tack
adhesive
mat
(turquoise)
Paper
Cardstock (thin)/ 0.25mm
Cardstock (medium-thick)/ 0.35mm
Vellum, tracing paper/ 0.07mm
Poster board (thin)/ 0.35mm
Poster board (thick)/ 0.5mm
Others
Sheet
Deep cut
blade
(purple)
Iron-on fabric
High tack
appliqué
adhesive
contact
fabric support
sheet (white
sheet (light
backing)
blue backing)
Blade scale
setting
Cut pressure
setting
Material y su grosor
-
3
3.5
-1
0
Papel para impresora/0,1 mm
Papel para álbumes de recortes (delgado)/ 0,15 mm
-
-
-
4
0
Papel para álbumes de recortes (mediogrueso)/ 0,25 mm
-
-
-
-
4
5
3
5.5
7.5
0
0
0
0
4
-
-
-
4
4
*
*
-
-
-
Flannel (for quilt piece)/ 0.6mm
-
-
Flannel (except for quilt piece)/
0.6mm
-
-
-
-
-
-
-
Papel
3
3,5
-1
0
-
-
-
4
0
-
-
-
-
4
5
3
5,5
7,5
0
0
0
0
4
Tela de algodón fino (para piezas de
acolchado)/ 0,25 mm
-
-
-
4
4
Tela de algodón fino (excepto para piezas
de acolchado)/ 0,25 mm
-
-
Franela (para piezas de acolchado)/ 0,6 mm
-
-
-
Cartulina (delgada)/ 0,25 mm
Cartulina (media-gruesa)/ 0,35 mm
Vitela, papel de calco/ 0,07 mm
Soporte de cartón (delgado)/ 0,35 mm
Soporte de cartón (grueso)/ 0,5 mm
4
-
6.5
4
Franela (excepto para piezas de acolchado)/
0,6 mm
-
5
5.5
4
4
5.5
4
5
6
0
0
0
0
Fieltro/ 1 mm
Tela vaquera de 14 onzas / 0,75 mm
Lámina de plástico (PP)/ 0,2 mm
Vinilo/ 0,2 mm
Imán/ 0,3 mm
Adhesivo o sello/ 0,2 mm
* When cutting slick paper
1. Attaching the paper to the mat / 1. Colocar el papel en el tapete
-
-
*
*
-
-
-
-
-
6,5
4
-
-
5
5,5
4
4
5,5
4
5
6
0
0
0
0
-
2. Adjusting the Blade Extension / 2. Ajustar la extensión de la cuchilla
a
c
3
●● Craft paper or fabric covered with decorative layer (that can
b
easily separate) such as lamé or foil is not recommended. If such
media is used or tested it is recommended to clean the scanner
glass at the bottom of the machine after every use.
cubiertas con una capa decorativa (que pueden separarse
fácilmente), como lama o papel de aluminio. Si se utilizan o
prueban dichos materiales, es recomendable limpiar el cristal del
escáner en la parte inferior de la máquina después de cada uso.
4
4
* Si se corta papel satinado
Note
●● No es recomendable utilizar papel para manualidades o telas
4
6,5
-
When cutting fabric, use a sheet for fabric cutting. Refer to the
Operation Manual for details on preparing the sheet.
Cuando corte tela, utilice una hoja especial para cortar dicho
material. Consulte el Manual de instrucciones para más
información acerca de la preparación de la hoja.
Nota
Ajuste de la
presión de
corte
-
4
Otros
Ajuste de la
Hoja de contacto Hoja de soporte
escala de la
adhesiva
Tapete adhesivo
para aplicación
cuchilla
Cuchilla para Cuchilla para
Tapete estándar
de alta sujeción
de
de tela
corte estándar corte profundo
(turquesa y
baja sujeción
mediante la plancha especial para tela
(púrpura)
(turquesa)
púrpura)
(turquesa)
(estabilizador de (estabilizador de
respaldo blanco) respaldo azul claro)
-
4
Tela
Hoja
-
6.5
-
-
Cuchilla para cortar
Tapete
-
Thin cotton fabric (except for quilt
piece)/ 0.25mm
Felt/ 1mm
Denim 14oz/ 0.75mm
Plastic sheet (PP)/ 0.2mm
Vinyl/ 0.2mm
Magnet/ 0.3mm
Sticker or seal/ 0.2mm
●Esta tabla ofrece una orientación general. Antes de empezar el proyecto, realice una prueba de corte con el mismo material.
-
-
Thin cotton fabric (for quilt piece)/
0.25mm
Fabric
Standard cut
blade
(turquoise)
-
Scrapbook paper (mediumthick)/0.25mm
2008 brother blue
1
End of holder cap
2
Material that will be cut
3
Length of blade tip
* Make sure that there are no wrinkles and no part can curl off.
* Do not discard the protective sheet peeled off the mat; save it for later use.
* Compruebe que no se forman arrugas y que no se enrolla ninguna parte del material.
* No deseche la hoja protectora que ha retirado del tapete; guárdela para su uso posterior.
3. Installing the Holder / 3. Instalar el soporte
Fully turn the cap to the right to extend
the blade tip to its maximum.
Gire el tapón completamente hacia la
derecha para extender al máximo la
punta de la cuchilla.
Adjust the blade extension.
* Be careful that the blade does not
extend too much.
Ajuste la extensión de la cuchilla.
* Compruebe que la extensión de la
cuchilla no sea excesiva.
1
Extremo del tapón del soporte
2
El material que se cortará
3
Longitud de la punta de la cuchilla
4. Adjusting the cut pressure / 4. Ajustar la presión de corte
XF5948-001
XF5948-001.indd 1
2013/07/10 10:26:50
BLACK
2008 brother blue
5. Trial Cutting / 5. Prueba de corte
1
2
3
Hold the mat level and insert it.
* Insert the mat so that it is
tucked under the feed rollers.
Select “Pattern”.
Touch the “Test” key.
Select a test pattern.
Touch the “Set” key.
Check the pattern arrangement.
Seleccione “Patrón”.
Toque la tecla “Prueba”.
Seleccione un patrón de prueba.
Toque la tecla “Ajuste”.
Compruebe la distribución del
patrón.
4
5
6
Sujete el tapete de forma que
quede plano e insértelo.
* Inserte el tapete de forma
que quede por debajo de los
rodillos de alimentación.
Press “Feed Button” to load the mat.
Pulse el botón de “avance” para cargar el
tapete.
7
2. Adjusting the Blade
Extension
Select “Cut”.
Press “Start/Stop Button” to start cutting.
Seleccione “Cort.”
Pulse el botón de “inicio/parar” para
empezar a cortar.
Press “Feed Button” to feed out the mat.
Peel off the material.
Use the spatula to peel off the cutout pattern.
Pulse el botón de “avance” para retirar el
tapete.
Despegue el material.
Utilice la espátula para despegar el patrón
cortado.
2. Ajustar la extensión de la
cuchilla
6. Cutting a Selected Pattern (Clover) / 6. Cortar un patrón seleccionado (trébol)
1
2
3
4
5
6
Continue by following the
procedure starting with step 3
in “Trial Cutting”.
Select “Pattern”.
Select the pattern category.
Select the pattern.
Edit the pattern.
Check the pattern arrangement.
Change the pattern arrangement.
Touch the “OK” key.
Seleccione “Patrón”.
Seleccione la categoría del patrón.
Seleccione el patrón.
Edite el patrón.
Compruebe la distribución del
patrón.
Compruebe la distribución del
patrón.
Toque la tecla “OK”.
Continúe con el procedimiento a
partir del paso 3 de la sección
“Prueba de corte”.
7. Using “Direct Cut” Mode to Cut a Pattern Drawn on Material / 7. Utilizar el modo “Corte directo” para cortar un patrón dibujado en el material
1
“Direct Cut” function: An original
illustration can be scanned and its
outline can be cut out.
Función “Corte directo”: puede escanear
una ilustración original y cortar su
contorno.
7
2
3
5
6
Hold the mat level and insert it.
Select “Scan”.
Select “Direct Cut”.
Attach the original to the mat.
Seleccione “Escaneo”.
Seleccione “Corte directo”.
Coloque el original en el tapete.
Sujete el tapete de forma que
quede plano e insértelo.
Press “Feed Button” to load the mat.
Pulse el botón de “avance” para cargar el tapete.
8
9
Touch the “OK” key.
Select the area to be cut.
Touch the “OK” key.
Touch the “Cut” key.
Toque la tecla “OK”.
Seleccione la zona a cortar.
Toque la tecla “OK”.
Toque la tecla “Cort.”.
XF5948-001.indd 2
4
10
11
Pulse el botón de “inicio/parar” para empezar
a cortar.
Press “Feed Button” to feed out the mat.
Pulse el botón de “avance” para retirar el tapete.
Pulse el botón de “inicio/parar” para
empezar a escanear.
12
Peel off the material.
Press “Start/Stop Button” to start cutting.
Press “Start/Stop Button” to start
scanning.
Despegue el material.
Use the spatula to peel off the cutout
pattern.
Utilice la espátula para despegar el
patrón cortado.
2013/07/10 10:26:51