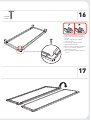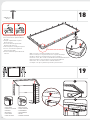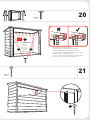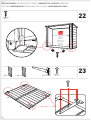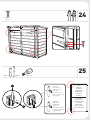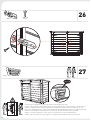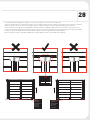
1
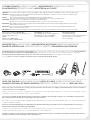
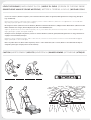
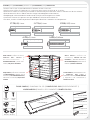
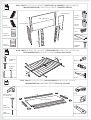
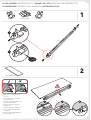
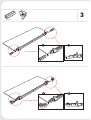
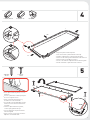
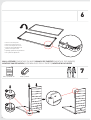
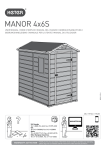
BIKES, BINS & MORE
ASSEMBLY INSTRUCTIONS | CONSIGNES DE MONTAGE | INSTRUCCIONES DE MONTAJE | MONTAGEANLEITUNG
| MONTAGE-VOORSCHRIFTEN | ISTRUZIONI D’ASSEMBL AGGIO | INSTRUÇÕES DE MONTAGEM
WWW.KETER.COM
SKU:
17192185 | 17193463
BIKE, BINS & MORE
2 easy steps to use a QR-code:
WARRANTY
ACTIVATION
Thank you for your purchase of the Keter shed,
In order to activate your warranty, please enter
www.keter.com, under storage buildings
category and fill in the sheds warranty
activation form.
1. Download a FREE QR-Code
reader from your smartphone
application site.
2. Scan the QR-Code.
A-1267-3 556925
IF THERE ARE MISSING OR BROKEN PARTS, PLEASE DO NOT RETURN THE PRODUCT TO THE STORE.
Please log onto our website, or contact Customer Service at:
S’IL Y A DES PIÈCES MANQUANTES OU CASSÉES, NE RETOURNEZ PAS LE PRODUIT AU MAGASINV.
euillez visiter notre site Internet, ou contacter notre Service Clientèle:
SI HUBIERA ALGUNA PARTE FALTANTE O DAÑADA, NO DEVUELVA EL PRODUCTO A LA TIENDA.
Inicie sesión en nuestro sitio en Internet o contáctese con nuestro servicio de atención al cliente:
WWW.KETER.COM
BITTE BRINGEN SIE IHR PRODUKT NICHT GLEICH ZUM LADEN ZURÜCK, FALLS TEILE FEHLEN ODER DEFEKT SIND.
Bitte loggen Sie in unsere Website ein oder wenden Sie sich an unseren Kundenservice:
US: # 1-888-374-4262
Canada: # 1-800-661-6721
UK: # 0121-5060008
Other European Countries:
# 31-1612-28301
IN GEVAL VAN ONTBREKENDE OF GEBROKEN ONDERDELEN NIET HET PRODUCT NAAR DE WINKEL RETOURNEREN.
Ga naar onze website of neem contact op met de Klantenservice:
IN CASO DI PARTI MANCANTI O DANNEGGIATE, EVITARE DI RESTITUIRE IL PRODOTTO AL NEGOZIO.
Accedere al nostro sito o contattare il Servizio Clienti:
SE HOUVER PEÇAS EM FALTA OU PARTIDAS, NÃO DEVOLVA O PRODUTO À LOJA.
Entre na nossa página de Internet ou contacte o Serviço de Clientes:
2
CUSTOMER SERVICE | SERVICE CLIENTÈLE | KUNDENSERVICE | SERVICIO AL CLIENTE |
KLANTENSERVICE | SERVIZIO CLIENTI | ASSISTÊNCIA AO CLIENTE
IMPORTANT: For assistance with assembly or to request missing parts, please log onto our web site at www.keter.com or contact Customer Service.
IMPORTANT : Pour toute assistance lors du montage ou pour obtenir des pièces manquantes, veuillez visiter notre site Internet : www.keter.com
ou contacter notre Service Clientèle.
WICHTIG:
Sollten Sie bei der Montage Hilfe benötigen oder fehlende Teile anfordern müssen,
besuchen Sie bitte unsere Internet-Seite www.keter.com oder wenden Sie sich an unseren Kundenservice.
IMPORTANTE: Para asistencia con el armado o para solicitar partes que puedan faltar,
por favor, entre a nuestro sitio en Internet: www.keter.com, o contáctese con nuestro servicio al cliente.
BELANGRIJK: Voor hulp bij het monteren of het aanvragen van missende onderdelen, kunt u op onze website inloggen: www.keter.com of contact
opnemen met de klantenservice.
IMPORTANTE: Per ricevere assistenza sul montaggio o per richiedere parti mancanti, accedere al nostro sito web all'indirizzo www.keter.com
oppure contattare il Servizio clienti.
IMPORTANTE: Para obter assistência ou pedir peças que estejam em falta, aceda ao nosso site www.keter.com ou contacte a assistência a clientes.
US: Call Toll Free Number: 1-(888)-374-4262
Fax: 317-575-4502 11495 North Pennsylvania Suite 110,
Carmel, Indiana 46032, U.S.A
Canada:
Appel gratuit: 1-(800)-661-6721
Call Toll Free Number: 1-(800)-661-6721
United Kingdom: Keter (UK) Ltd.
Unit 4, Woodgate Business Park, Clapgate Lane,
Birmingham, B32 - 3DB, United Kingdom.
Tel: 0121-5060008, Fax: 0121-4220808
Other European Countries:
Keter Europe Gardening
Ericssonstraat 17, Postbus 224, 5120 AE Rijen,
the Netherlands. Tel: 31-1612-28301,
Fax: 31-1612-28322
REQUIRED TOOLS | OUTILS EXIGÉS | HERRAMIENTAS NECESARIAS | BENÖTIGTE WERKZEUGE
BENODIGD GEREEDSCHAP | ATTREZZATURA OCCORRENTE | FERRAMENTAS NECESSÁRIAS
The following tools are required for shed assembly | Pour construire votre remise, vous aurez besoin des outils suivants | Für die Montage
des Gartenschuppens benötigen Sie folgende Werkzeuge | Las siguientes herramientas son necesarias para armar el cobertizo |
De volgende gereedschappen worden vereist voor het monteren van het schuurtje | Il montaggio richiede i seguenti
utensili | São necessárias as seguintes ferramentas para a montagem do abrigo de jardim:
LEVEL THE GROUND | NIVELLEMENT DU SOL | NIVELE EL SUELO | SORGEN SIE FÜR EINE EBENE
GRUNDFLÄCHE MAAK DE GROND WATERPAS | METTERE IL TERRENO A LIVELLO | NIVELAR O SOLO
Please select your construction site carefully | The ground surface must be level | it is highly recommended that you construct a wooden or
concrete | base to use as a foundation.
Veuillez sélectionner le site de votre construction avec précaution. La surface du sol doit être plane | il est fortement recommandé de construire une base en bois ou solide afin de l'utiliser comme fondation.
Seleccione con cuidado el lugar donde colocará su cobertizo | la superficie del suelo debe ser pareja | le recomendamos especialmente
que construya una base de madera o cemento para usar como cimiento.
Bitte wählen sie ihren montagestandort sorgfältig aus | die bodenfläche muss eben sein. Es wird empfohlen, dass sie eine holz-oder betonunterlage als fundament anlegen.
Selecteer met zorg uw bouwplaats | het oppervlak van de grond moet vlak zijn | het wordt ten zeerste aangeraden dat u een houten of
betonnen basis maakt om als fundament te gebruiken.
Scegliere con cura la posizione ove montare la casetta | la superficie del terreno deve essere ben livellata | si raccomanda vivamente di
costruire un basamento in legno o in calcestruzzo, da utilizzare come fondamenta.
Por favor, escolha o local de construção cuidadosamente | a superfície do solo deve ser nivelada | recomenda-se vivamente que construa
uma base de madeira ou de cimento para usar como fundações.
3
LEVEL THE GROUND | NIVELLEMENT DU SOL | NIVELE EL SUELO | SORGEN SIE FÜR EINE EBENE
GRUNDFLÄCHE MAAK DE GROND WATERPAS | METTERE IL TERRENO A LIVELLO | NIVELAR O SOLO
Clear area of stones | Remove all plants, roots and other obstacles | Rake the ground | Make ground level using a long, flat object
(e.g. wood beam).
Retirez toutes les pierres | Arrachez toutes les plantes, racines et autres obstacles | Ratissez le sol | Aplanissez le sol à l'aide d'un
objet long et plat (une planche en bois par exemple).
Beseitigen Sie Steine | Entfernen Sie alle Pflanzen, Wurzeln und andere Hindernisse | Pflügen Sie den Boden durch | Ebenen Sie den
Boden mit Hilfe eines langen, flachen Objektes (wie z.B. eines Holzbalken) aus.
Saque las piedras del área | Retire todas las plantas, raíces y otros obstáculos | Rastrille la tierra | Nivele el suelo usando un objeto
largo y plano (por ejemplo, una viga de madera).
Verwijder stenen | Verwijder alle planten, wortels en andere obstakels | Hark de grond | Maak de grond met een lang, vlak onderwerp (bijv. een houten balk) waterpas.
Eliminare le pietre | Rimuovere piante, radici e altri ostacoli | Livellare il terreno | Mettere a livello il terreno utilizzando un oggetto
lungo e piatto (ad es. un asse di legno).
Retire as pedras do local | Retire todas as plantas, raízes e outros obstáculos | Alise o local | Nivele o solo utilizando um objecto
comprido e plano (por exemplo, uma trave de madeira).
CAUTION | AVERTISSEMENT | WICHTIG | ADVERTENCIA | WAARSCHUWING | ATTENZIONE | ATENÇÃO
4
SCREWS | VIS | SCHRAUBEN | TORNILLOS | SCHROEVEN | VITI | PARAFUSOS
•
•
•
•
•
•
•
Please refer to the screw index below to find the actual screw size.
Veuillez vous référer à l’index des vis ci-dessous pour trouver la taille de la vis réelle.
Remítase al indice los tornillos presentado a continuación para informase sobre el tamaño real de los mismos.
Bitte benutzen Sie die u.a. Tabelle um die richtige Schraubengröße zu bestimmen.
Raadpleeg de schroevenindex hieronder om de feitelijke schroevengrootte te vinden.
Consultare l'elenco viti riportato sotto per individuare l’effettiva misura delle viti.
Por favor, consulte o índice de parafusos abaixo para identificar o tamanho certo do parafuso.
S13b(x35) 12mm
cm
1
inch
2
0.5
Sc15(x6) 16mm
3
cm
4
1
1
2
inch
1.5
0.5
3
1
dS2b(x2) 12mm
cm
inch
1
2
0.5
cm
4
1
inch
1.5
2
0.5
3
1
4
1.5
S40b(x2) 40mm
3
1
S26b(x102) 26mm
cm
4
inch
1.5
1
2
0.5
3
4
1
1.5
ROOF PARTS | PIÈCES DU TOIT |
PA R T E S D E L T E C H O |
DACHELEMENTE
|
DAKONDERDELEN | PARTI DEL
TETTO | PEÇAS DO TELHADO
WALL PARTS | PIÈCES DU
CONTOUR | PARTES DE LAS
PAREDES | WANDELEMENTE |
MUURONDERDELEN | PARTI DELLA
PARETE | PAINÉIS LATERAIS
DOOR PARTS | PIÈCES DE LA PORTE
| TÜRELEMENTE | PARTES DE LA
PUERTA | DEURONDERDELEN |
PARTI DELLA PORTA | PEÇAS DAS
PORTAS
FLOOR PANELS | PANNEAUX DU SOL
| PA N E L E S D E L P I S O |
BODENELEMENTE | VLOERPANELEN
| PANNELLI DEL PAVIMENTO |
PAINÉIS DO PISO
FLOOR PANELS | PANNEAUX DU SOL | PANELES DEL PISO | BODENELEMENTE |
5
VLOERPANELEN | PANNELLI DEL PAVIMENTO | PAINÉIS DO PISO
t
fcb
s26b (x9)
26mm
ds (x1) 159mm
fcs
sc15 (x6)
16mm
t
f (x1) 76x185cm
t
dsr
fcb (x1) 180cm
fs
t (x4)
ds
fcs
t
dsl (x1) dsr (x1)
fs
fcs (x2) 71cm
dsl
fs (x2) 9.5cm
5
WALL PARTS | PIÈCES DU CONTOUR | PARTES DE LAS PAREDES | WANDELEMENTE
15
| MUURONDERDELEN | PARTI DELLA PARETE | PAINÉIS LATERAIS
fc4
rsw 76x142cm
fc4 (x2)
129cm
nfl (x1)
fc4
fbk 184x130cm
lsw 76x142cm
fc5
fc5 (x2)
142cm
nfr (x1)
v (x1)
rsw (x1)
142x76 cm
fbk (x1)
130x184cm
fc5
nfr
lsw (x1)
142x76 cm
s26b (x54)
26mm
nfl
DOOR PARTS | PIÈCES DE LA PORTE | TÜRELEMENTE | PARTES DE LA PUERTA |
29
DEURONDERDELEN | PARTI DELLA PORTA | PEÇAS DAS PORTAS
t
dh
dp
s13b (x35)
12mm
dp1
dh
dh
db
ds2b (x2)
12mm
dp1 (x2)
l
db1 (x1)
db
pl
r
d
dh
dp1
dpt (x1)
dpl (x1)
10
dh (x4)
ROOF PARTS | PIÈCES DU TOIT | DACHELEMENTE | PARTES DEL TECHO |
DAKONDERDELEN | PARTI DEL TETTO | PEÇAS DO TELHADO
rc
crb (x1) 180cm
crs (x2) 72cm
rc (x4)
crb
crs
rbs (x1) 195x87cm
rc
rc
crf (x1) 180cm
crs
s40b
40mm (x2)
dsb
crf
rc
s26b
26mm (x39)
6
dsb (x1) 180cm
FLOOR ASSEMBLY | MONTAGE DU SOL | ARMADO DEL PISO | MONTAGE DER BODENPLATTE |
VLOERMONTAGE | MONTAGGIO DEL PAVIMENTO | MONTAGEM DO PISO
dsl (x 1 )
ds (x 1 ) 159cm
1
dsr (x 1 )
dsr
1
ds
2
dsl
2
f (x 1 ) 185x76 cm
f
• Fit the panel accordingly within
the crevice
• Placez le panneau convenablement dans la fente
• Coloque el panel adecuadamente
dentro de la hendidura
• Passen Sie das Panel genau in
den Spalt ein
• Plaats het paneel zo in de gleuf
• Inserite il pannello seguendo la
scanalatura
• Encaixe o painel adequadamente
dentro da abertura
1
2
3
7
fs (x 2 )
3
t (x 2 )
fs
1
2
3
4
fs
8
fcb (x 1 ) 180cm
4
t (x 2 )
fcs (x 2 ) 71cm
1
t
fcs
fcb
2
t
• Fully fit the panel inside the profile
• Fixez entièrement le panneau dans la découpe
• Coloque completamente el panel dentro del perfil
• Passen Sie das Panel genau und akkurat in das Profil ein
• Plaats het paneel volledig in het profiel
• Inserire correttamente il pannello all’interno delle guide
• Encaixe totalmente o painel dentro do contorno
fcs
s26b (x 9 )
26 mm
5
sc15 (x 6 )
16 mm
s26b
• Fit the panel inside the profile screw on
mark line
• Insérez le panneau à l’endroit prévu pour
la vis sur la ligne dessinée
• Encaje el panel dentro del marco y
atorníllelo en la línea marcada
• Verschrauben Sie die Bodenplatte an der
markierten Linie auf dem Profil mit der
Schraube
• Plaats het paneel binnen het profiel,
schroef op de gemarkeerde lijn
• Inserite il pannello nel profilo. Avvitate
sulla linea guida
• Ajuste o Painel no Interior do Contorno.
Aparafuse na linha Marcada.
sc15
s26b
sc15
10cm
9
6
•
•
•
•
•
•
•
Turn over the floor panel
Retournez le panneau du sol
Dé la vuelta al panel del suelo
Drehen Sie die Bodenplatte um
Draai het vloerpaneel om
Capovolgi il pannello del pavimento
Vire o painel do pavimento
WALL ASSEMBLY | MONTAGE DU MUR | ARMADO DE PAREDES | MONTAGE DER WÄNDE |
MONTAGE VAN DE MUREN | ASSEMBLAGGIO DELLE PARETI | MONTAGEM DA PAREDE
7
lsw (x 1 ) 142x76 cm
fc4 (x 1 ) 129cm
fc4
1
2
10
fbk (x1)
fbk (x1)184x130 cm
1
FOLDED
PLIABLE
DOBLADO
GEFALTET
GEVOUWEN
PIEGATO
DOBRADO
8
9
s26b (x 6 )
26 mm
2
• Fully fit the panel inside the profile
• Fixez entièrement le panneau dans la
découpe
• Coloque completamente el panel
dentro del perfil
• Passen Sie das Panel genau und
akkurat in das Profil ein
• Plaats het paneel volledig in het profiel
• Inserire correttamente il pannello
all’interno delle guide
• Encaixe totalmente o painel dentro do
contorno
11
fc4 (x 1 ) 129cm
rsw (x 1 ) 142x76 cm
10
s26b (x 6 )
26 mm
fc4
1
fc5 (x 2 ) 142cm
11
s26b(x8)
26mm
fc5
fc5
THIS SIDE
UP
12
2
THIS SIDE
UP
nfl (x 1 )
nfr (x 1 )
nfl
nfr
THIS SIDE
UP
12
s26b(x8)
26mm
nfl
nfr
THIS SIDE
UP
13
s26b (x 26 )
26 mm
THIS SIDE
UP
• Fully fit the panel inside the profile
• Fixez entièrement le panneau dans la
découpe
• Coloque completamente el panel
dentro del perfil
• Passen Sie das Panel genau und
akkurat in das Profil ein
• Plaats het paneel volledig in het profiel
• Inserire correttamente il pannello
all’interno delle guide
• Encaixe totalmente o painel dentro do
contorno
13
ROOF ASSEMBLY | MONTAGE DU TOIT | ARMADO DEL TECHO | DACHMONTAGE |
DAKMONTAGE | MONTAGGIO DEL TETTO | MONTAGEM DO TELHADO
crf (x 1 ) 180 cm
rbs (x 1 ) 195x87 cm
14
dsb (x 1 ) 180 cm
dsb
1
2
crf
crf
rbs
dsb
3
7.5cm
crb (x 1 ) 180 cm
crs (x 2 ) 72 cm
15
rc (x 4 )
crs
rc
rc
crb
1
2
rc
crs
rc
14
7.5cm
7.5cm
s26b (x8)
26mm
16
• Fully fit the panel inside the profile
• Fixez entièrement le panneau dans la
découpe
• Coloque completamente el panel
dentro del perfil
• Passen Sie das Panel genau und
akkurat in das Profil ein
• Plaats het paneel volledig in het profiel
• Inserire correttamente il pannello
all’interno delle guide
• Encaixe totalmente o painel dentro do
contorno
17
15
18
s26b (x 22 )
26 mm
• Fully fit the panel inside the profile
• Fixez entièrement le panneau dans la
découpe
• Coloque completamente el panel
dentro del perfil
• Passen Sie das Panel genau und
akkurat in das Profil ein
• Plaats het paneel volledig in het profiel
• Inserire correttamente il pannello
all’interno delle guide
• Encaixe totalmente o painel dentro do
contorno
• Make sure that screws drill through the metal channel.
• Assurez-vous que les vis pénètrent à travers le profilé métallique.
• Asegúrese de que los tornillos perforan el orificio metálico.
• Stellen Sie sicher, dass sich die Schrauben durch den Metallkanal drehen.
• Zorg ervoor dat de schroeven door de metalen uitsparing boren.
• Assicurarsi che le viti attraversino la canalina metallica.
• Certifique-se de que os parafusos perfuram o perfil metálico.
19
1
2
• DOOR SIDE
• CÔTÉ PORTE
• LADO DE LA PUERTA
• TÜRSEITE
• DEURZIJDE
• LATO PORTA
• LADO DA PORTA
16
• BACK WALL
• MUR DU FOND
• PARED TRASERA
• HINTERWAND
• ACHTERWAND
• RETRO
• PAREDE TRASEIRA
20
s26b (x 9 )
26 mm
THIS SIDE UP
CETTE PARTIE
EN HAUT
x2
x5
Back
Arrière
Trasero
Hinterseite
Achterkant
Indietro
Traseiro
x2
• Fully fit the panel inside the profile
• Fixez entièrement le panneau dans la découpe
• Coloque completamente el panel dentro del perfil
• Passen Sie das Panel genau und akkurat in das Profil ein
• Plaats het paneel volledig in het profiel
• Inserire correttamente il pannello all’interno delle guide
• Encaixe totalmente o painel dentro do contorno
21
s40b (x 2 )
40 mm
door
door
x1
17
DOOR ASSEMBLY | MONTAGE DE LA PORTE | ARMADO DE LA PUERTA | MONTAGE
DER TÜR | DEURMONTAGE | MONTAGGIO DELLA PORTA | MONTAGEM DA PORTA
22
ds2b (x2 )
12 mm
Back
Arrière
Trasero
Hinterseite
Achterkant
Indietro
Traseiro
x1
dbl (x 1 )
dbr (x 1 )
dbl
dbr
18
dh (x 4 )
s13b (x 16 )
12 mm
x1
23
24
s13b (x 12 )
12 mm
dpt (x 1 )
25
dp1 (x 2 )
dpl (x 1 )
1
dpt
dp1
2
dpl
Short up
Court en haut
Pequeño arriba
Kurz oben
Korte naar boven
Lato corto verso l'alto
Curto no topo
Long down
Long en bas
Grande abajo
Lang unten
Lange naar beneden
Lato lungo verso il basso
Longo em baixo
INSIDE
INTÉRIEUR
INTERIOR
INNENSEITE
BINNENKANT
INTERNO
INTERIOR
LEFT DOOR
PORTE GAUCHE
PUERTA IZQUIERDA
LINKE TÜR
LINKER DEUR
PORTA SINISTRA
PORTA ESQUERDA
19
db1 x1
V (x1)
s13b (x 7 )
12 mm
26
27
• Push vent into the right position as your helper holds the wall steady from the inside.
• Poussez la bouche d’aération dans la bonne position en même temps que votre assistant maintient le mur de l’intérieur.
• Mientras el ayudante sostiene la pared fija desde dentro, introduzca la rejilla de ventilación en la posición correcta.
• Drücken Sie die Entlüftung in die richtige Position, während Ihr Gehilfe die Wand von innen in einer stabilen Position hält.
• Duw het verluchtingspaneel in de juiste positie terwijl uw helper de muur aan de binnenzijde tegenhoudt.
• Spingere la ventola nella posizione corretta, mentre il vostro aiutante tiene fermo il muro dall’interno.
• Empurre a abertura na posição correta, enquanto o seu ajudante mantém a parede firme a partir do interior.
20
28
• Level the doors by inserting spacers under the corners of the shed, Lift the corner of the lower door side.
• Ajuster le niveau des portes en insérant des écarteurs sous les angles de l'abri, soulever l'angle du côté de la porte située au niveau le plus bas.
• Nivele las puertas con la inserción de los separadores bajo las esquinas del cobertizo Eleve la esquina del lado inferior de la puerta.
• Passen Sie die Türen an, indem Sie die Abstandhalter unter die Ecken des Schuppens einfügen, heben Sie die Ecke der unteren Türseite an.
• Stel de deuren op gelijke hoogte door opvulstukken onder de hoeken van het schuurtje te plaatsen. Til de hoek aan de kant van de laagste deur omhoog.
• Livellare le ante inserendo gli spessori sotto gli angoli del capanno. Sollevare l'angolo dal lato dell'anta più bassa.
• Nivele as portas inserindo os espaçadores debaixo dos cantos do abrigo, Levante o canto do lado inferior da porta.
spacer
écarteur
separador
abstandhalter
opvulstuk
spessore
espaçador
spacer
écarteur
separador
abstandhalter
opvulstuk
spessore
espaçador
21
LIMITED 2-YEAR WARRANTY
Keter’s renowned reputation for fine products is a result of its dedication and commitment to quality, design and innovation. The entire range of sheds and boxes
is manufactured from high quality materials under rigorous control and supervision. In case a problem should occur, please address your claim to customer
service either by phone or through our web site: www.keter.com. The warranty is valid as of the date of purchase and a dated proof of purchase should be
presented on request. Keter continuously tests its products for durability & stability and will replace, at its discretion, any product or part which fails due to
structural defect or faulty workmanship, or which fails due to fading of color, for a 2-year period from the initial date of purchase. Damage caused by: use of force,
incorrect handling, inappropriate use, neglect, commercial use or use other than for personal or household purposes; damages resulting from alteration,painting,
or assembly not in accordance with the User’s Manual and damages caused as a result of storage above the capacity load of the product, are excluded from this
warranty. In addition, this limited warranty does not apply to damage resulting from exceptional wind (including, but not limited to, storms) effects.After a claim
has been settled the guarantee period will continue to be counted and shall terminate upon its expiry date. Keter shall not be responsible for any damage caused
by any reason whatsoever to goods stored in the Product. Please note that the products are produced from the finest raw materials, which are“clear”: non-toxic
and completely recyclable. Please keep your receipt and this instruction manual for future customer service purpose.
GARANTIE LIMITÉE DE 2 ANS
La renommée croissante de Keter pour l’excellence de ses produits est le fruit de son engagement pour la qualité, la création et l’innovation. La gammecomplète
d’abris de jardin et de coffres a été fabriquée avec des matériaux de qualité, sous contrôle rigoureux. En cas de problème, veuillez adresser votreréclamation au
service clientèle, par téléphone ou par le biais de notre site I nternet: www.keter.com. La garantie prend effet à compter de la date d’achat et unepreuve d’achat
datée devra être présentée sur demande. Keter teste constamment la solidité et la stabilité de ses produits et remplacera, si elle le jugenécessaire, tout produit
ou partie de produit avéré défectueux du fait d’un défaut de fabrication ou de l’altération des couleurs, pendant une période de 2 ans àcompter de la date d’achat.
Les dommages causés par l’usage de la force, un maniement impropre, une utilisation inappropriée du produit, une négligence, unusage commercial ou un usage
à des fins non privées; de même que les dommages résultant d’une modification, d’une coloration ou d’un assemblage noneffectué en conformité avec le manuel
de l’utilisateur; ainsi que les dommages causés par un stockage dépassant la capacité pondérale du produit, sont exclusde cette garantie. E n outre, cette garantie
limitée ne s’applique pas aux dommages résultant des effets exceptionnels du vent (y compris, mais pas limité auxtempêtes). A près avoir formulé votre
réclamation, la période de la garantie restera valide jusqu’à sa date d’expiration. Keter décline toute responsabilité pourtout dommage de quelque nature que ce
soit des biens emmagasinés dans le produit. À noter que les articles sont fabriqués avec des matières premières dequalité supérieure, déclarées “écologiques”:
non toxiques et entièrement recyclables. Veuillez conserver votre reçu et ce mode d’emploi pour pouvoir accéder ultérieurement au service à la clientèle.
GARANTÍA LIMITADA POR 2 AÑOS
La afamada reputación que Keter ha ganado por sus excelentes productos es el resultado de su dedicación y compromiso hacia lacalidad, el diseño y la
innovación.La gama completa de cobertizos y cajas se fabrica con materiales de óptima calidad y bajo estrictos controles y supervisión.En caso de surgir algún
inconveniente, rogamos tenga a bien elevar su queja al servicio de atención al cliente,ya sea vía telefónica o a través de nuestro sitio en la Web: www.keter.com.La
garantía es válida a partir de la fecha de compra y, a solicitud, deberá presentarse un comprobante de compra con fecha.Keter pone a prueba sus productos en
forma constante para determinar la durabilidad y estabilidad de los mismos.A su criterio, reemplazará todo producto o parte del mismo que presente fallas como
consecuencia de un defecto estructural o demano de obra, o que se deteriore por decoloración, durante un período de 2 años, contados a partir de la fecha de
compra inicial.Los daños causados por: el uso de la fuerza, la manipulación incorrecta, la utilización inadecuada, el descuido, el uso comercial ocon un propósito
diferente del personal o doméstico; los daños que resultaran de modificaciones, pinturas o armado no realizadosde conformidad con las explicaciones del Manual
de Instrucciones; y los daños causados por exceder la capacidad de carga dealmacenamiento del producto, quedan excluidos de esta garantía. Además, esta
garantía limitada no se aplica a los daños queresulten de los efectos de un viento excepcional (incluso, aunque no taxativamente, de las tormentas). Una vez que
se hayaremediado un reclamo, el período de garantía seguirá contando y finalizará en su fecha de vencimiento. Keter no asumeresponsabilidad alguna por ningún
daño que hubiera sufrido cualquier artículo almacenado en el Producto, cualquiera fuera sucausa. Tenga en cuenta que los productos se fabrican con materias
primas de excelente calidad, que son «ecológicas»: es decir, notóxicas y completamente reciclables. Para poder recibir asistencia como cliente en el futuro, le
rogamos que conserve su ticket y este manual de instrucciones.
JAHRES-GARANTIE MIT BESCHRÄNKTER HAFTUNG 2
Der gute Ruf von Keter›s Produkten begründet sich auf die Verpflichtung zu Qualität, Design und Innovation.Das gesamte Produkt-Spektrum der Gartenschuppen
und Truhen wird aus hochwertigen Materialien unter strenger Kontrollehergestellt. Sollte ein Problem auftreten, wenden Sie sich bitte telefonisch oder über
unsere Homepage www.keter.coman unseren Kundendienst. Die Garantiezeit beginnt mit dem Kaufdatum. Bitte bewahren Sie die datierte Kaufquittung für
eventuelleRückfragen auf.Keter prüft seine Produkte ständig auf lange Lebensdauer und Stabilität. Sollten trotzdem Mängel auftreten, die auf MaterialoderVerarbeitungsfehler zurückzuführen sind, oder sollte die Farbe verblassen, wird jedes mangelhafte Produkt oder Teilinnerhalb eines Zeitraums von 2 Jahren
ab dem Kaufdatum ersetzt.Von dieser Garantie ausgeschlossen sind: Schäden die durch Gewaltanwendung, unsachgemäße Bedienung oderBehandlung,
Nachlässigkeit, kommerzielle Nutzung oder andere Nutzungen außer zu persönlichen Zwecken oder im Haushaltverursacht wurden. Schäden, die durch
Veränderungen am Produkt, das Anstreichen oder unsachgemäße, vom Benutzerhandbuchabweichende Montage auftreten, ebenso wie Schäden, die auf das
Überschreiten der zugelassenen Ladekapazität zurückzuführensind, sind ebenfalls von der Garantie ausgeschlossen. Darüber hinaus deckt diese beschränkte
Garantie Schäden, die aufaußergewöhnliche Windbelastung (einschließlich, aber nicht nur Sturmschäden) zurückzuführen sind, nicht ab. Im Falle einererledigten
Reklamation wird die Garantiezeit weiterlaufen und der Garantieanspruch gilt nur bis zum ursprünglichen Ablaufdatum.Bitte beachten Sie, dass unsere Produkte
aus hochwertigen, umweltfreundlichen Rohmaterialien hergestellt werden: absolut ungiftigund vollständig recyclebar. Bitte bewahren Sie Ihren Kaufbeleg und
dieses Handbuch für zukünftige Kundendienstzwecke auf.
JARIGE GARANTIE MET BEPERKTE AANSPRAKELIJKHEID
Keter heeft aan zijn toewijding en verplichtingen ten opzichte van kwaliteit, ontwerp en vernieuwing voor zijn prachtige producten, zijn vermaarde reputatie
tedanken. De gehele serie schuurtjes en dozen zijn, onder strenge controle en met toezicht van kwaliteitsmaterialen vervaardigd. In geval dat zich een
probleemvoordoet, dient u deze of via de telefoon, of via onze website, bij de klantenservice voor te leggen. Het adres voor onze website is: www.keter.com. De
garantieis vanaf de aankoopdatum geldig en bij verzoek moet een aankoopbewijs met datum worden getoond. Keter test zijn producten continu op houdbaarheid
&betrouwbaarheid en zal, gedurende een periode van 2 jaar vanaf de eigenlijke aankoopdatum, naar eigen goeddunken elk product of onderdeel
metconstructiefouten, of met kleurvervaging, vervangen. De garantie dekt niet de hierop volgende aangegeven schade: schade veroorzaakt door
gewelddadiggebruik, onjuist gebruik, verwaarlozing, handelsgebruik anders dan persoonlijk of huishoudelijk gebruik, schade berokkent door aangebrachte
veranderingen,verven of montage verricht op een andere wijze als beschreven wordt in de handleiding en schade veroorzaakt door het opslaan boven het
vermogenonderdeelvan het product. Daarnaast is deze beperkte garantie niet van toepassing op schade die ontstaan is als resultaat van buitengewone
windeffecten (inclusief,maar niet beperkt tot, stormen). Nadat een claim is gevestigd, gaat de garantieperiode gewoon door tot de vervaldatum, waarop het zal
worden beëindigd.Keter kan niet aansprakelijk worden gesteld voor enige schade die door een of andere reden is ontstaan tijdens het opslaan van het product.
Denk eraan datde producten van de fijnste ruwe materialen zijn gemaaktdie geheel zuiver zijn: niet giftig en geheel recyclebaar. A.u.b. uw ontvangstbewijs en deze
gebruiksaanwijzing bewaren in verband met toekomstige klantendienst.
22
GARANZIA LIMITATA DI 2 ANNI
L’ottima reputazione di cui gode Keter per i suoi prodotti è il risultato di una dedizione e di un impegno costante verso la qualità,il design e l’innovazione.L’intera
gamma degli armadietti e dei box viene prodotta con materiali di prima qualità, sotto un controllo e una supervisione rigorosi.Se dovesse presentarsi un problema,
presentare reclamo al servizio d’assistenza, per telefono o attraverso il nostro sito Web:www.keter.com.La garanzia è valida a partire dalla data di acquisto e su
richiesta deve essere presentata una prova di acquisto datata.Keter tiene continuamente sotto controllo la durevolezza e la solidità dei suoi prodotti ed è pronta
a sostituire, a sua discrezione,qualsiasi prodotto o parte di esso presentante un›alterazione provocata da un difetto strutturale o dal processo di produzione,
oun’alterazione causata da un colore sbiadito, per un periodo di 2 anni a partire dalla data di acquisto.I danni causati da: uso di forza, uso non corretto, utilizzo
inappropriato, negligenza, uso commerciale o uso diverso da quello personale oper fini domestici; danni derivanti da alterazione, pittura, o montaggio non
eseguito in conformità con il manuale d’istruzioni;e danni provocati in conseguenza di condizioni di magazzinaggio eccedenti la capacità di carico del prodotto,
sono esclusi dalla presentegaranzia. Inoltre, questa garanzia limitata non si applica ai danni causati dagli effetti di condizioni meteo eccezionali(inclusi, ma non
limitati a, itemporali).Dopo aver stabilito un reclamo, il periodo di garanzia continuerà ad essere calcolato e terminerà alla sua data di scadenza.Keter non sarà
ritenuta responsabile per danni causati da una qualunque ragione ai beni contenuti nel Prodotto.Si noti che i prodotti sono costruiti dalle migliori materie prime,
che sono «sicure»: non tossiche e completamente riciclabili. Si prega di conservare la ricevuta e questo manuale di istruzioni ai fini del servizio clienti futuro.
GARANTIA LIMITADA DE 2 ANOS
A célebre reputação da Keter pelos seus produtos distintos é resultante da sua dedicação e compromisso com a qualidade,o design e a inovação.Toda a gama de
abrigos de jardim e caixas é produzida com materiais de elevada qualidade que são sujeitos a umcontrolo e supervisão rigorosos.Se ocorrer algum problema com
o produto, faça a sua reclamação ao serviço de apoio ao cliente, através do telefone ou do nosso site:www.keter.com.A Garantia é válida a partir da data de compra
e deve ser apresentada uma prova de compra, se solicitado.A Keter testa continuamente os seus produtos quanto a durabilidade e estabilidade, e procederá, da
forma que achar conveniente, àsubstituição de qualquer produto ou parte do mesmo que esteja danificado como consequência de defeito na estrutura, defeito
defabrico ou descoloração do produto, durante um período de 2 anos, a contar da data da compra.Os danos causados pelo uso da força, manuseamento
incorrecto, utilização indevida, negligência, uso comercial ou outro uso que não orelacionado com fins domésticos ou pessoais, danos causados por alteração,
pintura ou montagem que não sejam em conformidadecom o Guia do Utilizador, assim como danos causados pelo armazenamento de artigos acima da
capacidade de carga do produto, sãoexcluídos desta garantia. Além disso, esta garantia limitada não abrange danos resultantes dos efeitos de ventos
anormais(incluindo, entre outros, tempestades).Após a resolução de uma reclamação, o período da garantia continuará a ser contado e deve terminar após o fim
da data de validade .A Keter não será responsável por nenhuns danos causados por qualquer motivo nos bens armazenados no Produto.Note que os produtos
são produzidos a partir das melhores matérias-primas, as quais são “limpas”: não-tóxicas e totalmenterecicláveis. Por favor, guarde este recibo e este manual
de instruções para efeitos de futuro atendimento ao cliente.
CARE & SAFETY
• In case of fire, do not attempt to extinguish any burning polypropylene with water | Unsuitable for storage of flammable or corrosive substances
• It is of utmost importance to assemble all of the parts according to the directions. Do not skip any step.
• Please consult your local authorities if any permits are required to erect shed.
• Periodically check shed to assure that it remains stable and that the site remains level.
• It is highly recommended to secure the shed to an immovable object or to the ground by drilling holes in the floor at the pre-marked locations and
inserting proper screws into the ground (size: 1.9’’-3’’ ,screws are not included).
• Wear safety-goggles and always follow the manufacturer’s instructions when using power tools.
• Wash shed with garden hose or a mild detergent solution. Using a stiff brush or abrasive cleaner could damage shed.
• Hot items such as recently used grills, blowtorches, etc. must not be stored in the shed.
• Heavy articles should not be leaned against the walls, as this may cause distortion.
• Keep roof clean of snow and leaves. Heavy amounts of snow on roof can damage the shed making it unsafe to enter.
• Although wind direction varies, it is an important factor when taking into account where to place your shed. Therefore, it is recommended to reduce
wind exposure of the shed in general, and the door side in particular.
• Keep doors closed and locked to prevent wind damage.
• Do not stand on the roof.
• Shed not designed for habitation.
PRÉCAUTIONS ET SÉCURITÉ
• En cas d’incendie, ne pas t enter d’ét eindre le POL Ypropylène brûlé avec de l’eau | Ne convient pas pour le stockage de substances inflammables ou caustiques
• Ilest impératif de monter toutes les parties selon les instructions. N e pas omettre une quelconque étape.
• Veuillez consulter les autorités locales de votre commune pour savoir si un permis est nécessaire à la construction de votre remise.
• Vérifiez régulièrement la stabilité de votre remise et l’horizontalité de son site de construction.
• Il est fortement recommandé de fixer l’abri vers un objet statique ou vers le terrain par les trous de forage dans le sol aux endroits pré-marqués et
insérer correctement les vis dans le sol (taille: 1,9”-3”, les vis ne sont pas inclus).
• Portez des lunettes de protection et suivez toujours les instructions du fabricant lorsque vous utilisez des outils électriques.
• Lavez la remise au tuyau d’arrosage ou avec un détergent doux. Utiliser une brosse dure ou un produit d’entretien abrasif risquerait de l’endommager.
• Des objets chauds tels que des grils non refroidis, des chalumeaux, etc. ne doivent pas être entreposés dans la remise.
• Ne pas déposer d’objets lourds contre les parois afin d’éviter tout risque de déformation.
• Maintenez le toit propre et dégagé de neige et de feuilles. D e lourdes quantités de neige sur le toit peuvent abîmer la remise et rendre dangereux
l’accès à l’intérieur.
• Bien que la direction du vent change, il est important de prendre en compte où l’abri est posé. C ependant, il est recommandé de réduire l’exposition
de l’abri au vent en général, et de la porte latérale en particulier.
• Veillez à fermer les portes à clef pour éviter tout dégât provoqué par le vent.
• Ne montez jamais sur le toit.
• Abri non conçu pour habitation.
PFLEGE - UND SICHERHEITSHINWEISE
• Im Brandfall sollten S ie nicht versuchen, brennendes Polypropylen mit Wasser zulöschen | Nicht zur Aufbewahrung von entzündbaren oder ät zenden
Mitt elnvorgesehen
• Es ist äußerst wichtig, dass alle Teil der Anleitung zufolge montiert werden. Bitte lassen Sie keine Schritte aus.
• Falls Sie eine Baugenehmigung für den Gartenschuppen benötigen, wenden Sie sich bitte an die örtlichen Behörden.
• Überprüfen Sie den Gartenschuppen in regelmäßigen Abständen, um sosicherzustellen, dass seine Stabilität sowie die Ebenheit seines Standortes
noch gewährleistet sind.
• Es wird strengstens empfohlen, den Schuppen an ein unbewegliches Objekt oder am Boden zu verankern. Dies geschieht durch Bohren von Löchern
an den markierten Stellen und das Verankern am Boden durch die richtigen Schrauben (Größe 1.9”-3”, die Schrauben sind nicht im Lieferumfang).
• Tragen Sie beim Gebrauch von Elektrowerkzeugen eine Schutzbrille und folgen Sie stets der Anleitung des Herstellers.
• Bitte verwenden Sie zur Reinigung des Schuppens einen Gartenschlauch oder ein mildes Putzmittel. D ie Verwendung von harten Bürsten oder
anderen ungeeigneten Putzgeräten kann das Material beschädigen.
23
• Noch heiße Gegenstände wie Grillgeräte, Fackeln usw. dürfen nicht im Schuppen aufbewahrt werden.
• Schwere Gegenstände dürfen nicht an die Wände angelehnt werden, da dies zu einer Verformung des Materials führen kann.
• Halten Sie das Dach frei von Schnee und Laub. Große S chneemengen auf dem Dach können den Gartenschuppen beschädigen und sein Betreten
zur Gefahr werden lassen.
• Obwohl Windrichtungen wechseln, können diese bei der Wahl des Standpunkts I hres Schuppens ausschlaggebend sein. Daher ist es empfohlen,
die Windbelastung des Schuppen im Allgemeinen und der Türseite im Besonderen zu verringern.
• Zum Schutz vor Windschäden halten Sie die Türen geschlossen und verriegelt.
• Bitte das Dach nicht betreten.
• Schuppen nicht zum Bewohnen geeignet.
CUIDADO Y SEGURIDAD
• En caso de incendio, no intente extinguir polipropileno en llamas con agua | No es apropiado para el almacenamiento de sustancias inflamables o causticas.
• Es de suma importancia armar todas las partes de acuerdo con las instrucciones. N o omita ninguno de los pasos.
• Consulte a las autoridades locales si se requiere algún permiso para instalar el cobertizo.
• Verifique el cobertizo periódicamente para corroborar que esté estable y que el suelo esté nivelado.
• Se recomienda especialmente afirmar el cobertizo a un objeto inmóvil o al suelo, haciendo perforaciones en el piso, en los lugares previamente
marcados, e insertando los tornillos apropiados en el suelo (tamaño: 1,9’’-3’’. L os tornillos no vienen incluidos.).
• Use anteojos protectores; al usar herramientas eléctricas, siga siempre las instrucciones del fabricante.
• Lave el cobertizo con una manguera para jardín o una solución que contenga un detergente suave. L a utilización de un cepillo duro o de un producto
de limpieza abrasivo podría dañar el cobertizo.
• Los objetos calientes -como por ejemplo, las parrillas recién usadas, sopletes, etc.- no deben guardarse en el cobertizo.
• Se recomienda no apoyar artículos pesados contra las paredes, pues esto podrá ocasionar deformaciones.
• Mantenga el techo libre de nieve y hojas. G randes cantidades de nieve sobre el techo pueden dañar el cobertizo y hacer peligrosa la entrada al mismo.
• Aunque su dirección varíe, el viento es un factor importante a tomar en cuenta cuando decida dónde ubicar su cobertizo. P or lo tanto, se recomienda
reducir la exposición al viento del cobertizo en general y del lado de la puerta en particular.
• Mantenga las puertas cerradas y trabadas para evitar los daños producidos por el viento.
• No se pare sobre el techo.
• El cobertizo no es apropiado para vivienda.
ZORG EN VEILIGHEID
• In geval van brand NIET proberen om brandend polypropyleen met water te blussen | Ongeschikt voor het opslaan van brandbare of gevaarlijke materialen
• Het is uitermate belangrijk alle onderdelen volgens de richtlijnen te monteren. Sla geen van de stappen over.
• Raadpleeg uw plaatselijke autoriteiten of er bepaalde vergunningen worden vereist om het schuurtje te plaatsen.
• Controleer het schuurtje regelmatig om er zeker van te zijn dat het stabiel blijft en dat de locatie waterpas blijft.
• Het wordt ten zeerste aangeraden het schuurtje aan een onverplaatsbaar object of aan de grond te bevestigen door op de voorgemarkeerde locaties
gaten in de grond te boren en de geschikte schroeven in de grond te plaatsen (afmeting: 1.9’’-3’’, schroeven zijn niet inbegrepen).
• Draag een veiligheidsbril en volg altijd de instructies van de fabrikant als u elektrisch gereedschap gebruikt.
• Was het schuurtje met een tuinslang of een zacht wasmiddel af. Het gebruik van een harde borstel of oplosmiddelen kan het schuurtje beschadigen.
• Warme voorwerpen zoals een pas gebruikte grill, branders, enz. mogen niet in het schuurtje worden geplaatst.
• Laat geen zware voorwerpen tegen de muren leunen. D it kan misvorming veroorzaken.
• Houdt het dak vrij van sneeuw en bladeren. G rote hoeveelheden sneeuw op het dak kunnen het schuurtje beschadigen en de toegang ertoe gevaarlijk maken.
• Ofschoon windrichtingen variëren, is het belangrijk dat u rekening houdt met de plaats waar u uw schuurtje opstelt. Het wordt daarom aangeraden
over het algemeen het schuurtje en vooral de deurzijde, zo min mogelijk aan wind bloot te stellen.
• Houdt de deuren dicht en op slot om windschade te voorkomen.
• S ta niet op het dak.
• Het schuurtje is niet voor woondoeleinden ontworpen.
MANUTENZIONE E SICUREZZA
• In caso di incendio, non usare l’acqua per spegnere il fuoco sugli oggett i in polipropilene | Non adatt o per la conservazione di sostanze infiammabili o corrosive
• È della massima importanza assemblare tutte le parti seguendo accuratamente le istruzioni. N on saltare nessuno dei passaggi descritti.
• Consultare l’ente di controllo locale nel caso in cui per il montaggio del magazzino siano richieste delle autorizzazioni .
• Controllare la struttura periodicamente per assicurarsi che sia stabile e che il sito sia a livello.
• Si consiglia vivamente di fissare il capanno su un oggetto immobile o sul terreno effettuando dei fori sul pavimento nelle posizioni precedentemente
contrassegnate e inserendo le viti adeguate nel terreno (dimensioni: 1.9’’-3’’, le viti non sono incluse).
• Indossare occhiali di sicurezza e seguire sempre le istruzioni del produttore durante l’utilizzo di strumenti elettrici.
• Lavare il magazzino con un tubo da giardino o una soluzione detergente delicata. P er non provocare danni non utilizzare una spazzola dura o un
pulitore abrasivo.
• Non conservare nel magazzino prodotti caldi come grill usati da poco, lampade per saldature ecc.
• Evitare di appoggiare oggetti pesanti alle pareti per non deformarle.
• Rimuovere la neve e le foglie che si accumulano sulla copertura. T roppa neve potrebbe danneggiare il magazzino rendendone precaria la struttura.
• Sebbene la direzione del vento vari continuamente, è un fattore importante quando si prende in considerazione dove collocare il capanno. Quindi, si
consiglia in generale di ridurre l’esposizione del capanno al vento, in particolare il lato della porta.
• Chiudere e bloccare le porte per evitare eventuali danni provocati dal vento.
• E vitare di rimanere in piedi sul tetto.
• Il magazzino non è stato progettato per fungere da abitazione.
MANUTENZIONE E SICUREZZA
• Em caso de incêndio, não t ente apagar material de polipropileno em combustão com água | Não deve ser utilizado para guardar
substâncias inflamáveis ou corrosivas
• Éde extrema importância que monte todas as partes de acordo com as instruções. N ão omita nenhum passo.
• Contacte as autoridades locais se for necessária alguma licença para montar o abrigo de jardim.
• Verifique periodicamente o abrigo de jardim para certificar-se que o mesmo se encontra estável e nivelado no local.
• Recomenda-se vivamente que fixe o abrigo a um objecto inamovível ou ao chão, efectuando orifícios no fundo do mesmo, nos locais previamente
marcados e inserindo os parafusos adequados no chão (tamanho: 1.9-3 polegadas, parafusos não incluídos).
• Utilize sempre óculos de protecção e siga as instruções do fabricante quando utilizar ferramentas eléctricas.
• Lave o abrigo de jardim com água ou com um detergente suave. S e utilizar uma escova dura ou um detergente abrasivo poderá danificar o abrigo de jardim.
• Elementos quentes, tais como grelhas acabadas de utilizar, maçaricos, etc. não devem ser guardados no abrigo de jardim.
• Artigos pesados não devem ser encostados ao abrigo de jardim, na medida em que podem provocar empenos da estrutura.
• Não deixe acumular neve ou folhas sobre o telhado do abrigo de jardim. G randes quantidades de neve sobre o telhado podem danificar o abrigo de
jardim e impedir uma utilização segura do mesmo.
• Embora a direcção do vento varie, é um factor importante que deve ter conta no momento de posicionar o abrigo. P ortanto, recomenda-se que
reduza a exposição do abrigo ao vento em geral e em particular do lado da porta.
• Mantenha as portas fechadas e trancadas para evitar danos provocados pelo vento.
• Não se coloque em cima do telhado do abrigo de jardim.
• Oabrigo de jardim não foi concebido para ser uma habitação.
24