1
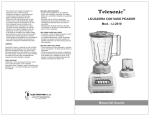
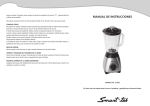
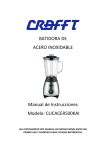
DESCRIPCIÓN DE LAS PARTES
MANUAL DE INSTRUCCIONES
LICUADORA CON PICATODO
ED-1193
ESTIMADO CLIENTE
Felicitaciones por su compra!
Por favor lea cuidadosamente este manual, y guárdelo para su futura referencia.
Si necesita soporte adicional, no dude en escribir a: [email protected]
Pagina 1
IMPORTANTE
NOTA: Si la jarra está llena, no la saque sin su base.
Antes de enchufar la licuadora verifique lo siguiente:
•
•
•
•
•
•
•
•
Que la licuadora esté completamente armada.
Que el selector de velocidad esté en la posición “OFF”.
Que el voltaje indicado en la base de la licuadora corresponda con el de su red domiciliaria.
No use la licuadora sin la jarra correctamente instalada.
Mantenga la licuadora lejos del alcance de los niños.
Cuando el motor esté funcionando:
- No coloque ni quite la jarra.
- No introduzca objetos en la jarra.
- No meta las manos dentro de la jarra.
Desenchufe la licuadora después de usarla.
DESCRIPCIÓN DE LA LICUADORA (Fig. 1)
A. Tapa central. Sirve para añadir ingredientes líquidos (por ejemplo aceite para preparar
mayonesa, etc.) colocándola volcada. El líquido fluirá a través del orificio.
B. Orificio central de la tapa. Sirve para añadir ingredientes mientras el motor está funcionando (por
ejemplo cubitos de hielo). Quite la tapa central girándola en sentido contrario a las manecillas del
reloj.
C. Tapa. Antes de usar la licuadora, asegúrese que la tapa esté bien asegurada (gire la tapa en
sentido horario).
D. Jarra. Luego de usar la licuadora, quite la jarra (junto con la base).
SELECTOR DE VELOCIDAD (Fig. 6)
Elija la velocidad adecuada para el licuado presionando uno de los botones del selector de velocidad.
•
•
Los botones de la izquierda son para menor velocidad y los de la derecha para mayor velocidad.
Para licuar un poco más, presione el botón PULSE.
VELOCIDADES RECOMENDADAS
MINIMUM: Para bebidas calientes (máximo 80º C)
MEDIUM: Para líquidos o ingredientes no sólidos como batidos de leche, masa para panqueques
(mantequilla suave), omeletes, etc.
MAXIMUM: Para moler carne y alimentos sólidos como queso, nueces, porotos y cobitos de hielo.
PULSE: Para ingredientes que necesitan varias licuadas sucesivas o para licuados rápidos a máxima
velocidad. Presione el botón PULSE y suéltelo para detener el licuado.
•
•
•
•
•
•
•
E. Sello hermético.
La tapa debe estar colocada en la jarra siempre que esté usando la licuadora.
Para obtener buenos resultados, no llene la jarra con más de 1500 ml. (Fig. 5).
Puede que necesite detener la licuadora de tiempo en tiempo para quitar los restos que se adhieren
a las paredes de la jarra. Use una espátula.
Antes de colocar carne u otros ingredientes sólidos, córtelos en pequeños pedazos.
Para obtener mejores resultados con ingredientes duros, coloque poca cantidad en la jarra en lugar
de llenarla.
No licue más de un cubito de hielo a la vez.
Si tarda mucho en licuar, apague la licuadora y presione unas cuantas veces el botón PULSE,
mueva los ingredientes con una espátula (no durante el licuado) o reduzca la cantidad de
ingredientes.
F. Base de la jarra / Cuchillas.
LIMPIEZA
G. Cubierta del motor.
Quite la jarra y su base después de cada uso. Lávela en agua jabonosa y enjuáguela con agua limpia.
No use un lavaplatos automático. Limpie la cubierta del motor con un paño húmedo. La limpieza de la
licuadora es más sencilla cuando la realiza inmediatamente después de usarla.
H. Selector de velocidad.
I. Cable de energía.
MONTAJE
•
•
•
Coloque la tapa haciéndola girar en sentido horario sobre la jarra hasta que esta quede asegurada.
Coloque el sello hermético en la base de la jarra (Fig. 2).
Asegure la base de la jarra girándola en sentido horario (Fig. 3).
Coloque la jarra y montada a la base en la cubierta del motor. Gire la base de la jarra en sentido
horario hasta que quede asegurada. (Fig. 4).
Pagina 2
PICATODO (Cuchillas 2 y 3)
IMPORTANTE: No haga funcionar la licuadora con el picatodo vacío. No coloque líquidos en el
recipiente.
•
Sirve para moler granos de café, nueces o chocolate a cualquier punto, preparar biscochos. El
picatodo molerá los ingredientes en pequeños pedazos.
Pagina 3
USO DEL PICATODO
•
•
•
Coloque los ingredientes en el recipiente. Puede colocar pan tostado o chocolate para lograr
pequeños pedazos. No llene el recipiente a más de 2/3 de su capacidad.
Asegúrese que la tapa esté bien asegurada antes de encender la licuadora.
Dependiendo del grado de fineza que desee obtener haga funcionar el picatodo entre 15 y 20
segundos.
RALLADOR (Cuchilla 3)
IMPORTANTE: No haga funcionar la licuadora con el picatodo vacío. No coloque líquidos en el
recipiente.
•
Puede rayar quesos parmesanos y similares en cualquier espesor en tan sólo unos segundos, pero
no puede rayar quesos cremosos.
•
Corte el queso en pequeños pedazos y colóquelos en el recipiente. No llene el recipiente a más de
2/3 de su capacidad.
•
Vuelva a colocar la tapa y asegúrese que esté bien asegurada antes de encender la licuadora. Licue
durante 10 segundos. El grado de fineza depende del tiempo que haga funcionar la licuadora.
Pagina 4
To Protection Your Applianccs,operate 1 min ON,5 mins OFF
INSTRUCTION MANUAL
BLENDER
WITH EXTRA GRINDER
ED-1193
DEAR CUSTOMER
Congratulations for your purchase!
Please read this manual carefully, and keep it for future reference.
If you need extra support, please write to [email protected]
Page 1
IMPORTANT
•
•
•
•
•
Before connecting to the mains. Make sure that;
o The blender is completely mounted;
o The speed selector is on” off” ;
o The voltage specified at the bottom; side corresponds to the mains voltage;
Never put the blender to work without the jar mounted;
Keep the blender away from children;
When the motor is running
o do not place nor remove the jar.
o do not insert objects into the jar.
o do not put your hand into the jar.
Always remove the plug from the socket after use.
GENERAL DESCRIPTION(FIG. 1)
J. Stopper. Liquid ingredients( e.g. oil for the preparation of mayonnaise) can be added through the
small aperture in the stopper when placed upsid down(fig.1)
K. Opening in the lid. This opening can be used for adding ingredients when the motor is
running(e.g.ice cubes) unlock the stopper by turning it anti-clockwise.
L. Lid. Always place the lid securely before use (turn the lid clockwise until locked).
M. Jar. Always remove the filled jar(together with the jar holderl) from the blender base after use.
N. Sealing ring.
O. Jar holder/ blade unit.
P. Motor housing.
Q. Speed selector.
R. Mains cord.
ASSEMBLING
•
•
•
•
Put the sealing ring in the jar holder (fig.2).
Mount the jar holder by turning the jar clockwise until locked (fig.3).
Put the jar holder with mounted jar on the motor housing. Turn the jar holder clockwise until locked
(fig.4) NOTE: Do not dis-mount the filled jar without jar holder.
Place the lid onto the jar by turning it clockwise until locked.
Speed selection(fig.6)
Select the appropriate blending speed by sliding the control knob from “off”.
• To the right for minimum. Medium and maximum speed successively.
• To the left for very short(repetitive)operation(PULSE).
Suggested speeds:
• “minimum” is for hot drinks(max.80!C).
• “medium” is for liquids and for the preparation of non-solid ingredients such as for milkshakes.pancakes (light batter).omelettes.
• “maximum”is for meat and solid food such as cheese.coconut. beans. Nuts and icecubes.
• “pulse” is for ingredients which require repetitive on/off switching. Or only very short blending at
maximum speed. Slide the knob to the left to switch the blender on release the knob to switch it off
automatically.
Page 2
•
•
•
•
•
•
•
Always have the lid on the jar when blending.
For good results do not fill beyond 1500ml (fig.5).
It may be necessary to interrupt the blending form time to time and remove particles sticking onto the
jar. Use a soft spatula for this purpose.
Cut meat or other solid food into small pieces before putting them into the blender jar.
For good results with hard ingredients. Feed a series of small portions into the jar rather than putting
one large quantity into it .
Blend only one ice cube at a time.
If the blending is not performed quickly. Switch off the appliance and switch a few times to “pulse”.
Or stir the ingredients with a spatula (not while blending!) or reduce the contents of the jar.
CLEANING
Disassemble the jar and the jar holder after each use. Wash them in soapy water. Then rinse them with
clean water. Do not wash them in a dish-washer. You can clean the motor housing with a humid cloth.
Cleaning is easiest when done immediately after use.
THE MILL ATTACHMENT(BLENDER 2.3)
Important: never run empty.never place liquids in the bowl.
-will mill coffee beans. Nuts chocolate to any degree of fineness. Make bread. Bis-cuit and cornflake
crumbs. It will not chop any item into bite sized pieces.
To use the mill attachment:
-place ingredients in the bowl. Bread. Toast or chocolate should be broken into smallish pieces. Do not
fill beyond 2/3 of capacity.
-Make sure that the twist lock lid is properly secured before switching on.
-Depending on the degree of fineness of the ground coffee which is required. The mixer should be
swithched on from 15 to 20 seconds.
THE GRATER ATTACHEMENT ( BLENDER 3)
Important: never run empty. Never place liquids in the bowl
• Parmesan and other cheeses (except cream varieties) can be finely or coarsely grated with in a few
seconds.
To use the grater attachment.
• Cut the cheese into small pieces and place in the bowl. Do not fill beyond 2/3 of capacity.
• Replace the cover. Make sure that the twist lock lid is properly secured before switching on and turn
on the grater for about 10 seconds. The fineness of the grated cheese depends on the length of time
the machine is run.
SAFETY NOTE
•
•
•
•
•
Read instruction manual before use!
Household use only.
Must put liquids, fruits before switch ON.
Operate the appliance 1 mins on, 5 mins off,
if the unit overheat, let it cool down for 5 mins
Page 3