1
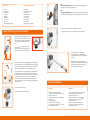
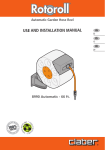
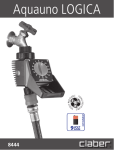
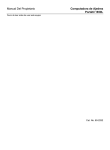
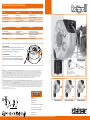
®
TROUBLESHOOTING / RESOLUCION DE PROBLEMAS
PROBLEM
PROBABLE CAUSE
REMEDY
No watering operation
Faucet connection leaks
Hose not rewinding uniformly
Hose not retracting
Water turned off
Loose connection
Spring action blocked
Hose pulled out completely
Turn water on at faucet
Tighten hose connection
Pull hose out completely and walk back into unit
See image below
PROBLEMA
CAUSA PROBABLE
RESOLUCION
No se produce el riego
Fugas en la conexión al grifo
El tubo no se enrolla uniformemiente
Paso del agua cerrado
Conexión floja
El resorte está bloqueado
El tubo no se enrolla
El tubo está completamiente desenrollado
Abra el paso del agua en el grifo
Apriete la conexión de la manguera
Extraiga el tubo completamiente y
acompañelo hasta el top
Vea la imagen más abajo
HOSE NOT RETRACTING:
This happens when the entire length of the hose is pulled from unit, which
effects the spring action. To solve the problem, lay unit on the ground with
lead hose facing up, slightly pull hose and release slowly.
EL TUBO NO SE ENROLLA:
Este occurre cuando el tubo está completamiente desenrollado, el que
daña la acción del resorte. Para solucionar el problema, ponga el Rotoroll
en el suelo, con el tubo hacia arriba, extraigalo y enrollelo acompañándolo.
If the hose ever slips out of your grip, the
“SOFT BLOCK” safety system automatically
locks to prevent it rewinding.
WARRANTY
Claber thanks you for your purchase. Please read the instructions contained in this booklet thoroughly before you start to use. Each section contains essential instructions on how to install or operate correctly. Warranty: The appliance is
guaranteed for a period of two years from the date shown on the invoice, receipt or VAT receipt issued at the time of purchase. The warranty becomes null and void in the event of unauthorized tampering with the product, or if no proof of
purchase can be presented. Declaration of conformity: Claber hereby declares under its full responsibility that this appliance conforms to the following standards and associated documentation UE: UNI EN ISO 12100-1. UNI EN ISO 12100-2.
UNI EN 294 as required by directive 98/37/CE. Terms of the warranty: Claber hereby guarantees this product to be free from defects in materials or manufacture. For a period of two years from the date of delivery to the end user, Claber shall
repair or replace free of charge any parts recognized as defective provided the product has been used under normal operating conditions, has been correctly maintained, and has not been tampered with or otherwise modified.
Claber declines all responsibility for damage or injury deriving from use or installation that fails to comply with the requirements of these installation and operation instructions, or deriving from use in conjunction with other products not
manufactured by Claber. All goods travel at the risk and expense of the owner. For technical assistance or customer service support please contact Claber Inc., 191 Stanley Street, Elk Grove Village, IL 60007. Toll: 800-930-4566.
Email: [email protected]. All aspects of the contract of sale not covered by these terms are governed by the general conditions of sale available on the website www.claberinc.com. Made in Italy.
Si el tubo se le escapa de la mano
involuntariamente, el sistema de securidad
“SOFT BLOCK” lo bloquea de forma automática.
GARANTIA
Le agradecemos la confianza que ha depositado en Claber comprando Rotoroll. Le aconsejamos que lea atentamente este manual de instrucciones antes de utilizar el aparato: encontrará las indicaciones necesarias para realizar correctamente
cualquier operación. Garantía: el aparato está garantizado por dos años a partir de la fecha de compra, certificada por una factura, un recibo o un tique, emitidos al efectuar la compra. La garantía pierde su validez en caso de manipulación del
aparato o si no es posible presentar el justificante de la fecha de compra. Declaración de conformidad: asumiendo la plena responsabilidad, declaramos que el producto es conforme con la norma UE: UNI EN ISO 12100-1. UNI EN ISO 12100-2.
UNI EN 294, según las prescripciones de la Directiva 98/37/CE. Condiciones de garantía: Claber garantiza que el producto no presenta defectos ni en los materiales ni de fabricación. Durante dos años desde la fecha de entrega al cliente, Claber
reparará o sostituirálas piezas defectuosas sin cargo alguno siempre que el producto haya sido utilizado correctamente, no haya sido manipulado o modificado y haya recibido mantenimiento adecuado. Claber no es responsable de los daños
ocasionados por un uso o instalación no conformes con las normas y prescripciones de instalación e uso. Tampoco es responsable de productos no fabricados por Claber que se hayan combinado con los suyos. El producto viaja por cuenta y
riesgo del cliente. Para asistencia técnica, información y reclamaciones, contacte Claber Inc, 191 Stanley Street, Elk Grove Village, IL 60007. Número gratuito: 800-930-4566. Correo electrónico: [email protected]. Para cualquier otro aspecto,
vigen las condiciones generales de venta en www.claberinc.com. Fabricado en Italia.
2.5 ft
CLABER INC.
191 Stanley Street
ELK GROVE VILLAGE
IL 60007 - USA
Ph. 847/364.4566 - Fax 847/364.4588
Customer Service / Servicio clientes:
Toll / Número gratuito 800-930-4566
[email protected]
www.claberinc.com
8986
8988
8990
ROTOROLL MANUAL 33 ft
ROTOROLL AUTOMATIC 33 ft
ROTOROLL AUTOMATIC 66 ft
Parts supplied:
Componentes suministrados de serie:
- Hose reel
- Hose reel support
- Metal axle pin
- 4 Fixing screws
- 4 Wall plugs
- 6.6 ft Extension
- Tap union ø 3/4”
- Spray nozzle
- Handle and plug (Only for 8986)
- Portamangueras
- Soporte del portamangueras
- Perno metálico
- n° 4 Tornillos de fijación
- n° 4 Tacos de pared
- 6.6 ft Extensión
- Toma del grifo ø 3/4”
- Lanza regulable
- Manivela y tapón (sólo por 8986)
ASSEMBLY INSTRUCTIONS / INSTRUCCIONES DE MONTAJE
1
Ø 3/4”
20-27 mm
NOTE:
Only for 8986 ROTOROLL MANUAL 33ft. On the left side of Rotoroll housing, line up handle with
axle pin guides, then screw plug into handle to tighten it.
4
NOTA:
Sólo por 8986 ROTOROLL MANUAL 33ft. Introduzca la manivela en el correspondiente alojamiento
a la izquierda, comprobando que quede bien colocada en las guías del perno, y enroque el tapón.
Twist faucet connector onto faucet, then snap in lead hose into connector.
5
Conecte el portamangueras al grifo con el correspondiente tubo dotado de empalmes.
When choosing a location for installation, the unit should
be placed at no more than 2 ft from water tap connection,
and at a height of 2.5 ft from the ground. Make sure that
no obstacles near the unit will block the 180° swivel
action.
Elija la posición del portamangueras de manera que
quede el espacio suficiente para girar 180°, que esté a
menos de 2 ft de una toma de agua, y a 2.5 ft del suelo.
2.5 ft
6
2 ft
2
Ø 0.4 inches
90°
3
Extraiga el tubo hasta obtener la longitud deseada.
Para bloquearlo en la posición deseada, suelte rápidamente
el tubo. Para desbloquearlo, ejerza una ligera tracción.
Enrolle el tubo acompañándolo hasta el top.
Cut out the template from top of packaging and tightly secure it horizontally at the
chosen installation point. Use a 13/32” drill bit, drill 4 holes into wall as in template.
Fit in the 4 wall plugs. Secure wall mount to the wall using the 4 screws provided.
Slide axle pin into the hole of support, making sure plastic plug is facing up.
Recorte la plantilla impresa en la parte superior del envase y colóquela de manera
que quede perfectamente horizontal en el punto deseado. Con un taladro y una
broca de 10 mm (0.4 inches), realice cuatro orificios en la pared, coincidiendo con
los orificios de la plantilla, y ponga los tacos. Con los cuatro tornillos dotados
de serie, fije el soporte del portamangueras a la pared e introduzca el perno
métalico en el corispondiente orificio, controlando que el tapón de plástico quede
orientado hacia arriba.
Place hose reel over the metal axle pin.
Introduzca el portamangueras en el perno metálico
Snap in nozzle, pull hose out to required length.
To lock hose quickly pull to activate locking feature.
To unlock/rewind use a short tug on hose, then walk hose
back into unit.
PRECAUTIONS / ADVERTENCIAS
PRECAUTIONS:
ADVERTENCIAS:
- Take indoors during freezing temperatures
- Keep the water tap closed when Rotoroll® is not in use
- Rewind hose when not in use
- In regular intervals, clean hose with damp cloth while
retracting into unit
- Watch out for sharp objects
- Never remove hose union or hose clamp
- Do not attempt repair. Refer Rotoroll® to an authorized
Claber® Service Centre for repair
- Guárde en un lugar resguardado durante la estación del frío
- Cierre sempre el grifo cuando no utilice Rotoroll®
- Enrolla el tubo cuando non en uso
- Limpie periódicamente el tubo con un paño húmedo
- Controle que no haya objectos puntiagudos o afilados
que puedan dañar el tubo
- No quite nunca el empalme y el bloqueo del tubo
- No sustituya nunca el tubo: para hacerlo, diríjase a un
Centro de Asistencia Claber®