1
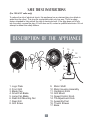
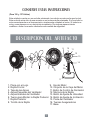
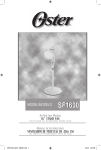
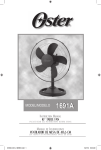
60º
1693
Instruction Manual
TABLE FAN WITH OSCILLATION
PLEA S E R E A D A L L I N S T RU C T I O N S B E F O R E U S I N G
Manual de Instruccione s
VENTILADOR DE MESA CON OSCILACION
LEA TO D A S L A S I N S T RU CC I O N E S A N T E S D E U S A R
IMPORTANT SAFEGUARDS
When using electrical appliances, basic safety precautions should always be followed to
reduce the risk of fire, electric shock, and injury to persons, including the following:
READ ALL INSTRUCTIONS BEFORE USING THE APPLIANCE.
• Use fan only for purposes described in the instruction manual
• To protect against electrical shock do not immerse unit, plug or cord in water or spray
with liquids. Plug the appliance directly into an electrical outlet of the same voltage
as that of the rating plate in the unit
• Close supervision is necessary when any appliance is used by or near children
• Unplug from outlet when not in use, when moving fan from one location to another,
before putting on or taking off parts and before cleaning
• Avoid contact with moving parts
• DO NOT operate in the presence of explosives and/or flammable fumes
• To avoid fire hazard, NEVER place the cord under rugs or any parts near an open
flame, cooking or other heating appliance
• DO NOT operate any appliance with a damaged cord or plug or after the appliance
malfunctions or has been damaged in any manner. Return this appliance only to the
nearest Authorized Oster® Service Center for examination, repair or adjustment
• The use of attachments not recommended or sold by the appliance manufacturer may
cause hazards
• DO NOT let the cord hang over the edge of a table, counter or come in contact with hot
surfaces or leave exposed to high traffic areas
• DO NOT use outdoors
• To disconnect, grip plug and pull from wall outlet. NEVER yank on cord
• Always use on a dry, level surface
• DO NOT operate fan until fully assembled with all parts properly in place
• This product is intended for household use ONLY and not for commercial or industrial
applications
• WARNING: To reduce the risk of electrical shock and injury to persons, DO NOT use in
window
• WARNING: To reduce the risk of fire or electric shock, DO NOT use this fan with any
solid-state speed control device
1
SAVE THESE INSTRUCTIONS
(For 120 & 127 volts only)
To reduce the risk of electrical shock, this appliance has a polarized plug (one blade is
wider than the other). This plug fits a polarized outlet only one way. This is a safety
feature intended to help reduce the risk of electrical shock. If the plug does not fit fully
into the outlet, reverse the plug. If it still does not fit, contact a qualified electrician. Do not
attempt to defeat this safety feature.
DESCRIPTION OF THE APPLIANCE
9
10
11
12
13
14
60º
6
3
1
4
2
15
7
5
16
8
17
1. Logo Plate
2. Front Grill
3. Blade Cap
4. Small Fan Blade
5. Large Fan Blade
6. Rear Grill Mounting Nut
7. Rear Grill
8. Grill Screw
9. Motor Shaft
10. Motor Housing Assembly
11. Oscillation Knob
12. Grill Mount
13. Speed Control Knob
14. Tilt Adjustment Knob
15. Assembly Post
16. Thumb Screws
17. Base
2
INSTRUCTIONS FOR USE
BEFORE USING FOR THE FIRST TIME
Read and follow all the instructions for this section on use and care and find a place to
keep this instruction manual ready for future reference.
For your convenience, record the complete model number (located at the bottom of the
motor) and the date you received the product, together with your purchase receipt and
attach to the warranty and service information. Retain in the event that the warranty
service is required.
NOTE: The use of attachments not recommended or sold by Sunbeam Products, Inc.
may cause fire, electrical shock, injury or damage to the product.
ASSEMBLY INSTRUCTIONS
Carefully unpack contents from carton.
1. Place Base on a dry, level surface.
2. Slide Motor Housing Assembly post onto Base and secure with Thumb Screws.
3. Position the Rear Grill over the Motor Shaft, making certain the 2 notches at the top
and bottom of the Rear Grill fit over the 2 prongs on the Motor Housing. Secure the
Rear Grill in place with the Rear Grill Mounting Nut. Turn Mounting Nut clockwise and
tighten firmly.
4. Position the Large Fan Blade, with hollowed interior of the Blade facing towards the
Rear Grill, firmly onto the Motor Shaft. Align the Motor Shaft pin with the recessed
groove in the back of the Fan Blade. Be sure the Shaft protrudes from the front of
the Blade.
5. Position the Small Fan Blade, with guide pins into the hollowed interior of the Large
Blade, and press firmly into place. Also be sure the Shaft protrudes from the front of
the Blade.
6. Secure the Fan Blade onto the Motor Shaft by turning the Blade Cap counterclockwise and tighten firmly.
7. Center the Front Grill by aligning the Oster® logo horizontally and parallel to the floor,
and then place into the Rear Grill. Snap the Front and Rear Grills completely together.
Tighten the Grill Screw at the bottom of the Rear Grill. Depending on the tension of the
Grill Screw, you may have to loosen it before securing the front grill. (NOTE: If Logo
Plate is not already assembled to Front Grill, you must attach it by aligning the slots
located on the back side of the Logo Plate with the notches in the grill center. Press
firmly into place.)
3
OPERATING INSTRUCTIONS
1. Set fan on a dry, level surface.
2. Plug cord into electric outlet. Please make sure the Speed Control Knob is in the off
position (O).
3. The speed is adjusted by turning the Control Knob to the desired setting, O-III-II-I.
4. The Oscillation Control Knob (
) is located on the top of the Fan Motor Housing.
To start oscillation, push Control Knob down. To stop oscillation, pull Control Knob up.
ADJUSTMENT INSTRUCTIONS
Fan Head Tilt Adjustment
1. To change the tilting angle of the Fan Head, simply loosen the Tilt-Adjustment Knob.
2. Move the Fan Head to the desired angle and firmly tighten the Tilt-Adjustment Knob to
lock into place.
MAINTENANCE AND CLEANING
Follow these instructions to correctly and safely care for your table fan. Please
remember:
• Always unplug the fan before cleaning or disassembling
• Do not allow water to drip on or into the Fan Motor Housing
• Do not use any of the following as a cleaner: gasoline, thinner, benzene
(See instructions for fan head assembly)
1. To access the Fan Blade, remove the Front Grill and the Fan Blade Nut.
2. Clean the Fan Blade, both Front and Rear Grills with a soft cloth moistened with a mild
soap solution.
3. Replace Blade, tighten the Fan Blade Nut, and securely fasten the Front Grill.
FAN HEAD AND BASE CLEANING
Using a soft, moist cloth, with or without a mild soap solution, carefully clean the Fan
Base and Head. Please use caution around the Motor Housing area. Do not allow the
motor or other electrical components to be exposed to water.
FAN STORAGE
When storing your fan in the off season, it is important to keep it in a safe dry location. It
is important to protect the fan head from dust. WE STRONGLY RECOMMEND USING
THE ORIGINAL BOX FROM PURCHASE.
4
1 – YEAR LIMITED WARRANTY
Sunbeam Products, Inc. (“Sunbeam”) doing business as Jarden Consumer Solutions
warrants that for a period of ONE year from the date of purchase, this product will be free
from defects in material and workmanship. Sunbeam, at its option, will repair or replace
this product or any component of the product found to be defective during the warranty
period. Replacement will be made with a new or remanufactured product or component.
If the product is no longer available, replacement may be made with a similar product of
equal or greater value. This is your exclusive warranty.
This warranty is valid for the original retail purchaser from the date of initial retail
purchase and is not transferable. Keep the original sales receipt. Proof of purchase is
required to obtain warranty performance. Oster® dealers, service centers, or retail stores
selling Oster® products do not have the right to alter, modify or in any way change the
terms and conditions of this warranty.
This warranty does not cover normal wear of parts or damage resulting from any of the
following: negligent use or misuse of the product, use on improper voltage or current, use
contrary to the operating instructions, disassembly, repair or alteration by anyone other
than an Oster® Authorized Service Center. Further, the warranty does not cover: Acts of
God, such as fire, flood, hurricanes and tornadoes.
Sunbeam shall not be liable for any incidental or consequential damages caused by the
breach of any express, implied or statutory warranty or condition. Except to the extent
prohibited by applicable law, any implied warranty or condition of merchantability or
fitness for a particular purpose is limited in duration to the duration of the above warranty.
How To Obtain Warranty Service: Please see the country specific warranty insert or
contact your local authorized distributor.
PLEASE DO NOT RETURN THIS PRODUCT TO THE PLACE OF PURCHASE
5
PRECAUCIONES IMPORTANTES
Para reducir el riesgo de incendio, descarga eléctrica o daños personales, siempre se
deben seguir precauciones de seguridad cuando se utiliza cualquier artefacto eléctrico,
incluyendo las siguientes:
LEA TODAS LAS INSTRUCCIONES ANTES DE UTILIZAR SU VENTILADOR DE MESA
• Utilice este Ventilador de Mesa sólo para los propósitos descritos en este manual
• Para protegerse de descargas eléctricas, no sumerja la unidad, enchufe o cordón en
agua ni rocíe con ningún líquido, y enchúfela en un tomacorriente del mismo voltaje que
el que está indicado en la placa de características eléctricas del artefacto
• Es necesaria una supervisión cercana cada vez que un artefacto eléctrico es utilizado
por niños o cerca de ellos
• Desenchufe el cable del tomacorriente cuando no esté utilizando su Ventilador de
Mesa, cuando lo mueva de un lugar a otro, antes de colocarle o retirarle piezas o antes
de limpiarlo
• Evite el contacto con piezas en movimiento
• NO opere en presencia de explosivos y/o gases inflamables
• Para evitar el riesgo de incendios, NUNCA coloque el cable debajo de alfombras o
ninguna de las partes cerca de una llama, cocina o cualquier otro artefacto que se
caliente
• NO opere ningún artefacto con un cordón o enchufe dañados, después de que el
artefacto haya fallado o si se cae al suelo o se daña de cualquier otra manera. Regrese
el artefacto al Centro de Servicio Oster® Autorizado más cercano para examinarlo,
repararlo o para ajustarlo mecánica o eléctricamente
• El uso de accesorios no recomendados o vendidos por el fabricante podría llegar a ser
peligroso
• NO permita que el cable cuelgue del borde de la mesa o mostrador, ni lo deje expuesto
a áreas de alto tráfico
• NO utilice este artefacto al aire libre
• Para desconectarlo, tome el enchufe y retírelo del tomacorriente de la pared, NUNCA
hale el cable
• Utilice siempre su Ventilador de Mesa sobre una superficie seca y plana
• NO opere el ventilador hasta que se encuentre completamente armado con todas las
piezas en su lugar
• Este artefacto es SOLO para uso doméstico y no debe de utilizarse para ningún
propósito comercial o industrial
• ADVERTENCIA: Para reducir el riesgo de descarga eléctrica o daños físicos,
NO utilice este artefacto en una ventana
• ADVERTENCIA: Para reducir el riesgo de una descarga eléctrica, NO utilice este
ventilador con ningún control de velocidad en “estado sólido”
6
CONSERVE ESTAS INSTRUCCIONES
(Para 120 y 127 Voltios)
Este artefacto cuenta con un enchufe polarizado (una clavija es más ancha que la otra).
Este enchufe entra sólo de una manera en un tomacorriente polarizado. Si el enchufe no
entra correctamente en el tomacorriente, simplemente colóquelo al revés. Si todavía no
entra, comuníquese con un electricista competente. De ninguna manera intente
modificar o forzar la conexión diseñada como medida de seguridad.
DESCRIPCION DEL ARTEFACTO
9
10
11
12
13
14
60º
6
3
1
2
4
15
7
5
16
8
17
1. Placa con el Logo
2. Rejilla Frontal
3. Tapa de las Aspas
4. Aspas Pequeñas del Ventilador
5. Aspas Grandes del Ventilador
6. Tuerca para Montar la Rejilla Posterior
7. Rejilla Posterior
8. Tornillo de la Rejilla
7
9. Eje del Motor
10. Conjunto de la Caja del Motor
11. Botón de Control de Oscilación
12. Montura de la Rejilla
13. Botón de Ajuste de Velocidad
14. Botón de Ajuste de Inclinación
15. Poste del Ventilador
16. Tuercas Aseguradoras
17. Base
INSTRUCCIONES DE OPERACION
ANTES DE UTILIZAR SU VENTILADOR DE MESA POR PRIMERA VEZ
Lea y siga todas las instrucciones de operación y seleccione un lugar para conservar
este manual de instrucciones listo para referencia futura.
Para su conveniencia, escriba el número de modelo completo (ubicado en la parte
inferior del motor) y la fecha en que usted recibió el producto, junto con el recibo de
compra y préndalo en la información de servicio y garantía. Guárdelo en caso de que
sea necesario obtener servicio bajo garantía.
NOTA: El uso de dispositivos no recomendados o vendidos por Sunbeam Products, Inc.
podrían causar un incendio, descarga eléctrica, heridas o daños al producto.
INSTRUCCIONES DE ENSAMBLAJE
Retire cuidadosamente todo el contenido que se encuentra en la caja:
1. Coloque la Base sobre una superficie nivelada y seca.
2. Ajuste la Caja del Motor a la Base y al Poste y afírmela con las Tuercas
Aseguradoras.
3. Posicione la Rejilla Posterior sobre el Eje del Motor, asegúrese de que las 2 ranuras,
tanto la de arriba como la de debajo, de la Rejilla posterior encajen sobre las 2 puntas
de la Caja del Motor. Asegure la Rejilla Posterior en su lugar con la Tuerca para
Montar. Gire la Tuerca para Montar en la dirección de las agujas del reloj y apriete
firmemente.
4. Posicione el Aspa Grande del Ventilador con la parte hundida del interior del Aspa,
mirando hacia la Rejilla Posterior y afírmela en el Eje del Motor. Alinee la Varilla del
Eje del Motor con el hueco de engranaje en la parte posterior del Aspa del Ventilador.
Asegúrese de que la Varilla sobresalga de la parte frontal del Aspa.
5. Posicione el Aspa Pequeña del Ventilador con las puntas de guía en la parte hundida
del interior del Aspa Grande, presione firmemente en su lugar. También asegúrese de
que el Eje sobresalga del frente del Aspa.
6. Asegure el Aspa del Ventilador en la Caja del Motor girando la Tapa de las Aspas en
la dirección de las agujas del reloj y apriete firmemente.
7. Centre la Rejilla Frontal del Ventilador alineando el Logo de Oster® de manera
horizontal y paralelo al piso, luego coloque en la Rejilla Posterior. Apriete las Rejillas
Frontal y Posterior completamente juntas. Apriete el Tornillo de la Rejilla a la parte de
abajo de la Rejilla Posterior. Dependiendo de la tensión del Tornillo de la Rejilla, usted
quizás tendrá que soltarla antes de asegurarla con la Rejilla Frontal. (NOTA: Si la
Placa del Logo no estuviese aún ensamblada en la Rejilla Frontal usted deberá
asegurarla alineando los agujeros localizados en la parte posterior de la Placa del
Logo con las ranuras en el centro de la Rejilla. Presione firmemente en su lugar).
8
COMO OPERAR SU VENTILADOR DE MESA
1. Coloque el Ventilador en una superficie seca y nivelada
2. Enchufe el cable en un tomacorriente. Por favor asegúrese de que el Botón de Control
de Velocidad esté en la posición de apagado (O).
3. Las velocidades se ajustan girando el Botón de Control al ajuste deseado 0-III-II-I.
4. El Botón de Control de Oscilación (
) se encuentra localizado en el tope de la
Caja del Motor del Ventilador. Para comenzar la oscilación, presione el Botón de
Control hacia abajo. Para detener la oscilación, hale el Botón de Control hacia arriba.
COMO AJUSTAR SU VENTILADOR DE MESA
Control de Ajuste del Cabezal del Ventilador
1. Para cambiar el ángulo de ajuste del Cabezal del Ventilador, simplemente afloje el
Botón de Ajuste de Inclinación.
2. Mueva el Cabezal del Ventilador al ángulo deseado y apriete firmemente el Botón de
Ajuste de Inclinación para que quede ajustado en su lugar.
MANTENIMIENTO Y LIMPIEZA
Siga las siguientes instrucciones para un correcto y seguro cuidado de su Ventilador de
Mesa, por favor recuerde:
• Siempre desenchufe el Ventilador antes de limpiarlo o desarmarlo
• No permita que gotee agua en la Caja del Ventilador
• No utilice ninguno de los siguientes productos como limpiadores: gasolina, disolvente,
bencina
(Vea las instrucciones para ensamblar el Cabezal del Ventilador)
1. Para tener acceso a las Aspas del Ventilador, remueva la Rejilla Frontal y la Tuerca
para Montar las Aspas del Ventilador.
2. Asegúrese de utilizar una toalla suave y humectada con una solución de jabón
delicada
3. Vuelva a colocar en su lugar las Aspas, apriete la Tuerca para Montar y asegure
rápidamente la Rejilla Frontal.
LIMPIEZA DEL CABEZAL Y LA BASE
Utilizando una toalla suave y humectada, con o sin una solución de jabón delicada,
cuidadosamente limpie la Base y el Cabezal del Ventilador. Por favor tenga cuidado
alrededor del área de la Caja del Motor. No permita que el motor o cualquier otro
componente eléctrico estén expuestos al agua.
ALMACENAJE
Cuando desee guardar su Ventilador de Mesa es importante mantenerlo en un sitio
seguro y seco. Es importante proteger del polvo el Cabezal del Ventilador.
RECOMENDAMOS EN GRAN MANERA UTILIZAR LA CAJA ORIGINAL DEL
PRODUCTO.
9
GARANTIA LIMITADA DE 1 AÑO
Sunbeam Products, Inc. (“Sunbeam”), una empresa de Jarden Consumer Solutions
garantiza que este producto estará libre de defectos en material o mano de obra por
un periodo de un año a partir de la fecha de la compra. Sunbeam, a su elección,
reparará o reemplazará este producto o cualquier componente del producto que se
encuentre defectuoso durante el período de garantía. El reemplazo será efectuado por
un producto o componente nuevo o remanufacturado. Si el producto ya no está
disponible, el reemplazo podrá ser efectuado por un producto similar de igual o mayor
valor. Esta es su garantía exclusiva.
Esta garantía es válida para el comprador original al detalle desde la fecha de compra
original al detalle y no es transferible. Guarde el recibo de venta original. Se requiere
prueba de compra para obtener la garantía. Los concesionarios Oster®, Centros de
Servicio Oster® Autorizado, o almacenes de ventas al detalle de productos
Oster® no tienen el derecho de alterar, modificar o cambiar, de manera alguna, los
términos y condiciones de esta garantía.
Esta garantía no cubre el desgaste normal de las piezas o daños causados por: uso
negligente o mal uso del producto, uso en voltaje o corriente inapropiada, uso contrario
a las instrucciones de operación, desarme, reparación o alteración por cualquier
persona que no sea de un Centro de Servicio Oster® Autorizado. Además, esta
garantía no cubre: Actos de la naturaleza, tales como incendios, inundaciones,
huracanes o tornados.
Sunbeam no será responsable por ningún daño incidental o consecuente causado por
el incumplimiento de la garantía o condición expresa, implícita o reglamentaria.
Excepto hasta donde lo prohíben las leyes aplicables, cualquier garantía implícita o
condición de comerciabilidad o aptitud para un propósito particular, está limitada en
base a la duración de la garantía descrita arriba.
Cómo obtener Servicio de Garantía: Por favor consulte el inserto de la garantía
correspondiente al país o póngase en contacto con su distribuidor autorizado local.
NO REGRESE ESTE PRODUCTO AL LUGAR DE COMPRA
10
©2006 Sunbeam Products, Inc. doing business as Jarden Consumer Solutions. All rights
reserved. Distributed by Sunbeam Products, Inc. doing business as Jarden Consumer
Solutions, Boca Raton, Florida 33431.
©2006 Sunbeam Products, Inc., una empresa de Jarden Consumer Solutions. Todos los
derechos reservados. Distribuido por Sunbeam Products Inc., una empresa de Jarden
Consumer Solutions, Boca Raton, Fl 33431.
Printed in China
Impreso en China
P.N. 119382 / 9100010007296
00169305ESM1
CBA-021506