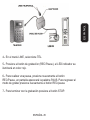
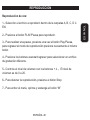
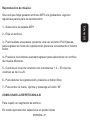
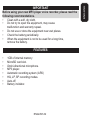
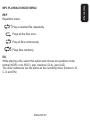
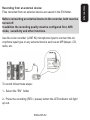
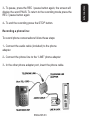
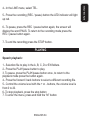
1
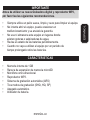
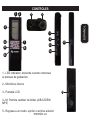
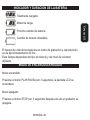
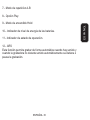
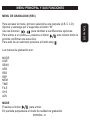
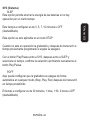
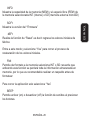
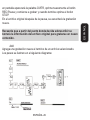
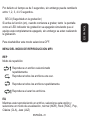
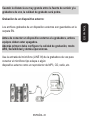
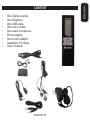
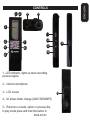
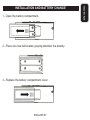
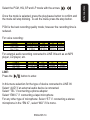
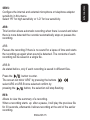
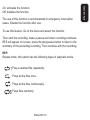
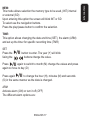
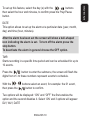
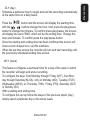
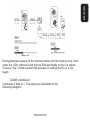
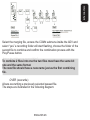
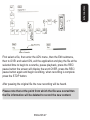
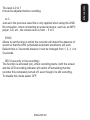
IMPORTANTE
•
•
•
•
•
Siempre utilice un paño suave, limpio y seco para limpiar el equipo.
No intente abrir el equipo, puede ocasionar un
malfuncionamiento y se anulará la garantía.
No use ni almacene este equipo en lugares donde
existan goteras o salpicaduras de agua.
Revise el estado de las baterías periódicamente.
Cuando no vaya a utilizar el equipo por un período de
tiempo prolongado retire las baterías.
CARACTERISTICAS
•
•
•
•
•
•
•
•
Memoria interna de 1GB
Ranura de expansión de memoria microSD
Micrófono omni-direccional.
Reproductor MP3.
Sistema de grabación automática (ARS)
Tres modos de grabación (SHQ, HQ, SP)
Apagado automático.
Indicador de batería.
ESPAÑOL-02
ESPAÑOL
Antes de
de utilizar
utilizar su
su nueva
nuevo Grabadora
Kit C
Antes
digital y reproductor MP3,
por favor lea las siguientes recomendaciones.
CONTENIDO
Una grabadora digital
Un audífono.
Un cable USB.
Un cable de línea telefónica.
Un micrófono de solapa.
Un adaptador telefónico.
Un convertidor de voltaje
Un manual de instrucciones.
ESPAÑOL-03
ESPAÑOL
•
•
•
•
•
•
•
•
CONTROLES
9
10
3
11
4
5
12
13
7
8
15
14
6
1.- LED indicador, enciende cuando comienza
el proceso de grabación.
2.- Micrófono interno
16
3.- Pantalla LCD
4.- M; Permite cambiar de folder (A/B/C/D/EN/
MP3)
5.- Regresa a un modo, opción o archivo anterior
ESPAÑOL-04
ESPAÑOL
1 2
6.- Play/Pausa
Botón para encender la grabadora, además este permite
reproducir un archivo o pausarlo, ya sea de música o
de grabación.
7.- Stop
Este botón le permite apagar la grabadora / detiene en modo de
reproducción.
8.- Avanza al siguiente modo, opción o archivo. En modo de
reproducción, si oprime y sostiene este botón Avanzará en
modo rápido.
9.- Entrada de audífonos.
10.- Entrada del micrófono de solapa y LINE IN
11.- REC/PAUSE
Oprima esta botón para comenzar a grabar, además permite pausar
mientras se esta grabando.
12.- Vol+
Incrementa el nivel de volumen.
ESPAÑOL-05
ESPAÑOL
En modo de reproducción, si oprime y sostiene este botón Regresará
en modo rápido.
14.- Hold
Deslice este botón hacia la derecha para activar la función Hold que
es el modo de seguridad para evitar que se presionen los botones del
equipo accidentalmente y cambie de opción mientras está en
funcionamiento.
Mueva hacia la izquierda para desactivarlo.
15.- Entrada USB
16.- Compartimiento de batería
ESPAÑOL-06
ESPAÑOL
13.- VolDisminuye el nivel de volumen.
INSTALACION Y CAMBIO DE BATERIA
ESPAÑOL
1.- Retire la tapa del compartimiento de baterías.
2.- Coloque dos baterías AAA, ponga atención a la polaridad.
3.- Coloque nuevamente la tapa del compartimiento.
ESPAÑOL-07
INDICADOR Y DURACION DE LA BATERIA
Mitad de carga.
Próximo cambio de batería.
Cambio de batería inmediato.
El tiempo de vida de las baterías en modo de grabación y reproducción
es de aproximadamente 20 hrs.
Este tiempo dependerá del tipo de batería y del nivel de volumen
utilizado.
MODO DE ENCENDIDO/APAGADO
Modo encendido:
Presione el botón PLAY/PAUSA por 3 segundos, la pantalla LCD se
encenderá
Modo apagado:
Presione el botón STOP por 3 segundos después de ello el grabador se
apagará.
ESPAÑOL-08
ESPAÑOL
Totalmente cargado.
PANTALLA LCD
1.- Carpetas A-D son
carpetas donde se
guardarán las
grabaciones de voz.
“EN” es la carpeta de
grabación de un equipo
externo conectado en
LINE IN, MP3 es la
carpeta con archivos
de musica en formato
MP3
2.- Tipo de memoria
interna (INT) o microSD
(SD)
ESPAÑOL
Características de la pantalla LCD:
1
2
3
12
4
5
6
7
8
11
3.- Número de archivo.
10
4.- Calidad de grabación.
9
5.- Hora
6.- Alarma
ESPAÑOL-09
7.- Modo de repetición A-B
9.- Modo de encendido Hold
10.- Indicador de nivel de energía de las baterías.
11.- Indicador de estado de operación.
12.- ARS
Esta función permite grabar de forma automática cuando hay sonido y
cuando la grabadora no detecta sonido automáticamente se detiene o
pausa la grabación.
ESPAÑOL-10
ESPAÑOL
8.- Opción Play
CONECTANDO A LA COMPUTADORA
2.- Inserte el cable USB en la entrada USB de la grabadora, el extremo
contrario conéctelo a un puerto USB disponible en la computadora.
3.- En pantalla de la grabadora aparecerá la palabra USB.
4.- Para Windows XP. La computadora detectará el nuevo equipo y
comenzará un proceso de actualización automática.
ESPAÑOL-11
ESPAÑOL
1.- Asegúrese de que la grabadora este apagada.
5.- Una vez que termine este proceso, aparecerá el mensaje de que el
equipo estará listo para usarse.
7.- Utilice el Explorador de Windows para realizar la transferencia de
archivos MP3, simplemente copie y pegue los archivos a la carpeta
“Music” de la grabadora.
8.- Para desconectar la grabadora de la computadora. E��������������
n la barra de
herramientas del escritorio seleccione el dispositivo USB con el botón
derecho del mouse “Quitar hardware con seguridad”.
9.- Posteriormente
����������������������������������������������������������
aparecerá una ventana seleccione Detener y
enseguida aparecerá una segunda ventana, seleccione el dispositivo
masivo USB y de click en Aceptar.
10.- Hasta que aparezca el siguiente mensaje, desconecte el cable
USB.
ESPAÑOL-12
ESPAÑOL
6.- El dispositivo aparecerá como Unidad extraíble y será identificado
con una letra (E, F ó G normalmente, pero podría aparecer otra).
MENU PRINCIPAL Y SUS FUNCIONES
Para accesar al menú, primero seleccione una carpeta (A,B, C ó D):
Oprima y sostenga por 2 segundos el botón “M”
Use los botones
para cambiar a las diferentes opciones.
Para entrar a un submenú presione el botón
este mismo botón le
permite confirmar una selección.
Para salir de un submenú presione el botón stop
Los menús de grabación son:
MODE
LINE
SENS
ARS
RES
REP
MEM
TIME
FILE
SYS
ADV
MODE
Presione el botón
para entrar.
En pantalla parpadeará el modo de calidad de grabación.
ESPAÑOL-13
ESPAÑOL
MENU DE GRABACION (REC)
Seleccione el modo PCM, HQ, SP ó LP con las flechas
Anteses
deelutilizar
su nuevo
Kit C de grabación, sin embargo se
PCM
mejor modo
de calidad
reduce el tiempo de grabación.
Para grabación de voz:
F O R M AT O
T A S A D E G R A B A C IO N
T IE M P O D E G R A B A C IO N
PCM (M ono)
44,1K H z/16bit
3,38hrs
HQ
64K bps
36,25hrs
SP
32K bps
72.5hrs
LP
16K bps
145hrs
Para grabación de audio externo conectado en LINE IN como un
reproductor MP3, reproductor CD, etc.
F O R M AT O
T A S A D E G R A B A C IO N
T IE M P O D E G R A B A C IO N
PCM
44,1K H z/16bit
1,41hrs
HQ
64K bps
17,5 hrs
SP
32K bps
23,20 h rs
LP
16K bps
36.35 h rs
LINE:
Presione el botón
para entrar.
En este menú podrá seleccionar el tipo de dispositivo conectado en
LINE IN
Si conecta un equipo de audio externo seleccione “AUD”
Si conecta el adaptador telefónico seleccione “TEL”
Si conecta el micrófono de solapa seleccione “EM IC”
Para otro tipo de micrófono:
Si el micrófono a conectar es stereo seleccione “ST”
ESPAÑOL-14
ESPAÑOL
Una vez que seleccionó el modo, oprima el botón Play/Pausa para
confirmar y el modo dejará de parpadear. Para salir del menú oprima el
botón Stop.
dentro de “EM IC”, si es monoaural seleccione “MO”
ARS
Esta función permite grabar de forma automática cuando hay sonido y
cuando la grabadora no detecta sonido automáticamente se detiene o
pausa la grabación.
ARS
Pausa la grabación si no hay sonido por un cierto tiempo y restablece
la grabación cuando detecta sonido. El contenido de cada grabación
estará en un solo archivo.
ARS B
Al igual que en el caso anterior, solo que cada grabación se guardará
en varios archivos.
Presione el botón
para entrar.
En pantalla parpadeará “ARS” con los botones
seleccione
ARS ó ARS B posteriormente confirme la selección con el botón
,
la selección dejará de parpadear
ESPAÑOL-15
ESPAÑOL
SENS
En este menú podrá configurar la sensibilidad del micrófono interno,
micrófono externo o el adaptador telefónico.
Seleccione “HI” para alta sensibilidad o “LO” para baja sensibilidad.
On: Permite activar la función.
Off: Desactiva la función.
Se recomienda usar esta función en casos de interrupción de
emergencia. Después de utilizar esta función desactive la función.
Para usar esta función. Entre al menú, active la función.
Posteriormente comience la grabación, realice una pausa y cuando
continúe la grabación en pantalla aparecerá la palabra RES, presione el
botón Play/Pausa para escuchar el resumen de la grabación
previamente hecha, posteriormente continúe con la grabación.
REP
Modo de repetición, en esta opción encontrará las siguientes formas de
repetir en modo de reproducción.
Reproduce un archivo seleccionado
repetidamente.
Reproduce todos los archivos una vez.
ESPAÑOL-16
ESPAÑOL
RES
Permite conocer el resumen de una grabación.
Cuando una grabación reinicia después de una pausa, reproducirá el
archivo previamente por 30 segundos después permitirá grabar en el
punto final de la grabación previa.
Reproduce todos los archivos repetidamente.
MEM
En este modo puede seleccionar el modo de memoria a utilizar, interna
(INT) o externa (SD)
Al entrar a esta opción parpadeará en pantalla INT o SD
para seleccionar use los botones de desplazamiento.
Para confirmar la selección presione el botón Play/Pausa.
TIME
En esta opción permite cambiar la fecha y hora (SET), la alarma (ARM)
y configurar el modo de programación por tiempo específico de
grabación (TMR)
SET
Presione el botón
parpadeará el año (Y)
Con los botones
para entrar.
cambie el valor.
Presione nuevamente
para cambiar a mes (M)
cambie los valores y presione nuevamente
para pasar a día (D)
Presione nuevamente
para cambiar la hora (H)
minutos (M) y segundos (S) de la misma forma como cambio la fecha.
ESPAÑOL-17
ESPAÑOL
Reproduce al azar los archivos.
AFt
Permite establecer que cada 15, 30, 45 ó 60 minutos se active la
alarma con duración de 1 minuto.
Simplemente entre a este submenú y cambie el valor con los botones
y para confirmar la selección oprima el botón Play/Pausa.
dLY
En esta opción podrá configurar que se active la alarma en una hora en
particular todos los días.
Presione el botón
para entrar a esta opción, en pantalla
parpadeará las horas, con los botones de desplazamiento cambie el
valor de la hora, presione nuevamente el botón Play/Pausa para
cambiar a los minutos y de igual forma cambie el valor con las flechas
de desplazamiento
, para confirmar y guardar la configuración
presione el botón Play/Pausa.
Para salir del submenú presione el botón Stop.
ESPAÑOL-18
ESPAÑOL
ARM
Permite activar la alarma (ON) o desactivarla (OFF)
Las diferentes opciones de alarma son:
Para configurarlo, seleccione el (los) día (s) con los botones
,
posteriormente seleccione la hora y minutos y para confirmar presione
el botón Play/Pausa
dATE
En esta opción le permitirá configurar la alarma en una fecha (año, mes,
día) y hora (hora, minutos) en particular.
Antes
de utilizar
su nuevo
C
Al termino
de configurar
laKit
alarma
en pantalla aparecerá un icono
en forma de campana indicando la activación de la alarma.
Cuando se active la alarma y desee apagarlo presione el botón
Stop
Para desactivar el estado de la alarma en general
seleccione la opción OFF dentrol del menú ARM
ESPAÑOL-19
ESPAÑOL
WLY
Aqui puede configurar la alarma en un tiempo en particular por ejemplo
si solo desea que suene a una hora el lunes seleccione MO y configuré
la hora, o Martes (TUE), Miércoles (Wed), Jueves (THU), Viernes (FRI),
Sábado (SAT), Domingo (SU) o de Lunes a Sábado (M-SA) o Lunes a
Viernes (M-F)
Presione el botón
para entrar al submenú,
en pantalla aparecerá los digitos del 01 al 10 parpadeando Estos
números representan los eventos a programar.
Con los botones
seleccione un evento, por ejemplo el evento
01, después vuelva a presionar el botón
para confirmar.
Posteriormente aparecerá 2 opciones “ON” y “OFF” la primera habilita
la opción y la segunda la deshabilita.
Seleccione “ON” y aparecerá 3 opciones: dLY, WLY, dATE
dLY (día)
Aqui podrá programar una hora en especial para que comience y
termine la grabación en forma automática diariamente a la misma hora.
Presione el botón
y en pantalla parpadeará la hora de inicio, con
los botones
cambie la hora,
después vuelva a oprimir el botón Play/Pausa para cambiar los minutos.
Presione Play/Pausa para confirmar, posteriormente aparecerá en
pantalla la palabra “END” que es la hora final. Cambie la hora y los
minutos. Para confirmar presione el botón Play/Pausa
ESPAÑOL-20
ESPAÑOL
tMR
Comienza la grabación en un periodo de tiempo especifíco, puede
programar hasta 10 eventos.
WLY (Semana)
En esta opción podrá configurar un día de la semana a una hora en
particular en que comenzará y terminará una grabación.
Puede configurar los dias: De Lunes a Viernes (M-F), de Lunes a
Sabado (M-SA), solo el Lunes (Mo), Martes (TUE), Miércoles (Wed),
Jueves (THU), Viernes (FRI), Sábado (SAT) ó Domingo (SU).
Con una hora inicial y una hora final.
Para configurar esta opción siga los pasos de la opción anterior (día)
solo que seleccione un día en particular o la semana completa.
dATE
En esta opción podrá configurar una fecha en particular del año, tanto
de incio como final, de esta forma comenzará la grabación y se
detendrá hasta la fecha final programada.
El formato de fecha es día (D), mes (M) y año (Y)
ESPAÑOL-21
ESPAÑOL
Una vez confirmada la hora de inicio y la hora final, en pantalla
aparecerá un icono en forma de reloj, salga del submenú. Cada que
llegue la hora programada se activará la grabadora y comenzará a
grabar hasta que termine el tiempo previamente programado.
Antes de utilizar su nuevo Kit C
Para los tres casos de configuración dLY, WLY y dATE
automáticamente iniciará la grabación y se detendrá hasta la
programación asignada.
En caso de tener la grabadora apagada, al llegar a la hora
programada automáticamente empezará la grabación y cuando
termine el tiempo programado se volverá a apagar.
Para deshabilitar la programación, en el submenú tMR seleccione
OFF de cada evento programado y confirme la selección con el
botón Play/Pausa.
FILE
En este submenú encontrará 3 opciones que son:
COPY
MOVE
ERS
COPY
Permite copiar un archivo de la memoria interna a la
memoria externa y viceversa.
Para copiar un archivo, primero introduzca una memoria MicroSD
Después seleccione el origen (INT o SD), posteriormente
ESPAÑOL-22
ESPAÑOL
El formato de la hora es Hora (H), Minuto (M), la fecha y hora es tanto
inicial como final.
Antes
de utilizar
su nuevo
C
Si
seleccionó
el origen
INTKit
entonces
copiará el archivo a la
memoria microSD y a la inversa.
MOVE
Permite mover un archivo de una memoria interna a una memoria
MicroSD y a la inversa.
A diferencia de la opción anterior aqui simula la función de cortar el
archivo y pegarlo en la memoria de destino.
Los pasos para mover son los mismos que en el caso anterior salvo
que en lugar de entrar al submenú COPY entre al submenú MOVE.
ERS
En esta opción podrá borra los archivos
Entre a esta opción y encontrará las opciones ONE y ALL en ONE
borrará el archivo seleccionado.
y en ALL borrará todos los archivos de una carpeta.
Seleccione ERS, después ONE o ALL y luego Yes para comenzar con
el proceso de borrado.
ESPAÑOL-23
ESPAÑOL
seleccione la carpeta donde se encuentre el archivo (A, B, C, D, EN ó
MP3) seleccione el archivo, después entre al submenú FILE, después
a la opción COPY y seleccione “YES” inmediatamente comenzará el
proceso de copiado.
Este tiempo a configurar es de 3, 5, 7, 10 minutos u OFF
(deshabilitado)
Esta opción es solo aplicable en el modo STOP
Cuando no este en operación la grabadorá y después de transcurrir el
tiempo previamente programado el equipo se apagará.
Con el botón Play/Pausa entre a SYS, despues entre a SLEP y
seleccione el tiempo, confirme la selección oprimiendo nuevamente el
botón Play/Pausa.
POFF
Aquí puede configurar que la grabadora se apague de forma
automática en cualquier modo (Stop, Play, Rec) después de transcurrir
un tiempo predefinido
El tiempo a configurar es de 30 minutos, 1 hora, 1:30, 2 horas u OFF
(deshabilitado)
ESPAÑOL-24
ESPAÑOL
SYS (Sistema)
SLEP
Esta opción permite ahorrar la energía de las baterías si no hay
operación por un cierto tiempo.
SOFt
Muestra la versión del “Firmware”
dEFt
Realiza la función de “Reset” es decir regresa los valores iniciales de
fabrica
Entre a este modo y seleccione “Yes” para correr el proceso de
restauración de los valores iniciales.
FMt
Permite dar formato a la memoria selecciona INT o SD recuerde que
activando esta función se perderá toda la información almacenada en
memoria, por lo que es recomendable realizar un respaldo antes de
formatear
Para correr la aplicación solo seleccione “Yes”
BEEP
Permite activar (on) o desactivar (off) la función de sonidos al presionar
los botones.
ESPAÑOL-25
ESPAÑOL
INFO
Muestra la capacidad de la memoria (MEM) y el espacio libre (REM) de
la memoria seleccionada INT (interna) o SD (memoria externa microSD)
Edit
Permite editar un archivo de grabación de las carpetas de grabación de
voz (A, B, C, D y EN)
Los submenús contenidos en esta opción son:
Cut (cortar)
Divide un archivo en 2.
Los pasos se ilustran en el siguiente diagrama:
ESPAÑOL-26
ESPAÑOL
AdV (Funciones avanzadas)
Permite al usuario configurar de forma avanzada una grabación de voz.
Los submenús contenidos son:
COMb (combina)
Combina 2 archivos en 1
Los pasos se ilustran en el siguiente diagrama:
Seleccione el archivo a combinar, entre al submenú COMb dentro de
AdV y elija “YES” Comenzará a parpadear una carpeta de grabación,
seleccione la carpeta del segundo archivo a combinar y confirme el
proceso de combinación con el botón Play/Pausa.
ESPAÑOL-27
ESPAÑOL
Durante la reproducción haga una pausa (en el momento donde desee
cortar el archivo), posteriormente entre al submenú ADV y luego a Edit y
finalmente a la opción Cut, seleccione “Yes” en ese momento
comenzará el proceso de cortar el archivo en 2.
El nuevo archivo debe de renombrase como el primer archivo a
combinar.
OVEr (sobrescribir)
Permite sobreescribir en un archivo previamente seleccionado a partir
de una pausa.
Los pasos se ilustran en el siguiente diagrama:
Primero seleccione un archivo, entre al menú AdV, luego al submenú
EdIt, después a OVEr y seleccione ON, salga de la aplicación y
reproduzca el archivo. En el tiempo seleccionado para empezar a
sobreescribir, pause la reproducción, oprima el botón REC/Pausa,
ESPAÑOL-28
ESPAÑOL
Antes
de utilizar2 su
nuevo en
Kituno,
C los dos archivos deben tener la
Para combinar
archivos
misma tasa de bits y el mismo formato.
Antes
de utilizar
su nuevo
Kit C donde decida sobrescribir se
Recuerde
que a partir
del punto
borrará la información del archivo original para grabarse un nuevo
contenido.
Add
Agrega una grabación nueva al termino de un archivo seleccionado.
Los pasos se ilustran en el siguiente diagrama:
ESPAÑOL-29
ESPAÑOL
en pantalla aparecerá la palabra OVER, oprima nuevamente el botón
REC/Pausa y comience a grabar y cuando termine oprima el botón
STOP.
En el archivo original después de la pausa, se escuchará la grabación
nueva.
VLC
Nivel de voz. Permite ajustar el nivel de volumen de grabación en caso
de grabar por medio del micrófono interno, micrófono externo o por
medio del adaptador telefónico.
El nivel es de 0 a 7
Antesde
deajustarse
utilizar suantes
nuevo
C
Debe
deKit
empezar
a grabar.
LLC
Al igual que en el caso anterior solo que se aplica cuando use la
conexión LINE-IN, cuando conecte un equipo externo como un
reproductor MP3, CD, etc.
El nivel de volumen es de -5 a 5
SYNC
Permite configurar el tiempo en que la grabadora detectará la ausencia
de sonido para que la función ARS (Programación de apagado
automático) entre en operación.
ESPAÑOL-30
ESPAÑOL
Primero seleccione un archivo, entre al menú AdV, luego al submenú
EdIt, después a Add y seleccione ON, salga de la aplicación y
reproduzca el archivo, pause la reproducción, oprima el botón REC/
Pausa, en pantalla aparecerá la palabra Add, oprima nuevamente el
botón REC/Pausa y comience a grabar y cuando termine oprima el
botón STOP.
SECU (Seguridad en la grabación)
Si activa la función (on), cuando comienza a grabar, tanto la pantalla
como el LED indicador de grabación se apagarán simulando que el
equipo esta completamente apagado, sin embargo se estar realizando
la grabación.
Para deshabilitar este modo seleccione OFF.
MENU DEL MODO DE REPRODUCCION MP3
REP
Modo de repetición
Reproduce un archivo seleccionado
repetidamente.
Reproduce todos los archivos una vez.
Reproduce todos los archivos repetidamente.
Reproduce al azar los archivos.
EQ
Mientras esta reproduciendo un archivo, seleccione esta opción y
seleccione un modo de ecualización, normal (NOR), Rock (ROC), Pop,
Clásica (CLA), Jazz (JAZ)
ESPAÑOL-31
ESPAÑOL
Por defecto el tiempo es de 3 segundos, sin embargo puede cambiarlo
entre 1, 2, 3, 4 ó 5 segundos.
Las demás submenús son los mismos del Menú de grabación (de las
carpetas A, B, C, D y EN)
Grabación de voz:
Una vez realizada las configuraciones correspondientes dentro del
menú de grabación siga los siguientes pasos:
1.- Con el control “M” seleccione una carpeta A, B, C ó D
2.- Seleccione la calidad de grabado dentro del menú MODE.
3.- Elija el nivel de sensibilidad del micrófono dentro del menú SENS
4.- Presione el botón de grabación (REC/Pause), el LED indicador se
iluminará en color rojo.
5.- Para realizar una pausa, presione nuevamente el botón
REC/Pause, en pantalla aparecerá la palabra PAUS. Para regresar al
modo de grabar presione nuevamente el botón REC/pause
6.- Para terminar con la grabación presione el botón STOP.
ESPAÑOL-32
ESPAÑOL
GRABACION
Antes
delautilizar
su nuevo
Kit
C
Cuando
distancia
es muy
grande
entre la fuente de sonido y la
grabadora de voz, la calidad de grabado será pobre.
Los archivos grabados de un dispositivo externos son guardados en la
carpeta EN.
Antes
suun
nuevo
Kit C externo a la grabadora, ambos
Antes de
de utilizar
conectar
dispositivo
equipos deben estar apagados.
Además primero debe configurar la calidad de grabación, modo
ARS, Sensibilidad y demás operaciones.
Use la entrada del micrófono (LINE IN) de la grabadora de voz para
conectar el micrófono tipo solapa o algún
dispositivo externo como un reproductor de MP3, CD, radio, etc.
ESPAÑOL-33
ESPAÑOL
Grabación de un dispositivo externo:
Para realizar la grabación siga los siguientes pasos:
2.- Presione el botón de grabación (REC/pause), el LED indicador se
iluminará en color rojo.
3.- Para realizar una pausa, presione nuevamente el botón
REC/Pause, en pantalla aparecerá la palabra PAUS. Para regresar al
modo de grabar presione nuevamente el botón REC/Pause
4.- Para terminar con la grabación presione el botón STOP.
Grabación de una línea telefónica:
Para poder grabar las conversaciones telefónicas siga los siguientes
pasos:
1.- Inserte el cable de audio (incluido) en el adaptador telefónico.
2.- Conecte la línea telefónica en el adaptador telefónico “LINE”.
3.- En el otro puerto de telefónico del adaptador, inserte el cable del
teléfono.
ESPAÑOL-34
ESPAÑOL
1.- Seleccione la carpeta “EN”.
ESPAÑOL
4.- En el menú LINE, seleccione TEL.
5.- Presione el botón de grabación (REC/Pause), el LED indicador se
iluminará en color rojo.
6.- Para realizar una pausa, presione nuevamente el botón
REC/Pause, en pantalla aparecerá la palabra PAUS. Para regresar al
modo de grabar presione nuevamente el botón REC/pause
7.- Para terminar con la grabación presione el botón STOP.
ESPAÑOL-35
REPRODUCCION
1.- Selección el archivo a reproducir dentro de la carpetas A, B, C, D ó
EN.
2.- Presione el botón PLAY/Pausa para reproducir.
3.- Para realizar una pausa, presione una vez el botón Play/Pausa,
para regresar al modo de reproducción presione nuevamente el mismo
botón.
4.- Presione los botones avanzar/regresar para seleccionar un archivo
de grabación diferente.
5.- Controle el nivel de volumen con los botones + ó -, El nivel de
volumen es de 0 a 20.
6.- Para detener la reproducción, presione el botón Stop
7.- Para entrar al menú, oprima y sostenga el botón “M”
ESPAÑOL-36
ESPAÑOL
Reproducción de voz:
Reproducción de música:
1.- Seleccione la carpeta MP3
2.- Elija un archivo.
3.- Para realizar una pausa, presione una vez el botón PLAY/pausa,
para regresar al modo de reproducción presione nuevamente el mismo
botón.
4.- Presione los botones avanzar/regresar para seleccionar un archivo
de música diferente.
5.- Controle el nivel de volumen con los botones + ó -, El nivel de
volumen es de 0 a 20.
6.- Para detener la reproducción, presione el botón Stop
7.- Para entrar al menú, oprima y sostenga el botón “M”
COMO USAR LA REPETICION A-B
Para repetir un segmento de archivo:
En modo reproducción seleccione un punto inicial,
ESPAÑOL-37
ESPAÑOL
Una vez que haya pasado archivos MP3 a la grabadora, siga los
siguientes pasos para la reproducción:
posteriormente presione una sola vez el botón “M”, en pantalla
parpadeará el icono “A-B”, después seleccione un punto final, presione
nuevamente el botón “M” dejará de parpadear el icono “A-B”
Para apagar el modo de repetición A-B, oprima el botón “M”
ESPECIFICACIONES
Alimentación: 4,5V - - - 300mA
3V - - - (2 x AAA)
Memoria: 1GB
Rango de Frecuencia: 20Hz a 20kHz
Convertidor
Alimentación: 120V~ 60Hz 7W
Salida: 4,5 V - - - 300mA
Antes
de utilizar
su nuevo
Kit
C
El
diseño
del producto
y las
especificaciones
pueden cambiar sin
previo aviso.
ESPAÑOL-38
ESPAÑOL
Listo comenzará a repetir el fragmento seleccionado.
Producto: Grabadora digital de voz de 145Hr 1GB y
reproductor MP3
Modelo: REC-830
Marca: Steren
PÓLIZA DE GARANTÍA
Esta póliza garantiza el producto por el término de un año en todas sus partes y mano
de obra, contra cualquier defecto de fabricación y funcionamiento, a partir de la fecha de
entrega.
CONDICIONES
1.- Para hacer efectiva la garantía, presente ésta póliza y el producto, en donde fue
adquirido o en Electrónica Steren S.A. de C.V.
2.- Electrónica Steren S.A de C.V. se compromete a reparar el producto en caso de estar
defectuoso sin ningún cargo al consumidor. Los gastos de transportación serán cubiertos
por el proveedor.
3.- El tiempo de reparación en ningún caso será mayor a 30 días, contados a partir de la
recepción del producto en cualquiera de los sitios donde pueda hacerse efectiva la
garantía.
4.- El lugar donde puede adquirir partes, componentes, consumibles y accesorios, así como
hacer válida esta garantía es en cualquiera de las direcciones mencionadas
posteriormente.
ESTA PÓLIZA NO SE HARA EFECTIVA EN LOS SIGUIENTES CASOS:
1.- Cuando el producto ha sido utilizado en condiciones distintas a las normales.
2.- Cuando el producto no ha sido operado de acuerdo con el instructivo de uso.
3.- Cuando el producto ha sido alterado o reparado por personal no autorizado por
Electrónica Steren S.A. de C.V.
El consumidor podrá solicitar que se haga efectiva la garantía ante la propia casa
comercial donde adquirió el producto. Si la presente garantía se extraviara, el consumidor
puede recurrir a su proveedor para que le expida otra póliza de garantía, previa
presentación de la nota de compra o factura respectiva.
DATOS DEL DISTRIBUIDOR
Nombre del Distribuidor
Domicilio
Producto
Marca
Modelo
Número de serie
En caso de que su producto
presente alguna falla, acuda
al centro de distribución más
cercano a su domicilio y en caso
de tener alguna duda o pregunta
por favor llame a nuestro Centro
de Atención a Clientes, en
donde con gusto le atenderemos
en todo lo relacionado con su
producto Steren.
Centro de Atención a Clientes
01 800 500 9000
Fecha de entrega
ELECTRONICA STEREN S.A. DE C.V.
Camarones 112, Obrero Popular, 02840, México, D.F. RFC: EST850628-K51
STEREN PRODUCTO EMPACADO S.A. DE C.V.
Biólogo MaximIno Martínez No. 3408 Int. 3 y 4, San Salvador Xochimanca, México, D.F. 02870,
RFC: SPE941215H43
ELECTRONICA STEREN DEL CENTRO, S.A. DE C.V.
Rep. del Salvador 20 A y B, Centro, 06000, México. D.F. RFC: ESC9610259N4
ELECTRONICA STEREN DE GUADALAJARA, S.A.
López Cotilla No. 51, Centro, 44100, Guadalajara, Jal. RFC: ESG810511HT6
ELECTRONICA STEREN DE MONTERREY, S.A.
Colón 130 Pte., Centro, 64000, Monterrey, N.L. RFC: ESM830202MF8
ELECTRONICA STEREN DE TIJUANA, S.A. de C.V.
Calle 2a, Juárez 7636, Centro, 22000, Tijuana, B.C.N. RFC: EST980909NU5
FEATURES
•
•
•
•
•
•
•
•
1GB of internal memory
MicroSD card slot.
Omini-directional microphone.
MP3 player.
Automatic recording system (ARS)
HQ, LP, SP recording modes.
Auto-off
Battery incidator.
ENGLISH-02
ENGLISH
IMPORTANT
Antes de
utilizar
sunew
nuevo
C
Before
using
your
MP3Kit
player
voice recorder, please read the
following recommendations.
Clean with a soft, dry cloth.
•
Do not try to open the equipment, may cause
•
malfunction and warranty repeal.
Do not use or store the equipment near wet places.
•
Check the battery periodically.
•
When the equipment is not to be used for a long time,
•
remove the battery.
•
•
•
•
•
•
•
•
•
One Digital recorder.
One Earphone.
One USB cable.
One Line-in cable.
One Lapel microphone.
Phone adapter.
One AC/DC adaptor
Installation CD driver.
User´s manual.
ENGLISH-03
ENGLISH
CONTENT
ENGLISH
CONTROLS
1 2
9
10
3
11
4
5
7
8
6
12
13
15
14
1.- LED indicator, lights up when recording
process begins.
2.- Internal microphone
3.- LCD screen
16
4.- M; allows folder change (A/B/C/D/EN/MP3)
5.- Returns to a mode, option or previous file.
In play mode press and hold this button to
ENGLISH-04
6.- Play/pause
Button to turn on the recorder, also serves as the play or pause button
during the playback of a music file or recording.
7.-Stop
This button turns off the recorder or stops in playback mode.
8.- Advances to the next mode, option or file. In playback mode press
and hold this button to create a short cut.
9.- Earphone plug.
10.- Lapel microphone plug and IN LINE
11.- REC/PAUSE
Press this button to start recording, also allows pausing while recording.
12.- Vol +
Raise volume level
13.- Vol Decrease volume level.
ENGLISH-05
ENGLISH
create a short cut.
15.- USB plug
16.- Battery compartment
ENGLISH-06
ENGLISH
14.- Hold
Slide the button to the right to activate the hold function, which is also
the security mode to avoid accidental pressing of the buttons that may
change the option or mode while the device is running. To deactivate
slide to the left.
1.- Open the battery compartment.
2.- Place one new AAA battery paying attention the polarity.
3.- Replace the battery compartment cover.
ENGLISH-07
ENGLISH
INSTALLATION AND BATTERY CHANGE
Fully charged.
Half charge.
Soon battery change.
Battery change.
The battery life in recording and playback mode is approximately 20
hours.
This time depends on the battery type and the volume level used.
TURN ON/OFF POWER
Turn On:
Press the PLAY/PAUSE button for 3 seconds, the LCD screen will turn
on.
Turn off:
Press the STOP button for 3 seconds after this the recorder will turn off.
ENGLISH-08
ENGLISH
BATTERY INDICATOR
ENGLISH
LCD SCREEN
Features of LCD screen:
1.- Folders A-D are
folders where voice
recordings are stored.
EN is the recording
folder for any device
connected to LINE IN,
MP3 is the folder with
MP3 music format files
2.- Internal memory
type (INT) or microSD
(SD)
3.- File Number.
1
2
3
12
4
5
6
7
8
11
4.- Recording quality.
10
5.- Time
9
6.- Alarm
7.- A-B Repeat mode
8.- Play option
ENGLISH-09
10.- Batteries charge level indicator.
11.- Operating status indicator.
12.- ARS
This function allows recording automatically when there is sound and
when there is no sound detected it automatically stops or pauses the
recording.
ENGLISH-10
ENGLISH
9.- Power hold mode
1.- Make sure that the recorder off.
2.- Insert the USB cable into the USB input of the recorder, connect it to
the extreme opposite an available USB port on the computer.
3.- On display the word USB.
4.- For Windows XP. The computer detects new hardware and begin a
process of automatic updating.
ENGLISH-11
ENGLISH
CONNECTING TO THE COMPUTER
9 .- Later, a window will display, then select Stop, a second
window will appear select accept.
10 .- Until the following message appears then disconnect the USB
cable.
ENGLISH-12
ENGLISH
5.- Once the process finished, the next message displays on the screen:
your new hardware is correctly installed. This message means that you
can start to use the new hardware.
6.- The device appears such as removable drive and you can identify it
by a letter (usually by letter E, F or letter G, but it could displays another
one).
7.- If you want to transfer any Mp3 files just copy the desired files using
Windows Explorer, and paste in the folder music
8.- In the toolbar select the desktop USB device with
right-click “Safely remove Hardware”
To access the menu First select a folder (A, B, C or D):
For 2 seconds press and hold the “M”
Use the
buttons to change to the different options.
To enter a submenu press the
button this same button confirms
a selection.
To quit a submenu press the stop button
The recording menus are:
MODE
LINE
SENS
ARS
RES
REP
MEM
TIME
FILE
SYS
ADV
MODE
Press the button
to enter.
The quality of recording mode will blink on the screen.
ENGLISH-13
ENGLISH
VOICE MENU
Once the mode is selected, press the play/pause button to confirm and
the mode will stop blinking. To exit the menu press the stop button.
PCM is the best recording quality mode; however the recording time is
reduced.
For voice recording:
F O R M AT
R ec. R ate
R ec. T im e
P C M (M o n o )
44,1K H z/16bit
3,38hrs
HQ
64K bps
36,25hrs
SP
32K bps
72.5hrs
LP
16K bps
145hrs
For external audio recording connected to LINE IN such as an MP3
player, CD player, etc.
F O R M AT
R ec. R ate
R ec. T im e
LINE:
Press the
PCM
44,1K H z/16bit
1,41hrs
HQ
64K bps
17,5 h rs
SP
32K bps
23,20 hrs
LP
16K bps
36.35 h rs
button to enter.
In this menu selection for the type of device connected to LINE IN
Select “AUD” if an external audio device is connected.
Select “TEL” if connecting a phone adapter
Select “EM IC” if connecting a lapel microphone
For any other type of microphone: Select “ST” if connecting a stereo
microphone in the “EM IC”, select “MO” if it’s mono.
ENGLISH-14
ENGLISH
Select the PCM, HQ, SP and LP mode with the arrows
ARS:
This function allows automatic recording when there is sound and when
there is none detected the recorder automatically stops or pauses the
recording.
ARS
Pauses the recording if there is no sound for a lapse of time and starts
the recording up again when sound is detected. The contents of each
recording will be saved in a single file.
ARS B
As stated before, only if each recording is saved in different files.
Press the
button to enter.
The screen will blink “ARS” by pressing the buttons
select ARS or ARS B once selected confirm by
pressing the
button, the selection will stop flashing
RES:
Allows to view the summary of a recording.
When a recording starts up after a pause, it will play the previous file
for 30 seconds, afterwards it allows recording at the end of the earlier
recording.
ENGLISH-15
ENGLISH
SENS:
Configure the internal and external microphone or telephone adapter
sensitivity in this menu.
Select “HI” for high sensitivity or “LO” for low sensitivity.
The use of this function is recommended in emergency interruption
cases. Disable the function after use.
To use this feature. Go to the menu and select the function.
Then start the recording, make a pause and when recording continues
RES will appear on screen, press the play/pause button to listen to the
summary of the preceding recording. Then continue with the recording.
REP:
Repeat mode, this option has the following types of playback mode.
Play a selected file repeatedly.
Plays all the files once.
Plays all the files continuously.
Plays files randomly.
ENGLISH-16
ENGLISH
On: activates the function.
Off: disables the function.
TIME:
This option allows changing the date and time (SET), the alarm (ARM)
and set up the timer for specific recording time (TMR)
SET
Press the
Using the
button to enter. The year (Y) will blink
buttons change the value.
Press
again to switch to month (M) change the values and press
again to move to day (D)
Press again
to change the hour (H), minutes (M) and seconds
(S) in the same manner as the date is changed.
ARM
Activate alarm (ON) or turn it off (OFF)
The different alarm options are:
ENGLISH-17
ENGLISH
MEM:
This mode allows selection the memory type to be used, (INT) internal
or external (SD)
Upon entering this option the screen will blink INT or SD
To select use the navigation buttons.
Press the play/pause button to confirm the selection.
DLY
Use this option to activate the alarm at a particular time every day.
Press the
button to enter this option, the hours will blink on the
screen, with the navigation buttons
change the value of the hour, press the play/pause button again to
switch to minutes and do the same to change the value with the
navigation arrows, to confirm and save the settings press the play/pause button.
To exit the submenu press the stop button.
WLY
Set up the alarm at a particular time, for example, if it is only needed
to go off at a particular time on Monday select MO and set the time,
or Tuesday (TUE), Wednesday (WED), Thursday (THU), Friday (FRI),
Saturday (SAT), Sunday (SU) or from Monday through Saturday (M-SA)
or Monday through Friday (M-F)
ENGLISH-18
ENGLISH
AFT
Allows the alarm to be activated every 15, 30, 45 to 60 minutes for a
period of 1 minute.
Simply enter this submenu and change the value using the
buttons to confirm the selection, press the Play/Pause button.
DATE
This option allows to set up the alarm at a particular date (year, month,
day) and time (hour, minutes).
Antes
de alarm
utilizarhas
su been
nuevoset
Kitthe
C screen will show a bell-shaped
After the
icon indicating the alarm is set. To turn off the alarm press the
stop button.
To deactivate the alarm in general choose the OFF option.
TMR
Starts recording in a specific time period and can be scheduled for up to
10 events.
Press the
button to enter the submenu, the screen will flash the
digits from 01-10 these numbers represent events to schedule.
With the
then press the
buttons select an event, for example: the 01 event,
button to confirm.
Two options will de displayed: “ON” and “OFF” the first enables the
option and the second disables it. Select ‘ON’ and 3 options will appear:
DLY, WLY, DATE
ENGLISH-19
ENGLISH
To set up this feature, select the day (s) with the
buttons
then select the hour and minutes, to confirm press the Play/Pause
button.
Press the
button and the screen will display the starting time,
with the
buttons change the hour, then press the play/pause
button to change the minutes. To confirm press play/pause, the screen
will display the word “END” which will be the ending time. Change the
hour and minutes. To confirm press the play/pause button
Once the starting and ending time has been confirmed the screen will
show a clock shaped icon, exit the submenu.
When the set time arrives the recorder will turn and start recording until
the previously scheduled ending time arrives.
WLY (week)
This feature configures a particular time for a day of the week in which
the recorder will begin and end a recording.
To configure the days: from Monday through Friday (M-F), from Monday through Saturday (M-SA), only on Monday (MO), Tuesday (TUE),
Wednesday (WED), on Thursday (THU), Friday (FRI), Saturday (SAT)
or Sunday (SU).
With a starting and ending time.
To configure this set up follow the steps of the previous option (day),
simply select a particular day or the whole week.
ENGLISH-20
ENGLISH
DLY (day)
Schedule a particular hour to begin and end the recording automatically
at the same time on a daily basis.
Antes
de utilizar
nuevo
C DATE the recording will
In all three
cases:suDLY,
WLYKit
and
automatically start and stop until the assigned programming.
If the recorder is turned off, when the programmed scheduled time
arrives the recording will start automatically and when the scheduled time ends it will turn off automatically again.
To disable the programming, in the TMR submenu select OFF for
each scheduled event and confirm with the play/pause button.
FILE
This submenu includes the following 3 options:
COPY
MOVE
ERS
COPY
The Copy feature allows to copy a file from the internal to external
memory and vice versa.
ENGLISH-21
ENGLISH
DATE
This feature sets up a particular date in the year, both the start and end,
this way the recording will begin and stop until the scheduled end date.
The date format is day (D), month (M) and year (Y) The format of the
time is hour (H), minute (M), the date and time are both initial and final.
Antes
de utilizar
Kitthe
C file will be copied to the memory
If the INT
sourcesu
is nuevo
selected
microSD and vice versa.
MOVE
This feature allows moving a file from an internal memory to a MicroSD
memory and back.
Unlike the previous option above this feature simulates cutting the file
and pasting it into the destination memory.
The steps to move are the same as above but instead entering the
COPY submenu choose the MOVE submenu.
ERS
This option erases files. In this function ONE and ALL options will be
found.
In ONE the selected file will be erased. And in ALL, all the files in a
folder will be deleted.
Select ERS, then ONE or ALL, then Yes to begin with the clearing
process.
ENGLISH-22
ENGLISH
To copy a file, first insert a MicroSD memory after select the source (INT
or SD), then select the folder where the file is located (A, B, C, D EN
or MP3) select the file, then enter the FILE submenu, then choose the
COPY option and select “YES”, the copy process will begin immediately.
SLEP
This option allows saving battery power if the device is not used for a
certain period of time.
The time that can be set up is 3, 5, 7, 10 minutes or OFF (disabled)
This option is only accessible in the STOP mode
When the recorder is not in use the and after the
previously scheduled time has passed the device will turn off.
With the play/pause button enter SYS, then enter SLEEP and select the
time, confirm the selection by pressing the play/pause button again.
POFF
This feature allows to turn off the recorder by any method. (Stop, Play,
Rec) After a predetermined time.
The time to be set is 30 minutes, 1 hour, 1:30, 2 hours or OFF (disabled)
INFO
Displays the memory capacity (MEM) and the free space (REM) of the
selected memory either INT (internal) or SD (external memory
microSD)
SOFt
Displays the “Firmware” version
ENGLISH-23
ENGLISH
SYS (System)
FMT
Allows formatting the memory select INT or SD note that by activating
this feature all the information stored in memory will be lost, that is why
it is recommended to create a backup before formatting
To run the application simply select “Yes”
BEEP
Enables (on) and disables (off) the sounds feature when using the
buttons.
ADV (advanced functions)
Allows the user to configure advanced features for a voice recording.
The submenus include the following:
Edit
To edit a recording file of voice recording folders (A, B, C, D and EN).
The content of the submenus included in this option are:
Cut (cut)
Divide a file in 2. The steps are illustrated in the following diagram
ENGLISH-24
ENGLISH
dEFt
Performs the “reset” function, that is, it resets initial manufacturer values
Select this mode and choose “Yes” to start the reset process for initial
values.
ENGLISH
During playback pause (at the moment where the file must be cut), then
enter the ADV submenu and then to Edit and finally to the Cut option,
Choose “Yes” at that moment the process of cutting the file in 2 will
begin.
COMB (combined)
Combines 2 files in 1. The steps are illustrated in the
following diagram:
ENGLISH-25
ENGLISH
Select the merging file, access the COMb submenu inside the ADV and
select “yes” a recording folder will start flashing, choose the folder of the
second file to combine and confirm the combination process with the
Play/Pause button.
Antes
de utilizar
suinto
nuevo
To
combine
2 files
oneKit
theCtwo files must have the same bit
rate and the same format.
The new file should have a new name just as the first combining
file.
OVER (overwrite)
Allows overwriting a previously selected paused file.
The steps are illustrated in the following diagram:
ENGLISH-26
ENGLISH
First select a file, then enter the ADV menu, then the EdIt submenu,
then to OVEr and select ON, exit the application and play the file at the
selected time to begin to overwrite, pause playback, press the REC/
pause button the screen will display the word OVER, press the REC/
pause button again and begin recording, when recording is complete
press the STOP button.
After pausing the original file the new recording will be heard.
Antes de utilizar su nuevo Kit C
Please note that at the point from which the file was overwritten
the file information will be deleted to record the new content.
ENGLISH-27
First select a file, enter the AdV menu, then the EdIt submenu, then to
Add and choose ON, exit the application and play the file, pause the
playback, press the REC/pause button the screen will display the Add
word, press the REC/pause button again to begin recording and when
recording is complete press the STOP button.
VLC
Voice level. This feature allows recording volume level adjustment in
the case the recording is done by an internal or external microphone or
through the telephone adapter.
ENGLISH-28
ENGLISH
Add
Adds a new recording at the end of a selected file. The steps are illustrated in the following diagram:
LLC
Just as in the previous case this is only applied when using the LINEIN connection, when connecting an external device, such as, an MP3
player, CD, etc., the volume level is from - 5 to 5
SYNC
Allows to set the time in which the recorder will detect the absence of
sound so that the ARS (scheduled automatic shutdown) will work.
Default time is 3 seconds however it can be changed from 1, 2, 3, 4 or
5 seconds.
SECU (security in the recording)
The function is activated (on), when recording starts, both the screen
and the LED recording indicator will switch off simulating that the
recorder this completely turned off, even though it is still recording.
To disable this mode select OFF.
ENGLISH-29
ENGLISH
The level is 0 to 7
It must be adjusted before recording.
REP
Repetition mode
Play a selected file repeatedly.
Plays all the files once.
Play all files continuously.
Plays files randomly.
EQ
While playing a file, select this option and choose an equalizer mode,
normal (NOR), rock (ROC), pop, classical (CLA), jazz (JAZ)
The other submenus are the same as the recording menu (folders A, B,
C, D and EN)
ENGLISH-30
ENGLISH
MP3 PLAYBACK MODE MENU
Voice recording:
After the corresponding settings are established in the recording menu
follow these steps:
1.-With control “M” choose a folder A B, C or D
2.- Select the recording quality in the MODE menu.
3.- Choose the level microphone sensitivity in the SENS menu
4.- Press recording (REC / pause) button, the LED
indicator will light up red.
5.- To pause, press the REC button / pause button again, the screen will
display the word PAUS. To return to the recording mode press the REC
button / pause button again.
6.-To end the recording press the STOP button.
Antes de utilizar su nuevo Kit C
When the distance between the sound source and the voice
recorder is too long the quality of the recording will be poor.
ENGLISH-31
ENGLISH
RECORDING
Antes de
utilizar suan
nuevo
Kit Cdevice to the recorder, both must be
Before
connecting
external
turned off.
In addition the recording quality must be configured first, ARS
mode, sensitivity and other functions.
Use the voice recorder (LINE IN) microphone input to connect the microphone lapel type or any external device such as an MP3player, CD,
radio, etc.
To record follow these steps:
1.- Select the “EN” folder
2.- Press the recording (REC / pause) button the LED indicator will light
up red.
ENGLISH-32
ENGLISH
Recording from an external device:
Files recorded from an external device are saved in the EN folder.
4.- To end the recording press the STOP button.
Recording a phone line:
To record phone conversations follow these steps:
1.- Connect the audio cable (included) to the phone
adapter.
2.- Connect the phone line to the “LINE” phone adapter
3.- In the other phone adapter port, insert the phone cable.
ENGLISH-33
ENGLISH
3.- To pause, press the REC / pause button again, the screen will
display the word PAUS. To return to the recording mode press the
REC / pause button again
5.- Press the recording (REC / pause) button the LED indicator will light
up red.
6.- To pause, press the REC / pause button again, the screen will
display the word PAUS. To return to the recording mode press the
REC / pause button again.
7- To end the recording press the STOP button.
PLAYING
Speech playback:
1.- Selection file to play in the A, B, C, D or EN folders.
2.- Press the PLAY/pause button to play.
3. To pause, press the PLAY/pause button once, to return to the
playback mode press the button again.
4.- Press the forward / back buttons to select a different recording file.
5.- Control the volume level with the + or - buttons, the volume level is
from 0 to 20.
6.-To stop playback, press the stop button
7. To enter the menu, press and hold the “M” button
ENGLISH-34
ENGLISH
4.- In the LINE menu, select TEL.
Once the MP3 files have been transferred to the recorder, follow these
steps for playback:
1.- Select the MP3 folder
2.- Choose a file.
3.- To pause, press the PLAY/pause button once, to return to playback
mode press the button again.
4.- Press forward / back buttons to select a different music file.
5.- Control the volume level with the + or - buttons, the volume level is
from 0 to 20.
6.- To stop playback, press the stop button
7.- To enter the menu, press and hold the “M” button
HOW TO USE THE A-B REPETITION
To repeat a file segment:
In playback mode select a starting point, then click “M” only once, the
screen will blink the icon, then select an ending point, press the “M”
button again the “A-B” icon will stop blinking
Ready, the selected fragment will begin to repeat itself.
To turn off “A-B” repetition mode, press the “M” button
ENGLISH-35
ENGLISH
Music playback:
Input: 4.5V - - - 300mA
3V - - - (2 x AAA)
Memory: 1GB
Frequency range: 20Hz to 20kHz
Converter
Input: 120V~ 60Hz 7W
Output: 4.5 V - - - 300mA
Antes de utilizar su nuevo Kit C
Products design and specifications are subject to change without
previous notice.
ENGLISH-36
ENGLISH
SPECIFICACIONS
Product: 1GB MP3 player voice recorder
Part number: REC-830
Brand: Steren
WARRANTY
This Steren product is warranted under normal usage against defects in workmanship and
materials to the original purchaser for one year from the date of purchase.
CONDITIONS
1.- This warranty card with all the required information, invoice or purchase ticket, product
box or package, and product, must be presented when warranty service is required.
2.- If the product stills on the warranty time, the company will repair it free of charge.
3.- The repairing time will not exceed 30 natural days, from the day the claim was received.
4.- Steren sell parts, components, consumables and accessories to customer, as well as
warranty service, at any of the addresses mentioned later.
THIS WARRANTY IS VOID IN THE NEXT CASES:
If the product has been damaged by an accident, acts of God, mishandling, leaky batteries,
failure to follow enclosed instructions, improper repair by unauthorized personnel, improper
safe keeping, among others.
a) The consumer can also claim the warranty service in the purchase establishment.
b) If you lose the warranty card, we can reissue it, if you show the invoice or purchase ticket.
RETAILER INFORMATION
Name of the retailer
Address
Product
Brand
Part number
Serial number
Date of delivery
In case your product fails or have questions, please contact your nearest dealer. If
you are in Mexico, please give a call to our Call Center.
Call Center
01 800 500 9000