1
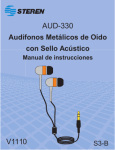
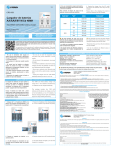
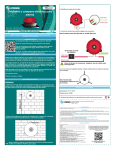
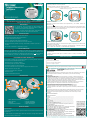
ALA-HUM
4. Coloque la base y use dos tornillos para fijarla.
Alarma detectora
de humo
Al realizar las perforaciones, tenga cuidado de que no existan tuberías ocultas con
cableado eléctrico, gas o agua.
SEGURIDAD
Manual de instrucciones
V1.0
3. Realice las perforaciones con un taladro. Luego inserte dos taquetes, cuidando
que estos queden al ras de la superficie.
0715m
Antes de utilizar su nuevo producto Steren, lea este instructivo para evitar
cualquier mal funcionamiento.
Instalar la alarma
1.Empuje la palanca hacia adentro del compartimento y, sin soltarla, inserte una
batería de 9 V
IMPORTANTE
La información que se muestra en este manual sirve
únicamente como referencia sobre el producto. Debido a
actualizaciones pueden existir diferencias.
2.Acomode la alarma sobre la base y gírela en el sentido de las manecillas del reloj,
hasta que escuche un clic. Asegúrese de que las pestañas de seguridad de ambas
partes encajen entre sí al momento de girar.
Por favor, consulte nuestra página web (www.steren.com)
para obtener la versión más reciente del instructivo.
PRECAUCIONES
• Limpie la alarma al menos una vez cada 6 meses
• Retire la batería antes de darle mantenimiento
• No utilice solventes para limpiarla
• Utilice un cepillo de cerdas suaves para limpiarla
• Realice la prueba de funcionamiento una vez por semana
Prueba de funcionamiento
• Nunca intente hacer pruebas con fuego; puede dañar la unidad o provocar un
Debe realizar esta prueba con cierta frecuencia para comprobar que la alarma esté
funcionando correctamente.
incendio
Presione el botón LED durante 3 segundos. Inmediatamente, la alarma emitirá un
sonido a través del zumbador y el LED destellará rápidamente.
• No la moje ni introduzca en recipientes con agua
CARACTERÍSTICAS
MANTENIMIENTO
Ideal para uso doméstico e industrial. Se puede usar en lugares propensos a
incendios (fábricas de cartón, papel, plástico, etc.) con prohibición a fumadores, entre
otros. Cuenta con zumbador y se alimenta por una batería de 9 V
Tiene un soporte
para su instalación y un botón con LED indicador de funcionamiento y prueba.
• El sensor de humo debe estar libre de cualquier obstrucción, revíselo y límpielo
periódicamente.
• Cuando la batería esté baja, la alarma emitirá un “beep” intermitente; debe
reemplazarla.
ESPECIFICACIONES
RECOMENDACIONES GENERALES
Evite instalar el aparato en los siguientes lugares, ya que se generan condiciones
para que se active indebidamente la alarma:
• Áreas de cocina y cuartos de calderas
Alimentación: 9 V
10 µA en reposo
10 a 50 mA en funcionamiento
Consumo nominal: 0,0007 kWh/año
Consumo en espera: no aplica
• Cerca de aparatos que utilicen combustible
• Espacios de menos de 3 metros de altura
El diseño del producto y las especificaciones pueden variar sin previo aviso.
• Cerca de corrientes de aire que puedan empujar humo desde la cocina
• Baños o áreas con mucho vapor
Producto: Alarma detectora de humo
Modelo: ALA-HUM
Marca: Steren
• Lugares con mucho polvo y suciedad
• Espacios sin aire
PÓLIZA DE GARANTÍA
Esta póliza garantiza el producto por el término de un año en todos sus componentes y mano de obra,
contra cualquier defecto de fabricación y funcionamiento, a partir de la fecha de entrega.
• Zonas con demasiados insectos
ESTRUCTURA
1
7
2
8
4
3
5
7
6
CONDICIONES
1.- Para hacer efectiva la garantía, presente esta póliza y el producto, en donde fue adquirido o en
Electrónica Steren S.A. de C.V.
2.- Electrónica Steren S.A de C.V. se compromete a reparar el producto en caso de estar defectuoso
sin ningún cargo al consumidor. Los gastos de transportación serán cubiertos por el proveedor.
3.- El tiempo de reparación en ningún caso será mayor a 30 días,contados a partir de la recepción del
producto en cualquiera de los sitios donde pueda hacerse efectiva la garantía.
4.- El lugar donde puede adquirir partes, componentes, consumibles y accesorios, así como hacer
válida esta garantía es en cualquiera de las direcciones mencionadas posteriormente.
ESTA PÓLIZA NO SE HARÁ EFECTIVA EN LOS SIGUIENTES CASOS:
1.- Cuando el producto ha sido utilizado en condiciones distintas a las normales.
2.- Cuando el producto no ha sido operado de acuerdo con el instructivo de uso.
3.- Cuando el producto ha sido alterado o reparado por personal no autorizado por Electrónica Steren
S.A. de C.V.
El consumidor podrá solicitar que se haga efectiva la garantía ante la propia casa comercial donde
adquirió el producto. Si la presente garantía se extraviara, el consumidor puede recurrir a su
proveedor para que le expida otra póliza, previa presentación de la nota de compra o factura
respectiva.
DATOS DEL DISTRIBUIDOR
1. Botón LED de funcionamiento
5. Palanca
2. Sensor de humo
6. Conector para batería
3. Zumbador
7. Pestañas de seguridad
4. Compartimento para batería
8. Seguro de base (key)
INSTRUCCIONES
Fijar la base
1. Presione el seguro de la base y gírela en sentido contrario a las manecillas del reloj
para liberarla.
2. Utilice la base como plantilla para realizar dos marcas en el lugar donde habrá de
colocar los tornillos posteriormente.
Nombre del Distribuidor _________________________________________
Domicilio _____________________________________________________
Producto _____________________________________________________
Marca _______________________________________________________
Modelo ______________________________________________________
Número de serie _______________________________________________
Fecha de entrega ______________________________________________
ELECTRÓNICA STEREN S.A. DE C.V.
Camarones 112, Obrero Popular, 02840, Del. Azcapotzalco, México, D.F.
RFC: EST850628-K51
STEREN PRODUCTO EMPACADO S.A. DE C.V.
Biólogo Maximino Martínez No. 3408 Int. 2, 3 y 4, San Salvador Xochimanca,
Del. Azcapotzalco, México, D.F. 02870, RFC: SPE941215H43
ELECTRÓNICA STEREN DEL CENTRO, S.A. DE C.V.
Rep. del Salvador 20 A y B, Centro, 06000, Del. Cuauhtémoc, México. D.F.
RFC: ESC9610259N4
ELECTRÓNICA STEREN DE GUADALAJARA, S.A.
López Cotilla No. 51, Centro, 44100, Guadalajara, Jal. RFC: ESG810511HT6
ELECTRÓNICA STEREN DE MONTERREY, S.A.
Colón 130 Pte., Centro, 64000, Monterrey, N.L. RFC: ESM830202MF8
ELECTRÓNICA STEREN DE TIJUANA, S.A. de C.V.
Calle 2a, Juárez 7636, Centro, 22000, Tijuana, B.C.N. RFC: EST980909NU5
En caso de que su producto
presente alguna falla, acuda
al centro de distribución más
cercano a su domicilio y en
caso de tener alguna duda o
pregunta por favor llame a
nuestro Centro de Atención a
Clientes, en donde con gusto
le atenderemos en todo lo
relacionado con su producto
Steren.
Centro de Atención a Clientes
01 800 500 9000
ALA-HUM
4. Place the base and use two screws to fix it.
Smoke detector
alarm
When making holes, be careful that there are no hidden pipes with electrical wiring, gas
or water.
SEGURIDAD
Instruction manual
V1.0
3. Drill holes. Then insert two anchors, making sure that these are right over the
surface.
0715m
Before using your new Steren´s product, please read this instruction
manual to prevent any damage.
Installing alarm
IMPORTANT
1. Push the lever into the compartment and keep it pressed, insert a 9 V
The instructions of this manual are for reference about the
product. There may be differences due to updates.
battery.
2. Arrange the alarm on the base and turn it clockwise, until you hear a click. Make
sure the locking tabs on both sides fit together when turning.
Please check our website (www.steren.com) to obtain the
latest version of the instruction manual.
CAUTIONS
• Clean the alarm at least once every 6 months
• Remove the battery before servicing
• Do not use solvents to clean
• Use a soft bristle brush to clean
• Perform test function once a week
Test function
• Never try to experiment with fire; You can damage the unit or cause fire
This test should be performed frequently to check that the alarm is working properly.
Press the LED button function for 3 seconds. Immediately, the alarm will sound
through the buzzer and the LED will flash quickly.
• Do not wet or insert containers with water
HIGHLIGHTS
The smoke detector alarm is perfect to domestic or industrial use. It can be use in
MAINTENANCE
factories where manufacture paper, plastic, carton, or places where smoking is
prohibited, among others. It includes a buzzer and it is powered by 9 V
battery.
Easy to install and easy to handle. It has a button with an in-use / test indicator LED.
• The smoke sensor must be free of any obstruction, inspect and clean it regularly.
• When the battery is low, the alarm will emit an intermittent "beep"; please, replace
it.
GENERAL RECOMMENDATIONS
Avoid installing the unit in the following places:
SPECIFICATIONS
• Kitchen areas and boiler rooms
Input: 9 V
10 µA (stand-by)
10 to 50 mA (operating)
• Nearby appliances that use fuel
• Spaces with less than 3 meters of height
Nominal consumption: 0.0007 kWh/year
Stand-by power consumption: not applicable
• Near air currents that can push smoke from the kitchen
• Bathrooms or areas with steam alot
• Places with dust and dirt
Product design and specifications are subject to change without notice.
• Airless spaces
• Areas with too many insects
Product: Smoke detector alarm
Part number: ALA-HUM
Brand: Steren
STRUCTURE
1
WARRANTY
7
2
This Steren product is warranted under normal usage against defects in workmanship and materials
to the original purchaser for one year from the date of purchase.
8
CONDITIONS
1. This warranty card with all the required information, invoice, product box or package, and
4
3
product, must be presented when warranty service is required.
5
7
2. If the product is in the warranty time, the company will repair it free of charge.
3. The repairing time will not exceed 30 natural days, from the day the claim was received.
4. Steren sell parts, components, consumables and accessories to customer, as well as warranty
6
service, at any of the addresses mentioned later.
THIS WARRANTY IS VOID IN THE NEXT CASES:
If the product has been damaged by an accident, acts of God, mishandling, leaky batteries,
failure to follow enclosed instructions, improper repair by unauthorized personnel, improper
1. LED button function
5. Lever
2. Smoke sensor
6. Battery connector
3. Buzzer
7. Locking tabs
4. Battery compartment
8. Base locks (key)
INSTRUCTIONS
Fix the base
1. Press the base locks and rotate counterclockwise to release it.
2. Use the base as a template to make two marks where you want to install it.
safe keeping, among others.
a) The consumer can also claim the warranty service in the purchase establishment.
b) If you lose the warranty card, we can reissue it, if you show the invoice or purchase ticket.
RETAILER INFORMATION
In case your product
fails or have questions,
please contact your
nearest dealer. If you
are in Mexico, please
call to our Call Center.
Name of the retailer _______________________________________________
Address _________________________________________________________
Product _________________________________________________________
Brand ___________________________________________________________
01 800 500 9000