1
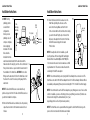
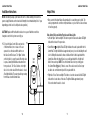
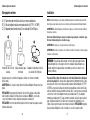
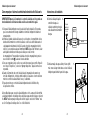
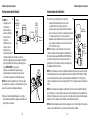
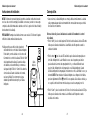
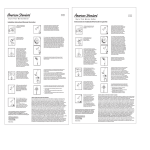
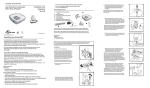
LeakSmart by Waxman™
Wireless Smart Valve
Installation and
Model 8810300L
Operating
Manual
Automatic Water Shut-off Valve
LEAK SMART
™
© 2014 Waxman Consumer Products
LeakSmart Smart Valve
LeakSmart Smart Valve
Smart Valve from LeakSmart by Waxman™
Smart Valve from LeakSmart by Waxman™
Congratulations on your purchase of the Smart Valve from LeakSmart by Waxman™. The
Smart Valve is a patented, electronic, motorized brass water ball valve that connects to the
main water supply line in your home. The Smart Valve allows you to quickly turn on or off
the water supply to the whole house. It incorporates wireless technology which allows it to
be monitored and controlled with a Lowe’s® Iris® home management system. (Iris Smart
Hub required).
Wireless Smart Valve - Model 8810300L
FEATURES:
• Valve Control Enclosure has easy to read and use function buttons with LED status lights
• Lead free compliant, precision machined brass water ball valve for dependable, long lasting performance
• Valve can be operated from anywhere using your smart phone, tablet or computer (Iris Smart Hub required).
• AC Power with battery backup – for continued operation in the event of power outages. The Smart Valve can also operate on batteries as the primary power source if an electrical outlet is not available. (If batteries are fresh and at full strength, the estimated battery life is 1 year, depending upon the level of activity and valve operation).
• Automatic monthly maintenance cycling of the valve for reliable, continuous operation
• Valve can be opened, closed, tested and reset at any time with the touch of a button on the Valve Control Enclosure or by using a smart phone, tablet or computer through the Iris home management system (Iris Smart Hub required).
• 2 Year Limited Warranty
HOW THE SMART VALVE FROM LEAKSMART BY WAXMAN™ WORKS WITH IRIS®
The Smart Valve works with the Lowe’s Iris home management system. The Iris home
management system allows you to view the current state and control your Smart Valve.
You can turn the water on and off at the water main in your home from anywhere using
your smart phone, tablet or computer. The Smart Valve can also be closed automatically
when Iris detects a leak in your home (Iris wireless leak detectors are sold separately),
to help protect your home from water leaks caused by faulty appliances and burst water
supply lines.
NOTE: This installation and operating manual contains important information about the
operation of the unit. If you are installing this unit for use by others, we recommend you
leave this manual - or a copy of it – with the user.
To ensure proper installation and to maximize the performance of your Smart Valve, please
read this entire manual thoroughly before installing or operating the Smart Valve.
2.
3.
LeakSmart Smart Valve
LeakSmart Smart Valve
This Package Contains:
Installation
A. (1) Valve Control Enclosure with Battery Back Up
B. (1) Motorized Brass Water Ball Smart Valve (3/4” FIP x 3/4” MIP)
C. (1) AC Power Adaptor with 10 ft Cord
NOTE: The Smart Valve is a supplemental valve to your existing plumbing system. Do not remove any
existing valves from your plumbing system to install the Smart Valve.
A
WARNING: The Smart Valve is for indoor use only! Do not install the Smart Valve outdoors!
The Smart Valve is to be installed after the main water valve and the water meter. Do not attach
the Smart Valve to the water meter.
B
C
WARNING:
- For use with water only.
- Do not install on gas line.
WARNING: Do not use this product on fire suppression systems or fire sprinkler water lines.
Valve Control Enclosure
Motorized Water Ball Valve
AC Power Adaptor
Check to make sure everything in the package matches the contents listed above.
Read the instructions thoroughly before installing or operating the Smart Valve.
WARNING: Do not put finger(s) inside the Smart Valve. Risk of serious injury may occur.
CAUTION: To protect the Valve Control Enclosure from possible damage during
installation, remove it before installing the valve. NOTE: Enclosure does not need to be
placed onto valve until after installation.
CAUTION: Do not grip plastic motor drive for leverage when installing the valve.
4.
STOP: You may need to purchase additional fittings to install the Smart Valve. If you
are not sure how to install the Smart Valve to your main water line, we recommend
that you contact a licensed Plumber.
Preparation: The Valve Control Enclosure needs to be removed from the Water
Ball Valve before installation. No prying is necessary. Just slide it away from the valve.
Step 8 instructs you to install the Smart Valve (3/4” FIP x 3/4” MIP). Most rigid main water
supply lines will be copper. Evaluate your main water supply line and determine which
size adapter fittings you will need (the most common adaptor fittings will be 3/4” solder x
3/4” male adaptor and 3/4” solder x 3/4” female adaptor). Then determine what size union
you will need to complete the installation. Check your local plumbing codes for complete
compliance before beginning installation.
CAUTION: Make sure the Smart Valve is not connected to the adapter fitting(s) when soldering.
5.
LeakSmart Smart Valve
LeakSmart Smart Valve
How to pair with Lowe’s Iris® home management system:
Installation Instructions:
IMPORTANT: Pair the Valve Control Enclosure with Iris and test functionality before
installing the valve on your water supply line.
6.Shut off the main water
supply valve. The main
water valve will be located
before the water meter.
1. Place the Smart Valve near the final installation location. This tests that it is within
wireless range of the Iris Smart Hub during pairing.
2. Install 4 fresh AA alkaline batteries (batteries not included) into the battery
compartment of the Valve Control Enclosure or power using the AC Power Adaptor cord. A flashing blue light will appear and the valve will now be in Iris Pairing Mode. NOTE: After approximately 10 minutes, the Blue light will stop
flashing and the valve will be out of Iris Pairing Mode. To reset the valve back into Iris Pairing Mode, press the Center Button once and the Blue light will begin
flashing again.
6.
Main
Water Supply
Shut-off Valve
Water Direction
3. Using a computer, log into your Iris account at www.lowes.com/iris. Click the
“Devices” link and select “Add Devices”. Follow the on-screen instructions.
7.Open both hot and cold handles on the faucet closest 7.
to the where you are placing the Smart Valve to relieve the water pressure.
4. When the Valve Control Enclosure is successfully paired with the Iris Smart Hub, the hub will beep and a blue light on the center of the Valve Control Enclosure will blink 3 times and stop.
5. You can now monitor and control your Smart Valve from the Iris website and mobile apps.
If you experience difficulty connecting the Smart Valve to Iris, move the Iris Smart Hub closer
to the Smart Valve or install additional devices to increase the range of your Iris network.
NOTE: To remove the device from Iris, click the “Remove” button in the “Device
Settings” section on the Iris website.
6.
Water Meter
7.
Water Main
LeakSmart Smart Valve
LeakSmart Smart Valve
Installation Instructions:
Installation Instructions:
8.NOTE: Existing
8.
plumbing systems
Main
can be different
Water Supply
Shut-off
Valve
Water Meter
configurations. 2 ft. or greater
Check your local
plumbing codes for
Water Direction
complete compliance
before beginning
installation. The Smart
Valve should be
installed in the main
water line and downstream from the water meter and the main water shut-off valve(s) in your home. It is recommended 9.
that you find a location a couple feet after the water meter for the installation of the Smart Valve. CAUTION: Do not solder fittings near the water meter. Position the Smart Valve so that the arrow on the side of the valve is pointing away from the water meter.
NOTE: The Valve Control Enclosure can be oriented in any
position as long as the front of the Valve Control Enclosure faces
you after the installation is complete.
9. Once the Smart Valve has been installed, close the previously opened faucet and turn on the main water valve and check for leaks.
8.
Smart
Valve
10.
Attach the Valve Control Enclosure back onto the
Smart Valve by sliding the enclosure over the
valve’s motor housing. Make sure that the front
of the enclosure that has the function buttons is facing
you and not the wall. Plug the pin on the end of the
AC power cord adaptor into the bottom of the Valve
Control Enclosure and plug into the nearest
110 volt outlet.
NOTE: If a nearby wall outlet is not available, you will
need to purchase a thin low voltage AC Power Adaptor
Extension Wire for LeakSmart (Model # 8821100). This
9 foot extension wire can be found on www.lowes.com/iris
or getleaksmart.com This extension wire will extend the
overall length of the AC Power adaptor.
10.
Valve Control
Enclosure
Valve Motor
Housing
AC Adapter
Power Cord
Motorized
Water
Ball Valve
NOTE: It is recommended that you do not plug the AC Power Adaptor into an extension cord. The
Smart Valve comes with a 10 ft. AC Power Adaptor Cord. A 9 ft. AC Power Adaptor Extension Wire is
also available (sold separately) that can provide a total length of 19 ft. for the AC Power Cord supply.
NOTE: It is recommended to use the AC Power adaptor as your primary power source. If an electrical
outlet is not available, you can use the battery system as your primary power source (If batteries are
fresh and at full strength, the estimated battery life is 1 year,
depending upon the level of activity and valve operation).
NOTE: The Smart Valve can be operated without being paired to an Iris Smart Hub as long as the
power cord is connected and/or the batteries are installed.
9.
LeakSmart Smart Valve
LeakSmart Smart Valve
Installation Instructions:
Helpful Hints
NOTE: The battery backup system allows the unit to continue working in the event of a
power outage (If batteries are fresh and at full strength, the estimated battery life is 1 year,
depending upon the level of activity and valve operation).
CAUTION: Replace with fresh batteries at least once a year. If batteries need to be
changed sooner, the Iris system can notify you.
11. To check the Valve Control Enclosure function
of the Smart Valve, turn on a faucet. You can
open and close the valve with the buttons on
the Valve Control Enclosure. The “Open” button
on the left side is to open the valve. When the valve
is open, a Green light will blink and water will run
from your faucet. The “Close” button on the right
side is to close the valve. When the valve is closed,
a Red light will blink. The water should stop running
from the faucet and the Smart Valve.
11.
10.
Smart
Valve
Open
Close
• Once a month, the Smart Valve will automatically close and then open by itself. The valve is programmed to run this monthly maintenance cycle so that the valve continues to function properly.
Valve Control Enclosure Button Functions and Status Lights
• Left side “Open” button and light. This button opens the valve and a Green LED light indicates the status of the open valve.
•
Center Button and light. A Blue LED light indicates the valve is paired with the Iris Smart Hub. The light will blink twice approximately every 2 seconds indicating the unit is in Iris Pairing Mode and will continue to blink until the Iris Hub is paired with the Smart Valve. When the Smart Valve is successfully paired with Iris, the light will blink 3 times and stop. NOTE: To reset the Smart Valve to factory setting, push the Center Button quickly 5 times in a row. If the valve is reset, it will no longer be able to be controlled remotely until it is re-paired with Iris.
• Right side “Close” button and light. This button closes the valve and a Red LED light indicates the closed status of the valve. The light will blink approximately every 10 seconds when the valve is closed.
11.
LeakSmart Smart Valve
LeakSmart Smart Valve
Troubleshooting
Manual Operation of Smart Valve
Problem What to Check
Red or Green status light(s) does not light
-Make sure there is power to the outlet.
when operating the valve
-Unplug AC Power Adaptor cord from Valve
Control Enclosure and plug back in.
-If AC Adaptor extension wire was used,
unplug both ends and reconnect.
-Replace with fresh batteries
No water comes out of the faucet
-Make sure Smart Valve is open.
-Make sure the main water supply valve is open.
- Replace with fresh batteries.
Smart Valve does not operate
-Check that the unit is powered from the AC
Power Adaptor or fresh batteries.
Smart Valve does not operate with Iris
-Check Iris website to ensure the Valve Control
Enclosure is connected to Iris.
-Check Internet connection to Iris Smart Hub.
-Install Iris Range Extender (sold separately.)
-Press reset button on Iris Smart Hub
-Power down the Smart Valve by unplugging the
AC Power Adaptor Cord from the electrical
outlet and remove the batteries from the Valve
Control Enclosure. Wait approximately one
minute and restore power to the Smart Valve.
-Call Iris Support at 855-469-IRIS (4747)
12.
In the event of repeated error messages from Iris that the valve is not automatically
opening and closing, the valve can be manually opened or closed.
1. Unplug the AC power cord from the Valve Control Enclosure.
2. Remove the Valve Control Enclosure from the valve.
3. Use a marker and draw a line across one side where the upper and lower motor housing connects. This way once the motor is removed you will know how to reposition it for assembly.
4. Remove the 4 screws using a Phillips head screwdriver.
5. Place thumb and finger on plastic gear and rotate clockwise to open valve or counter clockwise to close it. Do not use tools to manually open or close valve.
13.
LeakSmart Smart Valve
LeakSmart Smart Valve
Iris® Customer Care
2 Year Limited Warranty
Call toll free 855-469-IRIS (4747)
Waxman Consumer Products Group warrants the enclosed LeakSmart product to be free from defects in materials
or workmanship, under normal use and service, for a period of two (2) years from the date of purchase. If at any time
during the warranty period the product is determined to be defective, Waxman Consumer Products Group shall repair
or replace it (at our option). The warranty is limited to defective parts as stated. All costs of removal and installation of
the LeakSmart product, including the replacement of warranty parts, are the responsibility of the purchaser. The manufacturer shall not be liable for incidental, consequential, or special damages arising at, or in connection with product
use or performance, except as may otherwise be accorded by law. Some states do not allow the exclusion limitation
of incidental or consequential damages, so the limitation may not apply to you. Any damage to this LeakSmart product as a result of misuse, abuse, neglect, accident, improper installation, or any use violating the instruction manual
furnished by us will void this warranty. This warranty does not cover damages or loss caused by defects, and the
owner’s use of the LeakSmart product confirms the understanding that this product does not constitute an insurance
policy, and is only a loss mitigation product used to reduce the risk of water damage.
Lowe’s Iris Support
www.lowes.com/iris/support
Warranty Service
Call toll free 1-800-531-3342 or e-mail [email protected].
14.
To obtain warranty service, call our Customer Service Department at 1-800-531-3342, or e-mail us
at [email protected]. You may also send the product and original dated sales receipt, prepaid US
postage to: Waxman CPG, 24455 Aurora Road, Bedford Heights, Ohio 44146, Attention: Customer Service.
15.
Válvula inteligente de leaksmart
LeakSmart Smart Valve
FCC Compliance
This equipment has been tested and found to comply with the limits for a Class B digital
device, pursuant to part 15 of the FCC Rules. These limits are designed to provide
reasonable protection against harmful interference in a residential installation. This
equipment generates, uses and can radiate radio frequency energy, and if not installed and
used in accordance with the instructions, may cause harmful interference to radio
communications. However, there is no guarantee that interference will not occur in a
particular installation. If this equipment does cause harmful interference to radio or television
reception, which can be determined by turning the equipment off and on, the user is
encouraged to try to correct the interference by one or more of the following measures:
•Reorient or relocate the receiving antenna.
•Increase the separation between the equipment and the receiver.
•Connect the equipment into an outlet on a circuit different from that to which the receiver is connected.
•Consult the dealer or an experienced radio/TV technician for help.
LeakSmart de Waxman
™
Válvula inteligente inalámbrica
Modelo 8810300L
automatizada con válvula
de cierre de SUMINISTRO
DE AGUA
Manual de
instalación y
funcionamiento
LEAK SMART
™
16.
17.
© 2014 Waxman Consumer Products
Válvula inteligente de leaksmart
Válvula inteligente de leaksmart
Válvula inteligente de LeakSmart by Waxman™
Válvula inteligente de LeakSmart by Waxman™
Felicitaciones por la compra de la Válvula inteligente de LeakSmart by Waxman™. La
Válvula inteligente es la válvula de bola de latón electrónica y motorizada patentada que
se conecta a la línea de suministro de agua de su hogar. La Válvula inteligente le permite
conectar o desconectar el suministro de agua hacia todo el hogar. Integra la tecnología
inalámbrica que le permite monitorear y controlar con el sistema de administración doméstica de Lowes® Iris® (requiere módulo inteligente Iris).
Válvula inteligente inalámbrica: Modelo 8810300L
CARACTERÍSTICAS:
• El Cerramiento de control de la válvula cuenta con botones fáciles de leer y usar,
y luces LED que indican el estado.
• Válvula de bola de latón maquinado con precisión y sin plomo para un rendimiento
confiable y duradero.
• Puede operar la válvula desde cualquier parte mediante un teléfono inteligente,
tableta o computadora (requiere módulo inteligente Iris).
• Alimentación de CA con reserva de batería: Para un funcionamiento continuo en caso de cortes de energía (si las baterías son nuevas y cuentan con una carga completa, la vida útil estimada de la batería es de 1 año, según el nivel de actividad y funcionamiento de la válvula). La unidad puede funcionar con baterías si no dispone de un tomacorriente.
• Ciclo de mantenimiento mensual automático de la válvula para un funcionamiento
confiable y continuo.
• Puede abrir, cerrar, probar y restablecer la válvula en cualquier momento mediante el toque de un botón en el Cerramiento de control de la válvula o usando un teléfono
inteligente, tableta o computadora gracias al sistema de administración doméstica Iris (requiere módulo inteligente Iris).
• Garantía limitada de 2 años
Cómo funciona la Válvula inteligente de LeakSmart by Waxman™
La Válvula inteligente funciona gracias al sistema de administración doméstica Iris de
Lowe’s. El sistema de administración doméstica Iris le permite verificar el estado actual
y controlar la Válvula inteligente. Puede conectar o desconectar el suministro de agua,
desde la línea principal del hogar desde cualquier parte mediante un teléfono inteligente,
tableta o computadora. Además, puede cerrar la Válvula inteligente automáticamente
cuando Iris detecta una fuga en el hogar (los detectores de fugas inalámbricos Iris se
venden por separado), para proteger el hogar contra fugas de agua causadas por
electrodomésticos defectuosos y rompimientos de líneas de suministro de agua. Cuando
el sistema Iris detecta una fuga de agua, el módulo Iris envía una señal a la Válvula
inteligente para cerrar automáticamente el suministro de agua, además de limitar y
ayudar a minimizar el daño causado por el agua.
NOTA: Este manual de instalación y funcionamiento contiene información importante
sobre el funcionamiento de la unidad. Si desea instalar la unidad para que otros la
empleen, recomendamos dejar este manual (o una copia de él) con el usuario.
Para asegurar la instalación correcta y maximizar el rendimiento de su Válvula inteligente,
lea completamente este manual.
18.
19.
Válvula inteligente de leaksmart
Válvula inteligente de leaksmart
Este paquete contiene:
Instalación
A. (1) Cerramiento de control de la válvula con reserva de baterías
B. (1) Válvula inteligente de bola motorizada de latón (3/4” FIP x 3/4” MIP)
C. (1) Adaptador de alimentación de CA con cable de 3,05 m (10 pies)
NOTA: La Válvula inteligente es una válvula complementaria para su actual sistema de plomería. No
retire ninguna de las válvulas existentes de su sistema de plomería para instalar la Válvula inteligente.
B
A
C
ADVERTENCIA: La Válvula inteligente está diseñada solo para uso en interiores. No instale la Válvula
inteligente en exteriores.
Debe instalar la Válvula inteligente después de la válvula de agua principal y el medidor de agua.
No instale la Válvula inteligente en el medidor de agua.
ADVERTENCIA: Solo para uso con agua. No instale en la línea de gas.
ADVERTENCIA: No utilice este producto en los sistemas de extinción de incendios o líneas de agua de
rociadores contra incendios.
Cerramiento de control de
la válvula
Válvula de bola de agua
motorizado
Adaptador de alimentación de CA
con cable de 3,05 m (10 pies)
ATENCIÓN: Es posible que deba comprar conectores adicionales para instalar la
Válvula inteligente. Si no está seguro sobre cómo instalar la Válvula inteligente a la
línea de suministro de agua principal, recomendamos ponerse en contacto con un
plomero certificado.
Asegúrese de que los contenidos del paquete coincidan con la lista de contenidos
de más arriba.
ADVERTENCIA: No coloque los dedos dentro de la Válvula inteligente. Riesgo de lesiones
graves.
PRECAUCIÓN: Para proteger el Cerramiento de control de la válvula contra posibles
daños durante la instalación, retírelo antes de la instalación. NOTA: No es necesario
colocar el Cerramiento sobre la válvula hasta después de la instalación.
PRECAUCIÓN: No tome la transmisión de plástico del motor para hacer palanca cuando
instale la válvula.valve.
Preparación: Debe retirar el Cerramiento de control de la Válvula de bola inteligente
antes de la instalación. No necesita hacer apalancamiento. Simplemente deslice y aleje
de la válvula. En el Paso 8 se le indica que debe instalar la Válvula inteligente (3/4” FIP x
3/4” MIP). La mayoría de las líneas de suministro de agua rígidas serán de cobre. Evalúe
la línea de suministro de agua y determine el tamaño de los conectores que necesitará (el
conector más común es el adaptador macho para soldaduras de 3/4” y el adaptador
hembra para soldadura de 3/4”). Luego, determine el tamaño de la unión que necesitará
para completar la instalación. Consulte todos los requisitos de cumplimiento en los
códigos locales de plomería antes de comenzar la instalación. PRECAUCIÓN: Asegúrese
de que la válvula inteligente no esté conectada a los conectores cuando suelde.
20.
21.
Válvula inteligente de leaksmart
Válvula inteligente de leaksmart
Cómo emparejar el sistema de administración doméstica Iris® de Lowe’s:
Instrucciones de instalación:
IMPORTANTE: Empareje el Cerramiento de control de la válvula con Iris y pruebe su
funcionalidad antes de instalar la válvula en la línea de suministro de agua.
6.
6.Cierre la válvula principal de
suministro de agua. La
válvula de suministro principal
está ubicada frente al medidor
de agua.
1. Coloque la Válvula inteligente cerca de la ubicación final de instalación. Esto prueba que se encuentra dentro del rango inalámbrico del módulo inteligente Iris durante el emparejamiento.
2.Introduzca 4 baterías alcalinas AA nuevas (no se incluyen) en el compartimiento de las baterías del Cerramiento de control de la válvula o conecte a la electricidad usando el cable adaptador de alimentación de CA. Cuando el modo de emparejamiento de Iris esté listo, se encenderá una luz azul intermitente. NOTA: Después de 10 minutos, la luz azul dejará de destellar, esto indica que la válvula ya no está en modo de emparejamiento. Para restablecer la válvula al modo de emparejamiento, presione una vez el botón central . La luz azul volverá a destellar.
3.Con una computadora, inicie sesión en su cuenta Iris en www.lowes.com/iris. Haga clic en el vínculo “Dispositivos” y seleccione “Agregar dispositivos”. Siga las instrucciones en pantalla.
4.Cuando el Cerramiento de control de la válvula esté emparejado exitosamente con el módulo inteligente Iris, el módulo emitirá un pitido y la luz azul en el centro del Cerra
miento de control de la válvula titilará 3 veces y se detendrá.
5.Ya puede monitorear y controlar la Válvula inteligente desde el sitio Web de Iris y
las aplicaciones móviles.
Principal de
abastecimiento
de agua válvula
de cierre
Dirección de agua
7. Abra las manijas de agua caliente y fría en el grifo más cercano al lugar donde desea colocar la Válvula inteligente para disminuir la presión de agua.
Si tiene dificultades para conectar la válvula inteligente con Iris, acerque el Iris Smart Hub
a la válvula inteligente o instale dispositivos adicionales para aumentar el alcance de la red
Iris. NOTA: Para desemparejar el dispositivo del Iris, haga clic en el botón “Eliminar” en la
sección “Configuración de dispositivos” en el sitio Web de Iris.
22.
Meater agua
23.
7.
agua principal
Válvula inteligente de leaksmart
Válvula inteligente de leaksmart
Instrucciones de instalación:
Instrucciones de instalación:
8.
Principal de
8. NOTA: Las
abastecimiento de
configuraciones de
agua válvula
los sistemas de
de cierre
Meater agua
plomería existentes
pueden ser diferentes.
Consulte todos los
Dirección de agua
requisitos de
cumplimiento en los
códigos locales de
plomería antes de
comenzar la instalación.
La Válvula inteligente debe instalarse en la línea de
suministro de agua principal y aguas abajo del medidor de agua y la(s) válvula(s) de cierre de agua principal(es) en su
hogar. PRECAUCIÓN: No accesorios de soldadura cerca del medidor de agua. Coloque la
válvula inteligente de manera que la flecha en el lado de la válvula es apuntando lejos del medidor de agua.
NOTA: Puede orientar el Cerramiento de control de la válvula
en cualquier posición, siempre y cuando la parte frontal de este
apunte hacia usted una vez finalizada la instalación.
9.Después de instalar la Válvula inteligente, cierre el grifo y
abra la válvula de suministro de agua para comprobar que no hayan goteras en la válvula.
24.
Válvula
inteligente
2 pies o mayor
9.
10.
10. Vuelva a colocar el Cerramiento de control de la
válvula en la Válvula inteligente. Para esto, deslice
el cerramiento sobre la carcasa del motor de la
válvula. Asegúrese de que la parte frontal del cerramiento
que tiene los botones de función esté apuntando hacia usted
y no hacia la pared. Conecte el pin en el extremo del
adaptador de cable de alimentación de CA en la parte inferior
de la carcasa de la válvula de control y tapar en el enchufe
de 110 voltios más cercano.
NOTA: Si no dispone de un tomacorriente cercano, deberá
comprar un cable de extensión adaptador de alimentación de
CA de bajo voltaje para LeakSmart (Modelo #8821100). Puede
encontrar esta extensión eléctrica en www.lowes.com/iris o
getleaksmart.com. Esta extensión eléctrica será del largo total
del adaptador de alimentación CA.
Cerramiento de
control de la válvula
la válvula
del motor
viviendas
Válvula
inteligente
de bola
motorizada
de latón
Adaptador
de alimentación
de CA con
cable de
3,05 m (10 pies)
NOTA: Se recomienda que no enchufe el adaptador de alimentación de CA en una extensión eléctrica.
La válvula inteligente incluye un cable adaptador de alimentación de CA de 3,05 m (10 pies). También
se encuentra disponible una extensión eléctrica adaptadora de alimentación de 2,74 m (9 pies) (se
vende por separado) que puede ofrecer un largo total de 5,79 m (19 pies) para el cable de alimentación
de CA.
NOTA: Se recomienda usar un adaptador de alimentación de CA como fuente de alimentación principal. Si no dispone de un tomacorriente, puede usar un sistema de baterías como sistema principal de
alimentación (si las baterías son nuevas y cuentan con una carga completa, la vida útil estimada de las
baterías es de 1 año, según el nivel de actividad y funcionamiento de la válvula).
NOTA: La Válvula inteligente puede funcionar sin emparejarse con un módulo inteligente Iris, siempre y
cuando el cable de alimentación esté conectado o las baterías estén instaladas.
25.
Válvula inteligente de leaksmart
Válvula inteligente de leaksmart
Instrucciones de instalación:
Consejos útiles
NOTA: El sistema de reserva de baterías le permite a la unidad continuar funcionando
en el caso de un corte de energía (si las baterías son nuevas y cuentan con una carga
completa, la vida útil estimada de las baterías es de 1 año, según el nivel de actividad y
funcionamiento de la válvula).
• Una vez al mes, la válvula inteligente se cerrará y abrirá automáticamente. La válvula está programada para realizar este mantenimiento mensual de manera que continúe funcionando correctamente.
PRECAUCIÓN: Reemplace las baterías al menos una vez al año. El sistema Iris puede
notificarle si debe cambiar las baterías antes.
11.
11. Abra un grifo para verificar el funcionamiento
del Cerramiento de control de la Válvula inteligente.
Puede abrir y cerrar la válvula con los botones del
Cerramiento de control de la válvula. El botón “Abrir”
de la izquierda abre la válvula. Cuando la válvula
esté abierta, una luz verde titilará y comenzará a
salir agua del grifo. El botón “Cerrar” de la derecha
cierra la válvula. Cuando la válvula esté cerrada,
una luz roja titilará. En este momento el agua
debería dejar de fluir desde el grifo y la Válvula
inteligente.
Válvula
inteligente
Abierto
Cerca
Botones de función y Luces indicadoras de estado del Cerramiento de control
de la válvula
• Botón “Abrir” y luz al costado izquierdo. Este botón abre la válvula. Una luz LED verde indica que las válvulas están abiertas. La luz titilará cada 10 segundos cuando la
válvula esté abierta.
• Botón central y luz. Una luz LED azul indica que la válvula está emparejada con el módulo inteligente Iris. La luz titilará dos veces cada 2 segundos para indicar que la unidad está en modo de emparejamiento Iris, y continuará titilando hasta que el módulo inteligente Iris esté emparejado con la Válvula inteligente. Cuando la Válvula inteligente esté emparejada correctamente con Iris, la luz titilará 3 veces y se
detendrá. NOTA: Para restablecer la Válvula inteligente a la configuración de fábrica,
presione rápidamente el Botón central 5 veces seguidas. Si la válvula se reinicia, ya no se podrá controlar de forma remota hasta que se vuelve a emparejar con Iris.
• Botón “Cerrar” y luz al costado derecho. Este botón cierra la válvula. Una luz LED roja indica que las válvulas están cerradas. La luz titilará cada 10 segundos cuando la válvula esté cerrada.
26.
27.
Válvula inteligente de leaksmart
Válvula inteligente de leaksmart
SOLUCIÓN DE PROBLEMAS
Funcionamiento manual de la Válvula inteligente
En caso de que aparezcan reiterados mensajes de error de Iris indicando que la
válvula no se abre y cierra automáticamente, la válvula se puede abrir o cerrar de
forma manual.
Problema Qué hay que verificar
Las luces de estado roja o verde no se
-
encienden al accionar la válvula.
-
-
-
Asegúrese de que haya energía en el tomacorriente.
Desconecte el cable adaptador de alimentación
de CA del Cerramiento de control de la válvula, y vuelva a conectarlo.
Si empleó una extensión eléctrica de CA,
desconecte ambos extremos y vuelva a conectar.
Instale baterías nuevas.
1. Desconecte el cable de alimentación de CA del Cerramiento de control de la válvula.
2. Retire el Cerramiento de control de la válvula de la válvula.
No sale agua del grifo
- Asegúrese de que la Válvula inteligente esté abierta.
- Asegúrese de que el suministro de agua
principal esté abierto.
- Reemplace con baterías nuevas.
3. Use un marcador para hacer una línea en un costado donde se conecta la carcasa superior e inferior del motor. De esta manera, una vez que haya retirado el motor sabrá cómo volver a colocarlo para su ensamblaje.
La Válvula inteligente no funciona 4. Retire los 4 tornillos con un destornillador Phillips.
- Compruebe que la unidad está alimentada por el adaptador de alimentación de CA o con pilas.
La Válvula inteligente no funciona con Iris
- Visite el sitio Web de Iris para asegurarse de que el
Cerramiento de control de la válvula esté conectado a Iris.
- Verifique la conexión de Internet con el módulo
inteligente Iris.
- Presione el botón de reinicio en el Iris Smart Hub.
- Instale un extensor de rango Iris (se vende por separado).
- Apague la Válvula inteligente, para ello desenchufe el cable
del adaptador de alimentación de CA de la toma eléctrica
y retire las baterías del cerramiento de control de la válvula. Espere aproximadamente un minuto y restablezca la
alimentación la Válvula inteligente.
- Llame al Centro de servicio al cliente
al 855-469-IRIS (4747)
28.
5. Con su dedo pulgar e índice en el engranaje de plástico, gire en dirección de las manecillas del reloj para abrir la válvula o en dirección contraria a las manecillas del reloj para cerrarla. No use herramientas para abrir o cerrar manualmente la válvula.
29.
Válvula inteligente de leaksmart
Válvula inteligente de leaksmart
Servicio al Cliente de Iris
Garantía limitada de dos (2) años
®
Llame gratis al 855-469-IRIS (4747)
Servicio de asistencia de Lowe’s Iris
www.lowes.com/iris/support
Servicio de garantía
Llame gratis al 1-800-531-3342 o envíenos un correo electrónico a [email protected].
Waxman Consumer Products Group garantiza que los productos incluidos LeakSmart no presentarán defectos en el
material o en la mano de obra, bajo uso y mantenimiento normales, durante un periodo de dos (2) años desde la fecha
de compra. Si en cualquier momento durante el periodo de garantía se determina que el producto presenta defectos,
Waxman Consumer Products Group lo reparará o reemplazará (según nuestro criterio). La garantía se limita a las piezas
defectuosas tal como se estipula. Todos los costos de extracción e instalación del producto LeakSmart, incluido el
reemplazo de las piezas en garantía, son responsabilidad del comprador. El fabricante no será responsable por daños
incidentales, resultantes o especiales que surjan en relación con el uso o el funcionamiento del producto, excepto
que la ley indique lo contrario. Algunos estados no permiten la exclusión ni la limitación de los daños accidentales o
resultantes, de modo que las limitaciones pueden no aplicarse en su caso. Cualquier daño a este producto LeakSmart
resultante de un uso inadecuado, abuso, negligencia, accidente, instalación inadecuada o cualquier otro uso que infrinja
el manual de instrucciones proporcionadas por nosotros anulará esta garantía. Esta garantía no cubre los daños o la pérdida causados por defectos, y el uso por parte del propietario del producto LeakSmart confirma el entendimiento de que
este producto no constituye una póliza de seguro y es solo un producto de mitigación de pérdida que reduce el riesgo
de daños causados por el agua.
Para obtener el servicio de garantía, llame a nuestro Departamento de Servicio al Cliente al 1-800-531-3342 o envíenos
un correo electrónico a [email protected]. También puede enviar el producto y el recibo de compra
con la fecha original, con el franqueo estadounidense pagado a: Waxman CPG, 24455 Aurora Road, Bedford Heights,
Ohio 44146, Attention: Customer Service.postage to: Waxman CPG, 24455 Aurora Road, Bedford Heights, Ohio 44146,
Attention: Customer Service.
Cumplimiento con FCC
Este equipo ha sido probado y se ha verificado que cumple los límites para un dispositivo digital clase B, conforme
a la sección 15 de las reglas de la FCC. Estos límites se han diseñado para proporcionar una protección razonable
contra la interferencia perjudicial en una instalación residencial. Este equipo genera, utiliza y puede irradiar energía de
radiofrecuencia y, si no se instala y usa de acuerdo con las instrucciones, puede causar interferencia perjudicial a las comunicaciones de radio. Sin embargo, no se garantiza que no se producirán interferencias en una instalación en especial.
Si este equipo genera una interferencia perjudicial para la recepción de radio o televisión, lo que se puede determinar
apagando y encendiendo el equipo, se recomienda al usuario que intente corregir la interferencia con una o más de las
siguientes medidas:
• Reoriente o reubique la antena de recepción.
• Aumente la separación entre el equipo y el receptor.
• Conecte el equipo a un tomacorriente de un circuito distinto al que usa el receptor.
• Solicite ayuda al distribuidor o a un técnico con experiencia en radio/TV.
30.
31.
LEAK SMART
™
©2014 Waxman Consumer Products
24455 Aurora Road
Bedford Heights, Ohio 44146
Designed in the U.S.A.
Made in China
Diseñado en los EE. UU.
Hecho en China
Patent Pending
Patente en trámite
8810300L Rev. 7/14


![CS4070 Quick Reference Guide [Spanish] P/N MN000763A02ES](http://vs1.manualzilla.com/store/data/006172100_1-c575f13a170a0c72eba289d6b7e2bf2f-150x150.png)