1
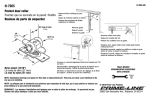
CARACTERÍSTICAS
MANUAL DE INSTRUCCIONES
LÁMPARA DE EMERGENCIA
EM-1198
•
•
•
•
•
•
•
Tubo fluorescente sencillo
Tubo fluorescente doble
Encendido automático en caso de corte de energía
Puede montarse en la pared o usarse como lámpara portátil gracias a su agarradera y soporte
LED indicador rojo para la recarga
LED indicador verde durante el funcionamiento
LED indicador azul en modo flash
ADVERTENCIAS
1.
2.
3.
4.
5.
6.
7.
Cargue la lámpara antes de usarla por primera vez. Instrucciones en la sección “Cómo recargar”.
Recargue la lámpara después de usarla y cada vez que la batería esté con poca energía.
Asegúrese que todos los interruptores estén en la posición “OFF” cuando no use la lámpara.
Cuando no vaya a usar la lámpara por 3 o 4 meses, cárguela periódicamente.
Recargue la lámpara sólo en interiores.
Verifique que el voltaje de su red domiciliaria corresponda al requerimiento de la lámpara.
No sumerja la lámpara en ningún líquido.
CÓMO RECARGAR
1.
2.
3.
4.
5.
6.
Abra el compartimiento del cable de energía.
Extraiga el cable de energía del compartimiento.
Enchufe el cable de energía al tomacorriente.
El LED indicador rojo se encenderá si el cable está correctamente enchufado en el tomacorriente.
Una vez cargada la batería, desenchufe el cable de energía y guárdelo en el compartimiento.
El tiempo de recarga completa es de aproximadamente 20 a 24 horas.
LÁMPARA DE EMERGENCIA
Coloque el interruptor en la posición para tubo fluorescente sencillo o tubo fluorescente doble. La
lámpara de emergencia quedará en el modo de espera y se encenderá automáticamente cuando haya
un corte de energía.
CÓMO REMPLAZAR EL TUBO FLUORESCENTE
1. Desenchufe la lámpara y coloque el interruptor en la posición “OFF”.
2. Desentornille la cubierta transparente con un destornillador cruz, quite la cubierta transparente. Gire
el tubo suavemente hasta que las patitas de metal aparezcan sobre el sostenedor del tubo. Quite el
tubo y apóyelo.
3. Coloque el nuevo tubo que debe ser del tipo recomendado.
4. Vuelva a colocar la cubierta transparente según las instrucciones.
CUIDADO Y MANTENIMIENTO
ESTIMADO CLIENTE
Felicitaciones por su compra!
Por favor lea cuidadosamente este manual, y guárdelo para su futura referencia.
Si necesita soporte adicional, no dude en escribir a: [email protected]
La lámpara debe ser limpiada con un paño humedecido en una solución jabonoso suave. No use
detergentes químicos ya que podría dañar las piezas plásticas.
NOTA: Recargue la batería cuando la intensidad de la luz disminuya.
Pagina 1
FEATURES:
INSTRUCTION MANUAL
• Single fluorescent light
RECHARGEABLE
• Twin fluorescent light
EMERGENCY
• Automatically turns on if power failure
LIGHT
• Mountable on wall, portable with built-in handle & stand
ED-1198
• Red LED indicates recharging
• Green LED indicates working
• Blue LED indicates flashing
Precaution:
1. Charge the lantern before using the first time, read instruction on " how to recharge"
2. Always recharge the lantern after use and recharge lantern when the battery power is exhausted.
The lantern will automatically turns off when the battery power is exhausted
3. Always make sure all the switches are on "OFF" position when not in use
4. Charge the lantern periodically when lantern is not being used for over 3 to 4 months.
5. Recharge the lantern indoor only.
6. Ensure correct electric rating of home power before plugging in.
7. Never immerse the lantern in water.
How to recharge:
1. Open the power cord compartment door.
2. Pull out the power cord/plug from the power cord compartment.
3. Plug in the power cord/plug to the receptacle of AC home power supply.
4. Red LED lights up if the cord is properly connected and there is AC power at receptacle
5. After fully charged, please unplug the lantern and put the power cord/plug back into the power cord
compartment.
6. Normal recharging time for maximum capacity is approximate 20-24 hours.
How to utilize emergency function:
Place the switch to the position of one or double lamp tubes during recharging; the emergency function
is now let to stand-by mode. The lamp tubes will be lighted up automatically when there is a power
failure.
How to replace lamp tubes:
1. Unplug the lantern and turn all switches to "OFF" position.
2. Unscrew and remove the transparent lens with a cross-heated screwdriver, lift out the lens case.
slightly turn the tube unit the metal pins shown up in the gap of the tube holder, lift the tube up on a
slant position.
3. Insert a new tube as recommended. (check the recommended tube wattage information on the
package)
4. Reassemble by reversing the above steps.
CARE AND MAINTENANCE:
The lantern should be cleaned by wiping with a damp cloth and mild detergent; Never use strong
chemicals to clean, as it will damage the plastic parts.
Note:
Please recharge in time when light dim.
Pagina 2