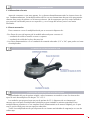
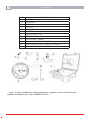
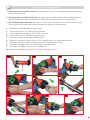
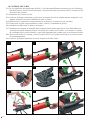
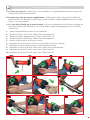
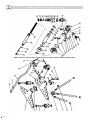
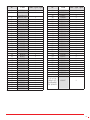
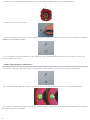
1
OPERATNG INSTRUCTIONS
& PARTS LIST
STANDARD SELF-LEVELING LASER LEVEL
STANDARD ROTATORY LASER LEVEL
PIPE BENDER CURVAMATIC-3
DIGITAL DIAL INDICATOR
TORQUE MULTIPLIERS
DRILL PERFORMATIC-102
PIPE THREADING MACHINE MASTERMATIC-2
INSPECTION CAMERA MASTERVISION REC/ECO
HYDRAULIC TROLLEY
MANUAL DE INSTRUCCIONES
OPERATING INSTRUCTIONS
MANUEL D’INSTRUCTIONS
NIVEL LÁSER AUTONIVELANTE STANDARD
/ STANDARD SELF-LEVELING LASER LEVEL /
NIVEAU LASER AUTO-RÉGLABLE STANDARD
ESPAÑOL.............................. 2
ENGLISH............................... 4
FRANÇAIS............................. 6
GARANTIA / GUARANTEE /
GARANTIE............................ 9
ESPAÑOL
Los niveles láser autonivelantes pueden ser utilizados en construcción, decoración, fontanería,…e incluyen las siguientes funciones:
- Utilización directa, sin ningún tipo de ajuste.
- Ofrece la posibilidad de trabajar tanto con niveles verticales como horizontales ya que proyecta una línea horizontal y otra vertical.
- El nivel podrá ser utilizado sólo, con la base o con el trípode, dependiendo de la superficie (todo ello incluido).
- También se podrá colgar este nivel en la cualquier altura mediante la anilla de la parte superior del nivel.
DATOS TÉCNICOS
Tipo de pilas
Duración de las baterías (en uso)
Longitud de onda
Luminosidad
Nivel de radiación
Rango de auto nivelación
Precisión horizontal/vertical
Temperatura de trabajo
Temperatura de almacenaje
2x1.5V AA DC
4h cont.
650nm
≤ 1mW
II
± 3º (La luz parpadeará a modo de alarma en caso de exceder este rango)
0.5mm/m
0ºC – 40ºC
-5ºC ~ 50ºC
COLOCACIÓN DE LAS PILAS
- Abrir la tapa del compartimiento de las pilas.
- Coloque dos nuevas pilas.
- Coloque de nuevo la tapa y estará listo para ser utilizado.
ADVERTENCIAS
- Hay que quitar las pilas si el nivel láser no se utiliza en periodos largos.
- En caso de que las pilas se estropeen por permanecer mucho tiempo en el nivel sin utilizarlo, limpiar el compartimiento con un
paño suave y evite el contacto directo.
- Para proteger el medioambiente, recicle las baterías usadas y gastadas, depositándolas en los lugares adecuados.
PARTES DEL NIVEL
1. Dial.
2. Salida de la línea horizontal.
3. Salida de la línea vertical.
4. Anilla.
5. Burbuja.
6. Protector de goma.
7. Botón de encendido.
8. Tornillo de nivelación.
-2-
INSTRUCCIONES DE USO
Para utilizar el nivel láser en el suelo, con el trípode o con alguna base horizontal:
Coloque el nivel en el suelo o en cualquier base horizontal (sin hacer ningún ajuste previo ya que es autonivelante) y encienda
el aparato (botón de ON/OFF). Se iluminarán una línea horizontal y una vertical. Si el ángulo excede los ±3º mencionados, la luz
parpadeará a modo de alarma y significará que el nivel está desnivelado. Si el nivel está sobre la base en una superficie irregular,
mueva el tornillo nivelador y si está sobre el trípode ajústelo para nivelarlo hasta que deje de parpadear la luz.
Para utilizarlo con la anilla:
El nivel láser se puede colgar en cualquier altura con las anillas de la parte superior de los niveles.
NOTA
Siempre que no se esté utilizando el nivel láser, se debe mantener en la posición OFF ya que además de ser el botón de encendido/
apagado, es una medida de protección que bloquea el dispositivo interior para no dañarlo ni golpearlo en los traslados, movimientos
bruscos,…Al pasar la rueda a posición ON, el mecanismo de auto nivelación interior se desbloquea quedando liberado.
ADVERTENCIAS
- No mire directamente al rayo láser.
- No mire al rayo láser con ningún aparato óptico.
- Mantenga a los niños alejados del rayo láser.
NOTA
¡IMPORTANTE!
El fabricante no se responsabiliza de los daños o mal funcionamiento de la máquina en caso de que no se use correctamente o se
haya utilizado para trabajos para los que no está diseñada.
GARANTÍA
El fabricante garantiza al comprador de ésta máquina la garantía total durante 12 meses de las piezas con defectos de fabricación.
Esta garantía no cubre aquellas piezas que por su uso normal tienen un desgaste.
Nota: para obtener la validez de la garantía, es absolutamente imprescindible que complete y remita al fabricante el documento
de “CERTIFICADO DE GARANTIA”, dentro de los siete dias a partir de la fecha de compra.
-3-
ENGLISH
Standard Self-levelling Laser Level can be used in civil construction, decoration, plumbing,... including the following functions:
- Use this Auto-setting level directly without any adjustment.
- Make the laser horizontal-line/vertical-line to check/correct the horizontal/vertical status of measured objects. Oblique incidence
made by laser vertical-line can also irradiate to walls and roofs.
- This laser level can be used alone, with the base or with the tripod (both included).
- Hang this level on the any height with the ring at the top of the level.
TECHNICAL DATA
Battery voltage
Operating time
Laser wavelength
Luminous power
Radiation class
Self-levelling range
The horizontal/vertical accuracy
Operating ambient temperature
Storage temperature
2x1.5V AA DC
4h cont.
650nm
≤ 1mW
II
± 3º (There will be the glitter-alarm if exceed this range)
0.5mm/m
0ºC – 40ºC
-5ºC ~ 50ºC
BATTERY ASSEMBLING
- Open the battery-box cover.
- Put two batteries into the box with anode outward.
- Close the box-cover and put down the Power button.
WARNING
- If don’t use the instrument over 3 months, please take the battery out and keep them in cool and dry place
- If the battery leaked, please clean the liquid with soft cloth and avoid contacting with skin
- In order to protect the environment please put the batteries into recycle-bin, forbidding rejecting and burning them.
PARTS OF LEVEL
1. Dial
2. Horizontal-line output
3. Vertical -line output
4. Stationary rings
5. Vial
6. Rubber gasket
7. Power-button
8. Levelling-screw
-4-
OPERATION INSTRUCTION
Use this level on the ground, other horizontal objects or the tripod:
Put it on the ground or other horizontal objects (there is an auto-setting inside without any adjustment before using), turn on Power
button. A horizontal laser-line and a laser vertical laser-line will be lighted. If the angle exceeded ±3° there will be a glitter-alarm. If
this is the case, the level is unlevelled. If the level is on surfaces, adjust the level with the levelling-screw. If the level is on the tripod,
adjust the tripod. When the glitter-alarm disappears, the level is adjusted. Now the equipment is levelled.
Connect with rings to use:
The Standard Self-levelling Laser Level can be hung on at any height with the rings at the top of the level.
NOTE
Whenever the laser level is not being used, it must be maintained in OFF position. It is a security measure for the inner device not
to damage it or to strike it in abrupt movements, displacement,...When the level is ON, the internal auto levelling device gets free to
move.
WARNING
- Don’t stare at the laser beam with eyes directly.
- Don’t stare at the laser beam with optical apparatus directly.
- Don‘t let child touch or close to the laser beam.
NOTE
IMPORTANT!
The maker will not take responsibility for damage or malfunction as a result of the Testing Pump being incorrectly used or, applied
for a purpose for which it was not intended.
GUARANTEE
The maker guarantees to the machine owner 12 months against any manifacture defect.
This guaranteee do not cover the parts wich are consumables.
Note: to apply the guarantee its necesary to send the “GUARANTEE CERTIFICATE” duly filled within one week after purchased
the machine to the maker.
-5-
FRANÇAIS
Les niveaux laser auto nivelant peuvent être utilisés en construction, décoration, plomberie,… et comprennent les fonctions suivantes:
- Utilisation directe, sans aucun type d’ajustement.
- Offre la possibilité de travailler aussi bien avec des niveaux verticaux qu’horizontaux, puisqu’ils projettent une ligne horizontale et
une autre verticale.
- Le niveau pourra être utilisé seul, avec la base ou le trépied, suivant la superficie (tout cela inclus).
- Le niveau pourra également être raccroché à quelconque hauteur par le biais de l’anneau de la partie supérieure du niveau.
RENSEIGNEMENTS TECHNIQUES
Type de piles
Durée des batteries (en utilisation)
Longueur d’onde
Luminosité
Niveau de radiation
Rang d’auto nivelage
Précision horizontale/verticale
Température de travail
Température d’usinage
2x1.5V AA DC
4h cont.
650nm
≤ 1mW
II
± 3º (La lumière clignotera en signe d’alarme en cas de dépassement du rang)
0.5mm/m
0ºC – 40ºC
-5ºC ~ 50ºC
INTRODUCTION DES PILES
- Retirer le couvercle du compartiment des piles.
- Introduire deux nouvelles piles.
- Remettre le couvercle et il sera prêt à être utilisé.
PRÉCAUTIONS
- Il est nécessaire de retirer les piles si le niveau laser n’est pas utilisé pendant de longues périodes.
- Au cas où les piles s’useraient du fait d’être resté trop longtemps dans le niveau sans en faire usage, nettoyer le compartiment à
l’aide d’une serviette douce et éviter le contact direct.
- Afin de protéger l’environnement, recyclez les batteries usées en les déposant dans les endroits prévus à cet effet.
PARTIES DU NIVEAU
1. Dial.
2. Sortie de la ligne horizontale.
3. Sortie de la ligne verticale.
4. Anneau.
5. Bulle.
6. Protecteur en caoutchouc.
7. Bouton d’incendie.
8. Vis de nivelage.
-6-
INSTRUCTIONS D’UTILISATION
Pour utiliser le niveau laser sur le sol, à l’aide du trépied ou d’une base horizontale :
Placer le niveau sur le sol ou sur une base horizontale (sans aucun ajustement préalable car il est auto nivelant) et allumer l’appareil
(bouton ON/OFF). Une ligne horizontale et une verticale s’illumineront). Si l’angle dépasse les ±3º mentionnés, la lumière clignotera
en signe d’alarme et cela signifiera que le niveau est dénivelé.
Si le niveau se trouve sur la base sur une superficie irrégulière, déplacer la vis nivelante et si il est sur le trépied, ajustez-le pour le
niveler jusqu’à ce la lumière cesse de clignoter.
Pour l’utiliser avec l’anneau :
Le niveau laser peut être raccroché à n’importe quelle hauteur à l’aide des anneaux de la partie supérieure des niveaux.
REMARQUE
Lorsqu’il n’est pas fait usage du niveau laser, la position OFF doit être maintenue, car, en plus d’être le bouton pour allumer/
éteindre, il est une mesure de protection qui bloque le dispositif intérieur pour ne pas l’endommager lors des déplacements,
mouvements brusques,…En passant la roue sur la position ON, le mécanisme d’auto nivelage intérieur se débloque, se libérant ainsi.
PRÉCAUTIONS
- Ne pas regarder directement le rayon laser
- Ne pas regarder le rayon laser avec un appareil optique.
- Eloigner les enfants du rayon laser.
NOTE
IMPORTANT!
Le fabricant ne se responsabilise pas des détériorations ou du mauvais fonctionnement de la machine dans le cas d’une mauvaise
utilisation ou suite á des usages pour lesquels elle n’est pas concue.
GARANTIE
Le fabricant donne une garantie de 12 mois à l’acquéreur de cette machine, pour les pièces avec un défaut de fabrication.
La garantie ne s’applique pas aux pièces d’usure normale.
Note : pour obtenir la validité de la garantie, il est obligatoire de compléter et de retourner au fabricant, le document
‘’CERTIFICAT DE GARANTIE’’ dans les 7 jours d’acquisition de la machine.
-7-
-8-
CERTIFICADO DE GARANTIA
GUARANTEE CERTIFICATE
CERTIFICAT DE GARANTIE
ARTICULO / ITEM / ARTICLE:.....................................................................................................................
Nº DE SERIE / SERIE Nº / Nº SERIE:............................................................................................................
DISTRIBUIDOR / DISTRIBUTOR / DISTRIBUTEUR:....................................................................................
PAIS / COUNTRY / PAYS:..............................................................................TEL.:....................................
FECHA DE VENTA / SALE DATE / DATE VENTE:.........................................................................................
NOMBRE DEL COMPRADOR / BUYER NAME / NOM DE L’ACHETEUR:...................................................
TEL. COMPRADOR / BUYER TEL. / TEL. DE L’ACHETEUR:.........................................................................
EGA MASTER GARANTIZA AL COMPRADOR DE ESTA MAQUINA LA GARANTIA TOTAL (DURANTE 12 MESES), DE LAS PIEZAS CON DEFECTOS DE FABRICACION. ESTA
GARANTIA NO CUBRE AQUELLAS PIEZAS QUE POR SU USO NORMAL TIENEN UN DESGASTE. PARA OBTENER LA VALIDEZ DE LA GARANTIA , ES ABSOLUTAMENTE
IMPRESCINDIBLE QUE COMPLETE Y REMITA ESTE DOCUMENTO A EGA MASTER , DENTRO DE LOS SIETE DIAS A PARTIR DE LA FECHA DE COMPRA.
EGA MASTER GUARANTEES TO THE BUYER OF THIS MACHINE THE TOTAL WARRANTY (DURING 12 MONTHS), OF THE PIECES WITH MANUFACTURING FAULTS.
THIS GUARANTEE DOES NOT COVER THOSE PIECES WORN OUT DUE TO A NORMAL USE. IN ORDER TO OBTAIN THE VALIDITY OF THIS WARRANTY , IT IS
ABSOLUTELY NECESSARY TO FULFILL THIS DOCUMENT AND RESEND IT TO EGA MASTER WITHIN 7 DAYS FROM SALE DATE.
EGA MASTER GARANTIE A L’ACHETEUR DE CETTE MACHINE LA GARANTIE TOTALE (PENDANT 12 MOIS) DES PIECES AVEC DEFAUTS DE FABRICATION. CETTE GARANTIE
NE COUVRE PAS LES PIECES QUE PAR UN USAGE NORMAL, SOIENT DETERIOREES. POUR OBTENIR LA VALIDITE DE LA GARANTIE, IL EST ABSOLUMENT IMPERATIF
COMPLETER ET ENVOYER CE DOCUMENT EGA MASTER, DANS UN DELAI DE 7 JOURS A PARTIR DE LA DATE D’ACHAT.
SELLO / STAMP / CACHET
EJEMPLAR PARA EGA MASTER / COPY FOR EGA MASTER / EXEMPLAIRE POUR EGA MASTER
CERTIFICADO DE GARANTIA
GUARANTEE CERTIFICATE
CERTIFICAT DE GARANTIE
ARTICULO / ITEM / ARTICLE:.....................................................................................................................
Nº DE SERIE / SERIE Nº / Nº SERIE:............................................................................................................
DISTRIBUIDOR / DISTRIBUTOR / DISTRIBUTEUR:....................................................................................
PAIS / COUNTRY / PAYS:..............................................................................TEL.:....................................
FECHA DE VENTA / SALE DATE / DATE VENTE:.........................................................................................
NOMBRE DEL COMPRADOR / BUYER NAME / NOM DE L’ACHETEUR:...................................................
TEL. COMPRADOR / BUYER TEL. / TEL. DE L’ACHETEUR:.........................................................................
EGA MASTER GARANTIZA AL COMPRADOR DE ESTA MAQUINA LA GARANTIA TOTAL (DURANTE 12 MESES), DE LAS PIEZAS CON DEFECTOS DE FABRICACION. ESTA
GARANTIA NO CUBRE AQUELLAS PIEZAS QUE POR SU USO NORMAL TIENEN UN DESGASTE. PARA OBTENER LA VALIDEZ DE LA GARANTIA , ES ABSOLUTAMENTE
IMPRESCINDIBLE QUE COMPLETE Y REMITA ESTE DOCUMENTO A EGA MASTER , DENTRO DE LOS SIETE DIAS A PARTIR DE LA FECHA DE COMPRA.
EGA MASTER GUARANTEES TO THE BUYER OF THIS MACHINE THE TOTAL WARRANTY (DURING 12 MONTHS), OF THE PIECES WITH MANUFACTURING FAULTS.
THIS GUARANTEE DOES NOT COVER THOSE PIECES WORN OUT DUE TO A NORMAL USE. IN ORDER TO OBTAIN THE VALIDITY OF THIS WARRANTY , IT IS
ABSOLUTELY NECESSARY TO FULFILL THIS DOCUMENT AND RESEND IT TO EGA MASTER WITHIN 7 DAYS FROM SALE DATE.
EGA MASTER GARANTIE A L’ACHETEUR DE CETTE MACHINE LA GARANTIE TOTALE (PENDANT 12 MOIS) DES PIECES AVEC DEFAUTS DE FABRICATION. CETTE GARANTIE
NE COUVRE PAS LES PIECES QUE PAR UN USAGE NORMAL, SOIENT DETERIOREES. POUR OBTENIR LA VALIDITE DE LA GARANTIE, IL EST ABSOLUMENT IMPERATIF
COMPLETER ET ENVOYER CE DOCUMENT EGA MASTER, DANS UN DELAI DE 7 JOURS A PARTIR DE LA DATE D’ACHAT.
SELLO / STAMP / CACHET
EJEMPLAR PARA EL CLIENTE / COPY FOR THE CUSTOMER / EXEMPLAIRE POUR LE CLIENT
DIGITAL DIAL INDICATOR
EGA Master DIGITAL DIAL INDICATOR
¾
DESCRIPTION
1. ZERO/ON key:
Pressing the “ZERO/ON” button lightly, you can reset the value at any
locations. Pressing the “ZERO/ON” button more than 2 seconds the power is
shut off. Pressing any key again the digital dial indicator restarts working.
2. UNIT key:
Pressing the “UNIT” button lightly, the unit between “mm” and “inch” can be
changed.
3. ABS/SET key:
a) Pressing the “ABS/SET” button lightly, the measuring condition can
be changed to absolute condition.
b) When the LCD displays “ABS/SET”, pressing this key for a long time
the pre-value can be set, meantime the LCD will display “Set”.
Pressing this key during a short time from 1 to 9 can be adjusted.
Pressing this key during a short time until the “Set” flickers again,
the “ABS/SET” setting can be finished.
4. RAN key:
Pressing the RAN button you can circulate between the volume measuring
maximize, minimize and max/min error. Pressing the “ZERO/ON” button at
any position, the last measuring value can be cleared, restarting the measure
again.
5. TOL key:
a) Pressing the “TOL” button more than 2 seconds; you can go into the
tolerance setting. Pressing the “TOL” button during a short time, the
number from 0 to 9 can be adjusted.
When LCD displays
SET (flash)
; you can set the upper limit.
00.000mm
When LCD displays
SET (flash)
; you can ser the lower limit.
(flash)00.000mm
Pressing this key during a short time until the “Set” flickers again,
the setting can be finished.
b) If something is wrong with the value, the indicator displays “EEE”;
pressing the “ZERO/ON” button, you can return to the ordinary
measuring condition. Pressing the “ZERO/ON” or “TOL” button, this
process can be removed.
c) Pressing the “TOL” button for a long time until the “Set” flickers, and
then pressing this key shortly twice; you can go into the tolerance
measuring again.
d) In the tolerance measuring process, the measuring condition
between comparative and absolute can not be changed.
e) In the tolerance measuring process, the indicator also displays the
displacement value.
f)
¾
Tolerance setting can be stored even if power is off.
PRECAUTIONS FOR USE:
1. The indicator has a high accuracy sensor and an info dealing circuit. DO
NOT immerse it in any type of liquid.
2. If in the “ON” position, the LCD can not display the value; please replace the
battery immediately.
3. Before using it, in order to protect of water steam; please clean the surface
of the indicator.
4. Working conditions:
a) Temperature: 5ºC – 40ºC.
b) Comparative humidity: < 80%.
c) DO NOT immerse the surface of keeping skin in the liquid with
electrolyte.
5. DO NOT exert the electronic pressure on the digital measuring tools, in order
to protect the circuit. DO NOT use electronic pan lettering.
MANUAL DE INSTRUCCIONES
OPERATING INSTRUCTIONS
MULTIPLICADORES DE PAR /
TORQUE MULTIPLIERS
MULTIPLICADOR DE PAR
ESPAÑOL................................ 2
ENGLISH................................. 5
GARANTIA / GUARANTEE /
GARANTIE.............................. 9
ESPAÑOL
INSTRUCCIONES DE SEGURIDAD
¡Atención! Cuide su seguridad.
1.Lea el manual atentamente antes de utilizar el aparato.
2. Consérvelo cerca para futura referencia.
3. No golpee el multiplicador de forma violenta o permita su caída.
4. Tenga cuidado en su transporte.
5. No sobreexponer el multiplicador a mayor par del admitido, puede causar rotura o pérdida de
eficacia.
6. Se aconseja probar inicialmente con pequeños pares de apriete para familiarizarse con la
herramienta.
7. Se recomienda usar herramientas y accesorios de alta calidad con nuestros multiplicadores de
par, como los ofrecidos por EGA Master.
2
1. INTRODUCCIÓN
1.1 Información relevante
Antes de comenzar a usar este aparato, lea y observe detenidamente todas las instrucciones de
uso. Fundamentalmente, los Multiplicadores de Par son una herramienta de precisión que permite
obtener altos pares de apriete con el menor esfuerzo. Ha de asegurarse que solo serán utilizados
por personal cualificado para su uso específico, y en el rango de valores para el cual están
diseñados.
1.2 Puesta en marcha
Para comenzar a usar el multiplicador de par es necesario disponer de:
- Dos llaves de vaso de impacto de la medida adecuada para conectar al:
* cuadrado de salida al tornillo o tuerca a apretar
* cuadrado de salida de la placa de reacción
- Una llave dinamométrica con el cuadrado de entrada adecuado (1/2” o 3/4”) para poder accionar
el multiplicador.
2. PARTES DEL ULTIPLICADOR DE PAR
3. SELECCIÓN DE MODELO DE MULTIPLICADOR
Dependiendo del par de apriete exigido, seleccionaremos un modelo u otro. Se ofrecen dos
tipos de ratio de multiplicación de par: 5:1 o 25:1.
Los modelos que proporcionan un par de apriete de 25:1, disponen de un sistema antiretorno que evita que el multiplicador rebobine proporcionando la máxima seguridad. Estos
multiplicadores permiten a su vez emplear llaves dinamométricas de menor longitud, por lo que
son la opción ideal para usar en espacios reducidos.
Todos los multiplicadores de par disponen de un sistema anti-dañado de engranajes en caso de
sobrecarga.
3
4. MODO DE EMPLEO
Una vez que se dispone de todos los elementos necesarios especificados en el punto 1.2, se
puede comenzar a usar el multiplicador de par:
1. Colocar el multiplicador de par con los vasos de impacto correspondientes en el tornillo o
tuerca a apretar.
2. Ajustar el cuadrado de la placa de reacción a la posición disponible del tornillo o tuerca
próximo.
Ha de cerciorarse que la disposición del multiplicador es totalmente paralela a la superficie
adherida. Una mala colocación perjudicaría el buen funcionamiento de la herramienta y podría
provocar daños en el multiplicador.
3. Colocar la llave dinamométrica correspondiente en el cuadrado de entrada del multiplicador
de par.
4. Apretar con la llave dinamométrica hasta llegar al par de apriete deseado de forma suave y
controlada.
Nota:
Para prevenir que el multiplicador se mueva o desajuste durante el uso, ha de asegurarse que
está perfectamente insertado en los vasos de impacto. Es importante intentar colocar el vaso
del plato de reacción lo más alejado posible del cuadrado conductor, es decir, intentar que la
distancia “D” sea la máxima posible (ver croquis adjunto). Esto favorecerá una mayor estabilidad y
seguridad.
4
ENGLISH
SAFETY INSTRUCTIONS
Attention! Be careful.
1.Read this manual carefully before using the product.
2. Keep close this manual for future reference
3. Do not hit the torque multiplier and avoid to let it falling.
4. Be careful during the transport of the torque multiplier.
5. Do not overload the torque multiplier with more torque than permitted, it can cause damage or
efectiveness.
6. It is advised to try initially with low torque ranges to get used to the tool.
7.It is strongly recommended to use high quality tools and accesories with our torque multipliers,
like EGA Master tools.
5
1. INTRODUCTION
1.1 Relevant information
Before start using this tool, please read carefully the operating instructions. Basically torque
multipliers are precision tools which allow to obtain high torque ranges with lower effort. Ensure
that the tool is only going to be used by qualified personal for it’s specific use, and in the range of
values it is designed for.
1.2 Implementing
To start using the torque multiplier is necessary to have:
- Two impact socket wrenches of the required measure to connect to:
* output square for the bolt or nut to be tightened
* output square of the reaction plate - Torque wrench with the required input square (1/2” o 3/4”) in order to be able to pull the torque
multiplier.
2. TORQUE MULTIPLIER’S SCHEMA
3. HOW TO CHOOSE THE TORQUE MULTIPLIER
Depending on the required torque value, we will choose one model or another. Two kind of
torque multiplication ratio are offered: 5:1 or 25:1.
The models which have a torque multiplication ratio of 25:1, have a non-return system in order
to avoid the reaction induced in the grip, providing the highest security. These torque multipliers
allow using shorter torque wrenches, so they are the ideal option to be used in reduced working
areas.
All the torque multipliers have a non-damage system of the gears in case of overload.
6
4. INSTRUCTIONS
Once we have available all the required elements specified in section 1.2, we can start using the
torque multiplier:
1. Place the torque multiplier with the impact socket wrenches on the bolt or nut to be
tightened.
2. Adjust the output square of the reaction plate to the next available bolt or nut.
It must be ensured that the torque multiplier disposal is completely paralell to the surface it is
joined to. A bad disposal of the torque multiplier would act against the well functioning of the tool
and could cause damage in the torque multiplier.
3. Insert the corresponding torque wrench in the input square of the torque multiplier.
4. Tighten up with the torque wrench in a smooth and controllated way until the torque value is
reached.
Note:
In order to avoid any movement or mismatching while using the torque multiplier, please ensure
that the torque multiplier is correctly placed and well inserted in the impact socket wrenches.
It is very important to place the impact socket wrench of the supporting output square as fas as
possible form the main output square. So that, “D” distance must be the maximum available in the
working place (see picture below). That will help having bigger stability and safety.
7
CERTIFICADO DE GARANTIA
GUARANTEE CERTIFICATE
CERTIFICAT DE GARANTIE
. ARTICULO / ITEM / ARTICLE:.....................................................................................................................
. Nº DE SERIE / SERIE Nº / Nº SERIE:............................................................................................................
. DISTRIBUIDOR / DISTRIBUTOR / DISTRIBUTEUR:....................................................................................
. PAIS / COUNTRY / PAYS:..............................................................................TEL.:....................................
. FECHA DE VENTA / SALE DATE / DATE VENTE:.........................................................................................
. NOMBRE DEL COMPRADOR / BUYER NAME / NOM DE L’ACHETEUR:...................................................
. TEL. COMPRADOR / BUYER TEL. / TEL. DE L’ACHETEUR:.........................................................................
EGA MASTER GARANTIZA AL COMPRADOR DE ESTA MAQUINA LA GARANTIA TOTAL (DURANTE 12 MESES), DE LAS PIEZAS CON DEFECTOS DE FABRICACION. ESTA
GARANTIA NO CUBRE AQUELLAS PIEZAS QUE POR SU USO NORMAL TIENEN UN DESGASTE. PARA OBTENER LA VALIDEZ DE LA GARANTIA , ES ABSOLUTAMENTE
IMPRESCINDIBLE QUE COMPLETE Y REMITA ESTE DOCUMENTO A EGA MASTER , DENTRO DE LOS SIETE DIAS A PARTIR DE LA FECHA DE COMPRA.
EGA MASTER GUARANTEES TO THE BUYER OF THIS MACHINE THE TOTAL WARRANTY (DURING 12 MONTHS), OF THE PIECES WITH MANUFACTURING FAULTS.
THIS GUARANTEE DOES NOT COVER THOSE PIECES WORN OUT DUE TO A NORMAL USE. IN ORDER TO OBTAIN THE VALIDITY OF THIS WARRANTY , IT IS
ABSOLUTELY NECESSARY TO FULFILL THIS DOCUMENT AND RESEND IT TO EGA MASTER WITHIN 7 DAYS FROM SALE DATE.
EGA MASTER GARANTIE A L’ACHETEUR DE CETTE MACHINE LA GARANTIE TOTALE (PENDANT 12 MOIS) DES PIECES AVEC DEFAUTS DE FABRICATION. CETTE GARANTIE
NE COUVRE PAS LES PIECES QUE PAR UN USAGE NORMAL, SOIENT DETERIOREES. POUR OBTENIR LA VALIDITE DE LA GARANTIE, IL EST ABSOLUMENT IMPERATIF
COMPLETER ET ENVOYER CE DOCUMENT EGA MASTER, DANS UN DELAI DE 7 JOURS A PARTIR DE LA DATE D’ACHAT.
SELLO / STAMP / CACHET
EJEMPLAR PARA EGA MASTER / COPY FOR EGA MASTER / EXEMPLAIRE POUR EGA MASTER
CERTIFICADO DE GARANTIA
GUARANTEE CERTIFICATE
CERTIFICAT DE GARANTIE
. ARTICULO / ITEM / ARTICLE:.....................................................................................................................
. Nº DE SERIE / SERIE Nº / Nº SERIE:............................................................................................................
. DISTRIBUIDOR / DISTRIBUTOR / DISTRIBUTEUR:....................................................................................
. PAIS / COUNTRY / PAYS:..............................................................................TEL.:....................................
. FECHA DE VENTA / SALE DATE / DATE VENTE:.........................................................................................
. NOMBRE DEL COMPRADOR / BUYER NAME / NOM DE L’ACHETEUR:...................................................
. TEL. COMPRADOR / BUYER TEL. / TEL. DE L’ACHETEUR:.........................................................................
EGA MASTER GARANTIZA AL COMPRADOR DE ESTA MAQUINA LA GARANTIA TOTAL (DURANTE 12 MESES), DE LAS PIEZAS CON DEFECTOS DE FABRICACION. ESTA
GARANTIA NO CUBRE AQUELLAS PIEZAS QUE POR SU USO NORMAL TIENEN UN DESGASTE. PARA OBTENER LA VALIDEZ DE LA GARANTIA , ES ABSOLUTAMENTE
IMPRESCINDIBLE QUE COMPLETE Y REMITA ESTE DOCUMENTO A EGA MASTER , DENTRO DE LOS SIETE DIAS A PARTIR DE LA FECHA DE COMPRA.
EGA MASTER GUARANTEES TO THE BUYER OF THIS MACHINE THE TOTAL WARRANTY (DURING 12 MONTHS), OF THE PIECES WITH MANUFACTURING FAULTS.
THIS GUARANTEE DOES NOT COVER THOSE PIECES WORN OUT DUE TO A NORMAL USE. IN ORDER TO OBTAIN THE VALIDITY OF THIS WARRANTY , IT IS
ABSOLUTELY NECESSARY TO FULFILL THIS DOCUMENT AND RESEND IT TO EGA MASTER WITHIN 7 DAYS FROM SALE DATE.
EGA MASTER GARANTIE A L’ACHETEUR DE CETTE MACHINE LA GARANTIE TOTALE (PENDANT 12 MOIS) DES PIECES AVEC DEFAUTS DE FABRICATION. CETTE GARANTIE
NE COUVRE PAS LES PIECES QUE PAR UN USAGE NORMAL, SOIENT DETERIOREES. POUR OBTENIR LA VALIDITE DE LA GARANTIE, IL EST ABSOLUMENT IMPERATIF
COMPLETER ET ENVOYER CE DOCUMENT EGA MASTER, DANS UN DELAI DE 7 JOURS A PARTIR DE LA DATE D’ACHAT.
SELLO / STAMP / CACHET
EJEMPLAR PARA EL CLIENTE / COPY FOR THE CUSTOMER / EXEMPLAIRE POUR LE CLIENT
C/ ZORROLLETA 11, POL. IND. JUNDIZ
01015 VITORIA, SPAIN P.O.B. APTDO. 5005
TEL. 34 - 945 290 001
FAX. 34 - 945 290 141
[email protected]
www.egamaster.com
PERFORADORAS /DRILLS
PERFORMATIC-102
CARACTERÍSTICAS TÉCNICAS
- CAPACIDAD MAXIMA ............................∅102 mm
- MOTOR....................................…........…..1500 W (230 V / 50 Hz ó 110 V / 60 Hz)
- VELOCIDAD..............................................950-2100 R.P.M
- ROSCA DE CONEXIÓN CORONAS........1/2” BSP (HEMBRA)-1.1/4” UNC (MACHO)
- PESO.........................................................18 Kg
- PARA TRABAJOS EN HORMIGÓN ARMADO, CEMENTO, LADRILLO, ASFALTO....
GARANTIA
EGA MASTER garantiza al comprador de esta máquina la garantía total durante 12 meses de las piezas
con defecto de fabricación.
Esta garantía no cubre aquellas piezas que por su uso normal tienen un desgaste, ni los accidentes, el
uso indebido y la manipulación.
NOTA: Para obtener la validez de la garantía, es absolutamente imprescindible que complete y remita a
EGA MASTER el documento de “Certificado de Garantía”, dentro de los siete días a partir de la fecha de
compra.
REPUESTOS
Para el pedido de repuestos indique el código de estos y el número de serie de la máquina
MEDIDAS GENERALES DE SEGURIDAD
- Asegurarse que el motor esté en posición de apagado antes de enchufar el cable a la
red eléctrica.
- Ponerse gafas y guantes.
- Llevar calzado de seguridad antideslizante.
- No ponerse ropa holgada.
- Asegurarse que los enchufes tienen toma de tierra.
- Solamente utilizar accesorios y repuestos originales. El uso de otros accesorios y
repuestos, puede ser peligroso.
- Desenchufar el cable de la máquina de la red eléctrica antes de realizar cualquier
ajuste o regulación.
- Quitar cualquier objeto extraño antes de encender la máquina.
- Mantener las manos lejos de la corona cuando la máquina esté funcionando.
- Mantener limpio el suelo alrededor de la máquina.(residuos de metal, aceite, grasa)
- Mantener el motor fuera del alcance del agua, ambientes húmedos y ambientes
inflamables.
NOTA: No respetar estas advertencias, puede resultar en graves daños personales.
-2-
INSTRUCCIONES DE USO
1- Fijar la máquina al suelo:
A) Con un tubo extensible, posicionandolo en la pieza cónica que está en la
parte superior de la columna.
B) Con la ventosa que EGA MASTER ofrece.
Con este sistema, la maquina queda fijada al suelo a través de la succión
realizada por el motor de la ventosa.
2– Fijar correctamente la corona a utilizar por medio de las llaves fijas que van con la
equipación de la máquina.
3 – Conectar la manguera al racord de entrada de la máquina (situado en el eje
vertical) y a la toma de agua para que la corona tenga en todo momento la
refrigeración adecuada durante el trabajo.
NOTA: La refrigeración es muy importante para que la máquina trabaje mas
desahogadamente y las coronas sean mas duraderas.
4 – Seleccionar la velocidad adecuada, dependiendo de la corona a utilizar.
- Velocidad lenta (950 r.p.m.), para coronas de (∅ 71-102 mm)
- Velocidad rápida (2100 r.p.m.), para coronas (∅12-63 mm)
5 – Poner la máquina en marcha en vacío a través del pulsador.
6 – Empezar a perforar de forma suave y uniforme hasta hacer contacto con el
hormigón.
Cuando la corona haga contacto con las varillas de acero (si estamos perforando
hormigón armado), la fuerza de taladrado tiene que decrecer ya que es cuando mas
sufre el motor.
7 – Después de realizar el trabajo, se apagará el interruptor y se cortará el suministro
de agua.
8 – Una vez realizada la perforación, hay que tener especial cuidado al material que ha
quedado en el interior de la corona, ya que puede caer en cualquier momento y
provocar un accidente.
EQUIPACIÓN:
1 Máquina
1 Soporte Fijo
2 Llaves fijas 30-32
1 Llave allen 4mm
1 Juego de escobillas de repuesto
1 Manguera de plástico
-3-
TECHNICAL SPECIFICATIONS
- MAXIMUM CAPACITY ............................∅102 mm
- MOTOR....................................…........….. 1500 W (230 V / 50 Hz ó 110 V / 60 Hz)
- SPEED......................................................950 / 2100 R.P.M
- CONNECTION THREAD.......................... 1/2” BSP (FEMALE)-1.1/4” UNC (MALE)
- WEIGHT......................................................18 Kg
- TO DRILL CONCRETE, REINFORCED CONCRETE, BRICK WALLS, CEMENT, ASPHALT....
WARRANTY
EGA MASTER guarantees the customer of this machine a total warranty of 12 months on manufacturing
defect pieces.
This warranty does not include those pieces that, due to a normal use they get worn, nor those that get
worn or broken due to accidents, incorrect use or manipulation.
NOTE: For getting the mentioned warranty, it is absolutely necessary to send the “Warranty Certification”
fulfilled to EGA MASTER within the 7 days after the purchase date.
SPARE PARTS
For ordering the needed spare parts, please ask us for the corresponding codes and also inform us about
the Serial Number of the machine.
GENERAL SAFETY RULES
Be sure that the motor is in OFF position before plugging the machine to the power supply.
Use goggles and safety gloves.
Wear safety shoes with anti-slippery soles.
Do not wear loose clothes.
Be sure that the electric socket-outlet where the machine is connected to is grounded (3-pronged
ground type socket).
- Use only original accessories and parts. Using non original accessories and parts may be hazardous.
- Disconnect the machine from the power supply before starting any maintenance or adjustment
procedure.
- Remove any strange/foreign object before starting the machine.
- Always keep hands and fingers away from the abrasive wheel when the machine is working.
- Never hold the workpiece by hand when the machine is cutting.
- Keep the floor around the machine clean and free of oil, grease or scrap material.
- Always keep machine and blade clean for getting the safest and best performance.
- Keep the motor away from water of too humid conditions.
-
NOTE: The not respecting of these safety rules may result in serious injury.
-4-
OPERATING INSTRUCTIONS
1 – Fix the machine to the ground:
A) With an extensible pipe which will be positioned on the cone placed in the superior part of the
column and on a joist on the ceiling.
B) With the vacuum cap that EGA MASTER offers.
With this system, the machine is fixed to the ground due to the suction that the motor provides
in the vacuum cap.
2 – Fix correctly the diamond drill to be used with the open end wrenches provided with the machine.
3 – Connect the plastic hose to the machine’s inlet connector (placed in the vertical axle) and to the water
supply. This water will keep the drill bit correctly refrigerated during work.
NOTE: A correct refrigeration is very important in order to make the machine work easier and to
make the drills last longer.
4 – Select the correct speed, depending on the drill to be used:
- Slow speed (950 r.p.m.), is for diamond drills (∅ 71-102 mm)
- Fast speed (2100 r.p.m.), is for diamond drills (∅12-63 mm)
5 – Switch on the machine.
6 – Move the drill down slowly (using the machine’s main lever), until the drill makes contact with the
surface to be drilled.
Press the drill softly in order to maximize machine’s performance.
When the drill makes contact with the concrete’s reinforcements (steel mesh), the force applied on
the lever must be decreased in order to avoid an overheating of the motor.
7 – After the work is finished, switch off the machine and stop water supply.
8 – After the drill has been made, please pay special attention on the material inside the diamond drill as
it can fall down at any moment and result in serious injury.
EQUIPMENT:
1 Machine
1 Fixed support
1 Open End Wrenches 30-32
1 Hexagonal Key Wrenches 4mm
1 Kit of spare Carbon Brushes.
1 Plastic Hose
-5-
-6-
POS. COD.
POS.
COD.
POS.
COD.
1
83605
29
83633
2
83606
30
83634
56+57 – 110
V
58
3
83607
31
83635
59
83663
4
83608
32
83636
60
83664
5
83609
33
83637
61
83665
6
83610
34
83638
62 – 230 V
83666
7
83611
35
83639
62 – 110 V
80235
8
83612
36
83640
63
83667
9
83613
37
83641
64
83668
10
83614
38
83642
65
83669
11
83615
39
83540
66
83670
12
83616
40
83644
67
83671
13
83617
41
83645
68
83672
14
83618
42
83646
69
83673
15
83619
43
83647
70
83674
16
83620
44
83648
71
83675
17
83621
45
83649
72
83676
18
83622
46
83650
73
83677
19
83623
47
83651
74
83678
20
83624
48
83652
75
83679
21
83625
49
83653
76
83680
22
83626
50
83654
77
83681
23
83627
51
83655
78
83682
24
83628
52
83656
79
83683
25
83629
53
83657
80
83684
26
83630
54
83658
81
83685
27
83631
55
83659
82
83686
28
83632
56
56+57 – 110
V
83660
83
83687
83661
84
83688
-7-
80124
83662
SPAIN
CERTIFICADO
DE
GARANTIA
- ARTICULO:.....................................................................................................
- Nº DE SERIE:..............................
- DISTRIBUIDOR:..............................................................................................
- PAIS:...........................................
TELEFONO:......................................
- FECHA DE VENTA:......................................
- NOMBRE DEL COMPRADOR:.......................................................................
- TELEFONO DEL COMPRADOR:...................................
SELLO DEL DISTRIBUIDOR
EGA MASTER GARANTIZA AL COMPRADOR DE ESTA MAQUINA LA GARANTIA TOTAL
(DURANTE 12 MESES), DE LAS PIEZAS CON DEFECTOS DE FABRICACION.
ESTA GARANTIA NO CUBRE AQUELLAS PIEZAS QUE POR SU USO NORMAL TIENEN UN DESGASTE.
PARA OBTENER LA VALIDEZ DE LA GARANTIA , ES ABSOLUTAMENTE IMPRESCINDIBLE QUE COMPLETE Y REMITA ESTE DOCUMENTO
A EGA MASTER , DENTRO DE LOS SIETE DIAS A PARTIR DE LA FECHA DE COMPRA.
(EJEMPLAR PARA EGA MASTER)
............................................................................................................................................................................................................................................................................................................
SPAIN
CERTIFICADO
DE
GARANTIA
- ARTICULO:.....................................................................................................
- Nº DE SERIE:..............................
- DISTRIBUIDOR:..............................................................................................
- PAIS:...........................................
TELEFONO:......................................
- FECHA DE VENTA:......................................
- NOMBRE DEL COMPRADOR:.......................................................................
- TELEFONO DEL COMPRADOR:...................................
SELLO DEL DISTRIBUIDOR
EGA MASTER GARANTIZA AL COMPRADOR DE ESTA MAQUINA LA GARANTIA TOTAL
(DURANTE 12 MESES), DE LAS PIEZAS CON DEFECTOS DE FABRICACION.
ESTA GARANTIA NO CUBRE AQUELLAS PIEZAS QUE POR SU USO NORMAL TIENEN UN DESGASTE.
PARA OBTENER LA VALIDEZ DE LA GARANTIA , ES ABSOLUTAMENTE IMPRESCINDIBLE QUE COMPLETE Y REMITA ESTE DOCUMENTO
A EGA MASTER , DENTRO DE LOS SIETE DIAS A PARTIR DE LA FECHA DE COMPRA.
(EJEMPLAR PARA EL CLIENTE)
GUARANTEE
SPAIN
CERTIFICATE
- ITEM:..............................................................................................................
- SERIE Nº:..........................................
- DISTRIBUTOR:...............................................................................................
- COUNTRY:.........................................
PHONE:.......................................
- SALE DATE:.......................................
- BUYER NAME:................................................................................................
- BUYER PHONE:.................................
DISTRIBUTOR STAMP
EGA MASTER GUARANTEES TO THE BUYER OF THIS MACHINE THE TOTAL WARRANTY
(DURING 12 MONTHS), OF THE PIECES WITH MANUFACTURING FAULTS.
THIS GUARANTEE DOES NOT COVER THOSE PIECES WORN OUT DUE TO A NORMAL USE.
IN ORDER TO OBTAIN THE VALIDITY OF THIS WARRANTY , IT IS ABSOLUTELY NECESSARY TO FULFILL THIS DOCUMENT
AND RESEND IT TO EGA MASTER WITHIN 7 DAYS FROM SALE DATE.
(COPY FOR EGA MASTER)
............................................................................................................................................................................................................................................................................................................
GUARANTEE
SPAIN
CERTIFICATE
- ITEM:..............................................................................................................
- SERIE Nº:..........................................
- DISTRIBUTOR:...............................................................................................
- COUNTRY:.........................................
PHONE:.......................................
- SALE DATE:.......................................
- BUYER NAME:................................................................................................
- BUYER PHONE:.................................
EGA MASTER GUARANTEES TO THE BUYER OF THIS MACHINE THE TOTAL WARRANTY
(DURING 12 MONTHS), OF THE PIECES WITH MANUFACTURING FAULTS.
THIS GUARANTEE DOES NOT COVER THOSE PIECES WORN OUT DUE TO A NORMAL USE.
IN ORDER TO OBTAIN THE VALIDITY OF THIS WARRANTY , IT IS ABSOLUTELY NECESSARY TO FULFILL THIS DOCUMENT
AND RESEND IT TO EGA MASTER WITHIN 7 DAYS FROM SALE DATE.
(COPY FOR THE CUSTOMER)
DISTRIBUTOR STAMP
OPERATING INSTRUCTIONS
HYDRAULIC TROLLEY
SPARE PARTS DRAWING....... 6
GUARANTEE........................... 9
OPERATORS MANUAL SLCE SERIES HYDRAULIC SCISSOR LIFT
2
3
4
PARTS LIST
6
SPARE PARTS DRAWING
7
GUARANTEE
CERTIFICATE
ITEM:.................................................................................................................................
SERIE Nº:...........................................................................................................................
DISTRIBUTOR:..................................................................................................................
COUNTRY:.....................................................PHONE:.....................................................
SALE DATE:.......................................................................................................................
BUYER NAME:...................................................................................................................
BUYER PHONE:.................................................................................................................
EGA MASTER GUARANTEES TO THE BUYER OF THIS MACHINE THE TOTAL WARRANTY (DURING 12
MONTHS), OF THE PIECES WITH MANUFACTURING FAULTS.
THIS GUARANTEE DOES NOT COVER THOSE PIECES WORN OUT DUE TO A NORMAL USE.
DISTRIBUTOR STAMP
IN ORDER TO OBTAIN THE VALIDITY OF THIS WARRANTY , IT IS ABSOLUTELY NECESSARY TO FULFILL
THIS DOCUMENT AND RESEND IT TO EGA MASTER WITHIN 7 DAYS FROM SALE DATE.
(COPY FOR EGA MASTER)
GUARANTEE
CERTIFICATE
ITEM:.................................................................................................................................
SERIE Nº:...........................................................................................................................
DISTRIBUTOR:..................................................................................................................
COUNTRY:.................................................... PHONE:.....................................................
SALE DATE:.......................................................................................................................
BUYER NAME:...................................................................................................................
BUYER PHONE:.................................................................................................................
EGA MASTER GUARANTEES TO THE BUYER OF THIS MACHINE THE TOTAL WARRANTY (DURING 12 MONTHS), OF THE PIECES WITH MANUFACTURING FAULTS.
THIS GUARANTEE DOES NOT COVER THOSE PIECES WORN OUT DUE TO A NORMAL USE.
IN ORDER TO OBTAIN THE VALIDITY OF THIS WARRANTY , IT IS ABSOLUTELY NECESSARY TO FULFILL THIS
DOCUMENT AND RESEND IT TO EGA MASTER WITHIN 7 DAYS FROM SALE DATE.
(COPY FOR THE CUSTOMER)
DISTRIBUTOR STAMP
C/ ZORROLLETA 11, POL. IND. JUNDIZ
01015 VITORIA, SPAIN P.O.B. APTDO. 5005
TEL. 34 - 945 290 001
FAX. 34 - 945 290 141
[email protected]
www.egamaster.com
MANUAL DE INSTRUCCIONES
OPERATING INSTRUCTIONS
MANUEL D’INSTRUCTIONS
MAQUINA ROSCADORA / PIPE THREADING
MACHINE / FILIERE ELECTRIQUE
MASTERMATIC-2
ESPAÑOL ............................... 2
ENGLISH ................................ 6
FRANÇAIS .............................. 8
DESPIECE / SPARE PARTS
DRAWING / DEPEÇAGE ...... 14
GARANTIA / GUARANTEE /
GARANTIE ........................... 17
ESPAÑOL
INSTRUCCIONES DE SEGURIDAD
¡Atención! Cuide su seguridad.
1. No utilice prendas colgantes que puedan enganchar en los elementos de rotación.
2. Utilice guantes de goma en los trabajos realizados al exterior.
3. Antes de poner en marcha, compruebe que tanto el cable como el enchufe se encuentran en
condiciones.
4. Para cualquier manipulación sobre la máquina, asegúrese de que ha sido desconectada de la red.
5. Emplee siempre los accesorios destinados a la máquina ya que sin su utilización puede resultar
lesionado.
MANTENIMIENTO
¡Realice el mantenimiento siempre con la máquina desconectada!
1. Soporte fijatubos: Cuide que las dentaduras de las mordazas de fijación se encuentran en perfecto estado, si no es así, reemplácelas.
2. Caja reductora: No requiere mantenimiento ya que dispone de una grasa especial de por vida.
3. Escobillas: Límpielas y compruebe el estado de desgaste, cambiándolas cuando este desgaste
llegue a ser 2/3 del total.
4. Interruptor: Asegúrese de que al cesar la acción del dedo, el interruptor retorna a la posición de
reposo, deteniéndose el giro del motor.
Nota: Para cualquier reparación, póngase en contacto con nuestro servicio técnico.
CARACTERISTICAS TECNICAS
Capacidad
Motor
Velocidad de trabajo
Velocidad de retroceso
Peso
2
1/4" ÷ 2"
1350 W (230 V / 50 Hz) o (110 V / 60 Hz)
25 rpm
25 rpm
8 Kgs.
INSTRUCCIONES DE FUNCIONAMIENTO
1. Utilice cabezas y adaptador para cabezas de serie ligera del fabricante.
2. Utilice siempre el soporte fijándolo fuertemente para impedir que la máquina pueda girar alrededor del tubo.
3. Asegúrese de que el interruptor solamente mantenga en funcionamiento el motor mientras se
mantiene el dedo accionado. Debiéndose detener al cesar esta acción.
4. Siempre que utilice un prolongador de cable, deberá desenrollarlo totalmente .
5. Seleccione el sentido de giro mediante el mando inversor.
6. Aboque la máquina en el tubo, asegurándose de que la barra del soporte se introduzca en su
correspondiente alojamiento en la máquina.
7. Al iniciar el roscado presione ligeramente la cabeza contra el tubo. Rosque hasta que el final de
los peines haya llegado al inicio del tubo.
8. No debe cambiar la marcha durante la operación de roscado, espere a que se detenga una vez
finalizada la rosca invirtiendo para realizar el desenroscado.
9. Utilice lubricante abundante durante el roscado mejorando la vida de la herramienta y la calidad
de la rosca.
1
2
3
4
5
6
7
8
9
3
NOTAS
¡IMPORTANTE!
El fabricante no se responsabiliza de los daños o mal funcionamiento de la máquina en caso de
que no se use correctamente o se haya utilizado para trabajos para los que no está diseñada.
Para pedir cualquier repuesto, mirar en el dibujo de despiece el número de la pieza deseada.
GARANTÍA
El fabricante garantiza al comprador de ésta máquina la garantía total durante 12 meses de las
piezas con defectos de fabricación.
Esta garantía no cubre aquellas piezas que por su uso normal tienen un desgaste.
Nota: para obtener la validez de la garantía, es absolutamente imprescindible que complete y
remita al fabricante el documento de “CERTIFICADO DE GARANTIA”, dentro de los siete dias a
partir de la fecha de compra.
4
ENGLISH
SAFETY INSTRUCTIONS
Attention! Be careful.
1. Do not wear loose clothing. They could be caught by moving parts of the machine.
2. For outdoor work, rubber gloves must be worn.
3. Before starting up the machine, check that the electric cable and switch are in optimum
condition.
4. Before carrying out any maintenance work or change of accesories, disconnect the machine
from the mains.
5. Always use the machine´s indicicated accesories because if you don´t, it could lead to risk of
personal injury.
MAINTENANCE
Always carry out any job on the machine with the machine disconnected.
1. Pipe Fastener Support: Check that the teeth of the jaws are in optimum condition; if not, replace
them.
2. Gear Box: Maintenance is not required because it has special grease which is good for life.
3. Brushes: Clean them and check the condition of the slack, changing the brushes when the slack
reaches 2/3 of the total.
4. On switch: Check that the machine switch unblocks automatically when finger pressure is released, stopping the motor rotation.
Note: For any necessary repairs, contact with our Technical Services.
CARACTERISTIQUES TECHIQUES
Capacité de filetage
Moteur
Vitesse de filetage
Vitesse rapide de retour
Poids
6
1/4"÷ 2"
1350 W (230 V / 50 Hz) ou (110 V / 60 Hz)
25 rpm
25 rpm
8 Kgs.
WORKING INSTRUCTIONS
1. Use maker’s threading heads.
2. Always use the support; fastening it correctly to avoid the machine from rotating around the pipe
(especially when threading the biggest sizes).
3. Check that the ON switch maintains the motor functioning only when it is pressed; and stops the
motor when it is released.
4. Whenever you use an extension cable you must unroll it completely.
5. Select the direction of the rotation with the reverse speed lever.
6. Insert the machine on to the pipe and make sure that the support is securely guided into its
housing located on the machine.
7. When starting the threading, push slightly the head against the pipe.
8. As soon as the threading and once the threading length has been achieved stop the motor. Change the position of the reverse gear and start the motor to begin unscrewing.
9. Use oil abundantly when threading to improve the life and quality of the thread.
1
2
3
4
5
6
7
8
9
7
NOTES
IMPORTANT!
The maker will not take responsibility for damage or malfunction as a result of the Testing Pump
being incorrectly used or, applied for a purpose for which it was not intended.
For ordering spare parts, please refer to the Spare Parts Drawing and note the needed number.
GUARANTEE
The maker guarantees to the machine owner 12 months against any manifacture defect.
This guaranteee do not cover the parts wich are consumables.
Note: to apply the guarantee its necesary to send the “GUARANTEE CERTIFICATE” duly filled
within one week after purchased the machine to the maker.
8
FRANÇAIS
INSTRUCTIONS DE SECURITE
Attention! Soyez prudent.
1. N´utilisez pas des vêtements amples Ils pourraient être entrainés dans les parties mobiles de la
machine.
2. Utilisez des gants de travail en caoutchouc, lors de travaux en extérieur.
3. Avant de démarrer la machine, vérifiez le bon état du câble d´alimentation électrique et de
l´interrupteur.
4. Déconnectez la machine du secteur, avant toute intervention d´entretien de la machine ou de
changement d´accesoire.
5. N´utilisez que des accesoires destinés exactement á la machine, afin d´eviter tout risque de
blessure corporelle.
ENTRETIEN
Toujours déconnecter la machine avant d´y entamer un travail d´entretien.
1. Support de fixation de tube : verifiez que la denture des mors soit en parfait état, sinon remplacez-les.
2. Carter d´engrenages : aucun entretien n´est requis; le carter contient une graisse spéciale
permanente (á vie).
3. Balais : (charbons) nettoyez-les et vérifiez leur état d´usure pério-diquement; ils doivent être
changés lorsque l´usure atteint les 2/3 de leur longueur initiale.
4. Interrupteur de marche : vérifiez que l´interrupteur se relâche automa-tiquement lors du relâchement de la presión du doight, en arrêtant la rotation du moteur.
Note : pour toute reparation, veullez contacter nos services techniques.
TECHNICAL CHARACTERISTICS
Threading capacity
Motor
Threading speed
Fast reverse speed
Weight
10
1/4"÷ 2"
1350 W (230 V / 50 Hz) or (110 V / 60 Hz)
25 rpm
25 rpm
8 Kgs.
INSTRUCTIONS D´UTILISATION
1. Utilisez les têtes de filetage du fabricant.
2. Utilisez toujours le support; le fixer correctemente afin d´eviter que la machine fase une rotation
autour du tube (particulièrement en filetant de gros diamètres).
3. Vérifiez que l´interrupteur de mise en marche ne maintienne le moteur en fonctionnement que
lorsqu´il est enfoncé; et arrête bien le moteur lorsq´il est relâché.
4. Lors d´utilisation d´une rallonge, celle-ci doit toujours être complètement déroulée .
5. Sélectionnez le sens de rotation au moyen du levier d´inversion de rotation.
6. Insérez la machine sur le tube à fileter et assurez-vous que le support est fermement maintenu dans
son emplacement situé sur la machine.
7. Dès que le filetage a comencé, pressez légèremente la tête de filetage contre le tube.
8. Ne changez pas de vitesse pendant le filetage et, dès que le travail de filetage est terminé, arrêtez le
moteur. Changez la position du levier d´inversion du sens de rotation et démarrez le moteur pour
commencer le dévissage.
9. Pendant le filetage, utilisez l´huile en abondance, afin d´améliorer la durée de vie et la qualité du filet.
1
2
3
4
5
6
7
8
9
11
NOTES
IMPORTANT!
Le fabricant ne se responsabilise pas des détériorations ou du mauvais fonctionnement de la
machine dans le cas d’une mauvaise utilisation ou suite á des usages pour lesquels elle n’est pas
concue.
Pour commander les pièces de rechange, regarder le descriptif et le numéro de pièce désiré.
GARANTIE
Le fabricant donne une garantie de 12 mois à l’acquéreur de cette machine, pour les pièces avec
un défaut de fabrication.
La garantie ne s’applique pas aux pièces d’usure normale.
Note : pour obtenir la validité de la garantie, il est obligatoire de compléter et de retourner au
fabricant, le document ‘’CERTIFICAT DE GARANTIE’’ dans les 7 jours d’acquisition de la machine.
12
DESPIECE / SPARE PARTS DRAWING / DEPEÇAGE
14
POS.
COD.
POS.
COD.
1
1
2
3
4
5
6
7
8
9
10
11
12
13
14
15
16
81638-220v
81639-110v
81650
81651
81635
81652
81629
81653
81654
81628
81655
81632
81630
81633
81656
81634
81657
17
18
19
20
21
22
23
24
28
29
30
31
32
33
34
35
36
81631
81627
81658
81659
81660
81661
81662
81663
81664
81665
81666
81667
81668
81669
81769
81770
81792
MOTOR / MOTEUR
POS.
COD.
POS.
COD.
1
2
3
4
5
6
7
7
8
8
9
10
11
12
13
14
15
16
17
81972
81973
81974
81975
81976
81977
81682-220V
81793-110V
81683-220V
81794-110V
81978
81979
81980
81642
81981
81982
81983
81984
81985
18
19
20
21
22
23
24
25
26
27
28
29
30
31
32
33
34
35
36
81986
81987
81988
81770
81640
81989
81990
81991
81992
81993
81994
81995
81996
81815
81997
81813
81814
81998
81999
15
CERTIFICADO DE GARANTIA
GUARANTEE CERTIFICATE
CERTIFICAT DE GARANTIE
ARTICULO / ITEM / ARTICLE: ....................................................................................................................
Nº DE SERIE / SERIE Nº / Nº SERIE: ...........................................................................................................
DISTRIBUIDOR / DISTRIBUTOR / DISTRIBUTEUR: ...................................................................................
PAIS / COUNTRY / PAYS: .............................................................................TEL.:....................................
FECHA DE VENTA / SALE DATE / DATE VENTE: ........................................................................................
NOMBRE DEL COMPRADOR / BUYER NAME / NOM DE L’ACHETEUR: ..................................................
TEL. COMPRADOR / BUYER TEL. / TEL. DE L’ACHETEUR: ........................................................................
EGA MASTER GARANTIZA AL COMPRADOR DE ESTA MAQUINA LA GARANTIA TOTAL (DURANTE 12 MESES), DE LAS PIEZAS CON DEFECTOS DE FABRICACION. ESTA
GARANTIA NO CUBRE AQUELLAS PIEZAS QUE POR SU USO NORMAL TIENEN UN DESGASTE. PARA OBTENER LA VALIDEZ DE LA GARANTIA , ES ABSOLUTAMENTE
IMPRESCINDIBLE QUE COMPLETE Y REMITA ESTE DOCUMENTO A EGA MASTER , DENTRO DE LOS SIETE DIAS A PARTIR DE LA FECHA DE COMPRA.
EGA MASTER GUARANTEES TO THE BUYER OF THIS MACHINE THE TOTAL WARRANTY (DURING 12 MONTHS), OF THE PIECES WITH MANUFACTURING FAULTS.
THIS GUARANTEE DOES NOT COVER THOSE PIECES WORN OUT DUE TO A NORMAL USE. IN ORDER TO OBTAIN THE VALIDITY OF THIS WARRANTY , IT IS ABSOLUTELY NECESSARY TO FULFILL THIS DOCUMENT AND RESEND IT TO EGA MASTER WITHIN 7 DAYS FROM SALE DATE.
EGA MASTER GARANTIE A L’ACHETEUR DE CETTE MACHINE LA GARANTIE TOTALE (PENDANT 12 MOIS) DES PIECES AVEC DEFAUTS DE FABRICATION. CETTE GARANTIE
NE COUVRE PAS LES PIECES QUE PAR UN USAGE NORMAL, SOIENT DETERIOREES. POUR OBTENIR LA VALIDITE DE LA GARANTIE, IL EST ABSOLUMENT IMPERATIF
COMPLETER ET ENVOYER CE DOCUMENT EGA MASTER, DANS UN DELAI DE 7 JOURS A PARTIR DE LA DATE D’ACHAT.
SELLO / STAMP / CACHET
EJEMPLAR PARA EGA MASTER / COPY FOR EGA MASTER / EXEMPLAIRE POUR EGA MASTER
CERTIFICADO DE GARANTIA
GUARANTEE CERTIFICATE
CERTIFICAT DE GARANTIE
ARTICULO / ITEM / ARTICLE: ....................................................................................................................
Nº DE SERIE / SERIE Nº / Nº SERIE: ...........................................................................................................
DISTRIBUIDOR / DISTRIBUTOR / DISTRIBUTEUR: ...................................................................................
PAIS / COUNTRY / PAYS: .............................................................................TEL.:....................................
FECHA DE VENTA / SALE DATE / DATE VENTE: ........................................................................................
NOMBRE DEL COMPRADOR / BUYER NAME / NOM DE L’ACHETEUR: ..................................................
TEL. COMPRADOR / BUYER TEL. / TEL. DE L’ACHETEUR: ........................................................................
EGA MASTER GARANTIZA AL COMPRADOR DE ESTA MAQUINA LA GARANTIA TOTAL (DURANTE 12 MESES), DE LAS PIEZAS CON DEFECTOS DE FABRICACION. ESTA
GARANTIA NO CUBRE AQUELLAS PIEZAS QUE POR SU USO NORMAL TIENEN UN DESGASTE. PARA OBTENER LA VALIDEZ DE LA GARANTIA , ES ABSOLUTAMENTE
IMPRESCINDIBLE QUE COMPLETE Y REMITA ESTE DOCUMENTO A EGA MASTER , DENTRO DE LOS SIETE DIAS A PARTIR DE LA FECHA DE COMPRA.
EGA MASTER GUARANTEES TO THE BUYER OF THIS MACHINE THE TOTAL WARRANTY (DURING 12 MONTHS), OF THE PIECES WITH MANUFACTURING FAULTS.
THIS GUARANTEE DOES NOT COVER THOSE PIECES WORN OUT DUE TO A NORMAL USE. IN ORDER TO OBTAIN THE VALIDITY OF THIS WARRANTY , IT IS ABSOLUTELY NECESSARY TO FULFILL THIS DOCUMENT AND RESEND IT TO EGA MASTER WITHIN 7 DAYS FROM SALE DATE.
EGA MASTER GARANTIE A L’ACHETEUR DE CETTE MACHINE LA GARANTIE TOTALE (PENDANT 12 MOIS) DES PIECES AVEC DEFAUTS DE FABRICATION. CETTE GARANTIE
NE COUVRE PAS LES PIECES QUE PAR UN USAGE NORMAL, SOIENT DETERIOREES. POUR OBTENIR LA VALIDITE DE LA GARANTIE, IL EST ABSOLUMENT IMPERATIF
COMPLETER ET ENVOYER CE DOCUMENT EGA MASTER, DANS UN DELAI DE 7 JOURS A PARTIR DE LA DATE D’ACHAT.
SELLO / STAMP / CACHET
EJEMPLAR PARA EL CLIENTE / COPY FOR THE CUSTOMER / EXEMPLAIRE POUR LE CLIENT
C/ ZORROLLETA 11, POL. IND. JUNDIZ
01015 VITORIA, SPAIN P.O.B. APTDO. 5005
TEL. 34 - 945 290 001
FAX. 34 - 945 290 141
[email protected]
www.egamaster.com
MANUAL DE INSTRUCCIONES
OPERATING INSTRUCTIONS
INSTRUCCIONES D’EMPLOI
CÁMARA DE INSPECCIÓN / INSPECTION
CAMERA / CAMERA D´INSPECTION
MASTERVISION REC / ECO
ESPAÑOL................................ 2
ENGLISH............................... 16
GARANTIA / GUARANTEE /
GARANTIE............................ 31
ESPAÑOL
INSTRUCCIONES DE SEGURIDAD
¡Atención! Cuide su seguridad.
1.Lea el manual atentamente antes de utilizar el aparato.
2. Evite la penetración de agua en la maleta y el uso de ésta en lugares extremadamente frios, calurosos o húmedos ya que podría dañar la cámara.
3. No tire la maleta.
4. Limpie la pantalla solo con un trapo suave.
5. Realizar copias de seguridad siempre antes de conectar el USB a la cámara. El fabricante no se
hace responsable de los daños ocasionados al USB bajo ninguna circunstancia.
6. No desconectar la unidad mientras se está grabando o utilizando ya que puede dañar la unidad
o la entrada USB.
2
1. INTRODUCCIÓN
1.1 Información relevante
Antes de comenzar a usar este aparato, lea y observe detenidamente todas las instrucciones de uso.
Fundamentalmente, MASTERVISION REC y ECO solo serán utilizadas por el personal cualificado para su
uso específico, y en el rango de datos para el cual están diseñadas.
1.2 Sobre MASTERVISION REC y ECO
MASTERVISION REC Y ECO es un producto que permite visualizar de manera sencilla imágenes
instantáneas.
Estos aparatos son sencillos en su manejo, gracias al intuitivo interface, pueden ser utilizados incluso
con guantes o ropa protectora.
Estos aparatos son ideales para cualquier aplicación en la cual se necesite visualizar
imágenes in situ. MASTERVISION ECO es un sustituto excelente de un sistema de captura
de video gracias a la opción que permite al usuario trasladar a un aparato de video exterior
las imágenes visualizadas en cada instante Su sólida estructura y la ausencia de partes
móviles hacen que esta cámara sea extremadamente duradera e ideal para usar en el exterior.
Usos habituales:
- Chimeneas, conductos, rejillas de ventilación o inspección de tubos.
- Mantenimiento rutinario y control de calidad.
- Inspección y localización de errores.
- Captura digital desde otras fuentes de video/TV
3
2. COMPONENTES Y CONTROLES
1. Botón de selección de video
2. Menú
3. Botón inferior
4. Botón superior
5. Menú de selección inferior / superior
6. Botón de encendido / apagado del LED
7. Entrada de energía
8. Pantalla TFT
2.1 Cámara
1. Leds blancos
2. Lente
3. Muelle
4. Conector bañado en oro
4
9. Entrada DC 12V
10. Salida de video
11. Puerto de entrada de la cámara
12. Puerto USB
13. Interruptor de energía y de carga
14. Puerto de entrada AC
15. Cable de salida DC 12V
16. Protector
2.2 Carrete de cable
1. Conector (al monitor)
2. Manilla
3. Conector del cable (a la cámara)
4. Carrete de cable
2.3 Mando de control remoto (solo utilizable en DVR)
1. Enter: para visualizar el video o música
2. Botón superior: pasa subir/artículo previo
3. REC: comenzar a grabar
4. Setup: características de grabación y de cambio
5. Enter: encendido
6. Botón inferior: para bajar/artículo siguiente
7. Exit: parar o salir del menú
8. Izquierda: seleccionar el artículo izquierdo
9. Derecha: seleccionar el artículo derecho
10. Rebobinar: rebobinar el video
11. Adelantar: adelantar el video
5
ARTÍCULO
Adaptador de energía
Cámara
Barra empuje flexible
Estuche de batería
3. ESPECIFICACIONES TÉCNICAS
Longitud del cable
Monitor
Cámara estanca
Batería
Fuente de luz blanca
Ángulo de visión
Campo de visión
Sensor de luminosidad Tensión de entrada
Lector de tarjetas
Grabación de video por medio de USB
Salida de video
Temperatura de trabajo
Peso
Maleta
Carrete de cable 20m
Carrete de cable 30m
6
DESCRIPCIÓN
110VAC ~ 240VAC 12VDC1800mA
Ø 26mm
Ø 40 - Ø 200mm
Selladas, ácido de plomo
código: 60060, 60062
20m
código: 60061, 60063
30m
320 x 960 Pixel 7” TFT color
IP X8
12V DC 1800mA
8 LEDs
60º
400mm
Color CCD
100 - 240V
USB
códigos: 60060, 60061
X
X
-28ºC - 50ºC
12 Kg
53.5 x 22 x 47,5cm
código: 60056
código: 60057
4. SISTEMA DE INSTALACIÓN
1. IMPORTANTE: cuando se conecte la cámara al monitor, el Power tiene que estar apagado ya
que las dos unidades pueden quedar dañadas.
2. Unir la cámara al carrete de cable (ver figura A) y conectar el carrete al monitor (ver figura B).
3. Enchufar una de las conexiones del cable del adaptador de energía al conector AC, y la otra
conexión al conector de entrada DC 12V o enchufar el cable desde el cargador de batería al conector de entrada 12V.
4. Encender el monitor por medio del POWER del frontal.
5. Introducir con cuidado la cámara en el tubo y desenrroscar el cable del carrete según la profundidad del tubo.
6. Encender el LED pulsando el botón correspondiente del frontal del monitor, y ajustar la luminosidad desde el MENU.
7. Grabar las imágenes en caso necesario (ver instrucciones DVR).
8. Por medio del cable de video se puede transferir las imágenes a otra pantalla u ordenador.
9. Cuando se ha finalizado el análisis, retirar con cuidado la cámara del tubo. Desenrroscar la cámara y limpiarla con un paño limpio y seco; entonces colocar la cámara en su posición inicial.
7
4.1 Instrucciones DVR ( solamente para los códigos: 60060 y
60061)
1. Seleccionar con el botón de selección de video el Video 2.
2. Quitar el capa de aislante de la batería del mando de control
remoto.
3. Pulsar el botón de control remoto 5 para comenzar el
sistema de grabación. Entonces se visualizará en pantalla PLAY
VIDEO.
4. Insertar el grabador USB ( USB o un disco duro externo) en
el puerto USB. Entonces se visualizará en pantalla que el USB
está conectado “USB CONNECTED” y los LEDs del USB se
iluminarán.
5. Pulsar el botón del mando de control remoto 3 para
comenzar a grabar; entonces la luz del de RECORDING LED
se iluminará.
6. Pulsar el botón del mando de control remoto 7 para detener
la grabación.
7. Pulsar el botón de control remoto 1 para rebobinar la
grabación.
8. Si se necesita mantener los videos grabados, pulsar el botón
del mando de control remoto 4; también se necesita visualizar
los video a tráves del menú SETTING, pulsar PLAY VIDEO.
4.2 Indicadores LED
1. REM: ventana de recepción remota.
2. Power: indica que el sistema está encendido.
3. Recording: se iluminará cuando se esté grabando.
4. USB: indica que el USB está conectado.
5. Error: detecta un error en el sistema o en el USB.
6. IR: se ilumina cuando se está utilizando el sistema de
grabación.
Los archivos de video grabados se guardarán el en USB. El
ususario puede utilizar el menú de la pantalla o pulsar el botón
REC para comenzar a grabar. Durante la grabación, la pantalla
visualizará que se está en modo grabación con un límite máximo
de 3h oras de grabación.
El usuario puede cambiar por medio del botón SETUP el tiempo
de grabación, desde 1 minuto al 180 minutos. El contenido
grabado puede ser visualizado por medio del ordenador.
4.3 Tiempo limitado de grabación
Algunos usuarios quizá olviden finalizar la grabación después de que está se ha iniciado. Las
cámaras poseen un tiempo limitado de grabación. El tiempo por defecto de grabación es de 2
horas. El usuario puede aumentar y disminuir dicho tiempo por medio del menú SETUP, desde 1
minuto hasta 180 minutos.
8
4.4 Programar la grabación
El usuario puede programar la grabación por adelantado. Se puede programar la grabación por
medio del botón SETUP. Entonces la unidad le preguntará el tiempo de grabación.
La grabación programada puede utilizarse una vez. El usuario deberá pulsar SETUP otra vez para
la próxima grabación.
4.5 Grabación por medio del lector USB
La unidad es capaz de grabar videos por medio del lector USB, igual que un disco duro externo.
El video grabado se grabará en el USB y podrá ser visualizado en la TV.
4.6. Formato de grabación
La resolución de grabación por defecto es 640 x 480, la cual utiliza 500MB/hora.
El usuario puede seleccionar la resolución 320x240 para tener mayor espacio.
4.7 Visualizar video
El usuario puede utilizar el menú para visualizar los video por medio de PLAY VIDEO.
La unidad visualizará la grabación de video seleccionada ubicada en el interior del USB.
No listará los video que no sean compatible.
4.8 Seleccionar el archivo de video
Cuando el usuario pulda “PLAY VIDEO”, la unidad visualizará en pantalla todos los archivos que
se encuantran en el USB. El usuario deberá seleccionar por medio de los botones de selección
superior e inferior y por medio del enter el video que se quiera visualizar. También se puede
pulsar el botón enter para pausar el video y exit para pararlo o salir al menú inicial.
El menú visualizará “loading, please wait ...” durante unos segundos antes de visualizarse el video
en pantalla.
4.9 Adelantar y rebobinar
El usuario puede utilizar los botones de rebobinar o adelantar del mando de control remoto para
acelerar la velocidad del rebobinado o adelantado de las imágenes del video (1x, 2x, 4x, 8x)
Siempre pulsar enter para volver a visualizar el video.
4.10 Formato de video compatible
Divx3.11 / Divx4 / Divx5 / MPEG1 / MPEG2 / MPEG4 ( El formato de video MPEG4: avi, .m4v,
.MPG, .MPEG, .VOB)
4.11 Características de grabación
Límite de tiempo de grabación: 00:00 - 03:00horas (por defecto 2 horas)
Sistema de grabación: PAL o NTSC ( por defecto NTSC)
Resolución: 640x480, 480x360, 720x480, y 320x240 (por defecto 640x480)
Ratio de compresión: 1000, 1200, 1500, 1800, 2100, 2500KB/s ( por defecto 1000Kb/s)
Frecuencia: 24.32 khz ( por defecto 32khz)
Programar la grabación: on / off ( por derfecto off)
9
5. PASOS PARA LA INSTALACIÓN DE CODEC
Si el usuario no puede abrir los videos grabados en el ordenador, por favor instalar los codec que
se encuantran el el CD adjunto.
Colocar el disco en el CD-ROM, entonces instalar el programa de acuerdo a lo siguiente:
10
11
12
6. RECARGA
1. Enchufar una de las conexiones del cable AC a la red eléctrica. Insertar la otra conexión del
cable AC al conector AC de la carga de batería. ( ver figura A)
2. Pulsar hacia abajo el interruptor de carga. (ver figura B)
3. El indicador LED se lucirá de color rojo cuando esté cargando y se cambiará a verde cuando
la carga se finalice. (normalmente el periodo de carga es de 8-10 horas)
No sobrecargar la batería! La sobrecarga puede dañar la batería o puede provocar fugas del ácido
que lleva.
13
7. DESPIECE
Nº
1
2
3
4
5
6
7
8
9
10
11
12
DESCRIPCIÓN
CÁMARA
MONITOR
CARRETE DE CABLE
CABLE AC
CARGADOR DE BATERÍA
MALETA
CARGADOR DC 12V
PROTECTOR
PROTECTOR DE CÁMARA
CABLE DE UNIÓN ENTRE LA CÁMARA Y EL CARRETE
MANDO DE CONTROL REMOTO
DISCO CON LOS CODEC
Nota: si se no visualizan los videos grabados en el ordenador o en la pantalla, por favor instalar
los codec del disco.
14
8. ELIMINACIÓN DE RESIDUOS
En la UE los equipos electrónicos no pertenecen a residuos
domésticos pero – de acuerdo con la Directiva 2002/96/F del
Parlamento Europeo y del Consejo del 27 de Enero de 2003 referente a
Residuos Eléctricos y equipamiento electrónico- deben ser eliminados
de una manera adecuada. Si no se va a volver a hacer uso de la batería,
por favor, desecharla de acuerdo con la normativa correspondiente.
9. DECLARACIÓN DE CONFORMIDAD
Los productos MASTERVISION REC y ECO se ajustan a los requerimientos necesarios de protección
establecidos en las directrices del Consejo Europeo.
10. GARANTIA
En caso de uso correcto el periodo de garantía para MASTERVISION REC y ECO es de 12 meses desde
la fecha de venta. Quedan excluidas las piezas o accesorios al fin de su vida útil (por ejemplo, baterías).
Esta garantía no incluye el coste de transporte y embalaje en caso de reparación.
15
ENGLISH
SAFETY INSTRUCTIONS
Attention! Be careful.
1.Read the user manual carefully before using this system.
2. Avoid any water leaking into the case and y using the device in extremely cold, heat, or humidity environment, it may damage the device.
3. Don’t throw the case away.
4. Clean the screen only with a smooth dust cloth.
5. Always back up your date before connecting your USB device to this system. The manufacturer
is not responsible for any date damage on your USB device for any reason.
6. Do not disconnect the unit while recording or playing. It may damage the unit and/or the USB
device.
16
1. INTRODUCTION
1.1 Relevant information
Before start using this device, read carefully the instructions manual. Basically, MASTERVISION REC
and ECO will only be used by qualified personal for its specifical use, and between the data range
has been designed for.
1.2 About MASTERVISION 1
MASTERVISION REC and ECO are easy-use products that allow to show snapshots. These devices
have a simple and intuitive interface, and can also be used with gloves or safety clothes.
MASTERVISION REC and ECO are ideals for any application in which sequences of still images or
videoclips need to be captured and stored on site. MASTERVISION ECO is an ideal replacement for
a VCR or computer based video capture system where still images or video clips need to be captured
from a video source and y MASTERVISION REC permit the video recording by the USB system.
Its rugged construction and the absence of moving parts make it extremely durable and it is ideal for
use in the field.
Typical applications include:
- Chimney, Duct, Vent or pipe inspection and documentation
- Routine maintenance and quality control
- Inspection and fault-finding
- Digital capture from other video/TV sources
17
2. COMPONENTS AND CONTROLS
1. Video selector button
2. Menu
3. Down selector
4. Up selector
5. Menu UP/DOWN selector
6. LED ON/OFF button
7. Power switch
8. Flat TFT switch
2.1 Camera
1. White leds
2. Lens
3. Spring
4. Gold connector
18
Fig. 1
9. DC 12V in
10. Video out
11. Camera port
12. USB port
13. Power & charge switch
14. AC input port
15. DC 12V output cord
16. Sunshade
2.2 Cable reel
1. Male plug ( to monitor)
2. Handle
3. Cable connector (to camera)
4. Cable reel
2.3 Remote control buttons (DVR use only)
1. Enter: enter to view and play video or music
2. Up: go to up / previous item
3. REC: start the recording
4. Setup: system setup and recording features
5. Enter: system in
6. Down: select down / next item
7. Exit: system in
8. Left: select left item
9. Right: select right item
10. Rewind: review video
11. Forward: forward video
19
3. TECHNICAL SPECIFICATIONS
ITEM
Power adapter
Camera
Flexible push rod
Battery case
Cable total lenght
Monitor
Waterproof camera
Battery
White light source
Angle of view
Field of view
Illumination sensor
Input voltage
Card reader
Video recording by USB system
Video output
Working temperature
Weight
Case
20m cable reel
30m cable reel
20
DESCRIPTION
110VAC ~ 240VAC 12VDC1800mA
Ø 26mm
Ø 40 - Ø 200mm
Sealed, lead acid
code: 60060, 60062
20m
code: 60061, 60063
30m
320 x 960 Pixel 7” TFT color
IP X8
12V DC 1800mA
8 LEDs
60º
400mm
Color CCD
100 - 240V
USB
code: 60060, 60061
X
X
-28ºC - 50ºC
12 Kg
53.5 x 22 x 47,5cm
code: 60056
code: 60057
4. SYSTEM SET-UP
1. IMPORTANT: when connecting the camera to the monitor the power must be off or both
units will be damaged.
2. Screw the camera to the cable reel (see figure A). Connect the reel to the monitor (see figure
B).
3. Plug the power adapter cord into the wall AC socket and other end into the DC 12V-Input jack,
or plug the cord from the battery case power. Plug the power cord of battery case into the 12Vinput jack.
4. Turn on the power switch on the front of the monitor.
5. Gently lower the camera into a pipe duct, etc and reel out the cable until it is at the desired
depth.
6. Turn on the led button and adjust the brightness from the MENU.
7. record the pictures if you need ( see DVR operating).
8. By a video cable you can transfer the picture to other larger screen.
9. When finish, carefully remove the camera from the pipe duct, etc. Screw out the camera and
clean it with a clean, soft and dry cloth then put the camera into the previous position.
21
4.1 DVR operation ( only for the codes 60060 y 60061)
1. Set the screen video button on Video 2.
2. Take off the isolation sheet from the remote control battery.
3. Press the remote control button 5 to enter the recording
system, you can see DVR system PLAY VIDEO manual on the
screen.
4. Insert your USB recorder (USB flash or removable hard disc
etc) to the USB port, you can see USB CONNECTED on the
screen. The USB LED light turn on.
5. Press remote control button 3 to start the recording. The
recording led light turn on.
6. Press remote control button 7 to stop recording.
7. Press remote control button 1 to review recording.
8. If you need to manage your recording pictures, press remote
control button 4, also you can do this files management by
electing the SETTING on PLAY VIDEO manual on the screen.
4.2 LED indicators
1. REM: remote receiving window
2. Power: it indicates systems is on
3. Recording: it will blink during recording
4. USB: it indicates USB device is connected
5. Error: it indicates the system or USB device has error
6. IR: it blinks when remote control is in use recording video
The recorded video files will be found in a directory of USB
devices. User can use the on-screen menu or press (REC)
button to start recording. Press exit to stop recording. During
the recording, TV screen will display recording time and time
limit (up to 3 hours).
User can press setup button to change recording time limit from
1 to 180 minutes. The recorded content can be viewed from
computer.
4.3 Recording time limit
Some users may forget to stop the recording after it is initiated. So the unit has a recording time
limit feature. The default time limit is 2 hours. User can go to setup mode to increase or decrease
the limit from 1 to 180 minutes.
22
4.4 Schedule recording
User can schedule a recording in advance. Simply enable the schedule recording in the setup.
Then the unit will ask user to setup timing.
Recording schelude can be used once. User has to set up schedule again for next recording.
4.5 Recording to USB device
The unit is able to record video into USB devices such as USB hard disck. The recorded video will
be stored in the USB devices and played back on the TV screen.
4.6. Recording format
The default recording resolution is 640 x 480, which takes about 500MB/hour.
User may select 320x240 to save storage space.
4.7 Video play
User can use on-screen menu to enter “play video” mode. The unit will display the record video
and other compatible videos inside USB device.
It will not list the non-compatible videos.
4.8 Select the video file
When the user enters “PLAY VIDEO” node, the set will display all of the available video files on
TV screen. User will use down or up selector to select desired video and press enter button to play.
Press and hold down or up button to go to previous or next video.
Use enter button to start or pause the playing. Use exit button to stop or go back to previous
menu.
The screen will display “loading, please wait...” fro few seconds before playing video.
4.9 Fast forward and rewind
User can use left and right button on the remote control to fast forwarding or rewinding (1x, 2x,
4x, or 8x). Always press enter button to go back normal playing.
4.10 Compatible video format
Divx3.11 / Divx4 / Divx5 / MPEG1 / MPEG2 / MPEG4 ( MPEG4 video file format: avi, .m4v, .MPG,
.MPEG, .VOB)
4.11 Recording setup
Recording time limit: 00:00 - 03:00hours (default is 2 hours)
Video standard: PAL o NTSC ( default NTSC)
Resolution: 640x480, 480x360, 720x480, y 320x240 (default 640x480)
Compression rate: 1000, 1200, 1500, 1800, 2100, 2500KB/s ( default 1000Kb/s)
Sample frequency: 24.32 khz ( default 32khz)
Schedule recording: on / off ( default off)
23
5. CODEC INSTALLATION
If you can not open the recording document on computer, please run the disc document.
Put the disc into CD-ROM, then install the system according the following ico:
24
25
26
6. RECHARGE
1. Plug the AC cord into wall AC socket and insert the other end into the battery box AC jack. (
see figure A)
2. Press down the charge switch (see figure B)
3. Charge LED will be red during charging. Then turn to be green when finish charging ( normally
charging time 8 - 10 hours).
Do not overcharge the battery!! Overcharging can result in damage to or acid leaking from the
battery.
27
7. ASSEMBLY DRAWING AND PARTS LIST
Nº
1
2
3
4
5
6
7
8
9
10
11
12
DESCRIPCTION
CAMERA
MONITOR
CABLE REEL
AC CORD
BATTERY CASE
CASE
DC 12V POWER SUPPLY
SUNSHADE
CAMERA PROTECTOR
UNION CABLE BETWEEN THE CAMERA AND THE
REEL
REMOTE CONTROL
CODEC DISC
Note: if you can not read the recording pictures on your computer, please down load the codec
software from the disc.
28
8. WASTE DISPOSAL
In the European Union, electronic equipment does not belong
into domestic waste but - in accordance with Directive 2002/96/EC
of the European Parliament and of the Council of 27 January 2003
on Waste Electrical and Electronic Equipment - must be disposed
of in an expert manner. If you do no longer need this unit, please
dispose of it in accordance with the applicable statutory provisions.
9. DECLARATION OF CONFORMITY
MASTERVISION REC and ECO conform with the essential protection requirements which are set
out in the directives of the European Council.
10. GUARANTEE
In case of proper usage, the guarantee period for MASTERVISION REC and ECO amount to 12
months from the date of sale. Excluded here are wear-and-tear parts (e.g. batteries).
The cost for the transportation and the packing of the device in the case of repair are not covered
by this guarantee.
29
ITALIANO
ISTRUZIONI DI SICUREZZA
¡Attenzione!!!!
1. Leggere distintamente il manuale prima di utilizzare l’apparato
2. Evitiare la penetrazione di acqua nella valigia e l’uso di questa in posti eccessivamente freddi,
Caldi o umidi poiché potrebbe danneggiare la camera.
3. Non tiri la valigetta.
4. Pulire lo schermo con un panno morbido.
5. Realizzare sempre copie di sicurezza prima di collegare l’USB alla camera. Il fabbricante non e’
responsabile dei danni causati all’USB in nessuna circostanza.
6. Non sconnettere l’unità mentre si sta registrando o utilizzando poiché può danneggiare l’unità
o l’avanzato USB.
2
1. INTRODUZIONE
1.1 Informazione rilevanti
Prima di cominciare ad usare questo apparato, legga ed osservi attentamente tutte le istruzioni
di uso. Fondamentalmente, MASTERVISION REC ed Eco devono essere utilizzate da personale
qualificato.
1.2 Su MASTERVISION REC y ECO
MASTERVISION REC Ed Eco è un prodotto che permette di visualizzare in maniera semplici
immagini istantanee.
Questi apparati sono semplici nel suo maneggio, grazie all’intuitiva interfaccia, possono essere
utilizzati perfino con guanti o vestiti protettivi.
Questi apparati sono ideali per qualunque applicazione nella quale si debba visualizzare
immagini in sito. MASTERVISION Eco è un sostituto eccellente di un sistema di cattura video
grazie all’opzione che permette all’utente di trasportare l’apparato di video esterno le immagini
visualizzate in ogni istante la Sua struttura solida e l’assenza di parti morbide fanno che questa
camera sia eccessivamente solida, duratura ed ideale per utilizzarla in ambienti esterni.
Usi abituali:
- Camini, condotti, griglie di ventilazione o ispezione di tubi.
- Mantenimento quotidiano e controllo di qualità.
- Ispezione e localizzazione di errori.
- Cattura digitale da altre fonti di video/TV
3
2. COMPONENTI E CONTROLLI
1. Bottone di selezione di video
9. Entrata D.C. 12V
2.
3.
4.
5.
6.
7.
8.
10.
11.
12.
13.
14.
15.
16.
Menù
Bottone inferiore
Bottone superiore
Menù selezione inferiore / superiore
Bottone accensione / spento del LED
Entrata energia
Schermo TFT
2.1 Camera
1. Leds bianco
2. Lente
3. Molle
4. Connettore placato oro
4
Uscita video
Porta entrata camera
Porta USB
Interruttore energia e di carica
Porta entrata AC
Cavo di uscita D.C. 12V
Protezione
2.2 Portabobina
1. Connettore (al monitor)
2. Maniglia
3. Connettore del cavo (alla camera)
4. Portabobina
2.3 Comando di controllo remoto (utilizzabile solo in DVR)
1. Enter: per visualizzare video o musica
2. Bottone superiore: pasa subir/artículo previo
3. REC: inicia a registrare
4. Setup: Caratteristiche di registrazione e per cambiare o modificare
5. Enter: Accensione
6. Bottone inferiore: para bajar/artículo siguiente
7. Exit: fermare / uscire dal menu
8.Sinistra: Selezionare l’articolo sinistro
9. Destra: Selezionare l’articolo destro
10. Riavvolgere: Riavvolge il video
11. Avanzamento: Avanzamento del video
5
3. SPECIFICHE TECNICHE
ARTÍCOLO
Adattatore d’energia
Camera
Barrra di spinta flessibile
Astuccio Batteria
Lunghezza del cavo
Monitor
Camera stagna
Batteria
Fonte della luce Bianca
Angolo di visione
Campo di visione
Sensore di luminosita’
Tension d’entrata
Lettore scheda
Registrazione video con USB
Uscita Video
Temperatura di Lavoro
Peso
Valigetta
Porta cavo 20 m
Porta cavo 30 m
6
DESCRIZIONE
110VAC ~ 240VAC 12VDC1800mA
Ø 26mm
Ø 40 - Ø 200mm
Bollata in acido di piombo
Codice: 60060, 60062
20m
Codice: 60061, 60063
30m
320 x 960 Pixel 7” TFT color
IP X8
12V DC 1800mA
8 LEDs
60º
400mm
Color CCD
100 - 240V
USB
codice: 60060, 60061
USB
X
X
-28ºC - 50ºC
12 Kg
53.5 x 22 x 47,5cm
Codice: 60056
Codice: 60057
4. SISTEMA D’ISTALLAZIONE
1. IMPORTANTE: quando si collega la camera al monitor, il tasto Power deve essere spente,
perche’ le due unità potrebbero rimanere danneggiate.
2. Unire la camera alla bobina di cavo, vedere figura A, e collegare la bobina al monitor (vedere
figura B).
3.Collegare una delle connessioni del cavo dell’adattatore di energia al connettore AC, e l’altra
connessione al connettore di’corrente D.C. 12V o collegare il cavo dal caricatore di batteria al
co¬nector di entrata 12V.
4. Accendere il monitor con il tasto POWER.
5. Introdurre delicadamente la camera nel tubo, svolgera il cavo dalla bobina secondo la profondita’ del tubo.
6. Accendere il LED con il bottone corrispondente nel forntale del monitor, aggiustare la luminosita dal MENU.
7. Registrare le immagini nel caso necessario (vedere istruzione DVR).
8. Per mezzo di un cavo video si puo trasferire le immagini su un’altro schermo o cumputer.
9. Quando si e’ terminato lil lavoro, ritirare delicadamente la camera dal tubo. Svitare la camera
e pulirla con un panno pulito e asciutto; a questo punto collocare la camera nella sua posizione
iniziale .
7
4.1 Istruzione DVR (Solamente per i codici 60060 e 60061)
1. Selezionare con il pulsante di selezione video il video 2.
2. Togliere l’adesivo isolante dalla batteria del telecomando.
3. Premere il pulsante 5 dal controllo remoto per iniziare a
registrare, in quel momento si visualizzera sullo scherzo PLAY
VIDEO.
4. Inserire nella porta USB (USB oppure un disco rigido esterno),
a quel punto si visualizzera’ sullo scherzo che USB e’ connesso
“USB CONNECTED” e il led del USB si illuminera’.
5. Premere il pulsante del telecomando di controllo remoto nº
3 per iniziare a registrare, quinde la luce del “RECODING LED”
si illuminera’.
6. Premere il pulsante del telecomando remoto nº 7 per fermare
la registrazione.
7. Premere il pulsante del telecomando remoto nº 1 per
riavvolgere la registrazione.
8. Se si necesita mantenere il video in registrati, premere il
pulsante del telecomando remoto nº 4 anche se si necessita’
visualizzare i video attraverso dal Menu SETTING, premere
PLAY VIDEO.
4.2 Indicatore LED
1. REM: Finestra ricezione remota.
2. Power: Indica che il sistema e’ acceso.
3. Recording: Si illuminera’ quando sta registrando.
4. USB: indica che USB e’ connessoo.
5. Error: indica un errore nel sistema o nella USB.
6. IR: Si illumina quando di dta utilizando il sistema di
registrazione.
Gli archivi video registrati vengono salvati nella porta USB.
L’operatore puo’ utilizzare il menu dello schermo o premere il
pulsante REC per iniziare a registrare.
Durante la registrazione, sullo schermo si visualizzera’ che e’
in fase di registrazione con un limite massimo di 3 ore.
L’Operatore puo cambiare attraverso il pulsante SETUO il
tempo di registrazione da 1 minuto a 180 minuti. Il contenuto
registrato puo essere visualizato da un computer. medio del
ordenador.
4.3 Tempo limitato di registrazione
Alcuni operatori dimentichino terminare la registrazione dopo che questa ha incominciato. Le
camere possiedono un tempo limitato di registrazione.
Il tempo per diefoult di registrazione è di 2 ore. L’utente può aumentare e diminuire detto tempo
per mezzo del menù SETUP, da 1 minuto fino a 180 minuti.
8
4.4 Programmare la registrazione
L’operatore può programmare in anticipo la registrazione. Può programmarsi la registrazione
premendo il pulsante SETUP. L’unità gli domanderà il tempo di registrazione. La registrazione
programmata può usarsi una sola volta. L’utente dovrà premere un’altra volta SETUP per la
prossima registrazione.
4.5 Registrazione per mezzo del lettore USB
L’unità è capace di registrare video per mezzo del lettore USB, come un hard disk esterno.
Il video registrato si fisserà nell’USB e potrà essere visualizzato nella TV.
isualizado en la TV.
4.6. Formato di registrazione
La risoluzione di registrazione è 640 x 480, la quale utilizza 500MB/hora.
L’utente può selezionare la risoluzione 320x240 per avere maggiore spazio.
4.7 visualizzare video
L’utente può utilizzare il menù per visualizzare il video per mezzo di PLAY Video.
L’unità visualizzerà la registrazione di video selezionata ubicata all’interno dell’USB.
Non elencherà il video che non sia compatibile.
4.8 Selezionare il file dalll’archivio video
Quando l’utente preme “PLAY Video”, l’unità visualizzerà sullo schermo tutti gli archivi salvati
nell’USB. L’utente dovrà selezionare per mezzo dei tasti di selezione superiore ed inferiore e per
mezzo dell’enter il video che si voglia visualizzare
Per mettere in pausa si puo’ premere nuovamente il tasto enter oppure exit per fermarlo o uscire
al menù iniziale.
Il menù visualizzerà “loading, please wait...durante alcuni secondi prima di visualizzarsi il video
su schermo.
4.9 Adelantar y rebobinar
El usuario puede utilizar los botones de rebobinar o adelantar del mando de control remoto para
acelerar la velocidad del rebobinado o adelantado de las imágenes del video (1x, 2x, 4x, 8x)
Siempre pulsar enter para volver a visualizar el video.
4.10 Formato video compattibile
Divx3.11 / Divx4 / Divx5 / MPEG1 / MPEG2 / MPEG4 ( El formato de video MPEG4: avi, .m4v,
.MPG, .MPEG, .VOB)
4.11 Caratteristiche di registrazioni
Límite di tiempo di registrazione: 00:00 - 03:00ora (porStandard 2 ore)
Sistema di registrazione: PAL o NTSC ( standard NTSC)
Risoluzione: 640x480, 480x360, 720x480, y 320x240 (standard 640x480)
Compressione: 1000, 1200, 1500, 1800, 2100, 2500KB/s ( Standard 1000Kb/s)
Frequenza: 24.32 khz ( Standard 32khz)
Programma di registrazione: on / off ( standard off)
Frecuencia: 24.32 khz ( por defecto 32khz)
Programar la grabación: on / off ( por derfecto off)
9
5. PASSI PER L’INSTALLAZIONE DEL CODEC
Se l’utente non può aprire i videi registrati nel computer, installare i codec che si trovano nel CD
aggiunto.
Collocare il disco nel CD-Rom, allora installare il programma:
10
11
12
6. RICARICA
1.Collegare una delle connessioni del cavo AC alla rete elettrica. Inserire l’altra connessione del
cavo AC al connettore AC del carico di batteria. , (vedere figura A)
2. Premere verso il basso l’interruttore di carico. (vedere figura B)
3. IL LED si illuminera e si distinguerà di colore rosso quando sta caricando e si cambierà a verde
quando la carica e’ terminata. Normalmente il periodo di carico è di 8-10 ore.
Non sovraccaricare la batteria! Il sovraccarico può danneggiare la batteria o può provocare fughe
di acido.
13
7. SPACCATO
Nº
1
2
3
4
5
6
7
8
9
10
11
12
DESCRIZIONE
CÁMERA
MONITOR
BOBINA
CAVO AC
CARICA BATTERIA
VALIGETTA
CARICATOR DC 12V
PROTEZIONE
PROTEZIONE CAMERA
CAVO UNIONE CAMERA BOBINA
TELECOMANDO DI CONTROLLO REMOTO
CD-ROM CON CODICE CODEC
Nota: se non si visualizzano i video registrati nel computer o su uno scherzo, dovete
installare il CD-ROM con i codici CODECc del disco.
14
8. ELIMINAZIONE DEI RESIDUI
Gli equipaggiamenti
elettronici non appartengono a
residui domestici ma d’accordo col Direttivo 2002/96/F del
Parlamento Europeo e del Consiglio del 27 di Gennaio di
2003 relativamente a Residui Elettrici ed equipaggiamento
elettronico - devono essere eliminati in una maniera adeguata.
Eliminare i rifiuti in accordo con la normativa corrispondente.
9. DICHIARAZIONE DI CONFORMITA’
I prodotti MASTERVISION REC ed Eco si adattano alle ingiunzioni necessarie di protezione stabilite
nelle direttrici del Consiglio Europeo.
10. GARANZIA
caso di uso corretto il periodo di garanzia per MASTERVISION REC ed Eco è di 12 mesi dalla data
di vendita. Rimangono escluse i pezzi o accessori di usura, per esempio, batterie.
Questa garanzia non include il costo di trasporto ed imballaggio in caso di riparazione.
15
CERTIFICADO DE GARANTIA
GUARANTEE CERTIFICATE
CERTIFICAT DE GARANTIE
. ARTICULO / ITEM / ARTICLE:.....................................................................................................................
. Nº DE SERIE / SERIE Nº / Nº SERIE:............................................................................................................
. DISTRIBUIDOR / DISTRIBUTOR / DISTRIBUTEUR:....................................................................................
. PAIS / COUNTRY / PAYS:..............................................................................TEL.:....................................
. FECHA DE VENTA / SALE DATE / DATE VENTE:.........................................................................................
. NOMBRE DEL COMPRADOR / BUYER NAME / NOM DE L’ACHETEUR:...................................................
. TEL. COMPRADOR / BUYER TEL. / TEL. DE L’ACHETEUR:.........................................................................
EGA MASTER GARANTIZA AL COMPRADOR DE ESTA MAQUINA LA GARANTIA TOTAL (DURANTE 12 MESES), DE LAS PIEZAS CON DEFECTOS DE FABRICACION. ESTA
GARANTIA NO CUBRE AQUELLAS PIEZAS QUE POR SU USO NORMAL TIENEN UN DESGASTE. PARA OBTENER LA VALIDEZ DE LA GARANTIA , ES ABSOLUTAMENTE
IMPRESCINDIBLE QUE COMPLETE Y REMITA ESTE DOCUMENTO A EGA MASTER , DENTRO DE LOS SIETE DIAS A PARTIR DE LA FECHA DE COMPRA.
EGA MASTER GUARANTEES TO THE BUYER OF THIS MACHINE THE TOTAL WARRANTY (DURING 12 MONTHS), OF THE PIECES WITH MANUFACTURING FAULTS.
THIS GUARANTEE DOES NOT COVER THOSE PIECES WORN OUT DUE TO A NORMAL USE. IN ORDER TO OBTAIN THE VALIDITY OF THIS WARRANTY , IT IS
ABSOLUTELY NECESSARY TO FULFILL THIS DOCUMENT AND RESEND IT TO EGA MASTER WITHIN 7 DAYS FROM SALE DATE.
EGA MASTER GARANTIE A L’ACHETEUR DE CETTE MACHINE LA GARANTIE TOTALE (PENDANT 12 MOIS) DES PIECES AVEC DEFAUTS DE FABRICATION. CETTE GARANTIE
NE COUVRE PAS LES PIECES QUE PAR UN USAGE NORMAL, SOIENT DETERIOREES. POUR OBTENIR LA VALIDITE DE LA GARANTIE, IL EST ABSOLUMENT IMPERATIF
COMPLETER ET ENVOYER CE DOCUMENT EGA MASTER, DANS UN DELAI DE 7 JOURS A PARTIR DE LA DATE D’ACHAT.
SELLO / STAMP / CACHET
EJEMPLAR PARA EGA MASTER / COPY FOR EGA MASTER / EXEMPLAIRE POUR EGA MASTER
CERTIFICADO DE GARANTIA
GUARANTEE CERTIFICATE
CERTIFICAT DE GARANTIE
. ARTICULO / ITEM / ARTICLE:.....................................................................................................................
. Nº DE SERIE / SERIE Nº / Nº SERIE:............................................................................................................
. DISTRIBUIDOR / DISTRIBUTOR / DISTRIBUTEUR:....................................................................................
. PAIS / COUNTRY / PAYS:..............................................................................TEL.:....................................
. FECHA DE VENTA / SALE DATE / DATE VENTE:.........................................................................................
. NOMBRE DEL COMPRADOR / BUYER NAME / NOM DE L’ACHETEUR:...................................................
. TEL. COMPRADOR / BUYER TEL. / TEL. DE L’ACHETEUR:.........................................................................
EGA MASTER GARANTIZA AL COMPRADOR DE ESTA MAQUINA LA GARANTIA TOTAL (DURANTE 12 MESES), DE LAS PIEZAS CON DEFECTOS DE FABRICACION. ESTA
GARANTIA NO CUBRE AQUELLAS PIEZAS QUE POR SU USO NORMAL TIENEN UN DESGASTE. PARA OBTENER LA VALIDEZ DE LA GARANTIA , ES ABSOLUTAMENTE
IMPRESCINDIBLE QUE COMPLETE Y REMITA ESTE DOCUMENTO A EGA MASTER , DENTRO DE LOS SIETE DIAS A PARTIR DE LA FECHA DE COMPRA.
EGA MASTER GUARANTEES TO THE BUYER OF THIS MACHINE THE TOTAL WARRANTY (DURING 12 MONTHS), OF THE PIECES WITH MANUFACTURING FAULTS.
THIS GUARANTEE DOES NOT COVER THOSE PIECES WORN OUT DUE TO A NORMAL USE. IN ORDER TO OBTAIN THE VALIDITY OF THIS WARRANTY , IT IS
ABSOLUTELY NECESSARY TO FULFILL THIS DOCUMENT AND RESEND IT TO EGA MASTER WITHIN 7 DAYS FROM SALE DATE.
EGA MASTER GARANTIE A L’ACHETEUR DE CETTE MACHINE LA GARANTIE TOTALE (PENDANT 12 MOIS) DES PIECES AVEC DEFAUTS DE FABRICATION. CETTE GARANTIE
NE COUVRE PAS LES PIECES QUE PAR UN USAGE NORMAL, SOIENT DETERIOREES. POUR OBTENIR LA VALIDITE DE LA GARANTIE, IL EST ABSOLUMENT IMPERATIF
COMPLETER ET ENVOYER CE DOCUMENT EGA MASTER, DANS UN DELAI DE 7 JOURS A PARTIR DE LA DATE D’ACHAT.
SELLO / STAMP / CACHET
EJEMPLAR PARA EL CLIENTE / COPY FOR THE CUSTOMER / EXEMPLAIRE POUR LE CLIENT
31
C/ ZORROLLETA 11, POL. IND. JUNDIZ
01015 VITORIA, SPAIN P.O.B. APTDO. 5005
TEL. 34 - 945 290 001
FAX. 34 - 945 290 141
[email protected]
www.egamaster.com
MANUAL DE INSTRUCCIONES
OPERATING INSTRUCTIONS
MANUEL D’INSTRUCTIONS
CURVATUBOS HIDRÁULICO / HIDRÁULIC
PIPE BENDER / CINTREUSE HYDRAULIQUE
CURVAMATIC-3
ESPAÑOL................................ 2
ENGLISH................................. 8
FRANÇAIS............................. 14
DESPIECE / SPARE PARTS
DRAWING / DEPEÇAGE....... 20
GARANTIA / GUARANTEE /
GARANTIE............................ 23
ESPAÑOL
INSTRUCCIONES DE SEGURIDAD
¡Atención! Cuide su seguridad.
1.No utilice prendas colgantes que se puedan enganchar en los elementos en movimiento .
2.Utilice siempre guantes.
3.Emplee siempre los accesorios destinados a la máquina ya que sin su utilización puede resultar
lesionado.
4.No manipular ni utilizar la máquina desde la zona delantera (zona de curvado de tubo). El usuario
siempre se debe situar en la zona trasera (zona del pistón hidráulico).
5. Colocar siempre la pata delantera perfectamente alineada con el pistón hidráulico para garantizar
la seguridad durante el uso.
CURVATUBOS HIDRÁULICO – 3
Máquina curvadora adecuadamente equipada para curvar tubería de acero para conducción de
agua, gas, etc. de ¼"÷3". Su sistema de dos velocidades permite de forma automática una rápida
aproximación, así como un suave doblado sin necesidad de cambiar de pistón. Dispuesta con doble placa, lo que le da la máxima consistencia durante el curvado. Asentamiento sobre 3 patas de
apoyo para obtener una mayor estabilidad.
Sistema de giro del cilindro y placas para poder curvar en zonas de dificil acceso.
Este curvatubos está diseñado para curvar tubos conformes a la norma DIN-2440, y que hayan
sido conformados en caliente. Se muestra una tabla con los diametros y espesores que dicta la norma DIN-2440.
Presión de trabajo: 13 Tm.
ATENCIÓN
Antes de comenzar a trabajar, aflojar ligeramente (una vuelta) el tornillo de llenado de aceite nº36.
2
TABLA DE DIAMETROS DE TUBOS DIN-2440
TAMAÑO
DIAMETRO EXTERIOR
ESPESOR
1/4
13,5
2,35
3/8
17,2
2,35
1/2
21,3
2,65
3/4
26,9
2,65
1
33,7
3,25
1.1/4
42,4
3,25
1.1/2
48,3
3,65
2
60,3
3,65
2.1/2
76,1
3,65
3
88,9
4,03
MANTENIMIENTO
Es importante utilizar aceite hidráulico. No utilizar ningún otro tipo de fluído.
Filtrar el aceite antes de introducirlo en el depósito. Cualquier elemento extraño podría dañarlo.
En posición de reposo la válvula (nº50) debe estar abierta y el pistón debe estar retirado para
evitar que el muelle de retorno del pistón se encuentre presionado.
Después de varios dias sin uso deben engrasar la extremidad que asoma del pistón para evitar
oxidaciones y agarrotamientos al utilizarlo de nuevo.
RECOMENDACIONES
No ponerse nunca delante de la máquina, evitaremos accidentes.
IMPORTANTE
Para el pedido de repuestos indique el código de éstos y el número de serie de la máquina.
INSTRUCCIONES DE FUNCIONAMIENTO
A) LLENADO DEL DEPÓSITO
Introducir aceite a través del tapón (nº36). Introducir aceite a través del tapón (nº36). Para ello, se
aconseja retroceder completamente el pistón (mediante la ruleta de retroceso), estabilizar en horizontal
el pistón para nivelar completamente el aceite, meter una varilla hasta encontrar un obstáculo y medir
1,5cm de aceite. Ese será el nivel ideal de llenado.
A
3
B) CURVADO DE TUBOS
B1- El tornillo superior de llenado de aceite (*) debe estar parcialmente abierto para el uso. Sólo
debe cerrarse para el transporte. El pistón debe encontrarse en posición retirada, para lo cual la
válvula (nº50) debe estar abierta.
B2- Cierre la válvula (nº50).
B3- Con la placa superior abatida, coloque ambos diábolos en sus correspondientes alojamientos
de la placa inferior según la medida del tubo a curvar.
B4- Seleccione la huella correspondiente del diábolo y orientelo hacia la máquina.
B5- Seleccione la galleta necesaria en función de la medida del tubo a curvar.
B6- Introduzca el tubo a curvar alojándolo entre la galleta y los diábolos.
B7- Introducir y accionar la palanca en el alojamiento del pistón e iniciaremos el movimiento rápido de salida del pistón hasta que la galleta haga contacto con el tubo. En ese instante se accionará la velocidad de curvado suave, que nos permitirá curvar con mínimo esfuerzo.
B8- Una vez realizado el curvado, se abrirá la válvula (nº50). El pistón retrocederá automáticamente.
B9- Eleve la placa superior y retire la galleta junto con el tubo curvado.
B1
B2
B3
B4
B5
B6
B7
B8
B9
(*)
4
SOLUCIÓN A POSIBLES ERRORES
a) El pistón no avanza: compruebe que el tornillo superior (*) está parcialmente abierto y que la
válvula de retorno (nº50) está cerrada.
b)El pistón no retrocede o no retrocede completamente: compruebe que el tubo no está atascado
en los émbolos laterales. Dando un suave golpe debería soltarse. Comprobar también que el
tornillo superior (*) no esté cerrado.
c) Existe fuga de aceite por la parte frontal: esto es normalmente debido a la continua fricción
sobre la junta que sufre mayor rozamiento. Esta junta ha de ser cambiada periodicamente del
modo que a continuación se detalla:
1. Vaciar el déposito de aceite a través del tornillo superior.
2. Soltar la pieza Nº27 con ayuda de una llave hexagonal.
3. Soltar la pieza hexagonal Nº 33 con ayuda de una llave.
4. Soltar la pieza Nº28 con ayuda de una llave hexagonal.
5. Extraer el pistón pieza Nº30 con la mano.
6. Sustituir la junta del pistón Nº39 asegurándose de su correcta posición.
7. Introducir el pistón con suavidad para evitar dañar la junta.
8. Introducir la pieza Nº28 y apretar con ayuda de una llave hexagonal.
9. Introducir la pieza Nº33 y apretar con ayuda de una llave.
10. Introducir la pieza Nº27 y apretar con ayuda de una llave hexagonal.
1
2
3
4
5
6
7
8
9
10
5
NOTAS
¡IMPORTANTE!
El fabricante no se responsabiliza de los daños o mal funcionamiento de la máquina en caso de
que no se use correctamente o se haya utilizado para trabajos para los que no está diseñada.
Para pedir cualquier repuesto, mirar en el dibujo de despiece el número de la pieza deseada.
Según la directiva sobre residuos eléctricos de aparatos eléctricos y electrónicos (RAEE),
éstos deberán recogerse y tratarse por separado. Si en el futuro tiene que deshacerse de este producto, no se deshaga de él junto con la basura doméstica. Póngase en contacto con su distribuidor
para proceder a su reciclaje de manera gratuita cuando sea posible.
GARANTÍA
El fabricante garantiza al comprador de ésta máquina la garantía total durante 12 meses de las
piezas con defectos de fabricación.
Esta garantía no cubre aquellas piezas que por su uso normal tienen un desgaste.
Nota: para obtener la validez de la garantía, es absolutamente imprescindible que complete y
remita al fabricante el documento de “CERTIFICADO DE GARANTIA”, dentro de los siete dias a
partir de la fecha de compra.
6
ENGLISH
SAFETY INSTRUCTIONS
Attention! Be careful.
1.Do not wear loose clothing. They could be caught by moving parts of the machine.
2.Always wear gloves.
3.Always use the machine´s indicicated accesories because if you don´t, it could lead to risk of
personal injury.
4.Don’t use or manipulate the machine standing in front of it (pipe welding area). User should
always stand at the back of the machine (hydraulic piston area).
5. Place always the forward supporting leg perfectly lined with the hydraulic piston to guarantee the
use safety.
HIDRÁULIC PIPE BENDER – 3
Pipe bender machine properly equipped to bend steel pipe for conduction of water, gas, etc.
from ¼"÷3". The system of two speeds enables an automatic switch from “fast pre-loading” to
“soft bending” position without any need to change pistons. Fitted with double plate, wich gives
it the maximum consistency during the bending. Seated upon 3 legs of support to obtain a greater
stability. Has a turn system for the cylinder and plates to be able to bend in difficult access areas.
This pipe bender has been designed for bending pipes according to DIN-2440. Included a table
with the diameter and thickness specified by norm DIN-2440.
Working pressure : 13 Tm.
ATTENTION
Before beginning to work, loose slightly (a turn) the plug nº36.
8
TUBING DIAMETER & THICKNESS DIN-2440
SIZE
EXTERIOR DIAMETER
THICKNESS
1/4
13,5
2,35
3/8
17,2
2,35
1/2
21,3
2,65
3/4
26,9
2,65
1
33,7
3,25
1.1/4
42,4
3,25
1.1/2
48,3
3,65
2
60,3
3,65
2.1/2
76,1
3,65
3
88,9
4,03
MAINTENANCE
It is very important to use hidraulic oil and not any other type of fluid.
Filter the oil before putting it into the deposit as any foreign substance can damage the O rings
or any of the valves.
The valve (nº50), in position of rest, must be opened and the piston withdraw, to avoid having
pressed the spring of the pistons return.
Before several days without being used, lubricate the end of the piston to avoid corrosions and
seizure while starting again its usage.
ADVICE
Take care while working, don’t place your body in front of the machine, that will avoid accidents.
IMPORTANT
When ordering spare parts please indicate its code number and the serial number of the machine.
GUIDE OF USAGE
A) FILLING THE DEPOSIT
Introduce through the plug (nº36) the oil. Introduce through the plug (nº36) the oil. For that, it
is strongly recommended to move back the piston (with the runback roulette), stabilize the piston
horizontally to level the oil fully, insert a rod until a stop is found and measure 1,5cm of oil. This
will be the ideal level of filling.
A
9
B) BENDING OF PIPES
B1- The upper screw for oil filling must be half-opened for use (*). It only must be completely closed for transport. The piston must be in a withdrawal position and so to get it the valve (nº50)
must be oppened.
B2- Close the valve (nº50).
B3- With the superior plate withdrawn, place both resting forms in their corresponding housings of
the interior plate according to the size of the pipe bent.
B4- Select the form corresponding to the resting form in the end of the piston.
B5- Place the corresponding form in the end of the piston.
B6- Insert the pipe to be bent, housing it between the form and the resting forms.
B7- Insert and actuate the bar, inside the housing of the big piston (left) and we will actuate it fast
untill the pipe contacts with the bending form. At this moment smooth-bending speed will
start, which enables bending with minimal effort.
B8- Once the bend is gotten, the (nº50) will be oppened and by making this action, the piston will
go back automatically.
B9- Raise the superior plate and withdraw the form together with the bent pipe, removing it from the same.
B1
B2
B3
B4
B5
B6
B7
B8
B9
(*)
10
SOLUTION TO POSSIBLE ERRORS
a) The piston does not move forward: check the upper screw (*) is half-opened and the returning
valve (nº50) is closed.
b)The piston does not fully move back: check the pipe is not blocked by lateral resting forms. It
can be solved with some smooth knocks. Check too the upper screw (*) is half-opened.
c) Oil is leaking from front zone: the reason for this is the continous friction of the internal o-ring.
This o-ring must be from time to time changed according to following way:
1. Drain the oil tank through the upper screw.
2. Loosen the piece Nº 27 with a hexagonal key.
3. Loosen the hexagonal piece Nº 27 with a wrench.
4. Loosen the piece Nº 28 with a hexagonal key.
5. Extract the piston Nº30 piece with the hand.
6. Replace o-ring of the piston (piece Nº39) , making sure it is correctly positioned.
7. Introduce the piston with smoothness to avoid to damage the o-ring.
8. Introduce and tighten the piece Nº28 with a hexagonal key.
9. Introduce and tighten the piece Nº33 witha key.
10. Introduce and tighten the piece Nº27 with a hexagonal key.
1
2
3
4
5
6
7
8
9
10
11
NOTES
IMPORTANT!
The maker will not take responsibility for damage or malfunction as a result of the machine
being incorrectly used or, applied for a purpose for which it was not intended.
For ordering spare parts, please refer to the Spare Parts Drawing and note the needed number.
According to Waste Electrical and Electronic Equipment directive (WEEE), these ones must
be collected and arranged separately. If you have to throw them out, please, do not use the usual
rubbish. Please, contact your distributor for free recycling.
GUARANTEE
The maker guarantees to the machine owner 12 months against any manifacture defect.
This guaranteee do not cover the parts wich are consumables.
Note: to apply the guarantee its necesary to send the “GUARANTEE CERTIFICATE” duly filled
within one week after purchased the machine to the maker.
12
FRANÇAIS
INSTRUCTIONS DE SECURITE
Attention! Soyez prudent.
1.N´utilisez pas des vêtements amples Ils pourraient être entrainés dans les parties mobiles de la
machine.
2.Utilisez toujours des gants.
3.N´utilisez que des accesoires destinés exactement á la machine, afin d´eviter tout risque de
blessure corporelle.
4.Ne pas manipuler ni utiliser de puis la zone avant (zone du courbé du tube). L’utilisateur doit
toujours de situer dans la zone arrière (zone du piston hydraulique).
5.Toujours placer la patte avant parfaitement alignée avec le piston hydraulique pour garantir la
sécurité pendant l’utilisation.
CINTREUSE HYDRAULIQUE – 3
Machine à cintrer toute tuyauterie en acier pour la circulation d’eau, de gaz, etc de ¼" à 3".
Son système à deux vitesses permet de façon automatique une approximation rapide, ainsi qu’un
léger doublage sans avoir besoin de changer le piston. Dispose de 2 plaques qui permettent une
résistance maximum pendant le cintrage. 3 pieds d’appui pour une plus grande stabilité.
Système de rotation du cylindre et des plaques pour cintrer des tubes dans des zones d’accès
difficile.
Cette cintreuse est conçue pour cintrer des tubes conformes à la norme DIN-2440, qui ont été
façonnés à chaud.
Présenté tableau des diamètres et épaisseurs de tubes selon la norme DIN 2440.
Pression de travail : 13 Tm.
ATTENTION
Avant de commencer à travailler, desserrer légèrement (un tour) la vis de remplissage d’huile N°36.
14
TABLEAU DES DIAMETRES DE TUBES DIN-2440
DIMENSION
DIAMETRE EXTERIEUR
EPAIS SEUR
1/4
13,5
2,35
3/8
17,2
2,35
1/2
21,3
2,65
3/4
26,9
2,65
1
33,7
3,25
1.1/4
42,4
3,25
1.1/2
48,3
3,65
2
60,3
3,65
2.1/2
76,1
3,65
3
88,9
4,03
ENTRETIEN
Important: utiliser de l’huile hydraulique. N’utiliser aucun autre fluide.
Filtre l’huile avant de l’introduire dans le réservoir. Un élément extérieur pourrait endommager
la machine.
Dans la position de repos, la vanne (N°32) doit être ouverte et le piston doit être à son minimum
pour éviter que le ressort de retour du piston soit sous pression.
Après plusieurs sans utilisation, il faut graisser l’extrémité du piston pour éviter les oxydations et
bouchages éventuels.
RECOMMENDATIONS
Ne jamais se mettre devant la machine afin d’éviter les accidents.
IMPORTANT
Pour la commande de piéces détachées, indiquer la référence et le numéro de série de la machine.
GUIDE D’UTILISATION
A) REMPLISSAGE DU RESERVOIR
Remplir d’huile par le bouchon (nº36). Pour cela, il est conseillé de reculer complètement le piston (au
moyen de la roulette de recul), stabiliser à l’horizontal le piston pour niveler complètement l’huile, mettre
une tige jusqu’à rencontrer un obstacle et mesurer 1,5cm d’huile. Ce sera le niveau idéal de remplissage.
A
15
B) CINTRAGE DES TUBES
B1- La vis supérieure de remplissage d’huile (*) doit être partiellement ouverte pour son utilisation.
Elle doit juste se fermer pour le transport. Le piston doit être en position retirée, la vanne (nº50)
doit donc être ouverte.
B2- Fermeture de la vanne (nº50).
B3- Soulever la plaque supérieure, positionner les butées dans leurs emplacements respectifs sur la
plaque inférieure suivant le diamètre du tube à cintrer.
B4- Sélectionner l’empreinte correspondante sur la butée et l’orienter vers la machine.
B5- Positionner le galet correspondant au tube à cintrer à l’extrémité du piston.
B6- Introduire le tube entre le galet et les butées.
B7- Introduire et actionner le manche dans le grand piston (piston gauche) et vous obtiendrez une
avancée très rapide du galet jusqu’à son entrée en contact avec le tube. A cet instant, la vitesse
de courbage douce sera actionnée, ce qui nous permettra de courber avec un minimum d’effort.
B8- Après avoir réalisé le cintrage, ouvrir la vanne (N°32) et le piston reviendra à sa position initiale automatiquement.
B9- Soulever la plaque supérieure et retirer le galet et le tube cintré.
B1
B2
B3
B4
B5
B6
B7
B8
B9
(*)
16
SOLUTION AUX POSSIBLES ERREURS
a) Le piston n’avance pas : vérifier que la vis supérieure (*) est partiellement ouverte et que la valve de retour (nº50) est bien fermée.
b)Le piston ne recule pas ou pas complètement : vérifier que le tube n’est pas bouché dans les
pistons latéraux. En donnant un petit coup, ça devrait sauter. Vérifier également que la vis supérieure (*) n’est pas fermée.
c) Il y a des fuites d’huile par la partie frontale : cela est normalement du à la friction continue sur
le joint qui subit le plus de friction. Ce joint doit être changé périodiquement selon les détails
comme suit:
1. Vider le dépôt d’huile à travers la vis supérieure.
2. Desserrer la pièce Nº27 avec l’aide d’une clé hexagonale.
3. Desserrer la pièce hexagonale Nº33 avec l’aide d’une clé.
4. Desserrer la pièce Nº28 avec l’aide d’une clé hexagonale.
5. Extraire le piston pièce Nº30 avec la main.
6. Remplacer le joint du piston Nº39 en s’assurant de sa position correcte.
7. Introduire le piston doucement pour éviter d’abîmer le joint.
8. Introduire la pièce Nº28 et la serrer avec l’aide d’une clé hexagonale.
9. Introduire la pièce Nº33 et la serrer avec l’aide d’une clé.
10. Introduire la pièce Nº27 et la serrer avec l’aide d’une clé.
1
2
3
4
5
6
7
8
9
10
17
NOTES
IMPORTANT!
Le fabricant ne se responsabilise pas des détériorations ou du mauvais fonctionnement de la
machine dans le cas d’une mauvaise utilisation ou suite à des usages pour lesquels elle n’est pas
concue.
Pour commander les pièces de rechange, regarder le descriptif et le numéro de pièce désiré.
Selon la directive des déchets d’appareils électriques et électroniques (DEEE), ces derniers
devront se ramasser et suivre un traitement séparé. Si dans l’l’avenir vous devez vous débarrasser
de ce produit, ne le faites pas avec le reste d’ordures ménagères. Merci de vous adresser à votre
distributeur pour procéder à son recyclage gratuit si possible
GARANTIE
Le fabricant donne une garantie de 12 mois à l’acquéreur de cette machine, pour les pièces avec
un défaut de fabrication.
La garantie ne s’applique pas aux pièces d’usure normale.
Note : pour obtenir la validité de la garantie, il est obligatoire de compléter et de retourner au
fabricant, le document ‘’CERTIFICAT DE GARANTIE’’ dans les 7 jours d’acquisition de la machine.
18
DESPIECE / SPARE PARTS DRAWING / DEPEÇAGE
20
Nº
COD
CANT / QTY / QTÉ
Nº
COD
CANT / QTY / QTÉ
1
2
83864
641901/4,3/8,1/2"
64191-3/4"
64192-1"
64193-1.1/4"
64194-1.1/2"
64195-2"
64231-2.1/2"
64232-3"
83865
83866
83867
83868
83869
83870
83871
83872
83873
83874
83875
83876
83877
83878
83879
83880
83881
83882
83883
83884
83885
83886
83887
83889
83890
83891
83892
83893
83894
1
1
33
34
35
36
37
38
39
40
41
42
43
44
45
46
47
48
49
50
51
52
53
54
55
56
57
58
59
60
61
62
63
64
CONJUNTO
DE JUNTAS /
O-RING SET /
ENSEMBLE
DE JOINTS
83895
83896
83897
83898
83899
83900
83901
83902
83903
83904
83905
83906
83907
83908
83909
83910
83911
83912
83913
83914
83915
83916
83917
83918
83919
83920
83921
83922
83923
83924
83925
83926
1
1
1
1
1
1
1
1
2
2
3
1
2
1
1
1
1
1
1
1
1
1
1
2
2
1
1
1
1
1
1
1
83927
1
2
2
2
2
2
2
2
3
4
5
6
7
8
9
10
11
12
13
14
15
16
17
18
19
20
21
22
23
24
25
27
28
29
30
31
32
1
1
1
1
1
1
1
4
2
2
1
3
1
3
1
1
1
1
1
1
1
1
1
2
1
6
1
4
4
4
1
1
1
1
1
1
21
CERTIFICADO DE GARANTIA
GUARANTEE CERTIFICATE
CERTIFICAT DE GARANTIE
ARTICULO / ITEM / ARTICLE:.....................................................................................................................
Nº DE SERIE / SERIE Nº / Nº SERIE:............................................................................................................
DISTRIBUIDOR / DISTRIBUTOR / DISTRIBUTEUR:....................................................................................
PAIS / COUNTRY / PAYS:..............................................................................TEL.:....................................
FECHA DE VENTA / SALE DATE / DATE VENTE:.........................................................................................
NOMBRE DEL COMPRADOR / BUYER NAME / NOM DE L’ACHETEUR:...................................................
TEL. COMPRADOR / BUYER TEL. / TEL. DE L’ACHETEUR:.........................................................................
EGA MASTER GARANTIZA AL COMPRADOR DE ESTA MAQUINA LA GARANTIA TOTAL (DURANTE 12 MESES), DE LAS PIEZAS CON DEFECTOS DE FABRICACION. ESTA
GARANTIA NO CUBRE AQUELLAS PIEZAS QUE POR SU USO NORMAL TIENEN UN DESGASTE. PARA OBTENER LA VALIDEZ DE LA GARANTIA , ES ABSOLUTAMENTE
IMPRESCINDIBLE QUE COMPLETE Y REMITA ESTE DOCUMENTO A EGA MASTER , DENTRO DE LOS SIETE DIAS A PARTIR DE LA FECHA DE COMPRA.
EGA MASTER GUARANTEES TO THE BUYER OF THIS MACHINE THE TOTAL WARRANTY (DURING 12 MONTHS), OF THE PIECES WITH MANUFACTURING FAULTS.
THIS GUARANTEE DOES NOT COVER THOSE PIECES WORN OUT DUE TO A NORMAL USE. IN ORDER TO OBTAIN THE VALIDITY OF THIS WARRANTY , IT IS ABSOLUTELY NECESSARY TO FULFILL THIS DOCUMENT AND RESEND IT TO EGA MASTER WITHIN 7 DAYS FROM SALE DATE.
EGA MASTER GARANTIE A L’ACHETEUR DE CETTE MACHINE LA GARANTIE TOTALE (PENDANT 12 MOIS) DES PIECES AVEC DEFAUTS DE FABRICATION. CETTE GARANTIE
NE COUVRE PAS LES PIECES QUE PAR UN USAGE NORMAL, SOIENT DETERIOREES. POUR OBTENIR LA VALIDITE DE LA GARANTIE, IL EST ABSOLUMENT IMPERATIF
COMPLETER ET ENVOYER CE DOCUMENT EGA MASTER, DANS UN DELAI DE 7 JOURS A PARTIR DE LA DATE D’ACHAT.
SELLO / STAMP / CACHET
EJEMPLAR PARA EGA MASTER / COPY FOR EGA MASTER / EXEMPLAIRE POUR EGA MASTER
CERTIFICADO DE GARANTIA
GUARANTEE CERTIFICATE
CERTIFICAT DE GARANTIE
ARTICULO / ITEM / ARTICLE:.....................................................................................................................
Nº DE SERIE / SERIE Nº / Nº SERIE:............................................................................................................
DISTRIBUIDOR / DISTRIBUTOR / DISTRIBUTEUR:....................................................................................
PAIS / COUNTRY / PAYS:..............................................................................TEL.:....................................
FECHA DE VENTA / SALE DATE / DATE VENTE:.........................................................................................
NOMBRE DEL COMPRADOR / BUYER NAME / NOM DE L’ACHETEUR:...................................................
TEL. COMPRADOR / BUYER TEL. / TEL. DE L’ACHETEUR:.........................................................................
EGA MASTER GARANTIZA AL COMPRADOR DE ESTA MAQUINA LA GARANTIA TOTAL (DURANTE 12 MESES), DE LAS PIEZAS CON DEFECTOS DE FABRICACION. ESTA
GARANTIA NO CUBRE AQUELLAS PIEZAS QUE POR SU USO NORMAL TIENEN UN DESGASTE. PARA OBTENER LA VALIDEZ DE LA GARANTIA , ES ABSOLUTAMENTE
IMPRESCINDIBLE QUE COMPLETE Y REMITA ESTE DOCUMENTO A EGA MASTER , DENTRO DE LOS SIETE DIAS A PARTIR DE LA FECHA DE COMPRA.
EGA MASTER GUARANTEES TO THE BUYER OF THIS MACHINE THE TOTAL WARRANTY (DURING 12 MONTHS), OF THE PIECES WITH MANUFACTURING FAULTS.
THIS GUARANTEE DOES NOT COVER THOSE PIECES WORN OUT DUE TO A NORMAL USE. IN ORDER TO OBTAIN THE VALIDITY OF THIS WARRANTY , IT IS ABSOLUTELY NECESSARY TO FULFILL THIS DOCUMENT AND RESEND IT TO EGA MASTER WITHIN 7 DAYS FROM SALE DATE.
EGA MASTER GARANTIE A L’ACHETEUR DE CETTE MACHINE LA GARANTIE TOTALE (PENDANT 12 MOIS) DES PIECES AVEC DEFAUTS DE FABRICATION. CETTE GARANTIE
NE COUVRE PAS LES PIECES QUE PAR UN USAGE NORMAL, SOIENT DETERIOREES. POUR OBTENIR LA VALIDITE DE LA GARANTIE, IL EST ABSOLUMENT IMPERATIF
COMPLETER ET ENVOYER CE DOCUMENT EGA MASTER, DANS UN DELAI DE 7 JOURS A PARTIR DE LA DATE D’ACHAT.
SELLO / STAMP / CACHET
EJEMPLAR PARA EL CLIENTE / COPY FOR THE CUSTOMER / EXEMPLAIRE POUR LE CLIENT
C/ ZORROLLETA 11, POL. IND. JUNDIZ
01015 VITORIA, SPAIN P.O.B. APTDO. 5005
TEL. 34 - 945 290 001
FAX. 34 - 945 290 141
[email protected]
www.egamaster.com
MANUAL DE INSTRUCCIONES
OPERATING INSTRUCTIONS
MANUEL D’INSTRUCTIONS
NIVEL LÁSER ROTATORIO STANDARD
/ STANDARD ROTATORY LASER LEVEL /
NIVEAU LASER ROTATIF STANDARD
ESPAÑOL.............................. 2
ENGLISH............................... 6
FRANÇAIS........................... 10
GARANTIA / GUARANTEE /
GARANTIE.......................... 15
ESPAÑOL
DATOS TÉCNICOS
Tipo de pilas
Duración de las baterías (en uso)
Longitud de onda
Potencia de salida
Nivel de radiación
Precisión
Distancia de trabajo
Velocidad de rotación
Temperatura de trabajo
4x1.5V AA DC
8h cont.
650nm
≤ 1mW
II
0.5mm/m
10m
100 – 300 rpm
0ºC ~ 40ºC
USO DEL NIVEL CON EL TRÍPODE
- Para poder poner en marcha el nivel láser, hay que instalar las pilas. Para ello, quite la tapa ubicada en la parte posterior del nivel
e introduzca las baterías tal y como se indica en el compartimiento.
- Abra el trípode, coloque el nivel en la base mediante la rosca del trípode, y después ajuste la altura del trípode según lo necesitado.
- El nivel dispone de tres tornillos niveladores en la parte inferior para poder nivelarlo con ayuda de la burbuja (situada en la parte
superior del nivel).
- El botón de ON/OFF sirve también de regulador de velocidad, ya que puede girar desde 120rpm a 500rpm. Una vez puesto en
marcha la luz se proyectará en la superficie deseada.
- El nivel podrá proyectar una línea horizontal, una vertical, un punto o una cruz, mediante el sencillo movimiento de la ruleta de la
parte superior del nivel, dependiendo de las necesidades del usuario.
- El nivel ofrece la posibilidad de colocarlo en posición vertical (directamente en el trípode), u horizontalmente con la base
suministrada según se requiera en cada ocasión.
CALIBRADO
COMPROBACIÓN DEL ERROR DE ROTACIÓN HORIZONTAL
A1.- Montar y nivelar el nivel láser rotatorio en el trípode a una distancia de 4 m, de forma que el botón de encendido quede
afrontando la pared.
-2-
A2.- Encender el aparato en modo “POINT”. Girar la cabeza rotatoria manualmente hasta que el haz ilumine la pared y marcar un
punto A en la pared.
A3.- Rotar el nivel rotatorio 180 grados de forma que la parte posterior quede enfrentada a la pared. Renivelar.
A4.- Marcar un punto B en la pared.
A5.- Si la distancia entre los puntos A y B es superior a 2 mm, es necesaria la calibración: proceder como se indica en el apartado
CORRECCIÓN DEL ERROR DE ROTACIóN HORIZONTAL (B1-B3).
A6.- Colocar y nivelar ahora el nivel láser rotatorio en el trípode a una distancia de 4 m, de forma que uno de los laterales quede
enfrentando a la pared.
A7.- Encender el aparato en modo “POINT”. Girar la cabeza rotatoria manualmente hasta que el haz ilumine la pared y marcar un
punto C en la pared.
-3-
A8.- Rotar el nivel rotatorio 180 grados de forma que la parte posterior quede enfrentada a la pared. Renivelar.
A9.- Marcar un punto D en la pared.
A10.- Si la distancia entre los puntos C y D es superior a 2 mm, es necesaria la calibración: proceder como se indica en el apartado
CORRECCIÓN DEL ERROR (B4-B5).
A11.- Si finalmente la distancia entre los A y B es inferior a 2 mm y la distancia entre los puntos C y D es inferior a 2 mm, no es
necesario calibrar el nivel láser.
CORRECCIÓN DEL ERROR HORIZONTAL.
B1.- Nivelar hasta que el punto láser quede entre los puntos A y B. Este hecho provocará la desnivelación de la burbuja.
B2.- Centrar la burbuja dentro de los limites que se indican en la foto ajustando el tornillo Nº1 con un destornillador PH0.
B3.- Volver a comprobar la precisión del nivel láser rotatorio según los pasos A1-A5 del apartado anterior. Renivelar en caso de que
aún la precisión no sea la apropiada.
-4-
B4.- Nivelar hasta que el punto láser quede entre los puntos C y D. Este hecho provocará la desnivelación de la burbuja.
B5.- Centrar la burbuja dentro de los limites que se indican en la foto ajustando el tornillo N2 y N3 con un destornillador PH0.
NOTA
¡IMPORTANTE!
El fabricante no se responsabiliza de los daños o mal funcionamiento de la máquina en caso de que no se use correctamente o se
haya utilizado para trabajos para los que no está diseñada.
GARANTÍA
El fabricante garantiza al comprador de ésta máquina la garantía total durante 12 meses de las piezas con defectos de fabricación.
Esta garantía no cubre aquellas piezas que por su uso normal tienen un desgaste.
Nota: para obtener la validez de la garantía, es absolutamente imprescindible que complete y remita al fabricante el documento
de “CERTIFICADO DE GARANTIA”, dentro de los siete dias a partir de la fecha de compra.
-5-
ENGLISH
TECHNICAL DATA
Power supply
Operating time
Laser wavelength
Output power
Laser class
Accuracy
Working distance
Rotation speed
Operating temperature
4x1.5V AA DC
8h cont.
650nm
≤ 1mW
II
0.5mm/m
10m
100 – 300 rpm
0ºC ~ 40ºC
COMBINED USAGE OF THE LASER LEVELLER AND THE TRIPOD
- Put the batteries in the battery cover of laser level as it is indicated in the compartment. Switch on the power and the light on, the
laser aperture will give off light.
- Open the tripod, connect the screw on the base of the leveller with the screw thread on the tripod, and then adjust the height of
the tripod as needed.
- Turn the three jiggles handle on the leveller to make the air bubble in the adjustable vial in the centre.
- To find the accurate level of the object in 360 degree, first turn the function button on the top of the leveller to make the arrow on
the button point to the light dot, then press the slow button (or fast button) on the operating panel, the gig can rotate at the low speed
of 120 rpm (or a high speed of 500rpm), then the laser on the object is just the horizontal in 360 degree.
- The level will be able to project a horizontal line, a vertical line, a point or a cross with the simple movement of the function
button of the upper part of the level, following the needs of the user.
- The level offers the possibility of placing it on vertical position directly (in the tripod), or horizontally with the provided base
according to the requirements in each occasion.
CALIBRATION
CHECKING THE HORIZONTAL ROTATION ERROR
A1.- Place and level the Rotatory Laser level on the tripod and place aproximately 4 m away from the wall. Face the front (control
button) to the wall.
-6-
A2.- Switch the power on and place the unit in “POINT” mode. Rotate manually the head until the laser beam lights the wall and
mark the point A on the wall.
A3.- Rotate the laser level 180 degrees (including the tripod) so that the back (battery side) now faces the wall, and level it again.
A4.- Mark point B on the wall.
A5.- If the distance between points A and B is more than 2 mm, the lasel level needs to be calibrated: Please follow the steps in
CORRECTING HORIZONTAL ROTATION ERROR (B1-B3).
A6.- Place and level the Rotatory Laser level on the tripod and place aproximately 4 m away from the wall. Face un of the sides to
the wall.
A7.- Switch the power on and place the unit in “POINT” mode. Rotate manually the head until the laser beam lights the wall and
mark the point C on the wall.
-7-
A8.- Rotate the laser level 180 degrees (including the tripod) so that the back (battery side) now faces the wall, and level it again.
A9.- Mark point D on the wall.
A10.- If the distance between both C and D points is more than 2mm, the lasel level needs to be calibrated: Please follow the steps
in CORRECTING OF ERROR (B4-B5).
A11.- If finally the distance between points A and B is less than 2mm and the distance between C and D is also less than 2mm,
there is no need to calibrate the laser level.
CORRECTING HORIZONTAL OF ERROR
B1.- Adjust levelling screw until the laser beam rests midway between A and B. This will cause the vial bubble to shift from
center.
B2.- Center the buble of vial into the limits that picture indicates with the screw N1, using PH0 screwdriver.
B3.- .- Recheck accuracy following steps A1-A5. In case it still neds to readjust, follow this steps B4 again.
-8-
B4.- Adjust levelling screw until the laser beam rests midway between C and D. This will cause the vial bubble to shift from center.
B5.- Center the buble of vial into the limits with the screw N2 N3, using PH0 screwdriver.
NOTE
IMPORTANT!
The maker will not take responsibility for damage or malfunction as a result of the Testing Pump being incorrectly used or, applied
for a purpose for which it was not intended.
GUARANTEE
The maker guarantees to the machine owner 12 months against any manifacture defect.
This guaranteee do not cover the parts wich are consumables.
Note: to apply the guarantee its necesary to send the “GUARANTEE CERTIFICATE” duly filled within one week after purchased
the machine to the maker.
-9-
FRANÇAIS
RENSEIGNEMENTS TECHNIQUES
Type de piles
Durée des batteries (en tours d’utilisation)
Longueur d’onde
Puissance de sortie
Niveau de radiation
Précision
Distance de travail
Vitesse de rotation
Température de travail
4x1.5V AA DC
8h cont.
650nm
≤ 1mW
II
0.5mm/m
10m
100 – 300 rpm
0ºC ~ 40ºC
UTILISATION DU NIVEAU AVEC LE TRIPODE
- Afin de mettre en marche le niveau laser, il faut installer les piles. Pour cela, retirer le couvercle situé sur la partie supérieure du
niveau et introduire les batteries comme il est indiqué sur le compartiment.
- Ouvrir le trépied, placer le niveau sur la base à l’aide de l’anneau du trépied, ensuite, ajuster la hauteur du trépied à sa
convenance.
- Le niveau dispose de trois vis nivelantes sur la partie inférieure afin de pouvoir le niveler à l’aide de la bulle (située sur la partie
supérieure du niveau).
- Le bouton ON/OFF sert aussi de régulateur, puisqu’il peut pivoter de 120rpm à 500rpm. Une fois mise en marche, la lumière se
projettera vers la superficie voulue.
- Le niveau pourra projeter une ligne horizontale, une verticale, un point ou une croix, grâce au simple mouvement de la roulette à
la partie supérieure du niveau, suivant les nécessités de l’utilisateur.
- Le niveau offre la possibilité de placement en position verticale (directement dans le trépied), ou horizontalement avec la base
fournie selon les besoin de chaque occasion.
CALIBRÉ
VERIFICATION DE L’ERREUR DE ROTATION HORIZONTALE
A1.- Monter et niveler le niveau laser rotatif nivelé dans le trépied à une distance de 4 m, de manière à ce que le bouton allumé soit
face au mur.
-10-
A2.- Mettre l’appareil en marche “POINT”. Tourner la tête rotatrice manuellement jusqu’à ce que le faisceau illumine le mur et
marquer un point A sur le mur.
A3.- Faire pivoter le niveau rotatif à 180 degrés de façon à ce que la partie postérieure soit face au mur. Reniveler.
A4.- Marquer un point B sur le mur.
A5.- Si la distance entre les points A et B est supérieure à 2mm, la calibration est alors nécessaire : procéder comme il est précisé
dans le paragraphe CORRECTION DE L’ERREUR DE ROTATION HORIZONTALE (B1-B3).
A6.- A présent, placer et niveler le niveau laser rotatif nivelé dans le trépied à une distance de 4 m, de façon à ce que l’un des côtés
soit face au mur.
A7.- Mettre l’appareil en mode “POINT”. Faire pivoter la tête rotatrice manuellement jusqu’à ce que le faisceau éclaire le mur et
marquer un point C sur celui-ci.
-11-
A8.- Régler le niveau rotatif à 180 degrés de façon `s ce que la partie supérieure soit face au mur. Reniveller.
A9.- Marquer un point D sur le mur.
A10.- Si la distance entre les points C et D est supérieure à 2mm, la calibration est alors nécessaire : Suivre les indications
contenues dans le paragraphe CORRECTION DE L’ERREUR (B4-B5)
A11.- Si la distance entre les points A et B est finalement inférieure à 2mm et celle entre les points C et D inférieure à 2mm, il n’est
alors pas utile de calibrer le niveau laser.
CORRECTION DE L’ERREUR HORIZONTALE
B1.- Niveler jusqu’à ce que le point laser se situe entre les points A et B. Ceci provoquera la dénivellation de la bulle.
B2.- Centrer la bulle dans la marge de limites qui est indiquée sur la photo en ajustant la vis Nº1 avec le tournevis PH0.
B3.- Vérifier à nouveau la précision du niveau laser rotatif d’après les étapes A1-A5 de l’intitulé antérieur. Procéder à la renivellation
au cas où la précision ne serait toujours pas celle requise.
-12-
B4.- Niveler jusqu’à ce que le point laser soit entre les points C et D. Ceci provoquera la dénivellation de la bulle.
B5.- Centrer la bulle dans la marge de limites indiquée sur la photo en ajustant la vis N2 et N3 avec un tournevis PH0.
NOTE
IMPORTANT!
Le fabricant ne se responsabilise pas des détériorations ou du mauvais fonctionnement de la machine dans le cas d’une mauvaise
utilisation ou suite á des usages pour lesquels elle n’est pas concue.
GARANTIE
Le fabricant donne une garantie de 12 mois à l’acquéreur de cette machine, pour les pièces avec un défaut de fabrication.
La garantie ne s’applique pas aux pièces d’usure normale.
Note : pour obtenir la validité de la garantie, il est obligatoire de compléter et de retourner au fabricant, le document
‘’CERTIFICAT DE GARANTIE’’ dans les 7 jours d’acquisition de la machine.
-13-
CERTIFICADO DE GARANTIA
GUARANTEE CERTIFICATE
CERTIFICAT DE GARANTIE
ARTICULO / ITEM / ARTICLE:.....................................................................................................................
Nº DE SERIE / SERIE Nº / Nº SERIE:............................................................................................................
DISTRIBUIDOR / DISTRIBUTOR / DISTRIBUTEUR:....................................................................................
PAIS / COUNTRY / PAYS:..............................................................................TEL.:....................................
FECHA DE VENTA / SALE DATE / DATE VENTE:.........................................................................................
NOMBRE DEL COMPRADOR / BUYER NAME / NOM DE L’ACHETEUR:...................................................
TEL. COMPRADOR / BUYER TEL. / TEL. DE L’ACHETEUR:.........................................................................
EGA MASTER GARANTIZA AL COMPRADOR DE ESTA MAQUINA LA GARANTIA TOTAL (DURANTE 12 MESES), DE LAS PIEZAS CON DEFECTOS DE FABRICACION. ESTA
GARANTIA NO CUBRE AQUELLAS PIEZAS QUE POR SU USO NORMAL TIENEN UN DESGASTE. PARA OBTENER LA VALIDEZ DE LA GARANTIA , ES ABSOLUTAMENTE
IMPRESCINDIBLE QUE COMPLETE Y REMITA ESTE DOCUMENTO A EGA MASTER , DENTRO DE LOS SIETE DIAS A PARTIR DE LA FECHA DE COMPRA.
EGA MASTER GUARANTEES TO THE BUYER OF THIS MACHINE THE TOTAL WARRANTY (DURING 12 MONTHS), OF THE PIECES WITH MANUFACTURING FAULTS.
THIS GUARANTEE DOES NOT COVER THOSE PIECES WORN OUT DUE TO A NORMAL USE. IN ORDER TO OBTAIN THE VALIDITY OF THIS WARRANTY , IT IS
ABSOLUTELY NECESSARY TO FULFILL THIS DOCUMENT AND RESEND IT TO EGA MASTER WITHIN 7 DAYS FROM SALE DATE.
EGA MASTER GARANTIE A L’ACHETEUR DE CETTE MACHINE LA GARANTIE TOTALE (PENDANT 12 MOIS) DES PIECES AVEC DEFAUTS DE FABRICATION. CETTE GARANTIE
NE COUVRE PAS LES PIECES QUE PAR UN USAGE NORMAL, SOIENT DETERIOREES. POUR OBTENIR LA VALIDITE DE LA GARANTIE, IL EST ABSOLUMENT IMPERATIF
COMPLETER ET ENVOYER CE DOCUMENT EGA MASTER, DANS UN DELAI DE 7 JOURS A PARTIR DE LA DATE D’ACHAT.
SELLO / STAMP / CACHET
EJEMPLAR PARA EGA MASTER / COPY FOR EGA MASTER / EXEMPLAIRE POUR EGA MASTER
CERTIFICADO DE GARANTIA
GUARANTEE CERTIFICATE
CERTIFICAT DE GARANTIE
ARTICULO / ITEM / ARTICLE:.....................................................................................................................
Nº DE SERIE / SERIE Nº / Nº SERIE:............................................................................................................
DISTRIBUIDOR / DISTRIBUTOR / DISTRIBUTEUR:....................................................................................
PAIS / COUNTRY / PAYS:..............................................................................TEL.:....................................
FECHA DE VENTA / SALE DATE / DATE VENTE:.........................................................................................
NOMBRE DEL COMPRADOR / BUYER NAME / NOM DE L’ACHETEUR:...................................................
TEL. COMPRADOR / BUYER TEL. / TEL. DE L’ACHETEUR:.........................................................................
EGA MASTER GARANTIZA AL COMPRADOR DE ESTA MAQUINA LA GARANTIA TOTAL (DURANTE 12 MESES), DE LAS PIEZAS CON DEFECTOS DE FABRICACION. ESTA
GARANTIA NO CUBRE AQUELLAS PIEZAS QUE POR SU USO NORMAL TIENEN UN DESGASTE. PARA OBTENER LA VALIDEZ DE LA GARANTIA , ES ABSOLUTAMENTE
IMPRESCINDIBLE QUE COMPLETE Y REMITA ESTE DOCUMENTO A EGA MASTER , DENTRO DE LOS SIETE DIAS A PARTIR DE LA FECHA DE COMPRA.
EGA MASTER GUARANTEES TO THE BUYER OF THIS MACHINE THE TOTAL WARRANTY (DURING 12 MONTHS), OF THE PIECES WITH MANUFACTURING FAULTS.
THIS GUARANTEE DOES NOT COVER THOSE PIECES WORN OUT DUE TO A NORMAL USE. IN ORDER TO OBTAIN THE VALIDITY OF THIS WARRANTY , IT IS
ABSOLUTELY NECESSARY TO FULFILL THIS DOCUMENT AND RESEND IT TO EGA MASTER WITHIN 7 DAYS FROM SALE DATE.
EGA MASTER GARANTIE A L’ACHETEUR DE CETTE MACHINE LA GARANTIE TOTALE (PENDANT 12 MOIS) DES PIECES AVEC DEFAUTS DE FABRICATION. CETTE GARANTIE
NE COUVRE PAS LES PIECES QUE PAR UN USAGE NORMAL, SOIENT DETERIOREES. POUR OBTENIR LA VALIDITE DE LA GARANTIE, IL EST ABSOLUMENT IMPERATIF
COMPLETER ET ENVOYER CE DOCUMENT EGA MASTER, DANS UN DELAI DE 7 JOURS A PARTIR DE LA DATE D’ACHAT.
SELLO / STAMP / CACHET
EJEMPLAR PARA EL CLIENTE / COPY FOR THE CUSTOMER / EXEMPLAIRE POUR LE CLIENT
C/ ZORROLLETA 11, POL. IND. JUNDIZ
01015 VITORIA, SPAIN P.O.B. APTDO. 5005
FAX. 34 - 945 290 141
TEL. 34 - 945 290 001