1
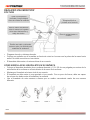
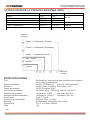
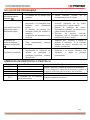
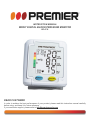
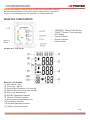
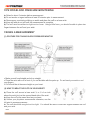
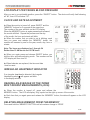
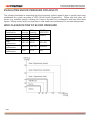
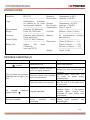
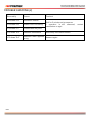
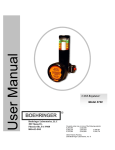
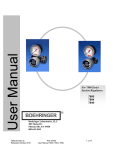
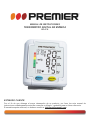
MANUAL DE INSTRUCCIONES TENSIÓMETRO DIGITAL DE MUÑECA BP-4716 ESTIMADO CLIENTE Con el fin de que obtenga el mayor desempeño de su producto, por favor lea este manual de instrucciones cuidadosamente antes de comenzar a utilizarlo, y guárdelo para su futura referencia. Si necesita soporte adicional, no dude en escribir a: [email protected] ÍNDICE INSTRUCCIONES DE SEGURIDAD ......................................................................................................... 2 PRECAUCIONES PARA EL USO DE LA UNIDAD ................................................................................ 2 ANTES DEL PRIMER USO........................................................................................................................ 2 DESCRIPCIÓN DE LA UNIDAD ................................................................................................................ 3 PANTALLA LCD ......................................................................................................................................... 3 CONCEJOS PARA MONITOREAR SU PRESIÓN SANGUÍNEA .............................................................. 3 REALIZAR UNA MEDICIÓN ...................................................................................................................... 4 POSTURA .............................................................................................................................................. 4 COMO ENROLLAR EL BRAZALETE EN SU MUÑECA ........................................................................ 4 PANTALLA LCD PARA LA TOMA DE LA PRESIÓN SANGUÍNEA ....................................................... 5 AJUSTE DEL RELOJ Y LA FECHA ........................................................................................................... 5 INDICADOR DE ARRITMIA CARDIACA ................................................................................................... 5 LECTURA DEL PROMEDIO DE LAS 3 MEDICIONES MAS RECIENTES (AUG) .................................... 5 BORRAR UNA MEDICIÓN DE LA MEMORIA ........................................................................................... 5 EVALUACIÓN DE LA PRESIÓN SANGUÍNEA PARA ADULTOS............................................................. 5 CLASIFICACIÓN DE LA PRESIÓN SANGUÍNEA (WHO) ......................................................................... 6 ESPECIFICACIONES ................................................................................................................................ 6 SOLUCIÓN DE PROBLEMAS ................................................................................................................... 7 SÍMBOLOS DE ERROR EN LA PANTALLA .............................................................................................. 7 LÍNEAS DE SERVICIO AL CLIENTE PREMIER Venezuela: Panamá: Sitio Web: E-mail: 0800 – ELECTRIC (353-2874) 300-5185 www.premiermundo.com [email protected] NOTA Nos reservamos el derecho de modificar las especificaciones, características y/u operación de esta unidad sin previo aviso, con el fin de continuar las mejoras y desarrollo del mismo. P-1 INSTRUCCIONES DE SEGURIDAD • • • • • • Lea este manual de instrucciones hasta que entienda las precauciones para operar la unidad, su funcionamiento y sus limitaciones. Después de leer el manual de instrucciones, recomendamos guardarlo para futuras referencias. Esta unidad no debe ser usada para auto-diagnosticarse, auto-tratarse o cambiar sus medicamentos sin consultar con un especialista. Si tiene alguna duda sobre el manejo de la unidad, consulte con un especialista. Esta unidad contiene elementos de alta precisión. Por lo tanto, evite exponerla a golpes, temperaturas extremas ó humedad, los rayos directos del sol, polvo o suciedad. No intente calibrar o reparar esta unidad usted mismo. Si tiene alguna duda respecto al funcionamiento y reparación de la unidad, contacte a un agente autorizado que pueda suministrarle la información necesaria. Si el monitor o el brazalete necesitan limpieza, use un paño seco y suave para limpiar el monitor y un paño ligeramente humedecido con un poco de agua y detergente suave para limpiar el brazalete. Nunca use alcohol, benceno, tiner u otro agente químico para limpiar el monitor o el brazalete. Reemplace las baterías si el monitor no ha sido usado por mas de 6 meses. Recomendamos el uso de baterías alcalinas. PRECAUCIONES PARA EL USO DE LA UNIDAD Esta unidad ha sido diseñada para ser usada por personas mayores de 18 años o por personal medico profesional para monitorear la presión sanguínea (Sistólica y diastólica) y la frecuencia del pulso. ANTES DEL PRIMER USO Asegúrese que ha instalado 2 baterías AAA (1.5V) (Recomendamos usar baterías alcalinas). Instale las baterías o reemplácelas si el indicador de batería baja aparece en la pantalla: • • • Retire la cubierta del compartimiento de las baterías presionando suavemente la flecha y deslizando la cubierta hacia delante. Coloque las baterías con las terminales negativas y positivas en el compartimiento. (Como lo indica la siguiente figura). Cierre el compartimiento de las baterías suavemente deslizándolo en la posición correcta. Notas: • Cuando la pantalla LCD muestre la señal de batería baja “ ”, las baterías deberán ser reemplazadas para asegurar una medición exacta. • No use baterías recargables con un voltaje de 12V, ya que estas no son aptas para esta unidad y pueden generar mediciones inexactas. • Remueva las baterías del compartimiento de la unidad si esta no va a ser usada por mas de 6 meses, con el fin de evitar daños ya que pueden presentarse fugas en las baterías. P-2 DESCRIPCIÓN DE LA UNIDAD Pantalla LCD Indicador de presión sistólica Indicador de Presión diastólica Indicador del pulso Botón de memoria Boton de Encendido y Apagado PANTALLA LCD 1. Fecha: Mes – Dia 2. Tiempo: Hora – Minuto 3. Presión sanguínea sistolica (Unidad: mmHg) 4. Presión sanguínea Diastólica (Unidad: mmHg) 5. Pulso (Unidad: Latido / Minuto) 6. Indicador de clasificacion WHO BP 7. Indicador de Inflado / Desinflado 8. Unidad de medición de la presión sanguínea 9. Indicador de batería baja 10. Indicador de arritmia cardiaca 11. Numero de registros en la memoria CONCEJOS PARA MONITOREAR SU PRESIÓN SANGUÍNEA • • • • • Relájese los 5 minutos previos a la medición. No fume o consuma cafeína al menos 30 minutos antes de realizar la medición. Quítese cualquier prenda que le apriete ó el reloj y coloque el brazalete de la unidad sobre la piel desnuda. Permanezca sentado y no hable hasta que la medición se ha realizado. El brazalete no debe estar ni muy apretado ni muy suelto. Con un poco de fuerza, debe ser capaz de colocar dos dedos entre el brazalete y la muñeca. P-3 REALIZAR UNA MEDICIÓN POSTURA Tome una respiración profunda y luego relájese antes de realizar la medición Asegúrese que su postura es la correcta Abra su mano suavemente sobre la mesa con la palma de la mano hacia arriba y relaje sus dedos. Eleve la unidad hasta su corazón Enrolle una toalla y colóquela entre su codo y la muñeca para estabilizar el antebrazo • • • Póngase cómodo y siéntese derecho. Coloque su muñeca con el brazalete en frente de usted en la mesa con la palma de la mano hacia arriba. No doble su muñeca ni sus dedos. El brazalete debe estar a la misma altura de su corazón. COMO ENROLLAR EL BRAZALETE EN SU MUÑECA • • • • Coloque el brazalete alrededor de su muñeca desnuda y 1/2 ó 3/4 de una pulgada por encima de la articulación de la muñeca en el lado abierto de la mano de la muñeca. Mantenga el brazalete al mismo nivel de su corazón. El brazalete no debe estar ni muy apretado ni muy suelto. Con un poco de fuerza, debe ser capaz de colocar dos dedos entre el brazalete y la muñeca. Use el brazalete de esta manera a menos que su medico recomiende usarlo de una manera diferente. Paso 1 P-4 Paso 2 Paso 3 Paso 4 PANTALLA LCD PARA LA TOMA DE LA PRESIÓN SANGUÍNEA Después de estar en una posición cómoda, presione el Botón de Encendido y Apagado. Primero, aparecerán en la pantalla de la unidad números “8”, luego la pantalla mostrara “00”. AJUSTE DEL RELOJ Y LA FECHA • • Cuando el monitor este apagado, presione el Botón de Encendido y Apagado y el botón de Memoria al mismo tiempo por 3 segundos. El numero del año empezara a parpadear en la pantalla LCD. Cuando el botón de Memoria es de nuevo presionado y liberado el Mes empezara a parpadear. Repita el proceso para ajustar el día del mes, la hora y los minutos. Cuando los números que desea ajustar estén parpadeando, cada vez que presione y libere el botón de Memoria, los números incrementaran de a uno a la vez para el año, mes, día, hora y minutos. • Cuando presione y libere el botón de Encendido y Apagado, saldrá del modo de ajuste de tiempo y fecha. Los números en la pantalla LCD se apagaran. • Cuando las baterías de la unidad son reemplazadas, los ajustes de tiempo y fecha deberán ser reajustados. Nota: Las horas son mostrada de 1 a 24 Horas, en lugar de 12AM y 12PM. INDICADOR DE ARRITMIA CARDIACA Si es detectada arritmia cardiaca, el símbolo correspondiente encenderá en la pantalla LCD de la unidad. se LECTURA DEL PROMEDIO DE LAS 3 MEDICIONES MAS RECIENTES (AUG) • • Cuando el monitor este apagado, presione y libere el botón de Memoria. La pantalla LCD mostrara el símbolo “AUg” en la esquina de la parte superior derecha. Cada vez que presione el botón Memoria, los datos aparecerán en la pantalla LCD de la unidad. BORRAR UNA MEDICIÓN DE LA MEMORIA Presione y sostenga el botón Memoria hasta que todos los números cambien a “0”. EVALUACIÓN DE LA PRESIÓN SANGUÍNEA PARA ADULTOS Los siguientes parámetros para evaluar la presión arterial alta (sin considerar la edad o el sexo) se han establecido como una guía de acuerdo a la WHO (Organización Mundial de la Salud). Tenga en cuenta que otros factores de riesgo (por ejemplo, diabetes, obesidad, tabaquismo, etc) deben ser tenidos en cuenta y pueden afectar estas cifras. Siempre consulte con su médico u otro profesional de la salud para una evaluación precisa. P-5 CLASIFICACIÓN DE LA PRESIÓN SANGUÍNEA (WHO) Clasificación de la presión sanguínea Optima Normal Alta - Normal Etapa 1 Hipertensión Etapa 2 Hipertensión Etapa 3 Hipertensión SBP (mmHg) <120 120-129 130-139 140-159 160-179 ≥180 DBP (mmHg) <80 80-84 85-89 90-99 100-109 ≥110 Color del Indicador Verde Amarillo Naranja Rojo Sistólica (mmHg) Grado 3 – Hipertensión (Severa) Grado 2 – Hipertensión (Moderada) Grado 1 – Hipertensión (Leve) Alta - Normal Normal Optima Diastólica (mmHg) ESPECIFICACIONES Tipo: Rango de medición: Precisión: Fuente de potencia: Vida útil de las baterías: Ambiente de operación: Ambiente de almacenamiento: Clasificación: Dimensiones del brazalete: Memoria: Dimensiones: Peso: P-6 Oscilométrico; Inflamiento de aire automático por bomba de aire y deflación automática. Presión: 40-280mmHg Pulso: 30-160 Pulsaciones Presión: Entre +/-5mmHg Pulso: Entre +/-5% 3V DC (2 baterías “AAA”) 250 Veces Apróx. (180mmHg, una vez / día, 22ºC) Temperatura: 5-40ºC humedad: <85% RH Temperatura: -20-60ºC Humedad: <95% RH Clase II, Tipo B 290mm x 72mm (+/-5mm) 90 Mediciones incluyendo Fecha y Hora 72 x 57 x 28.5mm (LxWxH) 74g SOLUCIÓN DE PROBLEMAS Problema Aparece el símbolo de batería baja en pantalla “ ” Las mediciones esta demasiado altas o demasiado bajas Posible causa • La batería de la unidad esta • gastada Instale baterías nuevas compartimiento de la unidad • El Sistema neumático esta • bloqueado o el brazalete está envuelto con demasiada fuerza. • El sistema de presión era inestable antes de realizar la medición • La posición del brazalete no es correcta. • Esta presentando arritmia cardiaca Asegúrese que el brazalete esta envuelto alrededor de su brazo correctamente y vuelva a medir. Realice la medición de nuevo. Permanezca calmado, no se mueva ni hable durante la medición. Siéntese de manera cómoda. Asegúrese que el brazalete esta al mismo nivel de su corazón. Relájese por minutos y vuelva a realizar la medición. Si el símbolo aparece de nuevo, consulte con un medico profesional • • El símbolo de arritmia cardiaca aparece en pantalla • • Operación incorrecta Posible solución Se ha presentado alguna interferencia al momento de • inflarse el brazalete u operación incorrecta durante la medición en el Refiérase a la sección “Realizar una medición” y repita el proceso nuevamente SÍMBOLOS DE ERROR EN LA PANTALLA Problema “Er U” “Er H” “Er 1” “Er 2” “Er 3” Posible causa Inflación insuficiente Inflación sobre 305mmHg Pulso indetectable Interferencia por radiación El resultado de la medición aparece incorrecto Posible solución Espere 5 minutos y realice la medición nuevamente. Si el funcionamiento sigue siendo anormal, contacte a un agente calificado para la revisión de la unidad Aléjese de las fuentes de radiación Realice la medición de nuevo P-7 INSTRUCTION MANUAL WRIST DIGITAL BLOOD PRESSURE MONITOR BP-4716 DEAR CUSTOMER In order to achieve the best performance of your product, please read this instruction manual carefully before using, and keep it for future reference. If you need extra support, please write to [email protected] PREMIER CUSTOMER SERVICE Venezuela: Panama: Website E-mail: 0800 – ELECTRIC (353-2874) 300-5185 www.premiermundo.com [email protected] NOTE This unit may be submitted to changes in specifications, characteristics and/or operation without prior notice to the user, in order to continue improving and developing its technology. P-1 IMPORTANT INFORMATION Please read this instruction manual thoroughly so that you completely understand the operations, cautions, performance and limitations with this monitor. After reading this manual, please keep it for future reference. You should not use this blood pressure monitor for self-diagnosis, self-treatment or to change medication without consulting your physician or other health care professional. Should you have any doubt or question about your blood pressure measurements, you should consult your physician or other health care professional. This device is contained high-precision parts; therefore, avoid exposing it to extreme temperature or humidity or to direct sunlight, shock and dust. Do not attempt to calibrate or repair this monitor. If you have any questions regarding the function or operation of this monitor, please contact our service agent so we can provide you with accurate information. Should the monitor or cuff need cleaning, use a dry, soft cloth or a cloth dampened with water and a mild detergent. Never use alcohol, benzene, thinner or other harsh chemicals to clean the monitor or cuff. Remove and replace the batteries if the monitor is not used for more than 6 months. Alkaline batteries recommended. PRECAUTION FOR USE The Wrist Automatic Blood Pressure Monitor is designed to be operated by anyone who is eighteen years and older or by medical professionals to monitor blood pressure (systolic and diastolic) and pulse rate. BEFORE YOU START Please make sure you have installed 2 “AAA” (1.5 volt) batteries (alkaline batteries recommended). To install batteries or replace them if the “Low Battery” symbol appears on display), proceed as follows: ■ Battery Loading ★ Remove the battery compartment cover by gently pushing down on arrow and sliding cover forward. ★ Place batteries with positive “+” and negative “-“ terminals into compartment and make sure they match the indicated terminals in the compartment. ★ Close the battery cover by gently sliding it into the compartment and pressing it into place. Note: ★ When the LCD display shows “Low Battery” signal ,the batteries must be replaced for accurate readings. ★ Do not use rechargeable batteries with a voltage of 1.2Veach because P-2 they are not suitable for this product and will cause inaccurate readings. ★ Remove the batteries if the monitor will not be used for six month or longer to avoid damage from the possibility of leaking batteries. MONITOR COMPONENTS DISPLAY OF LCD • • • • • • ★“MEMORY” Button /Clock Setting “ON/OFF” Button / Clock Adjusting LCD Display Systolic Indicator Diastolic Indicator Pulse Indicator DISPLAY OF LCD Mode for LCD display: (1) Date: Month - Day (2) Time: Hour - Minute (3) Systolic Blood Pressure (unit: mmHg) (4) Diastolic Blood Pressure (unit: mmHg) (5) Pulse (unit: beat/minute) (6) WHO BP Classification Indicator (7) Inflation / Deflation Indicator (8) Blood Pressure Measurement Unit (9) Low Battery Indicator (10) Irregular heartbeat Indicator (11) Memory Record Number P-3 TIPS FOR BLOOD PRESSURE MONITORING ★ Relax for about 5 minutes before measurement. ★ Do not smoke or ingest caffeine at least 30 minutes prior to measurement. ★ Remove any constricting clothing or watch and place the cuff on a bare wrist. ★ Keep still and do not talk until the measurement is complete. ★ The cuff must be neither too tight nor too loose. Using a little force, you should be able to place two fingers between the cuff and your wrist. TAKING A MEASUREMENT (1) POSTURE FOR TAKING BLOOD PRESSURE MONITOR ★ Make yourself comfortable and sit-up straight ★ Place the wrist with cuff in front of you on the table with the palm up. Do not bend your wrist or curl your fingers. ★ Cuff should be at the same height as your heart. (2) HOW TO WRAP THE CUFF ON YOUR WRIST? ★ Place the cuff around a bare wrist ½ or ¾ of an inch above the wrist joint on the opened-hand side of the wrist. ★ Keep the cuff at the same level as your heart. ★ Unless your physician recommends otherwise, use the left wrist to measure pressure. ★ The cuff should be snug but not too tight. You should be able to insert two fingers between the cuff and your wrist. P-4 LCD DISPLAY FOR TAKING BLOOD PRESSURE After you are in a comfortable position, press the “ON/OFF” button. The device will verify itself showing all “8s”, then LCD will show “00”. CLOCK AND DATE ADJUSTMENT ★ When the monitor is turned off, press ON/OFF and the ‘MEMORY’ buttons for 3 seconds at the same time. The number of the year will blink on the LCD display. When the MEMORY button is again pressed and released, the month will blink. Repeat the process and the day of the month, the hour and minute will blink. ★ When the number that you wish to set is blinking, each time you press and release the ‘MEMORY’ button, the number will increase by one for the year, month, day, hour or minute. Note: The hours are displayed as 1 through 24 Rather than 12 AM hours and 12 PM hours ★ When you again press and release ON/OFF button, you exit the time, and date adjusting mode. The numbers on the LCD display will then turn off. ★ When batteries are replaced, the time and date must be reset. IRREGULAR HEARTBEAT INDICATOR If an irregular heartbeat is detected, the Irregular Heartbeat symbol will appear and blink in the display window. READING AN AVERAGE OF THE THREE MOST RECENT MEASUREMENTS (AUG) ★ When the monitor is turned off, press and reléase the MEMORY button. The LCD will display ‘AUg’ symbol on the right up corner of the monitor. ★ Each time that you again press and release the ‘MEMORY’ button, the data will appear on the LCD display. DELETING MEASUREMENT FROM THE MEMORY Press and hold the ‘MEMORY’ BUTTON until all numbers change to ‘ZERO’. P-5 EVALUATING BLOOD PRESSURE FOR ADULTS The following standards for assessing high blood pressure (without regard to age or gender) have been established as a guide according to WHO (World Health Organization). Please note that other risk factors (e.g. diabetes, obesity, smoking, etc.) need to be taken into consideration and may affect these figures. Always consult with your physician or other health care professional for accurate assessment. WHO CLASSIFICATION OF BLOOD PRESSURE Blood Pressure Classification Optimal Normal High-Normal Stage 1 Hypertension Stage 2 Hypertension Stage 3 Hypertension P-6 SBP (mmHg) <120 120-129 130-139 DBP (mmHg) <80 80-84 85-89 COLOR INDICATOR 140-159 90-99 YELLOW 160-179 100-109 ORANGE ≥180 ≥110 RED GREEN SPECIFICATION Model No.: Type: Measurement Range: Accuracy: Power Supply: Battery Life: BP-4716 -----------------------------------Oscillometric; Automatic air inflation by air pump and automatic deflation -----------------------------------Pressure: 40~280mmHg Pulse: 30~160 Pulses -----------------------------------Pressure: within ±5mmHg Pulse: within ±5% 3V DC (2 “AAA” batteries) -----------------------------------Approx. 250 times (180mmHg, once /day, 22°C) Operation Environment: Temperature: 5~40°C Humidity: < 85%RH ---------------------------------------Storage Temperature: -20~60°C Environment: Humidity: < 95%RH Classification: Class II, type B ---------------------------------------Cuff Size: 290mm x 72mm (+/-5mm) ---------------------------------------Memory: 90 measurements including date and time ---------------------------------Dimensions: 72mm (2.83inch)---------(L) 57mm (2.24nch) ---------(W) 28.5mm (1.12inch) -------(H) ---------------------------------------Weight: 74g (0.16 LB) TROUBLE SHOOTING (1) Abnormality LCD shows Low Batter symbol Probable Reason Corrective action Batteries are low. Install new batteries. Make certain the cuff is wrapped Pneumatic system blocked or around your arm correctly and recuff is too tightly wrapped. measure. The unit does not measure. Measure again. Stay calm. Do Pressure system was unstable not move or speak during Readings are too high or too before measurement. measurement. low. Sit comfortably and still. Make The cuff position is not correct. sure the cuff is at the same level at your heart. Relax for about 5 minutes and measure again. If the symbol An irregular heartbeat Irregular heartbeat appears again, consult your symbol occurs. physician or other health care professional.. Some interference in inflation or Refer to the inflation step in wrong operation during “Taking blood pressure” and Incorrect operation measuring process again. P-7 TROUBLE SHOOTING (2) Abnormality Reason LCD shows “Er U” Insufficient inflation Checkout Wait for 5 minutes and re-measure. If operation is still abnormal, manufacture or agent LCD shows “Er H” Inflation over 305 mmHg LCD shows “Er 1” Undetectable the pulse LCD shows “Er 2” Radiation interference LCD shows “Er 3” Measured result appears Measure again wrong P-8 Move away the radiation source contact