1
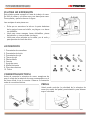
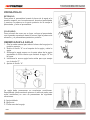
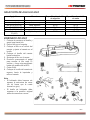
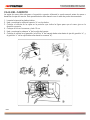
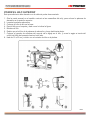
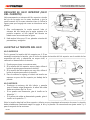
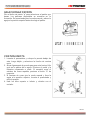
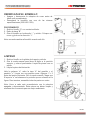
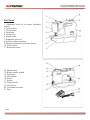
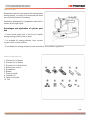
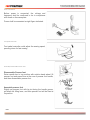
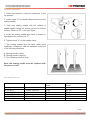
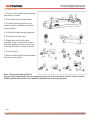
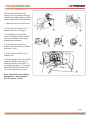
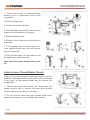
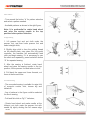
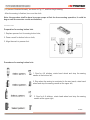
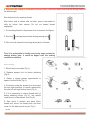
MANUAL DE INSTRUCCIONES
MÁQUINA DE COSER
MCO-5199
ESTIMADO CLIENTE
Con el fin de que obtenga el mayor desempeño de su producto, por favor lea este manual de
instrucciones cuidadosamente antes de comenzar a utilizarlo, y guárdelo para su futura referencia.
Si necesita soporte adicional, no dude en escribir a: [email protected]
ÍNDICE
INSTRUCCIONES DE SEGURIDAD ......................................................................................................... 3 DESCRIPCIÓN .......................................................................................................................................... 4 PLATINA DE EXPANSIÓN........................................................................................................................ 5 ACCESORIOS ........................................................................................................................................... 5 CONEXIÓN ELÉCTRICA ........................................................................................................................... 5 PEDAL ....................................................................................................................................................... 5 PRENSATELAS......................................................................................................................................... 6 REEMPLAZAR LA AGUJA ....................................................................................................................... 6 SELECCIÓN DE AGUJA E HILO .............................................................................................................. 7 BOBINADO DE HILO ................................................................................................................................ 7 CAJA DEL CARRETE ............................................................................................................................... 8 PONER EL HILO SUPERIOR .................................................................................................................... 9 DESLIZAR EL HILO INFERIOR (HILO DEL CARRETE) ....................................................................... 10 AJUSTAR LA TENSIÓN DEL HILO ........................................................................................................ 10 SELECCIONAR PATRÓN ....................................................................................................................... 11 COSTURA RECTA .................................................................................................................................. 11 COSTURA OCULTA ................................................................................................................................ 12 COSER OJALES ..................................................................................................................................... 12 COSER ORIFICIOS DE LOS BOTONES ................................................................................................ 13 COSER BOTONES .................................................................................................................................. 14 COSER CREMALLERAS ........................................................................................................................ 14 REEMPLAZAR EL BOMBILLO ............................................................................................................... 15 LIMPIEZA................................................................................................................................................. 15 RESOLUCIÓN DE PROBLEMAS ........................................................................................................... 16 P-1
PRECAUCIÓN
RIESGO DE CHOQUE
ELÉCTRICO , NO ABRA
Precaución: Para reducir el riesgo de choque eléctrico, no
retire la cubierta, no hay partes manipulables por el usuario al
interior de la unidad.
Refiera todo mantenimiento o
intervención técnica a personal técnico calificado.
Este símbolo indica la existencia de voltaje peligroso al
interior de esta unidad, que constituye un riesgo de choque
eléctrico.
Este símbolo indica que hay importantes instrucciones de
operación y mantenimiento en la literatura que acompaña a
esta unidad.
LÍNEAS DE SERVICIO AL CLIENTE PREMIER
Venezuela:
Panamá:
Sitio Web:
E-mail:
0800 – ELECTRIC (353-2874)
300-5185
www.premiermundo.com
[email protected]
NOTA
Nos reservamos el derecho de modificar las especificaciones, características y/u operación de este
producto sin previo aviso, con el fin de continuar las mejoras y desarrollo del mismo.
P-2
INSTRUCCIONES DE SEGURIDAD
•
•
•
•
•
•
•
•
•
•
•
•
•
La máquina de coser está diseñada para uso doméstico. No la utilice en exteriores.
No deje la máquina de coser sin atención después de que la haya conectado.
Si necesita reemplazar la bombilla, asegúrese de que sea una bombilla igual de 15W.
Mantenga la máquina de coser fuera del alcance de los niños.
No utilice la máquina de coser si observa que el cable de poder está dañado o presenta alguna otra
falla de funcionamiento. Haga que la máquina sea revisada.
No bloquee las rejillas de ventilación.
No permita que se introduzcan objetos dentro de las aberturas.
Apague y desconecte la máquina de coser después de utilizarla.
Mantenga los dedos alejados de las partes móviles, en especial de la aguja.
Utilice la placa adecuada para la aguja para evitar que se rompa.
Nunca utilice una aguja que se encuentre doblada.
No empuje ni hale las prendas cuando las esté cosiendo para evitar que la aguja se rompa.
No intente reparar la unidad usted mismo. Remita toda revisión, mantenimiento y reparación a
personal de servicio técnico calificado.
P-3
DESCRIPCIÓN
1. Botón de ajuste para la tensión del hilo
2. Palanca elevadora
3. Cortadora de hilo
4. Placa frontal
5. Prensatelas
6. Placa de la aguja
7. Platina de expansión
8. Botón para selección de patrón
9. Rueda de regulación para hilo de carrete completo
10. Cubierta frontal
11. Botón de pespunte
12. Base de la aguja
13. Husillo de carrete
14. Base de carrete
15. Rueda manual
16. Interruptor
17. Conector
18. Soporte
19. Palanca elevadora
20. Pedal
21. Cable eléctrico
P-4
PLATINA DE EXPANSIÓN
Esta platina puede expandir el área de trabajo al coser.
Es fácil de retirar y se utiliza como una base para coser.
Para quitarla y ponerla observe la figura.
Las ventajas de esta pieza son:
•
•
•
Evita que se amontone la tela en la parte delantera
de la aguja al coser un bolsillo, un pliegue o un hacer
un dobladillo;
Ideal para coser mangas, hacer dobladillos, pierna
del pantalón y otras prendas circulares;
Ideal para coser prendas en la rodilla y en el codo y
para prendas de vestir de niños.
ACCESORIOS
1. Prensatelas de cremallera
2. Prensatelas de botón
3. Prensatelas de ojal
4. Tijeras de ojal
5. Destornillador
6. Carrete
7. Aguja de coser
8. Aceite lubricante
9. Placa de cobertura
10. Fieltro
CONEXIÓN ELÉCTRICA
Antes de conectar la máquina de coser, asegúrese de
que el voltaje de la máquina de coser corresponde con el
del área donde la va a conectar. Observe la ilustración
sobre la conexión eléctrica.
PEDAL
Usted puede controlar la velocidad de la máquina de
coser por medio del pedal, presionándolo para obtener
mayor velocidad.
P-5
PRENSATELAS
RETIRARLO
Para retirar el prensatelas levante la barra de la aguja a la
posición superior con la rueda manual, levante el prensatelas
y presione la palanca en la parte posterior de la manija el
prensatelas, y retire el prensatelas.
COLOCARLO
Para colocarlo de nuevo en su lugar, coloque el prensatelas
con el pasador apuntando hacia la ranura, baje la palanca de
elevación, y el prensatelas quedará en posición.
REEMPLAZAR LA AGUJA
1. Gire la rueda manual para elevar la barra de la aguja a la
posición superior.
2. Suelte el tornillo “A” en el soporte de la aguja y retire la
aguja.
3. Sostenga la aguja nueva con la parte plana de la aguja
apuntando al orificio inferior que sostiene la aguja. “B” en
la figura.
4. Introduzca la nueva aguja hacia arriba para que encaje
con la clavija “C”.
5. Apriete el tornillo “A”.
La aguja debe permanecer en excelentes condiciones.
Reemplácela (desconectando primero el cable de poder para
evitar accidentes) en caso de presentarse las siguientes
situaciones:
A. Aguja doblada
B. Aguja rota
C. Punta roma de la aguja
P-6
SELECCIÓN DE AGUJA E HILO
Aguja No.
Prenda
No. 70 (#10)
No. 80 (#12)
No. 80-90 (#12-14)
No. 90-110 (#14-16)
No. 90-120 (#14-18)
Puntada de resorte No.
70 (#10)
Crepe de China
Popelina, seda pura
Lana, algodón
Lana
Dril
Tejido de punto
Especificación de hilo
de algodón
70-80
50-60
40-50
30-40
30
70-80
Especificación de hilo
de seda
100-140
80-100
60-70
50-60
45-50
100-140
BOBINADO DE HILO
1. Coloque el carrete en el husillo y
saque una tira de hilo.
2. Pase el hilo por el soporte.
3. Coloque el hilo en el orificio del
carrete y ajuste el carrete en el
husillo.
4. Coloque el husillo del carrete
hacia la derecha.
5. Sostenga el hilo con la mano.
6. Presione suavemente el pedal
para enrollar el hilo unas 10
vueltas, y luego siga enrollando
hasta que quede casi al 80%.
7. Corte el hilo.
8. Coloque el husillo del carrete de
regreso hacia la izquierda y
retire el carrete.
Nota
• El bobinado debe hacerse sin
separar la estructura de coser
(de tal forma que la rueda
manual no gire).
• El husillo de bobinado debe
regresar a la posición original
antes de comenzar a coser.
P-7
CAJA DEL CARRETE
La aguja de coser debe elevarse a la posición superior utilizando la rueda manual antes de armar o
desarmar la caja del carrete. Este procedimiento debe hacerlo con el cable de poder desconectado.
1. Levante la tapa de la platina inferior.
2. Hale y sostenga la cajita del carrete “a” con los dedos.
3. Coloque el carrete en la cajita en la posición que indica la figura para que al coser gire en la
dirección correcta.
4. Coloque el hilo en la muesca y hale 10 cm.
5. Hale y sostenga la palanca “a” de la cajita del carrete.
6. Coloque el carrete en el ganchito (el orificio “b” del carrete debe mirar hacia el eje del ganchito “e”, y
el ganchito “c” de la cajita debe mirar hacia la muesca “d”).
P-8
PONER EL HILO SUPERIOR
Este procedimiento debe hacerlo con el cable de poder desconectado.
1. Gire la rueda manual en el sentido contrario a las manecillas del reloj, para colocar la palanca de
elevación en la posición superior.
2. Levante la palanca elevadora.
3. Coloque el rollo de hilo en la base.
4. Pase el hilo por el soporte y hale como lo indica la figura.
5. Enhebre el hilo.
6. Deslice por el orificio de la palanca de elevación y luego hale hacia abajo.
7. Coloque el gancho de enhebrar del soporte de la aguja en el hilo, y cruce la aguja a través del
orificio del lado del operador hasta el otro lado.
8. Hale de 15 a 20 cm y córtelo con el cortador de hilo en la platina.
P-9
DESLIZAR EL HILO INFERIOR (HILO
DEL CARRETE)
Hale suavemente un extremo del hilo superior a través
del ojo de la aguja con la mano izquierda y gire la
rueda manual con la mano derecha como lo indica la
figura, para que la aguja de coser se introduzca en la
platina.
1. Gire continuamente la rueda manual, hale el
extremo del hilo hasta que la aguja regrese a la
posición superior; el hilo inferior del carrete se
halará como se muestra en la figura.
2. Hale ambos hilos unos 15 cm, páselos a través del
prensatelas y arréglelos.
AJUSTAR LA TENSIÓN DEL HILO
HILO SUPERIOR
Por lo general, la tensión del hilo superior es 4. Si es
necesario aumentar la tensión, gire el botón de ajuste de tensión del hilo superior en el sentido de las
manecillas del reloj y seleccione un mayor nivel, o
redúzcalo si desea reducir la tensión.
1. Puede proporcionar una costura recta.
2. Si la tensión del hilo superior es muy baja, utilice el
botón de ajuste para aumentar la tensión.
3. Si la tensión del hilo superior es muy alta, utilice el
botón de ajuste para reducir la tensión.
4. Para la costura en zigzag, el criterio de tensión es
exponer un poco de hilo superior por debajo de la
prenda.
HILO INFERIOR
• Sostenga un extremo del hilo inferior y permita
que el carrete caiga libremente; la altura de caída
debe ser máximo de 8 a 10 cm.
• Si no puede caer libremente, gire el tornillo en la
dirección “-“.
• Si la altura de caída es demasiado grande, gire el
tornillo en la posición “+”.
Nota: la tensión ideal de los hilos superior e inferior es muy importante al momento de coser. La tensión
debe establecerse finalmente según la aguja, el hilo y la prenda. Se recomienda un ajuste entre 3 y 5
para la mayoría de las costuras.
P-10
SELECCIONAR PATRÓN
Gire el botón de patrón “a” para seleccionar el patrón que
desee. Los patrones disponibles se muestran en la
ilustración. Se recomienda girar la rueda manual y elevar la
aguja a la posición superior antes de elegir el patrón.
COSTURA RECTA
1. Levante el prensatelas y coloque la prenda debajo de
este. Luego bájelo y seleccione la función de costura
recta.
2. Alinee ligeramente la prenda para que mire hacia el hilo
guía en la platina de la aguja. Presione el pedal y la
máquina comenzará a coser. Si necesita coser el
extremo de forma repetida, presione el botón “A” de
pespunte.
3. Al terminar de coser gire la rueda manual y lleve la
aguja a la posición superior, levante el prensatelas y
retire la prenda.
4. Hale los hilos superior e inferior y córtelos con el
cortador.
P-11
COSTURA OCULTA
•
•
•
•
•
La costura oculta es ideal para los bordes de los
toldillos de mosquitos, camisas, piernas del
pantalón y manteles.
Se puede seleccionar cualquiera de los patrones
que se muestran en la figura para este tipo de
costura.
Doble y aplane la prenda como se muestra en la
Figura 1.
Gire la rueda manual y lleve la aguja al extremo
izquierdo, coloque la prenda debajo del
prensatelas con la punta de la aguja entrando en el
pliegue izquierdo (1 a 2 piezas de hilos trenzados),
como se muestra en la Figura 2, y empiece a
coser.
Al terminar de coser, gire la prenda.
Nota: Se recomienda practicar este tipo de costura en
algunas prendas viejas o restos de prendas, antes de
coser la prenda verdadera.
COSER OJALES
PREPARACIÓN
1. Coloque el prensatelas para coser ojales.
2. Dibuje una marca para el ojal en el prensatelas.
3. Alinee la marca con el prensatelas.
Comenzar
Terminar
P-12
PROCEDIMIENTO
1. Cosa de 4 a 6 puntadas, gire la rueda manual y detenga
la aguja en la
parte inferior
izquierda.
Seleccione
un patrón
2. Deténgase cuando la costura llegue a la marca de inicio,
patrónla aguja en la parte superior
gire la ruedaSeleccione
manual y un
detenga
izquierda.
3. Cosa de 4 a 6 puntadas, gire la rueda manual y detenga
un patrón
la aguja en Seleccione
la parte superior
derecha.
4. Deténgase
cuando la
Seleccione
uncostura
patrón llegue a la marca final, gire
la rueda manual y detenga la aguja en la parte inferior
derecha.
COSER ORIFICIOS DE LOS BOTONES
Al terminar de coser el ojal, retire la prenda, y abra el ojal con las tijeras.
Tenga precaución de no cortar el hilo.
1. Coloque el hilo de inserción en el prensatelas como se muestra en la
figura.
2. Cosa el hilo de inserción.
3. Retire la prenda, hale el hilo de inserción y córtelo.
Nota: Se recomienda practicar este tipo de costura en algunas prendas
viejas o restos de prendas, antes de coser la prenda verdadera.
P-13
COSER BOTONES
1.
2.
3.
4.
Coloque la cubierta.
Coloque el prensatelas para botones.
Seleccione el patrón de zigzag.
Coloque el botón debajo del prensatelas y ajuste
la posición derecha e izquierda de la aguja.
5. Si es necesario ajustas la inclinación del hilo del
botón…
6. …se puede colocar una aguja en el prensatelas.
7. Cosa unas 5 puntadas y deje un extremo de 20
cm de hilo, enróllelo en la inclinación del hilo y
luego crúcelo a la parte posterior y haga un
nudo.
COSER CREMALLERAS
1. Coloque el prensatelas de cremalleras.
2. Seleccione el patrón de costura recta.
3. Cuando se cosa el lado derecho de la cremallera,
monte el prensatelas en la ranura izquierda,
coloque los dientes de la cremallera a lo largo del
borde y fije usando broches, y luego permita que
el lado izquierdo de la cremallera esté cerca del
prensatelas para coserlo.
4. Detenga la costura antes de que el prensatelas
haga contacto con el borde de la cremallera y
deje la aguja en la prenda y fije la prenda, levante
el prensatelas y hale el extremo de la cremallera
al lugar que ha sido cosido, y continúe
conociendo.
5. Cuando haya cosido el lado izquierdo de la
cremallera, monte el prensatelas en la ranura
derecha, y permita que el lado derecho de la
cremallera esté cerca del prensatelas para
coserlo.
P-14
REEMPLAZAR EL BOMBILLO
•
•
Apague y desconecte la máquina de coser antes de
hacer este procedimiento.
Reemplace la bombilla con una de las mismas
especificaciones (220-240V 15W).
PROCEDIMIENTO
1. Suelte el tornillo “A” con un destornillador.
2. Retire la placa “B”.
3. Gire el bombillo en la dirección “-” y retírelo. Coloque uno
nuevo y gírelo en la dirección “+”.
Nota: recuerde cambiar al bombillo cuando esté frío.
LIMPIEZA
1. Suelte el tornillo en la platina de la aguja y retírela.
2. Gire la rueda manual para llevar la aguja a la posición
superior, y suba el prensatelas. Limpie las piezas con un
cepillo.
3. Limpie la pieza de lubricación.
Hale la palanca “a”, retire la tapa “b” del ganchito y el
ganchito “c”. Limpie con una prenda suave. Agregue 1 o 2
gotas del aceite lubricante. Gire la rueda manual y haga que
el soporte “e” se balancee a la posición que se muestra en la
figura. Para terminar, ensamble todas las partes en orden.
Nota: Lleve a cabo este procedimiento con la máquina
apagada y desconectada. Estas piezas se deben limpiar y
mantener con frecuencia para un mejor rendimiento.
P-15
RESOLUCIÓN DE PROBLEMAS
Esta lista es para ayudarle a resolver problemas simples que pueden presentarse en el uso del
producto. Por favor léala y verifique estos puntos antes de solicitar ayuda de personal de servicio
técnico autorizado.
PROBLEMA
El hilo superior se rompe
El hilo inferior se rompe
La puntada se salta
La aguja se rompe
La puntada está muy suelta
Se arruga la prenda
La puntada queda demasiado abierta
La máquina de coser no funciona
Se escuchan ruidos anormales
•
CAUSA Y SOLUCIÓN
El hilo superior no está bien colocado.
La tensión del hilo es muy alta.
La aguja no está bien colocada.
La aguja está doblada.
El hilo inferior no está bien colocado en el carrete.
Hay partículas que rozan el hilo en la parte
inferior; limpie la cajita.
El carrete no funciona bien; reemplácelo.
La aguja no está bien colocada.
La aguja está dañada.
No es la aguja correcta.
El hilo inferior no está bien puesto.
La aguja ya está doblada.
La aguja no está bien montada.
No es la aguja, el hilo o el prensatelas correctos.
El hilo superior no está bien puesto.
El hilo inferior no está bien puesto.
No es la aguja, el hilo o el prensatelas correctos.
La tensión del hilo no es la correcta.
La tensión del hilo superior es muy alta.
El hilo superior no está bien puesto.
La aguja es demasiado gruesa.
La prenda es demasiado delgada o suave.
El hilo no es de buena calidad.
El hilo no está puesto correctamente.
La prenda no está puesta correctamente.
Verifique suministro de corriente eléctrica.
El hilo está atorado; suéltelo.
El aceite lubricante se ha gastado; agregue un
poco.
Hay partículas en la cajita; límpiela.
La aguja está rota; reemplácela.
Las personas y/o Marcas registradas en este manual de instrucciones no están afiliadas a Premier Electric Japan Corp. y aparecen en
este Manual con propósitos ilustrativos únicamente.
P-16
INSTRUCTION MANUAL
SEWING MACHINE
MCO-5199
DEAR CUSTOMER
In order to achieve the best performance of your product, please read this instruction manual carefully
before using, and keep it for future reference.
If you need extra support, please write to [email protected]
CAUTION
RISK OF ELECTRIC
SHOCK, DO NOT
OPEN
Caution: To reduce the risk of electric shock do not open
this device, there are not serviceable parts for customers.
Please refer any maintenance or repair to qualified
personnel.
This sign means the existence of dangerous voltage at
the inside of the unit, which states a risk of electric shock.
This sign means that there are important instructions of
operation and handling in the manual that comes with this
device.
PREMIER CUSTOMER SERVICE
Venezuela:
Panama:
Website
E-mail:
0800 – ELECTRIC (353-2874)
300-5185
www.premiermundo.com
[email protected]
NOTE
This unit may be submitted to changes in specifications, characteristics and/or operation without prior
notice to the user, in order to continue improving and developing its technology.
P-1
Important Safety Instructions
This sewing machine is specially designed for household. Please fully read the manual before usage.
“Danger” – In order to reduce the risk of electric shock:
1. Don’t leave it unattended after its plug is inserted into the socket. After the sewing machine is used or
before it is cleaned, the plug must be pulled out.
2. before the bulb is replaced, the plug must be pulled out and then AC220V 15W bulb could be
replaced.
“Warning” – In order to reduce the risks of fire, electric shock or injury:
1. Don’t take this machine as a toy. Pay attention to safety especially when the sewing machine could be
used or touched by child.
2. it is only allowed to operate the machine according to instructions specified in this Manual, and use
the accessories recommended by the supplier in the Manual.
3. Don’t operate the machine in the event that wire or plug is damaged, the machine couldn’t work
normally, or it fails due to falling down or dropping into water, and send it to the professional
maintenance station for check or repair.
4. Don’t operate the machine if the vent is blocked. It shall be avoided to pile some fiber tows, dust, rags
near the vent or foot pedal.
5. Never fall or insert any materials into the openings;
6. Don’t operate the machine outdoors;
7. Don’t operate this machine in a place with suspended matters or corrosive gases;
8. If power needs to be shut off, press the button to the position of “O”, which indicates power off, and
then pull the plug out of the socket;
9. Tightly hold the plug instead of the wire during pulling out the plug;
10. The fingers shall be kept away from the moving parts, especially near the sewing needle;
11. Adopt the proper needle plate, if not, the needle may be broken;
12. Never use the bent needle;
13. Don’t pull or push cloth hard during sewing, otherwise the needle may be broken due to deviation.
14. Pull the plug out of the sewing machine from the socket before addition of lubricant oil under the
casing removed, or any other maintenance specified in the Manual.
P-2
Content
Introduction
Part name ……………………………………………………………..…………………… P.4
Expansion post bed ………………………………………………..……………………… P.5
Presser foot and accessory ……………………………………..……………………….. P.5
Preparation before sewing
Power connection …………………………………………….…………………………… P.6
Assemble/ disassemble presser foot …………………………….……………………… P.6
Replace the sewing needle ……………………………………………….……………… P.7
Select needle and thread ………………………………………………………………… P.7
Wind bobbin thread ……………………………………………………..………………… P.8
Assemble/ disassemble bobbin case …………………………………………………… P.9
Thread the upper thread ……………………………………….………………………… P.10
Guide the lower thread (bobbin thread) ………………………………………………… P.10
Adjust thread tension……………………………………………………………………… P.11
Select pattern ……………………………………………………………………………… P.12
Sewing methods
Straight sewing …………………………………………………….……………………… P.12
Concealed sewing ………………………………………………………………………… P.13
Sew button hole …………………………………………………………………………… P.13
Button attaching …………………………………………………………………………… P.15
Zipper sewing ……………………………………………………………………………… P.15
Maintenance
Replace bulb ………………………………………………………………………..……… P.16
Clean feed dog and shuttle race ……………….………………………………………… P.16
Trouble shooting …………………………………………………………………………… P.17
P-3
Part Name
1. Adjustment knob for the upper threading
tension
2. Take-up lever
3. Thread cutter
4. Face plate
5. Presser foot
6. Needle plate
7. Expansion post bed
8. Knob for pattern selection
9. Regulating wheel for full bobbin thread
10. Front shroud
11. Backstitch button
12. Needle base
13. Bobbin winder spindle
14. Reel base
15. Hand wheel
16. Switch
17. Socket
18. Winder holder
19. Lifting lever
20. Foot pedal controller
21. Plug
P-4
Expansion Post Bed Expansion post bed can expand the working area
during sewing, it is easy to be removed and used
as a cylinder post bed for sewing.
Assembly/ disassembly of expansion post bed is
shown as the right figure.
Advantages and application of cylinder post
bed
- It could avoid piling cloth in the front of needle
during sewing pocket, pleat or hem;
- It is suitable for sewing sleeves, hem, trouser
leg and other circular clothes;
- It is suitable for sewing clothes at knee and elbow, and children’s garments.
Presser Foot And Accessories 1. Presser foot of zipper
2. Presser foot of button
3. Presser foot of button hole
4. Button-hole scissor
5. Screwdriver
6. Bobbin
7. Sewing needle
8. Lubricant oil
9. Feed cover plate
10. Felt
P-5
Power Connection Before power is connected, the voltage and
frequency shall be confirmed to be in compliance
with those on the nameplate.
Power shall be connected as right figure indicated.
Foot pedal controller Foot pedal controller could adjust the sewing speed,
pressing down for fast sewing
Assemble/ Disassemble Presser Foot Disassemble Presser foot
Raise needle bar to top position with rotation hand wheel, lift
presser foot and press lever at the rear of presser foot handle,
and then disassemble presser foot.
Assemble presser foot
Rightly put presser foot with its pin facing the handle groove,
put down the lifting lever, and then presser foot will be fixed at
its position.
P-6
Replace the Sewing Needle 1. rotate hand wheel to raise the needle bar to the
top position.
2. loosen screw “A” on needle clamp and remove the
sewing needle;
3. Hold new sewing needle with flat surface of
needle handle facing the bottom groove for needle
holding. Shown as “B” in the right figure;
4. Insert the sewing needle and make it upward to
lean against the location pin “C”;
5. Tighten screw “A” on the needle clamp.
** The sewing needle must be used under good
conditions; otherwise it shall be replaced under one
of the following situations:
A. Sewing needle is bent;
B. Sewing needle is broken;
C. Tip of sewing needle is blunt.
Note: the sewing needle must be replaced with
the power cut off.
Select Needle and Thread Needle No.
No. 70 (#10)
No. 80 (#12)
No. 80-90 (#12-14)
No. 90-110 (#14-16)
No. 90-120 (#14-18)
Spring stitch No. 70 (#10)
Cloth
Crepe de chine
Poplin, pure silk
Wool, cotton
Wool
Denim fabric
knit
Specification of cotton
thread
70-80
50-60
40-50
30-40
30
70-80
Specification of silk
thread
100-140
80-100
60-70
50-60
45-50
100-140
P-7
Wind Bobbin Thread 1. Put reel on the bobbin winder bracket
and draw out thread;
2. Wind thread by the winder holder;
3. Put thread through pinhole in the
bobbin and then fit bobbin into bobbin
winder spindle;
4. Pull bobbin winder spindle rightward;
5. Hold thread end by hand;
6. Slightly step on the foot pedal
controller, wind it for about ten circles
and then release your hand, step down
controller until 80% of thread is wound;
7. Cut the thread;
8. Return bobbin winder spindle leftward
and remove the bobbin.
Note: the thread winding shall be
operated with separating from the sewing structure (so that hand wheel couldn’t rotate); bobbin
winder spindle must return to its position leftward before sewing operation.
P-8
Assemble/ Disassemble Bobbin Case The sewing needle must be
raised to the top position through
rotating hand wheel before bobbin
case is assembled/ disassembled.
1. Open the cover of shuttle race;
2. Pull and hold the lever “a” of
bobbin case by your fingers;
3. Put bobbin into the bobbin
case, the bobbin shall be rotated
as arrow indicates in the figure
during drawing thread;
4. Put thread into the slot on
bobbin case and draw out thread
end about 10cm;
5. Pull and hold the lever “a” of
bobbin case;
6. Put the bobbin case into shuttle
hook (the bobbin case hole “b”
shall face shuttle hook shaft “e”
the positioning hook “c” of shuttle
case shall face the position slot
“d” on the shuttle hook cover).
Note: the bobbin case shall be
assembled or disassembled
with the power cut off.
P-9
Thread the upper thread 1. Rotate hand wheel in counterclockwise
direction, so as to make take-up lever at the
top position;
2. Raise the lifting lever;
3. Put the reel into the reel base;
4. Pull thread pass the winder holder and pull
forward as arrow indicates in the figure;
5. Bypass threading plate;
6. Slide into hole of take-up lever and then pull
downward;
7. Put threading hook of needle clamp on it,
cross needle through hole from the operator
side to another side;
8. Pull out thread about 15-20 cm and cut it at
the tread cutter on the face plate
Note: thread the upper thread under power
off.
Guide the lower Thread (Bobbin Thread)
Lightly pull the upper thread end through needle eye by left
hand and rotate hand wheel by right hand as arrow indicates
in the figure, so that sewing needle can be inserted into
needle plate.
1. Continuously rotate hand wheel, pull thread end until
needle returns to the top position; the lower thread (bobbin
thread) is pulled out as shown in the figure.
2. Pull out both the lower and upper threads about 15cm,
pass through presser foot and arrange them forward.
P-10
Adjust Thread Tension A. Adjust the upper thread tension
Generally, the upper thread tension is
set as “4”. If it is necessary to increase
tension, turn around the adjusting
button of the upper thread tension in
clockwise direction and select the
larger setting point; and vice versa.
1. It can provide ideal straight sewing
stitch;
2. If the upper thread tension is too
small, adjust the button and select the
larger value.
3. If the upper thread tension is too
large, adjust the button and select the
smaller value;
4. For the zigzag stitch, the criteria of
tension is to expose a little upper
thread from underside of cloth.
B. Adjust the lower thread (bobbin thread) tension
- Hold thread end and let bobbin case freely fall; the falling
height shall be limited within 8-10cm;
- If it can’t fall down freely, rotate screw in ”-“ direction;
- If its falling height is too large, rotate screw in “+” direction;
Note: the Suitable tension for the upper and lower threads
is very important to the sewing; the set tension shall be
finely tuned according to the actual needle, thread and
textile. It shall be set between “3” and “5” for most of
sewing operation.
P-11
Select Pattern - Turn around the button “a” for pattern selection
and select a pattern needed.
- Available patterns as shown in the right figure;
Note: It is preferential to rotate hand wheel
and raise the sewing needle to the top
position before pattern selection.
Straight Sewing 1. Lift presser foot and put cloth under the
presser foot, and then lower presser foot and
select straight stitch;
2. Slightly align cloth to face the guiding thread
on the needle plate, step down the foot pedal
controller, the machine will automatically feed
cloth and begin sewing. If it is necessary to sew
the stitch end repeatedly, press backstitch button
“A” for repeated sewing.
3. After the sewing is finished, rotate hand
wheel and raise the sewing needle to the top
position, lift the presser foot and take out cloth;
4. Pull back the upper and lower threads, cut
them at the thread cutter.
Concealed Sewing - The concealed sewing is suitable for edge fold
of mosquito curtain, skirt, trouser leg and
tablecloth.
- Any of patterns in the figure could be selected
for above sewing.
- Fold and flat cloth as Fig”1” indicates;
- Rotate hand wheel and make needle at the
leftmost, put cloth under the presser foot with
needle tip rightly sticking the left crease edge
P-12
(1-2 pieces of braided threads), as shown in Fig “2”, and then begin sewing;
- After the sewing is finished, turn over the cloth.
Note: the exercises shall be done by some scraps at first for above sewing operation, it could be
begun until the exercise results are satisfied;
Sew Button Hole Preparation for sewing button hole
1. Replace presser foot for sewing button hole;
2. Draw a mark for button hole on cloth;
3. Align the mark to presser foot.
Procedures for sewing button hole:
1. Sew for 4-6 stitches, rotate hand wheel and stop the sewing
needle at the bottom left;
2. Stop when the sewing is conducted to the start mark, rotate hand
wheel and stop the sewing needle at the upper left;
3. Sew for 4-6 stitches, rotate hand wheel and stop the sewing
needle at the upper right;
P-13
4. Stop when the sewing is conducted to the end mark, rotate hand wheel and stop the sewing needle at
the bottom right;
Sew button hole by inserting thread
After button hole is sewed, take out cloth, open in the middle of
cloth by button hole scissor. Do not cut sewed thread
negligently.
1. Put inserting thread in the presser foot as shown in the figure;
2. Sew the
inserting thread inside during sewing and
3.Take out cloth stress the inserting thread and cut thread.
Tips: It is preferential to firstly exercise by some scraps for
sewing button hole; it could be begun until the sewing
results are satisfied;
Button Attaching 1. Mount feed cover plate (Fig 1);
2. Replace presser foot for button attaching
(Fig 2);
3. Select a zigzag pattern approximate to
space of button holes (Fig 3);
4. Put button under the presser foot and make
left and right positions of needle respectively
face the left and right button holes (Fig 4);
5. If it is necessary to extend thread pitch of
button attaching longer (Fig 5), one needle
could be put on the presser foot (Fig 6);
6. Sew about 5 stitches and leave 20cm
thread end, wind it on thread pitch, and then
cross it to the back and tie a knot (Fig 7)
P-14
Zipper Sewing
1. Replace presser foot of zipper;
2. Select pattern of straight sewing;
3. When the right side of zipper is sewed, mount the presser
foot at the left groove, put zipper teeth along the cloth edge
and fix it by brooches, and then let right side of zipper teeth
close to the presser foot and sew it;
4. Stop sewing before the presser foot contacts zipper end,
and leave needle in cloth and fix the cloth, raise the presser
foot and pull the zipper end toward the sewed place, and then
sew it continuously.
5. When the left side of zipper is sewed, mount the presser
foot at the right groove, let left side of zipper teeth close to the
presser foot and sew it.
Replace Bulb - Shut off power before bulb is replaced.
- Replace bulb with the same specification (220-240v
15W)
Procedures:
1. Loosen screw “A” by screwdriver;
2. Remove face plate “B”
3. Rotate bulb in “-“ direction and remove it; and
replace a new one, rotate it in “+” direction and tighten
it.
Note: Be careful against scald during bulb
replacement; it is preferential to replace bulb when
it is cool down.
Clean Feed Dog and Shuttle Race P-15
1. Loosen screw on the needle plate and remove needle
plate;
2. Rotate hand wheel and make needle at the top position
and raise presser foot; clean feed dog and surrounding
rags by brush;
3. Clean the lubrication shuttle race.
Pull lever “a”of shuttle race outward, remove cover “b” of
shuttle hook and shuttle hook “c”, wipe them cleanly with
soft cloth, and then wipe shuttle race cleanly and add 12drops of sewing-machine oil, rotate hand wheel and
make shuttle hook bracket “e” sway to the position shown
as figure, finally assemble the parts in turn.
Note:
- Shut off power during cleaning and maintenance;
- Feed dog and shuttle race shall be regularly cleaned
and maintained.
Trouble Shooting Problems
The Upper thread broken
The lower thread breaks
Skipping stitch
Needle breaks
P-16
Causes
1. The upper thread is not
threaded correctly.
2. The upper thread tension is too
large.
3. The thread is too thick or fine.
4. Needle is improperly mounted.
5. Needle is distorted or blunt.
1. The lower thread is improperly
put into bobbin thread slot.
2. There are rags in shuttle hook.
3. The bobbin is damaged and
couldn’t work normally.
1. Needle is improperly mounted.
2. Needle is damaged.
3. Needle and thread is
improperly selected.
4. The upper thread is not
threaded correctly.
1. Needle is bent.
2. Needle is improperly mounted.
Amendments
1. Thread it again.
2. Reduce the tension (adjust to
the lower setting value)
3. Select suitable thread
4. Mount it again
5. Replace needle
1. Mount it again
2. Clean shuttle race
3. Replace bobbin
1. Mount it again
2. Replace needle
3. Select proper needle and
thread
4. Thread it again.
1. Replace needle
2. Mount it properly
Loose stitch
Crinkle
Staggering stitch
3. Needle and thread is
improperly selected.
4. The presser foot is improperly
selected.
1. The upper thread is not
threaded correctly.
2. The lower thread is not
threaded correctly.
3. Needle and thread is
improperly selected.
4. Thread tension is not set
correctly
1. The upper thread tension is too
large.
2. The upper thread is not
threaded correctly.
3. The needle is to thick.
4. Cloth is too thin or soft.
1. Thread is not uniform in size
2. The thread is not threaded
correctly.
3. Cloth is pulled uneven.
3. Select suitable needle
according to the requirement
4. Select the proper presser foot
1. Thread it again.
2. Thread it again
3. Select proper needle and
thread
4. Set it again.
1. Mount it again.
2. Thread it again.
3. Select suitable needle
4. Put paper gasket under cloth
1. Select good-quality thread.
2. Thread it again.
3. Automatically feed cloth by
machine
1. Power doesn’t be supplied.
1. Connect power supply.
2. Thread is blocked in the shuttle 2. Take out shuttle hook and
race.
clean it.
Machine doesn’t operate
3. Bobbin winder spindle doesn’t 3. Pull back bobbin winder spindle
be pulled back after thread is
wound
1. The lubricant oil is exhausted. 1. Add sewing-machine oil into the
moving parts.
Abnormal noise made by machine 2. There are rags on the shuttle
2. Clean shuttle race
race.
3. Needle is broken.
3. Replace needle
P-17