1
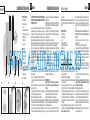
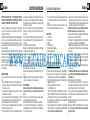
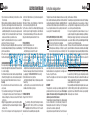
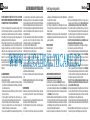
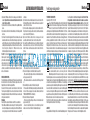
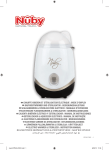
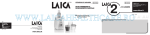
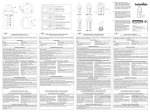
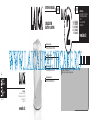
ISTRUZIONI E GARANZIA
STERILIZZATORE
ELETTRICO A VAPORE
BC1005
BC1005
ANNI DI GARANZIA
ANS DE GARANTIE
YEARS GUARANTEE
ANOS DE GARANTIA
JAHRE GARANTIE
LAICA S.p.A.
Viale del Lavoro, 10 - Fraz. Ponte
36021 Barbarano Vicentino (VI) ITALY
Fax: +39-0444-795324
Made in China
www.laica.it
FR Instructions et garantie
STÉRILISATEUR ÉLÉCTRIQUE À VAPEUR
Data - Date
WWW.LAICAHEALTHCARE.RO
Instructions and guarantee
GB
ELECTRIC STEAM STERILISER
#
TAGLIANDO
DI CONTROLLO
BC1005
STERILIZZATORE
ELETTRICO
A VAPORE
BC05 - 01/2013
LAICA S.p.A.
Viale del Lavoro, 10 - Fraz. Ponte
36021 Barbarano Vicentino (VI) - ITALY
Fax: +39-0444-795324
Made in China
www.laica.it
ES
Instrucciones y garantía
ESTERILIZADOR ELECTRICO DE VAPOR
DE
Anleitungen und garantie
ELEKTRISCHER DAMPFSTERILISATOR Timbro rivenditore - Cachet du revendeur
Retailer’s stamp - Sello del revendedor - Stempel des Händlers
STERILIZZATORE ELETTRICO A VAPORE
BC1005
1
4
Fig. 1
2
8
7
PARTI DELL’APPARECCHIO
1. Unità sterilizzatore
2. Vaschetta per l’acqua
3. Luce O/I
4. Coperchio unità sterilizzatore
5. Cestello porta biberon e tettarelle
6. Misurino dosatore
7. Pinze igieniche
8. Cavo elettrico
DEVICE PARTS
1. Steriliser unit
2. Water container
3. O/I light
4. Steriliser unit cover
5. Teat and bottle holding basket
6. Dosing measuring scoop
7. Hygienic tweezers
8. Power supply cable
IT Italiano
STERILIZZATORE ELETTRICO A VAPORE
E’ IMPORTANTE PRIMA DELL’UTILIZZO LEGGERE ATTENTAMENTE LE
ISTRUZIONI E LE AVVERTENZE CONTENUTE NEL PRESENTE LIBRETTO
E CONSERVARLE CON CURA.
non può essere considerato responsabile per eventuali danni derivanti da
usi impropri o errati.
•Prima dell’utilizzo assicurarsi che l’apparecchio si presenti integro senza
visibili danneggiamenti. In caso di dubbio non utilizzare l’apparecchio e
rivolgersi al proprio rivenditore.
•In caso di guasto e/o cattivo funzionamento, spegnere immediatamente
l’apparecchio senza manometterlo. Per le riparazioni rivolgersi sempre
al proprio rivenditore.
•Tenere l’apparecchio lontano da fonti di calore.
•Assicurarsi di avere le mani asciutte quando si inserisce o disinserisce
la spina e quando si agisce sul tasto di accensione/spegnimento.
•Il presente apparecchio deve essere utilizzato solo con il voltaggio riportato
sul fondo del prodotto.
•Non lasciare esposto l’apparecchio ad agenti atmosferici ( pioggia, sole,
ecc.), alte temperature o vicino a computer o altri strumenti elettronici.
•Per evitare surriscaldamenti pericolosi si raccomanda di svolgere per
tutta la sua lunghezza il cavo di alimentazione.
•Staccare la spina dalla presa della corrente quando l’apparecchio non è
utilizzato.
•Attenzione! Non intervenire per nessun motivo sul cavo elettrico. In caso
di danneggiamento rivolgersi al rivenditore.
La cura dei neonati richiede un’elevata igiene degli accessori necessari
per l’allattamento in quanto una scarsa attenzione può essere causa di
mal di pancia o diarrea. Tra i metodi domestici per garantire un livello
igienico adeguato, sicuramente l’impiego del calore costituisce quello più
interessante. Tramite il vapore, generato da una sorgente calda, è possibile
arrivare ad un livello di pulizia tale da poter ritenere eliminata la maggior
parte dei germi nocivi per i neonati. Partendo da questi presupposti, LAICA
propone un sistema semplice e sicuro per la sterilizzazione dei biberon
e di tutte le sue componenti. Il vostro nuovo sterilizzatore è in grado di
sterilizzare fino a 6 biberon in circa 10 minuti. E’ dotato di cestello interno
per la sterilizzazione delle tettarelle. L’apparecchio è dotato di misurino
dosatore e di pinze igieniche per maneggiare gli accessori sterilizzati.
Funzionamento a rete.
Italiano IT
Istruzioni e garanzia
dell’apparecchio).
•Attenzione! Non si tratta di un giocattolo ma di uno sterilizzatore a vapore
per uso domestico. Non lasciare l’oggetto incustodito anche quando non
utilizzato.
7)Lasciare raffreddare l’unità sterilizzatore per qualche minuto, aprire il
coperchio, estrarre il cestello porta tettarelle e le pinze igieniche e levare
l’acqua in eccesso all’interno dell’unità sterilizzatore asciugando con
un panno pulito. Ora il vostro nuovo sterilizzatore a vapore è pronto per
l’uso.
Attenzione! Prima di procedere con la sterilizzazione a vapore,
verificare che i biberon e gli accessori per l’allattamento possano
essere bolliti.
Lo sterilizzatore a vapore può sterilizzare fino a 6 biberon
contemporaneamente.
1)Posizionare l’apparecchio su una superficie piana e rigida.
2)Versare esattamente 60 ml di acqua fredda di rubinetto nella vaschetta
per l’acqua dell’apparecchio utilizzando il misurino in dotazione (figura
2). Attenzione! Nel caso in cui venga versata una quantità maggiore di
acqua il ciclo di sterilizzazione può risultare più lungo, nel caso di minore
quantità la sterilizzazione può risultare inefficace.
3)Mettere i biberon capovolti in posizione verticale all’interno dello
sterilizzatore appoggiandoli sul ripiano inferiore del cestello porta biberon
(figura 4) e le relative tettarelle o piccole parti da sterilizzare nel cestello
superiore.
Posizionare le pinze igieniche sul ripiano superiore tra le tettarelle.
Chiudere il coperchio.
Attenzione! Lavare accuratamente tutti i biberon e accessori con
sapone non schiumoso e sciacquarli abbondantemente con acqua
prima di ogni ciclo di sterilizzazione.
4)Inserire la spina e premere il pulsante O/I.
La luce O/I si accende (colore rosso). Attenzione! Se La luce O/I si accende
immediatamente dopo aver inserito la spina, significa che il pulsante O/I
è stato premuto accidentalmente prima dell’inserimento della spina.
In questo caso il dispositivo inizia automaticamente il ciclo di
sterilizzazione. Non accendere l’apparecchio se la vaschetta per l’acqua
della base non è stata riempita.
5)Dopo qualche minuto del vapore fuoriesce dal foro posto sul coperchio,
prestare attenzione a non scottarsi.
PARTI DELL’APPARECCHIO
1.Unità sterilizzatore
2.Vaschetta per l’acqua
3.Luce O/I
4.Coperchio unità sterilizzatore
5.Cestello porta biberon e tettarelle
6.Misurino dosatore
7.Pinze igieniche
8.Cavo elettrico
WWW.LAICAHEALTHCARE.RO
3
Fig. 2
5
6
Fig. 3
Fig. 4
AVVERTENZE GENERALI
L’uso di un qualsiasi apparecchio elettrico comporta l’osservanza di alcune
regole fondamentali:
• Staccare la spina dalla presa di corrente immediatamente dopo l’uso
e comunque sempre prima di pulirlo e prima di inserire o togliere gli
accessori.
•Non tirare il cavo di alimentazione o l’apparecchio stesso per staccare la
spina dalla presa di corrente.
•Se un apparecchio elettrico cade nell’acqua non cercare di raggiungerlo,
ma staccare subito la spina dalla presa della corrente.
•Non immergere mai l’apparecchio in acqua o altri liquidi.
•Non lasciare mai l’apparecchio in funzione senza sorveglianza e non
permettere che l’apparecchio sia usato da bambini, invalidi o disabili.
•Questo apparecchio dovrà essere destinato esclusivamente all’uso per il
quale è stato concepito e nel modo indicato nelle istruzioni d’uso. Ogni
altro utilizzo è da considerarsi improprio e quindi pericoloso. Il costruttore
AVVERTENZE SPECIALI
•Quando in funzione, lo sterilizzatore contiene acqua bollente e
vapore che fuoriesce dal coperchio, prestare attenzione per evitare
di scottarsi.
•Posizionare il dispositivo su una superficie piana, rigida e impermeabile;
tenere il cavo della presa della corrente lontano da fonti di calore.
•Non aprire l’unità quando in funzione per evitare bruciature.
•Non utilizzare lo sterilizzatore senza acqua; utilizzare solo acqua fredda
di rubinetto senza l’aggiunta di essenze, profumi, medicinali o altro.
•Non sterilizzare oggetti metallici.
•N on coprire o inserire oggetti nelle aperture dello sterilizzatore a
vapore (ad es. nel foro per l’uscita del vapore del coperchio, nel fondo
4
ISTRUZIONI PER L’USO STERILIZZATORE A VAPORE:
Prima di utilizzare il vostro sterilizzatore per la prima volta:
1)Posizionare l’apparecchio su una superficie piana e rigida.
2)Assemblare il cestello porta biberon e tettarelle come da figura 1.
3)Versare esattamente 60 ml di acqua fredda di rubinetto nella vaschetta
per l’acqua dell’apparecchio
utilizzando il misurino in dotazione (figura 2).
4)Posizionare il cestello e le pinze igieniche nello sterilizzatore (vedi figura
3). Chiudere il coperchio.
5) Inserire la spina e premere il pulsante O/I. La luce O/I si accende
(colore rosso). Attenzione! Se La luce O/I si accende immediatamente
dopo aver inserito la spina, significa che il pulsante O/I è stato premuto
accidentalmente prima dell’inserimento della spina. In questo caso
il dispositivo inizia automaticamente il ciclo di sterilizzazione. Non
accendere l’apparecchio se la vaschetta per l’acqua della base non è
stata riempita.
6)Dopo ogni ciclo di sterilizzazione la luce rossa si spegne per indicare che
la sterilizzazione è terminata. Spegnere in ogni caso l’apparecchio
togliendo la spina dalla presa di corrente.
5
IT Italiano
STERILIZZATORE ELETTRICO A VAPORE
6)Dopo circa 10 minuti la luce rossa si spegne, la sterilizzazione è terminata.
Spegnere in ogni caso l’apparecchio togliendo la spina dalla presa
di corrente.
7)Non rimuovere subito il coperchio, lasciare raffreddare lo sterilizzatore
per qualche minuto.
8)Lavare accuratamente le mani prima di prendere i prodotti sterilizzati.
9)Aprire il coperchio, prendere le pinze igieniche che possono essere
utilizzate per prendere le tettarelle sterili e metterle sui biberon. Prima
di assemblare i biberon, se necessario, rimuovere l’acqua in eccesso
con un panno asciutto.
Si consiglia di attendere almeno 10 minuti tra un ciclo e l’altro di
sterilizzazione.
Attenzione! La durata della sterilizzazione, una volta terminato il processo,
viene garantita per circa 6 ore se non viene aperto il dispositivo.
Quando il sistema viene aperto, i biberon e gli accessori devono essere
montati e utilizzati immediatamente; qualora non si utilizzino subito
procedere con una nuova sterilizzazione.
Al termine di ogni utilizzo, togliere sempre l’acqua in eccesso all’interno
dell’unità sterilizzatore asciugando con un panno morbido.
Italiano IT
Istruzioni e garanzia
2)Svuotare la vaschetta facendo attenzione che la spina non venga a
contatto con l’acqua.
Asciugare la parte esterna e interna dell’apparecchio con un panno
umido.
3)Versare 60 ml di acqua fredda di rubinetto, Inserire la spina e premere
pulsante O/I, la luce O/I si accende (colore rosso). Lasciare evaporare
l’acqua. NON mettere il coperchio.
4)Dopo circa 10 minuti la luce rossa si spegne. Spegnere l’apparecchio
togliendo la spina dalla presa di corrente.
5)Lasciare raffreddare l’apparecchio per qualche minuto.
Svuotare la vaschetta facendo attenzione che la spina non venga a
contatto con l’acqua. Asciugare la parte esterna e interna dell’apparecchio
con un panno umido.
6)Ripetere i punti 3-5 due volte.
CARATTERISTICHE TECNICHE
Tensione 230 V AC 50 HZ 400 W
SITUAZIONI PARTICOLARI
Qualora si verificassero le seguenti situazioni:
1)Nel caso in cui la spia luminosa ON/OFF non si accenda :
- verificare che la spina sia collegata alla corrente
2)Nel caso di fuoriuscita elevata di vapore dal coperchio dello sterilizzatore:
- verificare che nella vaschetta per l’acqua dell’apparecchio sia stata
versata la quantità corretta d’acqua (60 ml)
- verificare che l’apparecchio sia posizionato su una superficie piana e
rigida
3)Nel caso in cui i biberon siano macchiati dopo la sterilizzazione:
- verificare quando è stata effettuata l’ultima decalcificazione
dell’apparecchio. Nel caso in cui siano passate più di 2 settimane, togliere
il calcare dall’apparecchio (vedi paragrafo “PULIZIA MANUTENZIONE –
Decalcificazione”).
4)Nel caso in cui la sterilizzazione risulti molto lunga:
- verificare che nella vaschetta per l’acqua sia stata versata la quantità
corretta d’acqua (60 ml)
- verificare il carico di accessori inseriti nello sterilizzatore, un carico
leggero allunga il ciclo di sterilizzazione.
PROCEDURA DI SMALTIMENTO (DIR. 2002/96/CE - RAEE)
Il simbolo posto sul fondo dell’apparecchio indica la raccolta
separata delle apparecchiature elettriche ed elettroniche.
Al termine della vita utile dell’apparecchio, non smaltirlo come
rifiuto municipale solido misto ma smaltirlo presso un centro di
raccolta specifico situato nella vostra zona oppure riconsegnarlo
al distributore all’atto dell’acquisto di un nuovo apparecchio dello stesso
tipo ed adibito alle stesse funzioni. Questa procedura di raccolta separata
delle apparecchiature elettriche ed elettroniche viene effettuata in visione
di una politica ambientale comunitaria con obiettivi di salvaguardia, tutela
e miglioramento della qualità dell’ambiente e per evitare effetti potenziali
sulla salute umana dovuti alla presenza di sostanze pericolose in queste
apparecchiature o ad un uso improprio delle stesse o di parti di esse.
Attenzione! Uno smaltimento non corretto di apparecchiature elettriche ed
elettroniche potrebbe comportare sanzioni.
fiscale che avrete cura di conservare qui allegato.
Tale periodo è conforme alla legislazione vigente (D. Lgs. nr. 24 del 02/02/2002
e dal successivo “Codice al Consumo” D. Lgs. nr. 206 del 03/09/2005)
e si applica solo nel caso in cui il consumatore sia un soggetto privato. I
prodotti Laica sono progettati per l’uso domestico e non ne è consentito
l’utilizzo in pubblici esercizi.
La garanzia copre solo i difetti di produzione e non è valida qualora il danno
sia causato da evento accidentale, errato utilizzo, negligenza o uso improprio
del prodotto. Utilizzare solamente gli accessori forniti; l’utilizzo di accessori
diversi può comportare la decadenza della garanzia. Non aprire l’apparecchio
per nessun motivo; in caso di apertura o manomissione, la garanzia decade
definitivamente. La garanzia non si applica alle parti soggette ad usura in
seguito all’uso e alle batterie quando fornite in dotazione.
Trascorsi i 2 anni dall’acquisto, la garanzia decade; in questo caso gli
interventi di assistenza tecnica verranno eseguiti a pagamento. Informazioni
su interventi di assistenza tecnica, siano essi in garanzia o a pagamento,
potranno essere richieste contattando [email protected]. Non è dovuta nessuna
forma di contributo per le riparazioni e sostituzioni di prodotti che rientrino
nei termini della garanzia. In caso di guasti rivolgersi al rivenditore; NON
spedire direttamente a LAICA. Tutti gli interventi in garanzia (compresi
quelli di sostituzione del prodotto o di una sua parte) non prolungheranno
la durata del periodo di garanzia originale del prodotto sostituito.
La casa costruttrice declina ogni responsabilità per eventuali danni che
possono, direttamente o indirettamente, derivare a persone, cose ed animali
domestici in conseguenza della mancata osservanza di tutte le prescrizioni
indicate nell’apposito libretto istruzioni e concernenti, specialmente, le
avvertenze in tema di installazione, uso e manutenzione dell’apparecchio.
E’ facoltà della ditta Laica, essendo costantemente impegnata nel
miglioramento dei propri prodotti, modificare senza alcun preavviso in
tutto o in parte i propri prodotti in relazione a necessità di produzione,
senza che ciò comporti nessuna responsabilità da parte della ditta Laica
o dei suoi rivenditori.
Per ulteriori informazioni: www.laica.it
Questo prodotto è indicato per uso domestico.
La conformità, comprovata dalla marcatura CE riportata sul
dispositivo, è relativa alla direttiva 2004/108 CEE inerente la
compatibilità elettromagnetica ed alla 2006/95 CEE inerente al materiale
elettrico destinato ad essere adoperato entro taluni limiti di tensione.
Questo prodotto è uno strumento elettronico che è stato verificato per garantire,
allo stato attuale delle conoscenze tecniche, sia di non interferire con altre
apparecchiature poste nelle vicinanze (compatibilità elettromagnetica) sia
di essere sicuro se usato secondo le indicazioni riportate nelle istruzioni
per l’uso. In caso di comportamenti anomali del dispositivo, non prolungare
l’impiego ed eventualmente contattare direttamente il produttore.
WWW.LAICAHEALTHCARE.RO
PULIZIA E MANUTENZIONE
Prima di effettuare qualsiasi operazione di pulizia o di manutenzione
spegnere l’apparecchio disinserendo la spina dalla corrente e attendere
che lo sterilizzatore a vapore si raffreddi completamente.
Non immergere l’apparecchio in acqua; pulire la parte esterna con un panno
umido e asciugare accuratamente.
Non usare prodotti chimici o abrasivi.
Non lasciare mai acqua nel serbatoio quando l’apparecchio non è utilizzato.
Decalcificazione:
Si consiglia di togliere il calcare dall’apparecchio almeno ogni 2 settimane.
1)Per pulire la vaschetta per l’acqua dell’apparecchio versare 100 ml di
aceto e 200 ml di acqua fredda di rubinetto nella stessa e lasciare agire
per circa 30 minuti o fino a quando scompare ogni traccia di calcare.
NON accendere l’apparecchio.
6
GARANZIA
Il presente apparecchio è garantito 2 anni dalla data di acquisto che deve
essere comprovata da timbro o firma del rivenditore e dallo scontrino
7
FR Français
STÉRILISATEUR ÉLÉCTRIQUE À VAPEUR
ILS EST IMPORTANT AVANT L’EMPLOI DE LIRE ATTENTIVEMENT LES
INSTRUCTIONS ET LES AVERTISSEMENTS CONTENUS DANS CE LIVRET
ET LES GARDER AVEC SOIN.
a été conçu et dans la façon indiquée dans les instructions d’emploi.
Tout autre emploi est à considérer non approprié et donc dangereux.
Le constructeur ne peut pas être considéré responsable pour éventuels
dommages dérivant d’un emploi non approprié ou mauvais.
• Avant l’emploi il faut s’assurer que l’appareil se présente intègre sans
dommages visibles.
• En cas de doute ne pas utiliser l’appareil et contacter le propre vendeur.
• En cas de panne et/ou mauvais fonctionnement, éteindre immédiatement
l’appareil sans le manipuler. Pour les réparations contacter toujours le
propre vendeur.
• Maintenir l’appareil loin de sources de chaleur.
• Il faut s’assurer d’avoir les mains sèches quand on branche ou l’on
débranche la fiche et quand on agit sur la touche d’allumage/extinction.
• Cet appareil doit être utilisé seulement avec la tension indiquée sur le
fonds du produit.
• Ne pas laisser exposé l’appareil à agents atmosphériques ( pluie, soleil,
etc.), de hautes températures ou près d’ordinateurs ou autres instruments
électroniques.
• Pour éviter surchauffages dangereux on recommande de dérouler dans
toute sa longueur le câble d’alimentation.
• Débrancher la fiche depuis la prise du courant quand l’appareil n’est pas
utilisé.
• Attention! Ne pas intervenir pour aucune raison sur le câble électrique.
En cas d’endommagement contacter le revendeur.
Le soin des nouveau-nés demande une grande hygiène des accessoires
nécessaires pour l’allaitement car une faible attention peut être la cause
du mal à l’estomac ou diarrhée. Parmi les méthodes domestiques pour
garantir un niveau hygiénique approprié, sans doute l’emploi de la chaleur
représente celle la plus intéressante. À travers la vapeur, engendrée par
une source chaude, il est possible de rejoindre un niveau de propreté tel à
pouvoir considérer éliminée la plupart des germes nocifs pour les nouveaunés. Selon ces conditions, donc, LAICA propose un système simple et sûr
pour la stérilisation des biberons et de tous ses composants.
Votre nouveau stérilisateur est à même de stériliser jusqu’à 6 biberons
dans environ 10 minutes. Il est muni de panier interne pour la stérilisation
des tétines. L’appareil est équipé d’une tasse à mesurer et des pinces
hygiéniques pour la manipulation des articles stérilisés.
Fonctionnement par réseau.
Français
Instructions et garantie
en le débranchant de l’alimentation.
7)Laisser refroidir l’unité stérilisateur pour quelques minutes, ouvrir le
couvercle, extraire le panier porte tétines et les pinces hygiéniques et
enlever l’eau en excès à l’intérieur de l’unité stérilisateur séchant avec
un chiffon propre. Maintenant votre nouveau stérilisateur à vapeur est
prêt pour l’emploi.
Attention! Avant de procéder avec la stérilisation à vapeur, vérifier
que les biberons et les accessoires pour l’allaitement puissent être
bouillis.
Le stérilisateur à vapeur peut stériliser jusqu’à 6 biberons en contemporaine.
1)Positionner l’appareil sur une surface plate et rigide.
2)Verser exactement 60 ml d’eau froide du robinet dans le bac pour l’eau
de l’appareil utilisant la mesure en dotation (figure 2). Attention! Dans le
cas où l’on verse une quantité supérieure d’eau le cycle de stérilisation
peut résulter plus long, dans le cas d’une mineure quantité la stérilisation
peut résulter inefficace.
3)Placez les biberons renversés dans une position verticale à l’intérieur
du stérilisateur en les appuyant sur l’étagère inférieure du panier portebiberon (figure 4) et les relatives tétines ou de petites pièces à stériliser
dans le panier supérieur. Positionnez les pinces hygiéniques sur l’étagère
supérieure parmi les tétines. Fermer le couvercle.
Attention! Laver soigneusement tous les biberon et accessoires
avec savon ne pas moussant et rincer abondamment avec de l’eau
avant chaque cycle de stérilisation.
4)Branchezl a fiche et appuyez sur la touche O/I La lumière O/I s’allume
(couleur rouge). Attention! Si la lumière O/I s’allume immédiatement
après l’insertion de la fiche, cela signifie que le bouton O/I a été
accidentellement appuyé avant d’insérer la fiche.
Dans ce cas, l’appareil démarre automatiquement le cycle de stérilisation.
N’allumez pas l’appareil si le réservoir pour l’eau de la base n’a pas été
rempli.
5)Après quelques minutes de la vapeur sort depuis le trou placé sur le
couvercle, faire attention pour ne pas se brûler.
6)Après environ 10 minutes la lumière rouge s’éteint, la stérilisation est
• Ne pas stériliser de objets métalliques.
• Ne pas couvrir ou bien introduire des objets dans les ouvertures du
stérilisateur à vapeur (par ex. dans le trou pour la sortie de la vapeur du
couvercle, dans le fonds de l’appareil).
• Attention! Il ne s’agit pas d’un jouet mais d’un stérilisateur à vapeur pour
emploi domestique. Ne pas laisser l’appareil sans surveillance lorsqu’il
n’est pas utilisé.
PARTIES DE L’APPAREIL
1.Unité stérilisateur
2.Bac pour l’eau
3.Lumière O/I
4.Couvercle unité stérilisateur
5.Panier porte biberon et tétine
6.Tasse à mesurer
7.Pinces hygiéniques
8.Câble électrique
WWW.LAICAHEALTHCARE.RO
AVERTISSEMENTS GÉNÉRAUX
L’emploi de tout appareil électrique comporte l’observance de quelques
règles fondamentales:
• Débrancher la fiche depuis la prise de courant immédiatement après
l’emploi et en tout cas toujours avant de le nettoyer et avant d’introduire
ou enlever les accessoires.
• Ne pas tirer le câble d’alimentation ou l’appareil même pour débrancher
la fiche depuis la prise de courant.
• Si un appareil électrique tombe dans l’eau, ne pas essayer de le rejoindre;
il faut débrancher immédiatement la fiche depuis la prise de courant.
• Ne jamais immerger l’appareil dans l’eau ou autres liquides.
• Ne jamais laisser l’appareil en fonction sans surveillance et ne pas
permettre que l’appareil soit utilisé par enfants, invalides ou personnes
défavorisées.
• Cet appareil devra être destiné exclusivement à l’emploi pour lequel il
AVERTISSEMENTS SPÉCIAUX
• Quand il est en fonction, le stérilisateur contient de l’eau bouillante
et vapeur qui sort depuis le couvercle; il faut faire attention pour
éviter de se brûler.
• Positionner le dispositif sur une surface plate, rigide et imperméable;
maintenir le câble de la prise de courant loin de sources de chaleur.
• Ne pas ouvrir l’unité quand elle est en fonction pour éviter brûlures.
• Ne pas utiliser le stérilisateur sans eau; n’utiliser que de l’eau froide du
robinet sans l’addition d’essences, parfums, médicaments ou autres.
8
FR
INSTRUCTIONS POUR L’EMPLOI STÉRILISATEUR À VAPEUR:
Avant d’utiliser votre stérilisateur pour la première fois:
1)Positionner l’appareil sur une surface plate et rigide.
2)Assembler le panier porte biberon et tétines comme dans la figure 1.
3)Verser exactement 60 ml d’eau froide du robinet dans le bac pour l’eau
de l’appareil utilisant la mesure en dotation (figure 2).
4)Positionner le panier et les pinces hygiéniques dans le stérilisateur (voir
figure 3). Fermer le couvercle.
5)Branchezl a fiche et appuyez sur la touche O/I La lumière O/I s’allume
(couleur rouge). Attention! Si la lumière O/I s’allume immédiatement
après l’insertion de la fiche, cela signifie que le bouton O/I a été
accidentellement appuyé avant d’insérer la fiche. Dans ce cas, l’appareil
démarre automatiquement le cycle de stérilisation. N’allumez pas
l’appareil si le réservoir pour l’eau de la base n’a pas été rempli.
6)Après chaque cycle de stérilisation la lumière rouge s’éteint pour indiquer
que la stérilisation est terminée. Éteindre dans tous les cas l’appareil
9
FR Français
STÉRILISATEUR ÉLÉCTRIQUE À VAPEUR
terminée. Éteindre dans tous les cas l’appareil en le débranchant
de l’alimentation.
7)Ne pas enlever immédiatement le couvercle, laisser refroidir le
stérilisateur pour quelques minutes.
8)Laver soigneusement les mains avant de prendre les produits stérilisés.
9)Ouvrir le couvercle, extraire les pinces hygiéniques qui peuvent être
utilisées pour prendre les tétines stériles et mettez-les sur les biberons.
Avant d’assembler les biberons, si nécessaire,enlever l’eau en excès
avec un chiffon sec. On conseille d’attendre au moins 10 minutes entre
un cycle et l’autre de stérilisation.
Attention! La durée de la stérilisation, une fois terminé le processus, est
garantie pendant environ 6 heures si on n’ouvre pas le dispositif.
Quand le système est ouvert, les biberons et les accessoires doivent être
montés et utilisés immédiatement; si on ne les utilise pas immédiatement
il faut procéder avec une nouvelle stérilisation.
À la fin de chaque emploi, enlever toujours l’eau en excès à l’intérieur de
l’unité stérilisateur séchant avec un chiffon souple.
l’eau. Sécher la partie externe et interne de l’appareil avec un chiffon
humide.
3)Verser 60 ml d’eau froide de robinet, Introduire la fiche et appuyez sur
la touche O/I, la lumière O/I s’allume (couleur rouge). Laissez évaporer
l’eau. NE PAS mettre le couvercle.
4)Après environ 10 minutes la lumière rouge s’éteint. Éteindre l’appareil
en le débranchant de l’alimentation.
5)Laisser refroidir l’appareil pour quelques minutes. Vider le bac faisant
attention que la fiche n’entre pas en contact avec l’eau. Sécher la partie
externe et interne de l’appareil avec un chiffon humide.
6)Répéter les points 3-5 deux fois.
CAS EXCEPTIONNELS
Si vous rencontrez les situations suivantes:
1)Dans le cas où le témoin lumineux ON/OFF ne s’allume pas:
- vérifier que la fiche soit branchée.
2)Dans le cas de sortie importante de vapeur depuis le couvercle du
stérilisateur:
- vérifier que dans le bac pour l’eau de l’appareil ait été versée la quantité
correcte d’eau (60 ml)
- vérifier que l’appareil soit positionné sur une surface plate et rigide.
3)Dans le cas où les biberons aient des taches après la stérilisation:
- vérifier quand on a effectué la dernière décalcification de l’appareil. Au
cas où soient écoulées plus de 2 semaines, enlever le calcaire depuis
l’appareil (voir paragraphe “NETTOYAGE ENTRETIEN – Décalcification”).
4)Au cas où la stérilisation résulte très longue:
- vérifier que dans le bac pour l’eau ait été versée la quantité correcte
d’eau (60 ml)
- vérifier le charge d’accessoires introduits dans le stérilisateur, un charge
léger prolonge le cycle de stérilisation.
Français
Instructions et garantie
Ce produit est indiqué pour en emploi domestique.
La conformité, prouvée par le marquage CE indiqué sur le
dispositif, est relative à la directive 2004/108 CEE concernant
la compatibilité électromagnétique et à la 2006/95 CEE concernant le
matériau électrique destiné à être utilisé dans certaines limites de tension.
Ce produit est un instrument électronique qui a été vérifié pour garantir, à
l’état actuel des connaissances techniques, soit de ne pas interférer avec
d’autres appareils placés aux alentours (compatibilité électromagnétique)
soit d’être sécurisé si utilisé selon les indications des instructions pour
l’emploi.
En cas de comportements anormales du dispositif, ne pas prolonger
l’emploi et éventuellement contacter directement le producteur.
02/02/2002 et du suivant “Code à la Consommation” D. Lgs. nr. 206 du
03/09/2005) et s’applique seulement au cas où le consommateur soit un
sujet particulier. Les produits Laica sont projetés pour un emploi à la maison
et on ne permet pas son emploi dans les locaux publiques.
La garantie couvre uniquement les défauts de production et n’est pas
valable si les dommages sont causés par des événements accidentels,
par une utilisation incorrecte, par négligence ou par utilisation impropre
du produit. Utiliser uniquement les accessoires fournis; l’utilisation
d’accessoires divers peut entraîner l’annulation de la garantie. N’ouvrir
en aucun cas l’appareil; en cas d’ouverture ou d’endommagement, la
garantie sera annulée définitivement. La garantie n’est pas valide pour les
pièces soumises à usure suite à leur emploi et aux batteries lorsqu’elles
sont fournies en dotation. Une fois écoulés 2 ans dès la date d’achat, la
garantie s’échoit; dans ce cas les interventions d’assistance technique
seront réalisées sous paiement. Les informations sur les interventions
d’assistance technique, soient elles en garantie ou sous paiement, pourront
être demandées en contactant notre société à [email protected].
Aucune forme de contribution est due pour les réparations et les
remplacements inclus dans les termes de la garantie.
En cas de pannes, s’adresser à son revendeur; NE PAS expédier
directement à LAICA. Toutes les interventions en garantie (incluses celles
de remplacement du produit ou bien d’une de ses parties) ne prolongeront
pas la durée de la période de garantie originale du produit remplacé.
La maison constructrice décline toute responsabilité en cas d’éventuels
dommages causés, directement ou indirectement, aux personnes,
choses et animaux domestiques suite au manque d’attention à toutes les
prescriptions indiquées sur le livret d’instruction et concernant, de manière
particulière, les conseils relatifs à l’installation, l’utilisation et l’entretien de
l’appareil. Il est faculté de la société Laica, qui est constamment engagée
dans l’amélioration de ses produits, de modifier sans aucun avis au
préalable totalement ou partiellement ses propres produits en relation avec
la nécessité de production, sans que cela implique aucune responsabilité
de la part de la société Laica ou de ses vendeurs.
PROCÉDURE D’ÉLIMINATION (DIR. 2002/96/CE - WEEE)
Le symbole placé sur le fond de l’appareil indique la récolte séparée
des appareils électriques et électroniques.
A la fin de la vie utile de l’appareil, il ne faut pas l’éliminer comme
déchet municipal solide mixte; il faut l’éliminer chez un centre
de récolte spécifique situé dans votre zone ou bien le rendre au
distributeur au moment de l’achat d’un nouveau appareil du même type
et prévu pour les mêmes fonctions. Cette procédure de récolte séparée
des appareils électriques et électroniques se réalise dans une vision
d’une politique de sauvegarde, protection et amélioration de la qualité de
l’environnement et pour éviter des effets potentiels sur la santé humaine
dus à la présence de substances dangereuses dans ces appareils ou bien
à un emploi non autorisé d’elles ou de leurs parties.
Attention! Une élimination incorrecte des appareils électriques pourrait
impliquer des pénalités.
WWW.LAICAHEALTHCARE.RO
NETTOYAGE ET ENTRETIEN
Avant de réaliser toute opération de nettoyage ou d’entretien, éteindre
l’appareil en débranchant la fiche depuis le courant et attendre que le
stérilisateur à vapeur se refroidisse complètement.
Ne pas immerger l’appareil dans l’eau; nettoyer la partie externe avec
un chiffon humide et sécher soigneusement. Ne pas utiliser de produits
chimiques ou abrasifs. Jamais laisser de l’eau dans le réservoir lorsqu’il
n’est pas utilisé.
Décalcification:
On conseille d’enlever le calcaire depuis l’appareil au moins toutes les 2
semaines.
1)Pour nettoyer le bac pour l’eau de l’appareil verser 100 ml de vinaigre
et 200 ml d’eau froide de robinet dans la même et laisser agir pendant
environ 30 minutes ou jusqu’à quand disparaît toute trace de calcaire.
Ne pas allumer l’appareil.
2)Vider le bac faisant attention que la fiche n’entre pas en contact avec
CARACTERISTIQUES TECHNIQUES
Tension 230 V AC 50 HZ 400 W
10
FR
GARANTIE
Cet appareil est garanti pour une durée de 2 ans à partir de la date d’achat
qui doit apparaître sur le tampon et la signature du revendeur et sur le
reçu fiscal ci-joint que vous garderez avec soin.
Cette période est conforme à la législation en vigueur (D. Lgs. nr. 24 du
11
GB English
ELECTRIC STEAM STERILISER
BEFORE USING THE PRODUCT, IT IS IMPORTANT TO READ THE
INSTRUCTIONS AND WARNINGS CONTAINED IN THIS BOOKLET
CAREFULLY. PRESERVE THIS BOOKLET WITH CARE.
was designed, and in the way described in the instructions for use.
Any other use is to be considered improper and therefore dangerous.
The manufacturer cannot be made liable for any damages resulting
from improper or wrong use.
•Before use, make sure that the device is integral, without visible
damages. In case of doubt, do not use the device and refer to the
own dealer.
•In case of fault and/or malfunction, immediately switch off the
device without tampering it. For the repairing, always refer to the
own dealer.
•Keep the device away from heat sources.
•Make sure to have dry hands when inserting and removing the plug
and when acting on the ON/OFF key.
•This device has to be used only with the voltage values given on
the bottom of the product.
•Do not leave the device exposed to weathering (rain, sun, etc.), high
temperatures or close to computers or other electronic devices.
•To avoid dangerous overheating, it is recommended to unwind the
power supply cable for its entire length.
•Disconnect the plug from the power outlet when the device is not
in use.
•Caution! Do not intervene for any reason whatsoever on the electric
cable. In case of damage, refer to the own dealer.
Taking care of newborns requires utmost hygiene of the necessary
accessories for nursing since poor attention to this may result in
stomach ache or diarrhoea.
Among the household methods applied for assuring a suitable hygienic
level, the use of heat is surely the most interesting one. By means of
the steam generated by a hot source, it is possible to reach such a
cleanness level allowing considering most of the germs noxious for
newborns eliminated.
Assuming this, LAICA offers a simple and safe system for sterilizing
feeding bottles and all their components. Your new sterilizer can
sterilize up to 6 bottles in about 10 minutes. It is equipped with an
internal basket for sterilizing teats.
The device is equipped with a dosing measuring scoop and hygienic
tweezers to handle the sterilised accessories.
Mains operation.
English GB
Instructions and guarantee
•Do not cover or insert objects into the openings of the steam steriliser
(e.g. into the steam outlet hole on the cover, into the bottom of the
device).
•Caution! This is not a toy, but a household steam steriliser. Do not
leave the device unattended also when it is not used.
7) Let the steriliser cool down for few minutes, open the cover, extract
the teat basket and the hygienic tweezers, remove any excess
water from inside the steriliser unit, drying the same with a clean
cloth. Now your new steam steriliser is ready for use.
Caution! Before performing the steam sterilisation, verify that the
baby bottles and nursing accessories can be boiled.
The steam steriliser can sterilise up to 6 baby bottles simultaneously.
1)Place the device on a flat and stiff surface.
2)Pour exactly 60 ml of cold tap water into the device water tray using
the measuring scoop included in the supply (figure 2).
Caution! If a greater quantity of water is poured, the sterilisation
cycle may last longer; if the quantity is lower, the sterilisation may
be ineffective.
3)P lace the baby bottles upside down in vertical position inside
the steriliser leaning them on the lower tray of the bottle holding
basket (figure 4) and place the related teats or any small parts to
be sterilised on the upper basket.
Place the hygienic tweezers on the upper tray among the teats.
Close the cover.
Caution! Wash all baby bottles and accessories with non-foamy
soap carefully and rinse them with plenty of water before each
sterilisation cycle.
4)Connect the plug and press the O/I button.
The O/I light turns on (red). Caution! If the O/I light turns on
immediately after you insert the plug, it means that the O/I button
was accidentally pressed before connecting the plug.
In this case, the device starts automatically the sterilization cycle.
Do not turn the device on, if the water tank in the base has not been
filled first.
5)After few minutes, steam comes out from the hole on the cover,
watch out to avoid burns.
6)After about 10 minutes, the red light switches off: the sterilisation
has ended. In any case, switch off the device disconnecting the
plug from the outlet.
DEVICE PARTS
1. Steriliser unit
2. Water container
3. O/I light
4. Steriliser unit cover
5. Teat and bottle holding basket
6. Dosing measuring scoop
7. Hygienic tweezers
8. Power supply cable
WWW.LAICAHEALTHCARE.RO
GENERAL WARNINGS
The use of any electric device involves the respect of some essential
rules:
•Disconnect the plug from the power outlet immediately after use,
and in any case always before cleaning it and before inserting or
removing the accessories.
•Do not pull the power supply cable or the device itself to disconnect
the plug from the power outlet.
•If an electric device falls into water do not attempt to reach it, but
rather immediately disconnect the plug from the power outlet.
•Never immerse the device in water or other liquids.
•Never let the device work unattended and do not allow children,
invalid or disabled people to use it.
•This device shall be used only for the use destination for which it
SPECIAL WARNINGS
•When operating, the sterilizer contains boiling water and steam
that comes out from the cover. Watch out in order to avoid
burns.
•Place the device on a flat, rigid and water-proof surface; keep the
power supply cable away from heat sources.
•Do not open the unit when it is working in order to avoid burns.
•Do not use the steriliser without water; use only cold tap water
without adding any essence, perfume, medicine or other substances.
•Do not sterilise metal objects.
12
INSTRUCTIONS FOR USE STEAM STERILIZER:
Before using the steriliser for the first time:
1) Place the device on a flat and stiff surface.
2) Assemble the teat and bottle holding basket according to figure 1.
3) Pour exactly 60 ml of cold tap water into the device water tray
using the measuring scoop included in the supply (figure 2).
4) Place the basket and the hygienic tweezers into the steriliser (see
figure 3). Close the cover.
5) Connect the plug and press the O/I button.
The O/I light turns on (red).
Caution! If the O/I light turns on immediately after you insert the
plug, it means that the O/I button was accidentally pressed before
connecting the plug. In this case, the device starts automatically
the sterilization cycle. Do not turn the device on, if the water tank
in the base has not been filled first.
6) After each sterilisation cycle, the red light switches off indicating
that the sterilisation has ended. In any case, switch off the
device disconnecting the plug from the outlet.
13
GB English
ELECTRIC STEAM STERILISER
7)Do not remove the cover immediately; let the steriliser cool down
for few minutes.
8)Wash your hands carefully before picking up the sterilised products.
9)Open the cover, take the hygienic tweezers that can be used to pick
up the sterilised teats and place them on the baby bottles. Before
assembling the baby bottles, if necessary, remove any excess water
with a dry cloth. It is recommended to wait for at least 10 minutes
between one sterilisation cycle and the next one.
Caution! The sterilisation duration, after the process, is assured for
about 6 hours, if the device is not opened.
When the system is opened, the baby bottles and the accessories have
to be mounted and used immediately; if they are not used immediately,
perform a new sterilisation.
At the end of each use, always remove the excess water present
inside the sterilising unit drying it with a soft cloth.
button; the O/I light switches on (red). Let the water evaporate. Do
NOT place the cover.
4)After about 10 minutes, the red light switches off. Switch off the
device disconnecting the plug from the outlet.
5)Let the device cool down for some minutes. Empty the tray paying
attention to prevent the plug from getting in contact with water.
Dry the external and internal part of the device with a wet cloth.
6)Repeat the instructions given under items 3-5 twice.
SPECIAL SITUATIONS
Should the following situations occur:
1)If the ON/OFF warning light does not switch on:
- verify that the plug is connected to the outlet
2)In case a large quantity of steam comes out from the steriliser cover:
- verify that the right quantity of water (60 ml) has been poured
into the device water tray
- verify that the device is positioned on a flat and stiff surface
3)If the baby bottles are stained after the sterilisation:
- verify when the last descaling of the device was performed. If more
than 2 weeks have elapsed, remove the limescale from the device
(see paragraph “CLEANING AND MAINTENANCE - Descaling”).
4)If the sterilisation lasts for very long time:
- verify that the right quantity of water (60 ml) has been poured into
the water tray
- verify the load of accessories inserted into the steriliser; a light
load makes the sterilisation cycle longer.
English GB
Instructions and guarantee
This product is an electronic device that was tested to assure, according
to the current technical knowledge, that it does not interfere with other
nearby located equipment (electromagnetic compatibility) and that it is
safe if used according to the advices given in the instructions for use.
In case of operation anomalies, do not keep using the device and, if
necessary, refer to the manufacturer directly.
public businesses is forbidden.
The warranty covers only production defects and is void, if the damage
is caused by accidental events, wrong use, negligence or improper
use of the product. Use the supplied accessories only; the use of other
accessories may lead to warranty voidness.
Do not open the equipment for any reason whatsoever; in case of
opening or tampering of the equipment, warranty decays definitively.
Warranty does not apply to parts subject to tear and wear along the
use, as well as to batteries, when they are standard supplied. Warranty
decays after 2 years from the purchase date.
In this case, technical service interventions will be carried out against
payment. Information on technical service interventions, under warranty
terms or against payment, may be requested by writing at info@laica.
com. Nothing shall be owed for the repairing or replacement of products
covered by the warranty terms. In case of faults, refer to a dealer; DO
NOT send anything directly to LAICA.
All interventions covered by warranty (including product replacement
or the replacement of any of its parts) shall not be meant to extend
the duration of the original warranty period of the replaced product.
The manufacturer cannot be made liable for any damages that may
be caused, directly or indirectly, to people, things and pets resulting
from the inobservance of the provisions contained in the suitable user
manual, especially with reference to the warnings related to installation,
use and maintenance of the equipment.
Being constantly involved in improving its own products, Laica reserves
the right to modify its product, totally or partially, with reference to
any production need, without that this involves any responsibility
whatsoever by Laica or its dealers.
DISPOSAL PROCEDURE (DIR. 2002/96/EC - WEEE)
The symbol on the bottom of the device indicates the separated
collection of electric and electronic equipment.
At the end of life of the device, do not dispose it as mixed
solid municipal waste, but dispose it referring to a specific
collection centre located in your area or returning it to the
distributor, when buying a new device of the same type to be used
with the same functions.
This procedure of separated collection of electric and electronic devices
is carried out forecasting a European environmental policy aiming at
safeguarding, protecting and improving environment quality, as well
as avoiding potential effects on human health due to the presence of
hazardous substances in such equipment or to an improper use of
the same or of parts of the same.
Caution! The wrong disposal of electric and electronic equipment
may involve sanctions.
WWW.LAICAHEALTHCARE.RO
CLEANING AND MAINTENANCE
Before any cleaning or maintenance intervention, switch off the device,
disconnecting the plug from the outlet, and wait for the steam steriliser
to cool down completely.
Do not immerse the device into water; clean the outer part with a damp
cloth and dry thoroughly. Do not use chemical or abrasive products.
Never leave any water in the tank when the device is not used.
Descaling:
We recommend to remove the limescale from the device at least
every 2 weeks.
1)To clean the device water tray, pour 100 ml of vinegar and 200 ml
of cold tap water into the same and let it stand for about one 30
minutes or until any trace of limescale is removed. Do NOT switch
on the device.
2)Empty the tray paying attention to prevent the plug from getting in
contact with water. Dry the external and internal part of the device
with a wet cloth.
3)Pour 60 ml of cold tap water. Insert the plug and press the O/I
TECHNICAL FEATURES
Voltage 230 V AC 50 HZ 400 W
The conformity, certified by the CE-marking on the device,
refers to the EEC Directive 2004/108 on electromagnetic
compatibility and to the EEC Directive 2006/95 on electric
material destined to be used within given voltage limits.
14
WARRANTY
This equipment is covered by a 2-year warranty elapsing from the
purchase date, which has to be proven by means of the stamp or
signature of the dealer and by the fiscal payment receipt that
shall be kept enclosed to this document.
This warranty period complies with the laws in force (Italian legislative
decree No. 24 dated Feb. 02, 2002 and following “Consumers’ Act”
Italian legislative decree No. 206 dated Sep. 03, 2005) and applies
only in case the consumer is a private entity.
Laica products are designed for domestic use; therefore, their use in
15
ES Español
ESTERILIZADOR ELECTRICO DE VAPOR
ES IMPORTANTE ANTES DEL EMPLEO LEER CON CUIDADO LAS
INSTRUCCIONES Y LAS ADVERTENCIAS CONTENIDAS EN ESTE LIBRETE
Y GUARDARLAS CON CUIDADO.
Cualquier otro empleo es a considerarse impropio y entonces peligroso.
El constructor no puede ser considerado responsable para eventuales
daños originados por usos impropios o equivocados.
• Antes del empleo asegurarse que el aparato esté integro sin visibles
daños. En caso de duda no utilizar el aparato y contactar al propio
vendedor.
• En caso de avería y/o malo funcionamiento, apagar inmediatamente
el aparato sin manipularlo. Para las reparaciones siempre contactar al
propio vendedor.
• Mantener el aparato lejos de fuentes de calor.
• Asegurarse de tener las manos secas cuando se conecta o se desconecta
el enchufe y cuando se actúa en la tecla de encendido/apagado.
• El presente aparato debe ser utilizado solamente con el voltaje indicado
en el fondo del producto.
• No dejar expuesto el aparato a agentes atmosféricos ( lluvia, sol,
etc.), altas temperaturas o cerca de ordenadores u otros instrumentos
electrónicos.
• Para evitar sobrecalentamientos peligrosos se recomienda desenrollar
en toda en longitud el cable de alimentación.
• Desconectar el enchufe desde la toma de la corriente cuando el aparato
no es utilizado.
• Cuidado! No intervenir por ninguna razón en el cable eléctrico. En caso
de daños contactar al vendedor.
El cuidado hacia los recién nacidos solicita una alta higiene de los
accesorios necesarios para el amamantamiento porque un escaso cuidado
puede ser causa de mal de barriga o diarrea. Entre los métodos domésticos
para garantizar un nivel higiénico adecuado, seguramente el empleo del
calor representa aquel más interesante. Mediante el vapor, generado por
una fuente caliente, es posible alcanzar un nivel de limpieza tal a poder
considerada eliminada la mayoría de los gérmenes nocivos para los recién
nacidos. Según esta introducción, LAICA propone un sistema simple y
seguro para la esterilización de los biberones y de todas sus componentes.
Vuestro nuevo esterilizador es capaz de esterilizar hasta 6 biberones en
cerca de 10 minutos. Está equipado con cesta interna para la esterilización
de las tetillas. El dispositivo está equipado con taza de medición y pinzas
higiénicas para el manejo de accesorios esterilizados.
Funcionamiento desde red eléctrica.
Español ES
Instrucciones y garantía
(por ej. en el agujero para la salida del vapor de la tapa, en el fondo del
aparato).
• ¡Cuidado! No se trata de un juguete pero de un esterilizador de vapor
para uso domestico. No deje el aparato abandonado, incluso cuando no
esté en uso.
7)Dejar enfriar la unidad esterilizadora por algunos minutos, abrir la tapa,
extraer la cesta porta tetillas y las pinzas higiénicas y quitar el agua en
exceso al interior de la unidad esterilizadora secando con un paño limpio.
Ahora vuestro nuevo esterilizador de vapor está listo para el uso.
¡Cuidado! Antes de proceder con la esterilización de vapor, averiguar
que los biberones y los accesorios para el amamantamiento puedan
ser hervidos.
El esterilizador de vapor puede esterilizar hasta 6 biberones
contemporáneamente.
1)Posicionar el aparato en una superficie llana y rígida.
2)Poner exactamente 60 ml de agua fría de grifo en la cubeta para el
agua del aparato utilizando el medidor en dotación (figura 2). ¡Cuidado!
En el caso en que se ponga una cantidad mayor de agua el ciclo de
esterilización puede resultar más largo, en el caso de menor cantidad
la esterilización puede resultar ineficaz.
3)Colocar los biberones boca abajo en posición vertical dentro del
esterilizador apoyándolos en el estante inferior de la cesta porta
biberones (figura 4) y las relativas tetillas o o partes pequeñas para ser
esterilizadas en el cesto superior.
Posicionar las pinzas higiénicas en el estante superior entre las tetillas.
Cerrar la tapa.
¡Cuidado! Lavar cuidadosamente todos los biberones y accesorios
con jabón no espumoso y enjaguarlos abundantemente con agua
antes de cada ciclo de esterilización.
4)Conectar el enchufe y pulsar el botón O/I.
La luz O/I se enciende (color rojo).
Cuidado! Si la luz O/I se enciende inmediatamente después de insertar el
enchufe, esto significa que el botón O/I ha sido pulsado accidentalmente
antes de insertar el enchufe.
En este caso, el dispositivo comienza automáticamente el ciclo de
esterilización. No encender la unidad si el tanque para el agua de la
base no ha sido llenado.
5)Después de algunos minutos un poco de vapor sale desde el agujero
colocado en la tapa, hacer cuidado para no quemarse.
PARTES DEL APARATO
1.Unidad esterilizadora
2.Cubeta para el agua
3.Luz O/I
4.Tapa unidad esterilizadora
5.Cesta porta biberón y tetillas
6.Taza de dosificación
7.Pinzas higiénicas
8.Cable eléctrico
WWW.LAICAHEALTHCARE.RO
ADVERTENCIAS GENERALES
El uso de todo aparato eléctrico comporta la observancia de algunas reglas
fundamentales:
• Desconectar el enchufe desde la toma de corriente inmediatamente
después del uso y de todas maneras siempre antes de limpiarlo y antes
de introducir o quitar los accesorios.
• No tirar el cable de alimentación o el aparato mismo para desconectar
el enchufe desde la toma de corriente.
• Si un aparato eléctrico cae en el agua no intentar alcanzarlo, pero
desconectar inmediatamente el enchufe desde la toma de la corriente.
• Nunca sumergir el aparato en agua u otros líquidos.
• Nunca dejar el aparato en función sin control y no permitir que el aparato
sea utilizado por niños, minusvalidos o personas desfavorecidas.
• Este aparato tendrá que ser destinado exclusivamente al uso para el cual
ha sido concebido y en la manera indicada en las instrucciones de uso.
ADVERTENCIAS ESPECIALES
• Cuando en función, el esterilizador contiene agua hirviente y vapor que
sale desde la tapa, hacer cuidado para evitar de quemarse.
• Posicionar el dispositivo en una superficie llana, rígida e impermeable;
mantener el cable de la toma de la corriente lejos de fuentes de calor.
• No abrir la unidad cuando en función para evitar quemaduras.
• No utilizar el esterilizador sin agua; utilizar solamente agua fría de grifo
sin añadir esencias, perfumes, medicamentos u otro.
• No esterilizar objetos metálicos.
• No cubrir o introducir objetos en las aperturas del esterilizador de vapor
16
INSTRUCCIONES PARA EL USO ESTERILIZADOR DE VAPOR:
Antes de utilizar vuestro esterilizador por la primera vez:
1)Posicionar el aparato en una superficie llana y rígida.
2)Montar la cesta porta biberón y tetillas como en la figura 1.
3)Poner exactamente 60 ml de agua fría de grifo en la cubeta para el agua
del aparato utilizando el medidor en dotación (figura 2).
4)Posicionar la cesta porta tetillas y las pinzas higiénicas en el esterilizador
(ver figura 3). Cerrar la tapa.
5)Conectar el enchufe y pulsar el botón O/I.
La luz O/I se enciende (color rojo). Cuidado! Si la luz O/I se enciende
inmediatamente después de insertar el enchufe, esto significa que el
botón O/I ha sido pulsado accidentalmente antes de insertar el enchufe.
En este caso, el dispositivo comienza automáticamente el ciclo de
esterilización. No encender la unidad si el tanque para el agua de la
base no ha sido llenado.
6)Después de cada ciclo de esterilización la luz roja se apaga para indicar
que la esterilización se ha acabado. Apagar de todas maneras el
aparato quitando el enchufe desde la corriente.
17
ES Español
ESTERILIZADOR ELECTRICO DE VAPOR
6)Después de cerca 10 minutos la luz roja se apaga, la esterilización se ha
acabado. Apagar de todas maneras el aparato quitando el enchufe
desde la corriente.
7)No quitar inmediatamente la tapa, dejar enfriar el esterilizador por
algunos minutos.
8)Lavar cuidadosamente las manos antes de tomar los productos
esterilizados.
9)Abrir la tapa, tomar las pinzas higiénicas que pueden ser utilizadas
para tomar las tetillas estériles y ponerlas en los biberones. Antes de
ensamblar los biberones, si necesario, quitar el agua en exceso con un
paño seco. Se aconseja esperar por lo menos 10 minutos entre un ciclo
y el otro de esterilización.
¡Cuidado! La duración de la esterilización, una vez acabado el proceso, es
garantizada por cerca de 6 horas si no es abierto el dispositivo. Cuando el
sistema es abierto, los biberones y los accesorios deben ser montados y
utilizados inmediatamente; si no se utilizan inmediatamente proceder con
una nueva esterilización. Al final de cada empleo, quitar siempre el agua
en exceso al interior de la unidad esterilizadora secando con un paño suave.
húmedo.
3)Poner 60 ml de agua fría de grifo, Introducir el enchufe e pulsar el botón,
la luz O/I se enciende (color rojo). Dejar evaporar el agua. NO poner la
tapa.
4)Después de cerca 10 minutos la luz roja se apaga. Apagar el aparato
quitando el enchufe desde la corriente.
5)Dejar enfriar el aparato por algunos minutos. Vaciar la cubeta haciendo
cuidado que el enchufe no entre en contacto con el agua. Secar la parte
externa e interna de la base con un paño húmedo.
6)Repetir los puntos 3-5 dos veces.
SITUACIONES ESPECIALES
Si usted experimenta las siguientes situaciones:
1)Si la luz indicadora de ON/OFF no se enciende:
- averiguar que el enchufe sea conectado a la corriente.
2)En el caso de salida importante de vapor desde la tapa del esterilizador:
- averiguar que en la cubeta para el agua de la base se haya echado la
cantidad correcta de agua (60 ml)
- averiguar que el aparato sea posicionado en una superficie llana y
rígida
3)En el caso en que los biberones sean manchados después de la
esterilización:
- averiguar cuando se ha efectuado la ultima descalcificación del aparato.
En el caso en que hayan pasado más de 2 semanas, quitar la caliza desde
el aparato (ver párrafo “LIMPIEZA MANTENIMIENTO – Descalcificación”).
4)En el caso en que la esterilización resulte muy larga:
- averiguar que en la cubeta para el agua se haya echado la cantidad
correcta de agua (60 ml)
- averiguar el cargo de accesorios introducidos en el esterilizador, un
cargo ligero extiende el ciclo de esterilización.
Español ES
Instrucciones y garantía
Este producto está indicado para un uso doméstico.
La conformidad, probada por el marcado CE indicado en el
dispositivo, es relativa a la directiva 2004/108 CEE inherente la
compatibilidad electromagnética y a la 2006/95 CEE inherente al material
eléctrico destinado a ser utilizado dentro de ciertos límites de tensión.
Este producto es un instrumento electrónico que ha sido comprobado
para garantizar, el estado actual de los conocimientos técnicos, sea
de no interferir con otros aparatos en las cercanías, (compatibilidad
electromagnética) sea de estar seguro si utilizado según las indicaciones
de las instrucciones para el uso. En caso de comportamientos anómalos del
dispositivo, no continuar con el uso y eventualmente contactar directamente
al fabricante.
Consumo” D. Lgs. nr. 206 del 03/09/2005) y se aplica solamente en el caso
en que el consumidor sea un sujeto particular. Los productos Laica han sido
proyectados para el uso domestico y no se permite el empleo en ejercicios
públicos. La garantía ampara sólo los defectos de producción y no es válida
si el daño fuera causado por un accidente, uso incorrecto, negligencia
o uso impropio del producto. Emplee sólo los accesorios entregados, el
empleo de otros accesorios puede hacer que la garantía pierda su validez.
No abra por ningún motivo el aparato; en caso de apertura o alteración,
la garantía pierde definitivamente su validez. La garantía no se aplica a
las partes sometidas a desgaste debido al uso y a las baterías cuando se
suministren en dotación. Pasados los 2 años desde la compra, la garantía
se vence; en este caso las intervenciones de asistencia técnica se realizarán
bajo pago. Informaciones sobre las intervenciones de asistencia técnica,
sea en garantía o bajo pago, se pueden solicitar contactando info@laica.
com. No es debida ninguna forma de contribución para las reparaciones
o sustituciones de productos inclusos en los términos de la garantía. En
caso de averías, diríjase al revendedor; NO envíe directamente a LAICA.
Todas las intervenciones en garantía (incluso aquellas de sustitución del
producto o de una de sus partes) no extienden la duración del periodo de
garantía original del producto sustituido. El fabricante no se considera
responsable por posibles daños que puedan, directa o indirectamente,
afectar a personas, cosas o animales domésticos por la inobservancia
de todas las disposiciones indicadas en este manual de instrucciones
y, especialmente, referidas a las advertencias sobre la instalación, uso
y mantenimiento del aparato. Es facultad de la sociedad Laica, al estar
constantemente empeñada en la mejora de sus propios productos, modificar
sin preaviso alguno totalmente o en parte los productos presentes en el
catálogo en relación a necesidades de producción, sin que ello comporte
responsabilidad alguna por parte de la sociedad Laica o de sus vendedores.
PROCEDIMIENTO DE ELIMINACIÓN (DIR. 2002/96/CE - RAEE)
El símbolo colocado en el fondo del aparato indica la recogida
separada de los equipos eléctricos y electrónicos. Al término de
la vida útil del aparato, no eliminar como residuo municipal sólido
mixto sino eliminarlo en un centro de recogida específico colocado
en vuestra zona o entregarlo al distribuidor a la hora de comprar
un nuevo aparato del mismo tipo y destinado a las mismas funciones.
Este procedimiento de recogida separada de los equipos eléctricos y
electrónicos se realiza con el propósito de una política del medioambiente
comunitaria con objetivos de salvaguardia, defensa y mejoramiento de la
calidad del medioambiente y para evitar efectos potenciales en la salud de
los seres humanos debido a la presencia de sustancias peligrosas dentro
de estos equipos o a un uso inapropiado de los mismos o de algunas de
sus partes.Cuidado! Una eliminación no correcta de equipos eléctricos y
electrónicos podría conllevar sanciones.
WWW.LAICAHEALTHCARE.RO
LIMPIEZA Y MANTENIMIENTO
Antes de efectuar cualquiera operación de limpieza o de mantenimiento
apagar el aparato desenchufando el enchufe desde la corriente y esperar
que el esterilizador de vapor se enfríe completamente. No sumergir el
aparato en agua; limpiar la parte externa con un paño húmedo y secar
cuidadosamente. No utilice productos químicos o abrasivos. Nunca deje
agua en el tanque cuando no esté en uso.
Descalcificación:
Se aconseja quitar la caliza desde el aparato por lo menos cada 2 semanas.
1)Para limpiar la cubeta para el agua del aparato poner 100 ml de vinagre
y 200 ml de agua fría de grifo en la misma y dejar actuar por cerca 30
minutos o hasta cuando desaparece cada traza de caliza. NO encender
el aparato.
2)Vaciar la cubeta haciendo cuidado que el enchufe no entre en contacto
con el agua. Secar la parte externa e interna de la base con un paño
CARACTERÍSTICAS TÉCNICAS
Tensión 230 V AC 50 HZ 400 W
18
GARANTÍA
Este aparato está garantizado por 2 años a partir de la fecha de compra,
que debe estar certificada por el sello y firma del revendedor y el
recibo fiscal, que se conservará adjunto. Dicho periodo es conforme a
la legislación vigente (D. Lgs. nr. 24 del 02/02/2002 y siguiente “Código al
BENESSERE LAICA, SL
P. Ind. El Pastoret C/Cataluña, 9-11 • 03640 - Monovar
Tel. 966961040 • Fax 966961046
E-mail: [email protected] • C.I.F. B-53613030
19
DE Deutsch
ELEKTRISCHER DAMPFSTERILISATOR
VOR DEM GEBRAUCH DES GERÄTS IST ES WICHTIG, DIE IN DIESEM
HANDBUCH ENTHALTENEN ANWEISUNGEN UND HINWEISE ZU LESEN UND
DAS HANDBUCH SELBST SORGFÄLTIG AUFZUBEWAHREN.
es entworfen worden ist, und auf jene Weise zu verwenden, die in diesen
Anleitungen beschrieben ist. Jeder andere Gebrauch ist als unsachgemäß
und also als gefährlich zu betrachten. Der Hersteller haftet nicht für etwaige
Schäden, die von Missbrauch oder falschem Gebrauch verursacht sind.
• Vor dem Gebrauch prüfen, dass das Gerät unversehrt ist und keine Schäden
aufweist. Im Zweifelfall das Gerät nicht verwenden und sich an seinen
Vertragshändler wenden.
• Im Falle von Ausfall und/oder schlechtem Betrieb, das Gerät unmittelbar
ausschalten, ohne an ihm missbräuchlich einzugreifen. Für die
Instandsetzung sich immer an seinen Vertragshändler wenden.
• Das Gerät weit entfernt von Wärmequellen halten.
• Vor der Verbindung und Trennung des Steckers und vor der Betätigung der
EIN/AUS-Taste prüfen, trockene Hände zu haben.
• Das gegenständliche Gerät ist ausschließlich mit den Spannungswerten zu
verwenden, die am Boden des Produkts angegeben sind.
• Das Gerät nicht der Bewitterung (Regen, Sonne, usw.) oder hohen
Temperaturen ausgesetzt oder in der Nahe von Rechnern oder anderen
elektronischen Geräten lassen.
• Um gefährliche Überhitzungsphänomene zu vermeiden, wird es empfohlen,
das Netzkabel vollkommen abzuwickeln.
• Den Stecker von der Steckdose entfernen, wenn das Gerät nicht verwendet
wird.
• Vorsicht! Keinesfalls am Netzkabel eingreifen. Im Falle von Beschädigung
sich an den Vertragshändler wenden.
Die Pflege von Säuglingen erfordert eine ausgezeichnete Hygiene der für
das Stillen notwendigen Zubehörteile, da eine geringe Aufsicht darüber
Bauchschmerzen oder Durchfall verursachen kann. Unter den häuslichen
Arten und Weisen zur Sicherung eines geeigneten Hygieneniveaus ist die
Anwendung von Dampf sicherlich die interessanteste.
Durch den Dampf, der durch eine heiße Quelle erzeugt wird, ist es möglich
ein solches Reinigungsniveau zu erzielen, bei dem der Großteil der für die
Säuglingen schädlichen Keime als vernichtet betrachtet werden kann.
LAICA geht von diesen Voraussetzungen aus und bietet ein einfaches und
sicheres System zur Sterilisierung von Babyflaschen und den dazugehörenden
Bauteilen. Ihr neuer Sterilisator kann bis auf 6 Babyflaschen in etwa 10
Minuten sterilisieren. Er ist mit einem Innenkorb zur Sterilisierung der Sauger
versehen. Das Gerät verfügt über einen Dosiermessbecher und hygienische
Pinzetten für die Handhabung der sterilisierten Zubehörteile.
Netzbetrieb.
Deutsch DE
Anleitungen und garantie
Leitungswasser ohne Hinzufügung von Essenzen, Parfüms, Medikamenten
oder anderen Stoffen verwenden.
• Keine metallischen Gegenstände sterilisieren.
• Die Öffnungen am Dampfsterilisator (z.B. Dampfablassloch am Deckel,
Öffnungen am Boden des Geräts) nicht decken und keine Gegenstände in
dieselben einführen.
• Vorsicht! Das Gerät ist kein Spielzeug, sondern ein Dampfsterilisator für
Haushaltsgebrauch. Das Gerät nicht unbewacht lassen, auch wenn es nicht
gerade verwendet wird.
gefüllt worden ist.
6)Nach jedem Sterilisationszyklus schaltet sich die rote Lampe aus, um
anzugeben, dass die Sterilisation beendet ist. Auf jeden Fall, das Gerät
ausschalten, indem man den Stecker von der Steckdose entfernt.
7)Die Sterilisationseinheit für einige Minuten kühlen lassen, den Deckel
öffnen, den Saugerkorb und die hygienischen Pinzetten ausziehen, und
das überschüssige Wasser in den Sterilisator mit einem sauberen Tuch
entfernen. Nun, ist Ihr neuer Dampfsterilisator betriebsbereit.
Vorsicht! Vor der Dampfsterilisation prüfen, dass die Babyflaschen und
die Zubehörteile zum Stillen gekocht werden dürfen.
Der Dampfsterilisator kann gleichzeitig bis auf 6 Babyflaschen sterilisieren.
1)Das Gerät auf eine ebene und feste Oberfläche stellen.
2)Genau 60 ml von kaltem Leitungswasser in den Wasserbehälter des Geräts
gießen; dabei den standardgelieferten Messbecher verwenden (Abbildung
2). Vorsicht! Wird eine größere Menge von Wasser gegossen, kann der
Sterilisationszyklus länger dauern; wird eine kleinere Menge gegossen,
kann die Sterilisation unwirksam sein.
3)Die Babyflaschen umgedreht in senkrechter Position in den Sterilisator
stellen - sie dabei auf das untere Fach des Babyflaschenkorbs (Abbildung
4) legen; die dazugehörenden Sauger oder kleinen Teile, die zu sterilisieren
sind, in den oberen Korb stellen. Die hygienischen Pinzetten auf das obere
Fach unter den Saugern stellen. Den Deckel schließen.
Vorsicht! Vor jedem Sterilisationszyklus alle Babyflaschen und
Zubehörteile ganz sorgfältig mit nicht schäumender Seife waschen
und sie gründlich mit Wasser spülen.
4)Den Stecker verbinden und auf den I/O-Knopf drücken. Das O/I-Licht schaltet
sich ein (rot). Vorsicht! Sollte das O/I-Licht sofort ein werden, nachdem den
Stecker verbunden wird, bedeutet das, dass den O/I-Knopf versehentlich
vor der Verbindung des Steckers gedrückt worden war.
In diesem Fall startet das Gerät den Sterilisationszyklus automatisch. Das
Gerät nicht einschalten, wenn der Wassertank im Sockel nicht vorher gefüllt
worden ist.
5)Nach einigen Minuten kommt Dampf aus dem Loch aus, das am Deckel
vorhanden ist; acht geben, um Verbrennungen zu vermeiden (TOGLI).
BAUTEILE VOM GERÄT
1.Sterilisationseinheit
2.Wasserbehälter
3.O/I-Lampe
4.Deckel der Sterilisationseinheit
5.Babyflaschen- und Saugerkorb
6.Dosiermessbecher
7.Hygienische Pinzetten
8.Netzkabel
WWW.LAICAHEALTHCARE.RO
ALLGEMEINE WARNUNGEN
Der Gebrauch irgendwelcher elektrischen Ausrüstung erfordert die Beachtung
einigen grundlegenden Regeln:
• Den Stecker von der Steckdose unmittelbar nach dem Gebrauch und auf
jeden Fall immer vor der Reinigung und vor der Montage oder Entfernung
von Zubehörteilen entfernen.
• Das Netzkabel oder das Gerät selbst nicht ziehen, um den Stecker von der
Steckdose zu entfernen.
• Sollte ein elektrisches Gerät ins Wasser fallen, nicht versuchen, es zu
greifen, sonder den Stecker unmittelbar von der Steckdose entfernen.
• Das Gerät nie in Wasser oder andere Flüssigkeiten eintauchen.
• Das Gerät nie unbewacht arbeiten lassen. Kindern, Invaliden oder
Behinderten nicht erlauben, das Gerät zu verwenden.
• Dieses Gerät ist ausschließlich für die Gebrauchsbestimmung, für welche
SONDERWARNUNGEN
• Während des Betriebs enthält der Sterilisator Siedewasser und Dampf,
der aus dem Deckel herausströmt - Aufpassen, um Verbrennungen zu
vermeiden.
• Das Gerät auf eine flache, feste und wasserdichte Fläche positionieren. Das
Netzkabel weit entfernt von Wärmequellen halten.
• Die Einheit während des Betriebs nicht öffnen, um Verbrennungen zu
vermeiden.
• Den Sterilisator nicht ohne Wasser verwenden; ausschließlich kaltes
20
GEBRAUCHSANWEISUNGEN DAMPFSTERILISATOR:
Vor dem Gebrauch des Sterilisators für das erste Mal:
1)Das Gerät auf eine ebene und feste Oberfläche stellen.
2)Den Babyflaschen- und Saugerkorb laut Abbildung 1 anmontieren.
3)Genau 60 ml von kaltem Leitungswasser in den Wasserbehälter des Geräts
gießen; dabei den standardgelieferten Messbecher verwenden (Abbildung 2).
4)Den Korb und die hygienischen Pinzetten in den Sterilisator positionieren
(laut Abbildung 3). Den Deckel schließen.
5)Den Stecker verbinden und auf den I/O-Knopf drücken. Das O/I-Licht schaltet
sich ein (rot). Vorsicht! Sollte das O/I-Licht sofort ein werden, nachdem den
Stecker verbunden wird, bedeutet das, dass den O/I-Knopf versehentlich vor
der Verbindung des Steckers gedrückt worden war. In diesem Fall startet
das Gerät den Sterilisationszyklus automatisch.
Das Gerät nicht einschalten, wenn der Wassertank im Sockel nicht vorher
21
DE Deutsch
ELEKTRISCHER DAMPFSTERILISATOR
6)Nach etwa 10 Minuten schaltet sich die rote Lampe aus: die Sterilisation ist
beendet. Auf jeden Fall, das Gerät ausschalten, indem man den Stecker
von der Steckdose entfernt.
7)Den Deckel nicht sofort entfernen; den Sterilisator für einige Minuten kühlen
lassen.
8)Bevor man die sterilisierten Produkte handhabt, sich die Hände gründlich
waschen.
9)Den Deckel öffnen und die hygienischen Pinzetten nehmen, welche dazu
verwendet werden können, um die sterilisierten Sauger zu greifen und sie
auf die Babyflaschen zu stellen. Vor der Montage der Babyflaschen, falls
notwendig, das überschüssige Wasser mit einem trockenen Tuch entfernen.
Es wird empfohlen, mindestens 10 Minuten zwischen einem
Sterilisationszyklus und dem nächsten zu warten.
Vorsicht! Die Sterilisationsdauer am Ende des Prozesses ist für etwa 6
Stunden gesichert, wenn das Gerät nicht geöffnet wird. Wenn das System
geöffnet wird, sind die Babyflaschen und Zubehörteile sofort anzumontieren
und zu verwenden; sollte man sie nicht sofort verwenden, sie nochmals
sterilisieren. Nach jedem Gebrauch, das überschüssige Wasser immer
entfernen, das innerhalb der Sterilisationseinheit vorhanden ist; dabei ein
weiches Tuch verwenden.
Deutsch DE
Anleitungen und garantie
einschalten.
2)Den Behälter entfernen und dabei darauf achten, dass der Stecker nicht in
Berührung mit Wasser kommt. Die Außen- und Innenseite des Geräts mit
einem feuchten Tuch trocknen.
3)60 ml von kaltem Leitungswasser gießen. Den Stecker verbinden don O/IKnopf drücken. Die O/I-Lampe schaltet sich ein (rot). Das Wasser verdunsten
lassen. Den Deckel NICHT positionieren.
4)Nach etwa 10 Minuten schaltet sich die rote Lampe aus. Das Gerät
ausschalten, indem man den Stecker von der Steckdose entfernt.
5)Das Gerät für einige Minuten kühlen lassen. Den Behälter entfernen und
dabei darauf achten, dass der Stecker nicht in Berührung mit Wasser
kommt. Die Außen- und Innenseite des Geräts mit einem feuchten Tuch
trocknen.
6)Die Schritte 3-5 zweimal wiederholen.
TECHNISCHE EIGENSCHAFTEN
Spannung 230 V WS 50 HZ 400 W
Dieses Produkt ist für Haushaltgebrauch bestimmt. Die Konformität,
welche durch die auf das Gerät aufgetragene CE-Kennzeichnung
beweist ist, bezieht sich auf die EWG-Richtlinie 2004/108 über
elektromagnetische Verträglichkeit und auf die EWG-Richtlinie 2006/95 über
elektrisches Material, das innerhalb bestimmten Spannungsgrenzen zu
verwenden ist. Dieses Produkt ist ein elektronisches Gerät, das geprüft wurde,
um beim gegenständlichen Zustand der Technik zu sichern, dass es mit
anderen in der Nähe vorhandenen Vorrichtungen (elektromagnetische
Verträglichkeit) nicht interferiert und dass es sicher ist, wenn es nach den
Hinweisen verwendet wird, die in den Gebrauchsanweisungen angegeben
sind. Im Falle von Anomalien beim Gerät, es nicht weiter verwenden und, falls
notwendig, sich unmittelbar an den Hersteller wenden.
SONDERLAGEN
Wenn die folgenden Lagen stattfinden:
1)Wenn die ON/OFF-Warnlampe sich nicht einschaltet:
- Prüfen, dass der Stecker mit der Steckdose verbunden ist
2)Wenn sehr viel Dampf aus dem Sterilisatordeckel heraus strömt:
- Prüfen, dass die richtige Menge von Wasser in den Wasserbehälter des
Geräts gegossen wurde (60 ml)
- Prüfen, dass das Gerät auf eine ebene und feste Oberfläche positioniert
ist.
3)Wenn die Babyflaschen nach der Sterilisation fleckig sind:
- Prüfen, wenn die letzte Entkalkung des Geräts vorgenommen wurde. Wenn
mehr als 2 Wochen vergangen sind, das Gerät entkalken (siehe Absatz
“REINIGUNG UND WARTUNG – Entkalkung”).
4)Wenn die Sterilisation sehr lang dauert:
- Prüfen, dass die richtige Menge von Wasser in den Wasserbehälter
gegossen wurde (60 ml)
- Die Last von Zubehörteilen prüfen, die in den Sterilisator positioniert
wurden; eine leichte Last macht den Sterilisationszyklus langer.
ENTSORGUNGSVERFAHREN (RICHTLINIE 2002/96/EG - WEEE)
Das Symbol auf dem Boden des Geräts gibt die getrennte
Müllsammlung der elektrischen und elektronischen Ausrüstungen
an. Am Ende der Lebensdauer vom Gerät es nicht als gemischter
fester Gemeindenabfall, sondern es bei einem spezifischen
Müllsammlungszentrum in Ihrem Gebiet entsorgen oder es dem
Händler zurückgeben, wenn Sie ein neues Gerät desselben Typ mit denselben
Funktionen kaufen. Diese Prozedur getrennter Müllsammlung der elektrischen
und elektronischen Ausrüstungen wird im Hinblick auf eine zukünftige
gemeinsame europäische Umweltschutzpolitik vorgenommen, welche darauf
zielen wird, die Umwelt zu schützen und sichern, als auch die Umweltqualität
zu verbessern und potentielle Wirkungen auf die menschliche Gesundheit
wegen der Anwesenheit von gefährlichen Stoffen in diesen Vorrichtungen oder
Missbrauch derselben oder von Teilen derselben zu vermeiden.
Vorsicht! Die fehlerhafte Entsorgung von elektrischen und elektronischen
Vorrichtungen könnte Sanktionen mit sich bringen.
Das Einkaufsdatum ist durch den Stempel oder die Unterschrift vom
Vertragshändler und durch den Kassenzettel zu beweisen, welche als
Beilage zu diesem Dokument aufzubewahren sind. Diese Periode stimmt
mit der gültigen Gesetzgebung (It. D.Lgs. Nr. 24 vom 02.02.2002 und darauf
folgende “Verbraucherverordnung” it. D.Lgs. Nr. 206 vom 03.09.2005) überein
und wird erst dann angewandt, wenn der Verbraucher eine Privatperson ist.
Laica-Produkte sind als Haushaltprodukte entworfen und dürfen nicht in
öffentlichen Geschäften verwendet werden. Die Garantie deckt ausschließlich
Produktionsfehler und ist nicht gültig, wenn der Schaden durch willkürliche
Handlung, falschen Gebrauch, Nachlässigkeit oder Missbrauch vom Produkt
entsteht. Ausschließlich die standardgelieferten Zubehörteile verwenden.
Der Gebrauch von anderen Zubehörteilen kann das Ungültigkeitswerden
der Garantie als Folge haben. Die Vorrichtung keinesfalls öffnen. Wird die
Vorrichtung geöffnet oder missbräuchlich geändert, verfällt die Garantie
endgültig. Die Garantie ist für verschleißbare Teile als auch für die Batterien
nicht gültig, wenn diese letzten standardgeliefert werden. Die Garantie verfällt
nach zwei Jahren vom Einkauf. In diesem Fall werden die Serviceeingriffe
gegen Zahlung vorgenommen. Für Auskünfte über Serviceeingriffe –
eingeschlossen in der Garantie oder gegen Zahlung – schreiben Sie bitte an
[email protected]. Für in den Garantiebedingungen eingeschlossene Reparaturund Austauscheingriffe ist keine Sorte von Beitrag zu leisten. Im Falle von
Ausfällen sich an den Vertragshändler wenden. KEINE direkte Lieferung
zur LAICA vornehmen. Alle Eingriffe nach Garantiebedingungen (Austausch
vom Produkt oder von einem Teil desselben eingeschlossen) werden die
Dauer der ursprünglichen Garantieperiode für den ausgetauschten Produkt
nicht verlängern. Der Hersteller lehnt jede Haftung für etwaige direkte oder
indirekte Schäden an Personen, Sachwerten und Haustieren ab, welche
von der Missachtung der Vorschriften entstehen, welche im zweckmäßigen
Gebrauchshandbuch enthalten sind – vor allem mit Rücksicht auf Hinweise
über Installation, Gebrauch und Wartung der Vorrichtung. Die Firma Laica,
welche ständig nach der Verbesserung der eigenen Produkte strebt, behält sich
das Recht vor, ohne Voranmeldung ihre Produkte vollkommen oder teilweise
nach Herstellungserfordernissen zu ändern, ohne dass dadurch irgendwelche
Haftung seitens der Firma Laica oder ihrer Vertragshändler entsteht.
WWW.LAICAHEALTHCARE.RO
REINIGUNG UND WARTUNG
Vor jedem Reinigungs- oder Wartungseingriff, das Gerät ausschalten, indem
man den Stecker von der Steckdose entfernt und solange warten, bis der
Dampfsterilisator sich vollkommen abgekühlt hat.
Das Gerät nicht in Wasser tauchen. Seine Außenseite mit einem feuchten
Tuch reinigen und sorgfältig trocknen. Keine chemischen oder schleifenden
Reinigungsmittel verwenden. Nie Wasser im Behälter lassen, wenn das Gerät
nicht gerade verwendet wird.
Entkalkung:
Es wird empfohlen, das Gerät mindestens alle 2 Wochen zu entkalken.
1)Um den Wasserbehälter des Geräts zu reinigen, 100 ml von Essig und 200 ml
von kaltem Leitungswasser in denselben gießen und für etwa 30 Minuten,
oder bis jede Spur von Kalk entfernt wird, wirken lassen. Das Gerät NICHT
22
GARANTIE
Die gegenständliche Vorrichtung ist für 2 Jahre vom Einkaufsdatum garantiert.
23
NOTE
NOTE
WWW.LAICAHEALTHCARE.RO